
Introduction to Catalyst API
Overview
Catalyst API offers a wide range of functionalities that enable an application developer to work with the Catalyst components remotely in their application. You can build and manage your Catalyst application using the APIs, as well as perform remote operations on it, similar to working with it using the Catalyst web console.
For example, you can perform operations such as inserting data in a table in the Data Store, obtaining details of a folder in the File Store, or executing a function using the respective APIs.
Catalyst implements REST API standards, and supports HTTP requests and responses for accessing its resources. Catalyst resources are exposed through their endpoint URLs, and the HTTP clients can access these endpoints using their specific APIs.
Catalyst implements the following basic REST API principles:
- The endpoint URL of each instance of a Catalyst resource is unique.
- The HTTP method in the request dictates the operation to be performed on the resource.
- Additional payload information is passed as parameters in the request. They contain the details of the operation to be performed.
- Each request initiates a response from Catalyst.
You can refer to the request format and response format sections for details and examples.
Prerequisites
Before you begin working with Catalyst API, you must ensure that the following prerequisites are satisfied:
- A valid Zoho user account: Ensure that you have a valid Zoho login email address and password. You can sign up for a Zoho account here.
- An authentication token: You must obtain a valid OAuth access_token to access Catalyst API.
The help pages in OAuth 2.0 Authentication section will guide you in the process of understanding and obtaining authentication tokens.
All Catalyst APIs will be accessible to a Catalyst user in the App Administrator role, (Catalyst application developer) after they obtain their access_token. All the collaborators of a particular project will also be able to execute all Catalyst APIs using their access_token.
However, only certain operations are accessible for the users in the App User role, i.e., the end users of a Catalyst application with a Catalyst user authentication. The end user can only perform operations related to accessing specific application data, and not operations that modify the application. Each API help page will provide you with information on the execution permissions defined for it.
Note:
-
If you want to execute Catalyst operations without generating any authentication tokens, you can use Catalyst SDK instead
-
Catalyst currently does not support a separate API authentication process for end users of Catalyst applications. If you implement Catalyst SDK in your application code, the authentication is automatically handled as an App Administrator authentication. To use Catalyst API independently, you must follow the steps described in th OAuth 2.0 Authentication section to generate OAuth authentication tokens.
Multi-DC Support
Overview
Catalyst is currently hosted in seven data centers. The base API URI to access all Catalyst APIs and the Zoho Accounts Server URI will be different based on the data center you are accessing Catalyst from.
You must use the appropriate domain based on your location while sending an API request in Catalyst. This prevents conflicts with your browser and enables a smooth integration with your current session.
The seven data centers and their respective base API URIs supported by Catalyst for all APIs are:
- US (USA): https://api.catalyst.zoho.com
- EU (Europe): https://api.catalyst.zoho.eu
- IN (India): https://api.catalyst.zoho.in
- AU (Australia): https://api.catalyst.zoho.com.au
- CA (Canada): https://api.catalyst.zohocloud.ca
- JP (Japan): https://api.catalyst.zoho.jp
- SA (Saudi Arabia): https://api.catalyst.zoho.sa
The corresponding Zoho Accounts Server URI for the seven data centers that you must use while implementing OAuth 2.0 authentication are:
- US: https://accounts.zoho.com
- EU: https://accounts.zoho.eu
- IN: https://accounts.zoho.in
- AU: https://accounts.zoho.au
- CA: https://accounts.zohocloud.ca
- JP: https://accounts.zoho.jp
- SA: https://accounts.zoho.sa
Usage
You must ensure you perform the following actions to make use of Catalyst’s multi-DC support:
- You must use the appropriate Zoho Accounts Server URI in all the steps while implementing OAuth 2.0 authentication,
such as while making an authorization request to generate the grant token, access token, or refresh token.
For example, you can make this request to generate the grant token using a redirect method for the EU data center:
A response with the grant token will be returned after redirecting to the redirect URI, which will contain a location parameter as shown below:

This location parameter specifies the domain of your account. In this case, the location is returned as eu.
- You can enable multi-DC support after you register your client in Zoho’s API console. This lets you provide access to your application to users of a specific domain alone. For example, you can disable access to your application for the IN users and enable it for the other users. Refer to Register a New Client section for details.
- As mentioned earlier, you must use the appropriate base API URI while sending an API request. For example, to fetch all rows in a table in your Data Store, you must execute the following request URL for the EU data center:
https://api.catalyst.zoho.eu/baas/v1/project/{project_id}/table/{tableIdentifier}/row
Multi-Org Support
Overview
Catalyst allows you to create and manage multiple organizations within your Catalyst account. A unique Org ID will be generated for every organization you create. You can create individual projects in each organization and also assign access permissions to people contributing to the project.
You can only have one organization in your account as the default one. The organization marked as default will be logged in automatically when you sign in to your Catalyst account every time.
While you execute an API from Catalyst, it will be executed for the default organization automatically. For instance, when you pass the project ID in your API request, Catalyst will automatically look for a project with the same ID in your default organization. However, you can execute an API for other organizations that are not the default by exclusively passing the unique Org ID of those organizations in your requests.
Usage
You can pass the Org ID as a header in an API request to access a project in that organization in this format:
-H CATALYST-ORG: 15090237
You can check a complete sample request from the Request Format section.
Request Format
Request Methods
Catalyst API follows the REST standards and supports the following HTTP methods for client requests for the described purposes:
- GET : To fetch records from a Catalyst resource
- POST : To insert new records in a Catalyst resource
- PUT : To update existing records in a Catalyst resource
- DELETE : To delete existing records in a Catalyst resource
You must specify the request method for the operation while executing a Catalyst API request.
Request URL
The API requests are sent in the CURL format. A typical request URL is of the format:
https://api.catalyst.zoho.com/baas/v1/project/{project_id}
/{resource_name}/{additional_resource_details}
Note: The base API URL will be the following for the other data centers:
- EU: https://api.catalyst.zoho.eu
- IN: https://api.catalyst.zoho.in
- AU: https://api.catalyst.zoho.com.au
- CA: https://api.catalyst.zohocloud.ca
- JP: https://api.catalyst.zoho.jp
- SA: https://api.catalyst.zoho.sa
The common parameters passed in the request URL include the Project ID of the Catalyst project and the resource ID of the specific resource instance that is being accessed.
Request Headers
Mandatory header passed in the cURL request includes the following:
- Authorization header: OAuth token i.e., the access_token
Recommended headers passed in the cURL request can include the following:
- Content-Type: A REST API standard that indicates the original media type of the resource passed. It is highly recommended to pass this header when the API requests include JSON payload or form data, for example.
Optional headers passed in the cURL request can include the following:
- Org ID: The Org ID of an organization that is not the default. You can obtain the Org ID from the multi-org portal in the Catalyst console.
- Environment: The environmental header to specify the environment the request must be executed for. You can indicate if the API request should be executed for the development or production environment of the project.
Request Body
Based on the purpose of the request, you can pass additional data in the body of the request in an API call, such as the column name and value for updating the column of a table, or the folder name for creating a folder.
The particulars of the request to be sent, such as the headers and JSON attributes to be passed in the request, are specified in each API help page for the specific request.
curl “https://api.catalyst.zoho.com/baas/v1/project/4000000006007/segment/4000000006023/cache"
-X POST
-d ‘{“cache_name”:“City”,“cache_value”:“London”}’
-H “CATALYST-ORG: 15090237”
-H “Environment:Development”
-H “Content-Type:application/json”
-H “Authorization: Zoho-oauthtoken 1000.910*************************16.2f*************************57"”
Response Format
Overview
All Catalyst API responses will be in the JSON format. The response is sent after a request is processed by the Catalyst server.
A typical response contains the status of the request processing, which can be success or failure, and a set of data based on the request made. For example, if the request was made to delete a record in a resource, the data will contain the details of the record that was deleted. The response details of each API are specified in its help page in detail.
If the request was not processed successfully, the response will contain an appropriate error code to specify the error that occurred. The next section contains the error codes recognized by Catalyst and their descriptions.
{
    "status": "success",
    "data": {
        "cache_name": "City",
        "cache_value": "London",
        "project_details": {
            "id": 56000000087108,
            "project_name": "ShipmentTracking"
        },
        "segment_details": {
            "id": 56000000112489,
            "segment_name": "CustomerLocation"
        },
        "expires_in": "Mar 28, 2019 02:03 AM",
        "expiry_in_hours": 7
    }
}
Error Codes
When the server encounters an error while processing a client request, it sends an appropriate HTTP Status Code in the response back to the client. The following errors are recognized by Catalyst:
| HTTP Status Code | Error Code | Description |
|---|---|---|
| 403 | API_LIMIT_REACHED | You have reached the upper limits for API calls in your account. Upgrade your license plan. |
| 409 | CONFLICT | Contradicts with the existing value. Try giving another value. |
| 409 | DUPLICATE_ENTRY | The email ID you have entered already exists. Please provide a different email ID. |
| 409 | DUPLICATE_ENTRY | The domain name already exists. Please provide a different value. |
| 409 | DUPLICATE_OPERATION | The requested operation is already under progress. Please wait until it is completed. |
| 409 | DUPLICATE_VALUE | The value you have entered already exists. Please provide a different value. |
| 500 | EMAIL_ERROR | Email sending process failed. Try again after some time. |
| 410 | EXPIRED | The requested resource has expired. Please try creating it again. |
| 410 | EXPIRED_LOG | The response log you are trying to download is expired. |
| 202 | FUNCTION_ERROR | Encountered an internal server error. |
| 500 | INTERNAL_SERVER_ERROR | Encountered an internal server error. |
| 403 | INVALID_CONTENT | The given input is not in an acceptable format. |
| 404 | INVALID_ID | The resource ID you have provided does not exist. |
| 400 | INVALID_INPUT | The table name you have provided does not exist. |
| 400 | INVALID_INPUT | The column name you have provided does not exist. |
| 400 | INVALID_INPUT | The foreign key you have provided doesn't match with the ROWID of the parent table. |
| 400 | INVALID_INPUT | The input you have provided is not valid. |
| 404 | INVALID_NAME | The email ID you have provided does not exist. |
| 404 | INVALID_NAME | The table name you have provided does not exist. |
| 403 | INVALID_OPERATION | The requested operation is invalid. |
| 405 | INVALID_REQUEST_METHOD | The requested method is not accepted. |
| 400 | MISMATCH | The value provided does not match with the expected one. |
| 400 | MISSING_FUNCTION | The function ID you have provided does not exists. |
| 400 | MISSING_VALUE | The expected input is missing. |
| 401 | NO_ACCESS | You don't have privileges to perform this action |
| 204 | NO_CONTENT_AVAILABLE | The request returned an empty response. |
| 401 | UNAUTHORISED | You are not authorized to perform this action. |
| 403 | VERIFICATION_NEEDED | Your email address needs to be verified. |
| 400 | ZCQL_QUERY_ERROR | The format of your query is invalid. |
| 429 | TOO_MANY_REQUESTS | Concurrency or throttling limits reached for function, web client, or a Catalyst component execution. |
OAuth 2.0 Authentication
Overview
OAuth 2.0 is an industry-standard protocol for authentication and authorization. The framework enables a host of third-party client applications to gain secure and delegated access to protected resources in Zoho through APIs.
Some common characteristics of OAuth 2.0 are:
- Clients are not required to support password authentication or store user credentials. API calls can be made to access resources without having to provide user credentials for each call.
- Clients will only have access to resources authenticated by the user.
- Users can revoke the client’s delegated access at any time.
- OAuth2.0 access tokens expire after a set time, which provides strong security.
Terminology
Before you learn about the steps involved in implementing OAuth 2.0, you must understand the following terms related to OAuth 2.0 in the Catalyst context:
| Key Words | Description |
|---|---|
| Protected Resource | A Catalyst resource such as Cache, Cron, Table, or Folder |
| Resource Server | The Catalyst server that hosts the Catalyst protected resources |
| Client | An application that sends requests to the resource server to access the protected resources on behalf of the end-user |
| client_id | The unique key generated for a registered client |
| client_secret | The secret value generated for a specific registered client's client_id. When you register your Catalyst application in the Zoho API Console, a client_id and client_secret will be generated for it. |
| Authentication Server | The Catalyst authorization server that provides the necessary credentials to a client, such as the access_tokenor refresh_token |
| Grant Token or code | Catalyst authorization server generates a temporary token and sends it to the client via the browser. The client will send this code back to the authorization server to obtain the access and refresh tokens. |
| access_token | A temporary token that is sent to the resource server to access the protected resources of the user. Clients use the access_token to make requests to the associated application using the APIs. Each access_token will be valid for a set time period and can only be used to perform operations described in the scope. |
| refresh_token | A token that can be used to obtain new access tokens. This token has an unlimited lifetime until it is revoked by the end-user. |
| Scopes | Scopes control the type of resources that the client application can access. Each token is usually created with selected scopes for better security. For example, you can generate an access_token with a scope to only read the data in the Data Store or File Store.The standard format to define a scope is scope=service_name.scope_name.operation_type. The next section lists the scopes available in Catalyst. |
List of Scopes Available in Catalyst
| Scope Name | Available Scopes |
|---|---|
| projects | ZohoCatalyst.projects.ALL, ZohoCatalyst.project.export.READ, ZohoCatalyst.project.export.CREATE, ZohoCatalyst.project.import.READ, ZohoCatalyst.project.import.CREATE, ZohoCatalyst.project.import.DELETE |
| authentication | ZohoCatalyst.authentication.CREATE |
| tables | ZohoCatalyst.tables.READ, ZohoCatalyst.tables.rows.READ, ZohoCatalyst.tables.rows.CREATE, ZohoCatalyst.tables.rows.UPDATE, ZohoCatalyst.tables.rows.DELETE, ZohoCatalyst.tables.columns.READ |
| folders | ZohoCatalyst.folders.ALL |
| files | ZohoCatalyst.files.CREATE, ZohoCatalyst.files.READ, ZohoCatalyst.files.DELETE |
| cache | ZohoCatalyst.segments.ALL, ZohoCatalyst.cache.READ, ZohoCatalyst.cache.CREATE, ZohoCatalyst.cache.DELETE |
| cron | ZohoCatalyst.cron.ALL |
| zcql | ZohoCatalyst.zcql.CREATE |
| functions | ZohoCatalyst.functions.ALL, ZohoCatalyst.circuits.execution.EXECUTE |
| appsail | ZohoCatalyst.appsail.Read, ZohoCatalyst.appsail.Create, ZohoCatalyst.appsail.Update, ZohoCatalyst.appsail.Delete |
| circuits | ZohoCatalyst.circuits.EXECUTE |
| search | ZohoCatalyst.search.READ |
| ZohoCatalyst.email.CREATE | |
| notifications | ZohoCatalyst.notifications.web, ZohoCatalyst.notifications.mobile |
| mlkit | ZohoCatalyst.mlkit.READ |
| quickml | QuickML.deployment.READ |
| smartbrowz | ZohoCatalyst.pdfshot.execute, ZohoCatalyst.dataverse.execute |
| pipelines | ZohoCatalyst.pipeline.READ, ZohoCatalyst.pipeline.execution.CREATE |
| stratus | Stratus.fileop.CREATE, Stratus.fileop.ALL, Stratus.bucketop.ALL, ZohoCatalyst.buckets.objects.UPDATE, ZohoCatalyst.buckets.objects.READ, ZohoCatalyst.buckets.objects.DELETE, ZohoCatalyst.buckets.READ, ZohoCatalyst.buckets.objects.CREATE |
| IAM | AaaServer.profile.READ |
| tunneling | ZohoCatalyst.tunneling.READ, ZohoCatalyst.tunneling.UPDATE |
| scheduling | ZohoCatalyst.jobpool.READ, ZohoCatalyst.job.ALL |
| logs | ZohoCatalyst.cli.logs.CREATE |
| security_rules | ZohoCatalyst.security.rules.Read, ZohoCatalyst.security.rules.Update |
| event_listeners | ZohoCatalyst.eventlistners.ALL, ZohoCatalyst.eventlisteners.produce |
| NoSQL | ZohoCatalyst.nosql.READ, ZohoCatalyst.nosql.rows.ALL |
| users | ZohoCatalyst.projects.users.READ, ZohoCatalyst.projects.users.CREATE, ZohoCatalyst.projects.users.DELETE, ZohoCatalyst.projects.users.UPDATE |
| webapp | ZohoCatalyst.webapp.ALL |
| queue | ZohoCatalyst.queue.ALL, ZohoCatalyst.queue.data.READ, ZohoCatalyst.queue.data.CREATE |
| api gateway | ZohoCatalyst.apigateway.apis.READ, ZohoCatalyst.apigateway.apis.CREATE, ZohoCatalyst.apigateway.apis.UPDATE, ZohoCatalyst.apigateway.apis.DELETE, ZohoCatalyst.apigateway.READ, ZohoCatalyst.apigateway.UPDATE |
Step 1: Register a New Client
Register the Client
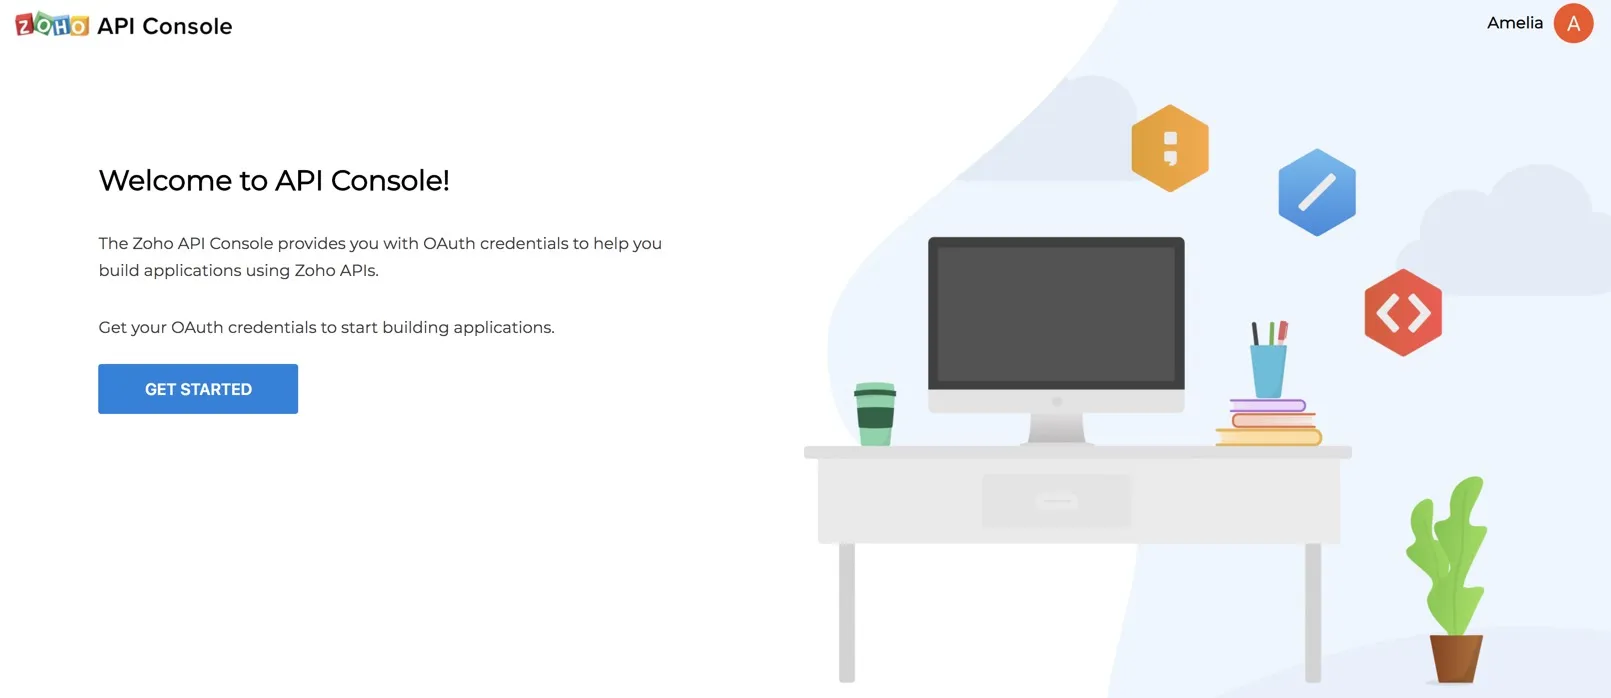
The first step towards obtaining an OAuth authentication token is to register your application with Zoho’s API console and obtain your client_id and client_secret.
- To register your application, visit the Zoho API Console and click Get Started.
- Select a client type for your application.
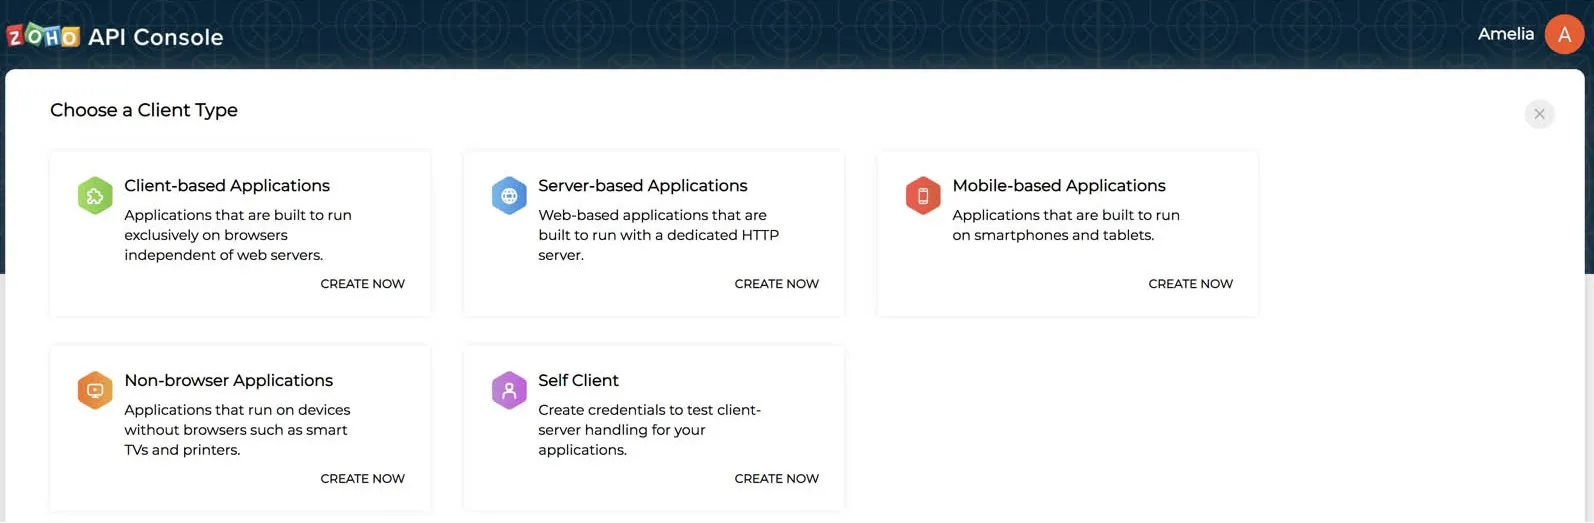
You can refer to Zoho’s OAuth documentation for more details.
- Provide the required details to register your application for the client type you chose.
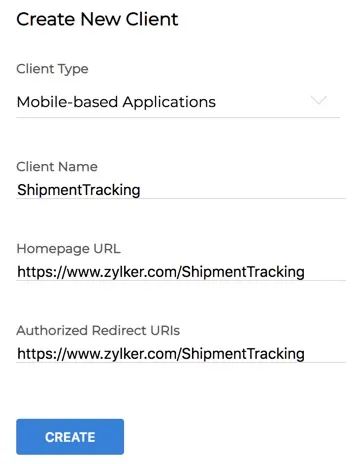
- Client Name: The name of your application you want to register with Zoho
- Homepage URL: The URL of your client’s homepage
- Authorized Redirect URIs: A valid URL of your application that Zoho Accounts redirects you to with the grant token after a successful authentication
- Click Create.
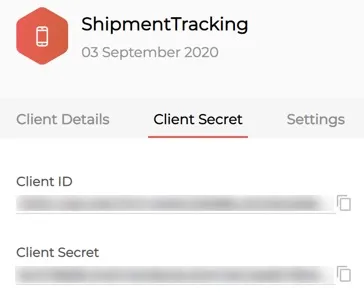
After the registration is successful, Zoho will provide you a set of OAuth 2.0 credentials: the client_id and client_secret, which are known to both Zoho and your application.
Enable Multi DC for the Client
As mentioned in the Multi-DC Support section, you can enable multi-DC support for your client from the Settings tab in the API console after you register it. This is available for all client types, except the Self Client type as it is used only for testing.
This feature lets you provide access to your application to users of a specific domain alone. As mentioned earlier, Catalyst is currently available in the EU, AU, IN, JP, SA and CA domains. So you can enable or disable access to your application for specific DC users if you need.
To access the multi-DC configurations for your client:
- Open your client from the API console and click Settings.
- Enable or disable the client access for the data centers you need. You can only avail the data centers that Catalyst supports.
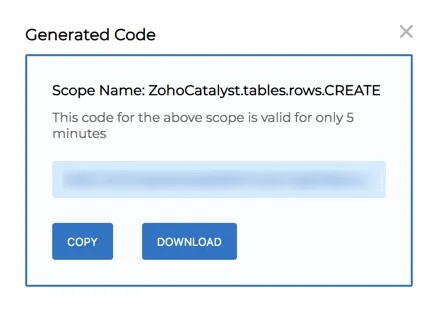
When you enable a DC, the console will generate a different client_secret for them by default. You can access it by clicking Show Code for the respective DC. The client_id will remain the same for all DCs.
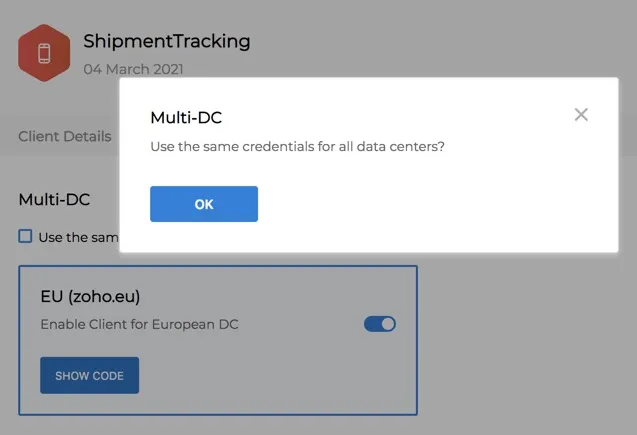
You can choose to have the same client_secret for all DCs by checking the Use the same OAuth credentials for all data centers checkbox. You must then click OK in the confirmation pop-up.
You can again unselect the checkbox to have a different client_secret, and confirm the action similarly.
Step 2: Generate Grant Token
After you generate the client_id and client_secret, you must generate a Grant Token or code for your application.
For Self Client Applications
If you previously selected the Self Client type, you must generate the Grant Token (code) in the following way:
- After registering your application, select Self Client from the Applications list in the
API console and click Generate Code.

- Enter a valid scope. You can check the list of scopes available in Catalyst from this section.
- Choose a time duration from the dropdown list. The Grant Token generated in this step will expire after this time period.
- Enter a description for the scope.
- Click Generate.
The API console will display the generated Grant Token or code value for your Self Client application.
For Other Applications
If you previously selected client types other than the Self Client type, you must generate the Grant Token using a redirect method:
- Send a request to the following URI with the params given below, to generate the Grant Token (code):
https://accounts.zoho.com/oauth/v2/auth?
Note: You must access the respective domains for the other data centers:
- EU: https://accounts.zoho.eu/
- AU: https://accounts.zoho.au/
- IN: https://accounts.zoho.in/
- CA: https://accounts.zohocloud.ca/
- JP: https://accounts.zohocloud.jp/
- SA: https://accounts.zohocloud.sa/
| Parameter | Description |
|---|---|
| scope* | The scope the Grant Token is to be generated for. You can provide multiple scopes by separating them using commas. You can check the list of scopes available in Catalyst from [this section](/en/api/oauth2/scopes/#Scopes). |
| client_id* | The Client ID that was generated during the client registration |
| state | An opaque string that is round-tripped in the protocol, i.e., whatever value you provide here will be passed back to you |
| response_type* | code(Provide this literal string as the value) |
| redirect_uri* | One of the Authorized Redirect URIs you provided while registering the client in the previous step. You must not provide an unregistered redirect URI. |
| access_type | The allowed values are offline and online. The online access_type only provides the Access Token for your application, which is valid for one hour. The offline access_type provides an Access Token as well as a Refresh Token for your application. The default value is considered to be online. |
| prompt | Consent (Provide this literal string as the value) Prompts for user consent every time your app tries to access user credentials. If you don't specify this parameter, the user will only be prompted for credentials the first time your app requests access. |
Note:
-
Fields marked with * are mandatory.
-
You can pass the parameters in the body of your request as form-data, for increased security.
Request Example
- If you send the prompt parameter in this request, a user consent page will open.
After you click Accept, Zoho will redirect you to the redirect_uri with the Grant Token in the code parameter. Save the code value for the next steps.

Based on your login details, the system automatically detects your domain and uses the domain-specific authentication URL to generate the Grant Token. The state parameter is also passed in the URL.
If you click Reject, the browser redirects to the redirect URI with the parameter error=access_denied.
Step 3: Generate Access Token and Refresh Token
Request Execution
After you obtain the Grant Token, send a POST request to the following URL with the params given below to generate the access_token:
https://accounts.zoho.com/oauth/v2/token?
Note: You must access the respective domains for the other data centers:
- EU: https://accounts.zoho.eu/
- AU: https://accounts.zoho.au/
- IN: https://accounts.zoho.in/
- CA: https://accounts.zohocloud.ca/
- JP: https://accounts.zohocloud.jp/
- SA: https://accounts.zohocloud.sa/
| Parameter | Description |
|---|---|
| code* | The Grant Token or the value of code obtained in the previous step. |
| client_id* | The Client ID that was generated during the client registration |
| client_secret* | The Client Secret that was generated during the client registration |
| grant_type* | authorization_code (Provide this literal string as the value) |
| redirect_uri | One of the Authorized Redirect URIs you provided while registering the client in the previous step. You must not provide an unregistered redirect URI. |
| scope |
The scope the access_token is to be generated
for. You can provide multiple scopes by separating them using commas. You can check the list of scopes available in Catalyst from [this section](/en/api/oauth2/scopes/). |
| state | An opaque string that is round-tripped in the protocol. In other words, whatever value you provide here will be passed back to you. |
Note:
- Fields marked with * are mandatory.
- You can pass the parameters in the body of your request as form-data, for increased security.
- The access_token will expire after the time period (in seconds) mentioned in the expires_in parameter.
- However, the refresh_token is permanent and can be used to regenerate a new access_token if the current one expires.
- You can use the domain specified in api_domain in your requests to make API calls to Catalyst.
- The “Bearer” value in the token_type indicates this is an access_token.
This completes the authentication process. Once you obtain the access_token for your application, you can use it in the authorization header of your HTTP requests to access Catalyst APIs. You can refer to the Request Format section for an example.
{
    "access_token": "{access_token}",
    "refresh_token": "{refresh_token}",
    "api_domain": "https://www.zohoapis.com",
    "token_type": "Bearer",
    "expires_in": 3600
}
Step 4: Refresh Access Token
Request Execution
When an access_token expires, you must use the refresh_token to generate a new access_token for your application.
To do so, send a POST request to the following URL with the params given below:
https://accounts.zoho.com/oauth/v2/token?
Note: You must access the respective domains for the other data centers:
- EU: https://accounts.zoho.eu/
- AU: https://accounts.zoho.au/
- IN: https://accounts.zoho.in/
- CA: https://accounts.zohocloud.ca/
- JP: https://accounts.zohocloud.jp/
- SA: https://accounts.zohocloud.sa/
| Parameter | Description |
|---|---|
| refresh_token* | The refresh_token obtained in the previous step |
| client_id* | The Client ID that was generated during the client registration |
| client_secret* | The Client Secret that was generated during the client registration |
| grant_type* | refresh_token (Provide this literal string as the value) |
| redirect_uri* | One of the Authorized Redirect URIs you provided while registering the client in the previous step. You must not provide an unregistered redirect URI. |
{
    "access_token": "{new_access_token}",
    "expires_in": 3600,
    "api_domain": "https://www.zohoapis.com",
    "token_type": "Bearer"
}
Catalyst Projects
The Project APIs enable you to create, update, delete, and obtain details of a Catalyst project. You can perform these actions from the Catalyst console as well. Catalyst CLI also enables you to create a project remotely and initialize resources in it.
Create a New Project
Description
This API enables you to create a new Catalyst project in your Catalyst account. You must pass the required project name in the request.
Request Details
Request URL
{api-domain}/baas/v1/project
Request Headers
Authorization: Zoho-oauthtoken {oauth_token}
Content-Type: application/json
Optional Headers
CATALYST-ORG: {org_id}
Environment: Development
Scope
ZOHOCATALYST.projects.CREATE
Request JSON Properties
Max Size: 50 characters
Response Details
The response will contain the details of the project that was created including the project domain details such as the project_domain_id and project_domain_name, and the details of the user such as their email_id and user_id.
curl -X POST

https://api.catalyst.zoho.com/baas/v1/project

-H “Authorization: Zoho-oauthtoken 1000.910*************************16.2f*************************57”

-H “Content-Type: application/json”

-d ‘{
“project_name”:“BillingDesk”
}’
{
    "status": "success",
    "data": {
        "project_name": "BillingDesk",
        "created_by": {
            "zuid": 3000000006001,
            "is_confirmed": true,
            "email_id": "amelia.burrows@zylker.com",
            "first_name": "Amelia",
            "last_name": "Burrows",
            "user_id": 671930455
        },
        "created_time": "Jan 29, 2020 11:59 AM",
        "redirect_url": "",
        "project_domain_details": {
            "project_domain_id": 10018095112,
            "project_domain_name": "billingdesk-697215025.development",
            "project_domain": "billingdesk-697215025.development.zohocatalyst.com",
            "user_auth": {},
            "mobile_auth": {}
        },
        "db_type": "SINGLE_DB",
        "id": 3000000005090,
        "project_type": "Live",
        "timezone": "Asia/Kolkata"
    }
}
Step 5: Revoke Refresh Token
Request Execution
You may choose to manually revoke a refresh_token, when you no longer need access for a particular scope.
To revoke a refresh_token, send a POST request to the following URL with the refresh_token to be revoked as a parameter.
https://accounts.zoho.com/oauth/v2/token/revoke?
Note: You must access the respective domains for the other data centers:
- EU: https://accounts.zoho.eu/
- AU: https://accounts.zoho.au/
- IN: https://accounts.zoho.in/
- CA: https://accounts.zohocloud.ca/
- JP: https://accounts.zohocloud.jp/
- SA: https://accounts.zohocloud.sa/
Your refresh token now will become invalid.
Get the Details of a Specific Project
Description
This API enables you to fetch the details of a specific project that the Catalyst user, such as the developer or a collaborator, logged in currently has created from their Catalyst account. The project is referred to by its project_id. The project details fetched are of the same Catalyst account the API is being executed from.
Request Details
Request URL
{api-domain}/baas/v1/project/{project_id}
Request Headers
Authorization: Zoho-oauthtoken {oauth_token}
Optional Headers
CATALYST-ORG: {org_id}
Environment: Development
Scope
scope=ZOHOCATALYST.projects.Read
Response Details
The response will contain the details of the project including the project domain details such as the project_domain_id and project_domain_name, and the details of the user that created it, such as their email_id and user_id.
curl -X GET

https://api.catalyst.zoho.com/baas/v1/project/4000000006007

-H “Authorization: Zoho-oauthtoken 1000.910*************************16.2f*************************57”
{
"status": "success",
"data": {
    "platforms": [],
    "project_name": "BillingDesk",
    "created_by": {
        "zuid": 780776954,
        "is_confirmed": false,
        "email_id": "amelia-burrows@zylker.com",
        "first_name": "Amelia",
        "last_name": "Burrows",
        "user_type": "Admin",
        "user_id": 11811000000003003
    },
    "created_time": "Jun 04, 2023 04:19 PM",
    "redirect_url": "",
    "project_domain_details": {
        "project_domain_id": 10060895541,
        "project_domain_name": "billingdesk-781316834.development",
        "project_domain": "https://billingdesk-781316834.development.catalystserverless.com",
        "user_auth": {
            "userAuth": {},
            "createdTime": null,
            "createdBy": null
        },
        "mobile_auth": {}
    },
    "db_type": "SINGLE_DB",
    "id": 11811000000315013,
    "project_type": "Live",
    "env_details": [
        {
            "id": 11811000000315049,
            "env_name": "Development",
            "env_type": 3,
            "env_status": "Active",
            "project_details": {
                "project_name": "BillingDesk",
                "id": 11811000000315013,
                "project_type": "Live"
            },
            "is_default": true,
            "env_zgid": "781316834",
            "action_required": false
        }
    ],
    "timezone": "Asia/Kolkata"
}

}
Get the Details of All Projects
Description
This API enables you to fetch the details of all the projects in the remote console of the Catalyst user, such as the developer or a collaborator, logged in currently. The project details fetched are of the same Catalyst account the API is being executed from.
Request Details
Request URL
{api-domain}/baas/v1/project
Request Headers
Authorization: Zoho-oauthtoken {oauth_token}
Optional Headers
CATALYST-ORG: {org_id}
Environment: Development
Scope
ZOHOCATALYST.projects.Read
Response Details
The response will contain the details of all the projects the user created in their remote console, including the project domain details such as the project_domain_id and project_domain_name, and the details of the user that created it, such as their email_id and user_id of each project.
curl -X GET

https://api.catalyst.zoho.com/baas/v1/project

-H “Authorization: Zoho-oauthtoken 1000.910*************************16.2f*************************57”
{
"status": "success",
"data": [
    {
        "platforms": [],
        "project_name": "BillingDesk",
        "created_by": {
            "zuid": 780776954,
            "is_confirmed": false,
            "email_id": "amelia.burrows@zylker.com",
            "first_name": "Amelia",
            "last_name": "Burrows",
            "user_type": "Admin",
            "user_id": 11811000000003003
        },
        "created_time": "Jun 04, 2023 04:19 PM",
        "redirect_url": "",
        "project_domain_details": {
            "project_domain_id": 10060895541,
            "project_domain_name": "billingdesk-781316834.development",
            "project_domain": "https://billingdesk-781316834.development.catalystserverless.com",
            "user_auth": {
                "userAuth": {},
                "createdTime": null,
                "createdBy": null
            },
            "mobile_auth": {}
        },
        "db_type": "SINGLE_DB",
        "id": 11811000000315013,
        "project_type": "Live",
        "env_details": [
            {
                "id": 11811000000315049,
                "env_name": "Development",
                "env_type": 3,
                "env_status": "Active",
                "project_details": {
                    "project_name": "BillingDesk",
                    "id": 11811000000315013,
                    "project_type": "Live"
                },
                "is_default": true,
                "env_zgid": "781316834",
                "action_required": false
            }
        ],
        "timezone": "Asia/Kolkata"
    },
    {
        "platforms": [],
        "project_name": "Zia",
        "created_by": {
            "zuid": 780776954,
            "is_confirmed": false,
            "email_id": "amelia.burrows@zylker.com",
            "first_name": "Amelia",
            "last_name": "Burrows",
            "user_type": "Admin",
            "user_id": 11811000000003003
        },
        "created_time": "Jun 02, 2023 11:55 AM",
        "redirect_url": "",
        "project_domain_details": {
            "project_domain_id": 10060816047,
            "project_domain_name": "zia-781316834.development",
            "project_domain": "https://zia-781316834.development.catalystserverless.com",
            "user_auth": {
                "userAuth": {},
                "createdTime": null,
                "createdBy": null
            },
            "mobile_auth": {}
        },
        "db_type": "SINGLE_DB",
        "id": 11811000000314001,
        "project_type": "Live",
        "env_details": [
            {
                "id": 11811000000314037,
                "env_name": "Development",
                "env_type": 3,
                "env_status": "Active",
                "project_details": {
                    "project_name": "Zia",
                    "id": 11811000000314001,
                    "project_type": "Live"
                },
                "is_default": true,
                "env_zgid": "781316834",
                "action_required": false
            }
        ],
        "timezone": "Asia/Kolkata"
    }
Delete Project
Description
This API enables you to delete a particular project, by referring to its Project ID.
Request Details
Request URL
{api-domain}/baas/v1/project/{project_id}
Request Headers
Authorization: Zoho-oauthtoken {oauth_token}
Content-Type: application/json
Optional Headers
CATALYST-ORG: {org_id}
Environment: Development
Scope
ZOHOCATALYST.projects.Delete
Request JSON Properties
Max Size: 50 characters
curl -X DELETE

https://api.catalyst.zoho.com/baas/v1/project/4000000006007

-H “Authorization: Zoho-oauthtoken 1000.910*************************16.2f*************************57”

-H “Content-Type: application/json” \
{
    "status": "success",
    "data": {
        "id": 4000000006007
    }
}
Functions
Catalyst Functions enable you to build custom functionalities in your application, and seamlessly integrate it with other Catalyst components to provide a powerful backend for it. You can automate tasks, perform memory-intensive computations, or integrate with third-party services using functions.
Catalyst offers support to develop server-side functions in Java, Node.js and Python programming environments.
Execute a Function
Description
This API enables you to execute a Basic I/O function by referring to its unique function ID. Basic I/O functions are used to perform basic input and output operations, computations, and simple HTTP operations.
Input parameters can passed to the function in the API request either as a query string or in the request body. A query string is preferred over the request body to pass the function parameters in. The response will contain the function output.
Request Details
Request URL
{api-domain}/baas/v1/project/{project_id}/function/{function_id}/execute
Request Methods
Request Headers
Authorization: Zoho-oauthtoken {oauth_token}
Optional Headers
CATALYST-ORG: {org_id}
Environment: Development
Scope
ZohoCatalyst.functions.EXECUTE
Response Details
The response contains the output of the processed function. A Basic I/O function returns response in the JSON format. The key output contains the output generated by the function you execute.
curl -X POST

https://api.catalyst.zoho.com/baas/v1/project/4000000006007/function/4000000045004/execute?name=Raymond%20McGregor

-H “Authorization: Zoho-oauthtoken 1000.910*************************16.2f*************************57”
{
"output": "Hello Raymond McGregor"
}
Circuits
Catalyst Circuits enable you to systematically define and organize a sequence of tasks to be carried out automatically in Catalyst. You can orchestrate tasks and automate workflows, and additionally include conditions, data, and paths in the workflow, to define a repeatable pattern of activities that achieves a business outcome using Circuits.
Catalyst offers support for automating the execution of Basic I/O functions of your application using a circuit.
Execute a Circuit
Description
This API enables you to execute a Catalyst circuit configured in the console by referring to its unique Circuit ID. You can pass the input to the circuit in the request JSON as described below.
Request Details
Request URL
{api-domain}/baas/v1/project/{project_id}/circuit/{circuit_id}/execute
Request Headers
Authorization: Zoho-oauthtoken {oauth_token}
Optional Headers
CATALYST-ORG: {org_id}
Environment: Development
Scope
ZohoCatalyst.circuits.EXECUTE
Request JSON Format
You must send the input to the circuit as key-value pairs in the JSON format like this:
{
“key_1”: “value_1”,
“key_2”: “value_2”,
“key_3”: “value_3”,
.
.
}
Response Details
The response contains the result and the details of the executed circuit, such as the circuit_name, the start_time and end_time of the execution, the instance_id, along with the details of the input that was passed to the circuit and the output generated from the circuit’s execution.
curl -X POST

https://api.catalyst.zoho.com/baas/v1/project/4000000006007/circuit/105000000180234/execute

-H “Authorization: Zoho-oauthtoken 1000.910*************************16.2f*************************57”

-d ‘[
{
“email”:“j.parker@zylker.com”,
“count”:“20”,
“traveller_type”:“Single”,
“rating”:“5”,
“location”:“New York”,
“suite”:“Executive”
}
]’
{
    "status": "success",
    "data": {
        "id": "b3c91799-5c18-4626-9983-a2d6af237e20",
        "name": "Case 1",
        "start_time": "Aug 24, 2020 02:24 PM",
        "end_time": "Aug 24, 2020 02:24 PM",
        "status": "success",
        "status_code": 6,
        "execution_meta": {},
        "circuit_details": {
            "name": "StayFinder",
            "ref_name": "StayFinder",
            "description": "",
            "instance_id": "ef9644a5-123a-438c-94d9-01b1bade8817"
        },
        "input": {
            "email":"j.parker@zylker.com",
            "count":"20",
            "traveller_type":"Single",
            "rating":"5",
            "location":"New York",
            "suite":"Executive"
        },
        "output": {
            "result": {
                "stay_list":{
                    "message":"Email has been sent successfully to j.parker@zylker.com",
                    "status":"success"
                }
            }
        }
    }
}
Authentication
Catalyst Authentication features enable you to add end-users to your Catalyst serverless applications, configure their user accounts and roles, and manage user sign-in and authentication of your application.
Add a New User
Description
This API enables you to add a new end-user to the Catalyst application for a specific platform. When the user has signed up, unique identification values such as ZUID, userID are created for them.
Request Details
Request URL
{api-domain}/baas/v1/project/{project_id}/project-user/signup
Request Headers
Authorization: Zoho-oauthtoken {oauth_token}
Content-Type: application/json
Optional Headers
CATALYST-ORG: {org_id}
Environment: Development
Scope
ZohoCatalyst.projects.users.CREATE
Request JSON Properties
Max Size: 200
The JSON that contains the details of the user
Max Size: 100
Max Size: 100
Response Details
The response will contain the details of the user added in the data key, including the metadata and identification values such as zaid, user_id, and org_id that were generated.
curl -X POST

https://api.catalyst.zoho.com/baas/v1/project/3000000002001/project-user/signup

-H “Authorization: Zoho-oauthtoken 1000.910*************************16.2f*************************57”

-H “Content-Type: application/json”

-H “PROJECT_ID: 1010309726”

-d ‘{
“user_details”:{
“first_name”:“Rowena”,
“last_name”:“Simmons”,
“email_id”:“r.simmons@zylker.com”
},
“platform_type”:“web”,
“redirect_url”:“https://logistics.zylker.com/app/index.html"
}’
{
    "status": "success",
    "data": {
        "zaid": 1010309726,
        "user_details": {
            "user_id": 671930455,
            "user_type": "App Administrator",
            "zuid": 3000000006001,
            "zaaid": 1011520995,
            "status": "ACTIVE",
            "is_confirmed": true,
            "email_id": "r.simmons@zylker.com",
            "first_name": "Rowena",
            "last_name": "Simmons",
            "created_time": "May 13, 2019 09:16 PM",
            "modified_time": "May 13, 2019 09:16 PM",
            "invited_time": "May 13, 2019 09:16 PM",
            "role_details": {
                "role_id": 1256000000288012,
                "role_name": "App Administrator"
            }
        },
        "redirect_url": "https://logistics.zylker.com/app/index.html",
        "platform_type": "web",
        "org_id": 1011520995
        "locale": "us|en_us|America/Los_Angeles"
        "time_zone": "America/Los_Angeles"
    }
}
Add a New User to an Exsiting Organization
Description
This API enables you to add a new end-user to an existing organization without creating a new organization for them. This can be done by providing the ZAAID of the organization that the user must be added to. The organization of a user cannot be changed later, once it is associated with their account.
When the user has signed up, unique identification values such as ZUID and User ID are created for them.
Request Details
Request URL
{api-domain}/baas/v1/project/{project_id}/project-user
Request Headers
Authorization: Zoho-oauthtoken {oauth_token}
Content-Type: application/json
Optional Headers
CATALYST-ORG: {org_id}
Environment: Development
Scope
ZohoCatalyst.projects.users.CREATE
Request JSON Properties
Max Size: 200
The JSON that contains the details of the user
Max Size: 100
Max Size: 100
Response Details
The response will contain the details of the user added in the data key, including the metadata and identification values such as zaid, user_id, and org_id that were generated.
curl -X POST

https://api.catalyst.zoho.com/baas/v1/project/3000000002001/project-user

-H “Authorization: Zoho-oauthtoken 1000.910*************************16.2f*************************57”

-H “Content-Type: application/json”

-d ‘{
“user_details”:{
“first_name”:“John”,
“last_name”:“Winchester”,
“email_id”:“john.w@zylker.com”,
“zaaid”:4567899
},
“redirect_url”: “https://logistics.zylker.com/app/index.html",
“platform_type”:“web”
}’
{
    "status": "success",
    "data": {
        "zaid": 1011481670,
        "user_details": {
            "user_id": 671930400,
            "user_type": "App User",
            "zuid": 3000000006001,
            "zaaid": 1011520995,
            "status": "ACTIVE",
            "is_confirmed": true,
            "email_id": "john.w@zylker.com",
            "first_name": "John",
            "last_name": "Winchester",
            "created_time": "May 13, 2019 09:16 PM",
            "modified_time": "May 13, 2019 09:16 PM",
            "invited_time": "May 13, 2019 09:16 PM",
            "role_id": 3000000005015
        },
        "redirect_url": "https://logistics.zylker.com/app/index.html",
        "platform_type": "web",
        "org_id": 1011520995
        "locale": "us|en_us|America/Los_Angeles"
        "time_zone": "America/Los_Angeles"
    }
}
Get the Details of the Current User
Description
This API enables you to fetch the details of the current user logged into the Catalyst application, on whose scope the function is being executed.
Request Details
Request URL
{api-domain}/baas/v1/project/{project_id}/project-user/current
Request Headers
Authorization: Zoho-oauthtoken {oauth_token}
Optional Headers
CATALYST-ORG: {org_id}
Environment: Development
Scope
ZohoCatalyst.projects.users.READ
Response Details
The response will contain the details of the current user including their identification values such as zaid, user_id, email_id, and their role details.
curl -X GET

https://api.catalyst.zoho.com/baas/v1/project/3000000005007/project-user/current

-H “Authorization: Zoho-oauthtoken 1000.910*************************6.2f*************************57”
{
    "status": "success",
    "data": {
        "zuid": 3000000006111,
        "zaaid": 1019540153,
        "status": "ACTIVE",
        "user_id": 671930409,
        "user_type": "App Administrator",
        "is_confirmed": true,
        "email_id": "p.boyle@zylker.com",
        "first_name": "Patricia",
        "last_name": "Boyle",
        "created_time": "Jul 09, 2019 04:11 PM",
        "modified_time": "Jul 09, 2019 04:11 PM",
        "invited_time": "Jul 09, 2019 04:11 PM",
        "role_details": {
            "role_id": 3000000005090,
            "role_name": "App Administrator"
        }
        "org_id":1019540153
        "locale": "us|en_us|America/Los_Angeles"
        "time_zone": "America/Los_Angeles"
    }
}
Get the Details of a Specific User
Description
This API enables you to obtain the details of a specific Catalyst application user, by passing their user_ID in the request.
Request Details
Request URL
{api-domain}/baas/v1/project/{project_id}/project-user/{user_id}
Request Headers
Authorization: Zoho-oauthtoken {oauth_token}
Optional Headers
CATALYST-ORG: {org_id}
Environment: Development
Scope
ZohoCatalyst.projects.users.READ
Response Details
The response will contain the details of the specific user including their identification values such as zuid, user_id, email_id, and their role details.
curl -X GET

https://api.catalyst.zoho.com/baas/v1/project/3000000005007/project-user/671930409

-H “Authorization: Zoho-oauthtoken 1000.910*************************16.2f*************************57”
{
    "status": "success",
    "data": {
        "zuid": 3171930400,
        "zaaid": 1019540153,
        "status": "ACTIVE",
        "user_id": 671930409,
        "user_type": "App User",
        "is_confirmed": true,
        "email_id": "john.w@zylker.com",
        "first_name": "John",
        "last_name": "Winchester",
        "created_time": "Jul 09, 2019 04:11 PM",
        "modified_time": "Jul 09, 2019 04:11 PM",
        "invited_time": "Jul 09, 2019 04:11 PM",
        "role_details": {
            "role_id": 3000000005015,
            "role_name": "App User"
        }
        "org_id":1019540153
        "locale": "us|en_us|America/Los_Angeles"
        "time_zone": "America/Los_Angeles"
    }
}
Get the Details of All Users
Description
This API enables you to fetch the details of all Catalyst applications users of a particular application through Pagination. Pagination allows you to retrieve the user list in pages through an iteration of API calls.
For example, if you require user records to be fetched in batches of 200 as individual pages, you must include a start and an end parameter in your request. You can set the start index as 0 using the start parameter, and specify the maximum number of users to be fetched as 200 using the end parameter. To fetch the next set of user records, you can execute another API call by setting the start index as 200, and specifying the number of user records in that page using the end parameter accordingly.
Request Details
Request URL
{api-domain}/baas/v1/project/{project_id}/project-user?start={start_index}&end={number_of_users}
The start index to fetch the user records from
Number of user records to return in a single page through pagination
Request Headers
Authorization: Zoho-oauthtoken {oauth_token}
Optional Headers
CATALYST-ORG: {org_id}
Environment: Development
Scope
ZohoCatalyst.projects.users.READ
Response Details
The response will contain the details of all application users including their identification values such as zuid, user_id, email_id, and their role details.
curl -X GET

https://api.catalyst.zoho.com/baas/v1/project/3000000005007/project-user?start=100&end=3

-H “Authorization: Zoho-oauthtoken 1000.910*************************16.2f*************************57”
{
    "status": "success",
    "data": [
        {
            "zuid": 3171930121,
            "zaaid": 1019540153,
            "status": "ACTIVE",
            "user_id": 671930409,
            "user_type": "App User",
            "is_confirmed": true,
            "email_id": "ron.grisham@zylker.com",
            "first_name": "Ronald",
            "last_name": "Grisham",
            "created_time": "Jul 09, 2019 04:11 PM",
            "modified_time": "Jul 09, 2019 04:11 PM",
            "invited_time": "Jul 09, 2019 04:11 PM",
            "role_details": {
                "role_id": 3000000005015,
                "role_name": "App User"
            }
            "org_id":1019540153
            "locale": "us|en_us|America/Los_Angeles"
            "time_zone": "America/Los_Angeles"
        },
        {
            "zuid": 3171930089,
            "zaaid": 1019543293,
            "status": "ACTIVE",
            "user_id": 671930121,
            "user_type": "App User",
            "is_confirmed": true,
            "email_id": "Lucy.p@zylker.com",
            "first_name": "Lucy",
            "last_name": "Pettigrew",
            "created_time": "Jul 09, 2019 04:26 PM",
            "modified_time": "Jul 09, 2019 04:26 PM",
            "invited_time": "Jul 09, 2019 04:26 PM",
            "role_details": {
                "role_id": 3000000005015,
                "role_name": "App User"
            }
            "org_id":1019540153
            "locale": "us|en_us|America/Los_Angeles"
            "time_zone": "America/Los_Angeles"
        },
        {
            "zuid": 3171937685,
            "zaaid": 1019540091,
            "status": "ACTIVE",
            "user_id": 671930888,
            "user_type": "App User",
            "is_confirmed": true,
            "email_id": "zayn.ahmed@zylker.com",
            "first_name": "Zayn",
            "last_name": "Ahmed",
            "created_time": "Jul 09, 2019 04:26 PM",
            "modified_time": "Jul 09, 2019 04:26 PM",
            "invited_time": "Jul 09, 2019 04:26 PM",
            "role_details": {
                "role_id": 3000000005015,
                "role_name": "App User"
            }
            "org_id":1019540153
            "locale": "us|en_us|America/Los_Angeles"
            "time_zone": "America/Los_Angeles"
        }
    ]
}
Delete User
Description
This API enables you to delete a user and completely remove their access to your Catalyst application.
Request Details
Request URL
{api-domain}/baas/v1/project/{project_id}/project-user/{user_id}
Request Headers
Authorization: Zoho-oauthtoken {oauth_token}
Optional Headers
CATALYST-ORG: {org_id}
Environment: Development
Scope
ZohoCatalyst.projects.users.DELETE
Response Details
The response will contain the details of the deleted user including their identification values such as zaid, user_id, email_id, and their role details.
curl -X DELETE

https://api.catalyst.zoho.com/baas/v1/project/3000000005007/project-user/671930409

-H “Authorization: Zoho-oauthtoken 1000.910*************************6.2f*************************57”
{
    "status": "success",
    "data": {
        "zuid": 3000000006111,
        "zaaid": 1019540153,
        "status": "ACTIVE",
        "user_id": 671930409,
        "user_type": "App Administrator",
        "is_confirmed": true,
        "email_id": "p.boyle@zylker.com",
        "first_name": "Patricia",
        "last_name": "Boyle",
        "created_time": "Jul 09, 2019 04:11 PM",
        "modified_time": "Jul 09, 2019 04:11 PM",
        "invited_time": "Jul 09, 2019 04:11 PM",
        "role_details": {
            "role_id": 3000000005090,
            "role_name": "App Administrator"
        }
        "org_id":1019540153
        "locale": "us|en_us|America/Los_Angeles"
        "time_zone": "America/Los_Angeles"
    }
}
Reset User Password
Description
This API enables you to reset the password of a user of your Catalyst application. When this API is called, an email will be sent to the user’s email address with a password reset link. The user can configure a new password for your application and save it, upon clicking the link.
Request Details
Request URL
{api-domain}/baas/v1/project/{project_id}/project-user/forgotpassword
Request Headers
Content-Type: application/json
PROJECT_ID: {ZAID}
Optional Headers
CATALYST-ORG: {org_id}
Environment: Development
Request JSON Properties
Max Size: N/A
Max Size: 200
The JSON that contains the details of the user
Mandatory: No
Max Size: 100
Mandatory: No
Max Size: 100
Mandatory: Yes
Max Size: N/A
Response Details
The response will contain the status of the reset password action.
curl -X POST

https://api.catalyst.zoho.com/baas/v1/project/3000000002001/project-user/forgotpassword

-H “Content-Type: application/json” \
-d ‘{
“user_details”:{
“email_id”:“p.boyle@zylker.com”
},
“platform_type”:“web”
}’
{
    "status": "success",
    "data": "Reset link sent to your p.boyle@zylker.com email address. Please check your email :)"
}
Sign Out User
Description
A Catalyst application user can log out from their current active session in the application using this API request. Catalyst will not send any response back for this API request.
Request Details
Request URL
{application_domain}/baas/logout?logout=true&PROJECT_ID={project_id}
The domain address of the Catalyst application
Optional Headers
CATALYST-ORG: {org_id}
Environment: Development
Data Store
Catalyst Data Store is a cloud-based relational database management system which stores the persistent data of your application in the form of tables.
Data Store APIs enable you to insert and manage records in the tables of your project’s Data Store, obtain table and column details, and even perform bulk read and bulk write actions. However, you can create a table and its schema only from the Catalyst console.
Insert a New Row In a Table
Description
This API enables you to insert a new row of data or a record in a table in the Data Store, by referring to the table’s unique ID or name.
You must pass the column names and their corresponding values for the record in a JSON array in the request as described below.
Note:
-
The table and the columns in it must already be created. You can create a table and the columns for it from the console.
-
You will be able to insert upto 5000 records in each table per project in the development environment. You can create upto 25,000 records overall in each project in the development environment. There are no upper limits for record creation in the production environment.
Request Details
Request URL
{api-domain}/baas/v1/project/{project_id}/table/{tableIdentifier}/row
Request Headers
Authorization: Zoho-oauthtoken {oauth_token}
Content-Type: application/json
Optional Headers
CATALYST-ORG: {org_id}
Environment: Development
Scope
ZohoCatalyst.tables.rows.CREATE
Request JSON Array
You must send the column names and their corresponding values in a JSON array like this:
{
    "column1_name": "column1_value",
    "column2_name": "column2_value",
    "column3_name": "column3_value",
    .
    .
}
where column_name is the name of a unique column in the table, and column_value is its corresponding value in the record.
Response Details
The response will contain the metadata of the row that was created such as its ROWID and CREATEDTIME, and the column key names and values that were inserted.
curl -X POST \
https://api.catalyst.zoho.com/baas/v1/project/4000000006007/table/EmpDetails/row

-H “Authorization: Zoho-oauthtoken 1000.910*************************16.2f*************************57”

-H “Content-Type:application/json”

-d ‘[
{
“Department_ID”:“IT678”,
“Department_Name”:“Marketing”,
“Employee_Name”:“Robert Page”
}
]’
{
"status": "success",
"data": [
    {
        "CREATORID": "12096000000003003",
        "MODIFIEDTIME": "2023-06-05 11:35:14:332",
        "Department_ID": null,
        "Employee_Name": "Robert Page",
        "Department_Name": "Marketing",
        "CREATEDTIME": "2023-06-05 11:35:14:332",
        "ROWID": 12096000000642928
    }
]

}
Get All Rows In a Table
Description
This API enables you to fetch all the rows from a particular table in the Data Store. You can refer to the table by its ID or name. The API incorporates pagination for fetching all rows. Pagination allows you to retrieve the records in pages through an iteration of API calls.
For example, if you require the rows to be fetched in batches of 100 as individual pages, you must include a max_rows parameter in your request, that specifies the maximum rows to be fetched in each page as 100.
Additionally, every API response will contain a token that you can pass in the next API call, to fetch the next page of rows. This token authorizes the subsequent fetching of data. You must pass the token string obtained in the response of the previous API call through the next_token parameter in the request. You need not pass the next_token parameter for the first API call. You can execute an API call for each iteration in this manner and fetch all rows in pages.
Request Details
Request URL
{api-domain}/baas/v1/project/{project_id}/table/{tableIdentifier}/row?next_token={token_string}&max_rows={number_of_rows}
(not required for the first API call) The token value obtained from the previous API call to be passed for fetching the next set of rows through pagination
(optional) The maximum number of rows that must be returned in a single page through pagination. The API will return 200 rows in a single page by default if this value is not specified.
Request Headers
Authorization: Zoho-oauthtoken {oauth_token}
Optional Headers
CATALYST-ORG: {org_id}
Environment: Development
Scope
ZohoCatalyst.tables.rows.READ
Response Details
The response will return the rows that are fetched through the API call in pages based on the max_rows value you specify. If there are rows available more than the requested count or the max_rows count, the response will also contain the token that you must pass to fetch the next set of rows as next_token. If there are no more records to be fetched, the response will not contain a token.
curl -X GET

https://api.catalyst.zoho.com/baas/v1/project/4000000006007/table/CustomerDetails/row?max_rows=4&next_token=*************

-H “Authorization: Zoho-oauthtoken 1000.910*************************16.2f*************************57”
{
    "status": "success",
    "data": [
    {
            "CREATORID": 56000000002003,
            "MODIFIEDTIME": "2019-03-06 10:16:41",
            "Department_ID": "IT148",
            "Department_Name": "Admin",
            "Employee_Name": "Eric Hyde",
            "CREATEDTIME": "2019-03-06 10:16:41",
            "ROWID": 56000000342025,
            "doubleDataType": null
        },
        {
            "CREATORID": 56000000002003,
            "MODIFIEDTIME": "2019-03-06 10:18:56",
            "Department_ID": "IT170",
            "Department_Name": "Sales",
            "Employee_Name": "Steven Kelso",
            "CREATEDTIME": "2019-03-06 10:18:56",
            "ROWID": 56000000342026,
            "doubleDataType": null
        },
    {
            "CREATORID": 56000000002003,
            "MODIFIEDTIME": "2019-03-06 10:19:00",
            "Department_ID": "IT190",
            "Department_Name": "Marketing",
            "Employee_Name": "Micheal Forman",
            "CREATEDTIME": "2019-03-06 10:18:58",
            "ROWID": 56000000342027,
            "doubleDataType": null
        },
    {
            "CREATORID": 56000000002003,
            "MODIFIEDTIME": "2019-03-06 10:45:11",
            "Department_ID": "IT111",
            "Department_Name": "Support",
            "Employee_Name": "Madeline Burkhart",
            "CREATEDTIME": "2019-03-06 10:18:34",
            "ROWID": 56000000342028,
            "doubleDataType": null
        },
    ],
"more_records" : true,
"next_token" : "{{token}}"
}
{
    "status": "success",
    "data": [
    {
            "CREATORID": 56000000002003,
            "MODIFIEDTIME": "2019-03-06 10:16:41",
            "Department_ID": "IT148",
            "Department_Name": "Admin",
            "Employee_Name": "Eric Hyde",
            "CREATEDTIME": "2019-03-06 10:16:41",
            "ROWID": 56000000342025,
            "doubleDataType": null
        },
        {
            "CREATORID": 56000000002003,
            "MODIFIEDTIME": "2019-03-06 10:18:56",
            "Department_ID": "IT170",
            "Department_Name": "Sales",
            "Employee_Name": "Steven Kelso",
            "CREATEDTIME": "2019-03-06 10:18:56",
            "ROWID": 56000000342026,
            "doubleDataType": null
        },
    {
            "CREATORID": 56000000002003,
            "MODIFIEDTIME": "2019-03-06 10:19:00",
            "Department_ID": "IT190",
            "Department_Name": "Marketing",
            "Employee_Name": "Micheal Forman",
            "CREATEDTIME": "2019-03-06 10:18:58",
            "ROWID": 56000000342027,
            "doubleDataType": null
        },
    {
            "CREATORID": 56000000002003,
            "MODIFIEDTIME": "2019-03-06 10:45:11",
            "Department_ID": "IT111",
            "Department_Name": "Support",
            "Employee_Name": "Madeline Burkhart",
            "CREATEDTIME": "2019-03-06 10:18:34",
            "ROWID": 56000000342028,
            "doubleDataType": null
        },
    ],
"more_records" : false
}
Update a Row in a Table
Description
This API enables you to update a particular row in a table in the Catalyst Data Store, by referring to its table ID or the table name. You must send the data to be updated in the record in the request JSON as described below.
Request Details
Request URL
{api-domain}/baas/v1/project/{project_id}/table/{tableIdentifier}/row
Request Headers
Authorization: Zoho-oauthtoken {oauth_token}
Content-Type: application/json
Optional Headers
CATALYST-ORG: {org_id}
Environment: Development
Scope
ZohoCatalyst.tables.rows.UPDATE
Request JSON Format
You must send the names of the columns and their corresponding values to be updated in the request, along with the ROWID of the record, as a JSON Array like this:
{
“column1_name”: “column1_value”,
“column2_name”: “column2_value”,
“column3_name”: “column3_value”,
.
.
“ROWID”:{row_id of the record}
}
Request JSON Properties
Response Details
The response will contain the metadata of the row that was updated such as its ROWID and CREATEDTIME, and the updated column key names and values.
curl -X PUT

https://api.catalyst.zoho.com/baas/v1/project/4000000006007/table/EmpDetails/row

-H “Authorization: Zoho-oauthtoken 1000.910*************************16.2f*************************57”

-H “Content-Type:application/json”

-d ‘[
{
“Department_Name”:“Finance”,
“Employee_Name”:“Morgan Jones”,
“ROWID”:3376000000170191
}
]’
{
    "status": "success",
    "data": [
        {
            "CREATORID": 3376000000002099,
            "MODIFIEDTIME": "2019-02-26 11:18:49",
            "Department_ID":"IT245",
            "Department_Name":"Finance",
            "Employee_Name": "Morgan Jones",
            "CREATEDTIME": "2019-02-26 11:18:49",
            "ROWID": 3376000000170191
        }
    ]
}
Delete a Row in a Table
Description
This API enables you to delete a particular record or a row of a table in the Data Store, by referring to the table’s unique ID or name. The row is referred by its ROWID.
Request Details
Request URL
{api-domain}/baas/v1/project/{project_id}/table/{tableIdentifier}/row/{row_id}
Request Headers
Authorization: Zoho-oauthtoken {oauth_token}
Optional Headers
CATALYST-ORG: {org_id}
Environment: Development
Scope
ZohoCatalyst.tables.rows.DELETE
Response Details
The response will contain the metadata of the row that was deleted such as its ROWID and CREATEDTIME, and the column key names and values in the row.
curl -X DELETE

https://api.catalyst.zoho.com/baas/v1/project/4000000006007/table/EmpDetails/row/3376000000171021

-H “Authorization: Zoho-oauthtoken 1000.910*************************16.2f*************************57”
{
    "status": "success",
    "data": {
        "CREATORID": 56000000002003,
        "MODIFIEDTIME": "2019-02-26 11:18:49",
        "Department_ID": "IT809"
        "Department_Name": "Accounting",
        "Customer_Name": "Jason Pierre",
        "CREATEDTIME": "2019-02-26 11:18:49",
        "ROWID": 3376000000171021,
        "doubleDataType": null
    }
}
Get the Metadata of a Specific Table
Description
This API enables you to retrieve the metadata of a specific table from the Data Store, by referring to the table’s unique ID or name.
Request Details
Request URL
{api-domain}/baas/v1/project/{project_id}/table/{tableIdentifier}
Request Headers
Authorization: Zoho-oauthtoken {oauth_token}
Optional Headers
CATALYST-ORG: {org_id}
Environment: Development
Scope
ZohoCatalyst.tables.READ
Response Details
The response will return the metadata of the table which will include the table details such as the table_id and table_name, and the metadata of all the columns in it such as the column_id, column_name, and data_type of each column.
curl -X GET

https://api.catalyst.zoho.com/baas/v1/project/4000000006007/table/EmpDetails

-H “Authorization: Zoho-oauthtoken 1000.910*************************16.2f*************************57”
    {
        "status": "success",
        "data": {
            "table_id": 56000000111778,
            "project_id": {
                "id": 4000000006007,
                "project_name": "HRApp"
            },
            "table_name": "EmpDetails",
            "modified_by": {
            "is_confirmed":true,
                "zuid": 1019540152,
                "user_id": 671930455,
                "email_id": "emma@zylker.com",
                "first_name": "Amelia",
                "last_name": "Burrows"
            },
            "modified_time": "2019-02-19T02:45:16+05:30",
            "column_details": [
                {
                    "table_id": 56000000111778,
                    "column_sequence": 1,
                    "column_id": 23400091030,
                    "column_name": "ROWID",
                    "category": 1,
                    "data_type": "bigint",
                    "is_read_only": false,
                    "max_length": 50,
                    "is_mandatory": false,
                    "default_value": "250",
                    "decimal_digits": 2,
                    "is_unique": false,
                    "search_index_enabled": false
                },
                {
                    "table_id": 56000000111778,
                    "column_sequence": 1,
                    "column_id": 23400091031,
                    "column_name": "CREATORID",
                    "category": 1,
                    "data_type": "bigint",
                    "is_read_only": false,
                    "max_length": 50,
                    "is_mandatory": false,
                    "default_value": "250",
                    "decimal_digits": 2,
                    "is_unique": false,
                    "search_index_enabled": true
                },
                {
                    "table_id": 56000000111778,
                    "column_sequence": 1,
                    "column_id": 23400091032,
                    "column_name": "CREATEDTIME",
                    "category": 1,
                    "data_type": "datetime",
                    "is_read_only": false,
                    "max_length": 50,
                    "is_mandatory": false,
                    "default_value": "250",
                    "decimal_digits": 2,
                    "is_unique": false,
                    "search_index_enabled": true
                },
                {
                    "table_id": 56000000111778,
                    "column_sequence": 1,
                    "column_id": 23400091033,
                    "column_name": "MODIFIEDTIME",
                    "category": 1,
                    "data_type": "datetime",
                    "is_read_only": false,
                    "max_length": 50,
                    "is_mandatory": false,
                    "default_value": "250",
                    "decimal_digits": 2,
                    "is_unique": false,
                    "search_index_enabled": true
                }
                {
                    "table_id": 56000000111778,
                    "column_sequence": 1,
                    "column_id": 23400091034,
                    "column_name": "EmpID",
                    "category": 1,
                    "data_type": "varchar",
                    "is_read_only": false,
                    "max_length": 6,
                    "is_mandatory": true,
                    "default_value": "",
                    "decimal_digits": ,
                    "is_unique": true,
                    "search_index_enabled": true
                }
                {
                    "table_id": 56000000111778,
                    "column_sequence": 1,
                    "column_id": 23400091035,
                    "column_name": "EmpName",
                    "category": 1,
                    "data_type": "varchar",
                    "is_read_only": false,
                    "max_length": 30,
                    "is_mandatory": true,
                    "default_value": "",
                    "decimal_digits": ,
                    "is_unique": false,
                    "search_index_enabled": false
                }
                {
                    "table_id": 56000000111778,
                    "column_sequence": 1,
                    "column_id": 23400091036,
                    "column_name": "DeptName",
                    "category": 1,
                    "data_type": "varchar",
                    "is_read_only": false,
                    "max_length": 30,
                    "is_mandatory": true,
                    "default_value": "",
                    "decimal_digits": ,
                    "is_unique": false,
                    "search_index_enabled": false
                }
            ],
            "table_scope": "ORG"
        }
    }
Get the Metadata of All Tables
Description
This API enables you to retrieve the metadata of all the tables in your project from the Data Store.
Request Details
Request URL
{api-domain}/baas/v1/project/{project_id}/table
Request Headers
Authorization: Zoho-oauthtoken {oauth_token}
Optional Headers
CATALYST-ORG: {org_id}
Environment: Development
Scope
ZohoCatalyst.tables.READ
Response Details
The response will return the metadata of all the tables which will include the table details such as the table_id and table_name of each table, and the details of the user that last modified the tables.
curl -X GET

https://api.catalyst.zoho.com/baas/v1/project/4000000006007/table

-H “Authorization: Zoho-oauthtoken 1000.910*************************16.2f*************************57”
{
  "status":"success",
  "data":[
    {
      "project_id":{
        "project_name":"ShipmentTracking",
        "id":4000000006007
      },
      "table_name":"CustomerInfo",
      "modified_by":{
        "zuid":1019540152,
        "is_confirmed":true,
        "email_id":"emma@zylker.com",
        "first_name":"Amelia",
        "last_name":"Burrows",
        "user_id":671930111
      },
      "modified_time":"Apr 11, 2020 10:33 PM",
      "table_id":3376000000081234
    },
    {
      "project_id":{
        "project_name":"ShipmentTracking",
        "id":3376000000061190
      },
      "table_name":"EmpInfo",
      "modified_by":{
        "zuid":1019540232,
        "is_confirmed":true,
        "email_id":"p.boyle@zylker.com",
        "first_name":"Patricia",
        "last_name":"Boyle",
        "user_id":671930455
      },
      "modified_time":"Mar 09, 2020 03:16 AM",
      "table_id":3376000000017896
    }
  ]
}
Get the Metadata of a Specific Column
Description
This API enables you to retrieve the metadata of a specific column in a table in the Data Store. The table is referred by its unique ID or name, and the column is referred by the column ID.
Request Details
Request URL
{api-domain}/baas/v1/project/{project_id}/table/{tableIdentifier}/column/{column_id}
Request Headers
Authorization: Zoho-oauthtoken {oauth_token}
Optional Headers
CATALYST-ORG: {org_id}
Environment: Development
Scope
ZohoCatalyst.tables.columns.READ
Response Details
The response will return the metadata of the specific column such as its column_id, column_name, and data_type.
curl -X GET

https://api.catalyst.zoho.com/baas/v1/project/4000000006007/table/EmpDetails/column/4000000042018

-H “Authorization: Zoho-oauthtoken 1000.910*************************16.2f*************************57”
{
    "status": "success",
    "data": {
        "table_id": 56000000118,
        "column_sequence": 3,
        "column_id": 4000000042018,
        "column_name": "Department",
        "category": 2,
        "data_type": "text",
        "is_read_only": false,
        "max_length": 100,
        "is_mandatory": true,
        "default_value": "Admin",
        "is_unique": false,
        "search_index_enabled": false
    }
}
Get the Metadata of All Columns
Description
This API enables you to retrieve the metadata of all the columns in a table in the Data Store, by referring to the table’s unique ID or name.
Request Details
Request URL
{api-domain}/baas/v1/project/{project_id}/table/{tableIdentifier}/column
Request Headers
Authorization: Zoho-oauthtoken {oauth_token}
Optional Headers
CATALYST-ORG: {org_id}
Environment: Development
Scope
ZohoCatalyst.tables.columns.READ
Response Details
The response will return the metadata of all columns such as the column_id, column_name, and data_type of each column.
curl -X GET

https://api.catalyst.zoho.com/baas/v1/project/4000000006007/table/EmpDetails/column

-H “Authorization: Zoho-oauthtoken 1000.910*************************16.2f*************************57”
  {
    "status":"success",
    "data":[
      {
        "table_id":829000000037723,
        "column_sequence":1,
        "column_name":"ROWID",
        "category":1,
        "data_type":"bigint",
        "is_read_only":false,
        "max_length":50,
        "is_mandatory":false,
        "decimal_digits":2,
        "is_unique":false,
        "search_index_enabled":false,
        "column_id":829000000037726
      },
      {
        "table_id":829000000037723,
        "column_sequence":2,
        "column_name":"CREATORID",
        "category":1,
        "data_type":"bigint",
        "is_read_only":false,
        "max_length":50,
        "is_mandatory":false,
        "decimal_digits":2,
        "is_unique":false,
        "search_index_enabled":true,
        "column_id":829000000037728
      },
      {
        "table_id":829000000037723,
        "column_sequence":3,
        "column_name":"CREATEDTIME",
        "category":1,
        "data_type":"datetime",
        "is_read_only":false,
        "max_length":50,
        "is_mandatory":false,
        "decimal_digits":2,
        "is_unique":false,
        "search_index_enabled":true,
        "column_id":829000000037730
      },
      {
        "table_id":829000000037723,
        "column_sequence":4,
        "column_name":"MODIFIEDTIME",
        "category":1,
        "data_type":"datetime",
        "is_read_only":false,
        "max_length":50,
        "is_mandatory":false,
        "decimal_digits":2,
        "is_unique":false,
        "search_index_enabled":true,
        "column_id":829000000037732
      },
      {
        "table_id":829000000037723,
        "column_sequence":5,
        "column_name":"EmpID",
        "category":2,
        "data_type":"bigint",
        "is_read_only":false,
        "max_length":15,
        "is_mandatory":true,
        "decimal_digits":2,
        "is_unique":true,
        "search_index_enabled":false,
        "column_id":829000000038445
      },
      {
        "table_id":829000000037723,
        "column_sequence":6,
        "column_name":"EmpName",
        "category":2,
        "data_type":"text",
        "is_read_only":false,
        "max_length":50,
        "is_mandatory":true,
        "decimal_digits":2,
        "is_unique":false,
        "search_index_enabled":false,
        "column_id":829000000038450
      }
    ]
  }
Truncate a Table
Description
This API enables you to truncate a specific table in the Data Store, by referring to the table’s unique ID or name.
The truncate operation deletes all the records in the table, while retaining its schema. The columns of the table and the table’s metadata will still be available, after the operation has ended.
You will receive notifications in your Catalyst console about the updates of the operation.
Request Details
Request URL
{api-domain}/baas/v1/project/{project_id}/table/{tableIdentifier}/truncate
Request Headers
Authorization: Zoho-oauthtoken {oauth_token}
Optional Headers
CATALYST-ORG: {org_id}
Environment: Development
Scope
ZohoCatalyst.tables.rows.DELETE
Response Details
The response will return the status of the truncate operation.
curl -X DELETE

https://api.catalyst.zoho.com/baas/v1/project/4000000006007/table/NewsHeadlines/truncate

-H “Authorization: Zoho-oauthtoken 1000.910*************************16.2f*************************57”
{
    "status": "success",
    "data": "The table will be truncated Shortly. Kindly Check Notification bar for updates"
}
Bulk Read Records
The Bulk Read operation can read thousands of records from a specific table in the Data Store and generate a CSV file containing the results of the read operation, if the job is successful. This data-intense operation can be performed in a single API execution.
Catalyst supports three APIs for the bulk read operation: a Create Bulk Read API, a Check Bulk Read Status API to check the status of the job execution manually, and a Download Bulk Read Result API to download the results. You can also configure a callback URL to enable the automatic posting of the job status responses in it.
Create a Bulk Read Job
Description
This API triggers the bulk read operation to obtain the records from the table in the Data Store, that match the criteria you specify in the input JSON. The table is referred to using its unique table ID or the table name.
Request Details
Request URL
{api-domain}/baas/v1/project/{projectId}/bulk/read
Request Headers
Authorization: Zoho-oauthtoken {oauth_token}
Optional Headers
CATALYST-ORG: {org_id}
Environment: Development
Scope
ZohoCatalyst.tables.bulk.READ
Request JSON Properties
The input for the Bulk Read API request must be sent in a JSON format. The request parameters are explained below.
The section where you can define the conditions and criteria for the bulk read job
The CSV file generated as the result of the bulk read process contains two hundred thousand/two lakh records in one page.
Page value ‘1’ indicates that the first two hundred thousand records matching your query will get exported. You can fetch subsequent records by increasing the page value.
For example, if you want to fetch records from the range 2,00,001 to 4,00,000, then you must specify the page value as ‘2’.
Default value: 1
Specific columns in the records that need to be fetched from the table. If you do not specify the columns, all columns will be selected and fetched.
You can include multiple columns in an array. Refer to the sample request code window.
A set of conditions based on which the records will be fetched
The operator that will bind the criteria groups together.
Supported Operators: AND, OR
If you define two or more criteria groups, you can use the AND or the OR operator in your request. For example, you can specify a criteria like “column1 equal value 1 AND column2 contains value 2” in the format specified in the previous section.
You can include upto 25 criteria sets in this section. The example shows 3 criteria sets.
The comparison operator that matches the column name with the criteria value
Supported Comparators: equal, not_equal, greater_than, greater_equal, less_than, less_equal, starts_with, ends_with, contains, not_contains, in, not_in, between, not_between
Note:
-
You can specify multiple values for in and not_in comparators, separated by commas.
-
Catalyst supports only the equal comparator for an encrypted column. You will not be able to use other comparators as the criteria for an encrypted column.
The section where you can define the properties of the callback URL, where automatic JSON responses of the job statuses will be sent to
The URL where the automatic responses will be sent to using the HTTP POST method, each time the job status changes. Information about the job details will be contained in the body of the JSON response.
If you don’t configure a callback URL, you must manually check the status of the job processing when you need, using the Check Bulk Read Status API.
Headers that you require to be passed in the JSON response to the callback URL.
You must specify the headers as:
{
"{header_name_1}" : “{header_value_1}”,
"{header_name_2}" : “{header_value_2}”
}
and so on. Refer to the sample request code.
Parameters that you require to be appended to the callback URL
You must specify the parameters as:
{
"{param_name_1}" : “{param_value_1}”,
"{param_name_2}" : “{param_value_2}”
}
and so on. Refer to the sample request code.
Response Details
There are three job processing states which will generate three different responses:
-
In-Progress: When you execute the API, Catalyst will immediately and automatically send you a response indicating that the job execution is in progress. If you have configured a callback URL in the request, the response will also be posted to the URL in the format you defined.
The response will contain a job_id parameter which you can use to check the status of the job execution for subsequent responses, if you have not configured a callback URL.
-
Success: The success state response will contain a download URL, where you can download a CSV file that contains the records matching your query. If you have not configured a callback URL, this response will not be sent by Catalyst automatically.
-
Failed: The failed state response will contain a description of the error occurred and the details. If you have not configured a callback URL, this response will not be sent by Catalyst automatically.
curl -X POST

https://api.catalyst.zoho.com/baas/v1/project/4000000006007/bulk/read

-H “Authorization: Zoho-oauthtoken 1000.91016.2f*57”

-d ‘{
“table_identifier”: “EmpDetails”,
“query” : {
“page” : “1”,
“select_columns” : [
“EmpID”, “EmpName”, “Department”
],
“criteria”: {
“group_operator”: “or”,
“group”: [
{
“column_name”: “Department”,
“comparator”: “equal”,
“value”: “Marketing”
} ,
{
“column_name”: “EmpID”,
“comparator”: “greater_than”,
“value”: “1000”
} ,
{
“column_name”: “EmpName”,
“comparator”: “starts_with”,
“value”: “S”
}
]
}
},
“callback” : {
“url” : “https://hr.zylker.com/en/EmpRecords/_callback.php",
“headers” : {
“src” : “ZCatalyst”,
“operation” : “bulkreadAPI”
},
“params” : {
“project_name” : “EmployeeDatabase”
}
}
}’
{
"status": "success",
"data": {
    "job_id": 2000000118004,
    "status": "In-Progress",
    "operation": "read",
    "project_details": {
         "project_name": "ShipmentTracking",
         "id": 4000000006007
     },
    "query": [
        {
            "table_id": 3376000000165541,
            "details": {
                "page": "1"
            }
        }
    ],
    "callback": {
        "url": "https://hr.zylker.com/en/EmpRecords/_callback.php",
        "headers": {
                  "src" : "ZCatalyst",
                  "operation" : "bulkreadAPI"
                          },
        "params": {
                  "project_name" : "EmployeeDatabase"
                         }
    },
    "created_by": {
        "zuid": 1019540152,
        "is_confirmed": true,
        "email_id": "emma@zylker.com",
        "first_name": "Amelia",
        "last_name": "Burrows",
        "user_id": 671930409
    },
    "created_time": "Oct 06, 2020 07:06 PM"
}

}
{
"status": "success",
"data": {
    "job_id": 2000000117007,
    "status": "Failed",
    "operation": "read",
    "project_details": {
         "project_name": "ShipmentTracking",
         "id": 4000000006007
     },
    "query": [
        {
            "table_id": 3376000000165541,
            "details": {
                "page": "1"
            }
        }
    ],
    "callback": {
        "url": "https://hr.zylker.com/en/EmpRecords/_callback.php",
         "headers": {
                  "src" : "ZCatalyst",
                  "operation" : "bulkreadAPI"
                          },
        "params": {
                   "project_name" : "EmployeeDatabase"
                         }
    },
    "created_by": {
        "zuid": 1019540152,
        "is_confirmed": true,
        "email_id": "emma@zylker.com",
        "first_name": "Amelia",
        "last_name": "Burrows",
        "user_id": 671930409
    },
    "created_time": "Oct 06, 2020 07:00 PM",
    "results": {
        "description": "The column ID in select_columns is invalid",
    }
}

}
Check Bulk Read Status
Description
You can execute this API to manually check the status of the bulk read job that you initiated previously.
If you had not configured a callback URL in your JSON request, you must check the job status yourself by executing this API. You must use the job_id that is sent to you in the automatic in-progress response when you initiate the bulk read operation, to check the job status subsequently.
Request Details
Request URL
{api-domain}/baas/v1/project/{project_id}/bulk/read/{job_id}
The unique ID of the job that was sent in the initial in-progress status response after the Bulk Read API was executed
Request Headers
Authorization: Zoho-oauthtoken {oauth_token}
Optional Headers
CATALYST-ORG: {org_id}
Environment: Development
Scope
ZohoCatalyst.tables.bulk.READ
Response Details
The JSON response for the success state will contain the details of the executed job, along with a download URL where you can download a CSV file that will contain a list of records matching your bulk read job query.
The JSON response for the failed state will contain the details of the executed job, along with a description of the error the occurred in the job processing, and its details, such as the rows that were skipped from being read and the reasons.
curl -X GET

https://api.catalyst.zoho.com/baas/v1/project/4000000006007/bulk/read/2000000118004

-H “Authorization: Zoho-oauthtoken 1000.910*************************16.2f*************************57”
{
"status": "success",
"data": {
    "job_id": 2000000118004,
    "status": "In-Progress",
    "operation": "read",
    "project_details": {
        "project_name": "EmployeeDatabase",
        "id": 4000000006007
    },
    "query": [
        {
            "table_id": 3376000000165541,
            "details": {
                "page": "1"
            }
        }
    ],
    "callback": {
        "url": "https://hr.zylker.com/en/EmpRecords/_callback.php",
        "headers": {
                  "src" : "ZCatalyst",
                  "operation" : "bulkreadAPI"
                          },
        "params": {
                  "project_name" : "EmployeeDatabase"
                         }
    },
    "created_by": {
        "zuid": 1019540152,
        "is_confirmed": true,
        "email_id": "emma@zylker.com",
        "first_name": "Amelia",
        "last_name": "Burrows",
        "user_id": 671930409
    },
    "created_time": "Oct 06, 2020 07:06 PM"
}

}
{
"status": "success",
"data": {
    "job_id": 2000000118004,
    "status": "Completed",
    "operation": "read",
    "project_details": {
        "project_name": "EmployeeDatabase",
        "id": 4000000006007
    },
    "query": [
                    {
            "table_id": 3376000000165541,
            "details": {
                "page": "1"
                            }
                      }
                   ],
    "callback": {
            "url": "https://hr.zylker.com/en/EmpRecords/_callback.php",
            "headers": {
                  "src" : "ZCatalyst",
                  "operation" : "bulkreadAPI"
                          },
              "params": {
                   "project_name" : "EmployeeDatabase"
                         }
                       },
    "created_by": {
            "zuid": 1019540152,
            "is_confirmed": true,
            "email_id": "emma@zylker.com",
            "first_name": "Amelia",
            "last_name": "Burrows",
            "user_id": 671930409
                           },
    "created_time": "Oct 06, 2020 07:06 PM",
"results": {
           "download_url": "https://api.catalyst.zoho.com/baas/v1/bulk/read/2000000117007/download",
           "description": "Bulk READ job 2000000117007 completed.",
            "details": [
                             {
                   "table_id": 3376000000165541,
                   "records_processed": 21,
                   "more_records": false
                             }
                           ]
                    }
           }

}
{
"status": "success",
"data": {
    "job_id": 2000000117007,
    "status": "Failed",
    "operation": "read",
    "project_details": {
        "project_name": "EmployeeDatabase",
        "id": 4000000006007
    },
    "query": [
        {
            "table_id": 3376000000165541,
            "details": {
                "page": "1"
            }
        }
    ],
    "callback": {
        "url": "https://hr.zylker.com/en/EmpRecords/_callback.php",
         "headers": {
                  "src" : "ZCatalyst",
                  "operation" : "bulkreadAPI"
                          },
        "params": {
                   "project_name" : "EmployeeDatabase"
                         }
    },
    "created_by": {
        "zuid": 1019540152,
        "is_confirmed": true,
        "email_id": "emma@zylker.com",
        "first_name": "Amelia",
        "last_name": "Burrows",
        "user_id": 671930409
    },
    "created_time": "Oct 06, 2020 07:00 PM",
    "results": {
        "description": "The column ID in select_columns is invalid",
    }
}

}
Download Bulk Read Result
Description
You can execute this API to download the result of a successful bulk read job that you initiated. This URL will also be sent in JSON response for the success state.
The downloaded CSV result file will contain a list of all the records matching your bulk read job query.
Request Details
Request URL
{api-domain}/baas/v1/project/{project_id}/bulk/read/{job_id}/download
The unique ID of the job that was sent in the initial in-progress status response after the Bulk Read API was executed
Request Headers
Authorization: Zoho-oauthtoken {oauth_token}
Optional Headers
CATALYST-ORG: {org_id}
Environment: Development
Scope
ZohoCatalyst.tables.bulk.READ
Response Details
The bulk read result file will be automatically downloaded to the configured directory in your system after you execute this API.
File format: ZIP file containing the CSV result file
Sample result file showing the details of a bulk read job:
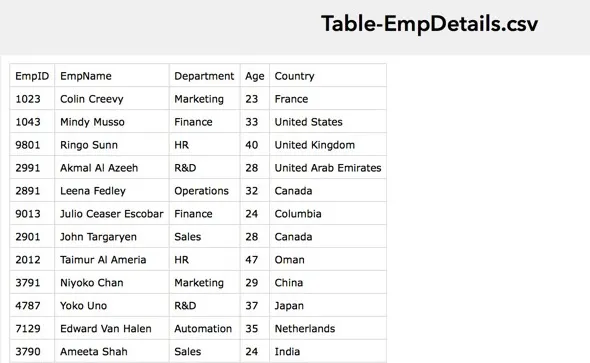
curl -X GET

https://api.catalyst.zoho.com/baas/v1/project/4000000006007/bulk/read/2000000118004/download

-H “Authorization: Zoho-oauthtoken 1000.910*************************16.2f*************************57”
Bulk Write Records
The Bulk Write operation can fetch thousands of records from a CSV file uploaded to a bucket in Stratus and insert them in a specific table in the Data Store. This data-intense operation can be performed in a single API execution.
After the bulk write operation has executed successfully, a CSV report file containing the details of the job execution will be generated at a download URL.
Catalyst supports three APIs for the bulk write operation: a Create Bulk Write API, a Check Bulk Write Status API to check the status of the job execution manually, and a Download Bulk Write Result API to download the results. You can also configure a callback URL to enable automatic posting of the job status responses in it.
Create a Bulk Write Job
Description
This API triggers the bulk write operation to obtain the records from a CSV file stored in Stratus and exports them to a table in the Data Store, based on the criteria you specify in the input JSON. The CSV file is referred to using its Object URL in Stratus, and the table is referred to using its unique table ID or the table name.
Note:
-
Ensure you have uploaded the required CSV file containing in Stratus, before you begin executing this operation.
-
The CSV file’s first row must be the header row i.e., the column names must be present as the header row.
-
The CSV file must contain data in the format that adheres to CSV file standards. If the file is not in the standard format, the data written to the table might be corrupted.
-
The Bulk Write API can insert up to 100,000 records in a single API call, irrespective of the environment. If you require more records to be written, you can do so in batches of 100,000 records by sending multiple Bulk Write API requests accordingly.
There are three operations that can be performed using this API:
- Insert: Inserts new rows of data into the table from the CSV file
- Update: Updates existing rows of data in the table. The records are identified either using a unique column in the table, or using their ROWIDs generated in the Data Store.
- Upsert: Enables both insert and update operations at the same time. If the record already exists, the row is updated. If the record does not exist, a new row with the data is inserted.
Request Details
Request URL
{api-domain}/baas/v1/project/{projectId}/bulk/write
Request Headers
Authorization: Zoho-oauthtoken {oauth_token}
Optional Headers
CATALYST-ORG: {org_id}
Environment: Development
Scope
ZohoCatalyst.tables.bulk.CREATE
Request JSON Properties
The input for the Bulk Write API request must be sent in a JSON format. The request parameters are explained below.
Specifies the operation to be executed using the API.
Allowed values: insert, update, upsert
Default operation: insert
The unique column using which the records are identified.
For example, if you specify a unique column called ‘EmployeeID’ as the find_by value, Catalyst will search the records in the Data Store table using the EmployeeID value. For the update operation, Catalyst will update the rows that match the EmployeeID from the CSV file. For the upsert operation, Catalyst will update existing rows, and insert new rows if there are no records with matching EmployeeID values.
Update: This can be a column with unique values as configured in the Data Store, or the ROWID generated by Catalyst for the records.
Upsert: You can only specify a column with unique values as configured in the Data Store. You will not be able to specify the ROWID as the find_by value. This is because, upsert will insert new rows if matching ones are not found, and the ROWID values will not be available for rows not existing in the Data Store.
Insert: If you specify a find_by column for an insert operation, any records matching the column values from the CSV file will be skipped and not inserted into the Data Store table. This is because, insert cannot update if a given record already exists.
Foreign key mapping for the columns that are primary keys in other tables. This is specified if any columns imported from the CSV file should be configured as foreign keys.
You must map foreign keys in the following format:
{
“local_column” : “local_column_name_1”,
“reference_column” : “reference_column_name_1”
}
where local_column is the name of the column in the table where the bulk write operation is processed, and reference_column is the name of the column in the table in which it is a primary key.
Refer to the sample request code.
The section where you can define the properties of the callback URL, where automatic JSON responses of the job statuses will be sent to.
The URL where the automatic responses will be sent to using the HTTP POST method, each time the job status changes. Information about the job details will be contained in the body of the JSON response.
If you don’t configure a callback URL, you must manually check the status of the job processing when you need, using the Check Bulk Write Status API.
Headers that you require to be passed in the JSON response to the callback URL
You must specify the headers as:
{
"{header_name_1}" : “{header_value_1}”,
"{header_name_2}" : “{header_value_2}”
}
and so on. Refer to the sample request code.
Parameters that you require to be appended to the callback URL
You must specify the parameters as:
{
"{param_name_1}" : “{param_value_1}”,
"{param_name_2}" : “{param_value_2}”
}
and so on. Refer to the sample request code.
Response Details
There are three job processing states which will generate three different responses:
-
In-Progress: When you execute the API, Catalyst will immediately and automatically send you a response indicating that the job execution is in progress. If you have configured a callback URL in the request, the response will also be posted to the URL in the format you defined.
The response will contain a job_id parameter which you can use to check the status of the job execution for subsequent responses, if you have not configured a callback URL.
-
Success: The success state response will contain a download URL, where you can download a CSV report file that contains the details of the job execution. It will list all the records that were skipped from being written along with the reasons. If you have not configured a callback URL, this response will not be sent by Catalyst automatically.
-
Failed: The failed state response will contain a description of the error that occurred and the details. If you have not configured a callback URL, this response will not be sent by Catalyst automatically.
curl -X POST https://api.catalyst.zoho.com/baas/v1/project/4000000006007/bulk/write

-H “Authorization: Zoho-oauthtoken 1000.91016.2f*57”

-d ‘{
“table_identifier”: “3376000000165511”,
“operation”: “insert”,
“object_details”: {
“bucket_name”: “zylker-emp”,
“object_key”: “employees/emp_rec.csv”,
“version_id”: “3546576879809”
},
“callback”: {
“url”: “https://hr.zylker.com/en/EmpRecords/_callback.php",
“headers”: {
“src”: “ZCatalyst”,
“operation”: “bulkwriteAPI”
},
“params”: {
“project_name”: “EmployeeDatabase”
}
},
“find_by”: “EmpID”,
“fk_mapping”: [
{
“local_column”: “EmployeeID”,
“reference_column”: “EmpID”
},
{
“local_column”: “DepartmentID”,
“reference_column”: “DeptID”
}
]
}’
{
"status": "success",
"data": {
    "job_id": 2000000110044,
    "status": "In-Progress",
    "operation": "insert",
    "project_details": {
         "project_name": "ShipmentTracking",
         "id": 4000000006007
     },
    "query": [
                    {
            "table_id": 3376000000165511,
            "object_details": {
                "bucket_name": "zylker-emp",
                "object_key" : "employees/emp_rec.csv",
                "version_id":"3546576879809"
                            }
                      }
                    ],
    "callback": {
    "url": "https://hr.zylker.com/en/EmpRecords/_callback.php",
    "headers": {
        "src": "ZCatalyst",
       "operation": "bulkwriteAPI"
      },
    "params": {
    "project_name": "EmployeeDatabase"
               }
         },
    "created_by": {
             "zuid": 3000000006111,
             "is_confirmed": true,
             "email_id": "emma@zylker.com",
             "first_name": "Amelia",
             "last_name": "Burrows",
             "user_id": 671930409
                             },
    "created_time": "Oct 05, 2020 07:33 PM"
}
}
{
"status": "success",
"data": {
    "job_id": 2000000110044,
    "status": "Completed",
    "operation": "insert",
    "project_details": {
        "project_name": "ShipmentTracking",
        "id": 4000000006007
    },
    "query": [
        {
            "table_id": 3376000000165511,
            "details": {
                "object_url" : "https://zylker-emp-development.zohostratus.com/employees/emp_rec.csv"
            }
        }
    ],
    "callback": {
        "url": "https://hr.zylker.com/en/EmpRecords/_callback.php",
        "headers": {
            "src": "ZCatalyst",
            "operation": "bulkwriteAPI"
        },
        "params": {
            "project_name": "EmployeeDatabase"
        }
    },
        "created_by": {
            "zuid": 3000000006111,
            "is_confirmed": true,
            "email_id": "emma@zylker.com",
            "first_name": "Amelia",
            "last_name": "Burrows",
            "user_id": 671930409
        },
        "created_time": "Oct 05, 2020 07:25 PM",
        "results": {
            "download_url": "https://api.catalyst.zoho.com/baas/v1/bulk/write/2000000110013/download",
            "description": "Bulk WRITE job completed. ",
            "details": [
                {
                    "table_id": 3376000000165511,
                    "records_processed": 176
                }
            ]
        }
    }
}
{
"status": "success",
"data": {
    "job_id": 2000000110044,
    "status": "Failed",
    "operation": "insert",
    "project_details": {
         "project_name": "ShipmentTracking",
         "id": 4000000006007
     },
    "query": [
                   {
            "table_id": 3376000000165511,
            "details": {
                "object_url" : "https://zylker-emp-development.zohostratus.com/employees/emp_rec.csv"
                            }
                    }
                   ],
 "callback": {
      "url": "https://hr.zylker.com/en/EmpRecords/_callback.php",
      "headers": {
           "src": "ZCatalyst",
           "operation": "bulkwriteAPI"
      },
    "params": {
          "project_name": "EmployeeDatabase"
     }
 }
    "created_by": {
        "zuid": 3000000006111,
        "is_confirmed": true,
        "email_id": "emma@zylker.com",
        "first_name": "Amelia",
        "last_name": "Burrows",
        "user_id": 671930409
                            },
    "created_time": "Oct 05, 2020 07:25 PM",
    "results": {
        "description": "The reference_column 'DeptID' in fk_mapping of table 3376000000165511 is not a unique column",
        "details": [ ]
                    }
               }
}
Check Bulk Write Status
Description
You can execute this API to manually check the status of the bulk write job that you initiated previously.
If you had not configured a callback URL in your JSON request, you must check the job status yourself by executing this API. You must use the job_id that is sent to you in the automatic in-progress response when you initiated the bulk write operation, to check the job status subsequently.
Request Details
Request URL
{api-domain}/baas/v1/project/{project_id}/bulk/write/{job_id}
The unique ID of the job that was sent in the initial [in-progress status response](/en/api/introduction/overview-and-prerequisites/#response-details) after the Bulk Write API was executed
Request Headers
Authorization: Zoho-oauthtoken {oauth_token}
Optional Headers
CATALYST-ORG: {org_id}
Environment: Development
Scope
ZohoCatalyst.tables.bulk.CREATE
Response Details
The JSON response for the success state will contain the details of the executed job, along with a download URL, where you can download a CSV report file that will contain the details of the job execution. It will list all the records that were skipped from being written along with the reasons.
The JSON response for the failed state will contain the details of the executed job, along with a description of the error occurred in the job processing, and its details.
curl -X GET

https://api.catalyst.zoho.com/baas/v1/project/4000000006007/bulk/write/2000000110044

-H “Authorization: Zoho-oauthtoken 1000.910*************************16.2f*************************57”
{
    "status": "success",
    "data": {
        "job_id": 2000000110044,
        "status": "In-Progress",
        "operation": "insert",
        "project_details": {
            "project_name": "EmployeeDatabase",
            "id": 4000000006007
        }
        "query": [
            {
                "table_id": 3376000000165511,
                "details": {
                    "object_url" : "https://zylker-emp-development.zohostratus.com/employees/emp_rec.csv",
            }
        }
    ],
    "callback": {
        "url": "https://hr.zylker.com/en/EmpRecords/_callback.php",
        "headers": {
            "src": "ZCatalyst",
            "operation": "bulkwriteAPI"
        },
        "params": {
            "project_name": "EmployeeDatabase"
        }
    },
    "created_by": {
            "zuid": 3000000006111,
            "is_confirmed": true,
            "email_id": "emma@zylker.com",
            "first_name": "Amelia",
            "last_name": "Burrows",
            "user_id": 671930409
    },
    "created_time": "Oct 05, 2020 07:33 PM"
}

}
{
    "status": "success",
    "data": {
        "job_id": 2000000110044,
        "status": "Completed",
        "operation": "insert",
        "project_details": {
            "project_name": "EmployeeDatabase",
            "id": 4000000006007
        }
        "query": [
            {
                "table_id": 3376000000165511,
                "details": {
                    "object_url" : "https://zylker-emp-development.zohostratus.com/employees/emp_rec.csv"
                }
            }
        ],
        "callback": {
            "url": "https://hr.zylker.com/en/EmpRecords/_callback.php",
            "headers": {
                "src": "ZCatalyst",
                "operation": "bulkwriteAPI"
            },
            "params": {
                "project_name": "EmployeeDatabase"
            }
        },
        "created_by": {
            "zuid": 3000000006111,
            "is_confirmed": true,
            "email_id": "emma@zylker.com",
            "first_name": "Amelia",
            "last_name": "Burrows",
            "user_id": 671930409
        },
        "created_time": "Oct 05, 2020 07:25 PM",
        "results": {
            "download_url": "https://api.catalyst.zoho.com/baas/v1/bulk/write/2000000110013/download",
            "description": "Bulk WRITE job completed. ",
            "details": [
                {
                    "table_id": 3376000000165511,
                    "records_processed": 176
                }
            ]
        }
    }
}
{
    "status": "success",
    "data": {
        "job_id": 2000000110044,
        "status": "Failed",
        "operation": "insert",
        "project_details": {
            "project_name": "EmployeeDatabase",
            "id": 4000000006007
        }
        "query": [
            {
                "table_id": 3376000000165511,
                "details": {
                    "object_url" : "https://zylker-emp-development.zohostratus.com/employees/emp_rec.csv"
                }
            }
        ],
        "callback": {
            "url": "https://hr.zylker.com/en/EmpRecords/_callback.php",
            "headers": {
                "src": "ZCatalyst",
                "operation": "bulkwriteAPI"
            },
            "params": {
                "project_name": "EmployeeDatabase"
            }
        },
        "created_by": {
            "zuid": 3000000006111,
            "is_confirmed": true,
            "email_id": "emma@zylker.com",
            "first_name": "Amelia",
            "last_name": "Burrows",
            "user_id": 671930409
        },
        "created_time": "Oct 05, 2020 07:25 PM",
        "results": {
            "description": "The reference_column 'DeptID' in fk_mapping of table 3376000000165511 is not a unique column",
            "details": [ ]
        }
    }
}
Download Bulk Write Result
Description
You can execute this API to download the result of a successful bulk write job that you initiated. This URL will also be sent in JSON response for the success state.
The downloaded CSV file will contain the details of the job execution. It will list all the records that were skipped from being written along with the reasons.
Request Details
Request URL
{api-domain}/baas/v1/project/{project_id}/bulk/write/{job_id}/download
The unique ID of the job that was sent in the initial [in-progress status response](/en/api/introduction/overview-and-prerequisites/#response-details) after the Bulk Write API was executed
Request Headers
Authorization: Zoho-oauthtoken {oauth_token}
Optional Headers
CATALYST-ORG: {org_id}
Environment: Development
Scope
ZohoCatalyst.tables.bulk.CREATE
Response Details
The bulk write result file will be automatically downloaded to the configured directory in your system after you execute this API.
File format: ZIP file containing the CSV result file
Sample result file showing the details of a bulk write job:
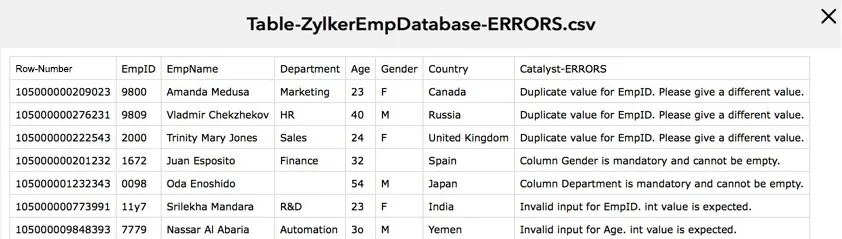
curl -X GET

https://api.catalyst.zoho.com/baas/v1/project/4000000006007/bulk/write/2000000110044/download

-H “Authorization: Zoho-oauthtoken 1000.910*************************16.2f*************************57”
Bulk Delete Rows in a Table
Description
This API enables you to delete records or rows of data in bulk from a specific table in the Data Store. The table is referred by its unique ID or name.
The bulk delete operation can delete a maximum of 200 rows in a single API call. You can choose the rows to be deleted by passing the unique ROWIDs of those rows as params in the request URL, as shown in the sample request.
You must include at least one ROWID, and can include upto 200 ROWIDs, in the request.
Request Details
Request URL
{api-domain}/baas/v1/project/{project_id}/table/{tableIdentifier}/row?ids={rowID_1},{rowID_2},{rowID_3}
Request Headers
Authorization: Zoho-oauthtoken {oauth_token}
Optional Headers
CATALYST-ORG: {org_id}
Environment: Development
Scope
ZohoCatalyst.tables.rows.DELETE
Response Details
The response contains the data of all the rows that were deleted through the operation, including their metadata like theROWID and CREATEDTIME, and the column key names and values in each row.
curl -X DELETE

https://api.catalyst.zoho.com/baas/v1/project/4000000006007/table/EmpDetails/row?ids=1028000000171815,1028000000171810,1028000000171805,1028000000171617

-H “Authorization: Zoho-oauthtoken 1000.910*************************16.2f*************************57”
{
"status": "success",
"data": [
    {
        "CREATORID": "1444000000003001",
        "MODIFIEDTIME": "2020-11-19 15:20:21:830",
        "Department_ID":"IT245",
        "Department_Name":"Finance",
        "Employee_Name": "Morgan Jones",
        "CREATEDTIME": "2020-11-19 15:20:21:830",
        "ROWID": "1028000000171815"
    },
    {
        "CREATORID": "1444000000003001",
        "MODIFIEDTIME": "2020-11-19 15:20:34:503",
        "Department_ID":"IT121",
        "Department_Name":"HR",
        "Employee_Name": "Leena Medley",
        "CREATEDTIME": "2020-11-19 15:20:34:503",
        "ROWID": "1028000000171810"
    },
    {
        "CREATORID": "1444000000003001",
        "MODIFIEDTIME": "2020-11-19 15:20:42:314",
        "Department_ID":"IT783",
        "Department_Name":"Marketing",
        "Employee_Name": "Tamira Shah",
        "CREATEDTIME": "2020-11-19 15:20:42:314",
        "ROWID": "1028000000171805"
    },
   {
        "CREATORID": "1444000000003001",
        "MODIFIEDTIME": "2020-11-19 15:20:42:314",
        "Department_ID":"IT098",
        "Department_Name":"Sales",
        "Employee_Name": "Julia McGregor",
        "CREATEDTIME": "2020-11-19 15:20:42:314",
        "ROWID": "1028000000171617"
    }
]

}
NoSQL
Catalyst NoSQL is a fully managed non-relational, NoSQL data storage feature that enables you to store the semi-structured, unstructured, and disparate data of your applications. Catalyst supports document-type data storage in the key-value pair based JSON format.
The Catalyst NoSQL APIs enable you to perform CRUD operations on your NoSQL tables. You can insert, update, delete, or fetch items, as well as execute queries on a table or a table’s index.
Insert Item
Description
This API enables you to insert a new item in a NoSQL table in your project. The table is referred to by its unique ID or name.
You can insert an item with or without specifying any conditions by passing the data in the Custom JSON format.
Request Details
Request URL
{api-domain}/baas/v1/project/{{project_id}}/nosqltable/{{table_identifier}}/item
Request Headers
Authorization: Zoho-oauthtoken {oauth_token}
Content-Type: application/json
Optional Headers
CATALYST-ORG: {org_id}
Environment: Development
Scope
ZohoCatalyst.nosql.item.INSERT
Request JSON Properties
The existing data of the table is retrieved and evaluated against this condition. The items are inserted only if the evaluation is true. If there is no existing data, the conditions are ignored and the items are inserted. There are three ways to initialize a condition:
Response Details
The response will return the status of the insert operation, as well as the details of the item inserted such as the table_name, partition_key and sort_key, if configured.
curl -X POST

https://api.catalyst.zoho.com/baas/v1/project/4000000006007/nosqltable/3376000003171728/item

-H “Authorization: Zoho-oauthtoken 1000.910*************************16.2f*************************57”

-H “Content-Type:application/json”

-d ‘{
“item”: {
“EmpID”: {
“N”: “10999”
},
“FirstName”:{
“S”: “Paul”
},
“LastName”:{
“S”: “Smith”
},
“PriorExperience”:{
“BOOL”: false
},
“Location”: {
“M”: {
“Country”: {
“S”: “USA”
},
“City”: {
“S”: “New York”
}
}
}
}
}’
{
"status": "success",
"data": {
    "table_name": "employeeDetails",
    "project_details": {
        "id": 4000000006007,
        "project_name": "EmpDatabase",
        "project_type": "Live"
    }
}
}
Update Item
Description
This API enables you to update an item from the existing data in a NoSQL table in your project. The table is referred to by its unique ID or name.
You can pass the attributes to be updated with or without specifying any conditions in the Custom JSON format.
Request Details
Request URL
{api-domain}/baas/v1/project/{{project_id}}/nosqltable/{{table_identifier}}/item
Request Headers
Authorization: Zoho-oauthtoken {oauth_token}
Content-Type: application/json
Optional Headers
CATALYST-ORG: {org_id}
Environment: Development
Scope
ZohoCatalyst.nosql.item.UPDATE
Request JSON Properties
Denotes the attribute to be updated along with its value. The update can be of two types: PUT (to add a new attribute within the item) and DELETE (to remove an attribute from the item). The attribute_path indicates the path within the item where the actual operation is to be done. The value to be updated can be of two types:
There are four functions that can be used:
if_not_exists - Checks the existence of the attribute and declares a value if it is not present.
append_list - Appends data to a list
add - Adds a value along with existing value or add an element in a set
reduction - Sub-traces a value from existing value or remove an element in a set.
The existing data of the table is retrieved and evaluated against this condition. The items are inserted only if the evaluation is true. If there is no existing data, the conditions are ignored and the items are inserted. There are three ways to initialize a condition:
Response Details
The response will return the status of the insert operation, as well as the details of the item updated such as the table_name, partition_key and sort_key, if configured.
curl -X PUT

https://api.catalyst.zoho.com/baas/v1/project/4000000006007/nosqltable/3376000003171728/item

-H “Authorization: Zoho-oauthtoken 1000.910*************************16.2f*************************57”

-H “Content-Type:application/json”

-d ‘{
keys:{
partition_key:{
“S”:“Country”
},
sort_key:{
“N”:“EmpID”
},
}
update_attributes:{
“item”: {
“EmpID”: {
“N”: “10999”
},
“FirstName”:{
“S”: “Paul”
},
“LastName”:{
“S”: “Smith”
},
“PriorExperience”:{
“BOOL”: false
},
“Location”: {
“M”: {
“Country”: {
“S”: “USA”
},
“City”: {
“S”: “New York”
}
}
}
}
}
}’
{
"status": "success",
"data": {
    "table_name": "employeeDetails",
    "project_details": {
        "id": 4000000006007,
        "project_name": "EmpDatabase",
        "project_type": "Live"
    }
}
}
Fetch Item
Description
This API enables you to fetch an item from a NoSQL table in your project. The table is referred to by its unique ID or name.
You can specify the attributes of the items to be fetched, and even denote if they need to be fetched from the master or a slave cluster.
Request Details
Request URL
{api-domain}/baas/v1/project/{{project_id}}/nosqltable/{{table_identifier}}/item/fetch
Request Headers
Authorization: Zoho-oauthtoken {oauth_token}
Content-Type: application/json
Optional Headers
CATALYST-ORG: {org_id}
Environment: Development
Scope
ZohoCatalyst.nosql.item.READ
Request JSON Properties
Response Details
The response will return the status of the fetch operation, as well as the items that are fetched. Either all the attributes or specified attributes of the items will be fetched.
curl -X GET

https://api.catalyst.zoho.com/baas/v1/project/4000000006007/nosqltable/3376000003171728/item/fetch

-H “Authorization: Zoho-oauthtoken 1000.910*************************16.2f*************************57”

-H “Content-Type:application/json”

-d ‘{
keys:{
partition_key:{
“S”:“Country”
},
sort_key:{
“N”:“EmpID”
},
}
required_attributes: {
“EmpID”,
“FirstName”,
“LastName”,
“PriorExperience”
},
consistent_read: “true”
}’
{
"status": "success",
"data": {
    fetched_attributes:{
"item": {
"EmpID": {
"N": "10999"
},
"FirstName":{
"S": "Paul"
},
"LastName":{
"S": "Smith"
},
"PriorExperience":{
"BOOL": false
}
}
}
}
}
Delete Item
Description
This API enables you to insert a new item in a NoSQL table in your project. The table is referred to by its unique ID or name.
You can insert an item with or without specifying any conditions by passing the data in the Custom JSON format.
Request Details
Request URL
{api-domain}/baas/v1/project/{{project_id}}/nosqltable/{{table_identifier}}/item
Request Headers
Authorization: Zoho-oauthtoken {oauth_token}
Content-Type: application/json
Optional Headers
CATALYST-ORG: {org_id}
Environment: Development
Scope
ZohoCatalyst.nosql.item.INSERT
Request JSON Properties
The existing data of the table is retrieved and evaluated against this condition. The items are inserted only if the evaluation is true. If there is no existing data, the conditions are ignored and the items are inserted. There are three ways to initialize a condition:
Response Details
The response will return the status of the insert operation, as well as the details of the item inserted such as the table_name, partition_key and sort_key, if configured.
curl -X DELETE

https://api.catalyst.zoho.com/baas/v1/project/4000000006007/nosqltable/3376000003171728/item

-H “Authorization: Zoho-oauthtoken 1000.910*************************16.2f*************************57”

-H “Content-Type:application/json”

-d ‘{
“item”: {
“EmpID”: {
“N”: “10999”
},
“FirstName”:{
“S”: “Paul”
},
“LastName”:{
“S”: “Smith”
},
“PriorExperience”:{
“BOOL”: false
},
“Location”: {
“M”: {
“Country”: {
“S”: “USA”
},
“City”: {
“S”: “New York”
}
}
}
}
}’
{
"status": "success",
"data": {
    "table_name": "employeeDetails",
    "project_details": {
        "id": 4000000006007,
        "project_name": "EmpDatabase",
        "project_type": "Live"
    }
}
}
Query Table
Description
This API enables you to query a NoSQL table in your project and fetch data. The table is referred to by its unique ID.
Request Details
Request URL
{api-domain}/baas/v1/project/{{project_id}}/nosqltable/{{table_identifier}}/item/query
Request Headers
Authorization: Zoho-oauthtoken {oauth_token}
Content-Type: application/json
Optional Headers
CATALYST-ORG: {org_id}
Environment: Development
Scope
ZohoCatalyst.nosql.POST
Request JSON Properties
Response Details
The response will return the status of the query operation, as well as the items that are fetched according to the conditions set in the query.
curl -X POST

https://api.catalyst.zoho.com/baas/v1/project/4000000006007/nosqltable/3376000003171728/item/query

-H “Authorization: Zoho-oauthtoken 1000.910*************************16.2f*************************57”

-H “Content-Type:application/json”

-d -d ‘{
key_condition:{
partition_key:{
“S”:“Country”
},
sort_key:{
“N”:“EmpID”
},
}
required_attributes: {
“EmpID”,
“FirstName”,
“LastName”,
“PriorExperience”
},
consistent_read: “true”
}’
{
“status”: “success”,
“data”: {
fetched_data:{
“item”: {
“EmpID”: {
“N”: “10999”
},
“FirstName”:{
“S”: “Paul”
},
“LastName”:{
“S”: “Smith”
},
“PriorExperience”:{
“BOOL”: false
}
}
}
}
}
Query Index
Description
This API enables you to query a NoSQL index in your project and fetch data. The index is referred to by its unique ID.
Request Details
Request URL
{api-domain}/baas/v1/project/{{project_id}}/nosqltable/{{table_identifier}}//index/{{index_identifier/}}/item/query
Request Headers
Authorization: Zoho-oauthtoken {oauth_token}
Content-Type: application/json
Optional Headers
CATALYST-ORG: {org_id}
Environment: Development
Scope
ZohoCatalyst.nosql.POST
Request JSON Properties
Response Details
The response will return the status of the query operation, as well as the items that are fetched according to the conditions set in the query.
curl -X POST

https://api.catalyst.zoho.com/baas/v1/project/4000000006007/nosqltable/3376000003171728/index/786387162881/item/query

-H “Authorization: Zoho-oauthtoken 1000.910*************************16.2f*************************57”

-H “Content-Type:application/json”

-d -d ‘{
key_condition:{
partition_key:{
“S”:“Country”
},
sort_key:{
“N”:“EmpID”
},
}
required_attributes: {
“EmpID”,
“FirstName”,
“LastName”,
“PriorExperience”
},
consistent_read: “true”
}’
{
“status”: “success”,
“data”: {
fetched_data:{
“item”: {
“EmpID”: {
“N”: “10999”
},
“FirstName”:{
“S”: “Paul”
},
“LastName”:{
“S”: “Smith”
},
“PriorExperience”:{
“BOOL”: false
}
}
}
}
}
Stratus
Stratus is Catalyst’s robust cloud storage solution. With a simple upload action, you can store your data of any type as Objects in containers called Buckets.
Get All Buckets
Description
This API allows you to get all available details of all buckets present in Stratus.
Request Details
Request URL
{api-domain}/baas/v1/project/{project_id}/bucket
Request Headers
Authorization: Zoho-oauthtoken {oauth_token}
Optional Headers
CATALYST-ORG: {org_id}
Environment: Development
Scope
ZohoCatalyst.buckets.READ
Response Details
The response will return the metadata and details of all the buckets including its bucket_name, and the details of the user who created and last modified the bucket.
curl -X GET https://api.catalyst.zoho.com/baas/v1/project/10108000003823392/bucket
-H “Authorization: Zoho-oauthtoken 1000.910*************************16.2f*************************57”
{
"status": "success",
"data": [
    {
    "bucket_name": "fsbucket17",
    "project_details": {
        "project_name": "Project-Rainfall-4",
        "id": 2000000000075,
        "project_type": "Live"
    },
    "created_by": {
        "zuid": 18599686,
        "is_confirmed": false,
        "email_id": "emmy@zylker.com",
        "first_name": "Amelia B",
        "last_name": "Fstest",
        "user_type": "Admin",
        "user_id": 2000000000055
    },
    "created_time": "Sep 27, 2023 05:01 PM",
    "modified_by": {
        "zuid": 18599686,
        "is_confirmed": false,
        "email_id": "emmy@zylker.com",
        "first_name": "Amelia B",
        "last_name": "Fstest",
        "user_type": "Admin",
        "user_id": 2000000000055
    },
    "modified_time": "Sep 27, 2023 05:01 PM",
    "bucket_meta": {
        "versioning": false,
        "caching": {
        "status": "Disabled"
        },
        "encryption": false,
        "audit_consent": false
    },
    "bucket_url": "https://fsbucket17-development.zohostratus.com"
    },
    {
    "bucket_name": "fsbucket16",
    "project_details": {
        "project_name": "Project-Rainfall-4",
        "id": 2000000000075,
        "project_type": "Live"
    },
    "created_by": {
        "zuid": 18599686,
        "is_confirmed": false,
        "email_id": "emmy@zylker.com",
        "first_name": "Amelia B",
        "last_name": "Fstest",
        "user_type": "Admin",
        "user_id": 2000000000055
    },
    "created_time": "Sep 27, 2023 04:58 PM",
    "modified_by": {
        "zuid": 18599686,
        "is_confirmed": false,
        "email_id": "emmy@zylker.com",
        "first_name": "Amelia B",
        "last_name": "Fstest",
        "user_type": "Admin",
        "user_id": 2000000000055
    },
    "modified_time": "Sep 27, 2023 04:58 PM",
    "bucket_meta": {
        "versioning": false,
        "caching": {
        "status": "Disabled"
        },
        "encryption": true,
        "audit_consent": true
    },
    "bucket_url": "https://fsbucket16-development.zohostratus.com"
    },
    {
    "bucket_name": "fsbucket15",
    "project_details": {
        "project_name": "Project-Rainfall-4",
        "id": 2000000000075,
        "project_type": "Live"
    },
    "created_by": {
        "zuid": 18599686,
        "is_confirmed": false,
        "email_id": "emmy@zylker.com",
        "first_name": "Amelia B",
        "last_name": "Fstest",
        "user_type": "Admin",
        "user_id": 2000000000055
    },
    "created_time": "Sep 27, 2023 04:57 PM",
    "modified_by": {
        "zuid": 18599686,
        "is_confirmed": false,
        "email_id": "emmy@zylker.com",
        "first_name": "Amelia B",
        "last_name": "Fstest",
        "user_type": "Admin",
        "user_id": 2000000000055
    },
    "modified_time": "Sep 27, 2023 04:57 PM",
    "bucket_meta": {
        "versioning": true,
        "caching": {
        "status": "In-Progress"
        },
        "encryption": false,
        "audit_consent": false
    },
    "bucket_url": "https://fsbucket15-development.zohostratus.com"
    }
]
}
Get Bucket
Description
This API allows you to get all available details of a bucket present in Stratus. The Bucket is referred by it unique bucket name.
Request Details
Request URL
{api-domain}/baas/v1/project/{project_id}/bucket/{bucket_name}
Request Headers
Authorization: Zoho-oauthtoken {oauth_token}
Optional Headers
CATALYST-ORG: {org_id}
Environment: Development
Scope
ZohoCatalyst.buckets.READ
Response Details
The response will return the metadata and details of the particular bucket including its bucket_name, and the details of the user who created and last modified the bucket.
curl -X GET https://api.catalyst.zoho.com/baas/v1/project/10108000003823392/bucket?bucket_name=mybucketname/
-H “Authorization: Zoho-oauthtoken 1000.910*************************16.2f*************************57”
{
"status": "success",
"data": [
    {
    "bucket_name": "fsbucket17",
    "bucket_url": "https://fsbucket17-development.stratus.com",
    "objects_count": 21,
    "size_in_bytes": 145578,
    "project_details": {
        "project_name": "Project-Rainfall-4",
        "id": 2000000000075,
        "project_type": "Live"
    },
    "created_by": {
        "zuid": 18599686,
        "is_confirmed": false,
        "email_id": "emmy@zylker.com",
        "first_name": "Amelia B",
        "last_name": "Fstest",
        "user_type": "Admin",
        "user_id": 2000000000055
    },
    "created_time": "Sep 27, 2023 05:01 PM",
    "modified_by": {
        "zuid": 18599686,
        "is_confirmed": false,
        "email_id": "emmy@zylker.com",
        "first_name": "Amelia B",
        "last_name": "Fstest",
        "user_type": "Admin",
        "user_id": 2000000000055
    },
    "modified_time": "Sep 27, 2023 05:01 PM",
    "bucket_meta": {
        "versioning": true,
        "caching": {
        "status": "Enabled"
        },
        "encryption": true,
        "audit_consent": false
    }
    }
]
}
Get All Objects
Description
This API allows you to get all the objects stored in a bucket. The Bucket is referred by it unique bucket name.
Request Details
Request URL
{api-domain}/baas/v1/project/{project_id}/bucket/objects
Query Parameters
Request Headers
Authorization: Zoho-oauthtoken {oauth_token}
Optional Headers
CATALYST-ORG: {org_id}
Environment: Development
Scope
ZohoCatalyst.buckets.objects.READ
Response Details
On successful execution, the response will contain a list of all the objects stored in the required bucket.
curl -X GET https://api.catalyst.zoho.com/baas/v1/project/10108000003823392/buckets/objects?bucket_name=mybucketname&max_keys=10&continuation_token=Sg43ou34rd2bih223oc8csc&prefix=myfolder/
-H “Authorization: Zoho-oauthtoken 1000.910*************************16.2f*************************57”
{
"status": "success",
"data": {
    "key_count": 5,
    "max_keys": 5,
    "truncated": true,
    "next_continuation_token": "n2BjzZo5FvrSQmx7z5LaJk7cvP2Yf2K6AJHw4Sg692TnfwHasUp8DJp8qL24A3TLAGPu8zyEysfjfQpjohEMaej",
    "contents": [
    {
        "key_type": "file",
        "key": "server 96.zip",
        "version_id": "01hh9hnwxw8r88kzzfnkn67grr",
        "size": 3012536,
        "content_type": "application/zip",
        "etag": "e460808d4190b37c472985a1f1d85720",
        "last_modified": "Dec 10, 2023 03:12 PM"
    },
    {
        "key_type": "file",
        "key": "oauthscopes.csv",
        "version_id": "01hh9hnhypzt63fwf5wyk2ef6f",
        "size": 19804,
        "content_type": "text/csv",
        "etag": "354266606189c30c80f336720102ead6",
        "last_modified": "Dec 10, 2023 03:11 PM"
    },
    {
        "key_type": "folder",
        "key": "lib 3",
        "size": 0,
        "last_modified": "Dec 10, 2023 03:11 PM"
    },
    {
        "key_type": "file",
        "key": "funcauthtest-Development (1).zip",
        "version_id": "01hh9hkv8xvetbxnrhx6c7444y",
        "size": 8485,
        "content_type": "application/zip",
        "etag": "5f868df044e91a4c7e26be26b6e93a64",
        "last_modified": "Dec 10, 2023 03:10 PM"
    },
    {
        "key_type": "file",
        "key": "Automl_LZ (1).csv",
        "version_id": "01hh9hkfdf07y8pnpbwtkt8cf7",
        "size": 257,
        "content_type": "text/csv",
        "etag": "223a363af39a49d4b32f6cdf0c569755",
        "last_modified": "Dec 10, 2023 03:10 PM"
    }
    ]
}
}
Get a Specific Object
Description
This API allows you to get a specfic object stored in a bucket. The Bucket is referred by it unique bucket name, and the required object is referred using its name.
If Versionning is enabled, then the required object can also be referred to using its uniquye version ID.
Request Details
Request URL
{api-domain}/baas/v1/project/{project_id}/bucket/object
Query Parameters
Request Headers
Authorization: Zoho-oauthtoken {oauth_token}
Optional Headers
CATALYST-ORG: {org_id}
Environment: Development
Scope
ZohoCatalyst.buckets.objects.READ
Response Details
On successful execution, the response will contain the details of the requested object.
curl -X GET https://api.catalyst.zoho.com/baas/v1/project/{projectID}/bucket/object?bucket_name={bucketName}&version_id={versionID}&object_key={objectPath}
-H “Authorization: Zoho-oauthtoken 1000.910*************************16.2f*************************57”
{
"status": "success",
"data": {
    "key": "Automl_LZ (1).csv",
    "size": 257,
    "content_type": "text/csv",
    "last_modified": "Dec 10, 2023 03:10 PM",
    "meta_data": {
    "automl_metakey": "metavalue"
    },
    "object_url": "https://gcpimport2-development.csezstratus.com/Automl_LZ%20(1).csv"
}
}
Get All Versions of an Object
Description
This API allows you to get all the versions of the object stored in a bucket. The Bucket is referred by it unique bucket name, and the required object is referred using its name.
Request Details
Request URL
{api-domain}/baas/v1/project/{project_id}/bucket/objects/versions
Query Parameters
Request Headers
Authorization: Zoho-oauthtoken {oauth_token}
Optional Headers
CATALYST-ORG: {org_id}
Environment: Development
Scope
ZohoCatalyst.buckets.objects.READ
Response Details
On successful execution, the response will contain the list of details of all the versions of the required object.
curl -X GET https://api.catalyst.zoho.com/baas/v1/project/10108000003823392/bucket/objects/versions?bucket_name=zylker-bucket&object_key=sampleimage&max_versions=10&continuation_token=Sg43ou34rd2bih223oc8csc/
-H “Authorization: Zoho-oauthtoken 1000.910*************************16.2f*************************57”
{
"status": "success",
"data": {
    "truncated": true,
    "key": "Automl_LZ (1).csv",
    "versions_count": 2,
    "max_versions": 2,
    "is_truncated": true,
    "next_continuation_token": "97tn3xP3te66VpfVwVJwtDAgouBKVNhGAV6jzGY6DMdX6hcJmwJKbFX3unakGdfKfJ",
    "version": [
    {
        "latest": true,
        "version_id": "01hh9hkfdf07y8pnpbwtkt8cf7",
        "is_latest": true,
        "last_modified": "Dec 10, 2023 03:10 PM",
        "size": 257,
        "etag": "223a363af39a49d4b32f6cdf0c569755"
    },
    {
        "latest": false,
        "version_id": "01hh9hjtge85k1fx2yp1kg8r2q",
        "is_latest": false,
        "last_modified": "Dec 10, 2023 03:10 PM",
        "size": 257,
        "etag": "223a363af39a49d4b32f6cdf0c569755"
    }
    ]
}
}
Check Bucket Availability
Description
This API allows you check the availability of a particular bucket present in Stratus. The bucket will be referred using its unique bucket name
Request Details
Request URL
{api-domain}/baas/v1/project/{project_id}/bucket/{bucket_name}
Request Headers
Authorization: Zoho-oauthtoken {oauth_token}
Optional Headers
CATALYST-ORG: {org_id}
Environment: Development
Scope
ZohoCatalyst.buckets.READ
Response Details
The response can be any of the following status codes:
- 200: If the bucket is available and if the user has the relevant permissions to access it.
- 403: If the bucket exists, bu the user does not have the relevant permissions to access the bucket.
- 404: If the bucket does not exist.
curl -X HEAD https://api.catalyst.zoho.com/baas/v1/project/10108000003823392/bucket?bucket_name=myBucketName/
-H “Authorization: Zoho-oauthtoken 1000.910*************************16.2f*************************57”
Check Object Availability
Description
This API allows you to check if a particular object is stored in a bucket. The Bucket is referred by it unique bucket name, and the required object is referred using its name.
If Versionning is enabled, then the required object can also be referred to using its uniquye version ID.
Request Details
Request URL
{api-domain}/baas/v1/project/{project_id}/bucket/objects
Query Parameters
Request Headers
Authorization: Zoho-oauthtoken {oauth_token}
Optional Headers
CATALYST-ORG: {org_id}
Environment: Development
Scope
ZohoCatalyst.buckets.objects.READ
Response Details
On successful execution, the response will contain the 200 status code, to indicate the object is present in the bucket. If the object is incorrect or not present in the bucket, you will get a 404 status code as your response.
curl -X HEAD https://api.catalyst.zoho.com/baas/v1/project/10108000003823392/bucket/object?bucket_name=myBucketName&object_key=image.jpeg&version_id=dfd233fcds2wd223/
-H “Authorization: Zoho-oauthtoken 1000.910*************************16.2f*************************57”
Download Object
Description
This API allows you to download the required object stored in a bucket. The Bucket is referred by it unique bucket name, and the required object is referred using its name.
Request Details
Request URL
{bucket_name}.zohostratus.com/{key}
The above domain name will change with respect to the data center:
| DC | Domain Name |
|---|---|
| US | zohostratus.com |
| EU | zohostratus.eu |
| IN | zohostratus.in |
| AU | zohostratus.com.au |
| CA | zohostratus.ca |
| SA | zohostratus.sa |
| JP | zohostratus.jp |
Note:
-
If the API is used in the development environment, then the domain will be structured in this manner: https://<bucket_name>-development.zohostratus.com
-
It is advisable to collect the bucket URL from the console.
Path Parameters
Query Parameters
Request Headers
Authorization: Zoho-oauthtoken {oauth_token}
Optional Headers
Range: To download a specific byte range of an object
retrieve-meta: To retrieve the metadata of the object | Possible Values: True/False | Default Value: False
Scope
Stratus.fileop.READ
Query Params to Override Responses
The following query parameters can be added to modify responses and get the required response. These are all optional parameters. The override will only work if the request is successful.
attachment; filename=“name”
Example: attachment; filename=“logo.svg”
Example: public,max-age=3600,no-transform
Response Details
On successful execution, the response will contain the object will be downloaded and the success message will be displayed.
Possible Failure Responses
404 due to object/bucket not found:
{
"status": 404,
"code": "key_not_found",
"message": "no such key is associated with any object in the bucket"
}
403 Unauthorzied. When you do not have the required permissions to perform the download operation
{
"status": 403,
"code": "access_forbidden",
"message": "request denied by resource access policy"
}
curl -X GET https://{bucket_name}.zohostratus.com/{key}
-H “Authorization: Zoho-oauthtoken 1000.910*************************16.2f*************************57”
200 OK
// Bytes of raw data
Upload Object
Description
This API allows you to upload the required objectto a bucket. The Bucket is referred by it unique bucket name, and the required object is referred using its name.
Request Details
Request URL
{bucket_name}.zohostratus.com/{key}
The above domain name will change with respect to the data center:
| DC | Domain Name |
|---|---|
| US | zohostratus.com |
| EU | zohostratus.eu |
| IN | zohostratus.in |
| AU | zohostratus.com.au |
| CA | zohostratus.ca |
| SA | zohostratus.sa |
| JP | zohostratus.jp |
Path Parameters
Note: The following points need to be kept in mind when providing value for key:
-
Maximum length of the key (including path name and object name) should be supported to 255 characters only.
-
key cannot contain the following characters including space: double quote, both angular brackets, hashtag, backward slash and pipe symbol.
Query Parameters
Request Headers
Authorization: Zoho-oauthtoken {oauth_token}
Optional Headers
content-type: application/json
content-length: Raw length of the object being uploaded in bytes.
compress: Whether to compress the object while storing. By default, compression is always done.
cache-control: Use this header to specify the browser caching policies.
overwrite: Specify whether you are required to overwrite a source. This is supported only for the objects of non-versioned buckets.
expires-after: This is an option you can use to set Time-to-Live (TTL) in seconds for an object. Value should be greater than or equal to 60 seconds.
x-user-meta:{1stKey}={1stValue};{2ndKey}={2ndValue};..{NthKey}={NthValue};: Metadata for the object. Each key-value pair is separated by semi-colons are provided as given in the previous column. 2047 characters is the maximum permitted length for this header.
Scope
Stratus.fileop.CREATE
Response Details
On successful execution, the response will contain the success message, and the object will be uploaded.
Possible Failure Responses
404 due to object/bucket not found:
{
"status": 404,
"code": "bucket_not_found",
"message": "no such bucket exists"
}
403 Unauthorzied. When you do not have the required permissions to perform the upload operation
{
"status": 403,
"code": "access_forbidden",
"message": "request denied by resource access policy"
}
400 Bad Request. Invalid Filename
{
"status": 400,
"code": "key_name_invalid",
"message": "key name does not support one or more character(s)"
}
409 Conflict. An object with the same name already exists
{
"status": 409,
"code": "key_already_exists",
"message": "key is already associated with another object in the bucket"
}
curl -X PUT https://{bucket_name}.zohostratus.com/{key}
-H “Authorization: Zoho-oauthtoken 1000.910*************************16.2f*************************57”
200 OK
Copy Object
Description
This API allows you to copy the required object stored in a bucket. The Bucket is referred by it unique bucket name, and the required object is referred using its name.
Request Details
Request URL
{api-domain}/baas/v1/project/{project_id}/bucket/object/copy
Query Parameters
Request Headers
Authorization: Zoho-oauthtoken {oauth_token}
Optional Headers
CATALYST-ORG: {org_id}
Environment: Development
Scope
ZohoCatalyst.buckets.objects.CREATE
Response Details
On successful execution, the response will contain the name of the copied object, the location of where it is copied to, and the success message confirming the copy action.
curl -X POST https://api.catalyst.zoho.com/baas/v1/project/10108000003823392/bucket/object/copy?bucket_name=myBucketName&object_key=mappedsample/Archive.zip&destination=mappedsample/Unarchive/
-H “Authorization: Zoho-oauthtoken 1000.910*************************16.2f*************************57”
{
"status": "success",
"data": {
    "object_key": "image2.png",
    "copy_to": "folder2/",
    "message": "Copy successful"
}
}
Rename Object
Description
This API allows you to rename the required object stored in a bucket. The Bucket is referred by it unique bucket name, and the required object is referred using its name.
Request Details
Request URL
{api-domain}/baas/v1/project/{project_id}/bucket/object
Query Parameters
Request Headers
Authorization: Zoho-oauthtoken {oauth_token}
Optional Headers
CATALYST-ORG: {org_id}
Environment: Development
Scope
ZohoCatalyst.buckets.objects.UPDATE
Response Details
On successful execution, the response will contain the previous name, modified name, and the success message confirming the rename action.
curl -X PATCH https://api.catalyst.zoho.com/baas/v1/project/10108000003823392/bucket/object/?bucket_name=myBucketName¤t_key=image2.png&rename_to=renamed.png/
-H “Authorization: Zoho-oauthtoken 1000.910*************************16.2f*************************57”
{
"status": "success",
"data": {
    "current_key": "image2.png",
    "rename_to": "renamed.png",
    "message": "Rename successful"
}
}
Put Object Metadata
Description
This API allows you to add metadata for the required object stored in a bucket. The Bucket is referred by it unique bucket name, and the required object is referred using its name.
Note:
-
You can use alphanumeric, underscores, or whitespace characters, as well as hyphens, to write your metadata. No other special character is allowed other than the once mentioned.
-
You can fetch the metadata of an object using the HEAD request method. In the response, the metadata will be listed in the key ‘x-user-meta’.
-
The maximum size limit of characters allowed for the overall metadata is 2047 characters. The character count used to determine the size limit also includes the colon “:” special character used to define the key value pair.
Request Details
Request URL
{api-domain}/baas/v1/project/{project_id}/bucket/object/metadata
Request JSON
You must send a JSON with its corresponding values as shown below.
{
"meta_data": {
    "key1": "value1",
    "key2": "value2"
}
}
You will feed this Request JSON to your Request Body, and you need to provide the value of:
Query Parameters
Request Headers
Authorization: Zoho-oauthtoken {oauth_token}
Optional Headers
CATALYST-ORG: {org_id}
Environment: Development
Scope
ZohoCatalyst.buckets.objects.CREATE
Response Details
On successful execution, the response will contain the success message indicating that the metada has been added to the required object.
curl -X PUT https://api.catalyst.zoho.com/baas/v1/project/10108000003823392/bucket/object/metadata?bucket_name=myBucketName&object_key=image2.png/
-H “Authorization: Zoho-oauthtoken 1000.910*************************16.2f*************************57”
-H “Content-Type:application/json”
--data-raw $’{"{“meta_data” : {“key1” : “value1”,“key2” : “value2”}}"}'
{
"status": "success",
"data": {
    "message": "Metadata added successfully"
}
}
Extract Zipped Object
Description
This API allows you to extract a zipped object stored in a bucket. The Bucket is referred by it unique bucket name, and the required object is referred using its name.
Request Details
Request URL
{api-domain}/baas/v1/project/{project_id}/bucket/object/zip-extract
Query Parameters
Request Headers
Authorization: Zoho-oauthtoken {oauth_token}
Optional Headers
CATALYST-ORG: {org_id}
Environment: Development
Scope
ZohoCatalyst.buckets.objects.CREATE
Response Details
On successful execution, the response will contain the name of the zipped object, the complete path name that has stored the extracted objects, and the success message confirming the extract action.
curl -X POST https://api.catalyst.zoho.com/baas/v1/project/10108000003823392/bucket/object/zip-extract?bucket_name=mybucketname&object_key=image2.png&destination=folder2/
-H “Authorization: Zoho-oauthtoken 1000.910*************************16.2f*************************57”
{
"status": "success",
"data": {
    "object_key": "image2.png",
    "destination": "folder2",
    "message": "Zip extract scheduled",
    "task_id": "hh2odww2334nsodno24"
}
}
Get Status of Zip Extract Operation
Description
This API allows you to get the status of an extract operation that is being performed on a zipped object stored in a bucket. The Bucket is referred by it unique bucket name, and the required object is referred using its name.
Request Details
Request URL
{api-domain}/baas/v1/project/{project_id}/bucket/object/zip-extract/{taskId}
Query Parameters
Request Headers
Authorization: Zoho-oauthtoken {oauth_token}
Optional Headers
CATALYST-ORG: {org_id}
Environment: Development
Scope
ZohoCatalyst.buckets.objects.READ
Response Details
On successful execution, the response will contain the status of the required extraction process being performed on a zipped object in Stratus.
curl -X GET https://api.catalyst.zoho.com/baas/v1/project/10108000003823392/bucket/object/zip-extract/hh2odww2334nsodno24?bucket_name=mybucketname&object_key=image2.png/
-H “Authorization: Zoho-oauthtoken 1000.910*************************16.2f*************************57”
{
"status": "success",
"data": {
    "task_status": "PENDING | COMPLETED | FAILED"
}
}
Create Signature for Bucket
Description
This API allows you to create a signature for the required bucket. The Bucket is referred by it unique bucket name.
Request Details
Request URL
{api-domain}/baas/v1/project/{project_id}/bucket/signature
Query Parameters
Request Headers
Authorization: Zoho-oauthtoken {oauth_token}
Optional Headers
CATALYST-ORG: {org_id}
Environment: Development
Scope
ZohoCatalyst.buckets.objects.CREATE
Response Details
On successful execution, the response will contain the required signature of the bucket along with its validity time period.
curl -X POST
https://api.catalyst.zoho.com/baas/v1/project/4000000006007/bucket/signature?bucket_name=zylker-bucket

-H “Authorization: Zoho-oauthtoken 1000.910*************************16.2f*************************57”
{
"status": "success",
"data": {
    "signature": "stsPolicy=eyJzaWduaW5ndGltZSI6MTcyMTk3NDc1NDQ1MiwiZXhwaXJhdGlvbiI6MzYwMCwiYWN0aW9uIjpbIkdldE9iamVjdCIsIlB1dE9iamVjdCJdLCJjcmVkZW50aWFscyI6IjY3MjUxNjQ0LTg1NDM1OTI2IiwicmVzb3VyY2UiOlsic3JuOjo6dGVzdGRzZHMtZGV2ZWxvcG1lbnQvKiJdLCJxdWVyeSI6W10sImhlYWRlcnMiOltdLCJib2R5Ijp7ImNvbnRlbnQtdHlwZSI6IioiLCJjb250ZW50LWxlbmd0aCI6bnVsbH19&stsSignature=Nyr29x7N-CzDSfFaTzzPnwWsL74ga9rIGZJIxWFdNtI",
    "expiry_time": 1786382487000
}
}
Get Presigned URL
Description
This API allows you to get presigned urls. Presigned URLs are secure URLs that authenticated users can share to their non-authenticated users. This URL will provide non-authenticated users with temporary authorization to access objects. Once the link is expired, you need to the sign the required URL again using this API.
Request Details
Request URL for Upload Action
{api-domain}/baas/v1/project/{project_id}/bucket/object/signed-url
Request URL for Download Action
{api-domain}/baas/v1/project/{project_id}/bucket/object/signed-url
Query Parameters
Request Headers
Authorization: Zoho-oauthtoken {oauth_token}
Optional Headers
CATALYST-ORG: {org_id}
Environment: Development
Scope For Download
ZohoCatalyst.buckets.objects.READ
Scope For Upload
ZohoCatalyst.buckets.objects.CREATE
Response Details
On successful execution, the response will contain presigned URL.
curl -X GET https://api.catalyst.zoho.com/baas/v1/project/10108000003823392/bucket/object/signed-url?bucket_name=myBucketName&object_key=object.pdf&expiry_in_seconds=3600&active_from=1716382375000&version_id=bs22sb2923ey2hds929/
-H “Authorization: Zoho-oauthtoken 1000.910*************************16.2f*************************57”
curl -X PUT https://api.catalyst.zoho.com/baas/v1/project/10108000003823392/bucket/object/signed-url?bucket_name=myBucketName&object_key=object.pdf&expiry_in_seconds=3600&active_from=1716382375000/
-H “Authorization: Zoho-oauthtoken 1000.910*************************16.2f*************************57”
{
"status": "success",
"data": {
    "signature": "https://mybucket.nimbuspop.com/folder1/folder2/image.jpeg?expires=1642915027000&signature=MEYCIQCcJDTsmZQhfuvFu3l3tsVL02uVwIMhLdlSg~ARI3E1aAIhAJ-rzzjn2gPH9pB3EoU3X~v~qvg5Rdt9OBoldBpVz6xt&key-id=vMUWDURn5DGtokPG",
    "expires_in_seconds": 300,
    "active_from": 1716382487000
}
}
Delete Object
Description
This API allows you to delete the required object stored in a bucket. The Bucket is referred by it unique bucket name, and the required object is referred using its name.
Request Details
Request URL
{api-domain}/baas/v1/project/{project_id}/bucket/object/
Query Parameters
Request JSON
You must send a JSON with its corresponding values as shown below.
{
"objects": [
    {
    "key": "file1.jpeg",
    "version_id": "{version_id}"
    },
    {
    "key": "file2.jpeg"
    },
    {
    "key": "file3.jpeg"
    }
],
"ttl_in_seconds": 100
}
You will feed this Request JSON to your Request Body, and you need to provide the value of:
Request Headers
Authorization: Zoho-oauthtoken {oauth_token}
Optional Headers
CATALYST-ORG: {org_id}
Environment: Development
Scope
ZohoCatalyst.buckets.objects.DELETE
Response Details
On successful execution, the response will contain the success message confirming the delete operation was successful.
curl -X PUT https://api.catalyst.zoho.com/baas/v1/project/10108000003823392/bucket/object?bucket_name=zylker-bucket/
-H “Authorization: Zoho-oauthtoken 1000.910*************************16.2f*************************57”
-H “Content-Type:application/json”
--data-raw $’{““status”: “success”,“data”:{“message”: “Deletion successful”}"}'
{
"status": "success",
"data": {
    "message": "Deletion successful"
}
}
Delete Path
Description
This API allows you to delete an entire path and every object stored in that path in a bucket. The Bucket is referred by it unique bucket name.
Request Details
Request URL
{api-domain}/baas/v1/project/{project_id}/bucket/object/prefix
Query Parameters
Request Headers
Authorization: Zoho-oauthtoken {oauth_token}
Optional Headers
CATALYST-ORG: {org_id}
Environment: Development
Scope
ZohoCatalyst.buckets.objects.DELETE
Response Details
On successful execution, the response will contain the success message confirming the delete operation was successful.
curl -X DELETE https://api.catalyst.zoho.com/baas/v1/project/10108000003823392/bucket/object/prefix?bucket_name=zylker-bucket&prefix=myfolder/
-H “Authorization: Zoho-oauthtoken 1000.910*************************16.2f*************************57”
{
"status": "success",
"data": {
    "prefix": "myfolder/",
    "message": "Deletion successful"
}
}
File Store
To use the Stratus component in the Early Access mode, email us at support@zohocatalyst.com.
Catalyst File Store provides cloud storage solutions to store, manage, and organize your application files and user data files such as images, videos, CSV files, spreadsheets, and more in folders.
Get the Details of a Specific Folder
Description
This API enables you to retrieve the details of a specific folder in the File Store, along with the details of all the files in the folder. The folder is referred by its unique Folder ID.
Request Details
Request URL
{api-domain}/baas/v1/project/{project_id}/folder/{folder_id}
Request Headers
Authorization: Zoho-oauthtoken {oauth_token}
Optional Headers
CATALYST-ORG: {org_id}
Environment: Development
Scope
ZohoCatalyst.folders.READ
Response Details
The JSON response returns the metadata of the particular folder such as the folder_name, the details of the user who created and last modified it, along with the metadata of all the files in the folder, such as the file_id, file_name, file_size of each file.
curl -X GET

https://api.catalyst.zoho.com/baas/v1/project/4000000006007/folder/3376000000427654

-H “Authorization: Zoho-oauthtoken 1000.910*************************16.2f*************************57”
{
"status":"success",
"data":{
  "folder_name":"PricingInfo",
  "created_time":"Apr 01, 2020 11:11 AM",
  "created_by":{
    "zuid":1019540152,
    "is_confirmed":true,
    "email_id":"emma@zylker.com",
    "first_name":"Amelia",
    "last_name":"Burrows",
    "user_id":671930455
  },
  "modified_time":"Apr 11, 2020 10:41 PM",
  "modified_by":{
    "zuid":1019540876,
    "is_confirmed":true,
    "email_id":"p.boyle@zylker.com",
    "first_name":"Patricia",
    "last_name":"Boyle",
    "user_id":671930321
  },
  "project_details":{
    "project_name":"ShipmentTracking",
    "id":4000000006007
  },
  "file_details":[
    {
      "id":337600000030123,
      "file_location":null,
      "file_name":"PO1898908GT.pdf",
      "file_size":10,
      "created_by":{
        "zuid":1019540199,
        "is_confirmed":true,
        "email_id":"jane.simmons@zylker.com",
        "first_name":"Jane",
        "last_name":"Simmons",
        "user_id":671930000
      },
      "created_time":"Feb 21, 2020 01:11 PM",
      "modified_by":{
        "zuid":1019540152,
        "is_confirmed":true,
        "email_id":"p.boyle@zylker.com",
        "first_name":"Patricia",
        "last_name":"Boyle",
        "user_id":671930321
      },
      "modified_time":"Jan 13, 2020 08:00 PM",
      "project_details":{
        "project_name":"ShipmentTracking",
        "id":4000000006007
      },
      "folder_details": 3376000000427654
    },
    {
      "id":337600000030121,
      "file_location":null,
      "file_name":"ST1898190CR.pdf",
      "file_size":9,
      "created_by":{
        "zuid":1019540152,
        "is_confirmed":true,
        "email_id":"p.boyle@zylker.com",
        "first_name":"Patricia",
        "last_name":"Boyle",
        "user_id":671930321
      },
      "created_time":"Jan 01, 2020 09:09 PM",
      "modified_by":{
        "zuid":1019540152,
        "is_confirmed":true,
        "email_id":"p.boyle@zylker.com",
        "first_name":"Patricia",
        "last_name":"Boyle",
        "user_id":671930321
      },
      "modified_time":"Mar 11, 2020 07:09 AM",
      "project_details":{
        "project_name":"ShipmentTracking",
        "id":4000000006007
      },
      "folder_details":3376000000427654
    }
  ],
  "audit_consent": false,
  "id":829000000038455
}

}
Get the Details of All Folders
Description
To use the Stratus component in the Early Access mode, email us at support@zohocatalyst.com.
This API enables you to retrieve the details of all the folders in your project from the File Store.
Request Details
Request URL
{api-domain}/baas/v1/project/{project_id}/folder
Request Headers
Authorization: Zoho-oauthtoken {oauth_token}
Optional Headers
CATALYST-ORG: {org_id}
Environment: Development
Scope
ZohoCatalyst.folders.READ
Response Details
The JSON response returns the metadata of all the folders such as the folder_name, the details of the user who created and last modified it, and the project details.
curl -X GET

https://api.catalyst.zoho.com/baas/v1/project/4000000006007/folder

-H “Authorization: Zoho-oauthtoken 1000.910*************************16.2f*************************57”
{
"status":"success",
"data":[
    {
        "folder_name":"ShipmentOrderForms",
        "created_time":"Oct 22, 2019 11:01 AM",
        "created_by":{
            "zuid":1019540152,
            "is_confirmed":true,
            "email_id":"emma@zylker.com",
            "first_name":"Amelia",
            "last_name":"Burrows",
            "user_type": "Admin",
            "user_id":671930455
        },
        "modified_time": "Jun 05, 2023 12:26 AM",
        "modified_by": {
            "zuid": 671930455,
            "is_confirmed": false,
            "email_id": "emma@zylker.com",
            "first_name": "Amelia",
            "last_name": "Burrows",
            "user_type": "Admin",
            "user_id": 671930455
        },
        "project_details":{
            "project_name":"ShipmentTracking",
            "id":4000000006007
        },
        "audit_consent": false,
        "id":105000000121098
    }
   {
        "folder_name":"PricingInfo",
        "created_time":"Sep 01, 2019 03:33 PM",
        "created_by":{
            "zuid":1019540152,
            "is_confirmed":true,
            "email_id":"p.boyle@zylker.com",
            "first_name":"Patricia",
            "last_name":"Boyle",
            "user_type": "Admin",
            "user_id":671930765
        },
        "modified_time": "Jun 05, 2023 12:26 AM",
        "modified_by": {
            "zuid": 671930455,
            "is_confirmed": false,
            "email_id": "p.boyle@zylker.com",
            "first_name": "Patricia",
            "last_name": "Boyle",
            "user_type": "Admin",
            "user_id": 671930765
        },
        "project_details":{
            "project_name":"ShipmentTracking",
            "id":4000000006007
        },
        "audit_consent": false,
        "id":105000000145678
    }
]

}
Upload a File In a Folder
Description
To use the Stratus component in the Early Access mode, email us at support@zohocatalyst.com.
This API enables you to upload a file from your local system to an existing folder in the File Store, by referring to the folder’s unique ID. You can upload an image, text document, CSV, or any type of file you need. The maximum size of a file that you can upload is 100 MB.
You must specify the file path and the file name in the API request, as shown in the sample request.
Request Details
Request URL
{api-domain}/baas/v1/project/{project_id}/folder/{folder_id}/file
Request Headers
Authorization: Zoho-oauthtoken {oauth_token}
Content-Type: multipart/form-data; boundary=—-WebKitFormBoundary7MA4YWxkTrZu0gW
Optional Headers
CATALYST-ORG: {org_id}
Environment: Development
Scope
ZohoCatalyst.files.CREATE
Request JSON Properties
Path of the file to be uploaded in your computer
Maximum file size allowed: 100 MB
Response Details
The JSON response returns the metadata of the file that was uploaded, such as the file_name, file_size, and the details of the user who uploaded the file.
curl -X POST

https://api.catalyst.zoho.com/baas/v1/project/4000000006007/folder/105000000121098/file

-H “Authorization: Zoho-oauthtoken 1000.910*************************16.2f*************************57”

-H “content-type: multipart/form-data; boundary=—-WebKitFormBoundary7MA4YWxkTrZu0gW”

-F code=@/Desktop/EmployeeInfo.csv

-F file_name=EmployeeInfo
{
"status": "success",
"data": {
    "id": 56000000368030,
    "file_location": null,
    "file_name": "EmployeeInfo",
    "file_size": 264328,
    "created_by": {
        "zuid": 1019540152,
        "is_confirmed": false,
        "email_id": "emma@zylker.com",
        "first_name": "Amelia",
        "last_name": "Burrows",
        "user_type": "Admin",
        "user_id": 64635102
    },
    "created_time": "Jun 05, 2023 12:40 AM",
    "modified_by": {
        "zuid": 1019540152,
        "is_confirmed": false,
        "email_id": "emma@zylker.com",
        "first_name": "Amelia",
        "last_name": "Burrows",
        "user_type": "Admin",
        "user_id": 64635102
    },
    "modified_time": "Jun 05, 2023 12:40 AM",
    "project_details": {
        "project_name": "EmployeePortal",
        "id": 3376000001796044,
        "project_type": "Live"
    },
    "folder_details": 3376000001925212
}

}
Download a File From a Folder
Description
To use the Stratus component in the Early Access mode, email us at support@zohocatalyst.com.
This API enables you to download a file from an existing folder in the File Store, by referring to the unique IDs of the folder and file.
The file will be automatically downloaded to the configured directory in your system after you execute this API. Catalyst will not send any response back for this request.
Request Details
Request URL
{api-domain}/baas/v1/project/{project_id}/folder/{folder_id}/file/{file_id}/download
Request Headers
Authorization: Zoho-oauthtoken {oauth_token}
Content-Type: application/json
Optional Headers
CATALYST-ORG: {org_id}
Environment: Development
Scope
ZohoCatalyst.files.READ
curl -X GET

https://api.catalyst.zoho.com/baas/v1/project/4000000006007/folder/105000000121098/file/332000000044009/download

-H “Authorization: Zoho-oauthtoken 1000.910*************************16.2f*************************57”

-H “Content-Type: application/json”
Get the Details of a Specific File
Description
To use the Stratus component in the Early Access mode, email us at support@zohocatalyst.com.
This API enables you to retrieve the details of a specific file in a folder in the File Store. The folder and the file are referred by their unique IDs.
Request Details
Request URL
{api-domain}/baas/v1/project/{project_id}/folder/{folder_id}/file/{file_id}
Request Headers
Authorization: Zoho-oauthtoken {oauth_token}
Optional Headers
CATALYST-ORG: {org_id}
Environment: Development
Scope
ZohoCatalyst.files.READ
Response Details
The response will return the metadata and details of the particular file including its file_name, file_size, and the details of the user who created and last modified the file.
curl -X GET

https://api.catalyst.zoho.com/baas/v1/project/4000000006007/folder/105000000121098/file/332000000044009

-H “Authorization: Zoho-oauthtoken 1000.910*************************16.2f*************************57”
{
"status":"success",
"data":{
  "id": 332000000044009,
  "file_location":null,
  "file_name":"Sales2019.csv",
  "file_size":264328,
  "created_by":{
    "zuid":1019540152,
    "is_confirmed":true,
    "email_id":"emma@zylker.com",
    "first_name":"Amelia",
    "last_name":"Burrows",
    "user_type": "Admin",
    "user_id":671930111
  },
  "created_time":"Apr 09, 2020 01:10 AM",
  "modified_by":{
    "zuid":1019540009,
    "is_confirmed":true,
    "email_id":"p.boyle@zylker.com",
    "first_name":"Patricia",
    "last_name":"Boyle",
    "user_type": "Admin",
    "user_id":671930989
  },
  "modified_time":"Mar 01, 2020 06:18 PM",
  "project_details":{
    "project_name":"ShipmentTracking",
    "id":4000000006007,
    "project_type": "Live"
  },
  "folder_details":105000000121098
  }
}
Get the Details of Multiple Files
Description
To use the Stratus component in the Early Access mode, email us at support@zohocatalyst.com.
This API enables you to retrieve the details of multiple files in a particular folder in the File Store. The folder is referred by its unique Folder ID.
This API request can retrieve the details of a maximum number of 200 files in the folder in one call. Therefore, if a folder has 300 files, you can execute a second API call to retrieve the details of files 201 to 300. This can be done by specifying the start and end values in the query params in the request as depicted below. The first 200 files are retrieved by default, if the query params are not specified.
Request Details
Request URL
{api-domain}/baas/v1/project/{project_id}/folder/{folder_id}/file?start={start_index}&end={number_of_files}
Start value of the current bundle
Number of files to be retrieved. The maximum value allowed is 200.
For example, to retrieve the details of files 201 to 300, specify the start as ‘201’ and the end as ‘100’.
Request Headers
Authorization: Zoho-oauthtoken {oauth_token}
Optional Headers
CATALYST-ORG: {org_id}
Environment: Development
Scope
ZohoCatalyst.files.READ
Response Details
The response will return the metadata and details of all the files that are returned, including their file_name, file_size, and the details of the user who created and last modified the file.
curl -X GET

https://api.catalyst.zoho.com/baas/v1/project/4000000006007/folder/3376000000301993/file?start=201&end=2

-H “Authorization: Zoho-oauthtoken 1000.910*************************16.2f*************************57”
{
"status":"success",
"data": [
    {
      "id":3376000000301234,
      "file_location":null,
      "file_name":"AuditLog.csv",
      "file_size":1621,
      "created_by": {
        "zuid":10016873924,
        "is_confirmed":true,
        "email_id":"emma@zylker.com",
        "first_name":"Amelia",
        "last_name":"Burrows",
        "user_type": "Admin",
        "user_id":671930400
      },
      "created_time":"Apr 27, 2020 07:37 PM",
      "modified_by": {
        "zuid":10016873924,
        "is_confirmed":true,
        "email_id":"p.boyle@zylker.com",
        "first_name":"Patricia",
        "last_name":"Boyle",
        "user_type": "Admin",
        "user_id":671938657
      },
      "modified_time":"Apr 27, 2020 07:37 PM",
      "project_details": {
        "project_name":"ShipmentTracking",
        "id": 4000000006007,
        "project_type": "Live"
      },
    "folder_details":3376000000301993
    },
    {
      "id":3376000000300987,
      "file_location":null,
      "file_name":"ZohoCatalyst-Pricing.pdf",
      "file_size":346466,
      "created_by": {
        "zuid":10016873924,
        "is_confirmed":true,
        "email_id":"emma@zylker.com",
        "first_name":"Ameila",
        "last_name":"Burrows",
        "user_type": "Admin",
        "user_id":671930400
      },
      "created_time":"Apr 27, 2020 07:36 PM",
      "modified_by": {
        "zuid":10016873924,
        "is_confirmed":true,
        "email_id":"p.boyle@zylker.com",
        "first_name":"Patricia",
        "last_name":"Boyle",
        "user_type": "Admin",
        "user_id":671938657
      },
      "modified_time":"Apr 27, 2020 07:36 PM",
      "project_details": {
        "project_name":"ShipmentTracking",
        "id":3376000000168765,
        "project_type": "Live"
      },
      "folder_details":3376000000301993
    }
  ]
}
Delete a File
To use the Stratus component in the Early Access mode, email us at support@zohocatalyst.com.
Description
This API is used to delete an existing file from a folder in the File Store, by referring to the Folder ID and File ID.
Request Details
Request URL
{api-domain}/baas/v1/project/{project_id}/folder/{folder_id}/file/{file_id}
Request Headers
Authorization: Zoho-oauthtoken {oauth_token}
Content-Type: application/json
Optional Headers
CATALYST-ORG: {org_id}
Environment: Development
Scope
ZohoCatalyst.files.DELETE
Response Details
The response will return the metadata and details of the file that was deleted including its file_name, file_size, and the details of the user who created and last modified the file.
curl -X DELETE

https://api.catalyst.zoho.com/baas/v1/project/4000000006007/folder/105000000121098/file/4000000044001

-H “Authorization: Zoho-oauthtoken 1000.910*************************16.2f*************************57”

-H “Content-Type: application/json”
{
"status": "success",
"data": {
    "id": 4000000044001,
    "file_location": null,
    "file_name": "bookingsSept2019.pdf",
    "file_size": 458186,
    "created_by": {
        "zuid": 671787990,
        "is_confirmed":true,
        "user_type": "Admin",
        "user_id": 671930400,
        "email_id": "emma@zylker.com",
        "first_name": "Amelia",
        "last_name": "Burrows"
    },
    "created_time": "2019-03-14T12:35:18+05:30",
    "modified_by": {
        "zuid": 671787990,
        "is_confirmed":true,
        "user_type": "Admin",
        "user_id": 671930400,
        "email_id": "emma@zylker.com",
        "first_name": "Amelia",
        "last_name": "Burrows"
    },
    "modified_time": "2019-03-14T12:35:18+05:30",
    "project_details": {
        "id": 4000000006007,
        "project_name": "ShipmentTracking",
        "project_type": "Live"
    },
    "folder_details": 105000000121098
}
}
Cache
Catalyst Cache is a small in-memory storage component that enables you to store data that is frequently accessed by your Catalyst application.
Catalyst cache is divided into partitions or cache units called segments. Each segment stores cache items in the form of key-value pairs.
Insert a Key-Value Pair In a Cache Segment
Description
This API enables you to insert a key-value pair as the cache item in a cache segment. The segment is referred by its unique ID. The key represents the attribute and the value is the data of the cache item.
You can also optionally specify the expiry time of the cache item. The default and maximum validity of a cache item is two days.
Request Details
Request URL
{api-domain}/baas/v1/project/{project_id}/segment/{segment_id}/cache
Request Headers
Authorization: Zoho-oauthtoken {oauth_token}
Content-Type: application/json
Optional Headers
CATALYST-ORG: {org_id}
Environment: Development
Scope
ZohoCatalyst.cache.CREATE
Request JSON Properties
Max Size: 50 characters
Max Size: 16000 characters
Max Size: 48
Response Details
The response will return the details of the cache item such as the cache_name, cache_value and expires_in, along with the details of the segment it was inserted into.
curl -X POST

https://api.catalyst.zoho.com/baas/v1/project/4000000006007/segment/3376000000425030/cache

-H “Authorization: Zoho-oauthtoken 1000.910*************************16.2f*************************57”

-H “Content-Type:application/json”

-d ‘{
“cache_name”:“counter”,
“cache_value”:“125”,
“expiry_in_hours”:24
}’
{
"status": "success",
"data": {
    "cache_name": "counter",
    "cache_value": "125",
    "project_details": {
        "id": 4000000006007,
        "project_name": "ShipmentTracking",
        "project_type": "Live"
    },
    "segment_details": {
        "id": 3376000000425030,
        "segment_name": "CustomerLocation"
    },
    "expires_in": "Mar 28, 2019 02:03 AM",
    "expiry_in_hours": 24,
    "ttl_in_milliseconds": 86400000
}
}
Get the Value of a Cache Key
Description
This API enables you to retrieve the value of a cache item from a segment in the cache. The segment is referred by its unique segment ID, and you must pass the key of the cache item in the request.
This API enables you to insert a key-value pair as the cache item in a cache segment. The segment is referred by its unique ID. The key represents the attribute and the value is the data of the cache item.
You can also optionally specify the expiry time of the cache item. The default and maximum validity of a cache item is two days.
Request Details
Request URL
{api-domain}/baas/v1/project/{project_id}/segment/{segment_id}/cache?cacheKey={cache_key}
Query Parameters
Request Headers
Authorization: Zoho-oauthtoken {oauth_token}
Optional Headers
CATALYST-ORG: {org_id}
Environment: Development
Scope
ZohoCatalyst.cache.READ
Response Details
The response will return the details of the cache item such as the cache_name, cache_value and expires_in, along with the details of its segment.
curl -X GET

https://api.catalyst.zoho.com/baas/v1/project/4000000006007/segment/31000000006023/cache?cacheKey=counter

-H “Authorization: Zoho-oauthtoken 1000.910*************************16.2f*************************57”
{
"status": "success",
"data": {
    "cache_name": "counter",
    "cache_value": "1344",
    "project_details": {
        "id": 4000000006007,
        "project_name": "ShipmentTracking",
        "project_type": "Live"
    },
    "segment_details": {
        "id": 31000000006023,
        "segment_name": "MailCounters"
    },
    "expires_in": "2019-03-13T18:36:02+05:30",
    "expiry_in_hours": 3,
    "ttl_in_milliseconds": 81187000
}

}
Update a Key-Value Pair
Description
This API enables you to update a key-value pair in a cache segment. The segment is referred by its unique ID. The key represents the attribute and the value is the data of the cache item.
You can update the key, value, or the time of expiry of the cache item. The default and maximum validity of a cache item is two days.
Request Details
Request URL
{api-domain}/baas/v1/project/{project_id}/segment/{segment_id}/cache
Request Headers
Authorization: Zoho-oauthtoken {oauth_token}
Optional Headers
CATALYST-ORG: {org_id}
Environment: Development
Scope
ZohoCatalyst.cache.CREATE
Request JSON Properties
Max Size: 50 characters
Max Size: 16000 characters
Max Size: 48
Response Details
The response will return the details of the updated cache item such as the cache_name, cache_value and expires_in, along with the details of its segment.
curl -X PUT

https://api.catalyst.zoho.com/baas/v1/project/4000000006007/segment/3376000000425030/cache

-H “Authorization: Zoho-oauthtoken 1000.910*************************16.2f*************************57”

-H “Content-Type:application/json”

-d ‘{
“cache_name”:“counter”,
“cache_value”:“1472”
}’
{
"status": "success",
"data": {
    "cache_name": "counter",
    "cache_value": "1472",
    "project_details": {
        "id": 4000000006007,
        "project_name": "ShipmentTracking",
        "project_type": "Live"
    },
    "segment_details": {
        "id": 3376000000425030,
        "segment_name": "CounterValues"
    },
    "expires_in": "Mar 28, 2019 02:03 AM",
    "expiry_in_hours": 7,
    "ttl_in_milliseconds": 172800000
}

}
Delete a Key-Value Pair
Description
This API enables you to delete an existing key-value pair from a specified cache segment. The segment is referred by its unique ID. The key represents the attribute and the value is the data of the cache item.
Request Details
Request URL
{api-domain}/baas/v1/project/{project_id}/segment/{segment_id}/cache?cacheKey={cache_key}
Query Parameters
Request Headers
Authorization: Zoho-oauthtoken {oauth_token}
Optional Headers
CATALYST-ORG: {org_id}
Environment: Development
Scope
ZohoCatalyst.cache.DELETE
Response Details
The response will return the details of the deleted cache item, including the cache_name, cache_value and expires_in. Since the cache entry has been removed, both cache_value and expiry fields will return as null.
curl -X DELETE

https://api.catalyst.zoho.com/baas/v1/project/4000000006007/segment/31000000006023/cache?cacheKey=counter

-H “Authorization: Zoho-oauthtoken 1000.910*************************16.2f*************************57”
{
"status": "success",
"data": {
    "cache_name": "NEW",
    "cache_value": null,
    "project_details": {
        "project_name": "ShipmentTracking",
        "id": 4000000006007,
        "project_type": "Live"
    },
    "segment_details": {
        "segment_name": "MailCounters",
        "id": 31000000006023
    },
    "expires_in": null,
    "expiry_in_hours": null,
    "ttl_in_milliseconds": null
}

}
ZCQL
ZCQL is Catalyst’s own query language that enables you to perform data retrieval, insertion, updating, and deletion operations on the tables in the Catalyst Data Store.
You can execute a variety of DML queries using ZCQL to obtain or manipulate data, and use various clauses and statements such as the SQL Join clauses, Groupby and OrderBy statements, and built-in SQL functions.
Execute a ZCQL Query
Description
This API enables you to execute a ZCQL query to retrieve, insert, update, or delete data from the tables in the Data Store. You can execute this API by passing a ZCQL query in the JSON request, as shown in the sample requests.
Request Details
Request URL
{api-domain}/baas/v1/project/{project_id}/query
Request Headers
Authorization: Zoho-oauthtoken {oauth_token}
Content-Type: application/json
Optional Headers
CATALYST-ORG: {org_id}
Environment: Development
Scope
ZohoCatalyst.zcql.CREATE
Request JSON Properties
Response Details
Data Retrieval Operations: The API returns the records that were fetched as a result of the query execution as the response.
Data Insertion and Updating Operations: The API returns the records that were inserted or updated through the query as the response.
Data Deletion Operations: The API returns the deleted row count.
curl -X POST

https://api.catalyst.zoho.com/baas/v1/project/4000000006007/query

-H “Authorization: Zoho-oauthtoken 1000.910*************************16.2f*************************57”

-H “Content-Type: application/json”

-d ‘{
“query”:“SELECT EmpID, EmpName, Department, Address from EmpDetails ORDER BY EmpID ASC LIMIT 1000,5”
}’
{
"status": "success",
"data": [
    {
        "EmpDetails": {
            "CREATORID": "3376000000002003",
            "MODIFIEDTIME": "2023-06-05 15:09:33:881",
            "CREATEDTIME": "2023-06-05 15:09:33:881",
            "ROWID": "3376000001924975",
            "EmpID": "1001",
            "EmpName": "Allison Powell",
            "Department":"Marketing",
            "Address": "13, Winter Avenue, Philadelphia, PY"
        }
    },
    {
        "EmpDetails": {
            "CREATORID": "3376000000002003",
            "MODIFIEDTIME": "2023-06-05 15:09:33:881",
            "CREATEDTIME": "2023-06-05 15:09:33:881",
            "ROWID": "3376000001927682",
            "EmpID": "1002",
            "EmpName": "James Cortez",
            "Department":"HR",
            "Address": "25, Blossom Street, Austin, TX"
        }
    },
    {
        "EmpDetails": {
            "CREATORID": "3376000000002003",
            "MODIFIEDTIME": "2023-06-02 21:04:11:111",
            "CREATEDTIME": "2023-06-02 15:05:21:001",
            "ROWID": "3376000001224112",
            "EmpID": "1003",
            "EmpName": "Han Chan",
            "Department":"Sales",
            "Address": "112, St.Patrick's Road, Louisville, KY"
        }
    },
    {
        "EmpDetails": {
            "CREATORID": "337600000003111",
            "MODIFIEDTIME": "2023-06-02 21:04:11:111",
            "CREATEDTIME": "2023-06-02 15:05:21:001",
            "ROWID": "3376000001242012",
            "EmpID": "1004",
            "EmpName": "Rubella Miguel",
            "Department":"Accounts",
            "Address": "333, Marine Bay, Salt Lake City, UT"
        }
    },
    {
        "EmpDetails": {
            "CREATORID": "3376000000115254",
            "MODIFIEDTIME": "2023-04-12 21:04:10:521",
            "CREATEDTIME": "2023-06-11 15:05:02:541",
            "ROWID": "3376000001241341",
            "EmpID": "1005",
            "EmpName": "Ronwick Boseman",
            "Department":"Support",
            "Address": "61, Gringott's Avenue, Herfordshire, CO"
        }
    }
]

}
curl -X POST

https://api.catalyst.zoho.com/baas/v1/project/4000000006007/query

-H “Authorization: Zoho-oauthtoken 1000.910*************************16.2f*************************57

-H “Content-Type: application/json”

-d ‘{
“query”:“INSERT INTO EmpDetails VALUES (1007,‘Randy Marsh’,‘Sales’,‘42, Tenth Street, Jacksonville, FL’, ‘14 MAR 2017’)”
}’
{
"status": "success",
"data": [
  {
    "EmpDetails": {
      "CREATORID": "3813000000002003",
      "EmpID": "1007",
      "EmpName": "Randy Marsh",
      "Department":"Sales",
      "Address": "42, Tenth Street, Jacksonville, FL",
      "DOJ": "14 MAR 2017",
      "MODIFIEDTIME": "2021-08-04 09:10:14:752",
      "CREATEDTIME": "2021-08-04 09:10:14:752",
      "ROWID": "3813000000214001"
    }
  }
]

}
curl -X POST

https://api.catalyst.zoho.com/baas/v1/project/4000000006007/query

-H “Authorization: Zoho-oauthtoken 1000.910*************************16.2f*************************57

-H “Content-Type: application/json”

-d ‘{
“query”:“UPDATE EmpDetails SET Department=‘Operations’ WHERE EmpID=1007”
}’
{
"status": "success",
"data": [
  {
    "EmpDetails": {
      "CREATORID": "3813000000002003",
      "EmpID": "1007",
      "EmpName": "Randy Marsh",
      "Department":"Operations",
      "Address": "42, Tenth Street, Jacksonville, FL",
      "DOJ": "14 MAR 2017",
      "MODIFIEDTIME": "2021-08-04 09:11:54:318",
      "CREATEDTIME": "2021-08-04 09:10:14:752",
      "ROWID": "3813000000214001"
    }
  }
]

}
curl -X POST

https://api.catalyst.zoho.com/baas/v1/project/4000000006007/query

-H “Authorization: Zoho-oauthtoken 1000.910*************************16.2f*************************57

-H “Content-Type: application/json”

-d ‘{
“query”:“DELETE FROM EmpDetails WHERE EmpID=1007”
}’
{
"status": "success",
"data": [
  {
    "EmpDetails": {
      "DELETED_ROWS_COUNT": 1
    }
  }
]

}
Search
Catalyst Search enables data searching in the indexed columns of the tables in your Catalyst Data Store. When you integrate Search in your application, the end users will be able to perform powerful searches through volumes of data in your Data Store with a single search query.
Execute Search Query
Description
This API enables you to execute a search operation in the indexed columns of all the tables in the Data Store. You can pass the search parameters in the request JSON. The records that match the search query are fetched as the response.
Request Details
Request URL
{api-domain}/baas/v1/project/{project_id}/search
Request Headers
Authorization: Zoho-oauthtoken {oauth_token}
Content-Type: application/json
Optional Headers
CATALYST-ORG: {org_id}
Environment: Development
Scope
ZohoCatalyst.search.READ
Request JSON Properties
Search pattern that contains the keywords to search for
You can provide multiple keywords separated by commas.
The indexed columns to be searched in a table
You must provide this in the following format:
{“table_name_1”: [“column_name_1”, “column_name_2”, “column_name_3”..], “table_name_2”: [“column_name_1”, “column_name_2”, “column_name_3”..]..}
The columns to be selected and displayed based on the search
You must provide this in the following format:
{“table_name_1”: [“column_name_1”, “column_name_2”, “column_name_3”..], “table_name_2”: [“column_name_1”, “column_name_2”, “column_name_3”..]..}
Sorts the records fetched in the search results either in an ascending or descending manner
Allowed Values: ASC, DESC
Starting index of a row where the search must begin
Default value: 0
The offset value of a row where search must end
Default value: 500
Response Details
The response returns the records that match the search query. The details of the rows including their metadata such as CREATORID and CREATEDTIME, and the column key names and values are returned.
curl -X POST

https://api.catalyst.zoho.com/baas/v1/project/4000000006007/search

-H “Authorization: Zoho-oauthtoken 1000.910*************************16.2f*************************57”

-H “Content-Type: application/json”

-d ‘{
“search” : “Mary”,
“search_table_columns” : {
“CustomerInfo”: [
“CustomerName”,
“TrainerName”
]
},
“start”:1000,
“end”:200
}’
{
"status": "success",
"data": {
    "CustomerInfo": [
        {
            "CREATORID": "56000000002003",
            "MODIFIEDTIME": "2019-02-08 13:13:44",
            "CustomerName": "Mary Johnson",
            "TrainerName": "Helena Stewart",
            "CustomerID":"PL1213234",
            "CREATEDTIME": "2019-02-08 13:13:44"
        },
        {
            "CREATORID": "56000000002003",
            "MODIFIEDTIME": "2019-02-08 20:11:10",
            "CustomerName": "Mary Palmer",
            "TrainerName": "Ronald Wazlib",
            "CustomerID":"SY091834",
            "CREATEDTIME": "2019-02-08 20:11:10"
        },
       {
            "CREATORID": "56000000002003",
            "MODIFIEDTIME": "2019-11-09 10:00:12",
            "CustomerName": "Herbert Spielberg",
            "TrainerName": "Mary Amber Rogers",
            "CustomerID":"AL987627",
            "CREATEDTIME": "2019-11-08 00:12:40"
        }
    ]
}
}
Catalyst Mail enables you to add the email addresses of your business that will be used to send emails to the end-users from your Catalyst application. You can configure email addresses of public domains or of your organization’s own domains. You can also use an external email client of your choice and configure its SMTP settings with Catalyst, instead of using the built-in Catalyst email client. You can perform these configurations from the console.
Send Email
Description
This API enables you to send emails from a verified email address to the recipients you specify, from your Catalyst application.
Catalyst enables you to set multiple email addresses as the receivers, and to CC, BCC, and reply to through a single send mail operation. You can also attach files in your email. The maximum supported limits for email recipients and file attachments in a single send mail operation are specified below:
- To address: 10
- CC: 10
- BCC: 5
- Reply to: 5
- Number of file attachments: 5
- Size of file attachments: 15 MB (through a single file or multiple files upto 5 files)
You must pass the sender and receiver email addresses, the subject, content, and the attachments of the email as form-data in your API request. The keys to be passed as form-data, along with sample values are specified Form-Data Properties section below.
Request Details
Request URL
{api-domain}/baas/v1/project/{project_id}/email/send
Request Headers
Authorization: Zoho-oauthtoken {oauth_token}
Content-Type: multipart/form-data; boundary=—-WebKitFormBoundary7MA4YWxkTrZu0gW
Optional Headers
CATALYST-ORG: {org_id}
Environment: Development
Scope
ZohoCatalyst.email.CREATE
Form-Data Properties
Response Details
The response returns the details of the email that was sent such as the status of the sent email, the project details, from_email, to_email, and content.
curl -X POST
https://api.catalyst.zoho.com/baas/v1/project/4000000006007/email/send
-H “Authorization: Zoho-oauthtoken 1000.910*************************16.2f*************************57”
-H “Content-Type: multipart/form-data; boundary=—-WebKitFormBoundary7MA4YWxkTrZu0gW” \
-F from_email=emma@zylker.com \
-F to_email=vanessa.hyde@zoho.com,r.owens@zoho.com,chang.lee@zoho.com
-F cc=p.boyle@zylker.com,robert.plant@zylker.com
-F bcc=ham.gunn@zylker.com,rover.jenkins@zylker.com
-F reply_to=peter.d@zoho.com,arnold.h@zoho.com
-F attachments=kycform.pdf
-F subject=“Greetings from Zylker Corp!”
-F content="
Hello,
We’re glad to welcome you at Zylker Corp. To begin your journey with us, please download the attached KYC form and fill in your details. You can send us the completed form to this same email address. We cannot wait to get started!
Cheers!
Team Zylker
"
-F html_mode=true
-F display_name=“Amelia Burrows” \
{
  "status": "success",
  "data": {
    "isAsync": false,
    "project_details": {
      "project_name": "Onboarding",
      "id": 2648000000235047,
      "project_type": "Live"
    },
    "display_name": "Amelia Burrows",
    "from_email": "emma@zylker.com",
    "to_email": [
      "vanessa.hyde@zoho.com",
      "r.owens@zoho.com",
      "chang.lee@zoho.com"
    ],
    "cc": [
      "p.boyle@zylker.com",
      "robert.plant@zylker.com"
    ],
    "bcc": [
      "ham.gunn@zylker.com",
      "rover.jenkins@zylker.com"
    ],
    "html_mode": true,
    "subject": "Greetings from Zylker Corp!",
    "content": "<p>Hello,</p><p>We're glad to welcome you at Zylker Corp. To begin your journey with us, please download thattached KYC form and fill in your details. You can send us the completed form to this same email address. We cannowait to get started!<p>Cheers!</p><p>Team Zylker </p>",
    "reply_to": [
      "peter.d@zoho.com",
      "arnold.h@zoho.com"
    ]
  }
}
Push Notifications
Push notifications are remote notifications that an application provider can send to the users of their application, even when the application is not actively running on the user device. Catalyst provides you with an easy way to integrate push notifications into your Catalyst web and iOS applications.
Send Web Push Notifications
Description
This API is used to send text push notifications to the users of your web application for testing, after you enable push notifications for it. You can enable push notifications and also register client devices for receiving push notifications by implementing the web script mentioned in this Web SDK help page. You can then use this API to send push notifications.
You can pass the push notification message and a list of the recipients in your API request as shown in the sample request.
Request Details
Request URL
{api-domain}/baas/v1/project/{project_id}/project-user/notify
Request Headers
Content-Type: application/json
Optional Headers
CATALYST-ORG: {org_id}
Environment: Development
Scope
ZohoCatalyst.notifications.web.CUSTOM
Request JSON Properties
Response Details
The response returns the status of the sent notification as success or failed.
curl -X POST

https://api.catalyst.zoho.com/baas/v1/project/3000000002001/project-user/notify

-H “Content-Type: application/json”

-d ‘{
“recipients”:[“rhonda.wilkins@zylker.com”,“isabella.j@zylker.com”,“harry.sandman@zylker.com”],
“message”:“Attention, new employees! Update your profile information in Zylker team app”
}’
{
"status": "success",
"data": true
}
Send iOS Push Notifications
Description
This API is used to send text push notifications to the user devices from your iOS app for testing, after you register your app with Apple, enroll for Catalyst push notifications, and register your device. You must implement the six steps explained in the Push Notifications- iOS help section before you can send push notifications to devices.
Catalyst enables you to send push notifications either to registered test devices or to production devices by passing the appID value from the configuration file of the respective environment. The request URL for sending push notifications to test devices and to production devices varies. These are presented in the Request Details section.
You can pass the push notification message and the recipient to send the push notifications to, along with other details in your API request as shown in the sample request.
Request Details
Request URL to send Test Notifications
{api-domain}/baas/v1/project/{project_id}/push-notification/{app_id}/test
Request URL to send Production Notifications
{api-domain}/baas/v1/project/{project_id}/push-notification/{app_id}/project-user/notify
Request Headers
Content-Type: application/json
Optional Headers
CATALYST-ORG: {org_id}
Environment: Development
Scope
ZohoCatalyst.notifications.mobile.CUSTOM
Request JSON Properties
The JSON that contains the details of the push notification content and metadata
Max Size: 100 characters
Max Size: 100 characters
Response Details
The response returns the status of the sent notification as success or failed, and the data that was passed including message and expiry_time.
curl -X POST

https://api.catalyst.zoho.com/baas/v1/project/204000000024010/push-notification/204000000036005/project-user/notify

-H “Content-Type: application/json”

-d ‘{
“recipients”:“amanda.boyle@zylker.com”,
“push_details”:{
“message”:“Welcome to Zylker App!”,
“badge_count”:10,
“expiry_time”:12,
“additional_info”:{
“sample_key” : “sample_value”
}
}
}’
{
"status": "success",
"data": {
    "recipients": "amanda.boyle@zylker.com",
    "push_details": {
        "message": "Welcome to Zylker App!",
        "additional_info": {
            "sample_key": "sample_value"
        },
        "badge_count": 10,
        "reference_id": null,
        "expiry_time": 12
    }
}
}
Send Push Notifications- Node.js SDK
Send Push Notifications- Python SDK
Register Device for Push Notifications- iOS SDK
Register Device for Push Notifications- Android SDK
Register Device for Push Notifications- Flutter SDK
Register Device for Push Notifications- Web SDK
Send Android Push Notifications
Description
This API is used to send text push notifications to the user devices from your Android app for testing, after you register your app with Firebase Cloud Messaging, enroll for Catalyst push notifications, and register your device. You must implement the four steps explained in the Push Notifications- Android help section before you can send push notifications.
Catalyst enables you to send push notifications either to registered test devices or to production devices by passing the appID value from the configuration file of the respective environment. The request URL for sending push notifications to test devices and to production devices varies. These are presented in the Request Details section.
You can pass the push notification message and the recipient to send the push notifications to, along with other details in your API request as shown in the sample request.
Request Details
Request URL to send Test Notifications
{api-domain}/baas/v1/project/{project_id}/push-notification/{app_id}/test
Request URL to send Production Notifications
{api-domain}/baas/v1/project/{project_id}/push-notification/{app_id}/project-user/notify
Query Parameters
isAndroid: true
Request Headers
Content-Type: application/json
Optional Headers
CATALYST-ORG: {org_id}
Environment: Development
Scope
ZohoCatalyst.notifications.mobile.CUSTOM
Request JSON Properties
The JSON that contains the details of the push notification content and metadata
Max Size: 100 characters
Max Size: 100 characters
Response Details
The response returns the status of the sent notification as success or failed, and the data that was passed including message and expiry_time.
curl -X POST

https://api.catalyst.zoho.com/baas/v1/project/204000000024010/push-notification/204000000036005/project-user/notify?isAndroid=true

-H “Content-Type: application/json”

-d ‘{
“recipients”:“amanda.boyle@zylker.com”,
“push_details”:{
“message”:“Welcome to Zylker App!”,
“badge_count”:10,
“expiry_time”:12,
“additional_info”:{
“sample_key” : “sample_value”
}
}
}’
{
"status": "success",
"data": {
    "recipients": "amanda.boyle@zylker.com",
    "push_details": {
        "message": "Welcome to Zylker App!",
        "additional_info": {
            "sample_key": "sample_value"
        },
        "badge_count": 10,
        "reference_id": null,
        "expiry_time": 12
    }
}
}
Send Push Notifications- Node.js SDK
Send Push Notifications- Python SDK
Register Device for Push Notifications- iOS SDK
Register Device for Push Notifications- Android SDK
Register Device for Push Notifications- Flutter SDK
Register Device for Push Notifications- Web SDK
Optical Character Recognition
Zia Optical Character Recognition electronically detects textual characters in images or digital documents, and converts them into machine-encoded text. Zia OCR can recognize text in 10 major languages.
Execute OCR
Description
This API is used to detect textual characters in images and documents, and deliver the recognized text as a JSON response. The response also contains a confidence score, which defines the accuracy of the detection.
You must specify the path to the image or document file in the API request, as shown in the sample request. You can optionally specify the languages present in the text, for quicker processing. OCR supports 9 international languages and 10 Indian languages, that are mentioned in the tables below. The language is automatically detected and the text is processed, if it is not specified.
Request Details
Request URL
{api-domain}/baas/v1/project/{project_id}/ml/ocr
Request Headers
Authorization: Zoho-oauthtoken {oauth_token}
content-type: multipart/form-data; boundary=—-WebKitFormBoundary7MA4YWxkTrZu0gW
Optional Headers
CATALYST-ORG: {org_id}
Environment: Development
Scope
ZohoCatalyst.mlkit.READ
Request JSON Properties
The input file to be processed. You must provide the path to it in your local system.
Allowed formats: .webp, .jpeg, .png, .bmp, .tiff, .pdf
File size limit: 20 MB
International Languages Supported by OCR
| Language | Language Codes |
|---|---|
| Arabic | ara |
| Chinese | chi_sim |
| French | fra |
| Italian | ita |
| Japanese | jpn |
| Portuguese | por |
| Romanian | ron |
| Spanish | spa |
Indian Languages Supported by OCR
| Language | Language Codes |
|---|---|
| English | eng |
| Hindi | hin |
| Bengali | ben |
| Marathi | mar |
| Telugu | tel |
| Tamil | tam |
| Gujarati | guj |
| Urdu | urd |
| Kannada | kan |
| Malayalam | mal |
| Sanskrit | san |
Response Details
The response returns the data of the OCR processing, which includes the text that was recognized from the input in the text key and the confidence score of the recognition in the confidence key.
curl -X POST

https://api.catalyst.zoho.com/baas/v1/project/4000000006007/ml/ocr
-H “Authorization: Zoho-oauthtoken 1000.910*************************16.2f*************************57”

-H “Content-Type: multipart/form-data; boundary=—-WebKitFormBoundary7MA4YWxkTrZu0gW”

-F “image=/Desktop/HelplineCard.webp”

-F “language=eng,spa”
{
"status":"success",
"data": {
	"confidence":79.71514892578125,
	"text":"Whenever you\nneed to talk,\nwe‘re open\n\n[—] text eseses\n[J] KidsHelpPhone.ca\n\n(@, call 1—800—663—6868 Kids Help Phone ©"
}
}
Face Analytics
Zia Face Analytics performs facial detection in images, and analyzes the facial features to provide information such as the gender, age, and emotion of the detected faces.
Face Analytics also provides the confidence levels of each attribute prediction that enables you to make informed decisions. It can detect up to 10 faces in an image, and it provides predictions of the attributes for each detected face.
Execute Face Analytics
Description
You can use this API to perform facial detection and analytics in an image file, and specify the path to it in the API request as shown in the sample request.
You can optionally specify an analysis mode which determines the number of facial landmarks to be detected in a face. You can also enable or disable the attributes to be predicted, such as the emotion, age, and gender.
This API is used to pass input for Face Analytics prediction. You must pass an input image file and the data in a JSON format in the request as described below.
Request Details
Request URL
{api-domain}/baas/v1/project/{project_id}/ml/faceanalytics
Request Headers
Authorization: Zoho-oauthtoken {oauth_token}
content-type: multipart/form-data; boundary=—-WebKitFormBoundary7MA4YWxkTrZu0gW
Optional Headers
CATALYST-ORG: {org_id}
Environment: Development
Scope
ZohoCatalyst.mlkit.READ
Request JSON Properties
The input file to be processed. You must provide the path to it in your local system.
Allowed formats: .webp, .jpeg, .png
Image size limit: 10 MB
Denotes the number of facial landmarks to be detected in a face
Allowed values: basic, moderate, advanced
Default value: advanced
- basic: 0-point landmark detector that detects the boundary of the face alone
- moderate: 5-point landmark detector that detects- Eyes: The center of both eyes, Nose: Nose tip, Lips: The center of both lips
- advanced: 68-point landmark detector that detects- Jawline: Face boundary, Eyebrows: Left and right eyebrow, Eyes: Left and right eye, Nose bridge, Nostril line, Upper lips: Upper and lower edge, Lower lips: Upper and lower edge
Allowed values:
false: Emotion will not be detected
true: Emotion will be detected
Default value: true
Allowed values:
false: Age will not be detected
true: Age will be detected
Default value: true
Allowed values:
false: Gender will not be detected
true: Gender will be detected
Default value: true
Response Details
The response returns the details of the facial landmarks of the detected faces, and the predictions for emotion, age, and gender, based on the parameters and mode set in the API request in the data key.
The overall probability of the co-ordinates of the facial landmark detection, and the probability of the predictions made for the emotion, age, and gender parameters will be returned as confidence scores.
curl -X POST

https://api.catalyst.zoho.com/baas/v1/project/4000000006007/ml/faceanalytics

-H “Authorization: Zoho-oauthtoken 1000.910*************************16.2f*************************57”

-H “Content-Type: multipart/form-data; boundary=—-WebKitFormBoundary7MA4YWxkTrZu0gW”

-F “image=@face.jpeg”

-d ‘{
“mode”: “basic”,
“emotion”: “true”,
“age”: “true”,
“gender”: “true”
}’
{
"status": "success",
"data": {
    "faces": [
        {
            "confidence": 1.0,
            "id": 0,
            "co_ordinates": [
                267,
                39,
                153,
                227
            ],
            "emotion": {
                "prediction": "not_smiling",
                "confidence": {
                    "smiling": "0.0",
                    "not_smiling": "1.0"
                }
            },
            "age": {
                "prediction": "3-9",
                "confidence": {
                    "0-2": "0.005",
                    "10-19": "0.33",
                    "20-29": "0.12",
                    "3-9": "0.509",
                    "30-39": "0.032",
                    "40-49": "0.003",
                    "50-59": "0.0",
                    "60-69": "0.0",
                    ">70": "0.0"
                }
            },
            "gender": {
                "prediction": "female",
                "confidence": {
                    "female": "0.92",
                    "male": "0.08"
                }
            }
        }
    ]
}

}
curl -X POST

https://api.catalyst.zoho.com/baas/v1/project/4000000006007/ml/faceanalytics

-H “Authorization: Zoho-oauthtoken 1000.910*************************16.2f*************************57”

-H “Content-Type: multipart/form-data; boundary=—-WebKitFormBoundary7MA4YWxkTrZu0gW”

-F “image=@face.jpeg”

-d ‘{
“mode”: “moderate”,
“emotion”: “false”,
“age”: “false”,
“gender”: “true”
}’
{
"status": "success",
"data": {
    "faces": [
        {
            "confidence": 1.0,
            "id": 0,
            "co_ordinates": [
                267,
                39,
                153,
                227
            ],
            "landmarks": {
                "left_eye": [337,135],
                "right_eye": [400,130],
                "nose": [
                    400,
                    165
                ],
                "mouth_left": [
                    353,
                    217
                ],
                "mouth_right": [
                    404,
                    211
                ]
            },
            "gender": {
                "prediction": "female",
                "confidence": {
                    "female": "0.92",
                    "male": "0.08"
                }
            }
        }
    ]
}

}
curl -X POST

https://api.catalyst.zoho.com/baas/v1/project/4000000006007/ml/faceanalytics

-H “Authorization: Zoho-oauthtoken 1000.910*************************16.2f*************************57”

-H “Content-Type: multipart/form-data; boundary=—-WebKitFormBoundary7MA4YWxkTrZu0gW”

-F “image=@face.jpeg”

-d ‘{
“mode”: “advanced”,
“emotion”: “true”,
“age”: “false”,
“gender”: “false”
}’
{
"status": "success",
"data": {
    "faces": [
        {
            "co_ordinates" : [ 185, 96, 275, 18],
            "confidence" : 0.99
            "landmarks" : {
                'mouth': [
                    [259, 440],
                    [287, 423],
                    [312, 413],
                    [325, 418],
                    [338, 414],
                    [354, 424],
                    [368, 442],
                    [355, 461],
                    [339, 470],
                    [325, 472],
                    [310, 470],
                    [285, 460],
                    [269, 440],
                    [311, 435],
                    [324, 436],
                    [338, 436],
                    [359, 442],
                    [339, 440],
                    [326, 441],
                    [312, 439]
                ],
                'right_eyebrow': [
                    [189, 245],
                    [216, 230],
                    [244, 227],
                    [273, 234],
                    [301, 248]
                ],
                'left_eyebrow': [
                    [356, 249],
                    [379, 238],
                    [401, 232],
                    [422, 235],
                    [436, 252]
                ],
                'right_eye': [
                    [225, 288],
                    [245, 281],
                    [265, 282],
                    [280, 295],
                    [263, 297],
                    [244, 297]
                ],
                'left_eye': [
                    [358, 299],
                    [376, 288],
                    [393, 290],
                    [408, 298],
                    [393, 305],
                    [376, 304]
                ],
                'nose': [
                    [329, 287],
                    [331, 311],
                    [334, 336],
                    [337, 360],
                    [301, 385],
                    [315, 389],
                    [329, 392],
                    [341, 390],
                    [352, 385]
                ],
                'jaw': [
                    [131, 283],
                    [136, 340],
                    [145, 393],
                    [158, 442],
                    [180, 484],
                    [212, 513],
                    [250, 530],
                    [287, 542],
                    [319, 545],
                    [347, 535],
                    [370, 512],
                    [393, 487],
                    [411, 456],
                    [423, 419],
                    [432, 381],
                    [437, 342],
                    [439, 303]
                ]
            },
            "emotion": {
                "prediction": "not_smiling",
                "confidence": {
                    "smiling": "0.0",
                    "not_smiling": "1.0"
                }
            }
        }
    ]
}

}
Image Moderation
Zia Image Moderation detects and recognizes inappropriate and unsafe content in images. The criteria include suggestive or explicit racy content, nudity, violence, gore, bloodshed, and the presence of weapons and drugs.
Execute Image Moderation
Description
This API recognizes the following inappropriate content in images and returns them in the response: racy, weapon, nudity, gore, drug. The response also contains the probability of each criteria with their confidence scores, and the prediction of the image being safe_to_use or unsafe_to_use.
You must specify the path of the image in the API request, as shown in the sample request. You can also optionally set the moderation mode for the request.
Request Details
Request URL
{api-domain}/baas/v1/project/{project_id}/ml/imagemoderation
Request Headers
Authorization: Zoho-oauthtoken {oauth_token}
content-type: multipart/form-data; boundary=—-WebKitFormBoundary7MA4YWxkTrZu0gW
Optional Headers
CATALYST-ORG: {org_id}
Environment: Development
Scope
ZohoCatalyst.mlkit.READ
Request JSON Properties
The input file to be processed.
Allowed formats: .webp, .jpeg, .png, .txt
File size limit: 10 MB
Denotes the moderation mode
Allowed values: basic, moderate, advanced
Default value: advanced
- basic: Detects nudity alone
- moderate: Detects nudity and racy content
- advanced: Detects all criteria mentioned in the description
Response Details
The response will contain the probability of the parameters detected, based on the mode set in the API request. Based on an aggregate of the detected parameters, it will also include the prediction of the image being safe or unsafe to use, along with a confidence score of the prediction.
curl -X POST

https://api.catalyst.zoho.com/baas/v1/project/4000000006007/ml/imagemoderation
-H “Authorization: Zoho-oauthtoken 1000.910*************************16.2f*************************57”

-H “Content-Type: multipart/form-data; boundary=—-WebKitFormBoundary7MA4YWxkTrZu0gW”

-F “file=@attachment1.txt”

-d ‘{
“mode”: “basic”
}’
{
"probability": {
"nudity": "1.0"
},
"confidence": 1,
"prediction": "unsafe_to_use"
}
curl -X POST

https://api.catalyst.zoho.com/baas/v1/project/4000000006007/ml/imagemoderation

-H “Authorization: Zoho-oauthtoken 1000.910*************************16.2f*************************57”

-H “Content-Type: multipart/form-data; boundary=—-WebKitFormBoundary7MA4YWxkTrZu0gW”

-F “file=@attachment1.txt”

-d ‘{
“mode”: “moderate”
}’
{
"probability": {
"racy": "0.0",
"nudity": "0.0"
},
"confidence": 0.9,
"prediction": "safe_to_use"
}
curl -X POST

https://api.catalyst.zoho.com/baas/v1/project/4000000006007/ml/imagemoderation

-H “Authorization: Zoho-oauthtoken 1000.910*************************16.2f*************************57”

-H “Content-Type: multipart/form-data; boundary=—-WebKitFormBoundary7MA4YWxkTrZu0gW”

-F “file=@attachment1.txt”

-d ‘{
“mode”: “advanced”
}’
{
"probability": {
"racy": "0.0",
"weapon": "1.0",
"nudity": "0.0",
"gore": "0.0",
"drug": "0.0"
},
"confidence": 1,
"prediction": "unsafe_to_use"
}
Object Recognition
Zia Object Recognition detects, locates, and recognizes individual objects in an image file. It can identify 80 different kinds of common objects from images. Zia can recognize 80 kinds of specific object types, some of which include: person, car, dog, chair, traffic light, knife, umbrella, and cellphone.
Execute Object Recognition
Description
This API is used to detect, locate, and recognize individual objects in an image file. The response returns the coordinates of each detected object in the image, its type, and the confidence score of each recognition.
You must specify the path to the image file in the API request, as shown in the sample request.
Request Details
Request URL
http://api.catalyst.zoho.com/baas/v1/project/{project_id}/ml/detect-object
Request Headers
Authorization: Zoho-oauthtoken {oauth_token}
content-type: multipart/form-data; boundary=—-WebKitFormBoundary7MA4YWxkTrZu0gW
Optional Headers
CATALYST-ORG: {org_id}
Environment: Development
Scope
ZohoCatalyst.mlkit.READ
Request JSON Properties
The image file that is to be processed for object recognition. You must provide the path to it in your local system.
Allowed formats: .webp, .jpeg, .png, .txt
File size limit: 10 MB
Response Details
The response will contain the details of each individual object detected, which includes its co_ordinates, object_type, and the confidence score of the detection.
curl -X POST

https://api.catalyst.zoho.com/baas/v1/project/56000000405001/ml/detect-object

-H “Authorization: Zoho-oauthtoken 1000.910*************************16.2f*************************57”

-H “Content-Type: multipart/form-data; boundary=—-WebKitFormBoundary7MA4YWxkTrZu0gW”

-F “file=@attachment1.txt” \
{
"status":"success",
"data":{
    "objects":[
        {
            "co_ordinates":[
                37,
                94,
                704,
                434
            ],
            "object_type":"dog",
            "confidence":"98.92"
        },
       {
            "co_ordinates":[
                20,
                67,
                202,
                120
            ],
            "object_type":"umbrella",
            "confidence":"97.05"
        }
    ]
}

}
Barcode Scanner
Zia Barcode Scanner enables you to scan the most commonly used linear and 2D barcode formats and decode the encoded data. Barcode Scanner can detect formats like Codabar, EAN-13, ITF, UPC-A, QR Code, and more.
Execute Barcode Scanner
Description
This API is used to decode the data encoded in a barcode from an image file. You must specify the path to the image file in the API request, as shown in the sample request.
You can optionally specify the barcode format. If you don’t specify it, Catalyst will automatically process the default value all for it. The JSON response returns the decoded data.
Request Details
Request URL
{api-domain}/baas/v1/project/{project_id}/ml/barcode
Request Headers
Authorization: Zoho-oauthtoken {oauth_token}
content-type: multipart/form-data; boundary=—-WebKitFormBoundary7MA4YWxkTrZu0gW
Optional Headers
CATALYST-ORG: {org_id}
Environment: Development
Scope
ZohoCatalyst.mlkit.READ
Request JSON Properties
The input file with the barcode to be scanned.
Allowed formats: .webp, .jpeg, .png, .txt
File size limit: 10 MB
Resolution limit: 36000000 pixels
The format of the barcode in the image. The format codes are specified in the table below.
You must provide the path to it in your local system.
Allowed formats: .webp, .jpeg, .png
File size limit: 10 MB
Barcode Format Codes
| Barcode Format | Format Code |
|---|---|
| Code 39 | code39 |
| Code 128 | code128 |
| Code 93 | code93 |
| Ean 8 | ean8 |
| Ean 13 | ean13 |
| Codabar | codabar |
| ITF | itf |
| UPC-A | upca |
| UPC-E | upce |
| RSS | rss |
| QR code | qrcode |
| Aztec | aztec |
| PDF417 | pdf417 |
| Data Matrix | datamatrix |
| If you don't know the format or if you don't specify it |
all |
Response Details
The response will contain the data detected in the barcode in the content field.
curl -X POST

https://api.catalyst.zoho.com/baas/v1/project/4000000006007/ml/ocr

-H “Authorization: Zoho-oauthtoken 1000.910*************************16.2f*************************57”

-H “Content-Type: multipart/form-data; boundary=—-WebKitFormBoundary7MA4YWxkTrZu0gW”

-F “file=@attachment1.txt”

-d ‘{
“format”: “ITF”
}’
{
	"status": "success",
	"data": {
		"content": "40156"
	}
}
Identity Scanner
Identity Scanner is a Zia AI-driven component that enables you to perform secure identity checks on individuals and documents by scanning and processing various ID proofs or official documents. It is a comprehensive suite that incorporates multiple functionalities divided into two major categories- E-KYC and Document Processing.
Facial Comparison
Facial Comparison, also known as E-KYC, is a part of Identity Scanner that compares two faces in two different images to determine if they are the same individual.
Process Facial Comparison
Description
This API enables you to perform a face comparison between a source image and a query image. You must specify the paths to both the image files in the API request, as shown in the sample request.
Request Details
Request URL
{api-domain}/baas/v1/project/{project_id}/ml/facecomparison
Request Headers
Authorization: Zoho-oauthtoken {oauth_token}
content-type: multipart/form-data; boundary=—-WebKitFormBoundary7MA4YWxkTrZu0gW
Optional Headers
CATALYST-ORG: {org_id}
Environment: Development
Scope
ZohoCatalyst.mlkit.READ
Request JSON Properties
The photo ID or an individual’s photograph. You must provide the path to it in your local system.
Allowed formats: .webp, .jpeg, .png
File size limit: 10 MB
The photo ID or an individual’s photograph. You must provide the path to it in your local system.
Allowed formats: .webp, .jpeg, .png
File size limit: 10 MB
Response Details
The response returns the result of comparison as true if the faces match, or false if they don’t match.
The response also contains a confidence score between the range of 0 to 1. Only if the comparison yields a confidence score of above 50% i.e., 0.5, the result will be set to true.
curl -X POST

https://api.catalyst.zoho.com/baas/v1/project/4000000006007/ml/facecomparison

-H “Authorization: Zoho-oauthtoken 1000.910*************************16.2f*************************57”

-H “Content-Type: multipart/form-data; boundary=—-WebKitFormBoundary7MA4YWxkTrZu0gW”

-F source_image=/Desktop/SourceImage.webp

-F query_image=/Desktop/QueryImage.webp
{
    "status": "success",
    "data": {
        "confidence": 1.0,
        "matched": "true"
    }
}
Aadhaar
The AADHAAR model is a part of the Document Processing feature of Identity Scanner that enables you to process Indian Aadhaar cards as identity proof documents.
Note:
-
Catalyst does not store any of the files you upload in its systems. The documents you upload are used for one-time processing only. They are not used for ML model training purposes either. Catalyst components are fully compliant with all applicable data protection and privacy laws.
-
Document Processing is only relevant to Indian users and is only available in the IN DC. This feature will not be available to users accessing from the EU, AU, US, JP, SA or CA data centers. Users outside of India from the other DCs can access the general OCR component to read and process textual content.
Process Aadhaar
Description
This API extracts fields of data from an Indian Aadhaar card using an advanced OCR technology. The JSON response will return the parameters recognized from the Aadhaar card, along with confidence scores for each recognition that determine their accuracy. You must provide the path to the image files of the front and back of the Aadhaar card, and specify the model type as AADHAAR in the API request.
Request Details
Request URL
{api-domain}/baas/v1/project/{project_id}/ml/ocr
Request Headers
Authorization: Zoho-oauthtoken {oauth_token}
content-type: multipart/form-data; boundary=—-WebKitFormBoundary7MA4YWxkTrZu0gW
Optional Headers
CATALYST-ORG: {org_id}
Environment: Development
Scope
ZohoCatalyst.mlkit.READ
Request JSON Properties
The image of the front side of the Aadhaar card to be processed. You must provide the path to it in your local system.
Allowed formats: .webp, .jpeg, .png, .bmp, .tiff
File size limit: 15 MB
The image of the back side of the Aadhaar card to be processed.You must provide the path to it in your local system.
Allowed formats: .webp, .jpeg, .png, .bmp, .tiff
File size limit: 15 MB
The model type of the image
Value to be passed: AADHAAR
The language code of the language to be identified. The AADHAAR model supports the Indian languages listed in a table below.
You must pass English and the relevant regional language alone for the AADHAAR type. For example, if you are from Tamil Nadu, you must pass tam and eng in the request.
Languages Supported by the Aadhaar Model Type
| Language | Language Codes |
|---|---|
| English | eng |
| Hindi | hin |
| Bengali | ben |
| Marathi | mar |
| Telugu | tel |
| Tamil | tam |
| Gujarati | guj |
| Urdu | urd |
| Kannada | kan |
| Malayalam | mal |
| Sanskrit | san |
Response Details
The response contains the parameters recognized in the Aadhaar card such as the card holder’s name, address, gender, Aadhaar card number assigned to respective keys. The response also shows a confidence score in the range of 0 to 1 for each of the recognized values.
curl -X POST
https://api.catalyst.zoho.com/baas/v1/project/4000000006007/ml/ocr
-H “Authorization: Zoho-oauthtoken 1000.910*************************16.2f*************************57”

-H “Content-Type: multipart/form-data; boundary=—-WebKitFormBoundary7MA4YWxkTrZu0gW”

-F aadhaar_front=/Desktop/Aadhaar1.webp

-F aadhaar_back=/Desktop/Aadhaar2.webp

-F model_type=AADHAAR

-F “language=eng,tam”
{
	"status":"success",
	"data":{
	"text": "{\"address\":{\"prob\":0.5,\"value\":\"S/O Tony, Seer 40, S/O Julie, 40, Dewdrops Street, Cherry Hill       Pondicherry, Pondicherry ureing4Gen, ureing4Gen 605008 \"},\"gender\":{\"prob\":\"0.9\",\"value\":\"male\"},\"dob\":  {\"prob\":\"0.6\", \"value\":\"12/12/2012\"},\"name\":{\"prob\":\"0.8\", \"value\":\"Hari Krishnan\"},\"aadhaar\":{\"prob\":0.8,\"value\":\"1234 5678 0123\"}}"
	}
}
PAN
The PAN model is a part of the Document Processing feature of Identity Scanner that enables you to process Indian PAN cards as identity proof documents.
Note:
-
Catalyst does not store any of the files you upload in its systems. The documents you upload are used for one-time processing only. They are not used for ML model training purposes either. Catalyst components are fully compliant with all applicable data protection and privacy laws.
-
Document Processing is only relevant to Indian users and is only available in the IN DC. This feature will not be available to users accessing from the EU, AU, US, JP, SA or CA data centers. Users outside of India from the other DCs can access the general OCR component to read and process textual content.
Process PAN
Description
This API extracts fields of data from a PAN card using an advanced OCR technology, and returns the parameters recognized from the PAN card as a JSON response. You must provide the path to the image file of the front side of the PAN card containing personal details in the API request. You must specify the model type in the API request as PAN, to process the PAN card. The PAN model can only process text in English by default.
Request Details
Request URL
{api-domain}/baas/v1/project/{project_id}/ml/ocr
Request Headers
Authorization: Zoho-oauthtoken {oauth_token}
content-type: multipart/form-data; boundary=—-WebKitFormBoundary7MA4YWxkTrZu0gW
Optional Headers
CATALYST-ORG: {org_id}
Environment: Development
Scope
ZohoCatalyst.mlkit.READ
Request JSON Properties
The image of the front side of the PAN card. You must provide the path to it in your local system.
Allowed formats: .webp, .jpeg, .png
File size limit: 15 MB
The model type of the image
Value to be passed: PAN
Response Details
The response will contain the parameters extracted from the PAN card such as their first name, last name, date of birth, and their PAN card number assigned to the respective keys.
curl -X POST

https://api.catalyst.zoho.com/baas/v1/project/4000000006007/ml/ocr

-H “Authorization: Zoho-oauthtoken 1000.910*************************16.2f*************************57”

-H “Content-Type: multipart/form-data; boundary=—-WebKitFormBoundary7MA4YWxkTrZu0gW”

-F image=/Desktop/MyPan.webp

-F model_type=PAN
{
"status": "success",
"data": {
    "first_name": "KIRAN",
    "last_name": "RAO",
    "date_of_birth": "03/04/1982",
    "pan": "ANRPM2537J"
}
}
Passbook
The PASSBOOK model is a part of the Document Processing feature of Identity Scanner that enables you to process Indian bank passbooks as financial or identity proof documents.
Note:
-
Catalyst does not store any of the files you upload in its systems. The documents you upload are used for one-time processing only. They are not used for ML model training purposes either. Catalyst components are fully compliant with all applicable data protection and privacy laws.
-
Document Processing is only relevant to Indian users and is only available in the IN DC. This feature will not be available to users accessing from the EU, AU, US, JP, SA or CA data centers. Users outside of India from the other DCs can access the general OCR component to read and process textual content.
Process Passbook
Description
This API extracts fields of data from a passbook using the OCR technology and returns the parameters recognized from the passbook as a JSON response. You must provide the path to the image file of the front page of the bank passbook, and specify the model type as PASSBOOK in the API request.
You can also optionally input the languages present in the passbook in the API request. The text recognition and extraction process is faster and more accurate if you specify the languages.
Request Details
Request URL
{api-domain}/baas/v1/project/{project_id}/ml/ocr
Request Headers
Authorization: Zoho-oauthtoken {oauth_token}
content-type: multipart/form-data; boundary=—-WebKitFormBoundary7MA4YWxkTrZu0gW
Optional Headers
CATALYST-ORG: {org_id}
Environment: Development
Scope
ZohoCatalyst.mlkit.READ
Request JSON Properties
The image of the front page of the passbook. You must provide the path to it in your local system.
Allowed formats: .webp, .jpeg, .png, .bmp, .tiff, .pdf
File size limit: 15 MB
The model type of the image
Value to be passed: PASSBOOK
The language code of the languages to be identified. You can pass multiple languages. The PASSBOOK model supports the Indian and international languages specified in the tables below.
Default value: eng
International Languages Supported by the Passbook Model Type
| Language | Language Codes |
|---|---|
| English | eng |
| Arabic | ara |
| Chinese | chi_sim |
| French | fra |
| Italian | ita |
| Japanese | jpn |
| Portuguese | por |
| Romanian | ron |
| Spanish | spa |
Indian Languages Supported by the Passbook Model Type
| Language | Language Codes |
|---|---|
| Hindi | hin |
| Bengali | ben |
| Marathi | mar |
| Telugu | tel |
| Tamil | tam |
| Gujarati | guj |
| Urdu | urd |
| Kannada | kan |
| Malayalam | mal |
| Sanskrit | san |
Response Details
The response contains the bank details and account details recognized from the passbook such as the bank name, branch, address, account number. The extracted fields of information are assigned to their respective keys. The response also shows if RTGS, NEFT, and IMPS have been enabled for that account by returning true or false for those keys.
curl -X POST

https://api.catalyst.zoho.com/baas/v1/project/4000000006007/ml/ocr

-H “Authorization: Zoho-oauthtoken 1000.910*************************16.2f*************************57”

-H “Content-Type: multipart/form-data; boundary=—-WebKitFormBoundary7MA4YWxkTrZu0gW”

-F image=/Desktop/MyPassbook.pdf

-F model_type=PASSBOOK

-F “language=eng”
	{
	"status":"success",
	"data":{
	"text": "{\"address\":\"NO.20 ,SUNSHINE LANE,ANNA NAGAR,CHENNAI\",\"city\":\"CHENNAI\",\"centre\":\"CHENNAI\",\"bankName\":\"ABC BANK LIMITED\",\"accountNumber\":\"000000001111222\",\"branch\":\"ANNA NAGAR\",\"dateOfOpening\":\"30/08/2012\",\"imps\":\"true\",\"neft\":\"true\",\"district\":\"CHENNAI\",\"contact\":\"2891289\",\"micr\":\"0101010\",\"name\":\" 999919\",\"state\":\"TAMIL NADU\",\"rtgs\":\"true\",\"ifsc\":\"ABCB0000111\"}"
	}
	}
Cheque
The CHEQUE model is a part of the Document Processing feature of Identity Scanner that enables you to process Indian bank cheque leaves as identity proof documents.
Note:
-
Catalyst does not store any of the files you upload in its systems. The documents you upload are used for one-time processing only. They are not used for ML model training purposes either. Catalyst components are fully compliant with all applicable data protection and privacy laws.
-
Document Processing is only relevant to Indian users and is only available in the IN DC. This feature will not be available to users accessing from the EU, AU, US, JP, SA or CA data centers. Users outside of India from the other DCs can access the general OCR component to read and process textual content.
Process Cheque
Description
This API extracts fields of data from a cheque using an advanced OCR technology, and returns the parameters recognized from the cheque as a JSON response. You must provide the path to the image file of a cheque leaf in the API request, and specify the model type as CHEQUE in the API request.
The CHEQUE model can only process text in English by default. No other languages are supported.
Request Details
Request URL
{api-domain}/baas/v1/project/{project_id}/ml/ocr
Request Headers
Authorization: Zoho-oauthtoken {oauth_token}
content-type: multipart/form-data; boundary=—-WebKitFormBoundary7MA4YWxkTrZu0gW
Optional Headers
CATALYST-ORG: {org_id}
Environment: Development
Scope
ZohoCatalyst.mlkit.READ
Request JSON Properties
The image of a bank cheque leaf. You must provide the path to it in your local system.
Allowed formats: .webp, .jpeg, .png
File size limit: 15 MB
The model type of the image
Value to be passed: CHEQUE
Response Details
The response will contain the parameters extracted from the cheque, such as the amount, bank name, branch name, account number, IFSC code, assigned to the respective keys.
curl -X POST

https://api.catalyst.zoho.com/baas/v1/project/4000000006007/ml/ocr

-H “Authorization: Zoho-oauthtoken 1000.910*************************16.2f*************************57”

-H “Content-Type: multipart/form-data; boundary=—-WebKitFormBoundary7MA4YWxkTrZu0gW”

-F image=/Desktop/MyCheque.webp

-F model_type=CHEQUE \
{
"status": "success",
"data": {
    "amount": "50000",
    "branch_name": "ANNA NAGAR WEST",
    "bank_name": "STATE BANK OF INDIA",
    "account_number": "00001234556001",
    "ifsc": "SBIN0011724",
    "date": "25/09/2012"
}

}
Text Analytics
Text Analytics as a whole includes a combination of the following three features: Sentiment Analysis, Named Entity Recognition, and Keyword Extraction. You can perform all three actions on a specific block of text, and obtain the tone of the text, the categorizations of the entities recognized from it, and key words and phrases that provide a gist of the text.
Execute All Text Analytics
Description
You can use this API to perform Sentiment Analysis, Named Entity Recognition, and Keyword Extraction on a block of text of upto 1500 characters. You can pass the text in the JSON body of the request, as shown in the sample request.
You can also pass optional keywords to perform Sentiment Analysis on the sentences containing only those keywords.
Request Details
Request URL
{api-domain}/baas/v1/project/{project_id}/ml/text-analytics
Request Headers
Authorization: Zoho-oauthtoken {oauth_token}
content-type: application/json
Optional Headers
CATALYST-ORG: {org_id}
Environment: Development
Scope
ZohoCatalyst.mlkit.READ
Request JSON Properties
Response Details
The response contains the results of each of the text analytics feature. Refer to the response details section of each feature individually for detailed information.
curl -X POST

https://api.catalyst.zoho.com/baas/v1/project/4000000006007/ml/text-analytics

-H “Authorization: Zoho-oauthtoken 1000.910*************************16.2f*************************57”

-H “Content-Type: application/json”

-d ‘{
“document”:"[Zoho Corporation is an Indian software development company. The focus of Zoho Corporation lies in web-based business tools and information technology.]"
}’
  {
  "status":"success",
  "data":[
  {
  "keyword_extractor":{
  "keywords":[
  "focus"
  ],
  "keyphrases":[
  "Indian software development company",
  "Zoho Corporation",
  "web - based business tools",
  "information technology"
  ]
  },
  "sentiment_prediction":[
  {
  "document_sentiment":"Neutral",
  "sentence_analytics":[
  {
  "sentence":"Zoho Corporation is an Indian software development company.",
  "sentiment":"Neutral",
  "confidence_scores":{
  "negative":0.0,
  "neutral":1.0,
  "positive":0.0
  }
  },
  {
  "sentence":"The focus of Zoho Corporation lies in web-based business tools and information technology.",
  "sentiment":"Neutral",
  "confidence_scores":{
  "negative":0.0,
  "neutral":1.0,
  "positive":0.0
  }
  }
  ],
  "overall_score":1.0
  }
  ],
  "ner":{
  "general_entities":[
  {
  "start_index":0,
  "confidence_score":99,
  "end_index":16,
  "ner_tag":"Organization",
  "token":"Zoho Corporation"
  },
  {
  "start_index":23,
  "confidence_score":99,
  "end_index":29,
  "ner_tag":"Miscellaneous",
  "token":"Indian"
  },
  {
  "start_index":73,
  "confidence_score":99,
  "end_index":89,
  "ner_tag":"Organization",
  "token":"Zoho Corporation"
  }
  ]
  }
  }
  ]
  }
Sentiment Analysis
Zia Sentiment Analysis is a part of Text Analytics that processes textual content to recognize the tone of the message, and the sentiments conveyed through it. It analyses each sentence in the text to determine if its tone is Positive, Negative, or Neutral. It then determines the tone of the overall text as one of the these three sentiments, based on the sentiments recognized in each sentence.
The response also returns the confidence scores for each sentence and the overall text, to showcase the accuracy of the analysis.
Execute Sentiment Analysis
Description
You can use this API to perform Sentiment Analysis on a block of text of upto 1500 characters in a single request. You must pass the text in the JSON body of the request, as shown in the sample request.
You can also pass optional keywords for the text. This will enable Sentiment Analysis to process only those sentences that contain these keywords, and determine their sentiments. Other sentences will be ignored.
Request Details
Request URL
{api-domain}/baas/v1/project/{project_id}/ml/text-analytics/sentiment-analysis
Request Headers
Authorization: Zoho-oauthtoken {oauth_token}
content-type: application/json
Optional Headers
CATALYST-ORG: {org_id}
Environment: Development
Scope
ZohoCatalyst.mlkit.READ
Request JSON Properties
Response Details
The response contains the result of individual sentence analysis and the overall text analysis as Positive, Negative, or Neutral, along with the overall confidence score of each analysis. The confidence score lies in the range of 0 to 1.
curl -X POST

https://api.catalyst.zoho.com/baas/v1/project/4000000006007/ml/text-analytics/sentiment-analysis
-H “Authorization: Zoho-oauthtoken 1000.910*************************16.2f*************************57”

-H “Content-Type: application/json”

-d ‘{“document”:"[I love the design of the new model.]",
“keywords”:"[design]"
}’
  {
  "status":"success",
  "data":[
  {
  "sentiment_prediction":[
  {
  "document_sentiment":"Positive",
  "sentence_analytics":[
  {
  "sentence":"I love the design of the new model",
  "sentiment":"Positive",
  "confidence_scores":{
  "negative":0.0,
  "neutral":0.0,
  "positive":1.0
  }
  }
  ],
  "keyword":"design",
  "overall_score":1.0
  }
  ]
  }
  ]
  }
Named Entity Recognition
Zia Named Entity Recognition is a part of Text Analytics that processes textual content to extract key words and group them into various categorizes. For example, it can determine a word in a text to be the name of an organization, the name of a person, or a date, and add it to the appropriate category accordingly. Refer here for a list of all categories recognized by NER.
The response will return the details of all recognized entities, and a tag indicating the category they belong to. It will also contain the confidence score of each recognition to showcase its accuracy, and the locations of the entity in the text.
Execute Named Entity Recognition
Description
You can use this API to perform named entity recognition on a block of text of upto 1500 characters in a single request. You can pass the text in the JSON body of the request, as shown in the sample request.
Request Details
Request URL
{api-domain}/baas/v1/project/{project_id}/ml/text-analytics/ner
Request Headers
Authorization: Zoho-oauthtoken {oauth_token}
content-type: application/json
Optional Headers
CATALYST-ORG: {org_id}
Environment: Development
Scope
ZohoCatalyst.mlkit.READ
Request JSON Properties
Response Details
The response returns an array of all the entities recognized in the text. The details of each entity recognition contains the tag of the entity’s categorization, such as ORG orMISC to indicate the name of an organization or a miscellaneous value respectively.
The response also returns the location of each entity in the text through start_index and end_index, that indicate the start and end indices of the entity. The confidence score determined for each entity classification is represented in percentage values.
curl -X POST

https://api.catalyst.zoho.com/baas/v1/project/4000000006007/ml/text-analytics/ner

-H “Authorization: Zoho-oauthtoken 1000.910*************************16.2f*************************57”

-H “Content-Type: application/json”

-d ‘{
“document”:"[The biggest reason for me to love and remember this trek is the beautiful valley itself. Right from the entry, you can see a bed of pink alpine orchids, blue Himalayan poppies, yellow marigolds, and a whole variety of flowers spread out around you. The weather was also very pleasant that day, about 24 degree celsius, which made the experience all the more amazing.]"
}’
    {
    "status": "success",
    "data": [
    {
    "ner": {
    "general_entities": [
    {
    "start_index": 21,
    "confidence_score": 100,
    "end_index": 25,
    "ner_tag": "Color",
    "token": "pink"
    }
    ]
    }
    },
    {
    "ner": {
    "general_entities": [
    {
    "start_index": 94,
    "confidence_score": 56,
    "end_index": 97,
    "ner_tag": "Duration",
    "token": "day"
    }
    ]
    }
    },
    {
    "ner": {
    "general_entities": []
    }
    },
    {
    "ner": {
    "general_entities": []
    }
    },
    {
    "ner": {
    "general_entities": [
    {
    "start_index": 0,
    "confidence_score": 100,
    "end_index": 6,
    "ner_tag": "Color",
    "token": "yellow"
    }
    ]
    }
    },
    {
    "ner": {
    "general_entities": [
    {
    "start_index": 6,
    "confidence_score": 100,
    "end_index": 15,
    "ner_tag": "Temperature",
    "token": "24 degree",
    "fine_entities": [
        {
            "start_index": 9,
            "end_index": 15,
            "ner_tag": "Fahrenhiet",
            "token": "degree"
        },
        {
            "start_index": 6,
            "end_index": 8,
            "ner_tag": "Value",
            "token": "24"
        }
    ]
    },
    {
    "start_index": 16,
    "confidence_score": 100,
    "end_index": 23,
    "ner_tag": "Unit_temperature",
    "token": "celsius"
    }
    ]
    }
    },
    {
    "ner": {
    "general_entities": [
    {
    "start_index": 5,
    "confidence_score": 61,
    "end_index": 14,
    "ner_tag": "Miscellaneous",
    "token": "Himalayan"
    },
    {
    "start_index": 0,
    "confidence_score": 100,
    "end_index": 4,
    "ner_tag": "Color",
    "token": "blue"
    }
    ]
    }
    }
    ]
    }
Keyword Extraction
Zia Keyword Extraction is a part of Text Analytics that processes textual content and extracts the highlights of the text. The extracted terms are grouped into two categories: Keywords and Keyphrases. These highlights deliver a concise summary of the text and provide an abstraction of the whole text.
Keyword Extraction is a highly useful feature if you want to skim through long textual content and just obtain the essential information and action items from it. You will be able to identify the subject matter and the gist of the text easily from the response, and save valuable time.
Execute Keyword Extraction
Description
You can use this API to perform Keyword Extraction on a block of text of upto 1500 characters in a single request. You can pass the text in the JSON body of the request, as shown in the sample request.
Request Details
Request URL
{api-domain}/baas/v1/project/{project_id}/ml/text-analytics/keyword-extraction
Request Headers
Authorization: Zoho-oauthtoken {oauth_token}
content-type: application/json
Optional Headers
CATALYST-ORG: {org_id}
Environment: Development
Scope
ZohoCatalyst.mlkit.READ
Request JSON Properties
Response Details
The response contains an array of the key words, and another array of the key phrases that are extracted from the text.
curl -X POST
https://api.catalyst.zoho.com/baas/v1/project/4000000006007/ml/text-analytics/keyword-extraction
-H “Authorization: Zoho-oauthtoken 1000.910*************************16.2f*************************57”
-H “Content-Type: application/json”
-d ‘{
“document”:
“[Catalyst is a full-stack cloud-based serverless development tool, that provides backend functionalities to build applications and microservices on various platforms.]”
}’
{
"status": "success",
"data": [
{
"keyword_extractor": {
"keywords": [
"microservices",
"applications"
],
"keyphrases": [
"backend functionalities",
"various platforms"
]
}
},
{
"keyword_extractor": {
"keywords": [
"Catalyst"
],
"keyphrases": [
"cloud-based serverless development tool"
]
}
}
]
}
Automation Testing
Automation Testing is an API testing tool that automates the testing process of the APIs in your application. You can test the Basic I/O and Advanced I/O functions in your application, or any third-party URL, and obtain responses. You can write test cases based on your requirements, schedule tests to be executed automatically, and manage the entire process of API testing with minimal manual intervention.
Execute a Test Plan
Description
A test plan enables the automated execution of one or more test suites in Automation Testing. This API enables you to trigger the execution of a test plan that is already configured in the remote console in your project. This is equivalent to the instant run option available for a test plan in the console.
Request Details
Request URL
{api-domain}/baas/v1/project/{project_id}/automation-testing/{test_plan_id}/execute
Request Headers
Authorization: Zoho-oauthtoken {oauth_token}
Environment: Development
Optional Headers
CATALYST-ORG: {org_id}
Environment: Development
Scope
ZohoCatalyst.automationtesting.execute
Response Details
The response contains the status of the test plan execution, along with details such as the unique Run ID that will be generated for each automated or instant test plan execution, the Test Plan ID that was passed, and the is_schedule_started parameter that contains the status of the execution initiation as true or false.
curl -X POST
https://api.catalyst.zoho.com/baas/v1/project/3359000000016812/automation-testing/537000000022025/execute
-H “Authorization: Zoho-oauthtoken 1000.25*************************e.3e*************************3” \
{
"status": "success",
"data": {
"id": 537000000034053,
"test_plan_id": 537000000022025,
"is_schedule_started": true
}
}
Catalyst SmartBrowz
Catalyst SmartBrowz is a Catalyst browser service that enables you to manage and control a remote browser in Catalyst’s cloud environment through a wide range of components. These include Browser Grid, Browser Logic function, PDF & Screenshot, Templates, and more.
Browser Grid
Browser Grid is a component of Catalyst SmartBrowz that enables you to connect to headless browsers through custom configurations of Nodes and Browsers.
List All Browser Grids
Description
You can use this API to get a list of all the grids that have been created for your project.
PDF Request Details
Request URL
{api-domain}/browser360/v1/project/{project_id}/browser-grid
Scope
ZohoCatalyst.grid.read
Request Headers
Authorization: Zoho-oauthtoken {oauth_token}
Content-Type: application/json
CATALYST-ORG: Provide the value of your Org ID.
Response Details
You will receive a response containing details of all the grids that are present in the project.
curl -X GET ‘https://api.catalyst.zoho.com/browser360/v1/project/38119000000022053/browser-grid'
-H ‘CATALYST-ORG: 111737956’
-H ‘Content-Type: application/json’
-H ‘Authorization: Zoho-oauthtoken 1000.******************************************************780’
{
“status”: “success”,
“data”: [
{
“id”: “3970000000006058”,
“name”: “play”,
“memory”: 1024,
“browser_version”: {
“chrome_version”: “137.0.7515.155”,
“firefox_version”: “136.0.4”
},
“created_time”: “Sep 10, 2025 07:04 PM”,
“modified_time”: “Sep 10, 2025 07:04 PM”,
“api_key_modified_time”: “1757511270919”,
“created_by”: {
“zuid”: “111734674”,
“email_id”: “emmy@zylker.com”,
“first_name”: “Headless”,
“last_name”: “2”,
“user_type”: “SuperAdmin”
},
“modified_by”: {
“zuid”: “111734674”,
“email_id”: “emmy@zylker.com”,
“first_name”: “Headless”,
“last_name”: “2”,
“user_type”: “SuperAdmin”
},
“project_details”: {
“project_name”: “Project-Rainfall”,
“id”: “38119000000022053”,
“project_type”: “Live”
},
“endpoint_type”: 1,
“max_session_count”: 1,
“max_nodes_count”: 10,
“max_concurrent_count”: 10,
“config_type”: 1
},
{
“id”: “3970000000005426”,
“name”: “Automation”,
“memory”: 1024,
“browser_version”: {
“chrome_version”: “137.0.7515.155”,
“firefox_version”: “136.0.4”
},
“created_time”: “Sep 10, 2025 12:47 PM”,
“modified_time”: “Sep 23, 2025 03:12 PM”,
“api_key_modified_time”: “1757488669690”,
“created_by”: {
“zuid”: “111734674”,
“email_id”: “emmy@zylker.com”,
“first_name”: “Headless”,
“last_name”: “2”,
“user_type”: “SuperAdmin”
},
“modified_by”: {
“zuid”: “111734674”,
“email_id”: “emmy@zylker.com”,
“first_name”: “Headless”,
“last_name”: “2”,
“user_type”: “SuperAdmin”
},
“project_details”: {
“project_name”: “Project-Rainfall”,
“id”: “38119000000022053”,
“project_type”: “Live”
},
“endpoint_type”: 2,
“max_session_count”: 1,
“max_nodes_count”: 5,
“max_concurrent_count”: 5,
“config_type”: 2
},
{
“id”: “3970000000005027”,
“name”: “SDK”,
“memory”: 1024,
“browser_version”: {
“chrome_version”: “137.0.7515.155”,
“firefox_version”: “136.0.4”
},
“created_time”: “Sep 10, 2025 11:33 AM”,
“modified_time”: “Sep 10, 2025 04:27 PM”,
“api_key_modified_time”: “1757484201284”,
“created_by”: {
“zuid”: “111734674”,
“email_id”: “emmy@zylker.com”,
“first_name”: “Headless”,
“last_name”: “2”,
“user_type”: “SuperAdmin”
},
“modified_by”: {
“zuid”: “111734674”,
“email_id”: “emmy@zylker.com”,
“first_name”: “Headless”,
“last_name”: “2”,
“user_type”: “SuperAdmin”
},
“project_details”: {
“project_name”: “Project-Rainfall”,
“id”: “38119000000022053”,
“project_type”: “Live”
},
“endpoint_type”: 2,
“max_session_count”: 1,
“max_nodes_count”: 5,
“max_concurrent_count”: 5,
“config_type”: 1
},
{
“id”: “3970000000005015”,
“name”: “Puppeteer_Grid”,
“memory”: 1024,
“browser_version”: {
“chrome_version”: “137.0.7515.155”,
“firefox_version”: “136.0.4”
},
“created_time”: “Sep 10, 2025 10:21 AM”,
“modified_time”: “Sep 10, 2025 10:21 AM”,
“api_key_modified_time”: “1757479864798”,
“created_by”: {
“zuid”: “111734674”,
“email_id”: “emmy@zylker.com”,
“first_name”: “Headless”,
“last_name”: “2”,
“user_type”: “SuperAdmin”
},
“modified_by”: {
“zuid”: “111734674”,
“email_id”: “emmy@zylker.com”,
“first_name”: “Headless”,
“last_name”: “2”,
“user_type”: “SuperAdmin”
},
“project_details”: {
“project_name”: “Project-Rainfall”,
“id”: “38119000000022053”,
“project_type”: “Live”
},
“endpoint_type”: 1,
“max_session_count”: 1,
“max_nodes_count”: 1,
“max_concurrent_count”: 1,
“config_type”: 1
},
{
“id”: “3970000000005013”,
“name”: “Selenium_Gridt”,
“memory”: 1024,
“browser_version”: {
“chrome_version”: “137.0.7515.155”,
“firefox_version”: “136.0.4”
},
“created_time”: “Sep 10, 2025 10:21 AM”,
“modified_time”: “Sep 23, 2025 05:50 PM”,
“api_key_modified_time”: “1757479864794”,
“created_by”: {
“zuid”: “111734674”,
“email_id”: “emmy@zylker.com”,
“first_name”: “Headless”,
“last_name”: “2”,
“user_type”: “SuperAdmin”
},
“modified_by”: {
“zuid”: “111734674”,
“email_id”: “emmy@zylker.com”,
“first_name”: “Headless”,
“last_name”: “2”,
“user_type”: “SuperAdmin”
},
“project_details”: {
“project_name”: “Project-Rainfall”,
“id”: “38119000000022053”,
“project_type”: “Live”
},
“endpoint_type”: 2,
“max_session_count”: 1,
“max_nodes_count”: 1,
“max_concurrent_count”: 1,
“config_type”: 2
}
]
}
List a Specific Browser Grid
Description
You can use this API to list the details of a specific browser grid created in your project. The required grid will be referred to using its Grid ID.
PDF Request Details
Request URL
{api-domain}/browser360/v1/project/{project_id}/browser-grid/{grid_id}
Scope
ZohoCatalyst.grid.read
Request Headers
Authorization: Zoho-oauthtoken {oauth_token}
Content-Type: application/json
CATALYST-ORG: Provide the value of your Org ID.
Response Details
You will receive a response containing details of a specific grid.
curl -X PUT ‘https://api.catalyst.zoho.com/browser360/v1/project/38119000000022053/browser-grid/3970000000006058'
-H ‘CATALYST-ORG: 111737956’
-H ‘Connection: keep-alive’
-H ‘Content-Type: application/json’
-H ‘Authorization: Zoho-oauthtoken 1000********************************************780’
-d ‘{
“name”: “grid_2”,
“memory”: 1024,
“max_nodes_count”: 10,
“max_session_count”: 1,
“endpoint_type”: 1,
“config_type”: 1
}’
{
“status”: “success”,
“data”: {
“id”: “3970000000006058”,
“name”: “play2”,
“memory”: 1024,
“browser_version”: {
“chrome_version”: “137.0.7515.155”,
“firefox_version”: “136.0.4”
},
“created_time”: “Sep 10, 2025 07:04 PM”,
“modified_time”: “Sep 24, 2025 11:55 AM”,
“api_key_modified_time”: “1757511270919”,
“created_by”: {
“zuid”: “111734674”,
“is_confirmed”: false,
“email_id”: “emmy@zylker.com”,
“first_name”: “Headless”,
“last_name”: “2”,
“user_type”: “SuperAdmin”
},
“modified_by”: {
“zuid”: “111734674”,
“is_confirmed”: false,
“email_id”: “emmy@zylker.com”,
“first_name”: “Headless”,
“last_name”: “2”,
“user_type”: “SuperAdmin”
},
“project_details”: {
“project_name”: “Project-Rainfall”,
“id”: “38119000000022053”,
“project_type”: “Live”
},
“endpoint_type”: 1,
“max_session_count”: 1,
“max_nodes_count”: 10,
“max_concurrent_count”: 10,
“config_type”: 1
}
}
Get Live Stats of the Grid
Description
You can use this API to get live stats of a specific grid’s performance. The required grid will be referred to using its Grid ID.
Request Details
Request URL
{api-domain}/browser360/v1/project/{project_id}/browser-grid/{grid_id}/stats?data_to_fetch=live_stats
Scope
ZohoCatalyst.grid.read
Request Headers for API Using OAuth
Authorization: Zoho-oauthtoken {oauth_token}
Content-Type: application/json
CATALYST-ORG: Provide the value of your Org ID.
Request Headers for API Using API Key
Authorization
api-key: The unique key generated by Catalyst. It can be retrived from the console.
Response Details
You will receive a response containing live stats of a specific grid referred to using its Grid ID.
curl -X GET ‘https://api.catalyst.zoho.com/browser360/v1/project/38119000000022053/browser-grid/3970000000005013/stats?data_to_fetch=live_stats'
-H ‘Authorization: Zoho-oauthtoken 1000*************************************f780’
-H ‘CATALYST-ORG: 111737956’
curl -X GET / ‘https://api.catalyst.zoho.com/browser360/v1/project/38119000000022053/browser-grid/3970000000005013/stats?data_to_fetch=live_stats'
-H ‘api-key: 961***********************************************************************7049’
{
“status”: “success”,
“data”: {
“free_sessions”: 5,
“session_queue_size”: 0,
“node_count”: 0,
“session_count”: 0,
“is_hub_alive”: false
}
}
Get Node and Request Count of a Grid
Description
You can use this API to get stats on the Node and Request count of a grid. The required grid will be referred to using its Grid ID.
Request Details
Request URL
{api-domain}/browser360/v1/project/{project_id}/browser-grid/{grid_id}/stats?data_to_fetch=node_req_count&datetime_filter=Last+30+Days
Scope
ZohoCatalyst.grid.read
Request Headers for API Using OAuth
Authorization: Zoho-oauthtoken {oauth_token}
Content-Type: application/json
CATALYST-ORG: Provide the value of your Org ID.
Request Headers for API Using API Key
Authorization
api-key: The unique key generated by Catalyst. It can be retrived from the console.
Response Details
You will receive a response containing the maximum and average values of the node and request count stats of a specific grid referred to using its Grid ID.
curl -X GET
‘https://api.catalyst.zoho.com/browser360/v1/project/38119000000022053/browser-grid/3970000000005013/stats?datetime_filter=24+Hours&data_to_fetch=node_req_count'
-H ‘CATALYST-ORG: 111737956’
-H ‘Authorization: Zoho-oauthtoken 1000*********************************************780’
curl -X GET
‘https://api.catalyst.zoho.com/browser360/v1/project/38119000000022053/browser-grid/3970000000005013/stats?datetime_filter=24+Hours&data_to_fetch=node_req_count'
-H ‘CATALYST-ORG: 111737956’
-H ‘api-key: 96********************************************************************7049’
{
“status”: “success”,
“data”: {
“avg_concurrent_node_count”: “1”,
“max_concurrent_node_count”: “1”,
“avg_concurrent_req_count”: “0”,
“max_concurrent_req_count”: “0”
}
}
Get Memory and CPU Usage of a Grid
Description
You can use this API to get the memory and CPU usage details of a specific grid. The required grid is referred to using its Grid ID.
Request Details
Request URL
{api-domain}/browser360/v1/project/{project_id}/browser-grid/{grid_id}/stats?data_to_fetch=memory_cpu_usage&datetime_filter=Last+30+Days
Scope
ZohoCatalyst.grid.read
Request Headers for API Using OAuth
Authorization: Zoho-oauthtoken {oauth_token}
Content-Type: application/json
CATALYST-ORG: Provide the value of your Org ID.
Request Headers for API Using API Key
Authorization
api-key: The unique key generated by Catalyst. It can be retrived from the console.
Response Details
You will receive a response containing the maximum and average values of the memory and CPU usage stats of a specific grid referred to using its Grid ID.
curl -X GET
‘https://api.catalyst.zoho.com/browser360/v1/project/38119000000022053/browser-grid/3970000000005013/stats?datetime_filter=24+Hours&data_to_fetch=memory_cpu_usage'
-H ‘CATALYST-ORG: 111737956’
-H ‘Authorization: Zoho-oauthtoken 1000*********************************************780’
-H ‘catalyst-org: 111737956’
curl -X GET
‘https://api.catalyst.zoho.com/browser360/v1/project/38119000000022053/browser-grid/3970000000005013/stats?datetime_filter=24+Hours&data_to_fetch=memory_cpu_usage'
-H ‘CATALYST-ORG: 111737956’
-H ‘api-key: 96********************************************************************7049’
{
“status”: “success”,
“data”: {
“max_memory_usage”: 926.65234375,
“high_disk_usage_count”: 0,
“max_cpu_usage”: 1.1011011011011012,
“avg_memory_usage”: 926.65234375,
“avg_cpu_usage”: 1.1011011011011012
}
}
Get Stats for Browser Rejections and Node Crashes
Description
You can use this API to get the stats on browsers that were rejected from spawning and nodes that crashed in a grid. The required grid will be referred to using its Grid ID.
Request Details
Request URL
{api-domain}/browser360/v1/project/{project_id}/browser-grid/{grid_id}/stats?data_to_fetch=crashed_data&datetime_filter=Last+30+Days
Scope
ZohoCatalyst.grid.read
Request Headers for API Using OAuth
Authorization: Zoho-oauthtoken {oauth_token}
Content-Type: application/json
CATALYST-ORG: Provide the value of your Org ID.
Request Headers for API Using API Key
Authorization
api-key: The unique key generated by Catalyst. It can be retrived from the console.
Response Details
You will receive a response containing the number of browsers that were not allowed to spawn and nodes that crashed of a specific grid referred to using its Grid ID.
curl -X GET
‘https://api.catalyst.zoho.com/browser360/v1/project/38119000000022053/browser-grid/3970000000005013/stats?datetime_filter=24+Hours&data_to_fetch=crashed_data'
-H ‘CATALYST-ORG: 111737956’
-H ‘Authorization: Zoho-oauthtoken 1000*********************************************780’ \
curl -X GET
‘https://api.catalyst.zoho.com/browser360/v1/project/38119000000022053/browser-grid/3970000000005013/stats?datetime_filter=24+Hours&data_to_fetch=crashed_data'
-H ‘CATALYST-ORG: 111737956’
-H ‘api-key: 96********************************************************************7049’
{
“status”: “success”,
“data”: {
“browser_req_reject_count”: 0,
“node_crashed_count”: “0”
}
}
Browser Request Graph
Description
You can use this API to get data on the number of browser requests in the grid during 24 hours. The required grid will be referred to using its Grid ID.
Request Details
Request URL
{api-domain}/browser360/v1/project/{project_id}/browser-grid/{grid_id}/graph-data?datetime_filter=24+Hours&data_to_fetch=req_graph_data
Scope
ZohoCatalyst.grid.read
Request Headers for API Using OAuth
Authorization: Zoho-oauthtoken {oauth_token}
Content-Type: application/json
CATALYST-ORG: Provide the value of your Org ID.
Request Headers for API Using API Key
Authorization
api-key: The unique key generated by Catalyst. It can be retrived from the console.
Response Details
You will receive a response containing the time and usage of the browser grid during 24 hours. The required grid is referred to using its Grid ID.
curl -X GET
‘https://api.catalyst.zoho.com/browser360/v1/project/38119000000022053/browser-grid/3970000000005013/graph-data?datetime_filter=24+Hours&data_to_fetch=req_graph_data'
-H ‘CATALYST-ORG: 111737956’
-H ‘Authorization: Zoho-oauthtoken 1000*********************************************780’
curl -X GET
‘https://api.catalyst.zoho.com/browser360/v1/project/38119000000022053/browser-grid/3970000000005013/graph-data?datetime_filter=24+Hours&data_to_fetch=req_graph_data'
-H ‘CATALYST-ORG: 111737956’
-H ‘api-key: 96********************************************************************7049’
{
“status”: “success”,
“data”: [
[“Sep 22 2025, 04:00 PM”, 0.0],
[“Sep 22 2025, 06:00 PM”, 0.0],
[“Sep 22 2025, 08:00 PM”, 0.0],
[“Sep 22 2025, 10:00 PM”, 0.0],
[“Sep 23 2025, 12:00 AM”, 0.0],
[“Sep 23 2025, 02:00 AM”, 0.0],
[“Sep 23 2025, 04:00 AM”, 0.0],
[“Sep 23 2025, 06:00 AM”, 0.0],
[“Sep 23 2025, 08:00 AM”, 0.0],
[“Sep 23 2025, 10:00 AM”, 0.0],
[“Sep 23 2025, 12:00 PM”, 0.0],
[“Sep 23 2025, 02:00 PM”, 0.0],
[“Sep 23 2025, 04:00 PM”, 0.0],
[“Sep 23 2025, 06:00 PM”, 0.0]
]
}
Node Count Graph
Description
You can use this API to get data on the number of nodes active in the grid during 24 hours. The required grid will be referred to using its Grid ID.
Request Details
Request URL
{api-domain}/browser360/v1/project/{project_id}/browser-grid/{grid_id}/graph-data?datetime_filter=24+Hours&data_to_fetch=node_graph_data
Scope
ZohoCatalyst.grid.read
Request Headers for API Using OAuth
Authorization: Zoho-oauthtoken {oauth_token}
Content-Type: application/json
CATALYST-ORG: Provide the value of your Org ID.
Request Headers for API Using API Key
Authorization
api-key: The unique key generated by Catalyst. It can be retrived from the console.
Response Details
You will receive a response containing the time and node count of a browser grid during 24 hours. The required grid is referred to using its Grid ID.
curl -X GET ‘https://api.catalyst.zoho.com/browser360/v1/project/38119000000022053/browser-grid/3970000000005013/graph-data?datetime_filter=24+Hours&data_to_fetch=node_graph_data'
-H ‘CATALYST-ORG: 111737956’
-H ‘Authorization: Zoho-oauthtoken 1000*********************************************780’
curl -X GET ‘https://api.catalyst.zoho.com/browser360/v1/project/38119000000022053/browser-grid/3970000000005013/graph-data?datetime_filter=24+Hours&data_to_fetch=node_graph_data'
-H ‘CATALYST-ORG: 111737956’
-H ‘api-key: 96********************************************************************7049’
{
“status”: “success”,
“data”: [
[“Sep 23 2025, 11:00 AM”, 0.0],
[“Sep 23 2025, 01:00 PM”, 0.0],
[“Sep 23 2025, 03:00 PM”, 0.0],
[“Sep 23 2025, 05:00 PM”, 1.0],
[“Sep 23 2025, 07:00 PM”, 0.0],
[“Sep 23 2025, 09:00 PM”, 0.0],
[“Sep 23 2025, 11:00 PM”, 0.0],
[“Sep 24 2025, 01:00 AM”, 0.0],
[“Sep 24 2025, 03:00 AM”, 0.0],
[“Sep 24 2025, 05:00 AM”, 0.0],
[“Sep 24 2025, 07:00 AM”, 0.0],
[“Sep 24 2025, 09:00 AM”, 0.0],
[“Sep 24 2025, 11:00 AM”, 0.0],
[“Sep 24 2025, 01:00 PM”, 0.0]
]
}
Memory Usage Graph
Description
You can use this API to get data on memory used by the grid during 24 hours. The required grid will be referred to using its Grid ID.
Request Details
Request URL
{api-domain}/browser360/v1/project/{project_id}/browser-grid/{grid_id}/graph-data?datetime_filter=24+Hours&data_to_fetch=memory_graph_data
Scope
ZohoCatalyst.grid.read
Request Headers for API Using OAuth
Authorization: Zoho-oauthtoken {oauth_token}
Content-Type: application/json
CATALYST-ORG: Provide the value of your Org ID.
Request Headers for API Using API Key
Authorization
api-key: The unique key generated by Catalyst. It can be retrived from the console.
Response Details
You will receive a response containing the time and node count of a browser grid during 24 hours. The required grid is referred to using its Grid ID.
curl -X GET ‘https://api.catalyst.zoho.com/browser360/v1/project/38119000000022053/browser-grid/3970000000005013/graph-data?datetime_filter=24+Hours&data_to_fetch=memory_graph_data'
-H ‘CATALYST-ORG: 111737956’
-H ‘Authorization: Zoho-oauthtoken 1000*********************************************780’
curl -X GET ‘https://api.catalyst.zoho.com/browser360/v1/project/38119000000022053/browser-grid/3970000000005013/graph-data?datetime_filter=24+Hours&data_to_fetch=memory_graph_data'
-H ‘CATALYST-ORG: 111737956’
-H ‘api-key: 96********************************************************************7049’
{
“status”: “success”,
“data”: [
{
“time”: “Sep 23 2025, 11:00 AM”,
“memory_usage_mb”: 0.0
},
{
“time”: “Sep 23 2025, 01:00 PM”,
“memory_usage_mb”: 0.0
},
{
“time”: “Sep 23 2025, 03:00 PM”,
“memory_usage_mb”: 0.0
},
{
“time”: “Sep 23 2025, 05:00 PM”,
“memory_usage_mb”: 771.1453125
},
{
“time”: “Sep 23 2025, 07:00 PM”,
“memory_usage_mb”: 0.0
},
{
“time”: “Sep 23 2025, 09:00 PM”,
“memory_usage_mb”: 0.0
},
{
“time”: “Sep 23 2025, 11:00 PM”,
“memory_usage_mb”: 0.0
},
{
“time”: “Sep 24 2025, 01:00 AM”,
“memory_usage_mb”: 0.0
},
{
“time”: “Sep 24 2025, 03:00 AM”,
“memory_usage_mb”: 0.0
},
{
“time”: “Sep 24 2025, 05:00 AM”,
“memory_usage_mb”: 0.0
},
{
“time”: “Sep 24 2025, 07:00 AM”,
“memory_usage_mb”: 0.0
},
{
“time”: “Sep 24 2025, 09:00 AM”,
“memory_usage_mb”: 0.0
},
{
“time”: “Sep 24 2025, 11:00 AM”,
“memory_usage_mb”: 0.0
},
{
“time”: “Sep 24 2025, 01:00 PM”,
“memory_usage_mb”: 0.0
}
]
}
CPU Usage Graph
Description
You can use this API to get data on CPU used by the grid during 24 hours. The required grid will be referred to using its Grid ID.
Request Details
Request URL
{api-domain}/browser360/v1/project/{project_id}/browser-grid/{grid_id}/graph-data?datetime_filter=24+Hours&data_to_fetch=cpu_graph_data
Scope
ZohoCatalyst.grid.read
Request Headers for API Using OAuth
Authorization: Zoho-oauthtoken {oauth_token}
Content-Type: application/json
CATALYST-ORG: Provide the value of your Org ID.
Request Headers for API Using API Key
Authorization
api-key: The unique key generated by Catalyst. It can be retrived from the console.
Response Details
You will receive a response containing the CPU usage of a browser grid during 24 hours. The required grid is referred to using its Grid ID.
curl -X GET ‘https://consoleqa2.catalyst.localzoho.com/browser360/v1/project/38119000000022053/browser-grid/3970000000005013/graph-data?datetime_filter=24+Hours&data_to_fetch=cpu_graph_data'
-H ‘CATALYST-ORG: 111737956’
-H ‘Authorization: Zoho-oauthtoken 1000*********************************************780’
curl -X GET ‘https://consoleqa2.catalyst.localzoho.com/browser360/v1/project/38119000000022053/browser-grid/3970000000005013/graph-data?datetime_filter=24+Hours&data_to_fetch=cpu_graph_data'
-H ‘CATALYST-ORG: 111737956’
-H ‘api-key: 96********************************************************************7049’
{
“status”: “success”,
“data”: [
[“Sep 23 2025, 11:00 AM”, 0.0],
[“Sep 23 2025, 01:00 PM”, 0.0],
[“Sep 23 2025, 03:00 PM”, 0.0],
[“Sep 23 2025, 05:00 PM”, 0.8621659781801722],
[“Sep 23 2025, 07:00 PM”, 0.0],
[“Sep 23 2025, 09:00 PM”, 0.0],
[“Sep 23 2025, 11:00 PM”, 0.0],
[“Sep 24 2025, 01:00 AM”, 0.0],
[“Sep 24 2025, 03:00 AM”, 0.0],
[“Sep 24 2025, 05:00 AM”, 0.0],
[“Sep 24 2025, 07:00 AM”, 0.0],
[“Sep 24 2025, 09:00 AM”, 0.0],
[“Sep 24 2025, 11:00 AM”, 0.0],
[“Sep 24 2025, 01:00 PM”, 0.0]
]
}
Stop Browser Grid
Description
You can use this API to stop and effectively terminate the browser grid.
Request Details
Request URL
{api-domain}/browser360/v1/project/{project_id}/browser-grid/{grid_id}/stop
Scope
ZohoCatalyst.grid.terminate
Request Headers for API Using OAuth
Authorization: Zoho-oauthtoken {oauth_token}
CATALYST-ORG: Provide the value of your Org ID.
Request Headers for API Using API Key
Authorization
api-key: The unique key generated by Catalyst. It can be retrived from the console.
Response Details
You will receive a response containing details on the status of the execution.
curl -X POST
‘https://api.catalyst.zoho.com/browser360/v1/project/38119000000022053/browser-grid/3970000000005013/stop'
-H ‘Authorization: Zoho-oauthtoken 1000*********************************************780’
-H ‘catalyst-org: 111737956’
curl -X POST \ ‘https://api.catalyst.zoho.com/browser360/v1/project/38119000000022053/browser-grid/3970000000005013/stop'
-H ‘CATALYST-ORG: 111737956’
-H ‘api-key: 96********************************************************************7049’
{
“status”: “success”,
“data”: true
}
PDF & Screenshot
PDF & Screenshot is a component of SmartBrowz that lets you generate visual documents of websites and web applications. It is a powerful tool that can be used to convert webpages to PDF, to use during UI debugging, and to understand visual components from end-users’ perspective, while implementing permitted crawling operations, just to name a few.
You can introduce this functionality in your Catalyst application using the API below.
Generate PDF Using HTML/URL
PDF Description
You can use this API to generate PDF documents of webpages by using HTML code or URL as your input.
PDF Request Details
Request URL
{api-domain}/browser360/v1/project/{project_id}/convert
Scope
ZohoCatalyst.pdfshot.EXECUTE
Request Headers
Authorization: Zoho-oauthtoken {oauth_token}
Content-Type: application/json
Request JSON Properties
Default: false.
HTML template for the print header. Should be valid HTML with the following classes to inject values into them:
The default value can be changed by using the
page.set_default_timeout() or page.set_default_navigation_timeout() methods.
PDF Response Details
The response will return the PDF document generated.
Generate Screenshot Using HTML/URL
Screenshot Description
You can use this API to generate screenshots of webpages using HTML code or URL as your input.
Screenshot Request Details
Request URL
{api-domain}/browser360/v1/project/{project_id}/convert
Scope
ZohoCatalyst.pdfshot.EXECUTE
Request JSON Properties
Screenshot Response Details
The response will return a screenshot that was generated.
curl -X POST \ ‘https://api.catalyst.zoho.com/browser360/v1/project/10470000000272001/convert'
-H “Authorization: Zoho-oauthtoken 1000.910*************************16.2f*************************57”
-H ‘Content-Type: application/json’
–d ‘{
“url”: “https://www.example.com”,
“output_options”: {
“output_type”: “pdf”
},
“pdf_options” : {
“scale” : 1,
“display_header_footer” : true,
“header_template” : “<style> #header, #footer { margin: 0 !important; padding: 0 !important; font-size: 9px; -webkit-print-color-adjust: exact;}</style><div style=\width:100%><span class=\date></span><span class=\title\ style=\float:right></span</div>”,
“footer_template” : “<style> #header, #footer { margin: 0 !important; padding: 0 !important; font-size: 9px; -webkit-print-color-adjust: exact;}</style><div style=\width:100%><span class=\url></span><div style=\float:right><span class=\pageNumber></span> / <span class=\totalPages></span></div></div>”,
“print_background” : false,
“landscape” : false,
“page_ranges” : “1”,
“format” : “A4”,
“width” : “100”,
“height” : “100”,
“margin” :
{
“top” : “1cm”,
“bottom” : “1cm”,
“left” : “1cm”,
“right”: “1cm”
},
“omit_background” : false
},
“page_options”:{
“css” : {
“content” : “body{background: lightgrey}”
},
“viewport” : {
“width”: 1440,
“height”: 900
},
“javascript_enabled” : true
},
“navigation_options”:{
“timeout” : 5000,
“wait_until” : “networkidle0”
}
}’
curl -X POST \ ‘https://api.catalyst.zoho.com/browser360/v1/project/10470000000272001/convert'
-H “Authorization: Zoho-oauthtoken 1000.910*************************16.2f*************************57”
-H ‘Content-Type: application/json’
–d’{
“url”: “https://www.example.com”,
“output_options”: {
“output_type”: “screenshot”
},
“screenshot_options”: {
“type”: “jpeg”,
“quality”: 100,
“full_page”: false,
“omit_background”: false,
“capture_beyond_viewport”: true,
“clip”: {
“x”: 50,
“y”: 100,
“width”: 1000,
“height”: 100
}
},
“page_options”: {
“css”: {
“content”: “body{background: lightgrey}”
},
“viewport”: {
“width”: 1440,
“height”: 900
},
“javascript_enabled”: true
},
“navigation_options”: {
“timeout”: 5000,
“wait_until”: “networkidle0”
}
}’
Generate PDF Using Templates
Description
You can use this API to generate PDF documents of webpages using Templates as your input.
PDF Request Details
Request URL
{api-domain}/browser360/v1/project/{project_id}/convert
Scope
ZohoCatalyst.pdfshot.EXECUTE
Request JSON Properties
Default: false.
The default value can be changed by using the
page.set_default_timeout() or page.set_default_navigation_timeout() methods.
PDF Response Details
The response will be a PDF that was generated.
Note:
-
You need to create a template in the console to use this API.
-
SmartBrowz Templates offers you the option to set a password for the PDF document you generate using a template. If you employ the Set Password Manually option, then you can use this API. This API cannot be used if you employ the Set Password Dynamically option.
Generate Screenshot Using Templates
Screenshot Description
You can use this API to generate screenshot of webpages, by using Templates as your input.
Screenshot Request Details
Request URL
{api-domain}/browser360/v1/project/{project_id}/convert
Scope
ZohoCatalyst.pdfshot.EXECUTE
Request JSON Properties
The default value can be changed by using the
page.set_default_timeout() or page.set_default_navigation_timeout() methods.
Screenshot Response Details
The response will be a Screenshot that was generated.
curl -X POST 'https://api.catalyst.zoho.com/browser360/v1/project/10470000000272001/convert'
-H “Authorization: Zoho-oauthtoken 1000.910*************************16.2f*************************57”
-H ‘Content-Type: application/json’
–d ‘{
“template_id”:“367000000044001”,
“template_data”:{},
“output_options”: {
“output_type”: “pdf”
},
“pdf_options” : {
“scale” : 1,
“display_header_footer” : true,
"print_background" : false,
"landscape" : false,
"page_ranges" : "1",
"format" : "A4",
"width" : "100",
"height" : "100",
"omit_background" : false,
"password": "Demo$"
},
"page_options":{
"css" : {
"content" : "body{background: lightgrey}"
},
"viewport" : {
"width": 1440,
"height": 900
},
"javascript_enabled" : true
},
"navigation_options":{
"timeout" : 5000,
"wait_until" : "networkidle0"
}
}’
curl -X POST \ ‘https://api.catalyst.zoho.com/browser360/v1/project/10470000000272001/convert'
-H “Authorization: Zoho-oauthtoken 1000.910*************************16.2f*************************57”
-H ‘Content-Type: application/json’
-d ‘{
“template_id”:“367000000044001”,
“template_data”:{},
“output_options”: {
“output_type”: “pdf”
},
“screenshot_options” : {
“type” : “jpeg”,
“quality” : 100,
“full_page” : false,
“omit_background” : false,
“capture_beyond_viewport” : true,
“clip” :{
“x” : 50,
“y” : 100,
“width” : 1000,
“height”: 100
}
},
“page_options”:{
"css" : {
"content" : "body{background: lightgrey}"
},
"viewport" : {
"width": 1440,
"height": 900
},
"javascript_enabled" : true
},
“navigation_options”:{
“timeout” : 5000,
“wait_until” : “networkidle0”
}
}’
Catalyst ConvoKraft
Catalyst ConvoKraft is an AI-powered service that allows you to build intelligent chatbots and deploy them in your Catalyst applications. These bots leverage Natural Language Understanding (NLU) to interpret messages and respond naturally in conversational English. You can customize the bot by setting up your own logic, providing simple question-answer pairs, or training it with custom resources, based on your application’s requirements.
SmartTrain is a component of the Catalyst ConvoKraft service that allows you to train your chatbot using your own resources. You can do this by configuring web URLs where the resources are hosted. This enables the bot to quickly provide accurate answers to user queries related to the trained content.
You can refer to this help documentation to learn more about the Catalyst ConvoKraft service.
Enable or Disable SmartTrain
This API enables or disables SmartTrain in the Catalyst ConvoKraft service. When enabled, you can add training materials to enhance the bot’s responses. Disabling it temporarily pauses the bot’s trained knowledge, preventing it from answering queries based on the training data. Once re-enabled, the training is automatically restored, allowing the bot to respond using the previously uploaded materials.
You can introduce this functionality in your Catalyst application using the API below.
Request Details
Request URL
{api-domain}/convokraft/api/v1/bots/{botid}? type=DEVELOPED
Note:
-
The query parameter type=DEVELOPED is used to indicate that the bot is in the developed state within the ConvoKraft service.
-
You can fetch the botid directly from the URL in the ConvoKraft service when the environment is set to Development in the console.
For example : https://console.catalyst.zoho.com/baas/v1/project/183272829220/Development#/convokraft/bots/3828281991118
Here, 3828281991118 is the botid.
Scope
ZIAPlatform.Convokraft.RAG.UPDATE
Request Headers
Authorization: Zoho-oauthtoken {oauth_token}
Content-Type: application/json
CATALYST-ORG: {org_id}
X-CATALYST-projectid: {project id}
X-CATALYST-Environment: Development
Request JSON Properties
Pass the value as true to enable the RAG feature and false to disable it.
Default: true.
Response Details
The response will return the status of the SmartTrain enable or disable operation, along with a status message and status code.
curl -X PATCH
https://api.catalyst.zoho.com/baas/v1/project/4000000006007/convokraft/api/v1/bots/92738220219110?type=DEVELOPED
-H ‘Authorization: Zoho-oauthtoken 1000.910*************************16.2f*************************57’
-H ‘Content-Type: application/json’
-H ‘CATALYST-ORG: 372822922’
-H ‘X-CATALYST-projectid: 2728172727718’
-H ‘X-CATALYST-Environment: “Development”’
--data ‘{
“bots”: {
“is_rag_enabled”: true
}
}’
{
"status": "SUCCESS",
"code": "SUCCESS",
"message": "Updated Successfully."
}
Add Training Material
This API enables you to upload custom training materials to SmartTrain, allowing the ConvoKraft bot to train automatically. You can provide web URLs of the training materials hosted on any third-party platform either in the HTML or TXT format. Once uploaded, the bot processes the content and uses it to respond to relevant queries.
You can introduce this functionality in your Catalyst application using the API below.
Request Details
Request URL
{api-domain}/convokraft/api/v1/bots/{botid}/rag_training_data?type=DEVELOPED
Note:
-
The query parameter type=DEVELOPED is used to indicate that the bot is in the developed state within the ConvoKraft service.
-
You can fetch the botid directly from the URL in the ConvoKraft service when the environment is set to Development in the console.
For example : https://console.catalyst.zoho.com/baas/v1/project/183272829220/Development#/convokraft/bots/3828281991118
Here, 3828281991118 is the botid.
Scope
ZIAPlatform.Convokraft.RAG.CREATE
Request Headers
Authorization: Zoho-oauthtoken {oauth_token}
Content-Type: application/json
CATALYST-ORG: {org_id}
X-CATALYST-projectid: {project id}
X-CATALYST-Environment: Development
Request JSON Properties
Response Details
This API provides the status of the training material upload process, including the status code and message. It also returns the URLs of the uploaded materials along with a unique ID assigned by ConvoKraft for each URL.
curl -X POST
https://api.catalyst.zoho.com/baas/v1/project/4000000006007/convokraft/api/v1/bots/92738220219110/rag_training_data?type=DEVELOPED
-H ‘Authorization: Zoho-oauthtoken 1000.910*************************16.2f*************************57’
-H ‘Content-Type: application/json’
-H ‘CATALYST-ORG: 372822922’
-H ‘X-CATALYST-projectid: 2728172727718’
-H ‘X-CATALYST-Environment: “Development”’
--data ‘{
“rag_training_data”: [
{
“url”: “https://www.apple.com/iphone-15”,
“title”: “Iphone 15 Specifications”
},
{
“url”: “https://www.apple.com/iphone-11/”,
“title”: “Iphone 11 Specifications”
}
]
}’
{
"status": "SUCCESS",
"code": "SUCCESS",
"message": "File upload in progress",
"info": {
"files": [
{
"id": "2000000028005",
"url": "https://www.apple.com/iphone-15/"
},
{
"id": "2000000028007",
"url": "https://www.apple.com/iphone-11/"
},
]
}
}
Get Training Materials
This API allows you to fetch the details and the metadata of the training materials associated with a particular ConvoKraft bot.
You can integrate this functionality into your Catalyst application using the API provided below.
Request Details
Request URL
{api-domain}/convokraft/api/v1/bots/{botid}/rag_training_data?type=DEVELOPED
Note:
-
The query parameter type=DEVELOPED is used to indicate that the bot is in the developed state within the ConvoKraft service.
-
You can fetch the botid directly from the URL in the ConvoKraft service when the environment is set to Development in the console.
For example : https://console.catalyst.zoho.com/baas/v1/project/183272829220/Development#/convokraft/bots/3828281991118
Here, 3828281991118 is the botid.
Scope
ZIAPlatform.Convokraft.RAG.READ
Request Headers
Authorization: Zoho-oauthtoken {oauth_token}
Content-Type: application/json
CATALYST-ORG: {org_id}
X-CATALYST-projectid: {project id}
X-CATALYST-Environment: Development
Response Details
This API provides details and the metadata of all training materials associated with the bot, including the unique ID generated by ConvoKraft, the title, URL, and status of each training material. It also includes information about the creation and modification of the materials, such as the user’s email address, time zone, ZUID, role, and other relevant details, along with the creation and modification timestamps.
curl -X GET
https://api.catalyst.zoho.com/baas/v1/project/4000000006007/convokraft/api/v1/bots/92738220219110/rag_training_data?type=DEVELOPED
-H ‘Authorization: Zoho-oauthtoken 1000.910*************************16.2f*************************57’
-H ‘Content-Type: application/json’
-H ‘CATALYST-ORG: 372822922’
-H ‘X-CATALYST-projectid: 2728172727718’
-H ‘X-CATALYST-Environment: “Development”’ \
{
“rag_training_data”: [
{
“id”: “67799000000085007”,
“title”: “Iphone 15 Specifications”,
“url”: “https://www.apple.com/iphone-15/”,
“source”: “URL”,
“created_by”: {
“id”: “76859507”,
“email”: “amelia.burrows@zylker.com”,
“username”: “amelia.burrows”,
“timezone”: “Asia/Calcutta”,
“nickname”: “amelia”,
“locale”: “en_IN”,
“role”: “SUPER_ADMIN”,
“zuid”: “76859507”
},
“created_time”: “1732880033148”,
“modified_by”: {
“id”: “76859507”,
“email”: “amelia.burrows@zylker.com”,
“username”: “amelia.burrows”,
“timezone”: “Asia/Calcutta”,
“nickname”: “nivetha.raja”,
“locale”: “en_IN”,
“role”: “SUPER_ADMIN”,
“zuid”: “76859507”
},
“modified_time”: “1732880389581”,
“status”: “TRAINED”
},
{
“id”: “67799000000085009”,
“title”: “Iphone 11 Specifications”,
“url”: “https://www.apple.com/iphone-11/”,
“source”: “URL”,
“created_by”: {
“id”: “76859507”,
“email”: “amelia.burrows”,
“username”: “amelia.burrows”,
“timezone”: “Asia/Calcutta”,
“nickname”: “amelia”,
“locale”: “en_IN”,
“role”: “SUPER_ADMIN”,
“zuid”: “76859507”
},
“created_time”: “1732880131250”,
“modified_by”: {
“id”: “76859507”,
“email”: “amelia.burrows@zylker.com”,
“username”: “amelia.burrows”,
“timezone”: “Asia/Calcutta”,
“nickname”: “amelia”,
“locale”: “en_IN”,
“role”: “SUPER_ADMIN”,
“zuid”: “76859507”
},
“modified_time”: “1732880131250”,
“status”: “TRAINED”
}
]
}
Delete Training Material
This API enables you to delete the custom training materials uploaded to the SmartTrain feature in the ConvoKraft bot by providing the unique ID assigned to each material in the request. You can also delete multiple materials at once by passing the IDs separated by commas. Please note that deleting the training material will automatically delete the trained knowledge in the bot, and it will not be able to answer any queries based on the deleted training material.
You can integrate this functionality into your Catalyst application using the API provided below.
Request Details
Request URL
{api-domain}/convokraft/api/v1/bots/{botid}/rag_training_data?type=DEVELOPED
Note:
-
The query parameter type=DEVELOPED is used to indicate that the bot is in the developed state within the ConvoKraft service.
-
You can fetch the botid directly from the URL in the ConvoKraft service when the environment is set to Development in the console.
For example : https://console.catalyst.zoho.com/baas/v1/project/183272829220/Development#/convokraft/bots/3828281991118
Here, 3828281991118 is the botid.
Scope
ZIAPlatform.Convokraft.RAG.DELETE
Request Headers
Authorization: Zoho-oauthtoken {oauth_token}
Content-Type: application/json
CATALYST-ORG: {org_id}
X-CATALYST-projectid: {project id}
X-CATALYST-Environment: Development
Request JSON Properties
Response Details
This API returns the status of the delete operation along with its status code and message.
curl -X DELETE
https://api.catalyst.zoho.com/baas/v1/project/4000000006007/convokraft/api/v1/bots/92738220219110/rag_training_data?type=DEVELOPED
-H ‘Authorization: Zoho-oauthtoken 1000.910*************************16.2f*************************57’
-H ‘Content-Type: application/json’
-H ‘CATALYST-ORG: 372822922’
-H ‘X-CATALYST-projectid: 2728172727718’
-H ‘X-CATALYST-Environment: “Development”’
--data ‘{
“rag_training_data”: [
{
“id”: “67799000000084013”
}
]
}’
{
“status”: “SUCCESS”,
“code”: “SUCCESS”,
“message”: “Updated Successfully.”
}
Fetch Answer from Bot
This API enables you to retrieve an answer from the ConvoKraft bot by submitting a transcript query. The bot will understand the question and respond with an answer based on its training.
You can integrate this functionality into your Catalyst application using the API provided below.
Request Details
Request URL
{api-domain}/convokraft/api/v1/bots/{production_botid}/answer
Note: You can fetch the production_botid directly from the URL in the ConvoKraft service when the environment is set to Production in the console.
For example : https://console.catalyst.zoho.com/baas/v1/project/183272829220/Production#/convokraft/bots/3828281991118
Here, 3828281991118 is the production_botid.
Scope
ZIAPlatform.Convokraft.RAG.CREATE
Request Headers
Authorization: Zoho-oauthtoken {oauth_token}
Content-Type: application/json
CATALYST-ORG: {org_id}
X-CATALYST-projectid: {project id}
X-CATALYST-Environment: Development
Response Details
The API returns the answer provided by ConvoKraft based on the training material, along with the status of the answer retrieval process.
curl -X POST
https://api.catalyst.zoho.com/convokraft/api/v1/bots/92738220219110/answer
-H ‘Authorization: Zoho-oauthtoken 1000.910*************************16.2f*************************57’
-H ‘Content-Type: application/json’
-H ‘CATALYST-ORG: 372822922’
-H ‘X-CATALYST-projectid: 2728172727718’
-H ‘X-CATALYST-Environment: “Production”’
--data ‘{
“transcript”: {
“message”: “Explain Iphone 11 Specifications”
}
}’
{
“transcript”: {
“message”: “The iPhone 11 is a sleek and powerful smartphone from Apple, featuring a 6.1-inch Liquid Retina HD display that offers vibrant colors and sharp detail. It’s powered by the A13 Bionic chip, which ensures fast performance and smooth multitasking. Whether you’re gaming, editing photos, or using apps, the iPhone 11 can handle it with ease.
One of the standout features of the iPhone 11 is its camera system. It has a dual-camera setup, with a 12MP wide and ultra-wide lens, making it great for capturing detailed photos and videos. The Night Mode feature helps take clearer pictures in low-light environments, and it also supports 4K video recording at 60fps, allowing you to shoot high-quality videos.”,
“status”: “action_completion”
}
}
Job Scheduling API
Job Scheduling is a Catalyst service that allows you to schedule job submissions and execute them in a Job Pool to trigger Circuits, Webhooks (any third-party URL), Job Functions, and App Sail service’s endpoints.
Get All Job Pools
Description
This API enables you to retrieve details of all the Job Pools present in the project.
Request Details
Request URL
{api-domain}/baas/v1/project/{project_id}/job_scheduling/jobpool
Request Headers
Authorization: Zoho-oauthtoken {oauth_token}
Optional Headers
CATALYST-ORG: {org_id}
Environment: Development
Scope
ZohoCatalyst.jobpool.READ
Response Details
The JSON response returns the metadata of all the Job Pools present in the project. the response will also contain the details of the user who created and last modified it.
curl -X GET
https://api.catalyst.zoho.com/baas/v1/project/10278000000019013/job_scheduling/jobpool
-H “Authorization: Zoho-oauthtoken 1000.91016.2f57”
{
"status": "success",
"data": [
{
"type": "AppSail",
"name": "TriggerMicroservice",
"created_by": {
"zuid": "77941453",
"is_confirmed": false,
"email_id": "emmy@zylker.com",
"first_name": "Amelia Burrows",
"last_name": "",
"user_type": "Admin",
"user_id": "10108000000009004"
},
"created_time": "May 28, 2024 04:51 PM",
"modified_by": {
"zuid": "77941453",
"is_confirmed": false,
"email_id": "emmy@zylker.com",
"first_name": "Amelia Burrows",
"last_name": "",
"user_type": "Admin",
"user_id": "10108000000009004"
},
"modified_time": "May 28, 2024 04:51 PM",
"capacity": {
"number": "1"
},
"project_details": {
"project_name": "ZylkerShipments",
"id": "10108000003823392",
"project_type": "Live"
},
"id": "10108000003823795"
},
{
"type": "Circuit",
"name": "InventoryDataMaintaince",
"created_by": {
"zuid": "77941453",
"is_confirmed": false,
"email_id": "emmy@zylker.com",
"first_name": "Amelia Burrows",
"last_name": "",
"user_type": "Admin",
"user_id": "10108000000009004"
},
"created_time": "May 28, 2024 04:49 PM",
"modified_by": {
"zuid": "77941453",
"is_confirmed": false,
"email_id": "emmy@zylker.com",
"first_name": "Amelia Burrows",
"last_name": "",
"user_type": "Admin",
"user_id": "10108000000009004"
},
"modified_time": "May 28, 2024 04:49 PM",
"capacity": {
"number": "3"
},
"project_details": {
"project_name": "ZylkerShipments",
"id": "10108000003823392",
"project_type": "Live"
},
"id": "10108000003823699"
},
{
"type": "Webhook",
"name": "VendorDataFetch",
"created_by": {
"zuid": "77941453",
"is_confirmed": false,
"email_id": "emmy@zylker.com",
"first_name": "Amelia Burrows",
"last_name": "",
"user_type": "Admin",
"user_id": "10108000000009004"
},
"created_time": "May 28, 2024 04:47 PM",
"modified_by": {
"zuid": "77941453",
"is_confirmed": false,
"email_id": "emmy@zylker.com",
"first_name": "Amelia Burrows",
"last_name": "",
"user_type": "Admin",
"user_id": "10108000000009004"
},
"modified_time": "May 28, 2024 04:47 PM",
"capacity": {
"number": "3"
},
"project_details": {
"project_name": "ZylkerShipments",
"id": "10108000003823392",
"project_type": "Live"
},
"id": "10108000003823632"
},
{
"type": "Function",
"name": "VendorReminder",
"created_by": {
"zuid": "77941453",
"is_confirmed": false,
"email_id": "emmy@zylker.com",
"first_name": "Amelia Burrows",
"last_name": "",
"user_type": "Admin",
"user_id": "10108000000009004"
},
"created_time": "May 28, 2024 04:44 PM",
"modified_by": {
"zuid": "77941453",
"is_confirmed": false,
"email_id": "emmy@zylker.com",
"first_name": "Amelia Burrows",
"last_name": "",
"user_type": "Admin",
"user_id": "10108000000009004"
},
"modified_time": "May 28, 2024 04:44 PM",
"capacity": {
"memory": "2048"
},
"project_details": {
"project_name": "ZylkerShipments",
"id": "10108000003823392",
"project_type": "Live"
},
"id": "10108000003823563"
}
]
}
Get Job Pool by Identifier
Description
This API enables you to retrieve details of a specific job pool. The Job Pool is referred by its unique Job Pool ID or its name.
Request Details
Request URL
{api-domain}/baas/v1/project/{project_id}/job_scheduling/jobpool/{jobpool_identifier}
Request Headers
Authorization: Zoho-oauthtoken {oauth_token}
Optional Headers
CATALYST-ORG: {org_id}
Environment: Development
Scope
ZohoCatalyst.jobpool.READ
Response Details
The JSON response returns the metadata of a specific corn present in the project. The response will also contain the details of the user who created and last modified it.
curl -X GET
https://api.catalyst.zoho.com/baas/v1/project/10278000000019013/job_scheduling/cron/10108000004154323
-H “Authorization: Zoho-oauthtoken 1000.91016.2f57”
{
"status": "success",
"data": {
"cron_name": "pcMonthlyDay",
"cron_type": "Calendar",
"cron_execution_type": "pre-defined",
"job_meta": {
"id": "10108000004154323",
"url": "",
"job_name": "j",
"job_config": {
"number_of_retries": 0
},
"target_type": "AppSail",
"target_details": {
"id": "10108000002976191",
"target_name": "appsailTrue"
},
"source_type": "Cron",
"source_details": {
"id": "10108000004154321",
"source_name": "pcMonthlyDay",
"details": {
"cron_execution_type": "pre-defined"
}
},
"jobpool_id": "10108000002976201",
"jobpool_details": {
"type": "AppSail",
"name": "appsailJP",
"created_by": {
"zuid": "77941453",
"is_confirmed": false,
"email_id": "emmy@zylker.com",
"first_name": "Amelia Burrows",
"last_name": "",
"user_type": "Admin",
"user_id": "10108000000009004"
},
"created_time": "Mar 28, 2024 05:41 PM",
"modified_by": {
"zuid": "77941453",
"is_confirmed": false,
"email_id": "emmy@zylker.com",
"first_name": "Amelia Burrows",
"last_name": "",
"user_type": "Admin",
"user_id": "10108000000009004"
},
"modified_time": "Mar 28, 2024 05:41 PM",
"capacity": {
"number": "5"
},
"project_details": {
"project_name": "AppsailCron",
"id": "10108000002976144",
"project_type": "Live"
},
"id": "10108000002976201"
},
"request_method": "get"
},
"cron_status": true,
"created_time": "Jun 04, 2024 04:31 PM",
"created_by": {
"zuid": "77941453",
"is_confirmed": false,
"email_id": "emmy@zylker.com",
"first_name": "Amelia Burrows",
"last_name": "",
"user_type": "Admin",
"user_id": "10108000000009004"
},
"modified_time": "Jun 04, 2024 04:31 PM",
"modified_by": {
"zuid": "77941453",
"is_confirmed": false,
"email_id": "emmy@zylker.com",
"first_name": "Amelia Burrows",
"last_name": "",
"user_type": "Admin",
"user_id": "10108000000009004"
},
"project_details": {
"project_name": "AppsailCron",
"id": "10108000002976144",
"project_type": "Live"
},
"end_time": "1718303399",
"cron_detail": {
"hour": 4,
"minute": 4,
"second": 4,
"repetition_type": "monthly",
"days": [
1,
3,
4
],
"timezone": "Asia/Kolkata"
},
"success_count": 0,
"failure_count": 0,
"id": "10108000004154321"
}
}
Submit Webhook Job By ID
Description
This API enables you to submit a job to a Job Pool that triggers a Webhook endpoint.
Request Details
Request URL
{api-domain}/baas/v1/project/{project_id}/job_scheduling/job
Request Headers
Authorization: Zoho-oauthtoken {oauth_token}
Content-Type: application/json
Optional Headers
CATALYST-ORG: {org_id}
Environment: Development
Scope
ZohoCatalyst.job.CREATE
Request JSON
You must send a JSON with its corresponding values as shown below.
{
"request_method": "post",
"source_type": "API",
"job_config": {
"number_of_retries": "2",
"retry_interval": 1800
},
"job_name": "webhookPost",
"jobpool_id": "10108000003823632",
"target_type": "Webhook",
"url": "https://www.zoho.com",
"headers": {
"h1": "v1"
},
"request_body": "{'key1':'val1'}"
}
You will feed this Request JSON to your Request Body, and you need to provide the value of:
Response Details
The JSON response returns the metadata of the submitted job. The response will also contain the details of the user who submitted the job.
curl -X POST
https://api.catalyst.zoho.com/baas/v1/project/{project_id}/job_scheduling/job
-H “Authorization: Zoho-oauthtoken 1000.91016.2f57”
-H “Content-Type:application/json”
--data-raw $’{“request_method”:“post”,“source_type”:“API”,“job_config”:{“number_of_retries”:“2”,“retry_interval”:1800},“job_name”:“webhookPost”,“jobpool_id”:“10108000003823632”,“target_type”:“Webhook”,“url”:“https://www.zoho.com”,“headers”:{“h1”:“v1”},“request_body”:"{'key1':'val1'}"}'
{
"status": "success",
"data": {
"job_id": "10108000004194125",
"created_time": "Jun 05, 2024 04:37 PM",
"response_code": null,
"start_time": {},
"end_time": {},
"submitted_on": {
"startTimeToRedirectLogsPage": "05/06/2024 16:32",
"timeWithGivenTimezone": "Jun 05, 2024 04:37 PM IST",
"timeWithJobTimezone": "Jun 05, 2024 04:37 PM IST"
},
"job_status": "PENDING",
"capacity": {
"number": "1"
},
"job_meta_details": {
"id": "10108000004194126",
"url": "https://www.zoho.com",
"job_name": "webhookPost",
"job_config": {
"number_of_retries": 2,
"retry_interval": 1800
},
"target_type": "Webhook",
"target_details": {
"target_name": "https://www.zoho.com"
},
"source_type": "API",
"source_details": {
"source_name": "API"
},
"jobpool_id": "10108000003823632",
"jobpool_details": {
"type": "Webhook",
"name": "VendorDataFetch",
"created_by": {
"zuid": "77941453",
"is_confirmed": false,
"email_id": "emmy@zylker.com",
"first_name": "Amelia Burrows",
"last_name": "",
"user_type": "Admin",
"user_id": "10108000000009004"
},
"created_time": "May 28, 2024 04:47 PM",
"modified_by": {
"zuid": "77941453",
"is_confirmed": false,
"email_id": "emmy@zylker.com",
"first_name": "Amelia Burrows",
"last_name": "",
"user_type": "Admin",
"user_id": "10108000000009004"
},
"modified_time": "May 28, 2024 04:47 PM",
"project_details": {
"project_name": "ZylkerShipments",
"id": "10108000003823392",
"project_type": "Live"
},
"id": "10108000003823632"
},
"headers": {
"h1": "v1"
},
"params": {},
"request_method": "post",
"request_body": "{'key1':'val1'}"
},
"retried_count": null,
"parent_job_id": "10108000004194125",
"execution_time": null
}
}
Submit a Function Job by ID
Description
This API enables you to submit a job to a Job Pool that triggers a Job Function endpoint.
Request Details
Request URL
{api-domain}/baas/v1/project/{project_id}/job_scheduling/job
Request Headers
Authorization: Zoho-oauthtoken {oauth_token}
Content-Type: application/json
Optional Headers
CATALYST-ORG: {org_id}
Environment: Development
Scope
ZohoCatalyst.job.CREATE
Request JSON
You must send a JSON with its corresponding values as shown below.
{
"source_type": "API",
"job_config": {
"number_of_retries": "2",
"retry_interval": 10800
},
"job_name": "functionJob",
"jobpool_id": "10108000003823563",
"target_type": "Function",
"target_id": "10108000003823893",
"params": {
"param1": "value1"
}
}
You will feed this Request JSON to your Request Body, and you need to provide the value of:
Response Details
The JSON response returns the metadata of the submitted job. The response will also contain the details of the user who submitted the job.
curl -X POST \ ‘https://api.catalyst.zoho.com/baas/v1/project/10108000003823392/job_scheduling/job
-H “Authorization: Zoho-oauthtoken 1000.91016.2f57”
-H “Content-Type:application/json”
--data-raw ‘{“source_type”:“API”,“job_config”:{“number_of_retries”:“2”,“retry_interval”:10800},“job_name”:“functionJob”,“jobpool_id”:“10108000003823563”,“target_type”:“Function”,“target_id”:“10108000003823893”,“params”:{“param1”:“value1”}}’
{
"status": "success",
"data": {
"job_id": "10108000004194195",
"created_time": "Jun 05, 2024 04:51 PM",
"response_code": null,
"start_time": {},
"end_time": {},
"submitted_on": {
"startTimeToRedirectLogsPage": "05/06/2024 16:46",
"timeWithGivenTimezone": "Jun 05, 2024 04:51 PM IST",
"timeWithJobTimezone": "Jun 05, 2024 04:51 PM IST"
},
"job_status": "PENDING",
"capacity": {
"memory": "512"
},
"job_meta_details": {
"id": "10108000004194196",
"url": "",
"job_name": "functionJob",
"job_config": {
"number_of_retries": 2,
"retry_interval": 10800
},
"target_type": "Function",
"target_details": {
"id": "10108000003823893",
"target_name": "target_function_fetch"
},
"source_type": "API",
"source_details": {
"source_name": "API"
},
"jobpool_id": "10108000003823563",
"jobpool_details": {
"type": "Function",
"name": "VendorReminder",
"created_by": {
"zuid": "77941453",
"is_confirmed": false,
"email_id": "emmy@zylker.com",
"first_name": "Amelia Burrows",
"last_name": "",
"user_type": "Admin",
"user_id": "10108000000009004"
},
"created_time": "May 28, 2024 04:44 PM",
"modified_by": {
"zuid": "77941453",
"is_confirmed": false,
"email_id": "emmy@zylker.com",
"first_name": "Amelia Burrows",
"last_name": "",
"user_type": "Admin",
"user_id": "10108000000009004"
},
"modified_time": "May 28, 2024 04:44 PM",
"project_details": {
"project_name": "ZylkerShipments",
"id": "10108000003823392",
"project_type": "Live"
},
"id": "10108000003823563"
},
"headers": {},
"params": {
"param1": "value1"
}
},
"retried_count": null,
"parent_job_id": "10108000004194195",
"execution_time": null
}
}
Submit a Circuit Job By ID
Description
This API enables you to submit a job to a Job Pool that triggers a Circuit’s endpoint.
Request Details
Request URL
{api-domain}/baas/v1/project/{project_id}/job_scheduling/job
Request Headers
Authorization: Zoho-oauthtoken {oauth_token}
Content-Type: application/json
Optional Headers
CATALYST-ORG: {org_id}
Environment: Development
Scope
ZohoCatalyst.job.CREATE
Request JSON
You must send a JSON with its corresponding values as shown below.
{
"source_type": "API",
"job_config": {
"number_of_retries": "4",
"retry_interval": 300
},
"job_name": "circuitJob",
"jobpool_id": "10108000003823699",
"target_type": "Circuit",
"target_id": "10108000004194246",
"test_cases": {
"key1": "value1",
"key2": "value2",
"key3": "value3"
}
}
You will feed this Request JSON to your Request Body, and you need to provide the value of:
Response Details
The JSON response returns the metadata of the submitted job. The response will also contain the details of the user who submitted the job.
curl -X POST
https://api.catalyst.zoho.com/baas/v1/project/{project_id}/job_scheduling/job
-H “Authorization: Zoho-oauthtoken 1000.91016.2f57”
-H “Content-Type:application/json”
--data-raw ‘{“source_type”:“API”,“job_config”:{“number_of_retries”:“4”,“retry_interval”:300},“job_name”:“circuitJob”,“jobpool_id”:“10108000003823699”,“target_type”:“Circuit”,“target_id”:“10108000004194246”,“test_cases”:{“key1”:“value1”,“key2”:“value2”,“key3”:“value3”}}’
{
"status": "success",
"data": {
"job_id": "10108000004194251",
"created_time": "Jun 05, 2024 04:56 PM",
"response_code": null,
"start_time": {},
"end_time": {},
"submitted_on": {
"startTimeToRedirectLogsPage": "05/06/2024 16:51",
"timeWithGivenTimezone": "Jun 05, 2024 04:56 PM IST",
"timeWithJobTimezone": "Jun 05, 2024 04:56 PM IST"
},
"job_status": "PENDING",
"capacity": {
"number": "1"
},
"job_meta_details": {
"id": "10108000004194252",
"job_name": "circuitJob",
"job_config": {
"number_of_retries": 4,
"retry_interval": 300
},
"target_type": "Circuit",
"target_details": {
"id": "10108000004194246",
"target_name": "abc"
},
"source_type": "API",
"source_details": {
"source_name": "API"
},
"jobpool_id": "10108000003823699",
"jobpool_details": {
"type": "Circuit",
"name": "InventoryDataMaintaince",
"created_by": {
"zuid": "77941453",
"is_confirmed": false,
"email_id": "emmy@zylker.com",
"first_name": "Amelia Burrows",
"last_name": "",
"user_type": "Admin",
"user_id": "10108000000009004"
},
"created_time": "May 28, 2024 04:49 PM",
"modified_by": {
"zuid": "77941453",
"is_confirmed": false,
"email_id": "emmy@zylker.com",
"first_name": "Amelia Burrows",
"last_name": "",
"user_type": "Admin",
"user_id": "10108000000009004"
},
"modified_time": "May 28, 2024 04:49 PM",
"project_details": {
"project_name": "ZylkerShipments",
"id": "10108000003823392",
"project_type": "Live"
},
"id": "10108000003823699"
},
"headers": {},
"params": {
"key1": "value1",
"key2": "value2",
"key3": "value3"
}
},
"retried_count": null,
"parent_job_id": "10108000004194251",
"execution_time": null
}
}
Submit an AppSail Job By ID
Description
This API enables you to submit a job to a Job Pool that triggers a AppSail service’s endpoint.
Request Details
Request URL
{api-domain}/baas/v1/project/{project_id}/job_scheduling/job
Request Headers
Authorization: Zoho-oauthtoken {oauth_token}
Content-Type: application/json
Optional Headers
CATALYST-ORG: {org_id}
Environment: Development
Scope
ZohoCatalyst.job.CREATE
Request JSON
You must send a JSON with its corresponding values as shown below.
{
"request_method": "get",
"source_type": "API",
"job_config": {
"number_of_retries": "3",
"retry_interval": 300
},
"job_name": "appsailJob",
"jobpool_id": "10108000002976201",
"target_type": "AppSail",
"target_id": "10108000002976191",
"url": "",
"headers": {
"h1": "k1"
},
"params": {
"p1": "v1"
}
}
You will feed this Request JSON to your Request Body, and you need to provide the value of:
Response Details
The JSON response returns the metadata of the submitted job. The response will also contain the details of the user who submitted the job.
curl -X POST
https://api.catalyst.zoho.com/baas/v1/project/{project_id}/job_scheduling/job
-H “Authorization: Zoho-oauthtoken 1000.91016.2f57”
-H “Content-Type:application/json”
--data-raw ‘{“request_method”:“get”,“source_type”:“API”,“job_config”:{“number_of_retries”:“3”,“retry_interval”:300},“job_name”:“appsailJob”,“jobpool_id”:“10108000002976201”,“target_type”:“AppSail”,“target_id”:“10108000002976191”,“url”:"",“headers”:{“h1”:“k1”},“params”:{“p1”:“v1”}}’
{
"status": "success",
"data": {
"job_id": "10108000004194320",
"created_time": "Jun 05, 2024 05:02 PM",
"response_code": null,
"start_time": {},
"end_time": {},
"submitted_on": {
"startTimeToRedirectLogsPage": "05/06/2024 16:57",
"timeWithGivenTimezone": "Jun 05, 2024 05:02 PM IST",
"timeWithJobTimezone": "Jun 05, 2024 05:02 PM IST"
},
"job_status": "PENDING",
"capacity": {
"number": "1"
},
"job_meta_details": {
"id": "10108000004194321",
"url": "",
"job_name": "appsailJob",
"job_config": {
"number_of_retries": 3,
"retry_interval": 300
},
"target_type": "AppSail",
"target_details": {
"id": "10108000002976191",
"target_name": "appsailTrue"
},
"source_type": "API",
"source_details": {
"source_name": "API"
},
"jobpool_id": "10108000002976201",
"jobpool_details": {
"type": "AppSail",
"name": "appsailJP",
"created_by": {
"zuid": "77941453",
"is_confirmed": false,
"email_id": "emmy@zylker.com",
"first_name": "Amelia Burrows",
"last_name": "",
"user_type": "Admin",
"user_id": "10108000000009004"
},
"created_time": "Mar 28, 2024 05:41 PM",
"modified_by": {
"zuid": "77941453",
"is_confirmed": false,
"email_id": "emmy@zylker.com",
"first_name": "Amelia Burrows",
"last_name": "",
"user_type": "Admin",
"user_id": "10108000000009004"
},
"modified_time": "Mar 28, 2024 05:41 PM",
"project_details": {
"project_name": "AppsailCron",
"id": "10108000002976144",
"project_type": "Live"
},
"id": "10108000002976201"
},
"headers": {
"h1": "k1"
},
"params": {
"p1": "v1"
},
"request_method": "get"
},
"retried_count": null,
"parent_job_id": "10108000004194320",
"execution_time": null
}
}
Get Job By ID
Description
This API enables you to retrieve details of a specific Job. The Job is referred by its unique Job ID.
Request Details
Request URL
{api-domain}/baas/v1/project/{project_id}/job_scheduling/job/{job_id}
Request Headers
Authorization: Zoho-oauthtoken {oauth_token}
Optional Headers
CATALYST-ORG: {org_id}
Environment: Development
Scope
ZohoCatalyst.job.READ
Response Details
The JSON response returns the metadata of a specific job present in the project. The response will also contain the details of the user who created and last modified it.
curl -X GET
https://api.catalyst.zoho.com/baas/v1/project/10278000000019013/job_scheduling/job/10278000000027019
-H “Authorization: Zoho-oauthtoken 1000.91016.2f57”
{
"status": "success",
"data": {
"job_id": "10108000003880208",
"created_time": "May 29, 2024 02:29 PM",
"response_code": "Success",
"start_time": {
"startTimeToRedirectLogsPage": "29/05/2024 14:24",
"timeWithGivenTimezone": "May 29, 2024 02:29 PM IST",
"timeWithJobTimezone": "May 29, 2024 02:29 PM IST"
},
"end_time": {
"timeWithGivenTimezone": "May 29, 2024 02:29 PM IST",
"timeWithJobTimezone": "May 29, 2024 02:29 PM IST",
"endTimeToRedirectLogsPage": "29/05/2024 14:34"
},
"submitted_on": {
"startTimeToRedirectLogsPage": "29/05/2024 14:24",
"timeWithGivenTimezone": "May 29, 2024 02:29 PM IST",
"timeWithJobTimezone": "May 29, 2024 02:29 PM IST"
},
"job_status": "SUCCESS",
"capacity": {
"memory": "256"
},
"job_meta_details": {
"id": "10108000003880209",
"url": "",
"job_name": "abc",
"job_config": {
"number_of_retries": 0
},
"target_type": "Function",
"target_details": {
"id": "10108000003823893",
"target_name": "target_function_fetch"
},
"source_type": "API",
"source_details": {
"source_name": "API"
},
"jobpool_id": "10108000003823563",
"jobpool_details": {
"type": "Function",
"name": "VendorReminder",
"created_by": {
"zuid": "77941453",
"is_confirmed": false,
"email_id": "emmy@zylker.com",
"first_name": "Amelia Burrows",
"last_name": "",
"user_type": "Admin",
"user_id": "10108000000009004"
},
"created_time": "May 28, 2024 04:44 PM",
"modified_by": {
"zuid": "77941453",
"is_confirmed": false,
"email_id": "emmy@zylker.com",
"first_name": "Amelia Burrows",
"last_name": "",
"user_type": "Admin",
"user_id": "10108000000009004"
},
"modified_time": "May 28, 2024 04:44 PM",
"project_details": {
"project_name": "ZylkerShipments",
"id": "10108000003823392",
"project_type": "Live"
},
"id": "10108000003823563"
},
"headers": {},
"params": {}
},
"retried_count": 0,
"parent_job_id": "10108000003880208",
"execution_time": "633",
"status": false,
"dispatch_delay": "103"
}
}
Create a Cron Using Cron Expressions
Description
This API enables you to create a recurring type cron defined using Cron Expressions that at the scheduled time will submit a job to the job pool and trigger a Job Function endpoint.
Note:
-
In this API, we are illustrating the sample request and sample response with a Job Function. The API functionality remains the same for webhook, Circuits, and AppSail jobs.
-
This API is applicable for Pre-Defined Crons and Dynamic Crons.
Request Details
Request URL
{api-domain/}baas/v1/project/{project_id}/job_scheduling/cron
Request Headers
Authorization: Zoho-oauthtoken {oauth_token}
Content-Type: application/json
Optional Headers
CATALYST-ORG: {org_id}
Environment: Development
Scope
ZohoCatalyst.cron.CREATE
Request JSON
You must send a JSON with its corresponding values as shown below.
{
"cron_type": "CronExpression",
"cron_status": true,
"cron_expression": "* * * * *",
"job_detail": {
"timezone": "PST"
},
"job_meta": {
"source_type": "Cron",
"job_config": {
"number_of_retries": "1",
"retry_interval": "500"
},
"job_name": "jobName",
"jobpool_id": "10108000003823563",
"target_type": "Function",
"target_id": "10108000003823893",
"params": {
"param1": "value1"
}
},
"cron_name": "cronExp",
"description": "cronexpression",
"end_time": 1717916399,
"cron_execution_type": "pre-defined"
}
You will feed this Request JSON to your Request Body, and you need to provide the value of:
Response Details
The JSON response returns the metadata of the created cron. The response will also contain the details of the user who created the cron.
curl -X POST \ https://api.catalyst.zoho.com/baas/v1/project/10108000003823392/job_scheduling/cron
-H “Authorization: Zoho-oauthtoken 1000.91016.2f57”
-H “Content-Type:application/json”
--data-raw ‘{“cron_type”:“CronExpression”,“cron_status”:true,“cron_expression”:"* * * * *",“job_detail”:{“timezone”:“PST”},“job_meta”:{“source_type”:“Cron”,“job_config”:{“number_of_retries”:“1”,“retry_interval”:“500”},“job_name”:“jobName”,“jobpool_id”:“10108000003823563”,“target_type”:“Function”,“target_id”:“10108000003823893”,“params”:{“param1”:“value1”}},“cron_name”:“cronExp”,“description”:“cronexpression”,“end_time”:1717916399,“cron_execution_type”:“pre-defined”}’
{
"status": "success",
"data": {
"cron_name": "cronExp",
"description": "cronexpression",
"cron_type": "CronExpression",
"cron_execution_type": "pre-defined",
"cron_expression": "* * * * *",
"job_meta": {
"id": "10108000004280709",
"url": "",
"job_name": "jobName",
"job_config": {
"number_of_retries": 1,
"retry_interval": 500
},
"target_type": "Function",
"target_details": {
"id": "10108000003823893",
"target_name": "target_function_fetch"
},
"source_type": "Cron",
"source_details": {
"id": "10108000004280707",
"source_name": "cronExp",
"details": {
"cron_execution_type": "pre-defined"
}
},
"jobpool_id": "10108000003823563",
"jobpool_details": {
"type": "Function",
"name": "VendorReminder",
"created_by": {
"zuid": "77941453",
"is_confirmed": false,
"email_id": "emmy@zylker.com",
"first_name": "Amelia Burrows",
"last_name": "",
"user_type": "Admin",
"user_id": "10108000000009004"
},
"created_time": "May 28, 2024 04:44 PM",
"modified_by": {
"zuid": "77941453",
"is_confirmed": false,
"email_id": "emmy@zylker.com",
"first_name": "Amelia Burrows",
"last_name": "",
"user_type": "Admin",
"user_id": "10108000000009004"
},
"modified_time": "May 28, 2024 04:44 PM",
"capacity": {
"memory": "2048"
},
"project_details": {
"project_name": "ZylkerShipments",
"id": "10108000003823392",
"project_type": "Live"
},
"id": "10108000003823563"
},
"headers": {},
"params": {
"param1": "value1"
}
},
"cron_status": true,
"created_time": "Jun 07, 2024 12:51 PM",
"created_by": {
"zuid": "77941453",
"is_confirmed": false,
"email_id": "emmy@zylker.com",
"first_name": "Amelia Burrows",
"last_name": "",
"user_type": "Admin",
"user_id": "10108000000009004"
},
"modified_time": "Jun 07, 2024 12:51 PM",
"modified_by": {
"zuid": "77941453",
"is_confirmed": false,
"email_id": "emmy@zylker.com",
"first_name": "Amelia Burrows",
"last_name": "",
"user_type": "Admin",
"user_id": "10108000000009004"
},
"project_details": {
"project_name": "ZylkerShipments",
"id": "10108000003823392",
"project_type": "Live"
},
"end_time": "1717916399",
"cron_detail": {
"jobId": "10108000004280707",
"transactionTimeout": -1,
"hour": 0,
"minute": 0,
"second": 0,
"timezone": "PST"
},
"id": "10108000004280707"
}
}
Delete Job by ID
Description
This API enables you to delete a job present in a Job Pool. The Job is referred by its job_id.
Request Details
Request URL
{api-domain}/baas/v1/project/{project_id}/job_scheduling/job/{job_id}
Request Headers
Authorization: Zoho-oauthtoken {oauth_token}
Optional Headers
CATALYST-ORG: {org_id}
Environment: Development
Scope
ZohoCatalyst.job.DELETE
Response Details
The JSON response returns the metadata of the deleted job. The response will also contain the details of the user who deleted the job.
curl -X DELETE
https://api.catalyst.zoho.com/baas/v1/project/10278000000019013/job_scheduling/job/10278000000027019
-H “Authorization: Zoho-oauthtoken 1000.91016.2f57”
{
"status": "success",
"data": {
"job_id": "10278000000027019",
"created_time": "May 29, 2024 02:29 PM",
"response_code": "Success",
"start_time": {
"startTimeToRedirectLogsPage": "29/05/2024 14:24",
"timeWithGivenTimezone": "May 29, 2024 02:29 PM IST",
"timeWithJobTimezone": "May 29, 2024 02:29 PM IST"
},
"end_time": {
"timeWithGivenTimezone": "May 29, 2024 02:29 PM IST",
"timeWithJobTimezone": "May 29, 2024 02:29 PM IST",
"endTimeToRedirectLogsPage": "29/05/2024 14:34"
},
"submitted_on": {
"startTimeToRedirectLogsPage": "29/05/2024 14:24",
"timeWithGivenTimezone": "May 29, 2024 02:29 PM IST",
"timeWithJobTimezone": "May 29, 2024 02:29 PM IST"
},
"job_status": "SUCCESS",
"capacity": {
"memory": "256"
},
"job_meta_details": {
"id": "10278000000027019",
"url": "",
"job_name": "abc",
"job_config": {
"number_of_retries": 0
},
"target_type": "Function",
"target_details": {
"id": "10108000003823893",
"target_name": "target_function_fetch"
},
"source_type": "API",
"source_details": {
"source_name": "API"
},
"jobpool_id": "10108000003823563",
"jobpool_details": {
"type": "Function",
"name": "VendorReminder",
"created_by": {
"zuid": "77941453",
"is_confirmed": false,
"email_id": "emmy@zylker.com",
"first_name": "Amelia Burrows",
"last_name": "",
"user_type": "Admin",
"user_id": "10108000000009004"
},
"created_time": "May 28, 2024 04:44 PM",
"modified_by": {
"zuid": "77941453",
"is_confirmed": false,
"email_id": "emmy@zylker.com",
"first_name": "Amelia Burrows",
"last_name": "",
"user_type": "Admin",
"user_id": "10108000000009004"
},
"modified_time": "May 28, 2024 04:44 PM",
"project_details": {
"project_name": "ZylkerShipments",
"id": "10108000003823392",
"project_type": "Live"
},
"id": "10108000003823563"
},
"headers": {},
"params": {}
},
"retried_count": 0,
"parent_job_id": "10108000003880208",
"execution_time": "633",
"status": false,
"dispatch_delay": "103"
}
}
Get Cron By Identifier
Description
This API enables you to get all available details of a cron present in the project. The cron is referred by its unique identifier like ID or name.
Request Details
Request URL
{api-domain}/baas/v1/project/{project_id}/job_scheduling/cron/{cron_id/cron_name}
Request Headers
Authorization: Zoho-oauthtoken {oauth_token}
Optional Headers
CATALYST-ORG: {org_id}
Environment: Development
Scope
ZohoCatalyst.cron.READ
Response Details
The JSON response returns the metadata of a specific cron present in the project. The response will also contain the details of the user who created and last modified it.
curl -X GET
https://api.catalyst.zoho.com/baas/v1/project/10278000000019013/job_scheduling/cron/10108000004154323
-H “Authorization: Zoho-oauthtoken 1000.91016.2f57”
{
"status": "success",
"data": {
"cron_name": "pcMonthlyDay",
"cron_type": "Calendar",
"cron_execution_type": "pre-defined",
"job_meta": {
"id": "10108000004154323",
"url": "",
"job_name": "j",
"job_config": {
"number_of_retries": 0
},
"target_type": "AppSail",
"target_details": {
"id": "10108000002976191",
"target_name": "appsailTrue"
},
"source_type": "Cron",
"source_details": {
"id": "10108000004154321",
"source_name": "pcMonthlyDay",
"details": {
"cron_execution_type": "pre-defined"
}
},
"jobpool_id": "10108000002976201",
"jobpool_details": {
"type": "AppSail",
"name": "appsailJP",
"created_by": {
"zuid": "77941453",
"is_confirmed": false,
"email_id": "emmy@zylker.com",
"first_name": "Amelia Burrows",
"last_name": "",
"user_type": "Admin",
"user_id": "10108000000009004"
},
"created_time": "Mar 28, 2024 05:41 PM",
"modified_by": {
"zuid": "77941453",
"is_confirmed": false,
"email_id": "emmy@zylker.com",
"first_name": "Amelia Burrows",
"last_name": "",
"user_type": "Admin",
"user_id": "10108000000009004"
},
"modified_time": "Mar 28, 2024 05:41 PM",
"capacity": {
"number": "5"
},
"project_details": {
"project_name": "AppsailCron",
"id": "10108000002976144",
"project_type": "Live"
},
"id": "10108000002976201"
},
"request_method": "get"
},
"cron_status": true,
"created_time": "Jun 04, 2024 04:31 PM",
"created_by": {
"zuid": "77941453",
"is_confirmed": false,
"email_id": "emmy@zylker.com",
"first_name": "Amelia Burrows",
"last_name": "",
"user_type": "Admin",
"user_id": "10108000000009004"
},
"modified_time": "Jun 04, 2024 04:31 PM",
"modified_by": {
"zuid": "77941453",
"is_confirmed": false,
"email_id": "emmy@zylker.com",
"first_name": "Amelia Burrows",
"last_name": "",
"user_type": "Admin",
"user_id": "10108000000009004"
},
"project_details": {
"project_name": "AppsailCron",
"id": "10108000002976144",
"project_type": "Live"
},
"end_time": "1718303399",
"cron_detail": {
"hour": 4,
"minute": 4,
"second": 4,
"repetition_type": "monthly",
"days": [
1,
3,
4
],
"timezone": "Asia/Kolkata"
},
"success_count": 0,
"failure_count": 0,
"id": "10108000004154321"
}
}
Get All Crons
Description
This API enables you to retrieve details of all Pre-defined crons present in the project.
Request Details
Request URL
{app_domain}/baas/v1/project/{project_id}/job_scheduling/cron
Request Headers
Authorization: Zoho-oauthtoken {oauth_token}
Optional Headers
CATALYST-ORG: {org_id}
Environment: Development
Scope
ZohoCatalyst.cron.READ
Response Details
The JSON response returns the metadata of all the crons present in the project. The response will also contain the details of the user who created and last modified the cron.
curl -X GET
https://api.catalyst.zoho.com/baas/v1/project/10278000000019013/job_scheduling/cron
-H “Authorization: Zoho-oauthtoken 1000.91016.2f57”
{
"status": "success",
"data": [
{
"cron_name": "circuitCron",
"cron_type": "Calendar",
"cron_execution_type": "pre-defined",
"job_meta": {
"id": "10108000004280089",
"job_name": "j",
"job_config": {
"number_of_retries": 0
},
"target_type": "Circuit",
"target_details": {
"id": "10108000004194246",
"target_name": "abc"
},
"source_type": "Cron",
"source_details": {
"id": "10108000004280087",
"source_name": "circuitCron",
"details": {
"cron_execution_type": "pre-defined"
}
},
"jobpool_id": "10108000003823699",
"jobpool_details": {
"type": "Circuit",
"name": "InventoryDataMaintaince",
"created_by": {
"zuid": "77941453",
"is_confirmed": false,
"email_id": "emmy@zylker.com",
"first_name": "Amelia Burrows",
"last_name": "",
"user_type": "Admin",
"user_id": "10108000000009004"
},
"created_time": "May 28, 2024 04:49 PM",
"modified_by": {
"zuid": "77941453",
"is_confirmed": false,
"email_id": "emmy@zylker.com",
"first_name": "Amelia Burrows",
"last_name": "",
"user_type": "Admin",
"user_id": "10108000000009004"
},
"modified_time": "May 28, 2024 04:49 PM",
"capacity": {
"number": "3"
},
"project_details": {
"project_name": "ZylkerShipments",
"id": "10108000003823392",
"project_type": "Live"
},
"id": "10108000003823699"
},
"headers": {},
"params": {
"key1": "value1",
"key2": "value2",
"key3": "value3"
}
},
"cron_status": true,
"created_time": "Jun 07, 2024 11:09 AM",
"created_by": {
"zuid": "77941453",
"is_confirmed": false,
"email_id": "emmy@zylker.com",
"first_name": "Amelia Burrows",
"last_name": "",
"user_type": "Admin",
"user_id": "10108000000009004"
},
"modified_time": "Jun 07, 2024 11:09 AM",
"modified_by": {
"zuid": "77941453",
"is_confirmed": false,
"email_id": "emmy@zylker.com",
"first_name": "Amelia Burrows",
"last_name": "",
"user_type": "Admin",
"user_id": "10108000000009004"
},
"project_details": {
"project_name": "ZylkerShipments",
"id": "10108000003823392",
"project_type": "Live"
},
"end_time": "1717871399",
"cron_detail": {
"hour": 4,
"minute": 3,
"second": 0,
"repetition_type": "daily",
"timezone": "Asia/Kolkata"
},
"success_count": 0,
"failure_count": 0,
"id": "10108000004280087"
},
{
"cron_name": "functionCron",
"description": "functionCron",
"cron_type": "CronExpression",
"cron_execution_type": "pre-defined",
"cron_expression": "* * * * *",
"job_meta": {
"id": "10108000004280074",
"url": "",
"job_name": "functionJob",
"job_config": {
"number_of_retries": 0
},
"target_type": "Function",
"target_details": {
"id": "10108000003823893",
"target_name": "target_function_fetch"
},
"source_type": "Cron",
"source_details": {
"id": "10108000004280072",
"source_name": "functionCron",
"details": {
"cron_execution_type": "pre-defined"
}
},
"jobpool_id": "10108000003823563",
"jobpool_details": {
"type": "Function",
"name": "VendorReminder",
"created_by": {
"zuid": "77941453",
"is_confirmed": false,
"email_id": "emmy@zylker.com",
"first_name": "Amelia Burrows",
"last_name": "",
"user_type": "Admin",
"user_id": "10108000000009004"
},
"created_time": "May 28, 2024 04:44 PM",
"modified_by": {
"zuid": "77941453",
"is_confirmed": false,
"email_id": "emmy@zylker.com",
"first_name": "Amelia Burrows",
"last_name": "",
"user_type": "Admin",
"user_id": "10108000000009004"
},
"modified_time": "May 28, 2024 04:44 PM",
"capacity": {
"memory": "2048"
},
"project_details": {
"project_name": "ZylkerShipments",
"id": "10108000003823392",
"project_type": "Live"
},
"id": "10108000003823563"
},
"headers": {},
"params": {
"p1": "v1"
}
},
"cron_status": true,
"created_time": "Jun 07, 2024 11:08 AM",
"created_by": {
"zuid": "77941453",
"is_confirmed": false,
"email_id": "emmy@zylker.com",
"first_name": "Amelia Burrows",
"last_name": "",
"user_type": "Admin",
"user_id": "10108000000009004"
},
"modified_time": "Jun 07, 2024 11:08 AM",
"modified_by": {
"zuid": "77941453",
"is_confirmed": false,
"email_id": "emmy@zylker.com",
"first_name": "Amelia Burrows",
"last_name": "",
"user_type": "Admin",
"user_id": "10108000000009004"
},
"project_details": {
"project_name": "ZylkerShipments",
"id": "10108000003823392",
"project_type": "Live"
},
"end_time": "1718908199",
"cron_detail": {
"hour": 0,
"minute": 0,
"second": 0,
"timezone": "Asia/Kolkata"
},
"success_count": 0,
"failure_count": 0,
"id": "10108000004280072"
},
{
"cron_name": "abcUpdated",
"cron_type": "OneTime",
"cron_execution_type": "pre-defined",
"job_meta": {
"id": "10108000004153012",
"url": "https://www.google.com",
"job_name": "j",
"job_config": {
"number_of_retries": 0
},
"target_type": "Webhook",
"target_details": {
"target_name": "https://www.google.com"
},
"source_type": "Cron",
"source_details": {
"id": "10108000004152971",
"source_name": "abcUpdated",
"details": {
"cron_execution_type": "pre-defined"
}
},
"jobpool_id": "10108000003823632",
"jobpool_details": {
"type": "Webhook",
"name": "VendorDataFetch",
"created_by": {
"zuid": "77941453",
"is_confirmed": false,
"email_id": "emmy@zylker.com",
"first_name": "Amelia Burrows",
"last_name": "",
"user_type": "Admin",
"user_id": "10108000000009004"
},
"created_time": "May 28, 2024 04:47 PM",
"modified_by": {
"zuid": "77941453",
"is_confirmed": false,
"email_id": "emmy@zylker.com",
"first_name": "Amelia Burrows",
"last_name": "",
"user_type": "Admin",
"user_id": "10108000000009004"
},
"modified_time": "May 28, 2024 04:47 PM",
"capacity": {
"number": "3"
},
"project_details": {
"project_name": "ZylkerShipments",
"id": "10108000003823392",
"project_type": "Live"
},
"id": "10108000003823632"
},
"request_method": "get"
},
"cron_status": false,
"created_time": "Jun 04, 2024 03:56 PM",
"created_by": {
"zuid": "77941453",
"is_confirmed": false,
"email_id": "emmy@zylker.com",
"first_name": "Amelia Burrows",
"last_name": "",
"user_type": "Admin",
"user_id": "10108000000009004"
},
"modified_time": "Jun 04, 2024 03:57 PM",
"modified_by": {
"zuid": "77941453",
"is_confirmed": false,
"email_id": "emmy@zylker.com",
"first_name": "Amelia Burrows",
"last_name": "",
"user_type": "Admin",
"user_id": "10108000000009004"
},
"project_details": {
"project_name": "ZylkerShipments",
"id": "10108000003823392",
"project_type": "Live"
},
"end_time": "-1",
"cron_detail": {
"time_of_execution": 1717612200,
"hour": 0,
"minute": 0,
"second": 0,
"timezone": "Asia/Kolkata"
},
"success_count": 0,
"failure_count": 0,
"id": "10108000004152971"
},
{
"cron_name": "abcupdate",
"description": "abc",
"cron_type": "OneTime",
"cron_execution_type": "pre-defined",
"job_meta": {
"id": "10108000004108000",
"url": "https://www.google.com",
"job_name": "j",
"job_config": {
"number_of_retries": 0
},
"target_type": "Webhook",
"target_details": {
"target_name": "https://www.google.com"
},
"source_type": "Cron",
"source_details": {
"id": "10108000004107959",
"source_name": "abcupdate",
"details": {
"cron_execution_type": "pre-defined"
}
},
"jobpool_id": "10108000003823632",
"jobpool_details": {
"type": "Webhook",
"name": "VendorDataFetch",
"created_by": {
"zuid": "77941453",
"is_confirmed": false,
"email_id": "emmy@zylker.com",
"first_name": "Amelia Burrows",
"last_name": "",
"user_type": "Admin",
"user_id": "10108000000009004"
},
"created_time": "May 28, 2024 04:47 PM",
"modified_by": {
"zuid": "77941453",
"is_confirmed": false,
"email_id": "emmy@zylker.com",
"first_name": "Amelia Burrows",
"last_name": "",
"user_type": "Admin",
"user_id": "10108000000009004"
},
"modified_time": "May 28, 2024 04:47 PM",
"capacity": {
"number": "3"
},
"project_details": {
"project_name": "ZylkerShipments",
"id": "10108000003823392",
"project_type": "Live"
},
"id": "10108000003823632"
},
"headers": {},
"params": {},
"request_method": "get"
},
"cron_status": false,
"created_time": "Jun 03, 2024 05:19 PM",
"created_by": {
"zuid": "77941453",
"is_confirmed": false,
"email_id": "emmy@zylker.com",
"first_name": "Amelia Burrows",
"last_name": "",
"user_type": "Admin",
"user_id": "10108000000009004"
},
"modified_time": "Jun 03, 2024 05:20 PM",
"modified_by": {
"zuid": "77941453",
"is_confirmed": false,
"email_id": "emmy@zylker.com",
"first_name": "Amelia Burrows",
"last_name": "",
"user_type": "Admin",
"user_id": "10108000000009004"
},
"project_details": {
"project_name": "ZylkerShipments",
"id": "10108000003823392",
"project_type": "Live"
},
"end_time": "-1",
"cron_detail": {
"time_of_execution": 1717623183,
"hour": 0,
"minute": 0,
"second": 0,
"timezone": "Asia/Kolkata"
},
"success_count": 0,
"failure_count": 0,
"id": "10108000004107959"
}
]
}
Create a One-Time Cron
Description
This API enables you to create a one-time cron that submits a Job to the Job Pool to trigger a Job Function endpoint.
Note:
-
In this API, we are illustrating the sample request and sample response with a Job Function. The API functionality remains the same for webhook, Circuits, and AppSail jobs.
-
This API is applicable for Pre-Defined Crons and Dynamic Crons.
Request Details
Request URL
{api-domain/}baas/v1/project/{project_id}/job_scheduling/cron
Request Headers
Authorization: Zoho-oauthtoken {oauth_token}
Content-Type: application/json
Optional Headers
CATALYST-ORG: {org_id}
Environment: Development
Scope
ZohoCatalyst.cron.CREATE
Request JSON
You must send a JSON with its corresponding values as shown below.
{
"cron_type": "OneTime",
"cron_status": true,
"job_detail": {
"time_of_execution": 1717916399,
"timezone": "PST"
},
"job_meta": {
"source_type": "Cron",
"job_config": {
"number_of_retries": "1",
"retry_interval": "60"
},
"job_name": "jobName",
"jobpool_id": "10108000003823563",
"target_type": "Function",
"target_id": "10108000003823893",
"params": {
"param1": "value1"
}
},
"cron_name": "oneTimeCronFn",
"cron_execution_type": "pre-defined"
}
You will feed this Request JSON to your Request Body, and you need to provide the value of:
Response Details
The JSON response returns the metadata of the created cron. The response will also contain the details of the user who created the cron.
curl -X POST \ ‘https://api.catalyst.zoho.com/baas/v1/project/10108000003823392/job_scheduling/cron
-H “Authorization: Zoho-oauthtoken 1000.91016.2f57”
-H “Content-Type:application/json”
--data-raw ‘{“cron_type”:“OneTime”,“cron_status”:true,“job_detail”:{“time_of_execution”:1717916399,“timezone”:“PST”},“job_meta”:{“source_type”:“Cron”,“job_config”:{“number_of_retries”:“1”,“retry_interval”:“60”},“job_name”:“jobName”,“jobpool_id”:“10108000003823563”,“target_type”:“Function”,“target_id”:“10108000003823893” ,“params”:{“param1”:“value1”}},“cron_name”:“oneTimeCronFn”,“cron_execution_type”:“pre-defined”}’
{
"status": "success",
"data": {
"cron_name": "oneTimeCronFn",
"cron_type": "OneTime",
"cron_execution_type": "pre-defined",
"job_meta": {
"id": "10108000004280446",
"url": "",
"job_name": "jobName",
"job_config": {
"number_of_retries": 1,
"retry_interval": 60
},
"target_type": "Function",
"target_details": {
"id": "10108000003823893",
"target_name": "target_function_fetch"
},
"source_type": "Cron",
"source_details": {
"id": "10108000004280444",
"source_name": "oneTimeCronFn",
"details": {
"cron_execution_type": "pre-defined"
}
},
"jobpool_id": "10108000003823563",
"jobpool_details": {
"type": "Function",
"name": "VendorReminder",
"created_by": {
"zuid": "77941453",
"is_confirmed": false,
"email_id": "emmy@zylker.com",
"first_name": "Amelia Burrows",
"last_name": "",
"user_type": "Admin",
"user_id": "10108000000009004"
},
"created_time": "May 28, 2024 04:44 PM",
"modified_by": {
"zuid": "77941453",
"is_confirmed": false,
"email_id": "emmy@zylker.com",
"first_name": "Amelia Burrows",
"last_name": "",
"user_type": "Admin",
"user_id": "10108000000009004"
},
"modified_time": "May 28, 2024 04:44 PM",
"capacity": {
"memory": "2048"
},
"project_details": {
"project_name": "ZylkerShipments",
"id": "10108000003823392",
"project_type": "Live"
},
"id": "10108000003823563"
},
"headers": {},
"params": {
"param1": "value1"
}
},
"cron_status": true,
"created_time": "Jun 07, 2024 12:26 PM",
"created_by": {
"zuid": "77941453",
"is_confirmed": false,
"email_id": "emmy@zylker.com",
"first_name": "Amelia Burrows",
"last_name": "",
"user_type": "Admin",
"user_id": "10108000000009004"
},
"modified_time": "Jun 07, 2024 12:26 PM",
"modified_by": {
"zuid": "77941453",
"is_confirmed": false,
"email_id": "emmy@zylker.com",
"first_name": "Amelia Burrows",
"last_name": "",
"user_type": "Admin",
"user_id": "10108000000009004"
},
"project_details": {
"project_name": "ZylkerShipments",
"id": "10108000003823392",
"project_type": "Live"
},
"end_time": "-1",
"cron_detail": {
"jobId": "10108000004280444",
"transactionTimeout": -1,
"time_of_execution": 1717916399,
"hour": 0,
"minute": 0,
"second": 0,
"timezone": "PST"
},
"id": "10108000004280444"
}
}
Create an Every Cron
Description
This API enables you to create a recurring type Every cron that at the scheduled time submits a Job to the Job Pool and triggers a Job Function endpoint.
Note:
-
In this API, we are illustrating the sample request and sample response with a Job Function. The API functionality remains the same for webhook, Circuits, and AppSail jobs.
-
This API is applicable for Pre-Defined Crons and Dynamic Crons.
Request Details
Request URL
{api-domain/}baas/v1/project/{project_id}/job_scheduling/cron
Request Headers
Authorization: Zoho-oauthtoken {oauth_token}
Content-Type: application/json
Optional Headers
CATALYST-ORG: {org_id}
Environment: Development
Scope
ZohoCatalyst.cron.CREATE
Request JSON
You must send a JSON with its corresponding values as shown below.
{
"cron_type": "Periodic",
"cron_status": true,
"job_detail": {
"repetition_type": "every",
"hour": "6",
"minute": "0",
"second": "0"
},
"job_meta": {
"source_type": "Cron",
"job_config": {
"number_of_retries": "3",
"retry_interval": "60"
},
"job_name": "jobName",
"jobpool_id": "10108000003823563",
"target_type": "Function",
"target_id": "10108000003823893",
"params": {
"param1": "value1"
}
},
"end_time": 1717957799,
"cron_name": "RecursiveCron",
"cron_execution_type": "pre-defined"
}
You will feed this Request JSON to your Request Body, and you need to provide the value of:
Response Details
The JSON response returns the metadata of the created cron. The response will also contain the details of the user who created the cron.
curl -X POST \ ‘https://api.catalyst.zoho.com/baas/v1/project/10108000003823392/job_scheduling/cron
-H “Authorization: Zoho-oauthtoken 1000.91016.2f57”
-H “Content-Type:application/json”
--data-raw ‘{“cron_type”:“Periodic”,“cron_status”:true,“job_detail”:{“repetition_type”:“every”,“hour”:“6”,“minute”:“0”,“second”:“0”},“job_meta”:{“source_type”:“Cron”,“job_config”:{“number_of_retries”:“3”,“retry_interval”:“60”},“job_name”:“jobName”,“jobpool_id”:“10108000003823563”,“target_type”:“Function”,“target_id”:“10108000003823893”,“params”:{“param1”:“value1”}},“end_time”:1717957799,“cron_name”:“RecursiveCron”,“cron_execution_type”:“pre-defined”}’
{
"status": "success",
"data": {
"cron_name": "RecursiveCron",
"cron_type": "Periodic",
"cron_execution_type": "pre-defined",
"job_meta": {
"id": "10108000004280482",
"url": "",
"job_name": "jobName",
"job_config": {
"number_of_retries": 3,
"retry_interval": 60
},
"target_type": "Function",
"target_details": {
"id": "10108000003823893",
"target_name": "target_function_fetch"
},
"source_type": "Cron",
"source_details": {
"id": "10108000004280480",
"source_name": "RecursiveCron",
"details": {
"cron_execution_type": "pre-defined"
}
},
"jobpool_id": "10108000003823563",
"jobpool_details": {
"type": "Function",
"name": "VendorReminder",
"created_by": {
"zuid": "77941453",
"is_confirmed": false,
"email_id": "emmy@zylker.com",
"first_name": "Amelia Burrows",
"last_name": "",
"user_type": "Admin",
"user_id": "10108000000009004"
},
"created_time": "May 28, 2024 04:44 PM",
"modified_by": {
"zuid": "77941453",
"is_confirmed": false,
"email_id": "emmy@zylker.com",
"first_name": "Amelia Burrows",
"last_name": "",
"user_type": "Admin",
"user_id": "10108000000009004"
},
"modified_time": "May 28, 2024 04:44 PM",
"capacity": {
"memory": "2048"
},
"project_details": {
"project_name": "ZylkerShipments",
"id": "10108000003823392",
"project_type": "Live"
},
"id": "10108000003823563"
},
"headers": {},
"params": {
"param1": "value1"
}
},
"cron_status": true,
"created_time": "Jun 07, 2024 12:31 PM",
"created_by": {
"zuid": "77941453",
"is_confirmed": false,
"email_id": "emmy@zylker.com",
"first_name": "Amelia Burrows",
"last_name": "",
"user_type": "Admin",
"user_id": "10108000000009004"
},
"modified_time": "Jun 07, 2024 12:31 PM",
"modified_by": {
"zuid": "77941453",
"is_confirmed": false,
"email_id": "emmy@zylker.com",
"first_name": "Amelia Burrows",
"last_name": "",
"user_type": "Admin",
"user_id": "10108000000009004"
},
"project_details": {
"project_name": "ZylkerShipments",
"id": "10108000003823392",
"project_type": "Live"
},
"end_time": "1717957799",
"cron_detail": {
"jobId": "10108000004280480",
"transactionTimeout": -1,
"hour": 6,
"minute": 0,
"second": 0,
"repetition_type": "every",
"timezone": "Asia/Kolkata"
},
"id": "10108000004280480"
}
}
Create a Daily Cron
Description
This API enables you to create a recurring type daily cron that at the scheduled time submits a Job to the Job Pool and triggers a Job Function endpoint.
Note:
-
In this API, we are illustrating the sample request and sample response with a Job Function. The API functionality remains the same for webhook, Circuits, and AppSail jobs.
-
This API is applicable for Pre-Defined Crons and Dynamic Crons.
Request Details
Request URL
{api-domain/}baas/v1/project/{project_id}/job_scheduling/cron
Request Headers
Authorization: Zoho-oauthtoken {oauth_token}
Content-Type: application/json
Optional Headers
CATALYST-ORG: {org_id}
Environment: Development
Scope
ZohoCatalyst.cron.CREATE
Request JSON
You must send a JSON with its corresponding values as shown below.
{
"cron_type": "Calendar",
"cron_status": true,
"job_detail": {
"repetition_type": "daily",
"hour": "1",
"minute": "0",
"second": "0",
"timezone": "PST"
},
"job_meta": {
"source_type": "Cron",
"job_config": {
"number_of_retries": "1",
"retry_interval": "300"
},
"job_name": "job",
"jobpool_id": "10108000003823563",
"target_type": "Function",
"target_id": "10108000003823893",
"params": {
"param1": "value1"
}
},
"cron_name": "RecursiveCronDaily",
"end_time": 1718002799,
"description": "dailycron",
"cron_execution_type": "pre-defined"
}
You will feed this Request JSON to your Request Body, and you need to provide the value of:
Response Details
The JSON response returns the metadata of the created cron. The response will also contain the details of the user who created the cron.
curl -X POST \ ‘https://api.catalyst.zoho.com/baas/v1/project/10108000003823392/job_scheduling/cron
-H “Authorization: Zoho-oauthtoken 1000.91016.2f57”
-H “Content-Type:application/json”
--data-raw ‘{“cron_type”:“Calendar”,“cron_status”:true,“job_detail”:{“repetition_type”:“daily”,“hour”:“1”,“minute”:“0”,“second”:“0”,“timezone”:“PST”},“job_meta”:{“source_type”:“Cron”,“job_config”:{“number_of_retries”:“1”,“retry_interval”:“300”},“job_name”:“job”,“jobpool_id”:“10108000003823563”,“target_type”:“Function”,“target_id”:“10108000003823893”,“params”:{“param1”:“value1”}},“cron_name”:“RecursiveCronDaily”,“end_time”:1718002799,“description”:“dailycron”,“cron_execution_type”:“pre-defined”}’
{
"status": "success",
"data": {
"cron_name": "RecursiveCronDaily",
"description": "dailycron",
"cron_type": "Calendar",
"cron_execution_type": "pre-defined",
"job_meta": {
"id": "10108000004280518",
"url": "",
"job_name": "job",
"job_config": {
"number_of_retries": 1,
"retry_interval": 300
},
"target_type": "Function",
"target_details": {
"id": "10108000003823893",
"target_name": "target_function_fetch"
},
"source_type": "Cron",
"source_details": {
"id": "10108000004280516",
"source_name": "RecursiveCronDaily",
"details": {
"cron_execution_type": "pre-defined"
}
},
"jobpool_id": "10108000003823563",
"jobpool_details": {
"type": "Function",
"name": "VendorReminder",
"created_by": {
"zuid": "77941453",
"is_confirmed": false,
"email_id": "emmy@zylker.com",
"first_name": "Amelia Burrows",
"last_name": "",
"user_type": "Admin",
"user_id": "10108000000009004"
},
"created_time": "May 28, 2024 04:44 PM",
"modified_by": {
"zuid": "77941453",
"is_confirmed": false,
"email_id": "emmy@zylker.com",
"first_name": "Amelia Burrows",
"last_name": "",
"user_type": "Admin",
"user_id": "10108000000009004"
},
"modified_time": "May 28, 2024 04:44 PM",
"capacity": {
"memory": "2048"
},
"project_details": {
"project_name": "ZylkerShipments",
"id": "10108000003823392",
"project_type": "Live"
},
"id": "10108000003823563"
},
"headers": {},
"params": {
"param1": "value1"
}
},
"cron_status": true,
"created_time": "Jun 07, 2024 12:33 PM",
"created_by": {
"zuid": "77941453",
"is_confirmed": false,
"email_id": "emmy@zylker.com",
"first_name": "Amelia Burrows",
"last_name": "",
"user_type": "Admin",
"user_id": "10108000000009004"
},
"modified_time": "Jun 07, 2024 12:33 PM",
"modified_by": {
"zuid": "77941453",
"is_confirmed": false,
"email_id": "emmy@zylker.com",
"first_name": "Amelia Burrows",
"last_name": "",
"user_type": "Admin",
"user_id": "10108000000009004"
},
"project_details": {
"project_name": "ZylkerShipments",
"id": "10108000003823392",
"project_type": "Live"
},
"end_time": "1718002799",
"cron_detail": {
"jobId": "10108000004280516",
"transactionTimeout": -1,
"hour": 1,
"minute": 0,
"second": 0,
"repetition_type": "daily",
"timezone": "PST"
},
"id": "10108000004280516"
}
}
Create a Monthly Cron (Date Type)
Description
This API enables you to create a recurring type Monthly cron (defined using the calendar date) that at the scheduled time submits a job to the job pool and triggers a Job Function endpoint.
Note:
-
In this API, we are illustrating the sample request and sample response with a Job Function. The API functionality remains the same for webhook, Circuits, and AppSail jobs.
-
This API is applicable for Pre-Defined Crons and Dynamic Crons.
Request Details
Request URL
{api-domain/}baas/v1/project/{project_id}/job_scheduling/cron
Request Headers
Authorization: Zoho-oauthtoken {oauth_token}
Content-Type: application/json
Optional Headers
CATALYST-ORG: {org_id}
Environment: Development
Scope
ZohoCatalyst.cron.CREATE
Request JSON
You must send a JSON with its corresponding values as shown below.
{
"cron_type": "Calendar",
"cron_status": true,
"job_detail": {
"repetition_type": "monthly",
"days": [
"1",
"3",
"8"
],
"hour": "3",
"minute": "0",
"second": "0",
"timezone": "PST"
},
"job_meta": {
"source_type": "Cron",
"job_config": {
"number_of_retries": "2",
"retry_interval": "500"
},
"job_name": "jobName",
"jobpool_id": "10108000003823563",
"target_type": "Function",
"target_id": "10108000003823893",
"params": {
"param1": "value1"
}
},
"cron_name": "recurCronMonthly",
"end_time": 1718002799,
"description": "monthly",
"cron_execution_type": "pre-defined"
}
You will feed this Request JSON to your Request Body, and you need to provide the value of:
Response Details
The JSON response returns the metadata of the created cron. The response will also contain the details of the user who created the cron.
curl -X POST \ https://api.catalyst.zoho.com/baas/v1/project/10108000003823392/job_scheduling/cron
-H “Authorization: Zoho-oauthtoken 1000.91016.2f57”
-H “Content-Type:application/json”
--data-raw ‘{“cron_type”:“Calendar”,“cron_status”:true,“job_detail”:{“repetition_type”:“monthly”,“days”:[“1”,“3”,“8”],“hour”:“3”,“minute”:“0”,“second”:“0”,“timezone”:“PST”},“job_meta”:{“source_type”:“Cron”,“job_config”:{“number_of_retries”:“2”,“retry_interval”:“500”},“job_name”:“jobName”,“jobpool_id”:“10108000003823563”,“target_type”:“Function”,“target_id”:“10108000003823893”,“params”:{“param1”:“value1”}},“cron_name”:“recurCronMonthly”,“end_time”:1718002799,“description”:“monthly”,“cron_execution_type”:“pre-defined”}’
{
"status": "success",
"data": {
"cron_name": "recurCronMonthly",
"description": "monthly",
"cron_type": "Calendar",
"cron_execution_type": "pre-defined",
"job_meta": {
"id": "10108000004280537",
"url": "",
"job_name": "jobName",
"job_config": {
"number_of_retries": 2,
"retry_interval": 500
},
"target_type": "Function",
"target_details": {
"id": "10108000003823893",
"target_name": "target_function_fetch"
},
"source_type": "Cron",
"source_details": {
"id": "10108000004280535",
"source_name": "recurCronMonthly",
"details": {
"cron_execution_type": "pre-defined"
}
},
"jobpool_id": "10108000003823563",
"jobpool_details": {
"type": "Function",
"name": "VendorReminder",
"created_by": {
"zuid": "77941453",
"is_confirmed": false,
"email_id": "emmy@zylker.com",
"first_name": "Amelia Burrows",
"last_name": "",
"user_type": "Admin",
"user_id": "10108000000009004"
},
"created_time": "May 28, 2024 04:44 PM",
"modified_by": {
"zuid": "77941453",
"is_confirmed": false,
"email_id": "emmy@zylker.com",
"first_name": "Amelia Burrows",
"last_name": "",
"user_type": "Admin",
"user_id": "10108000000009004"
},
"modified_time": "May 28, 2024 04:44 PM",
"capacity": {
"memory": "2048"
},
"project_details": {
"project_name": "ZylkerShipments",
"id": "10108000003823392",
"project_type": "Live"
},
"id": "10108000003823563"
},
"headers": {},
"params": {
"param1": "value1"
}
},
"cron_status": true,
"created_time": "Jun 07, 2024 12:35 PM",
"created_by": {
"zuid": "77941453",
"is_confirmed": false,
"email_id": "emmy@zylker.com",
"first_name": "Amelia Burrows",
"last_name": "",
"user_type": "Admin",
"user_id": "10108000000009004"
},
"modified_time": "Jun 07, 2024 12:35 PM",
"modified_by": {
"zuid": "77941453",
"is_confirmed": false,
"email_id": "emmy@zylker.com",
"first_name": "Amelia Burrows",
"last_name": "",
"user_type": "Admin",
"user_id": "10108000000009004"
},
"project_details": {
"project_name": "ZylkerShipments",
"id": "10108000003823392",
"project_type": "Live"
},
"end_time": "1718002799",
"cron_detail": {
"jobId": "10108000004280535",
"transactionTimeout": -1,
"hour": 3,
"minute": 0,
"second": 0,
"repetition_type": "monthly",
"days": [
1,
3,
8
],
"timezone": "PST"
},
"id": "10108000004280535"
}
}
Create a Monthly Cron (Week Type)
Description
This API enables you to create a recurring type Monthly cron (defined using the weeks in a month) that at the scheduled time submits a job to the job pool and triggers a Job Function endpoint.
Note:
-
In this API, we are illustrating the sample request and sample response with a Job Function. The API functionality remains the same for webhook, Circuits, and AppSail jobs.
-
This API is applicable for Pre-Defined Crons and Dynamic Crons.
Request Details
Request URL
{api-domain/}baas/v1/project/{project_id}/job_scheduling/cron
Request Headers
Authorization: Zoho-oauthtoken {oauth_token}
Content-Type: application/json
Optional Headers
CATALYST-ORG: {org_id}
Environment: Development
Scope
ZohoCatalyst.cron.CREATE
Request JSON
You must send a JSON with its corresponding values as shown below.
{
"cron_type": "Calendar",
"cron_status": true,
"job_detail": {
"repetition_type": "monthly",
"weeks_of_month": [
"1",
"2",
"3"
],
"week_day": [
"1"
],
"hour": "0",
"minute": "0",
"second": "0",
"timezone": "PST"
},
"job_meta": {
"source_type": "Cron",
"job_config": {
"number_of_retries": "2",
"retry_interval": "600"
},
"job_name": "job",
"jobpool_id": "10108000003823563",
"target_type": "Function",
"target_id": "10108000003823893",
"params": {
"param1": "value1"
}
},
"cron_name": "recurCronMonthlyWeek",
"description": "week",
"end_time": 1718607599,
"cron_execution_type": "pre-defined"
}
You will feed this Request JSON to your Request Body, and you need to provide the value of:
Response Details
The JSON response returns the metadata of the created cron. The response will also contain the details of the user who created the cron.
curl -X POST \ https://api.catalyst.zoho.com/baas/v1/project/10108000003823392/job_scheduling/cron
-H “Authorization: Zoho-oauthtoken 1000.91016.2f57”
-H “Content-Type:application/json”
--data-raw ‘{“cron_type”:“Calendar”,“cron_status”:true,“job_detail”:{“repetition_type”:“monthly”,“weeks_of_month”:[“1”,“2”,“3”],“week_day”:[“1”],“hour”:“0”,“minute”:“0”,“second”:“0”,“timezone”:“PST”},“job_meta”:{“source_type”:“Cron”,“job_config”:{“number_of_retries”:“2”,“retry_interval”:“600”},“job_name”:“job”,“jobpool_id”:“10108000003823563”,“target_type”:“Function”,“target_id”:“10108000003823893”,“params”:{“param1”:“value1”}},“cron_name”:“recurCronMonthlyWeek”,“description”:“week”,“end_time”:1718607599,“cron_execution_type”:“pre-defined”}’
{
"status": "success",
"data": {
"cron_name": "recurCronMonthlyWeek",
"description": "week",
"cron_type": "Calendar",
"cron_execution_type": "pre-defined",
"job_meta": {
"id": "10108000004280565",
"url": "",
"job_name": "job",
"job_config": {
"number_of_retries": 2,
"retry_interval": 600
},
"target_type": "Function",
"target_details": {
"id": "10108000003823893",
"target_name": "target_function_fetch"
},
"source_type": "Cron",
"source_details": {
"id": "10108000004280563",
"source_name": "recurCronMonthlyWeek",
"details": {
"cron_execution_type": "pre-defined"
}
},
"jobpool_id": "10108000003823563",
"jobpool_details": {
"type": "Function",
"name": "VendorReminder",
"created_by": {
"zuid": "77941453",
"is_confirmed": false,
"email_id": "emmy@zylker.com",
"first_name": "Amelia Burrows",
"last_name": "",
"user_type": "Admin",
"user_id": "10108000000009004"
},
"created_time": "May 28, 2024 04:44 PM",
"modified_by": {
"zuid": "77941453",
"is_confirmed": false,
"email_id": "emmy@zylker.com",
"first_name": "Amelia Burrows",
"last_name": "",
"user_type": "Admin",
"user_id": "10108000000009004"
},
"modified_time": "May 28, 2024 04:44 PM",
"capacity": {
"memory": "2048"
},
"project_details": {
"project_name": "ZylkerShipments",
"id": "10108000003823392",
"project_type": "Live"
},
"id": "10108000003823563"
},
"headers": {},
"params": {
"param1": "value1"
}
},
"cron_status": true,
"created_time": "Jun 07, 2024 12:37 PM",
"created_by": {
"zuid": "77941453",
"is_confirmed": false,
"email_id": "emmy@zylker.com",
"first_name": "Amelia Burrows",
"last_name": "",
"user_type": "Admin",
"user_id": "10108000000009004"
},
"modified_time": "Jun 07, 2024 12:37 PM",
"modified_by": {
"zuid": "77941453",
"is_confirmed": false,
"email_id": "emmy@zylker.com",
"first_name": "Amelia Burrows",
"last_name": "",
"user_type": "Admin",
"user_id": "10108000000009004"
},
"project_details": {
"project_name": "ZylkerShipments",
"id": "10108000003823392",
"project_type": "Live"
},
"end_time": "1718607599",
"cron_detail": {
"jobId": "10108000004280563",
"transactionTimeout": -1,
"hour": 0,
"minute": 0,
"second": 0,
"repetition_type": "monthly",
"weeks_of_month": [
1,
2,
3
],
"week_day": [
1
],
"timezone": "PST"
},
"id": "10108000004280563"
}
}
Create a Yearly Cron (Day Type)
Description
This API enables you to create a recurring type Yearly cron (defined using the calendar date), that at the scheduled time will submit a job to the job pool and trigger a Job Function endpoint.
Note:
-
In this API, we are illustrating the sample request and sample response with a Job Function. The API functionality remains the same for webhook, Circuits, and AppSail jobs.
-
This API is applicable for Pre-Defined Crons and Dynamic Crons.
Request Details
Request URL
{api-domain/}baas/v1/project/{project_id}/job_scheduling/cron
Request Headers
Authorization: Zoho-oauthtoken {oauth_token}
Content-Type: application/json
Optional Headers
CATALYST-ORG: {org_id}
Environment: Development
Scope
ZohoCatalyst.cron.CREATE
Request JSON
You must send a JSON with its corresponding values as shown below.
{
"cron_type": "Calendar",
"cron_status": true,
"job_detail": {
"repetition_type": "yearly",
"months": [
"0",
"1"
],
"days": [
"1",
"2",
"3",
"6",
"8"
],
"hour": "0",
"minute": "0",
"second": "0",
"timezone": "PST"
},
"job_meta": {
"source_type": "Cron",
"job_config": {
"number_of_retries": "1",
"retry_interval": "500"
},
"job_name": "jobName",
"jobpool_id": "10108000003823563",
"target_type": "Function",
"target_id": "10108000003823893",
"params": {
"param1": "value1"
}
},
"cron_name": "recurCronYearlyday",
"description": "yearlyday",
"end_time": 1719125999,
"cron_execution_type": "pre-defined"
}
You will feed this Request JSON to your Request Body, and you need to provide the value of:
Response Details
The JSON response returns the metadata of the created cron. The response will also contain the details of the user who created the cron.
curl -X POST \ https://api.catalyst.zoho.com/baas/v1/project/10108000003823392/job_scheduling/cron
-H “Authorization: Zoho-oauthtoken 1000.91016.2f57”
-H “Content-Type:application/json”
--data-raw ‘{“cron_type”:“Calendar”,“cron_status”:true,“job_detail”:{“repetition_type”:“yearly”,“months”:[“0”,“1”],“days”:[“1”,“2”,“3”,“6”,“8”],“hour”:“0”,“minute”:“0”,“second”:“0”,“timezone”:“PST”},“job_meta”:{“source_type”:“Cron”,“job_config”:{“number_of_retries”:“1”,“retry_interval”:“500”},“job_name”:“jobName”,“jobpool_id”:“10108000003823563”,“target_type”:“Function”,“target_id”:“10108000003823893”,“params”:{“param1”:“value1”}},“cron_name”:“recurCronYearlyday”,“description”:“yearlyday”,“end_time”:1719125999,“cron_execution_type”:“pre-defined”}’
{
"status": "success",
"data": {
"cron_name": "recurCronYearlyday",
"description": "yearlyday",
"cron_type": "Calendar",
"cron_execution_type": "pre-defined",
"job_meta": {
"id": "10108000004280594",
"url": "",
"job_name": "jobName",
"job_config": {
"number_of_retries": 1,
"retry_interval": 500
},
"target_type": "Function",
"target_details": {
"id": "10108000003823893",
"target_name": "target_function_fetch"
},
"source_type": "Cron",
"source_details": {
"id": "10108000004280592",
"source_name": "recurCronYearlyday",
"details": {
"cron_execution_type": "pre-defined"
}
},
"jobpool_id": "10108000003823563",
"jobpool_details": {
"type": "Function",
"name": "VendorReminder",
"created_by": {
"zuid": "77941453",
"is_confirmed": false,
"email_id": "emmy@zylker.com",
"first_name": "Amelia Burrows",
"last_name": "",
"user_type": "Admin",
"user_id": "10108000000009004"
},
"created_time": "May 28, 2024 04:44 PM",
"modified_by": {
"zuid": "77941453",
"is_confirmed": false,
"email_id": "emmy@zylker.com",
"first_name": "Amelia Burrows",
"last_name": "",
"user_type": "Admin",
"user_id": "10108000000009004"
},
"modified_time": "May 28, 2024 04:44 PM",
"capacity": {
"memory": "2048"
},
"project_details": {
"project_name": "ZylkerShipments",
"id": "10108000003823392",
"project_type": "Live"
},
"id": "10108000003823563"
},
"headers": {},
"params": {
"param1": "value1"
}
},
"cron_status": true,
"created_time": "Jun 07, 2024 12:39 PM",
"created_by": {
"zuid": "77941453",
"is_confirmed": false,
"email_id": "emmy@zylker.com",
"first_name": "Amelia Burrows",
"last_name": "",
"user_type": "Admin",
"user_id": "10108000000009004"
},
"modified_time": "Jun 07, 2024 12:39 PM",
"modified_by": {
"zuid": "77941453",
"is_confirmed": false,
"email_id": "emmy@zylker.com",
"first_name": "Amelia Burrows",
"last_name": "",
"user_type": "Admin",
"user_id": "10108000000009004"
},
"project_details": {
"project_name": "ZylkerShipments",
"id": "10108000003823392",
"project_type": "Live"
},
"end_time": "1719125999",
"cron_detail": {
"jobId": "10108000004280592",
"transactionTimeout": -1,
"hour": 0,
"minute": 0,
"second": 0,
"repetition_type": "yearly",
"days": [
1,
2,
3,
6,
8
],
"months": [
0,
1
],
"timezone": "PST"
},
"id": "10108000004280592"
}
}
Create a Yearly Cron (Week Type)
Description
This API enables you to create a recurring type Yearly cron (defined using the calendar weeks) that at the scheduled time will submit a job to the job pool and trigger a Job Function endpoint.
Note:
-
In this API, we are illustrating the sample request and sample response with a Job Function. The API functionality remains the same for webhook, Circuits, and AppSail jobs.
-
This API is applicable for Pre-Defined Crons and Dynamic Crons.
Request Details
Request URL
{api-domain/}baas/v1/project/{project_id}/job_scheduling/cron
Request Headers
Authorization: Zoho-oauthtoken {oauth_token}
Content-Type: application/json
Optional Headers
CATALYST-ORG: {org_id}
Environment: Development
Scope
ZohoCatalyst.cron.CREATE
Request JSON
You must send a JSON with its corresponding values as shown below.
{
"cron_type": "Calendar",
"cron_status": true,
"job_detail": {
"repetition_type": "yearly",
"months": [
"0",
"1",
"2",
"3",
"4",
"5",
"6",
"7",
"8",
"9",
"10",
"11"
],
"weeks_of_month": [
"1",
"3",
"5"
],
"week_day": [
"1"
],
"hour": "0",
"minute": "0",
"second": "0",
"timezone": "PST"
},
"job_meta": {
"source_type": "Cron",
"job_config": {
"number_of_retries": "2",
"retry_interval": "1000"
},
"job_name": "jobName",
"jobpool_id": "10108000003823563",
"target_type": "Function",
"target_id": "10108000003823893",
"params": {
"param1": "value1"
}
},
"cron_name": "recurCronYearlyWeek",
"description": "abc",
"end_time": 1719212399,
"cron_execution_type": "pre-defined"
}
You will feed this Request JSON to your Request Body, and you need to provide the value of:
Response Details
The JSON response returns the metadata of the created cron. The response will also contain the details of the user who created the cron.
curl -X POST \ https://api.catalyst.zoho.com/baas/v1/project/10108000003823392/job_scheduling/cron
-H “Authorization: Zoho-oauthtoken 1000.91016.2f57”
-H “Content-Type:application/json”
--data-raw ‘{“cron_type”:“Calendar”,“cron_status”:true,“job_detail”:{“repetition_type”:“yearly”,“months”:[“0”,“1”,“2”,“3”,“4”,“5”,“6”,“7”,“8”,“9”,“10”,“11”],“weeks_of_month”:[“1”,“3”,“5”],“week_day”:[“1”],“hour”:“0”,“minute”:“0”,“second”:“0”,“timezone”:“PST”},“job_meta”:{“source_type”:“Cron”,“job_config”:{“number_of_retries”:“2”,“retry_interval”:“1000”},“job_name”:“jobName”,“jobpool_id”:“10108000003823563”,“target_type”:“Function”,“target_id”:“10108000003823893”,“params”:{“param1”:“value1”}},“cron_name”:“recurCronYearlyWeek”,“description”:“abc”,“end_time”:1719212399,“cron_execution_type”:“pre-defined”}’
{
"status": "success",
"data": {
"cron_name": "recurCronYearlyWeek",
"description": "abc",
"cron_type": "Calendar",
"cron_execution_type": "pre-defined",
"job_meta": {
"id": "10108000004280663",
"url": "",
"job_name": "jobName",
"job_config": {
"number_of_retries": 2,
"retry_interval": 1000
},
"target_type": "Function",
"target_details": {
"id": "10108000003823893",
"target_name": "target_function_fetch"
},
"source_type": "Cron",
"source_details": {
"id": "10108000004280661",
"source_name": "recurCronYearlyWeek",
"details": {
"cron_execution_type": "pre-defined"
}
},
"jobpool_id": "10108000003823563",
"jobpool_details": {
"type": "Function",
"name": "VendorReminder",
"created_by": {
"zuid": "77941453",
"is_confirmed": false,
"email_id": "emmy@zylker.com",
"first_name": "Amelia Burrows",
"last_name": "",
"user_type": "Admin",
"user_id": "10108000000009004"
},
"created_time": "May 28, 2024 04:44 PM",
"modified_by": {
"zuid": "77941453",
"is_confirmed": false,
"email_id": "emmy@zylker.com",
"first_name": "Amelia Burrows",
"last_name": "",
"user_type": "Admin",
"user_id": "10108000000009004"
},
"modified_time": "May 28, 2024 04:44 PM",
"capacity": {
"memory": "2048"
},
"project_details": {
"project_name": "ZylkerShipments",
"id": "10108000003823392",
"project_type": "Live"
},
"id": "10108000003823563"
},
"headers": {},
"params": {
"param1": "value1"
}
},
"cron_status": true,
"created_time": "Jun 07, 2024 12:45 PM",
"created_by": {
"zuid": "77941453",
"is_confirmed": false,
"email_id": "emmy@zylker.com",
"first_name": "Amelia Burrows",
"last_name": "",
"user_type": "Admin",
"user_id": "10108000000009004"
},
"modified_time": "Jun 07, 2024 12:45 PM",
"modified_by": {
"zuid": "77941453",
"is_confirmed": false,
"email_id": "emmy@zylker.com",
"first_name": "Amelia Burrows",
"last_name": "",
"user_type": "Admin",
"user_id": "10108000000009004"
},
"project_details": {
"project_name": "ZylkerShipments",
"id": "10108000003823392",
"project_type": "Live"
},
"end_time": "1719212399",
"cron_detail": {
"jobId": "10108000004280661",
"transactionTimeout": -1,
"hour": 0,
"minute": 0,
"second": 0,
"repetition_type": "yearly",
"months": [
0,
1,
2,
3,
4,
5,
6,
7,
8,
9,
10,
11
],
"weeks_of_month": [
1,
3,
5
],
"week_day": [
1
],
"timezone": "PST"
},
"id": "10108000004280661"
}
}
Update a One-Time Cron
Description
This API enables you to update a one-time cron present in the project. The cron that needs to be updated will be referred using its unique identifier, such as name or ID.
Note:
-
In this API, we are illustrating the sample request and sample response with a Job Function. The API functionality remains the same for webhook, Circuits, and AppSail jobs.
-
This API is applicable for Pre-Defined Crons and Dynamic Crons.
Request Details
Request URL
{api-domain/}baas/v1/project/{project_id}/job_scheduling/cron/{cron_identifier (name/ID)}
Request Headers
Authorization: Zoho-oauthtoken {oauth_token}
Content-Type: application/json
Optional Headers
CATALYST-ORG: {org_id}
Environment: Development
Scope
ZohoCatalyst.cron.UPDATE
Request JSON
You must send a JSON with its corresponding values as shown below.
{
"cron_name": "oneTimeCronFn",
"cron_type": "OneTime",
"cron_status": true,
"cron_execution_type": "pre-defined",
"job_meta": {
"id": "10108000004280446",
"job_name": "jobName",
"job_config": {
"number_of_retries": 1,
"retry_interval": 60
},
"target_type": "Function",
"target_details": {
"id": "10108000003823893",
"target_name": "target_function_fetch"
},
"source_type": "Cron",
"source_details": {
"id": "10108000004280444",
"source_name": "oneTimeCronFn",
"details": {
"cron_execution_type": "pre-defined"
}
},
"jobpool_id": "10108000003823563",
"jobpool_details": {
"type": "Function",
"name": "VendorReminder",
"created_by": {
"zuid": "77941453",
"is_confirmed": false,
"email_id": "emmy@zylker.com",
"first_name": "Amelia Burrows",
"last_name": "",
"user_type": "Admin",
"user_id": "10108000000009004"
},
"created_time": "May 28, 2024 04:44 PM",
"modified_by": {
"zuid": "77941453",
"is_confirmed": false,
"email_id": "emmy@zylker.com",
"first_name": "Amelia Burrows",
"last_name": "",
"user_type": "Admin",
"user_id": "10108000000009004"
},
"modified_time": "May 28, 2024 04:44 PM",
"capacity": {
"memory": "2048"
},
"project_details": {
"project_name": "ZylkerShipments",
"id": "10108000003823392",
"project_type": "Live"
},
"id": "10108000003823563"
},
"params": {
"param1": "value1"
},
"target_id": "10108000003823893"
},
"job_detail": {
"time_of_execution": 1718002799,
"timezone": "PST"
},
"id": "10108000004280444"
}
You will feed this Request JSON to your Request Body, and you need to provide the value of:
Response Details
The JSON response returns the metadata of the updated cron. The response will also contain the details of the user who updated the cron.
curl -X PUT \ https://api.catalyst.zoho.com/baas/v1/project/10108000003823392/job_scheduling/cron/10108000004280444
-H “Authorization: Zoho-oauthtoken 1000.91016.2f57”
-H “Content-Type:application/json”
--data-raw ‘{“cron_name”:“oneTimeCronFn”,“cron_type”:“OneTime”,“cron_status”:true,“cron_execution_type”:“pre-defined”,“job_meta”:{“id”:“10108000004280446”,“job_name”:“jobName”,“job_config”:{“number_of_retries”:1,“retry_interval”:60},“target_type”:“Function”,“target_details”:{“id”:“10108000003823893”,“target_name”:“target_function_fetch”},“source_type”:“Cron”,“source_details”:{“id”:“10108000004280444”,“source_name”:“oneTimeCronFn”,“details”:{“cron_execution_type”:“pre-defined”}},“jobpool_id”:“10108000003823563”,“jobpool_details”:{“type”:“Function”,“name”:“VendorReminder”,“created_by”:{“zuid”:“77941453”,“is_confirmed”:false,“email_id”:“emmy@zylker.com”,“first_name”:“Amelia Burrows”,“last_name”:"",“user_type”:“Admin”,“user_id”:“10108000000009004”},“created_time”:“May 28, 2024 04:44 PM”,“modified_by”:{“zuid”:“77941453”,“is_confirmed”:false,“email_id”:“emmy@zylker.com”,“first_name”:“Amelia Burrows”,“last_name”:"",“user_type”:“Admin”,“user_id”:“10108000000009004”},“modified_time”:“May 28, 2024 04:44 PM”,“capacity”:{“memory”:“2048”},“project_details”:{“project_name”:“ZylkerShipments”,“id”:“10108000003823392”,“project_type”:“Live”},“id”:“10108000003823563”},“params”:{“param1”:“value1”},“target_id”:“10108000003823893”},“job_detail”:{“time_of_execution”:1718002799,“timezone”:“PST”},“id”:“10108000004280444”}’
{
"status": "success",
"data": {
"cron_name": "oneTimeCronFn",
"cron_type": "OneTime",
"cron_execution_type": "pre-defined",
"job_meta": {
"id": "10108000004280726",
"url": "",
"job_name": "jobName",
"job_config": {
"number_of_retries": 1,
"retry_interval": 60
},
"target_type": "Function",
"target_details": {
"id": "10108000003823893",
"target_name": "target_function_fetch"
},
"source_type": "Cron",
"source_details": {
"id": "10108000004280444",
"source_name": "oneTimeCronFn",
"details": {
"cron_execution_type": "pre-defined"
}
},
"jobpool_id": "10108000003823563",
"jobpool_details": {
"type": "Function",
"name": "VendorReminder",
"created_by": {
"zuid": "77941453",
"is_confirmed": false,
"email_id": "emmy@zylker.com",
"first_name": "Amelia Burrows",
"last_name": "",
"user_type": "Admin",
"user_id": "10108000000009004"
},
"created_time": "May 28, 2024 04:44 PM",
"modified_by": {
"zuid": "77941453",
"is_confirmed": false,
"email_id": "emmy@zylker.com",
"first_name": "Amelia Burrows",
"last_name": "",
"user_type": "Admin",
"user_id": "10108000000009004"
},
"modified_time": "May 28, 2024 04:44 PM",
"capacity": {
"memory": "2048"
},
"project_details": {
"project_name": "ZylkerShipments",
"id": "10108000003823392",
"project_type": "Live"
},
"id": "10108000003823563"
},
"headers": {},
"params": {
"param1": "value1"
}
},
"cron_status": true,
"modified_time": "Jun 07, 2024 12:53 PM",
"modified_by": {
"zuid": "77941453",
"is_confirmed": false,
"email_id": "emmy@zylker.com",
"first_name": "Amelia Burrows",
"last_name": "",
"user_type": "Admin",
"user_id": "10108000000009004"
},
"project_details": {
"project_name": "ZylkerShipments",
"id": "10108000003823392",
"project_type": "Live"
},
"end_time": "-1",
"cron_detail": {
"jobId": "10108000004280444",
"transactionTimeout": -1,
"time_of_execution": 1718002799,
"hour": 0,
"minute": 0,
"second": 0,
"timezone": "PST"
},
"id": "10108000004280444"
}
}
Update an Every Cron
Description
This API enables you to update a recurring type Every cron present in the project. The cron that needs to be updated will be referred using its unique identifier, such as name or ID.
Note:
-
In this API, we are illustrating the sample request and sample response with a Job Function. The API functionality remains the same for webhook, Circuits, and AppSail jobs.
-
This API is applicable for Pre-Defined Crons and Dynamic Crons.
Request Details
Request URL
{api-domain/}baas/v1/project/{project_id}/job_scheduling/cron/{cron_identifier (name/ID)}
Request Headers
Authorization: Zoho-oauthtoken {oauth_token}
Content-Type: application/json
Optional Headers
CATALYST-ORG: {org_id}
Environment: Development
Scope
ZohoCatalyst.cron.UPDATE
Request JSON
You must send a JSON with its corresponding values as shown below.
{
"cron_name": "RecursiveCronEvery",
"cron_type": "Periodic",
"cron_status": true,
"end_time": 1717957799,
"cron_execution_type": "pre-defined",
"job_meta": {
"id": "10108000004280482",
"job_name": "jobName",
"job_config": {
"number_of_retries": 3,
"retry_interval": 60
},
"target_type": "Function",
"target_details": {
"id": "10108000003823893",
"target_name": "target_function_fetch"
},
"source_type": "Cron",
"source_details": {
"id": "10108000004280480",
"source_name": "RecursiveCron",
"details": {
"cron_execution_type": "pre-defined"
}
},
"jobpool_id": "10108000003823563",
"jobpool_details": {
"type": "Function",
"name": "VendorReminder",
"created_by": {
"zuid": "77941453",
"is_confirmed": false,
"email_id": "emmy@zylker.com",
"first_name": "Amelia Burrows",
"last_name": "",
"user_type": "Admin",
"user_id": "10108000000009004"
},
"created_time": "May 28, 2024 04:44 PM",
"modified_by": {
"zuid": "77941453",
"is_confirmed": false,
"email_id": "emmy@zylker.com",
"first_name": "Amelia Burrows",
"last_name": "",
"user_type": "Admin",
"user_id": "10108000000009004"
},
"modified_time": "May 28, 2024 04:44 PM",
"capacity": {
"memory": "2048"
},
"project_details": {
"project_name": "ZylkerShipments",
"id": "10108000003823392",
"project_type": "Live"
},
"id": "10108000003823563"
},
"params": {
"param1": "value1"
},
"target_id": "10108000003823893"
},
"job_detail": {
"hour": 6,
"minute": 0,
"second": 0,
"repetition_type": "every"
},
"id": "10108000004280480"
}
You will feed this Request JSON to your Request Body, and you need to provide the value of:
Response Details
The JSON response returns the metadata of the updated cron. The response will also contain the details of the user who updated the cron.
curl -X PUT \ https://api.catalyst.zoho.com/baas/v1/project/10108000003823392/job_scheduling/cron/10108000004280480
-H “Authorization: Zoho-oauthtoken 1000.91016.2f57”
-H “Content-Type:application/json”
--data-raw ‘{“cron_name”:“RecursiveCronEvery”,“cron_type”:“Periodic”,“cron_status”:true,“end_time”:1717957799,“cron_execution_type”:“pre-defined”,“job_meta”:{“id”:“10108000004280482”,“job_name”:“jobName”,“job_config”:{“number_of_retries”:3,“retry_interval”:60},“target_type”:“Function”,“target_details”:{“id”:“10108000003823893”,“target_name”:“target_function_fetch”},“source_type”:“Cron”,“source_details”:{“id”:“10108000004280480”,“source_name”:“RecursiveCron”,“details”:{“cron_execution_type”:“pre-defined”}},“jobpool_id”:“10108000003823563”,“jobpool_details”:{“type”:“Function”,“name”:“VendorReminder”,“created_by”:{“zuid”:“77941453”,“is_confirmed”:false,“email_id”:“emmy@zylker.com”,“first_name”:“Amelia Burrows”,“last_name”:"",“user_type”:“Admin”,“user_id”:“10108000000009004”},“created_time”:“May 28, 2024 04:44 PM”,“modified_by”:{“zuid”:“77941453”,“is_confirmed”:false,“email_id”:“emmy@zylker.com”,“first_name”:“Amelia Burrows”,“last_name”:"",“user_type”:“Admin”,“user_id”:“10108000000009004”},“modified_time”:“May 28, 2024 04:44 PM”,“capacity”:{“memory”:“2048”},“project_details”:{“project_name”:“ZylkerShipments”,“id”:“10108000003823392”,“project_type”:“Live”},“id”:“10108000003823563”},“params”:{“param1”:“value1”},“target_id”:“10108000003823893”},“job_detail”:{“hour”:6,“minute”:0,“second”:0,“repetition_type”:“every”},“id”:“10108000004280480”}’
{
"status": "success",
"data": {
"cron_name": "RecursiveCronEvery",
"cron_type": "Periodic",
"cron_execution_type": "pre-defined",
"job_meta": {
"id": "10108000004280762",
"url": "",
"job_name": "jobName",
"job_config": {
"number_of_retries": 3,
"retry_interval": 60
},
"target_type": "Function",
"target_details": {
"id": "10108000003823893",
"target_name": "target_function_fetch"
},
"source_type": "Cron",
"source_details": {
"id": "10108000004280480",
"source_name": "RecursiveCronEvery",
"details": {
"cron_execution_type": "pre-defined"
}
},
"jobpool_id": "10108000003823563",
"jobpool_details": {
"type": "Function",
"name": "VendorReminder",
"created_by": {
"zuid": "77941453",
"is_confirmed": false,
"email_id": "emmy@zylker.com",
"first_name": "Amelia Burrows",
"last_name": "",
"user_type": "Admin",
"user_id": "10108000000009004"
},
"created_time": "May 28, 2024 04:44 PM",
"modified_by": {
"zuid": "77941453",
"is_confirmed": false,
"email_id": "emmy@zylker.com",
"first_name": "Amelia Burrows",
"last_name": "",
"user_type": "Admin",
"user_id": "10108000000009004"
},
"modified_time": "May 28, 2024 04:44 PM",
"capacity": {
"memory": "2048"
},
"project_details": {
"project_name": "ZylkerShipments",
"id": "10108000003823392",
"project_type": "Live"
},
"id": "10108000003823563"
},
"headers": {},
"params": {
"param1": "value1"
}
},
"cron_status": true,
"modified_time": "Jun 07, 2024 12:56 PM",
"modified_by": {
"zuid": "77941453",
"is_confirmed": false,
"email_id": "emmy@zylker.com",
"first_name": "Amelia Burrows",
"last_name": "",
"user_type": "Admin",
"user_id": "10108000000009004"
},
"project_details": {
"project_name": "ZylkerShipments",
"id": "10108000003823392",
"project_type": "Live"
},
"end_time": "1717957799",
"cron_detail": {
"hour": 6,
"minute": 0,
"second": 0,
"repetition_type": "every",
"timezone": "Asia/Kolkata"
},
"id": "10108000004280480"
}
}
Update a Daily Cron
Description
This API enables you to update a Daily cron present in the project. The cron that needs to be updated will be referred using its unique identifier, such as name or ID.
Note:
-
In this API, we are illustrating the sample request and sample response with a Job Function. The API functionality remains the same for webhook, Circuits, and AppSail jobs.
-
This API is applicable for Pre-Defined Crons and Dynamic Crons.
Request Details
Request URL
{api-domain/}baas/v1/project/{project_id}/job_scheduling/cron/{cron_identifier (name/ID)}
Request Headers
Authorization: Zoho-oauthtoken {oauth_token}
Content-Type: application/json
Optional Headers
CATALYST-ORG: {org_id}
Environment: Development
Scope
ZohoCatalyst.cron.UPDATE
Request JSON
You must send a JSON with its corresponding values as shown below.
{
"cron_name": "RecursiveCronDaily",
"description": "dailycron",
"cron_type": "Calendar",
"cron_status": true,
"end_time": 1718002799,
"cron_execution_type": "pre-defined",
"job_meta": {
"id": "10108000004280518",
"job_name": "job",
"job_config": {
"number_of_retries": 1,
"retry_interval": 300
},
"target_type": "Function",
"target_details": {
"id": "10108000003823893",
"target_name": "target_function_fetch"
},
"source_type": "Cron",
"source_details": {
"id": "10108000004280516",
"source_name": "RecursiveCronDaily",
"details": {
"cron_execution_type": "pre-defined"
}
},
"jobpool_id": "10108000003823563",
"jobpool_details": {
"type": "Function",
"name": "VendorReminder",
"created_by": {
"zuid": "77941453",
"is_confirmed": false,
"email_id": "emmy@zylker.com",
"first_name": "Amelia Burrows",
"last_name": "",
"user_type": "Admin",
"user_id": "10108000000009004"
},
"created_time": "May 28, 2024 04:44 PM",
"modified_by": {
"zuid": "77941453",
"is_confirmed": false,
"email_id": "emmy@zylker.com",
"first_name": "Amelia Burrows",
"last_name": "",
"user_type": "Admin",
"user_id": "10108000000009004"
},
"modified_time": "May 28, 2024 04:44 PM",
"capacity": {
"memory": "2048"
},
"project_details": {
"project_name": "ZylkerShipments",
"id": "10108000003823392",
"project_type": "Live"
},
"id": "10108000003823563"
},
"params": {
"param1": "value1"
},
"target_id": "10108000003823893"
},
"job_detail": {
"hour": "2",
"minute": 0,
"second": 0,
"repetition_type": "daily",
"timezone": "PST"
},
"id": "10108000004280516"
}
You will feed this Request JSON to your Request Body, and you need to provide the value of:
Response Details
The JSON response returns the metadata of the updated cron. The response will also contain the details of the user who updated the cron.
curl -X PUT \ https://api.catalyst.zoho.com/baas/v1/project/10108000003823392/job_scheduling/cron/10108000004280516
-H “Authorization: Zoho-oauthtoken 1000.91016.2f57”
-H “Content-Type:application/json”
--data-raw ‘{“cron_name”:“RecursiveCronDaily”,“description”:“dailycron”,“cron_type”:“Calendar”,“cron_status”:true,“end_time”:1718002799,“cron_execution_type”:“pre-defined”,“job_meta”:{“id”:“10108000004280518”,“job_name”:“job”,“job_config”:{“number_of_retries”:1,“retry_interval”:300},“target_type”:“Function”,“target_details”:{“id”:“10108000003823893”,“target_name”:“target_function_fetch”},“source_type”:“Cron”,“source_details”:{“id”:“10108000004280516”,“source_name”:“RecursiveCronDaily”,“details”:{“cron_execution_type”:“pre-defined”}},“jobpool_id”:“10108000003823563”,“jobpool_details”:{“type”:“Function”,“name”:“VendorReminder”,“created_by”:{“zuid”:“77941453”,“is_confirmed”:false,“email_id”:“emmy@zylker.com”,“first_name”:“Amelia Burrows”,“last_name”:"",“user_type”:“Admin”,“user_id”:“10108000000009004”},“created_time”:“May 28, 2024 04:44 PM”,“modified_by”:{“zuid”:“77941453”,“is_confirmed”:false,“email_id”:“emmy@zylker.com”,“first_name”:“Amelia Burrows”,“last_name”:"",“user_type”:“Admin”,“user_id”:“10108000000009004”},“modified_time”:“May 28, 2024 04:44 PM”,“capacity”:{“memory”:“2048”},“project_details”:{“project_name”:“ZylkerShipments”,“id”:“10108000003823392”,“project_type”:“Live”},“id”:“10108000003823563”},“params”:{“param1”:“value1”},“target_id”:“10108000003823893”},“job_detail”:{“hour”:“2”,“minute”:0,“second”:0,“repetition_type”:“daily”,“timezone”:“PST”},“id”:“10108000004280516”}’
{
"status": "success",
"data": {
"cron_name": "RecursiveCronDaily",
"description": "dailycron",
"cron_type": "Calendar",
"cron_execution_type": "pre-defined",
"job_meta": {
"id": "10108000004280784",
"url": "",
"job_name": "job",
"job_config": {
"number_of_retries": 1,
"retry_interval": 300
},
"target_type": "Function",
"target_details": {
"id": "10108000003823893",
"target_name": "target_function_fetch"
},
"source_type": "Cron",
"source_details": {
"id": "10108000004280516",
"source_name": "RecursiveCronDaily",
"details": {
"cron_execution_type": "pre-defined"
}
},
"jobpool_id": "10108000003823563",
"jobpool_details": {
"type": "Function",
"name": "VendorReminder",
"created_by": {
"zuid": "77941453",
"is_confirmed": false,
"email_id": "emmy@zylker.com",
"first_name": "Amelia Burrows",
"last_name": "",
"user_type": "Admin",
"user_id": "10108000000009004"
},
"created_time": "May 28, 2024 04:44 PM",
"modified_by": {
"zuid": "77941453",
"is_confirmed": false,
"email_id": "emmy@zylker.com",
"first_name": "Amelia Burrows",
"last_name": "",
"user_type": "Admin",
"user_id": "10108000000009004"
},
"modified_time": "May 28, 2024 04:44 PM",
"capacity": {
"memory": "2048"
},
"project_details": {
"project_name": "ZylkerShipments",
"id": "10108000003823392",
"project_type": "Live"
},
"id": "10108000003823563"
},
"headers": {},
"params": {
"param1": "value1"
}
},
"cron_status": true,
"modified_time": "Jun 07, 2024 12:59 PM",
"modified_by": {
"zuid": "77941453",
"is_confirmed": false,
"email_id": "emmy@zylker.com",
"first_name": "Amelia Burrows",
"last_name": "",
"user_type": "Admin",
"user_id": "10108000000009004"
},
"project_details": {
"project_name": "ZylkerShipments",
"id": "10108000003823392",
"project_type": "Live"
},
"end_time": "1718002799",
"cron_detail": {
"jobId": "10108000004280516",
"transactionTimeout": -1,
"hour": 2,
"minute": 0,
"second": 0,
"repetition_type": "daily",
"timezone": "PST"
},
"id": "10108000004280516"
}
}
Update a Monthly Cron (Date Type)
Description
This API enables you to update a Monthly cron (configured using the calendar dates) present in the project. The cron that needs to be updated will be referred using its unique identifier, such as name or ID.
Note:
-
In this API, we are illustrating the sample request and sample response with a Job Function. The API functionality remains the same for webhook, Circuits, and AppSail jobs.
-
The functionality of the API remains the same when you try to update a Monthly cron defined using the weeks of a month. Refer to Create a Monthly Cron (Week Type) API.
-
This API is applicable for Pre-Defined Crons and Dynamic Crons.
Request Details
Request URL
{api-domain/}baas/v1/project/{project_id}/job_scheduling/cron/{cron_identifier (name/ID)}
Request Headers
Authorization: Zoho-oauthtoken {oauth_token}
Content-Type: application/json
Optional Headers
CATALYST-ORG: {org_id}
Environment: Development
Scope
ZohoCatalyst.cron.UPDATE
Request JSON
You must send a JSON with its corresponding values as shown below.
{
"cron_name": "recurCronMonthly",
"description": "monthly",
"cron_type": "Calendar",
"cron_status": true,
"end_time": 1718002799,
"cron_execution_type": "pre-defined",
"job_meta": {
"id": "10108000004280537",
"job_name": "jobName",
"job_config": {
"number_of_retries": 2,
"retry_interval": 500
},
"target_type": "Function",
"target_details": {
"id": "10108000003823893",
"target_name": "target_function_fetch"
},
"source_type": "Cron",
"source_details": {
"id": "10108000004280535",
"source_name": "recurCronMonthly",
"details": {
"cron_execution_type": "pre-defined"
}
},
"jobpool_id": "10108000003823563",
"jobpool_details": {
"type": "Function",
"name": "VendorReminder",
"created_by": {
"zuid": "77941453",
"is_confirmed": false,
"email_id": "emmy@zylker.com",
"first_name": "Amelia Burrows",
"last_name": "",
"user_type": "Admin",
"user_id": "10108000000009004"
},
"created_time": "May 28, 2024 04:44 PM",
"modified_by": {
"zuid": "77941453",
"is_confirmed": false,
"email_id": "emmy@zylker.com",
"first_name": "Amelia Burrows",
"last_name": "",
"user_type": "Admin",
"user_id": "10108000000009004"
},
"modified_time": "May 28, 2024 04:44 PM",
"capacity": {
"memory": "2048"
},
"project_details": {
"project_name": "ZylkerShipments",
"id": "10108000003823392",
"project_type": "Live"
},
"id": "10108000003823563"
},
"params": {
"param1": "value1"
},
"target_id": "10108000003823893"
},
"job_detail": {
"hour": 3,
"minute": 0,
"second": 0,
"repetition_type": "monthly",
"days": [
1,
3,
8,
"9"
],
"timezone": "PST"
},
"id": "10108000004280535"
}
You will feed this Request JSON to your Request Body, and you need to provide the value of:
Response Details
The JSON response returns the metadata of the updated cron. The response will also contain the details of the user who updated the cron.
curl -X PUT \ https://api.catalyst.zoho.com/baas/v1/project/10108000003823392/job_scheduling/cron/10108000004280535
-H “Authorization: Zoho-oauthtoken 1000.91016.2f57”
-H “Content-Type:application/json”
--data-raw ‘{“cron_name”:“recurCronMonthly”,“description”:“monthly”,“cron_type”:“Calendar”,“cron_status”:true,“end_time”:1718002799,“cron_execution_type”:“pre-defined”,“job_meta”:{“id”:“10108000004280537”,“job_name”:“jobName”,“job_config”:{“number_of_retries”:2,“retry_interval”:500},“target_type”:“Function”,“target_details”:{“id”:“10108000003823893”,“target_name”:“target_function_fetch”},“source_type”:“Cron”,“source_details”:{“id”:“10108000004280535”,“source_name”:“recurCronMonthly”,“details”:{“cron_execution_type”:“pre-defined”}},“jobpool_id”:“10108000003823563”,“jobpool_details”:{“type”:“Function”,“name”:“VendorReminder”,“created_by”:{“zuid”:“77941453”,“is_confirmed”:false,“email_id”:“emmy@zylker.com”,“first_name”:“Amelia Burrows”,“last_name”:"",“user_type”:“Admin”,“user_id”:“10108000000009004”},“created_time”:“May 28, 2024 04:44 PM”,“modified_by”:{“zuid”:“77941453”,“is_confirmed”:false,“email_id”:“emmy@zylker.com”,“first_name”:“Amelia Burrows”,“last_name”:"",“user_type”:“Admin”,“user_id”:“10108000000009004”},“modified_time”:“May 28, 2024 04:44 PM”,“capacity”:{“memory”:“2048”},“project_details”:{“project_name”:“ZylkerShipments”,“id”:“10108000003823392”,“project_type”:“Live”},“id”:“10108000003823563”},“params”:{“param1”:“value1”},“target_id”:“10108000003823893”},“job_detail”:{“hour”:3,“minute”:0,“second”:0,“repetition_type”:“monthly”,“days”:[1,3,8,“9”],“timezone”:“PST”},“id”:“10108000004280535”}’
{
"status": "success",
"data": {
"cron_name": "recurCronMonthly",
"description": "monthly",
"cron_type": "Calendar",
"cron_execution_type": "pre-defined",
"job_meta": {
"id": "10108000004280805",
"url": "",
"job_name": "jobName",
"job_config": {
"number_of_retries": 2,
"retry_interval": 500
},
"target_type": "Function",
"target_details": {
"id": "10108000003823893",
"target_name": "target_function_fetch"
},
"source_type": "Cron",
"source_details": {
"id": "10108000004280535",
"source_name": "recurCronMonthly",
"details": {
"cron_execution_type": "pre-defined"
}
},
"jobpool_id": "10108000003823563",
"jobpool_details": {
"type": "Function",
"name": "VendorReminder",
"created_by": {
"zuid": "77941453",
"is_confirmed": false,
"email_id": "emmy@zylker.com",
"first_name": "Amelia Burrows",
"last_name": "",
"user_type": "Admin",
"user_id": "10108000000009004"
},
"created_time": "May 28, 2024 04:44 PM",
"modified_by": {
"zuid": "77941453",
"is_confirmed": false,
"email_id": "emmy@zylker.com",
"first_name": "Amelia Burrows",
"last_name": "",
"user_type": "Admin",
"user_id": "10108000000009004"
},
"modified_time": "May 28, 2024 04:44 PM",
"capacity": {
"memory": "2048"
},
"project_details": {
"project_name": "ZylkerShipments",
"id": "10108000003823392",
"project_type": "Live"
},
"id": "10108000003823563"
},
"headers": {},
"params": {
"param1": "value1"
}
},
"cron_status": true,
"modified_time": "Jun 07, 2024 01:00 PM",
"modified_by": {
"zuid": "77941453",
"is_confirmed": false,
"email_id": "emmy@zylker.com",
"first_name": "Amelia Burrows",
"last_name": "",
"user_type": "Admin",
"user_id": "10108000000009004"
},
"project_details": {
"project_name": "ZylkerShipments",
"id": "10108000003823392",
"project_type": "Live"
},
"end_time": "1718002799",
"cron_detail": {
"jobId": "10108000004280535",
"transactionTimeout": -1,
"hour": 3,
"minute": 0,
"second": 0,
"repetition_type": "monthly",
"days": [
1,
3,
8,
9
],
"timezone": "PST"
},
"id": "10108000004280535"
}
}
Update a Yearly Cron (Week Type)
Description
This API enables you to update an Yearly cron (defined using the weeks of a month) present in the project. The cron that needs to be updated will be referred using its unique identifier, such as name or ID.
Note:
-
In this API, we are illustrating the sample request and sample response with a Job Function. The API functionality remains the same for webhook, Circuits, and AppSail jobs.
-
The functionality of the API remains the same when you try to update an Yearly cron defined using the dates of a month. Refer to Create a Yearly Cron (Date Type) API.
-
This API is applicable for Pre-Defined Crons and Dynamic Crons.
Request Details
Request URL
{api-domain/}baas/v1/project/{project_id}/job_scheduling/cron/{cron_identifier(name/ID)}
Request Headers
Authorization: Zoho-oauthtoken {oauth_token}
Content-Type: application/json
Optional Headers
CATALYST-ORG: {org_id}
Environment: Development
Scope
ZohoCatalyst.cron.UPDATE
Request JSON
You must send a JSON with its corresponding values as shown below.
{
"cron_name": "recurCronYearlyWeek",
"description": "abc",
"cron_type": "Calendar",
"cron_status": true,
"end_time": 1719212399,
"cron_execution_type": "pre-defined",
"job_meta": {
"id": "10108000004280663",
"job_name": "jobName",
"job_config": {
"number_of_retries": 2,
"retry_interval": 1000
},
"target_type": "Function",
"target_details": {
"id": "10108000003823893",
"target_name": "target_function_fetch"
},
"source_type": "Cron",
"source_details": {
"id": "10108000004280661",
"source_name": "recurCronYearlyWeek",
"details": {
"cron_execution_type": "pre-defined"
}
},
"jobpool_id": "10108000003823563",
"jobpool_details": {
"type": "Function",
"name": "VendorReminder",
"created_by": {
"zuid": "77941453",
"is_confirmed": false,
"email_id": "emmy@zylker.com",
"first_name": "Amelia Burrows",
"last_name": "",
"user_type": "Admin",
"user_id": "10108000000009004"
},
"created_time": "May 28, 2024 04:44 PM",
"modified_by": {
"zuid": "77941453",
"is_confirmed": false,
"email_id": "emmy@zylker.com",
"first_name": "Amelia Burrows",
"last_name": "",
"user_type": "Admin",
"user_id": "10108000000009004"
},
"modified_time": "May 28, 2024 04:44 PM",
"capacity": {
"memory": "2048"
},
"project_details": {
"project_name": "ZylkerShipments",
"id": "10108000003823392",
"project_type": "Live"
},
"id": "10108000003823563"
},
"params": {
"param1": "value1"
},
"target_id": "10108000003823893"
},
"job_detail": {
"hour": 0,
"minute": 0,
"second": 0,
"repetition_type": "yearly",
"months": [
0,
1,
2,
3,
4,
5,
6,
7,
8,
9,
10,
11
],
"weeks_of_month": [
1,
3,
5,
"4"
],
"week_day": [
1
],
"timezone": "PST"
},
"id": "10108000004280661"
}
You will feed this Request JSON to your Request Body, and you need to provide the value of:
Response Details
The JSON response returns the metadata of the updated cron. The response will also contain the details of the user who updated the cron.
curl -X PUT \ https://api.catalyst.zoho.com/baas/v1/project/10108000003823392/job_scheduling/cron/10108000004280535
-H “Authorization: Zoho-oauthtoken 1000.91016.2f57”
-H “Content-Type:application/json”
--data-raw ‘{“cron_name”:“recurCronYearlyWeek”,“description”:“abc”,“cron_type”:“Calendar”,“cron_status”:true,“end_time”:1719212399,“cron_execution_type”:“pre-defined”,“job_meta”:{“id”:“10108000004280663”,“job_name”:“jobName”,“job_config”:{“number_of_retries”:2,“retry_interval”:1000},“target_type”:“Function”,“target_details”:{“id”:“10108000003823893”,“target_name”:“target_function_fetch”},“source_type”:“Cron”,“source_details”:{“id”:“10108000004280661”,“source_name”:“recurCronYearlyWeek”,“details”:{“cron_execution_type”:“pre-defined”}},“jobpool_id”:“10108000003823563”,“jobpool_details”:{“type”:“Function”,“name”:“VendorReminder”,“created_by”:{“zuid”:“77941453”,“is_confirmed”:false,“email_id”:“emmy@zylker.com”,“first_name”:“Amelia Burrows”,“last_name”:"",“user_type”:“Admin”,“user_id”:“10108000000009004”},“created_time”:“May 28, 2024 04:44 PM”,“modified_by”:{“zuid”:“77941453”,“is_confirmed”:false,“email_id”:“emmy@zylker.com”,“first_name”:“Amelia Burrows”,“last_name”:"",“user_type”:“Admin”,“user_id”:“10108000000009004”},“modified_time”:“May 28, 2024 04:44 PM”,“capacity”:{“memory”:“2048”},“project_details”:{“project_name”:“ZylkerShipments”,“id”:“10108000003823392”,“project_type”:“Live”},“id”:“10108000003823563”},“params”:{“param1”:“value1”},“target_id”:“10108000003823893”},“job_detail”:{“hour”:0,“minute”:0,“second”:0,“repetition_type”:“yearly”,“months”:[0,1,2,3,4,5,6,7,8,9,10,11],“weeks_of_month”:[1,3,5,“4”],“week_day”:[1],“timezone”:“PST”},“id”:“10108000004280661”}’
{
"status": "success",
"data": {
"cron_name": "recurCronYearlyWeek",
"description": "abc",
"cron_type": "Calendar",
"cron_execution_type": "pre-defined",
"job_meta": {
"id": "10108000004280844",
"url": "",
"job_name": "jobName",
"job_config": {
"number_of_retries": 2,
"retry_interval": 1000
},
"target_type": "Function",
"target_details": {
"id": "10108000003823893",
"target_name": "target_function_fetch"
},
"source_type": "Cron",
"source_details": {
"id": "10108000004280661",
"source_name": "recurCronYearlyWeek",
"details": {
"cron_execution_type": "pre-defined"
}
},
"jobpool_id": "10108000003823563",
"jobpool_details": {
"type": "Function",
"name": "VendorReminder",
"created_by": {
"zuid": "77941453",
"is_confirmed": false,
"email_id": "emmy@zylker.com",
"first_name": "Amelia Burrows",
"last_name": "",
"user_type": "Admin",
"user_id": "10108000000009004"
},
"created_time": "May 28, 2024 04:44 PM",
"modified_by": {
"zuid": "77941453",
"is_confirmed": false,
"email_id": "emmy@zylker.com",
"first_name": "Amelia Burrows",
"last_name": "",
"user_type": "Admin",
"user_id": "10108000000009004"
},
"modified_time": "May 28, 2024 04:44 PM",
"capacity": {
"memory": "2048"
},
"project_details": {
"project_name": "ZylkerShipments",
"id": "10108000003823392",
"project_type": "Live"
},
"id": "10108000003823563"
},
"headers": {},
"params": {
"param1": "value1"
}
},
"cron_status": true,
"modified_time": "Jun 07, 2024 01:03 PM",
"modified_by": {
"zuid": "77941453",
"is_confirmed": false,
"email_id": "emmy@zylker.com",
"first_name": "Amelia Burrows",
"last_name": "",
"user_type": "Admin",
"user_id": "10108000000009004"
},
"project_details": {
"project_name": "ZylkerShipments",
"id": "10108000003823392",
"project_type": "Live"
},
"end_time": "1719212399",
"cron_detail": {
"jobId": "10108000004280661",
"transactionTimeout": -1,
"hour": 0,
"minute": 0,
"second": 0,
"repetition_type": "yearly",
"months": [
0,
1,
2,
3,
4,
5,
6,
7,
8,
9,
10,
11
],
"weeks_of_month": [
1,
3,
4,
5
],
"week_day": [
1
],
"timezone": "PST"
},
"id": "10108000004280661"
}
}
Update a Cron Defined Using Cron Expressions
Description
This API enables you to update a cron defined using Cron Expressions. The cron that needs to be updated will be referred using its unique identifier, such as name or ID.
Note:
-
In this API, we are illustrating the sample request and sample response with a Job Function. The API functionality remains the same for webhook, Circuits, and AppSail jobs.
-
This API is applicable for Pre-Defined Crons and Dynamic Crons.
Request Details
Request URL
{api-domain/}baas/v1/project/{project_id}/job_scheduling/cron/{cron_identifier(name/ID)}
Request Headers
Authorization: Zoho-oauthtoken {oauth_token}
Content-Type: application/json
Optional Headers
CATALYST-ORG: {org_id}
Environment: Development
Scope
ZohoCatalyst.cron.UPDATE
Request JSON
You must send a JSON with its corresponding values as shown below.
{
"cron_name": "cronExp",
"description": "cronexpression",
"cron_type": "CronExpression",
"cron_status": true,
"end_time": 1717916399,
"cron_execution_type": "pre-defined",
"cron_expression": "/30 /6 * * *",
"job_meta": {
"id": "10108000004280709",
"job_name": "jobName",
"job_config": {
"number_of_retries": 1,
"retry_interval": 500
},
"target_type": "Function",
"target_details": {
"id": "10108000003823893",
"target_name": "target_function_fetch"
},
"source_type": "Cron",
"source_details": {
"id": "10108000004280707",
"source_name": "cronExp",
"details": {
"cron_execution_type": "pre-defined"
}
},
"jobpool_id": "10108000003823563",
"jobpool_details": {
"type": "Function",
"name": "VendorReminder",
"created_by": {
"zuid": "77941453",
"is_confirmed": false,
"email_id": "emmy@zylker.com",
"first_name": "Amelia Burrows",
"last_name": "",
"user_type": "Admin",
"user_id": "10108000000009004"
},
"created_time": "May 28, 2024 04:44 PM",
"modified_by": {
"zuid": "77941453",
"is_confirmed": false,
"email_id": "emmy@zylker.com",
"first_name": "Amelia Burrows",
"last_name": "",
"user_type": "Admin",
"user_id": "10108000000009004"
},
"modified_time": "May 28, 2024 04:44 PM",
"capacity": {
"memory": "2048"
},
"project_details": {
"project_name": "ZylkerShipments",
"id": "10108000003823392",
"project_type": "Live"
},
"id": "10108000003823563"
},
"params": {
"param1": "value1"
},
"target_id": "10108000003823893"
},
"job_detail": {
"timezone": "PST"
},
"id": "10108000004280707"
}
You will feed this Request JSON to your Request Body, and you need to provide the value of:
Response Details
The JSON response returns the metadata of the updated cron. The response will also contain the details of the user who updated the cron.
curl -X PUT \ https://api.catalyst.zoho.com/baas/v1/project/10108000003823392/job_scheduling/cron/10108000004280535
-H “Authorization: Zoho-oauthtoken 1000.91016.2f57”
-H “Content-Type:application/json”
--data-raw ‘{“cron_name”:“cronExp”,“description”:“cronexpression”,“cron_type”:“CronExpression”,“cron_status”:true,“end_time”:1717916399,“cron_execution_type”:“pre-defined”,“cron_expression”:"/30 /6 * * *",“job_meta”:{“id”:“10108000004280709”,“job_name”:“jobName”,“job_config”:{“number_of_retries”:1,“retry_interval”:500},“target_type”:“Function”,“target_details”:{“id”:“10108000003823893”,“target_name”:“target_function_fetch”},“source_type”:“Cron”,“source_details”:{“id”:“10108000004280707”,“source_name”:“cronExp”,“details”:{“cron_execution_type”:“pre-defined”}},“jobpool_id”:“10108000003823563”,“jobpool_details”:{“type”:“Function”,“name”:“VendorReminder”,“created_by”:{“zuid”:“77941453”,“is_confirmed”:false,“email_id”:“emmy@zylker.com”,“first_name”:“Amelia Burrows”,“last_name”:"",“user_type”:“Admin”,“user_id”:“10108000000009004”},“created_time”:“May 28, 2024 04:44 PM”,“modified_by”:{“zuid”:“77941453”,“is_confirmed”:false,“email_id”:“emmy@zylker.com”,“first_name”:“Amelia Burrows”,“last_name”:"",“user_type”:“Admin”,“user_id”:“10108000000009004”},“modified_time”:“May 28, 2024 04:44 PM”,“capacity”:{“memory”:“2048”},“project_details”:{“project_name”:“ZylkerShipments”,“id”:“10108000003823392”,“project_type”:“Live”},“id”:“10108000003823563”},“params”:{“param1”:“value1”},“target_id”:“10108000003823893”},“job_detail”:{“timezone”:“PST”},“id”:“10108000004280707”}’
{
"status": "success",
"data": {
"cron_name": "cronExp",
"description": "cronexpression",
"cron_type": "CronExpression",
"cron_execution_type": "pre-defined",
"cron_expression": "/30 /6 * * *",
"job_meta": {
"id": "10108000004280861",
"url": "",
"job_name": "jobName",
"job_config": {
"number_of_retries": 1,
"retry_interval": 500
},
"target_type": "Function",
"target_details": {
"id": "10108000003823893",
"target_name": "target_function_fetch"
},
"source_type": "Cron",
"source_details": {
"id": "10108000004280707",
"source_name": "cronExp",
"details": {
"cron_execution_type": "pre-defined"
}
},
"jobpool_id": "10108000003823563",
"jobpool_details": {
"type": "Function",
"name": "VendorReminder",
"created_by": {
"zuid": "77941453",
"is_confirmed": false,
"email_id": "emmy@zylker.com",
"first_name": "Amelia Burrows",
"last_name": "",
"user_type": "Admin",
"user_id": "10108000000009004"
},
"created_time": "May 28, 2024 04:44 PM",
"modified_by": {
"zuid": "77941453",
"is_confirmed": false,
"email_id": "emmy@zylker.com",
"first_name": "Amelia Burrows",
"last_name": "",
"user_type": "Admin",
"user_id": "10108000000009004"
},
"modified_time": "May 28, 2024 04:44 PM",
"capacity": {
"memory": "2048"
},
"project_details": {
"project_name": "ZylkerShipments",
"id": "10108000003823392",
"project_type": "Live"
},
"id": "10108000003823563"
},
"headers": {},
"params": {
"param1": "value1"
}
},
"cron_status": true,
"modified_time": "Jun 07, 2024 01:04 PM",
"modified_by": {
"zuid": "77941453",
"is_confirmed": false,
"email_id": "emmy@zylker.com",
"first_name": "Amelia Burrows",
"last_name": "",
"user_type": "Admin",
"user_id": "10108000000009004"
},
"project_details": {
"project_name": "ZylkerShipments",
"id": "10108000003823392",
"project_type": "Live"
},
"end_time": "1717916399",
"cron_detail": {
"jobId": "10108000004280866",
"transactionTimeout": -1,
"hour": 0,
"minute": 0,
"second": 0,
"timezone": "PST"
},
"id": "10108000004280707"
}
}
Submit Cron Instantly
Description
This API enables you to submit a cron that will instantly submit a job to the job pool to trigger a target type endpoint.
Note:
-
This API is ideally used to test if the configured cron is functioning as configured.
-
In this API, we are illustrating the sample request and sample response with a Job Function. The API functionality remains the same for webhook, Circuits, and AppSail jobs.
-
This API is applicable for Pre-Defined Crons and Dynamic Crons.
Request Details
Request URL
{app_domain}/baas/v1/project/{project_id}/job_scheduling/cron/{cron_id}/submit_job
Request Headers
Authorization: Zoho-oauthtoken {oauth_token}
Optional Headers
CATALYST-ORG: {org_id}
Environment: Development
Scope
ZohoCatalyst.cron.CREATE
Response Details
The JSON response returns the metadata of the submitted cron. The response will also contain the details of the user who submitted the cron.
curl -X POST
https://api.catalyst.zoho.com/baas/v1/project/10278000000019013/job_scheduling/cron/10108000003822189/submit_immediately
-H “Authorization: Zoho-oauthtoken 1000.91016.2f57”
{
"status": "success",
"data": {
"job_id": "10108000004251242",
"created_time": "Jun 07, 2024 10:32 AM",
"response_code": null,
"start_time": {},
"end_time": {},
"submitted_on": {
"startTimeToRedirectLogsPage": "07/06/2024 10:27",
"timeWithGivenTimezone": "Jun 07, 2024 10:32 AM IST",
"timeWithJobTimezone": "Jun 07, 2024 10:32 AM IST"
},
"job_status": "PENDING",
"capacity": {
"memory": "256"
},
"job_meta_details": {
"id": "10108000003822191",
"url": "",
"job_name": "delayJob",
"job_config": {
"number_of_retries": 0
},
"target_type": "Function",
"target_details": {
"id": "10108000003822071",
"target_name": "fn"
},
"source_type": "Cron",
"source_details": {
"id": "10108000003822189",
"source_name": "check2",
"details": {
"cron_execution_type": "pre-defined"
}
},
"jobpool_id": "10108000003822066",
"headers": {},
"params": {}
},
"retried_count": null,
"parent_job_id": "10108000004251242",
"execution_time": null,
"cron_circuit_id": null,
"circuit_execution": null,
"status": false
}
}
Patch Cron
Description
This API enables you to enable or disable a cron present in the project. The cron is referred by its unique identifier like ID.
Request Details
Request URL
{app_domain}/baas/v1/project/{project_id}/job_scheduling/cron/{cron_id}
Request Headers
Authorization: Zoho-oauthtoken {oauth_token}
Optional Headers
CATALYST-ORG: {org_id}
Environment: Development
Scope
ZohoCatalyst.cron.UPDATE
Response Details
The JSON response returns the metadata of the cron you are required to enable or disable. The response will also contain the details of the user who changed the status of the cron.
curl -X PATCH
https://api.catalyst.zoho.com/baas/v1/project/10278000000019013/job_scheduling/cron/10108000004280087
-H “Authorization: Zoho-oauthtoken 1000.91016.2f57”
-H “Content-Type:application/json”
--data-raw ‘{“id”:“10108000004280087”,“cron_status”:false}’
{
"status": "success",
"data": {
"cron_name": "circuitCron",
"cron_type": "Calendar",
"cron_execution_type": "pre-defined",
"job_meta": {
"id": "10108000004280089",
"job_name": "j",
"job_config": {
"number_of_retries": 0
},
"target_type": "Circuit",
"target_details": {
"id": "10108000004194246",
"target_name": "abc"
},
"source_type": "Cron",
"source_details": {
"id": "10108000004280087",
"source_name": "circuitCron",
"details": {
"cron_execution_type": "pre-defined"
}
},
"jobpool_id": "10108000003823699",
"jobpool_details": {
"type": "Circuit",
"name": "InventoryDataMaintaince",
"created_by": {
"zuid": "77941453",
"is_confirmed": false,
"email_id": "emmy@zylker.com",
"first_name": "Amelia Burrows",
"last_name": "",
"user_type": "Admin",
"user_id": "10108000000009004"
},
"created_time": "May 28, 2024 04:49 PM",
"modified_by": {
"zuid": "77941453",
"is_confirmed": false,
"email_id": "emmy@zylker.com",
"first_name": "Amelia Burrows",
"last_name": "",
"user_type": "Admin",
"user_id": "10108000000009004"
},
"modified_time": "May 28, 2024 04:49 PM",
"capacity": {
"number": "3"
},
"project_details": {
"project_name": "ZylkerShipments",
"id": "10108000003823392",
"project_type": "Live"
},
"id": "10108000003823699"
},
"headers": {},
"params": {
"key1": "value1",
"key2": "value2",
"key3": "value3"
}
},
"cron_status": false,
"created_time": "Jun 07, 2024 11:09 AM",
"created_by": {
"zuid": "77941453",
"is_confirmed": false,
"email_id": "emmy@zylker.com",
"first_name": "Amelia Burrows",
"last_name": "",
"user_type": "Admin",
"user_id": "10108000000009004"
},
"modified_time": "Jun 07, 2024 11:09 AM",
"modified_by": {
"zuid": "77941453",
"is_confirmed": false,
"email_id": "emmy@zylker.com",
"first_name": "Amelia Burrows",
"last_name": "",
"user_type": "Admin",
"user_id": "10108000000009004"
},
"project_details": {
"project_name": "ZylkerShipments",
"id": "10108000003823392",
"project_type": "Live"
},
"end_time": "1717871399",
"cron_detail": {
"hour": 4,
"minute": 3,
"second": 0,
"repetition_type": "daily",
"timezone": "Asia/Kolkata"
},
"success_count": 0,
"failure_count": 0,
"id": "10108000004280087"
}
}
Delete Cron
Description
This API enables you to delete a cron present in the project. The cron is referred by its unique identifier like ID or name.
Request Details
Request URL
{api-domain}/baas/v1/project/{project_id}/job_scheduling/cron/{cron_id/cron_name}
Request Headers
Authorization: Zoho-oauthtoken {oauth_token}
Optional Headers
CATALYST-ORG: {org_id}
Environment: Development
Scope
ZohoCatalyst.cron.DELETE
Response Details
The JSON response returns the metadata of the deleted cron. The response will also contain the details of the user who deleted the cron.
curl -X DELETE
https://api.catalyst.zoho.com/baas/v1/project/10278000000019013/job_scheduling/cron/10108000004154323
-H “Authorization: Zoho-oauthtoken 1000.91016.2f57
{
"status": "success",
"data": {
"cron_name": "pcMonthlyDay",
"cron_type": "Calendar",
"cron_execution_type": "pre-defined",
"job_meta": {
"id": "10108000004154323",
"url": "",
"job_name": "j",
"job_config": {
"number_of_retries": 0
},
"target_type": "AppSail",
"target_details": {
"id": "10108000002976191",
"target_name": "appsailTrue"
},
"source_type": "Cron",
"source_details": {
"id": "10108000004154321",
"source_name": "pcMonthlyDay",
"details": {
"cron_execution_type": "pre-defined"
}
},
"jobpool_id": "10108000002976201",
"jobpool_details": {
"type": "AppSail",
"name": "appsailJP",
"created_by": {
"zuid": "77941453",
"is_confirmed": false,
"email_id": "emmy@zylker.com",
"first_name": "Amelia Burrows",
"last_name": "",
"user_type": "Admin",
"user_id": "10108000000009004"
},
"created_time": "Mar 28, 2024 05:41 PM",
"modified_by": {
"zuid": "77941453",
"is_confirmed": false,
"email_id": "emmy@zylker.com",
"first_name": "Amelia Burrows",
"last_name": "",
"user_type": "Admin",
"user_id": "10108000000009004"
},
"modified_time": "Mar 28, 2024 05:41 PM",
"capacity": {
"number": "5"
},
"project_details": {
"project_name": "AppsailCron",
"id": "10108000002976144",
"project_type": "Live"
},
"id": "10108000002976201"
},
"request_method": "get"
},
"cron_status": true,
"created_time": "Jun 04, 2024 04:31 PM",
"created_by": {
"zuid": "77941453",
"is_confirmed": false,
"email_id": "emmy@zylker.com",
"first_name": "Amelia Burrows",
"last_name": "",
"user_type": "Admin",
"user_id": "10108000000009004"
},
"modified_time": "Jun 04, 2024 04:31 PM",
"modified_by": {
"zuid": "77941453",
"is_confirmed": false,
"email_id": "emmy@zylker.com",
"first_name": "Amelia Burrows",
"last_name": "",
"user_type": "Admin",
"user_id": "10108000000009004"
},
"project_details": {
"project_name": "AppsailCron",
"id": "10108000002976144",
"project_type": "Live"
},
"end_time": "1718303399",
"cron_detail": {
"hour": 4,
"minute": 4,
"second": 4,
"repetition_type": "monthly",
"days": [
1,
3,
4
],
"timezone": "Asia/Kolkata"
},
"success_count": 0,
"failure_count": 0,
"id": "10108000004154321"
}
}
Catalyst Pipelines
Catalyst Pipelines is a Catalyst CI/CD service that enables you to automate the build, test, and deploy processes of your applications. You can create-a-pipeline from the Catalyst console. We will be discussing the APIs that can be leveraged to trigger the pipeline and get the details of an existing pipeline in the next sections.
Get Pipeline Details
This API enables you to fetch the details of a pipeline created in the Catalyst console. This can be done by passing the pipeline_id and the project_id in the request URL. The API fetches the details of the project in which the pipeline is created and the details of the pipeline.
Request Details
Request URL
{api-domain}/baas/v1/project/{project_id}/pipeline/{pipeline_id}
The unique ID of the project in which the pipeline has been created
The unique ID of the pipeline for which the details have to be fetched.
Request Headers
Authorization: Zoho-oauthtoken {oauth_token}
Content-Type: application/json
Optional Headers
CATALYST-ORG: {org_id}
Environment: Development
Scope
pipeline.READ
Response Details
The pipeline details object will be returned as a response. It includes the details such as the name of the pipeline, details of the project including the project_name and project_type, the details of the user who has created the pipeline including the user_id, email_id, first_name, last_name and user_type, the status of the pipeline, the details of the users who had modified the pipeline along with the modified time details and also the default runner configuration of the pipeline.
curl -X GET
https://api.catalyst.zoho.com/baas/v1/project/4000000006007/pipeline/29810101101
-H “Authorization: Zoho-oauthtoken 1000.91016.2f57” \
{
“status”: “success”,
“data”: {
“pipeline_id”: “29810101101”,
“name”: “test1”,
“project_details”: {
“project_name”: “Project-Rainfall”,
“id”: “4000000006007”,
“project_type”: “Live”
},
“created_by”: {
“zuid”: “20257791”,
“is_confirmed”: false,
“email_id”: “amelia.burrows@zylker.com”,
“first_name”: “Amelia”,
“last_name”: “Burrows”,
“user_type”: “Admin”,
“user_id”: “5000000000056”
},
“created_time”: “Mar 19, 2024 11:28 AM”,
“modified_by”: {
“zuid”: “20257791”,
“is_confirmed”: false,
“email_id”: “amelia.burrows@zylker.com”,
“first_name”: “Amelia”,
“last_name”: “Burrows”,
“user_type”: “Admin”,
“user_id”: “5000000000056”
},
“modified_time”: “Mar 19, 2024 11:28 AM”,
“git_account_id”: “”,
“mask_regex”: [
null
],
“pipeline_status”: “Active”,
“config_id”: 2,
“integ_id”: 1
}
}
Execute Pipelines
This API enables you to trigger the pipeline on a particular branch in the Git repository. This can be done by passing the branch name as a parameter in the request body. When triggering manual pipelines, you can simply ignore the branch name parameter in the request JSON.
On triggering this API, the pipeline will be executed, and the status of execution will be returned as a response.
Get Pipeline Details
This API enables you to fetch the details of a pipeline created in the Catalyst console. This can be done by passing the pipeline_id and the project_id in the request URL. The API fetches the details of the project in which the pipeline is created and the details of the pipeline.
Request Details
Request URL
{api-domain}/baas/v1/project/{project_id}/pipeline/{pipeline_id}/run
The unique ID of the project in which the pipeline has been created
The unique ID of the pipeline for which the details have to be fetched.
Request Headers
Authorization: Zoho-oauthtoken {oauth_token}
Content-Type: application/json
Optional Headers
CATALYST-ORG: {org_id}
Environment: Development
branch:{{Git branch name}}
Scope
ZohoCatalyst.pipeline.execution.CREATE
Request JSON Properties
Response Details
An object containing the pipeline creation history details will be returned as a response. The object includes details such as the history_id, event_time, history_status.
curl -X POST
https://api.catalyst.zoho.com/baas/v1/project/4000000006007/pipeline/29810101101/run
-H “Authorization: Zoho-oauthtoken 1000.91016.2f57”
-H ‘Content-Type: application/json’
-d ‘{
“BRANCH_NAME” : “main”,
“EVENT”: “push”, \
“URL”: “https://www.google.com”
}
{
“status”: “success”,
“data”: {
“history_id”: “5000000021007”,
“pipeline_id”: “29810101101”,
“event_time”: “Mar 20, 2024 02:02 PM”,
“event_details”: {
“BRANCH_NAME”: “main”,
“EVENT”: “push”,
“URL”: “https://www.google.com”
},
“history_status”: “Queued”
}
}
Catalyst Slate
Slate is a robust front-end development service offered by Catalyst that enables you to seamlessly deploy, preview, and launch your web applications. It offers native support for the popular JavaScript frameworks, such as Next.js, Angular, and React, while seamlessly accommodating other frontend frameworks for hassle-free deployment.
Redeploy Application
You can trigger a new build for an existing deployment in Slate by passing the unique Catalyst project ID, the specific Slate application name within the project, and the deployment ID to the API below.
Request Details
Request URL
{api-domain}/slate/v1/project/{project_id}/app/{app_id}/deployment/{deployment_id}/redeploy
Note:
Open the Slate deployment in the console, and you can fetch the following values from the URL.
Here, 26879000000021001 is the project_id. 1860000000007114 is the app_id and 1860000000007119 is the deployment_id.
Request Headers
Authorization: Zoho-oauthtoken {oauth_token}
Content-Type: application/json
Request JSON Properties
Pass environment variables as key-value pairs through the request body.
For example:
{“API_KEY”: “xxxxxxxx2433”}
Scope
ZohoCatalyst.Slate.app.CREATE
Response Details
The response will include the status of the new build deployment, detailed deployment information, the commit message, and the commit URL retrieved directly from the connected Git repository, along with additional metadata.
curl -X POST
‘https://api.catalyst.zoho.com/slate/v1/project/4000000006007/app/29810101101/deployment/1860000000007119/redeploy'
-H ‘Authorization: Zoho-oauthtoken 1000.91016.2f57’
-H ‘Content-Type: application/json’
-d ‘{
{“API_KEY”: “xxxxxxx2433”}
}
{
“status”: “success”,
“data”: {
“id”: “2289000000006001”,
“status”: “Queued”,
“created_time”: “Feb 04, 2025 10:46 AM”,
“created_by”: {
“zuid”: “92747509”,
“is_confirmed”: false,
“email_id”: “amelia.b@zylker.com”,
“first_name”: “Amelia”,
“last_name”: “Burrows”,
“user_type”: “SuperAdmin”,
“user_id”: “28674000000016006”
},
“deployment_id”: “2289000000004006”,
“build_meta”: {
“event_type”: “push”,
“commit_id”: “18f6b8ef0d2586718a015be07701bd6ba486a18f”,
“commit_message”: “Initial commit”,
“commit_url”: “https://api.github.com/repos/ameliab-13966/nextjs-mongo-db/commits/18f6b8ef0d2586718a015be07701bd6ba486a18f",
“timestamp”: “2024-12-23T07:22:39Z”,
“author_name”: “amelia-b-13966”,
“repo_id”: “907257721”,
“repo_name”: “nextjs-mongo-db”,
“web_url”: “https://github.com/ameliab-13966/nextjs-mongo-db",
“ssh_url”: “git@github.com:ameliab-13966/nextjs-mongo-db.git”,
“http_url”: “https://github.com/ameliab-13966/nextjs-mongo-db.git",
“provider”: “Github”,
“repo_slug”: “nextjs-mongo-db”
}
}
}
Yes
No
Send your feedback to us