Deploy All Resources
Deploy Command Execution
To deploy your Catalyst project from the CLI to the remote console, execute the following command in your terminal from your project directory:
When you execute this command, it will deploy all deployable resources in your project directory by default. The CLI will consider the project that is active in your working directory. If any project other than the directory’s base project is active in it, the CLI will display a warning informing you of it.
Deploy Functions
The functions are deployed first. The CLI will compile all the Java functions in your project directory before deploying them. The compiled Java class files available in their respective directories. The Node.js and Python functions are deployed directly.

The CLI deploys each function individually. The CLI will display the status of each resource’s deployment individually, indicating if it was successful or a failure.
The Basic I/O and Advanced I/O functions are deployed to the URLs displayed in the terminal, and you can access their endpoints from their URLs. The endpoints of the Cron, Event, Browser Logic, and Integration functions are not accessible through URLs, as they are associated with cron jobs, event listeners, or external integrations respectively. The CLI will just display their deployment status.

Deploy Basic Client Applications
The client directory is deployed next. This will generate the URL endpoint of the hosted web client, where you can access the application.
The Basic web client will be deployed straight away.

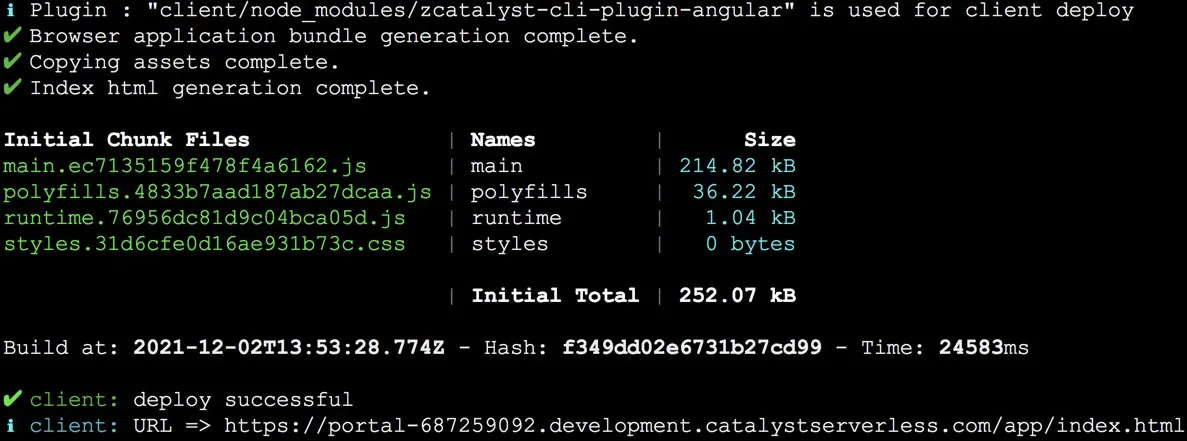
Deploy Angular Applications
When you deploy an Angular app, the Catalyst plugin for your Angular app, zcatalyst-cli-plugin-angular , which is installed when the Angular app is initialized, will handle the deployment.
The chunk files representing your Angular components and services, such as the polyfills and runtime files, are generated. The build is generated after the chunk files are generated.
Angular applications are compiled and built into an output directory dist/ . This folder will contain all the compiled files of your app, such as the entry point file, stylesheets, and templates of the HTML, CSS, JS or TS types in your app’s source folder, src .
The deployment details will be updated in the workspace configuration file angular.json . These fall under the standard deployment procedure of Angular applications.
The CLI will display the deployment details of your Angular app. The URL endpoint of the deployed web client will be generated and displayed. You can open the application with this URL.
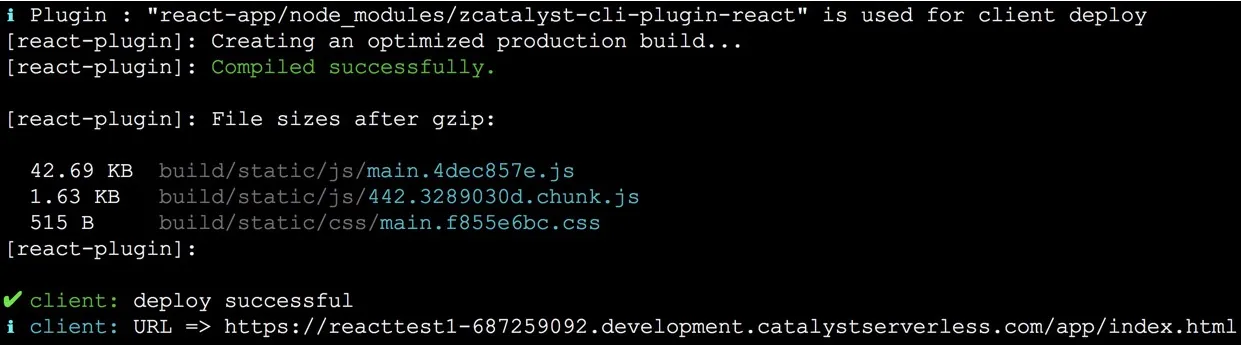
Deploy React Applications
When you deploy a React app, the Catalyst plugin for your React app, zcatalyst-cli-plugin-react , which is installed when the React app is initialized, will handle the deployment.
The plugin will enable the compilation of the React app. React applications are compiled and built into an output directory build/ . This folder will contain all the compiled files your app, such as the HTML, stylesheet, JS and other files in your app’s source folder src . The production-ready build is generated after the compilation.
If you had developed your React app in TypeScript, the code will be transpiled to JavaScript during the compilation. These fall under the standard deployment procedure of React applications.
The CLI will display the deployment details of your React app. The URL endpoint of the deployed web client will be generated and displayed. You can open the application with this URL.
-
The /app/ part in the URL of a Catalyst application indicates the client component. You can view the URLs of your application of both environments from the Environments settings section.
-
If you enter the application’s URL in this format: https://project_domain_name.development.catalystserverless.com, it will automatically redirect you to the application’s homepage that you have configured in the client-package.json file, in the development environment.
Deploy AppSail
Catalyst enables you to deploy AppSail solutions in two different ways:
- Regular Deploy
- Standalone Deploy
For both the cases, Catalyst deploys all the executable files of your app present in the build path that you specified during the app initialization.
Regular Deploy
The regular deploy execution applies when you have already initialized an AppSail resource either during the project initialization or by adding it in an existing project directory.
If the AppSail app is already initialized in the project directory, the CLI will automatically deploy the app with the rest of the project resources when you execute the catalyst deploy command. The CLI will display the endpoint URL of the app after it is deployed, that you can open it with.

If you have multiple AppSail apps in your project directory, you can access all of their URL endpoints from the CLI.
You can also execute the following command to deploy the AppSail service alone from your app’s source directory.
The deployment process is the same.

Standalone Deploy
You can do a standalone deploy of an app directly without initializing it as an AppSail service in prior.
You must remember the following points about the standalone deploy execution:
-
You must execute the standalone deploy command from a Catalyst project directory’s root. That is, catalyst.json and other project dependency files must be present in the directory.
-
You must also ensure your app’s deployable build files are present in the directory you execute the command from. This is because that directory will be considered the build directory automatically.
-
The app-config.json file is not created when you do a standalone deploy to deploy an app without initializing it. The information that this file carries is fetched as input from you in the CLI during the deployment.
You can do the standalone deploy of an AppSail app in the following way:
- Navigate to the directory the app’s deployable files are present in, and executing the following command:
- Enter a name for your app. You can name the main file of your app’s build anything you prefer.

- Select the build path for your app from the list and press Enter.

- Select a stack and runtime for your app and press Enter.
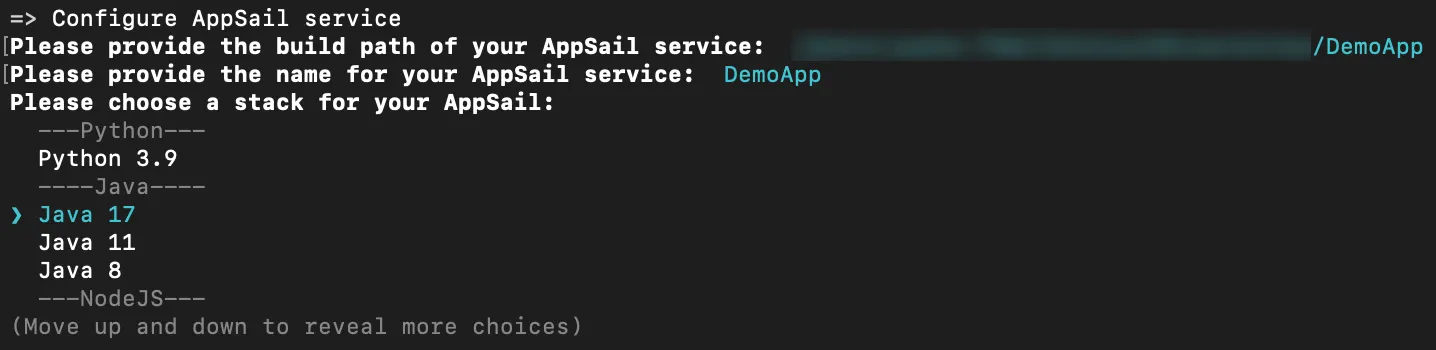
If you select Java, the CLI will further prompt you to pick either Java SE or the Java WAR as your app’s deployable format. You can learn more about this here.

If you select any other stack, this will be skipped.
- You must additionally specify the startup command for your app based on the stack, framework, and web server used. This information will be directly deployed and will be available in the Configurations section of your console after the app deployment.
Your app is now directly deployed to the associated remote project without requiring you to initialize it as an AppSail resource. You can now access it with its endpoint URL displayed in the CLI.

Deploy API Gateway
The API Gateway’s JSON file is deployed last. This will update the API definitions in the remote console.

Your project will now be synchronized with your online Catalyst account. You will be able to access the functions, web client, and updated API Gateway definitions that were deployed in the remote console.
Deploy to Slate
You can deploy your front-end web application in Catalyst Slate using the below listed steps. Before you deploy any application in Slate, please make sure the project directory has been linked to the Slate service. For this, you can use the catalyst slate:link command.
Execute the following command in your terminal from the Slate service’s project directory:
This deploys all the Slate components present in your project directory to the Catalyst development environment.
You can use the below option to provide a deployment message for the Slate deployment.
To deploy a specific app alone from the project directory to Slate, you can directly use the below command:
If you wish to deploy the application to the production environment, please use the below command. Please ensure you have accessed the production environment in the console before initiating a production deployment.
Last Updated 2025-10-06 21:41:10 +0530 IST
Yes
No
Send your feedback to us