Enable API Gateway
You can enable API Gateway from the CLI for your project if it is disabled. You must enable it before you access it for the first time.
Note: When you enable the API Gateway for your Catalyst application, the configurations
in Security Rules are automatically disabled. The functions and the web client hosted in your Catalyst project will immediately become inaccessible until you create APIs for them. You
should therefore proceed with caution. Ensure that you create APIs for all your functions and web client immediately
after enabling API Gateway. You must also ensure that the end users do not access them in the meantime.
To enable API Gateway for your project, execute the following command from your project directory:
copy
$
catalyst apig:enable
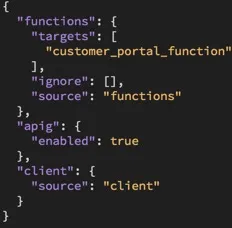
The CLI will enable the component and update the configuration files with the API Gateway’s status. This will also enable the API Gateway in the remote console.
You can always check the API Gateway’s status of your project in the catalyst.json file in your project directory. The enabled parameter for the apig configuration will be updated to true .
Note: If you are a Visual Studio Code IDE user, you can install the Catalyst Tools extension, and perform CLI operations using your IDE in place of the CLI. Steps to work with API Gateway using Visual Studio Code IDE can be found here.
Last Updated 2025-02-19 15:51:40 +0530 IST
Yes
No
Send your feedback to us
Skip
Submit

