Integration Functions
Introduction
Integration functions enable you to code and use a Catalyst function as the backend of other Zoho services, and establish an integration with them. You can code the business logic of any backend feature of the service that is supported, through Catalyst, in Java, Node.js or Python platforms.
When that particular feature is accessed in the external service, it will automatically invoke the execution of the Integration function coded in the Catalyst through a HTTP call.
Creating Integration functions for external services enables you to store and manage the function in Catalyst, thereby allowing you to access various Catalyst features and tools for it, such as viewing the logs or reports of the function executions through Catalyst Logs or Application Performance Monitoring.
Catalyst provides exclusive individual SDK packages for the services that you can integrate with. The SDK contains code templates of classes, objects, and methods that you can incorporate in your application easily, and build powerful backends for the service.
You can also generate sample payloads to test Integration functions in the CLI. Refer to the Event Generate help page to learn more.
Cliq Integration
Catalyst currently supports integration with Zoho Cliq through Integration functions. Cliq facilitates team communication, and enables you to collaborate, organize conversations, schedule tasks, and more. It also provides a platform for developers to build internal tools that automate work activities and bring data from other applications inside the chat windows. You can distribute these tools you create, and the end-users in Cliq can install them to access the feature.
Catalyst Integration Functions enable you to code the backend of Cliq extensions that can bundle the following Cliq internal tools:
- Bots: Conversational interface that handles tasks or responds to queries
- Commands: Slash commands that perform built-in or custom actions
- Message Actions: Actions that are performed as the response to individual messages
- Widgets: Enables you to customize your Cliq home screen
- Functions: Custom functions that can execute tasks based on event occurrences
You can learn more about these internal tools and extensions from the Cliq developer documentation.
Benefits
- Enables you to code bundled extensions in Java, Node.js or Python platforms, instead of in Deluge which is the default programming environment supported by Cliq
- Access function execution logs and detailed performance reports of Cliq backend functions through Logs or APM, that enable you to identify problem areas and rectify them immediately
- Functionally-rich SDK support exclusively for Cliq integration with pre-coded class files and code templates, making it easy for you to understand actions that can be performed
- Ability to create custom handler classes for any Cliq component and write your logic based on your needs
Create Integration Functions in Catalyst
Similar to other function types, you can create an Integration function from the console or initialize it from the CLI. If you initialize it from the CLI, you can code it using an external IDE and deploy it to the Catalyst console.
While creating an Integration function either from the console or from the CLI, you can simply select the service that you want to create the function for. Unlike other function types, you will not have the option to create an Integration function without an SDK, as the SDK structure can help you understand the Cliq components better.
Let’s look at the Integration function structure in detail.
Cliq Integration Function Structure
An Integration function package contains different components when compared to the other function types. A function’s directory in Catalyst generally contains the main function file, along with the SDK components of Java, Node.js or Python and configuration files.
As with the other function types, the boilerplate structure of an Integration function also contains all the necessary SDK components and configuration files. However, in addition to the JAR files or Node modules added to the directory, an Integration function’s package also includes the Catalyst Cliq SDK. The SDK provides you the interfaces and objects required to create handler classes and develop service-specific business logic. The code template contains individual handler classes for each component of the Cliq extension. That is, individual handler class files for bots, commands, widgets, functions, and message actions.
Let us first take a look at a sample Java, Node.js and Python function structure, before discussing handler classes.
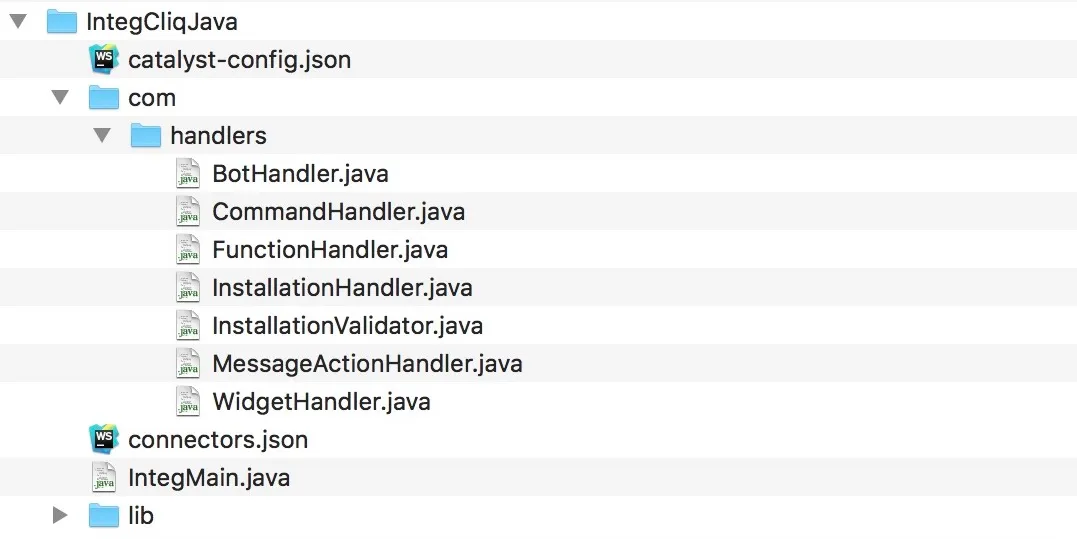
Java
The Java file structure contains the main Java file, along with the handler classes, JAR files of the Catalyst Java SDK, and configuration files.
The Cliq Java SDK is automatically included when you initialize the function from the CLI or create it in the console. You can also obtain the Cliq Java SDK from here.
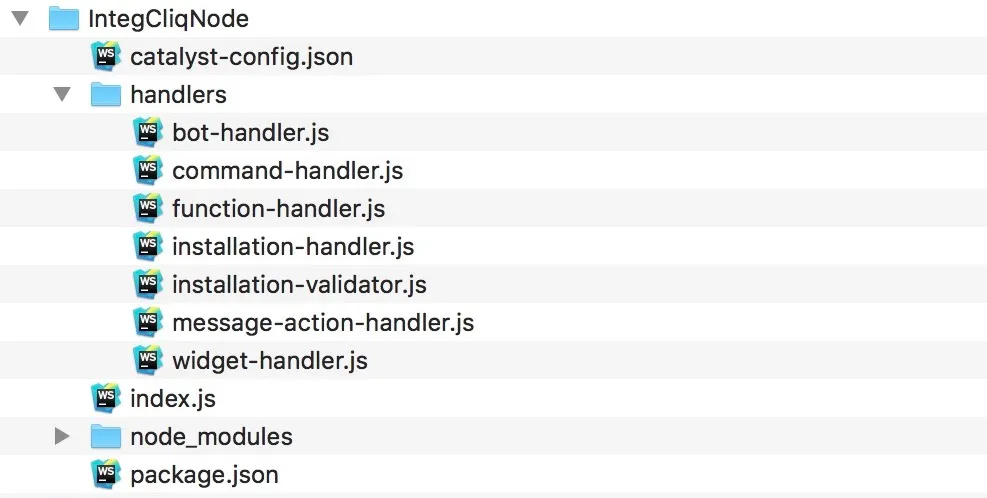
Node.js
The Node.js file structure also contains a main function along with the handler classes, the Node modules files of the Catalyst Node.js SDK, and configuration files.
Similar to the Cliq Java SDK, the Cliq Node.js SDK is also automatically included when you initialize the function from the CLI or create it in the console.
To install it manually, you must execute this command from the Node.js function’s directory using your terminal:
npm install zcatalyst-integ-cliqPython
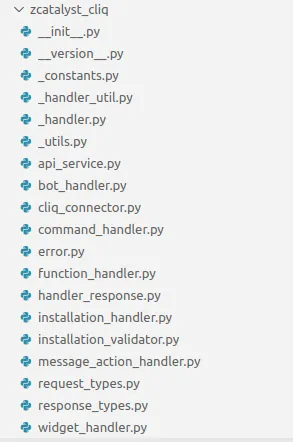
When you create a Python Integration function, in addition to the Python modules added to the functions directory, an Integration function’s package called the Cliq Python SDK will also be included. The SDK provides you the interfaces and objects required to create handler classes and develop service-specific business logic. The code template contains individual handler classes for each component of the Cliq extension. That is, individual handler class files for bots, commands, widgets, functions, and message actions.
pip install zcatalyst-cliqThe Catalyst Cliq SDK package contains the sub-packages mentioned below that are specific to the internal tools in Cliq application. You can refer to this section to know more about these tools.
Cliq Handler Classes
Cliq handlers contain the definitions of the business logic of a specific action in a Cliq component. Each component contains multiple handlers that define actions to handle specific actions or events.
For example, some of the handlers of a Cliq bot are:
- Welcome handler: Defines a custom message when a user subscribes to a bot
- Message handler: Triggers when a bot receives a message
- Mention handler: Renders a response when a bot is mentioned in a chat
Similarly, each of the Cliq components supported by Catalyst- Commands, Message Actions, Widgets, Functions, have individual handlers.
Refer to the Cliq help pages for details on all handlers supported by each component.
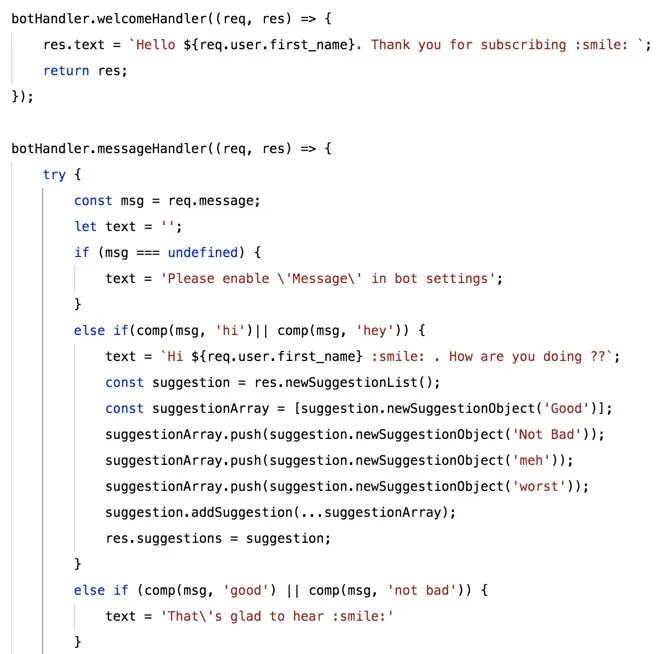
Catalyst provides templates for necessary objects and methods that would be useful in building an extension in each handler class. They help you understand handling various actions such as parsing Cliq calls, routing it to the appropriate implementation, or constructing the required response.
For example, BotClass.java, bot-handler.js or main.py contains a sample code template for each individual handler of a bot handler class.
You can refer to these definitions and use these methods to customize your own logic for the extension. You can modify the handler classes based on your requirements, and include only the necessary ones. The user can use this SDK for parsing the Cliq call, routing the call to corresponding implementation and to form output responses.
Handler Class Files mapping
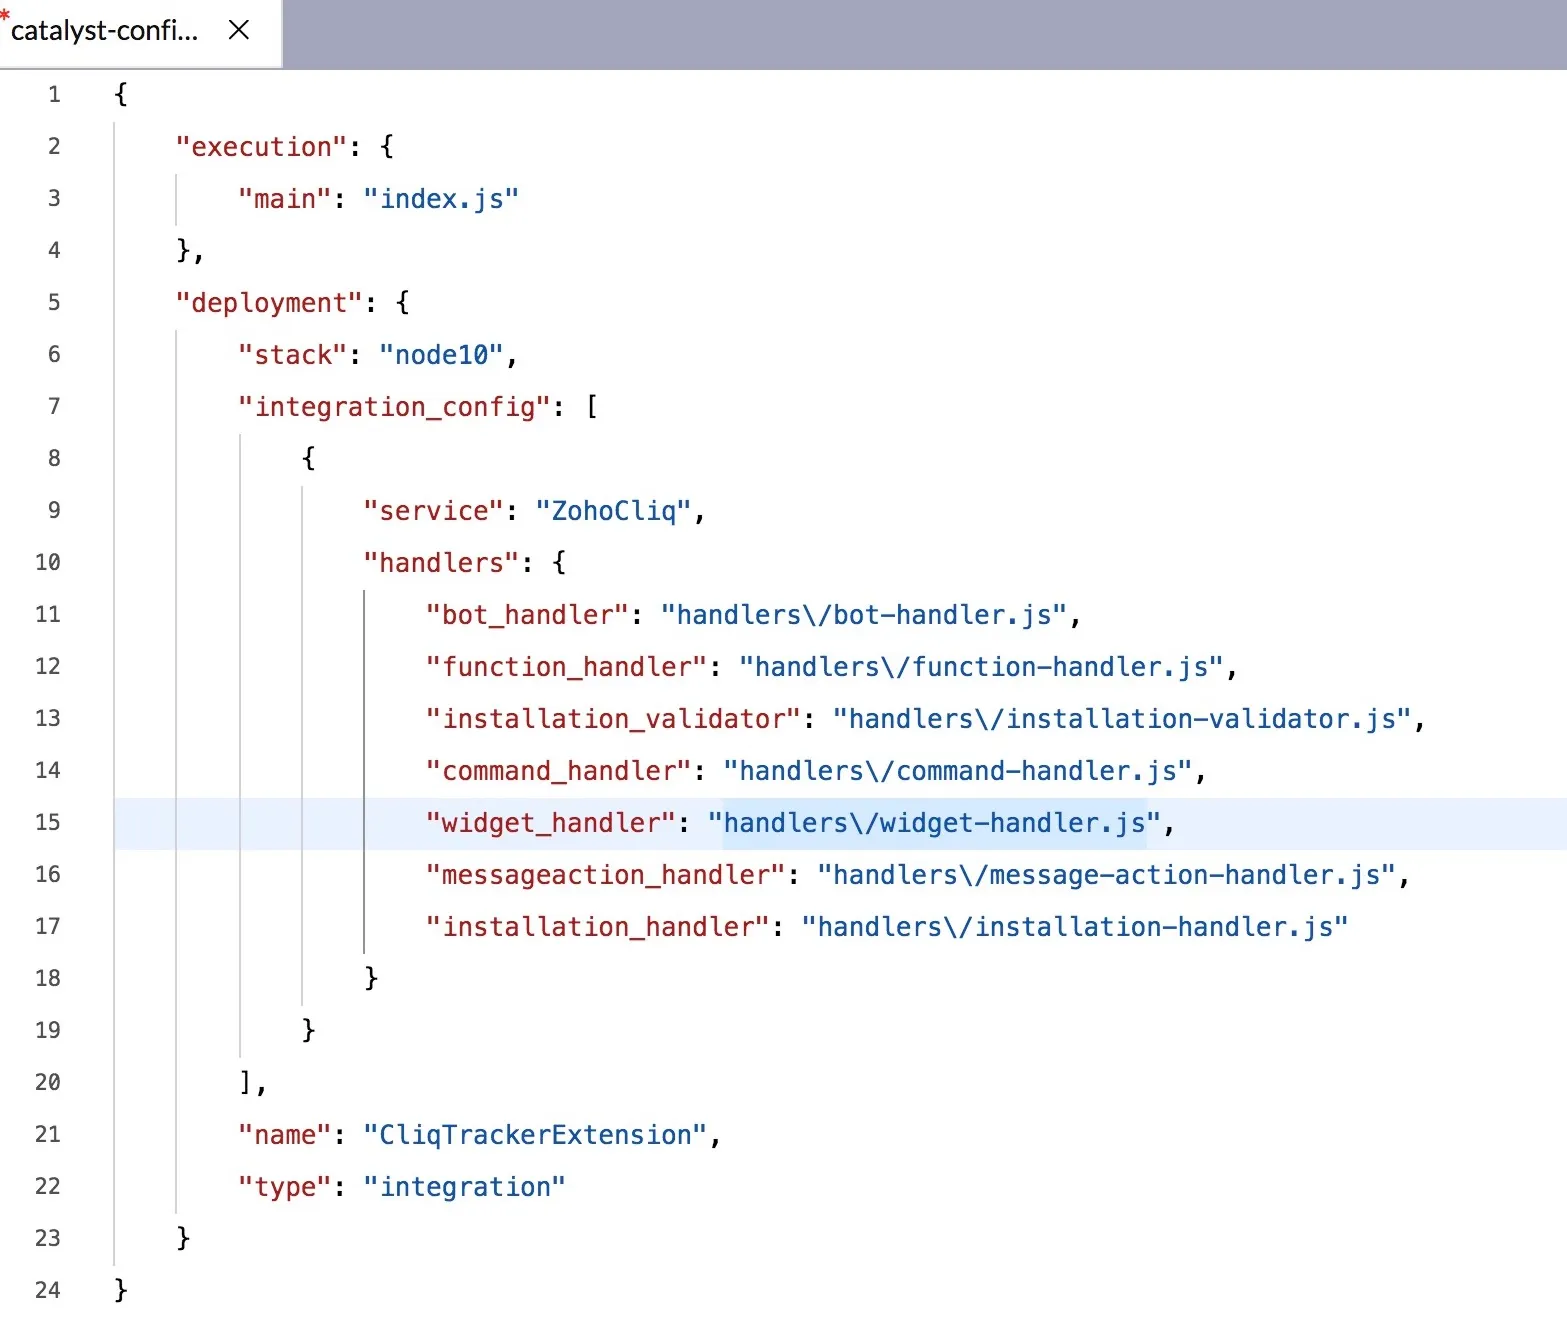
Mapping in catalyst-config.json for Java and Node.js Functions
All handler class files are mapped in the catalyst-config.json configuration file of a function. The configuration file typically only includes basic execution and deployment details of a Catalyst function. However, for an Integration function, this file also maps the handler classes that are used in it.
This mapping helps Catalyst execute the right set of actions, when the function is invoked.
You can also create a new handler class file for a Cliq component and define your own logic in them. However, you must manually map the handler class file in the catalyst-config.json file. Ensure that you follow the same format in writing the key for the mapping.
The default handler files created as a part of Catalyst Cliq SDK are already mapped, when you create the function from the console or the CLI.
Mapping in main.py for Python Functions
When you create an Integration function, the Cliq Python SDK will be automatically installed within your current project’s function directory. For Python, all the handler class files are mapped in the main.py file of a function. This mapping helps Catalyst execute the right set of actions, when the function is invoked.
You can also create a new handler class file for a Cliq component and define your own logic in them. However, you must manually map the handler class file in the main.py file. Ensure that you follow the same format in writing the key for the mapping.
The default handler files created as a part of Cliq Python SDK are already mapped, when you create the function from the CLI.
import zcatalyst-cliq
# your cliq handler files's mapping should be given here
config = {
    "ZohoCliq": {
        "handlers": {
            "bot_handler": "handlers/bot_handler.py",
            "function_handler": "handlers/function_handler.py",
            "installation_validator": "handlers/installation_validator.py",
            "command_handler": "handlers/command_handler.py",
            "widget_handler": "handlers/widget_handler.py",
            "messageaction_handler": "handlers/message_action_handler.py",
            "installation_handler": "handlers/installation_handler.py"
        }
    },
}
def handler(request, response):
    handler_resp = zcatalyst_cliq.execute(request, config)
    response.set_content_type('application/json')
    response.send(handler_resp)
The request object of type IntegrationRequest is sent as an argument to the execute() method and is parsed with information such as name of the Cliq’s internal tool and the operation being performed with it. The config property contains the mappings of the handler class files with the respective handlers and is passed as another argument to the method. Based on the parameters, the execute() method proceeds with its operation of processing the request with the respective handler classes, and returns the response.
After you create an Integration function in Catalyst, you can create an extension in Cliq to invoke the function. For creating extensions in Cliq, you can refer to this section.
Configure Extensions in Cliq
After you develop the backend for a Cliq extension, you must add the function while you configure the extension in Cliq. This will be a unique Cliq Extension - Catalyst Integration function mapping.
Whenever the components of that extension are invoked through Cliq, it will in turn trigger the Catalyst function mapped to it. The appropriate action defined for that request will be triggered through the handler classes.
For example, if the end-user in Cliq sends a message to a bot whose backend is defined in Catalyst, the request will be passed to Catalyst after it is authenticated. The details of the component, user, and chat are attached in the request body of the HTTP request.
Catalyst will then invoke the message handler defined in BotClass.java, bot-handler.js or main.py file, and will execute the appropriate action. Catalyst will send the response back to Cliq and it is rendered in the front-end of the Cliq component.
Creating an Extension in Cliq
You can create an extension in Cliq and configure components such as bots, widgets, or commands to be bundled in it from the developer console in Cliq.
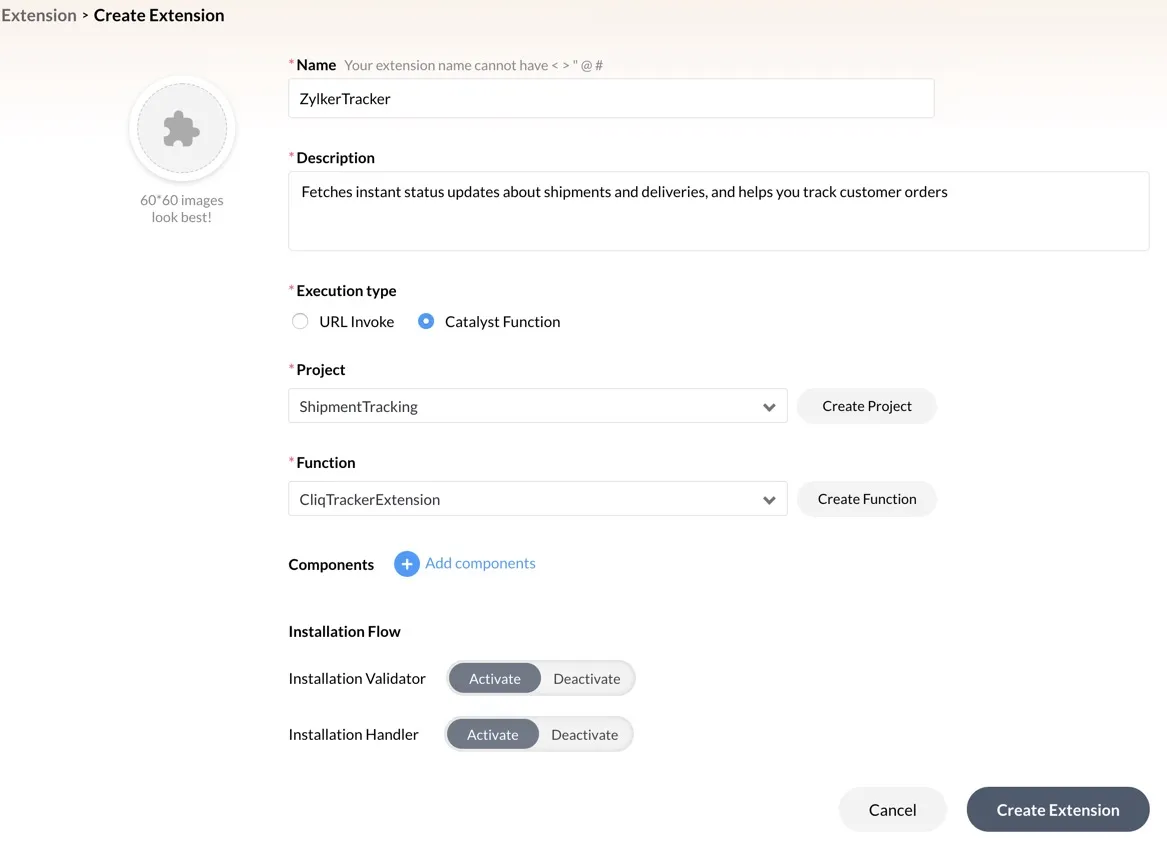
To configure a Catalyst Integration function in a Cliq extension, you must select the Execution Type as “Catalyst Function” when you create the extension in Cliq.
You must then choose the Catalyst project from the drop-down list. All projects from your Catalyst account will be listed here. You can also click Create Project which will redirect you to Catalyst to create a new project.
You must then select the Integration function from the drop-down list that will be associated with this extension. After you configure other details and components of your extension, click Create Extension.
This will create the integration with Catalyst and enable the Integration function to be executed each time the components are accessed.
To learn about developing extensions for Catalyst in Cliq in detail, refer to the Catalyst Type Extension help documentation.
Last Updated 2025-09-17 00:21:08 +0530 IST
Yes
No
Send your feedback to us
