IaC Settings
Introduction
The Infrastructure as Code (IaC) settings enable you to perform project exports and imports easily from the Catalyst console. You can export the schema of a Catalyst project, including the configurations of its components and the code, as an external ZIP file. You can import this ZIP file as a new project into any Catalyst account. The ZIP file is created in a specific format when you export a project, and it can only be imported in this format.
The project export and import feature enables easy transfers of projects between data centers or between Catalyst accounts. It also enables easy access and testing of a project from an external environment, such as a GitHub repository. You can simply clone a Git repo containing a Catalyst project’s components, generate its ZIP file to import it, and test the project. You can also perform these actions through a remote system, such as a CI system, or write scripts to automate these tasks. This feature also allows you to easily duplicate existing projects and branch them for different use cases.
You can access the IaC project exports and imports feature under the General settings in the Catalyst console.
Export/Import ZIP File Format
The IaC operations enable you to export and import the configurations of a project without the data. Data, such as the records in the Data Store tables, the list of the application’s users, or files from the File Store, will not be included in the ZIP file. However, the metadata of each table in the Data Store or the folder structures of the File Store will be included. This will be the same for every feature.
The ZIP file will also contain all the functions and the client component code in their respective directories.
The structure of the ZIP file that is generated when a project is exported is shown below:
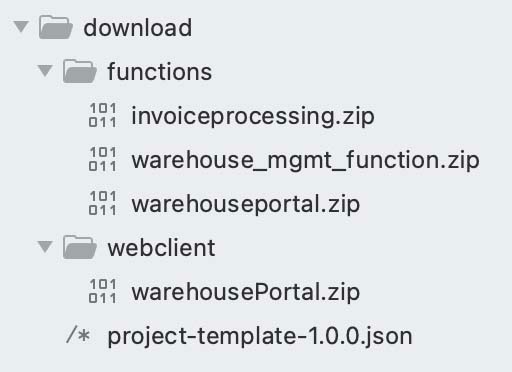
- ZIP File of the Functions Directory: The functions directory of the project in its standard structure. All functions created in the project will be present as individual ZIP files in this directory, along with their configuration files and SDK components.
- ZIP File of the Client Directory: The webclient directory of the project in its standard structure. The web client initialized in the project, with all the client files, will be present as a ZIP file in this folder.
- Project-Template JSON File: The configurations of the project’s components will be present in a single JSON file. The JSON file contains the project settings and component definitions. These include Data Store and File Store metadata, Cache segments, Cron jobs, Circuit configurations, Security rules, email domains and addresses, Event Listeners and rules, APIs in API Gateway, email templates, user profiles, and more.
An extract from a sample project-template JSON is given below:
{
  "name" : "project-template",
  "version" : "1.0.0",
  "parameters" : { },
  "components" : {
    "Circuits" : [ {
      "type" : "circuit",
      "name" : "InvoiceGen",
      "properties" : {
        "name" : "InvoiceGen",
        "states" : {
          "State1" : {
            "next" : "End",
            "start" : true,
            "type" : "pass"
          }
        }
      },
      "dependsOn" : [ ]
    } ],
    "Functions" : [ {
      "type" : "function",
      "name" : "warehouseportal",
      "properties" : {
        "stack" : "node14",
        "code" : {
          "path" : "functions/warehouseportal.zip"
        },
        "configuration" : {
          "memory" : 256
        },
        "type" : "basicio",
        "name" : "warehouseportal"
      },
      "dependsOn" : [ ]
    }
 ],
    "WebClient" : [ {
      "type" : "client",
      "name" : "warehousePortal",
      "properties" : {
        "app_name" : "warehousePortal",
        "code" : {
          "path" : "webclient/warehousePortal.zip"
        }
      },
      "dependsOn" : [ ]
    } ],
    "Cron" : [ {
      "type" : "cron",
      "name" : "dailyBackup",
      "properties" : {
        "cron_url_details" : {
          "headers" : { },
          "request_body" : "",
          "request_method" : "POST",
          "params" : { },
          "url" : "https://catalyst.zoho.com/help/index.html"
        },
        "end_time" : -1,
        "description" : "",
        "cron_name" : "dailyBackup",
        "job_detail" : {
          "hour" : 1,
          "timezone" : "America/Los_Angeles",
          "minute" : 0,
          "second" : 0,
          "repetition_type" : "Daily"
        },
        "cron_type" : "Calendar",
        "status" : true
      },
      "dependsOn" : [ ]
    } ],
    "Datastore" : [ {
      "type" : "table",
      "name" : "InventoryDB",
      "properties" : {
        "table_name" : "InventoryDB"
      },
      "dependsOn" : [ ]
    }, {
      "type" : "column",
      "name" : "InventoryDB-ProductID",
      "properties" : {
        "decimal_digits" : 2,
        "column_name" : "ProductID",
        "data_type" : "int",
        "is_unique" : false,
        "is_mandatory" : false,
        "search_index_enabled" : false,
        "table_id" : "InventoryDB",
        "table_name" : "InventoryDB",
        "max_length" : 10
      },
      "dependsOn" : [ "Datastore.table.InventoryDB" ]
    },
{
      "type" : "tableScope",
      "name" : "InventoryDB-App Administrator",
      "properties" : {
        "role_name" : "App Administrator",
        "table_scope" : "GLOBAL",
        "type" : "App Administrator",
        "table_name" : "InventoryDB"
      },
      "dependsOn" : [ "Datastore.table.InventoryDB" ]
    }, {
      "type" : "tableScope",
      "name" : "InventoryDB-App User",
      "properties" : {
        "role_name" : "App User",
        "table_scope" : "GLOBAL",
        "type" : "App User",
        "table_name" : "InventoryDB"
      },
      "dependsOn" : [ "Datastore.table.InventoryDB" ]
    }, {
      "type" : "tablePermission",
      "name" : "InventoryDB-App Administrator",
      "properties" : {
        "role_name" : "App Administrator",
        "type" : "App Administrator",
        "table_permissions" : [ "SELECT", "UPDATE", "INSERT", "DELETE" ],
        "table_name" : "InventoryDB"
      },
      "dependsOn" : [ "Datastore.table.InventoryDB" ]
    }, {
      "type" : "tablePermission",
      "name" : "InventoryDB-App User",
      "properties" : {
        "role_name" : "App User",
        "type" : "App User",
        "table_permissions" : [ "SELECT" ],
        "table_name" : "InventoryDB"
      },
      "dependsOn" : [ "Datastore.table.InventoryDB" ]
    }]
}
}Export a Project
You can export any project from the General Settings section, as these are common settings applicable to your entire Catalyst account.
Catalyst will write all the component definitions and the project settings into the project-template JSON file. If no components have been configured, the default configurations will be written to the JSON file.
You can export a project from its development or production environment, if production has been enabled for it. After the export is complete, you can download the ZIP file that will be generated. You can then import this ZIP file as is into a new project from a different account, data center, or the same account if you need the project to be duplicated.
To export a project:
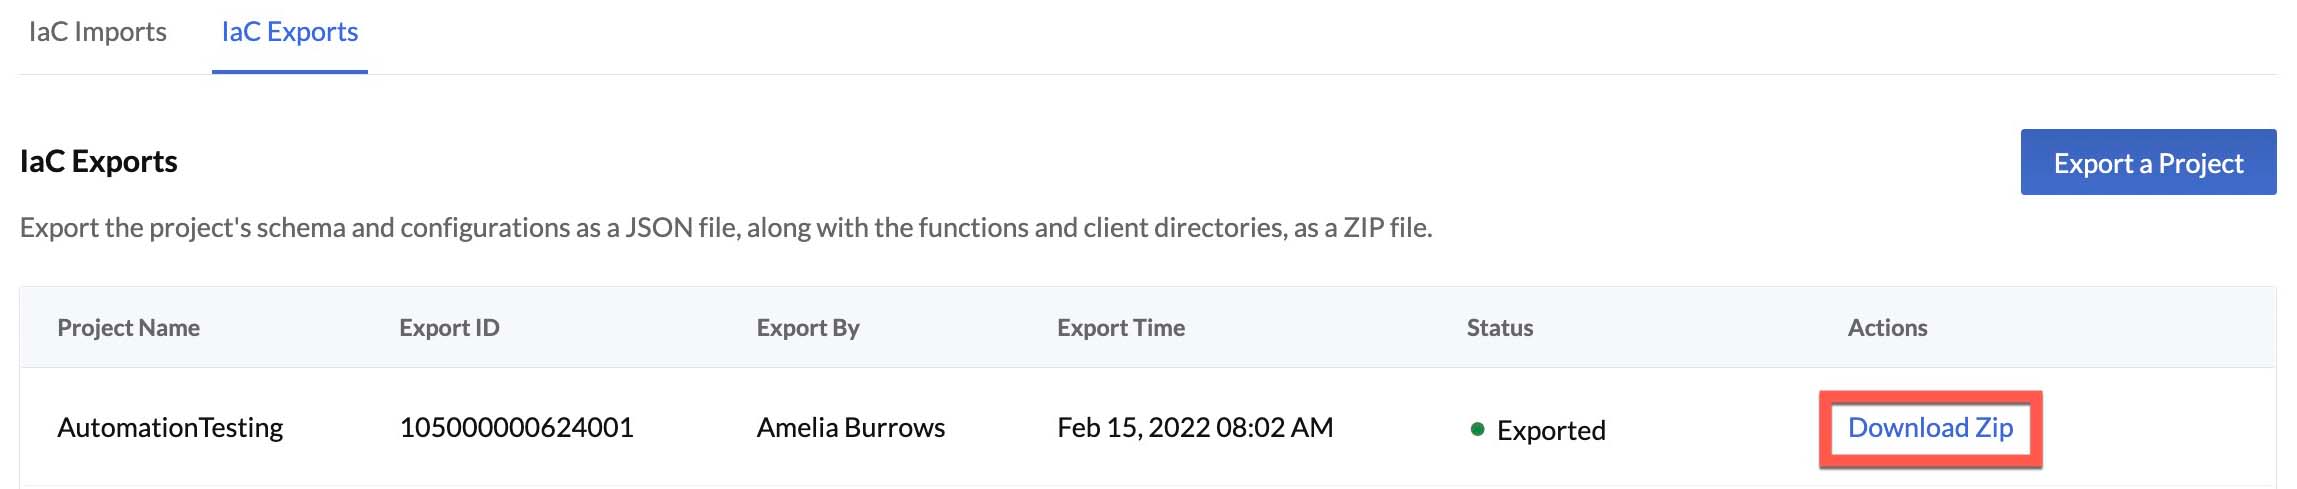
- Navigate to Infrastructure as Code under General Settings, then click the IaC Exports tab.
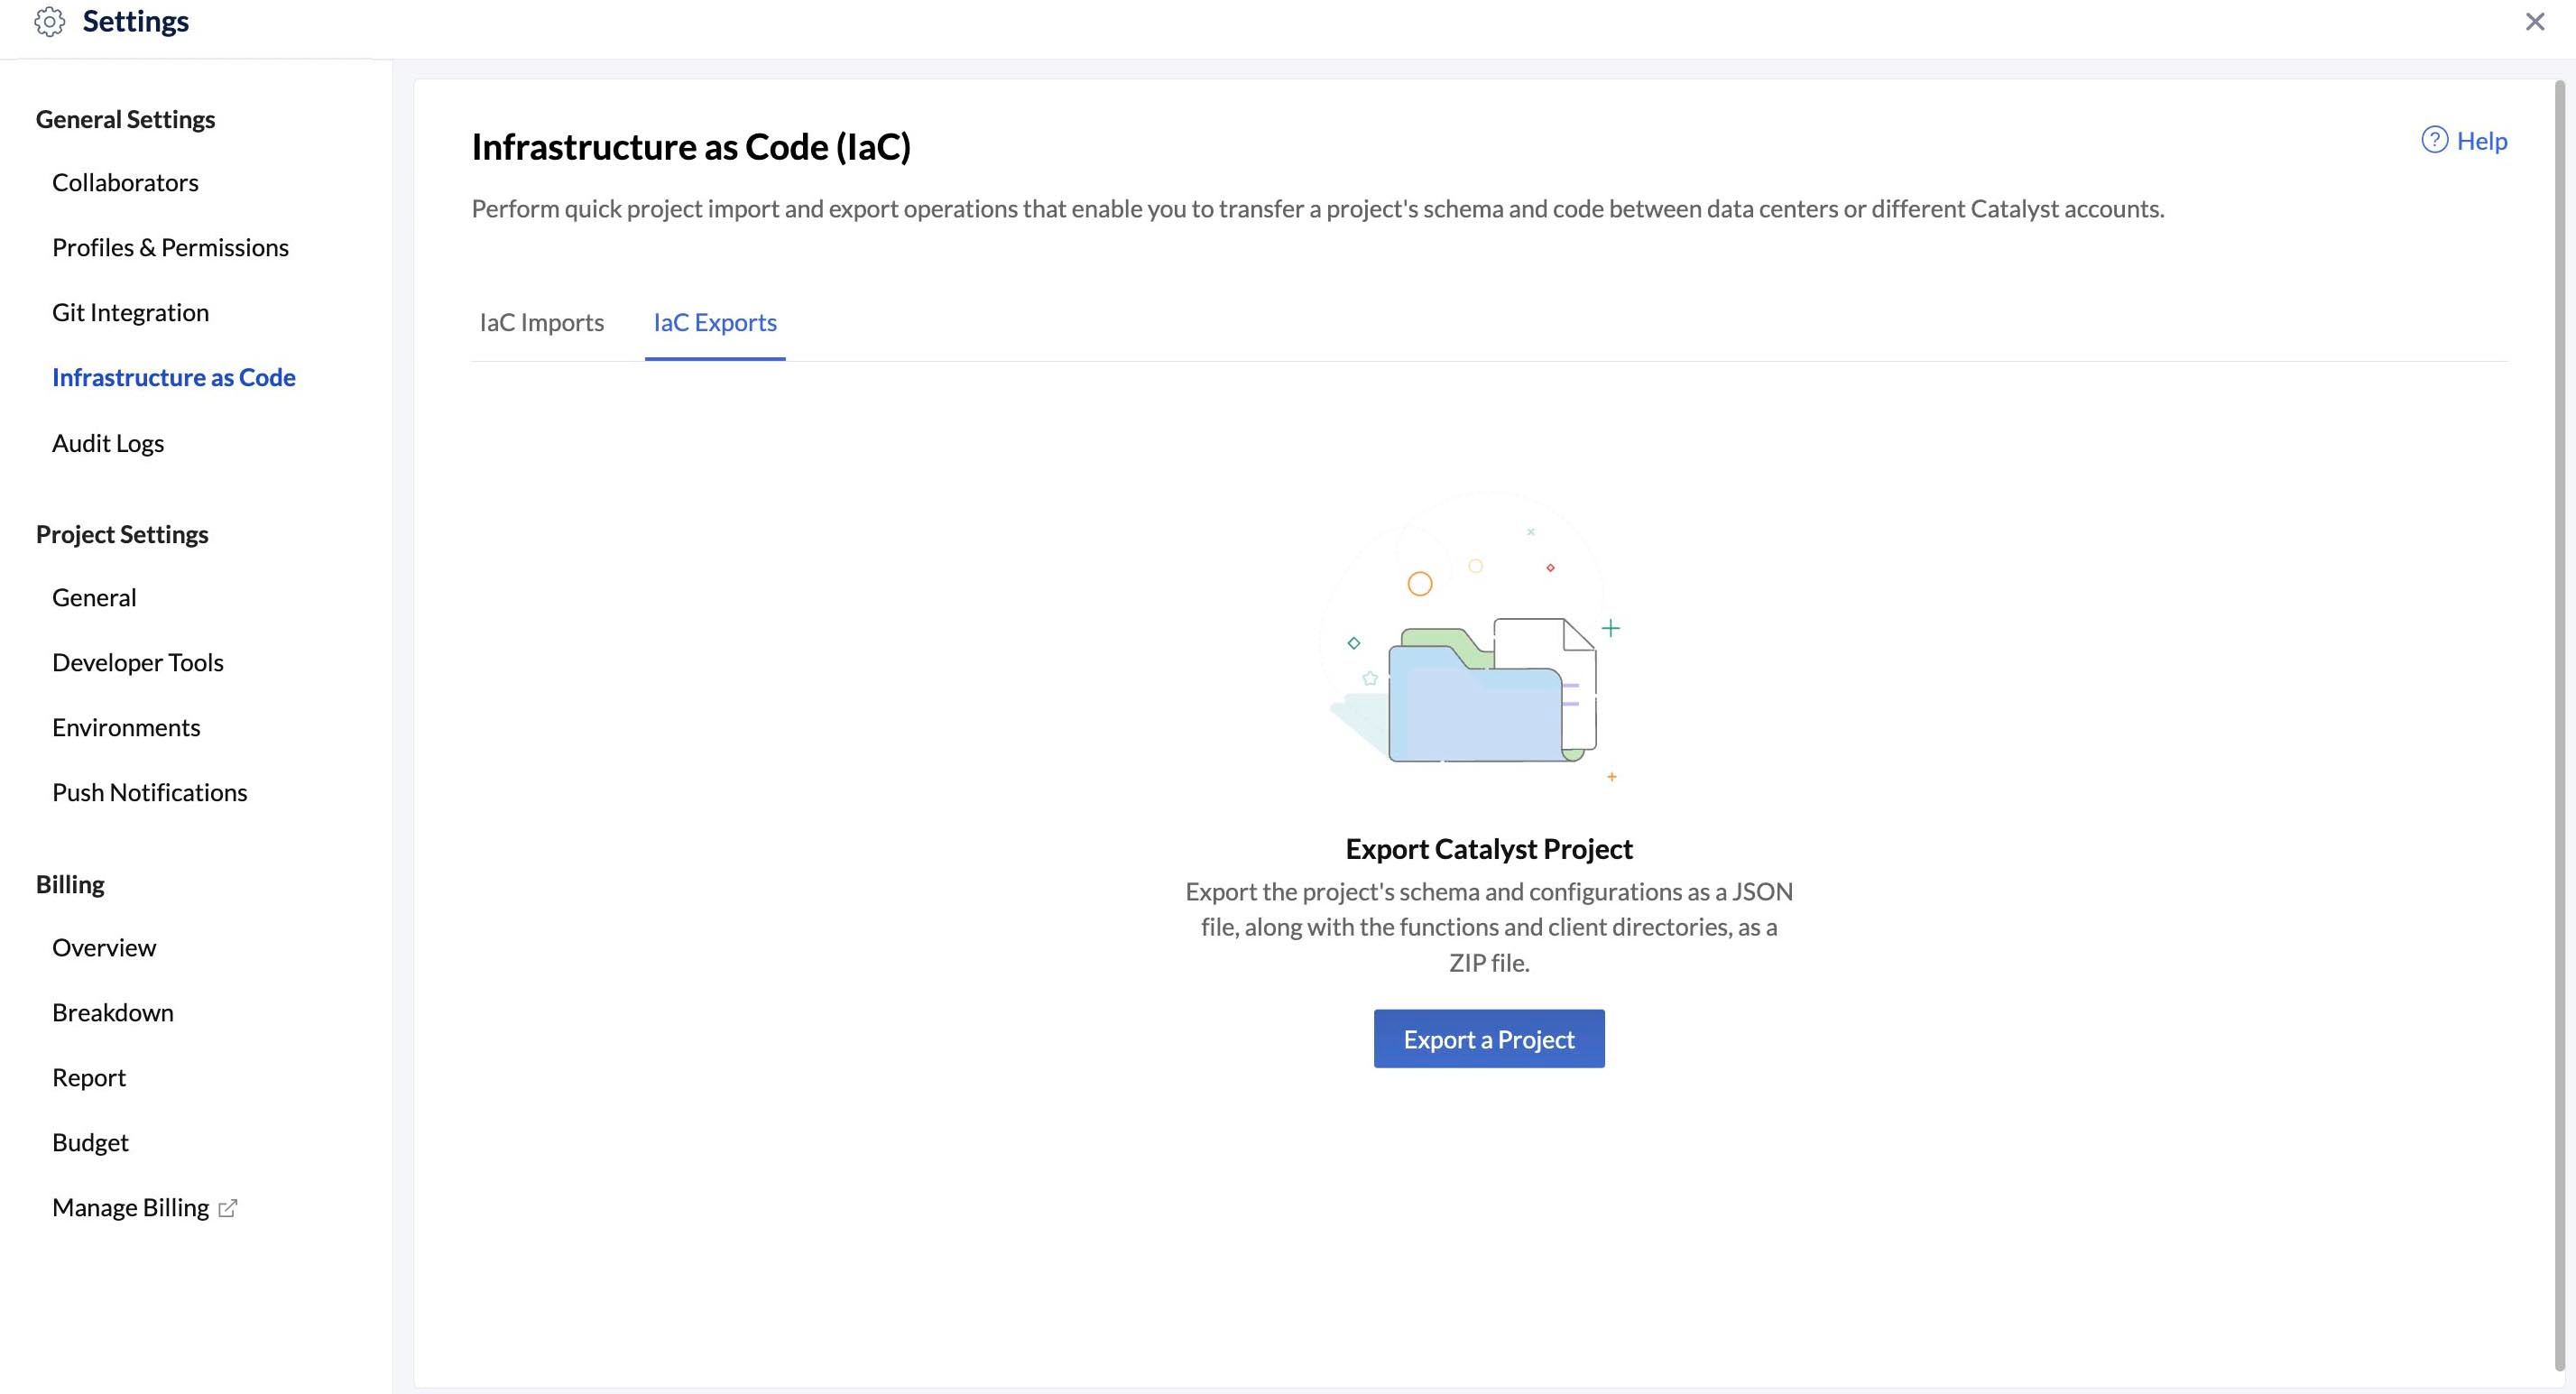
- Click Export a Project.
- Select a project to export from the list of projects in the drop-down. All projects in your Catalyst account will be shown here. Select the environment of the project to export.
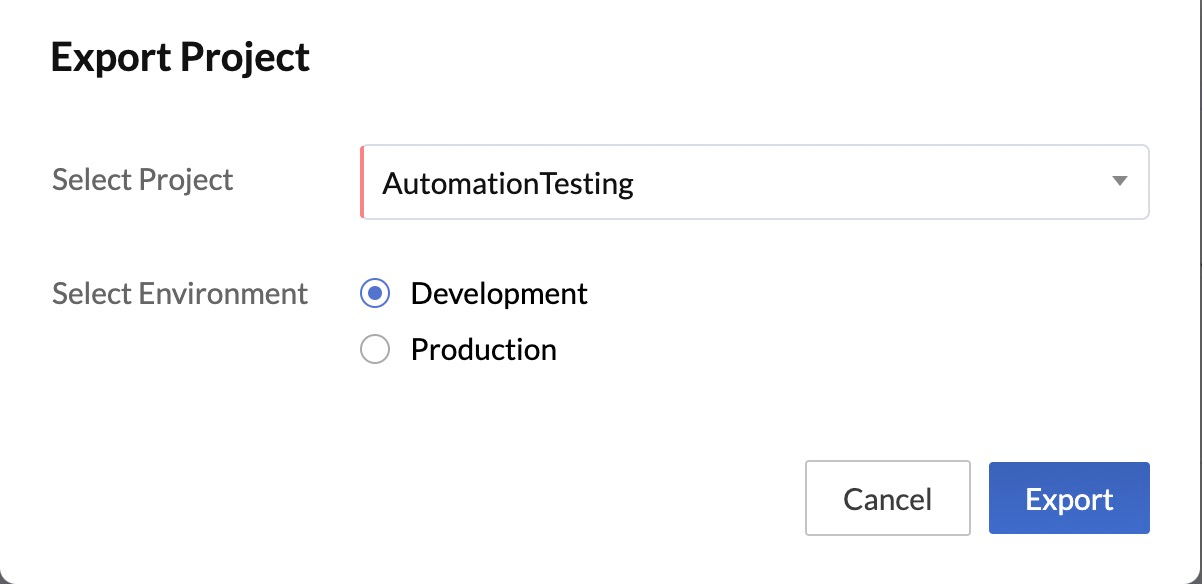
- Click Export.
Catalyst will begin the project export process. The console will display the status of the export.
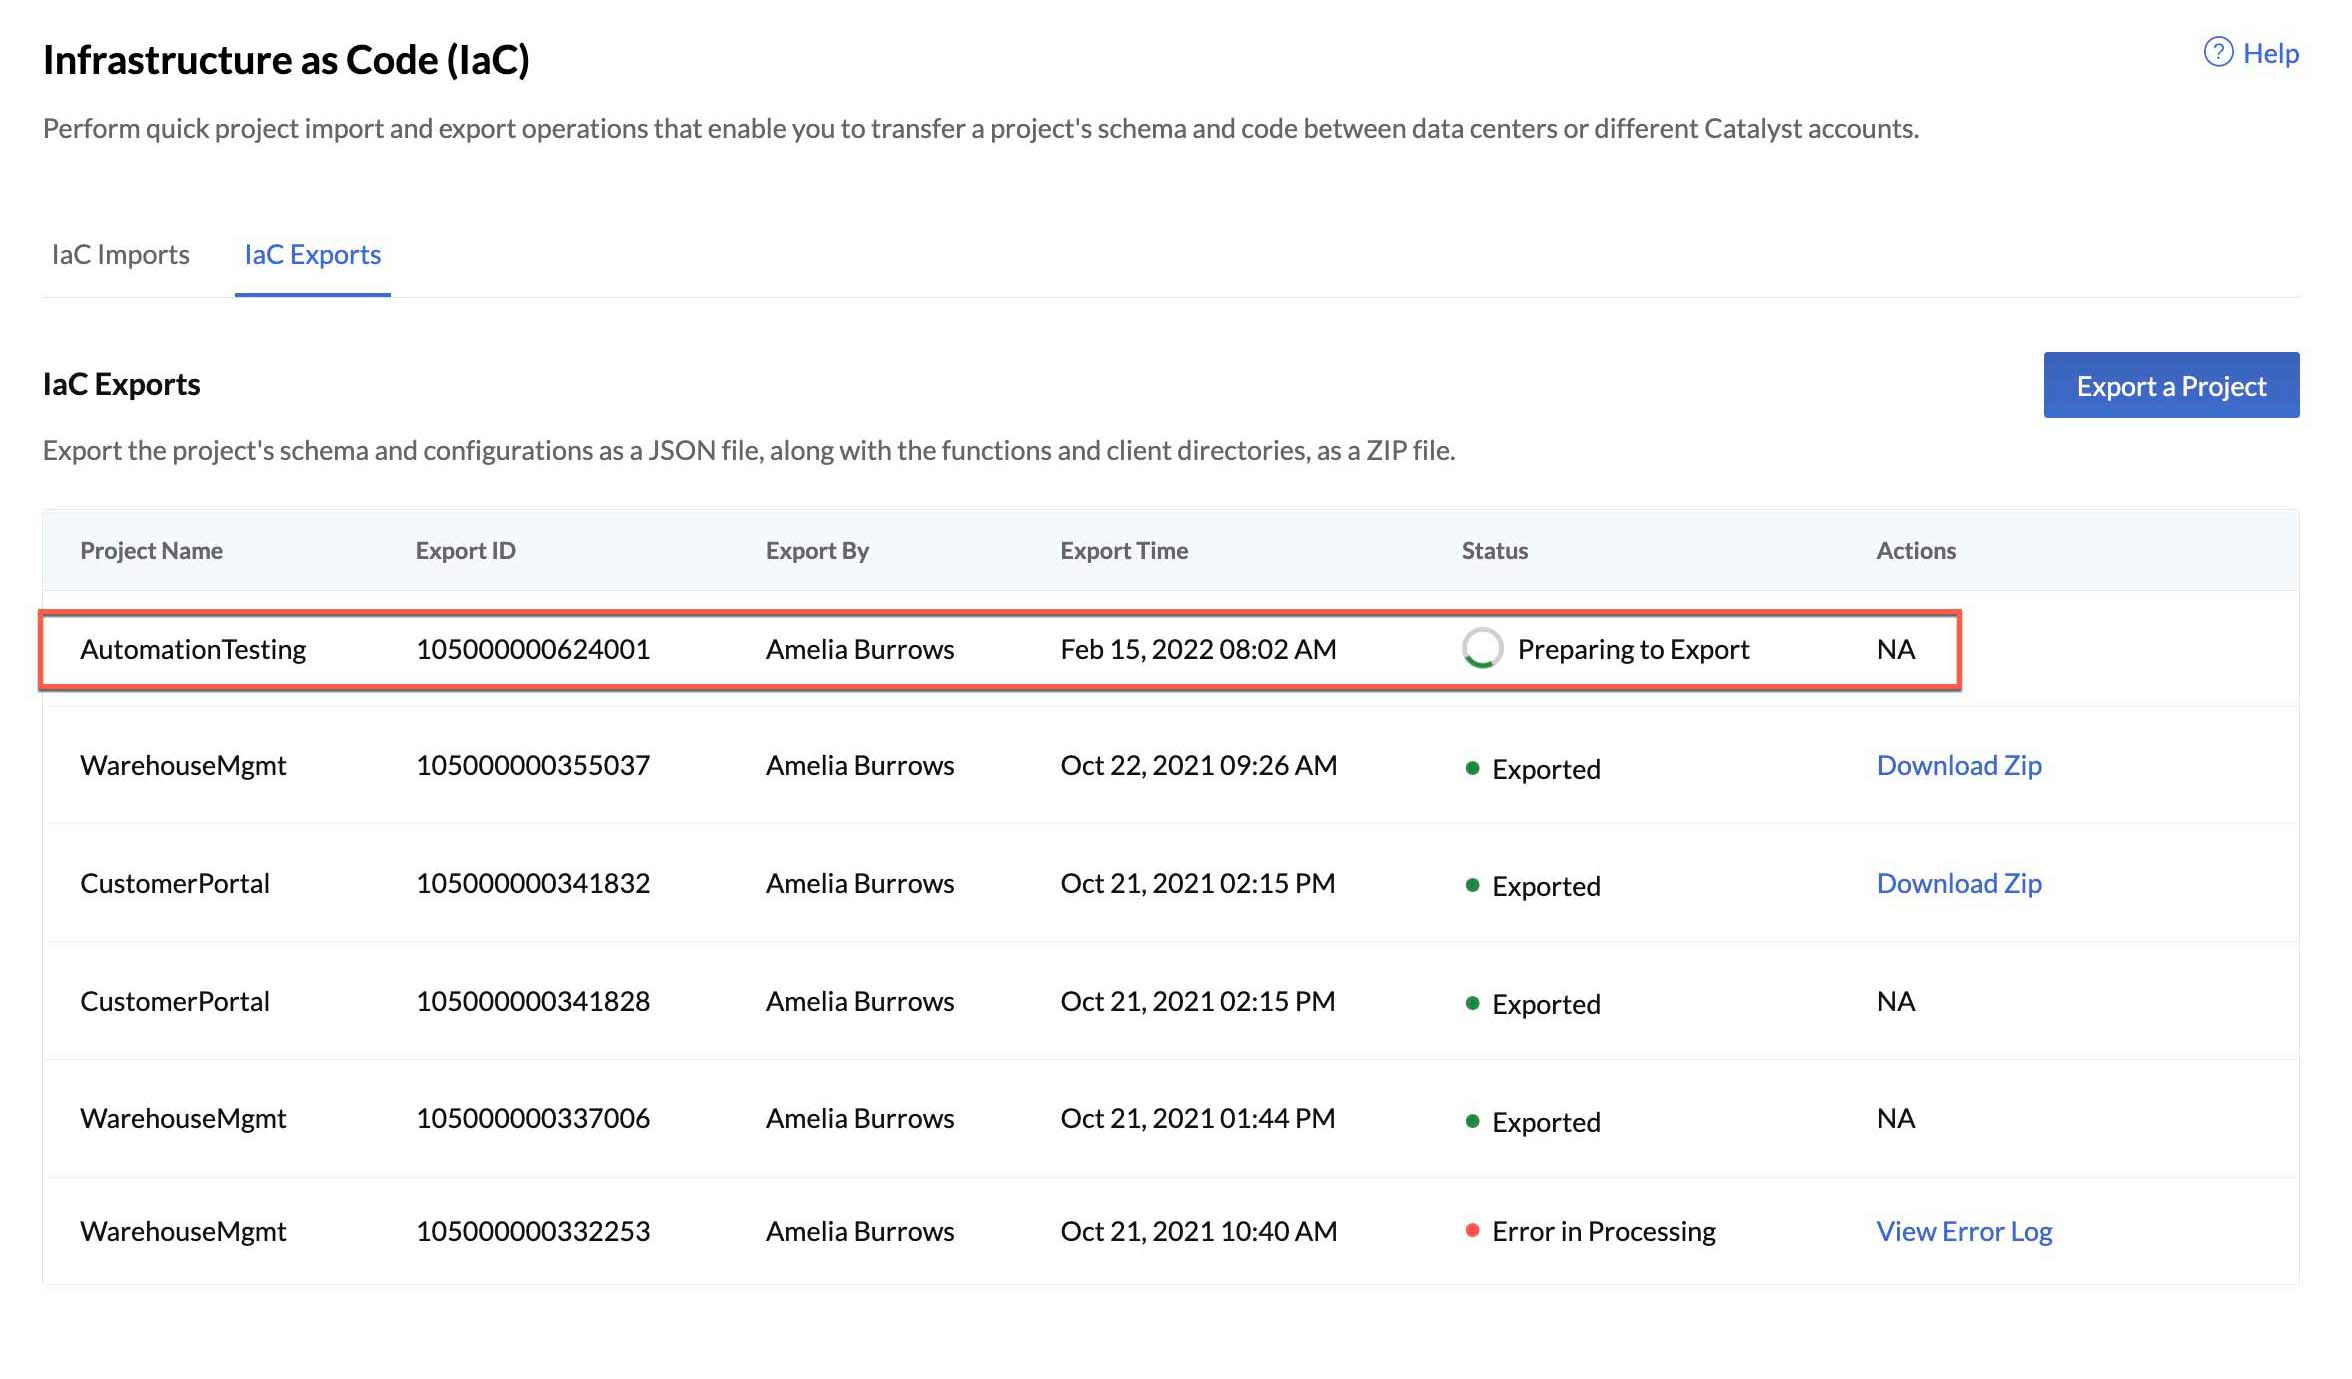
When the export is initialized, an Export ID is generated for it automatically. You can use the Export ID to check the status of the export job from the CLI. The console will also display other details of the export. After the export is complete, it will display a Download ZIP link, where you can download the project ZIP file from.
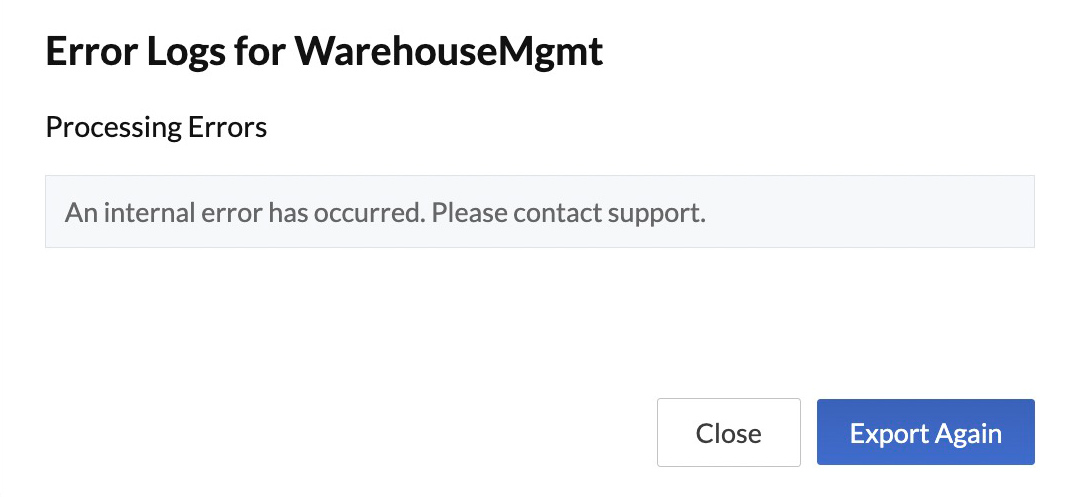
If there were any issues in the export process and Catalyst was unable to export the project, the console will display a View Error Log link.

You can click on this link to view the error details. You can resolve the error and export the project again.
Re-Export a Project
You can export a project again that was exported previously, if the ZIP download link has expired or if the project’s components or code have been updated.
-
Catalyst will always export the latest definitions and code of a project.
-
If you re-export a project that you previously exported, the Download ZIP link for the latest export of that project will only be available. This is because Catalyst only stores the latest export of a project, and none of its previous exports.
To export a project again that was previously exported, click the ellipsis icon for the exported project, then click Export Again.
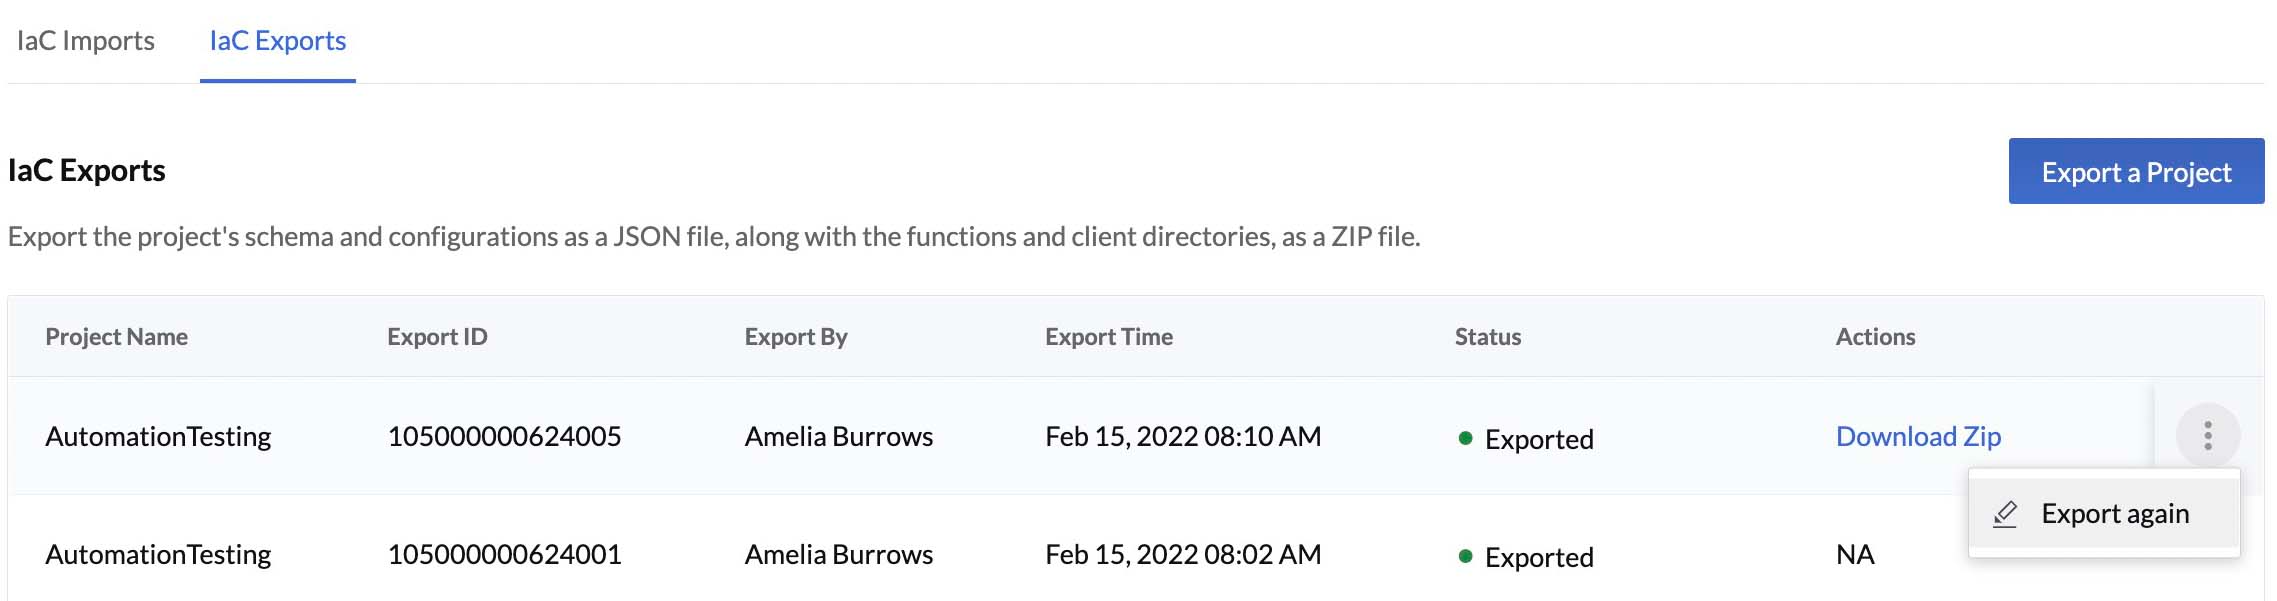
The project will be exported in the same manner as described in the last section. You can then download the latest export using the Download ZIP link.
Import a Project
The IaC import option enables you to import a new Catalyst project from an existing project ZIP file. Catalyst will configure each component based on the definitions specified in the project-template JSON. The functions and client code will be populated in the project as well, if present. After the import job is completed, the new project will be available with the configurations and code populated in it.
-
The source ZIP file containing the project definitions, and the functions and client code must be in the standard format to be imported.
-
The project-template JSON file must be mandatorily present in the root of the ZIP file. A project cannot be imported without this file. The functions or webclient directories are not mandatory.
-
You cannot import a project directly into the production environment.
You can import a new project in the following way:
- Navigate to Infrastructure as Code under General Settings.

- Click Import New Project from the IaC Imports section.
- Enter a name for the new project in the pop-up window. Select the source ZIP file of the project to be imported.
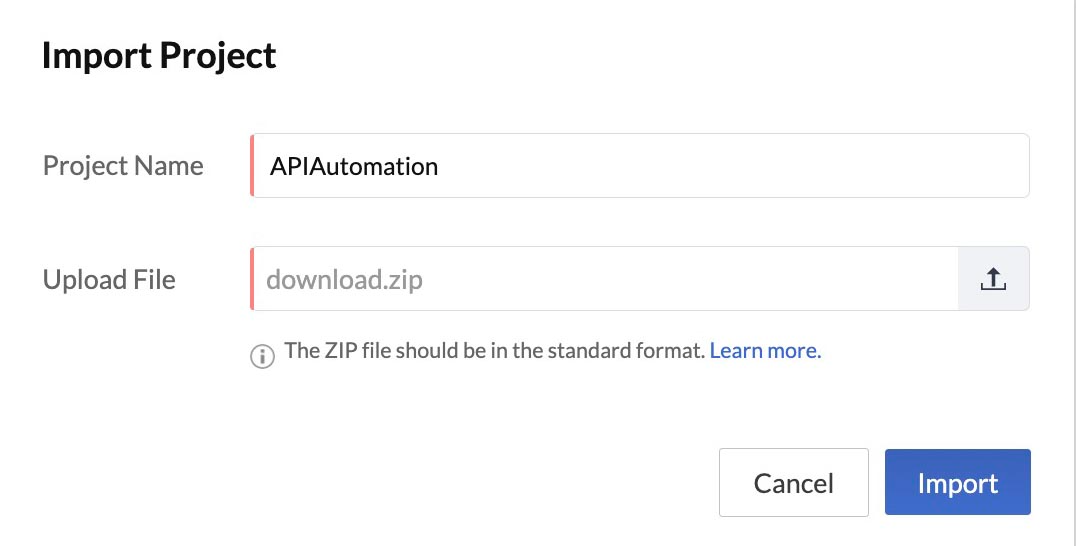
- Click Import.
Catalyst will begin the project import process. The console will display the status of the process.
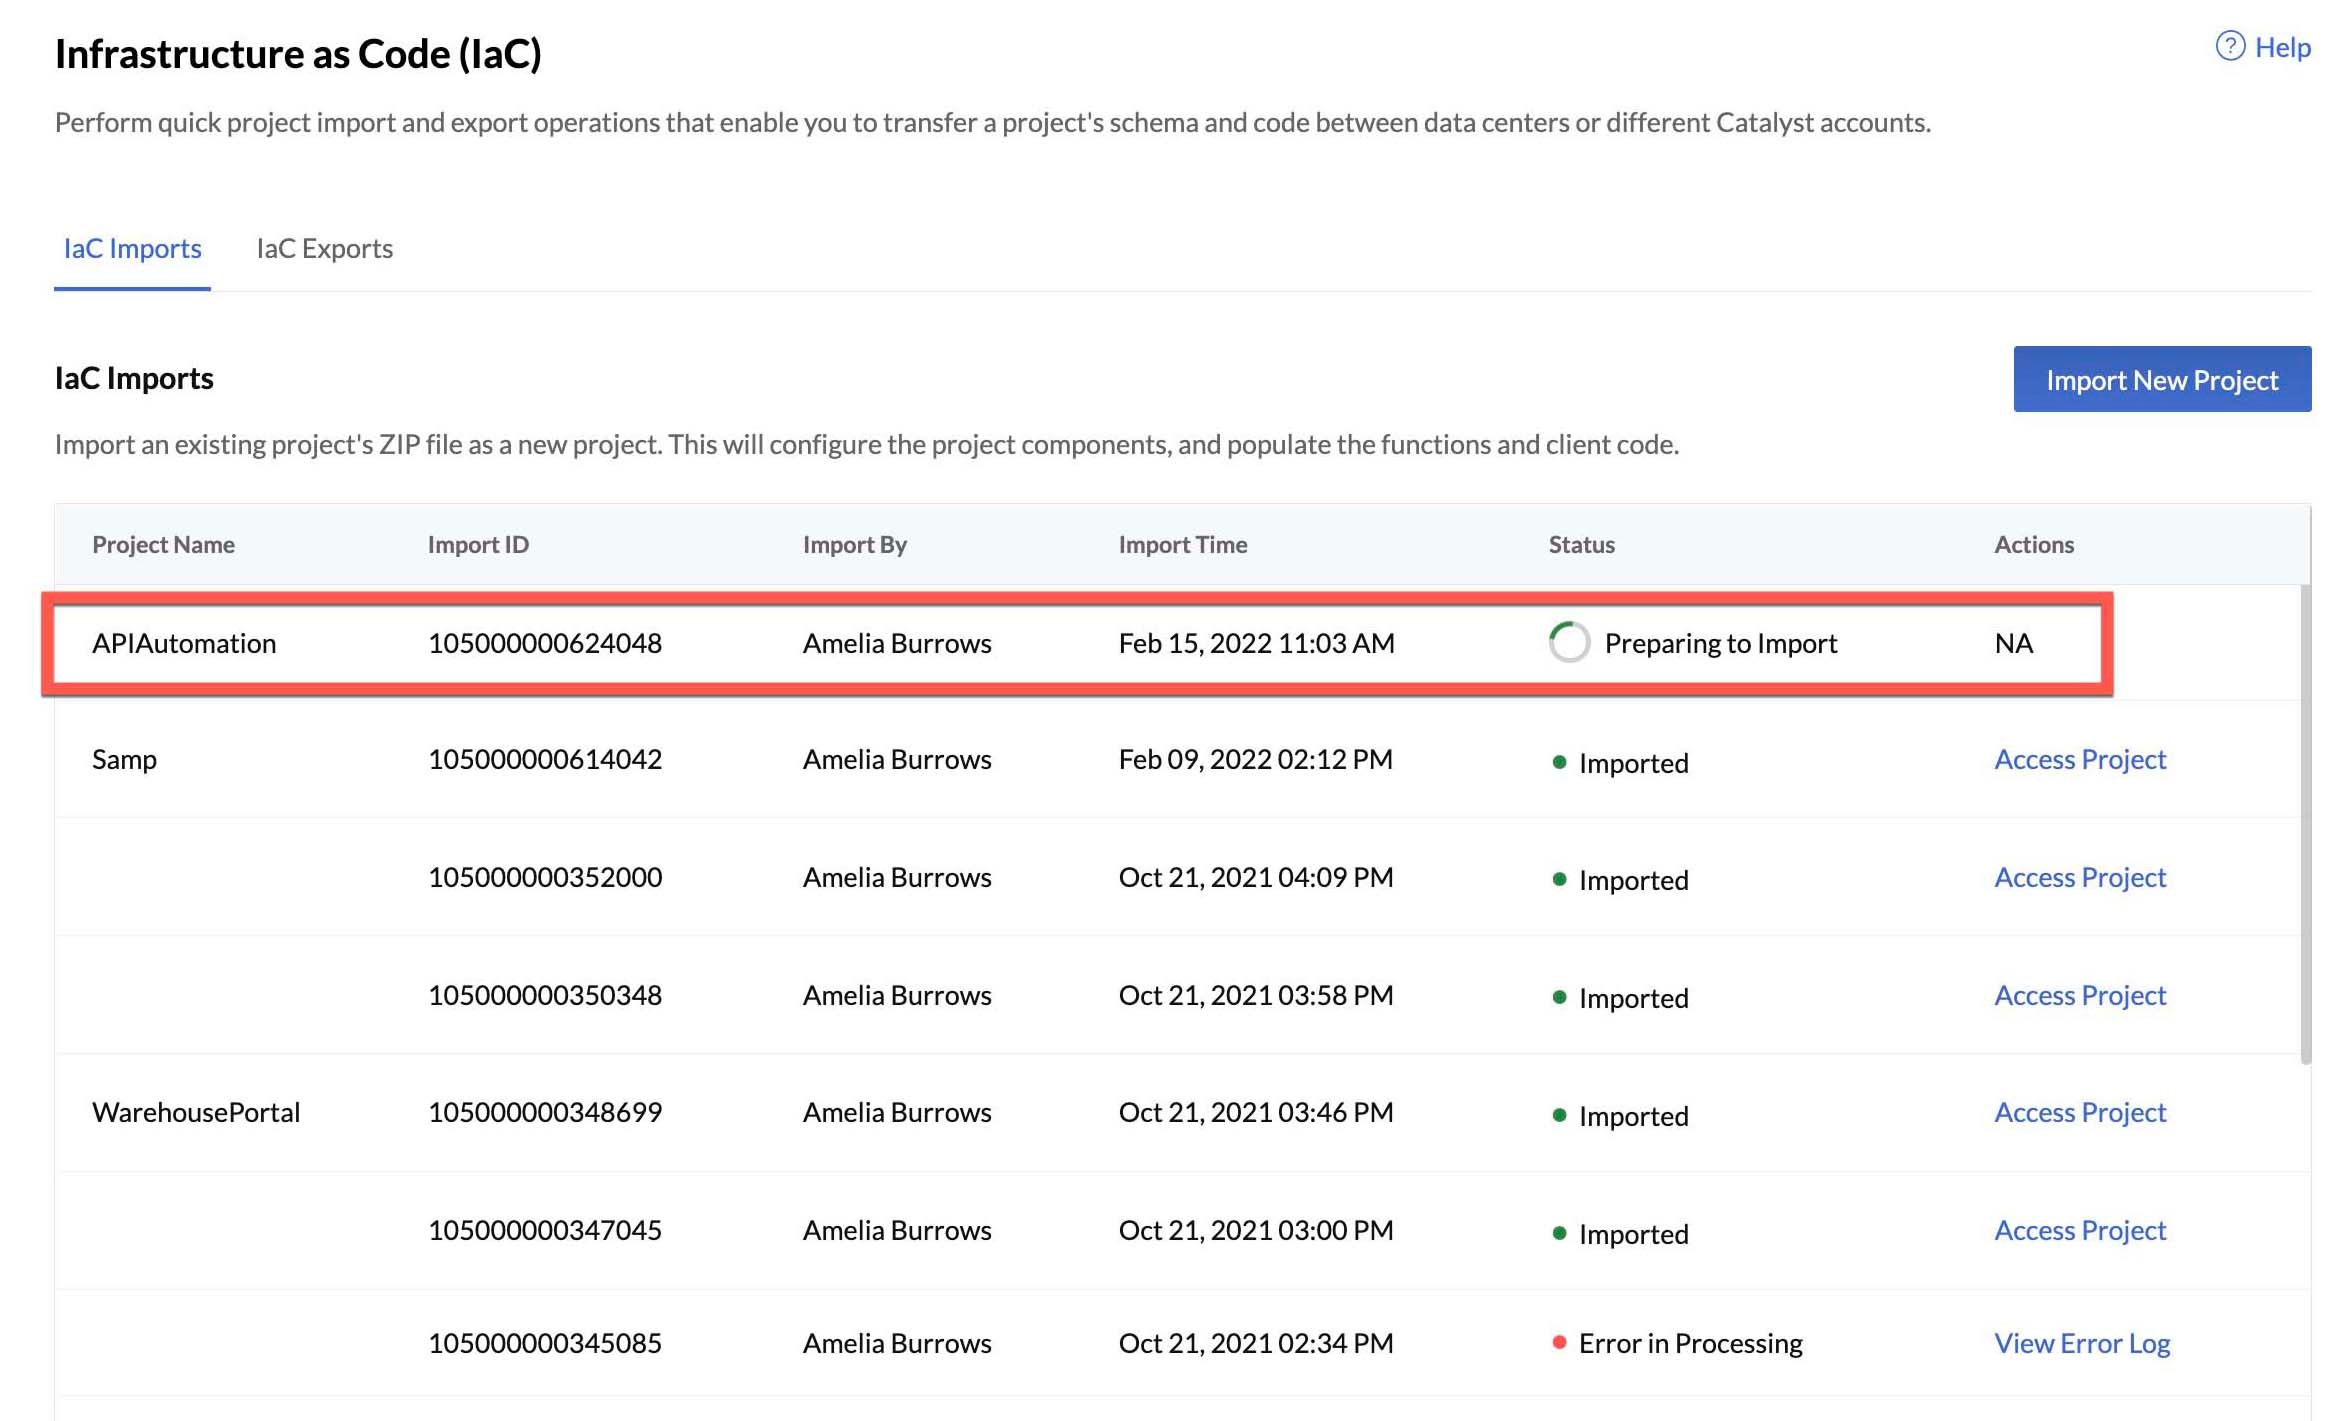
When the import is initialized, an Import ID is generated for it automatically. You can use the Import ID to check the status of the import job from the CLI. The console will also display other details of the import job.
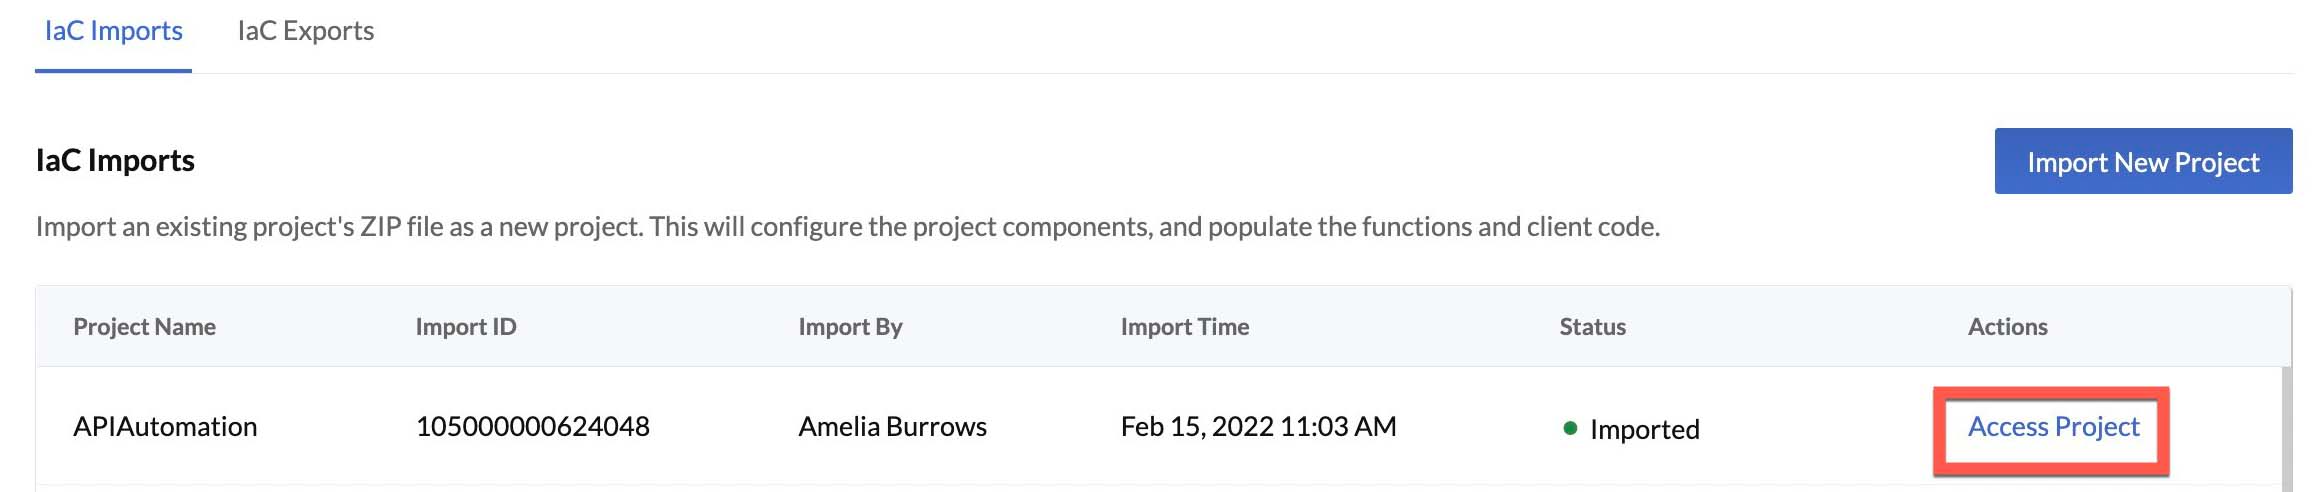
If the import is successful, you will find a new project created in the console with the components configured based on the ZIP file. The console will display an Access Project link for the import job. You can click this link to open the new project.
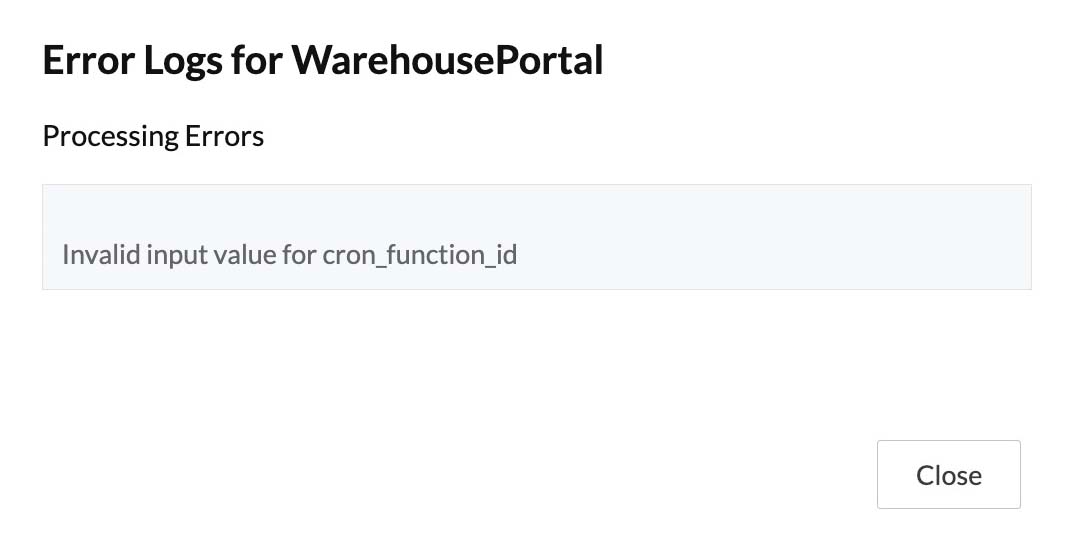
If there were any issues in the import process and Catalyst was unable to import the project, the console will display a View Error Log link.

You can click on it to view the error details. You can resolve the error and import the project again.
Last Updated 2025-11-19 20:37:41 +0530 IST
Yes
No
Send your feedback to us