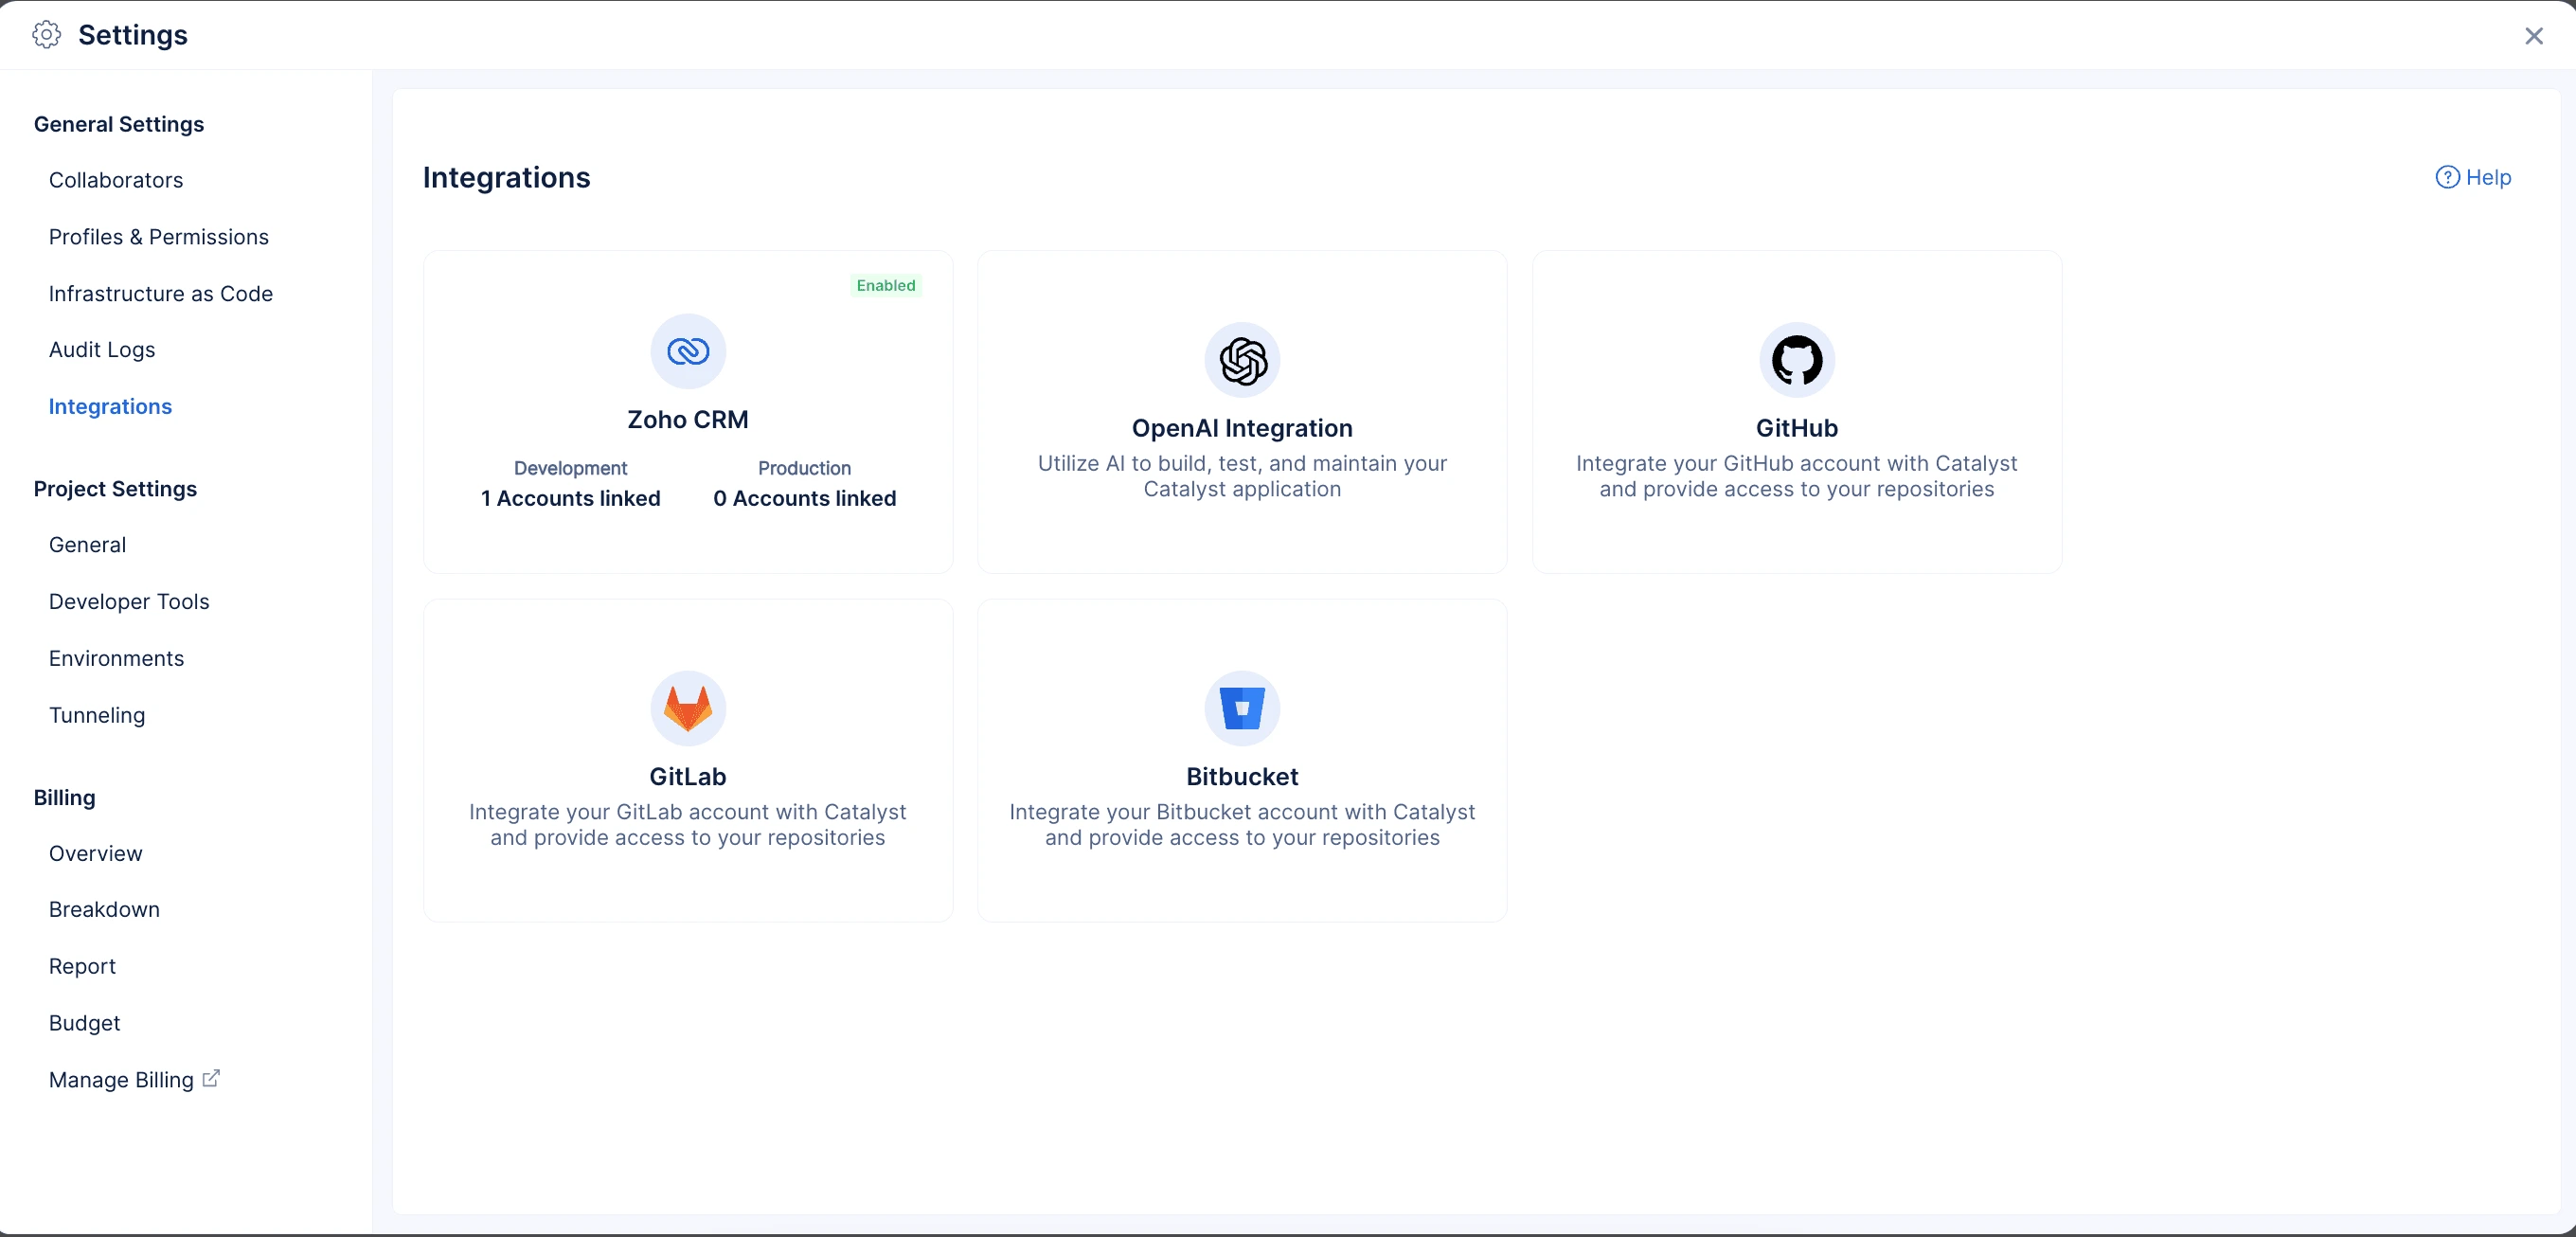
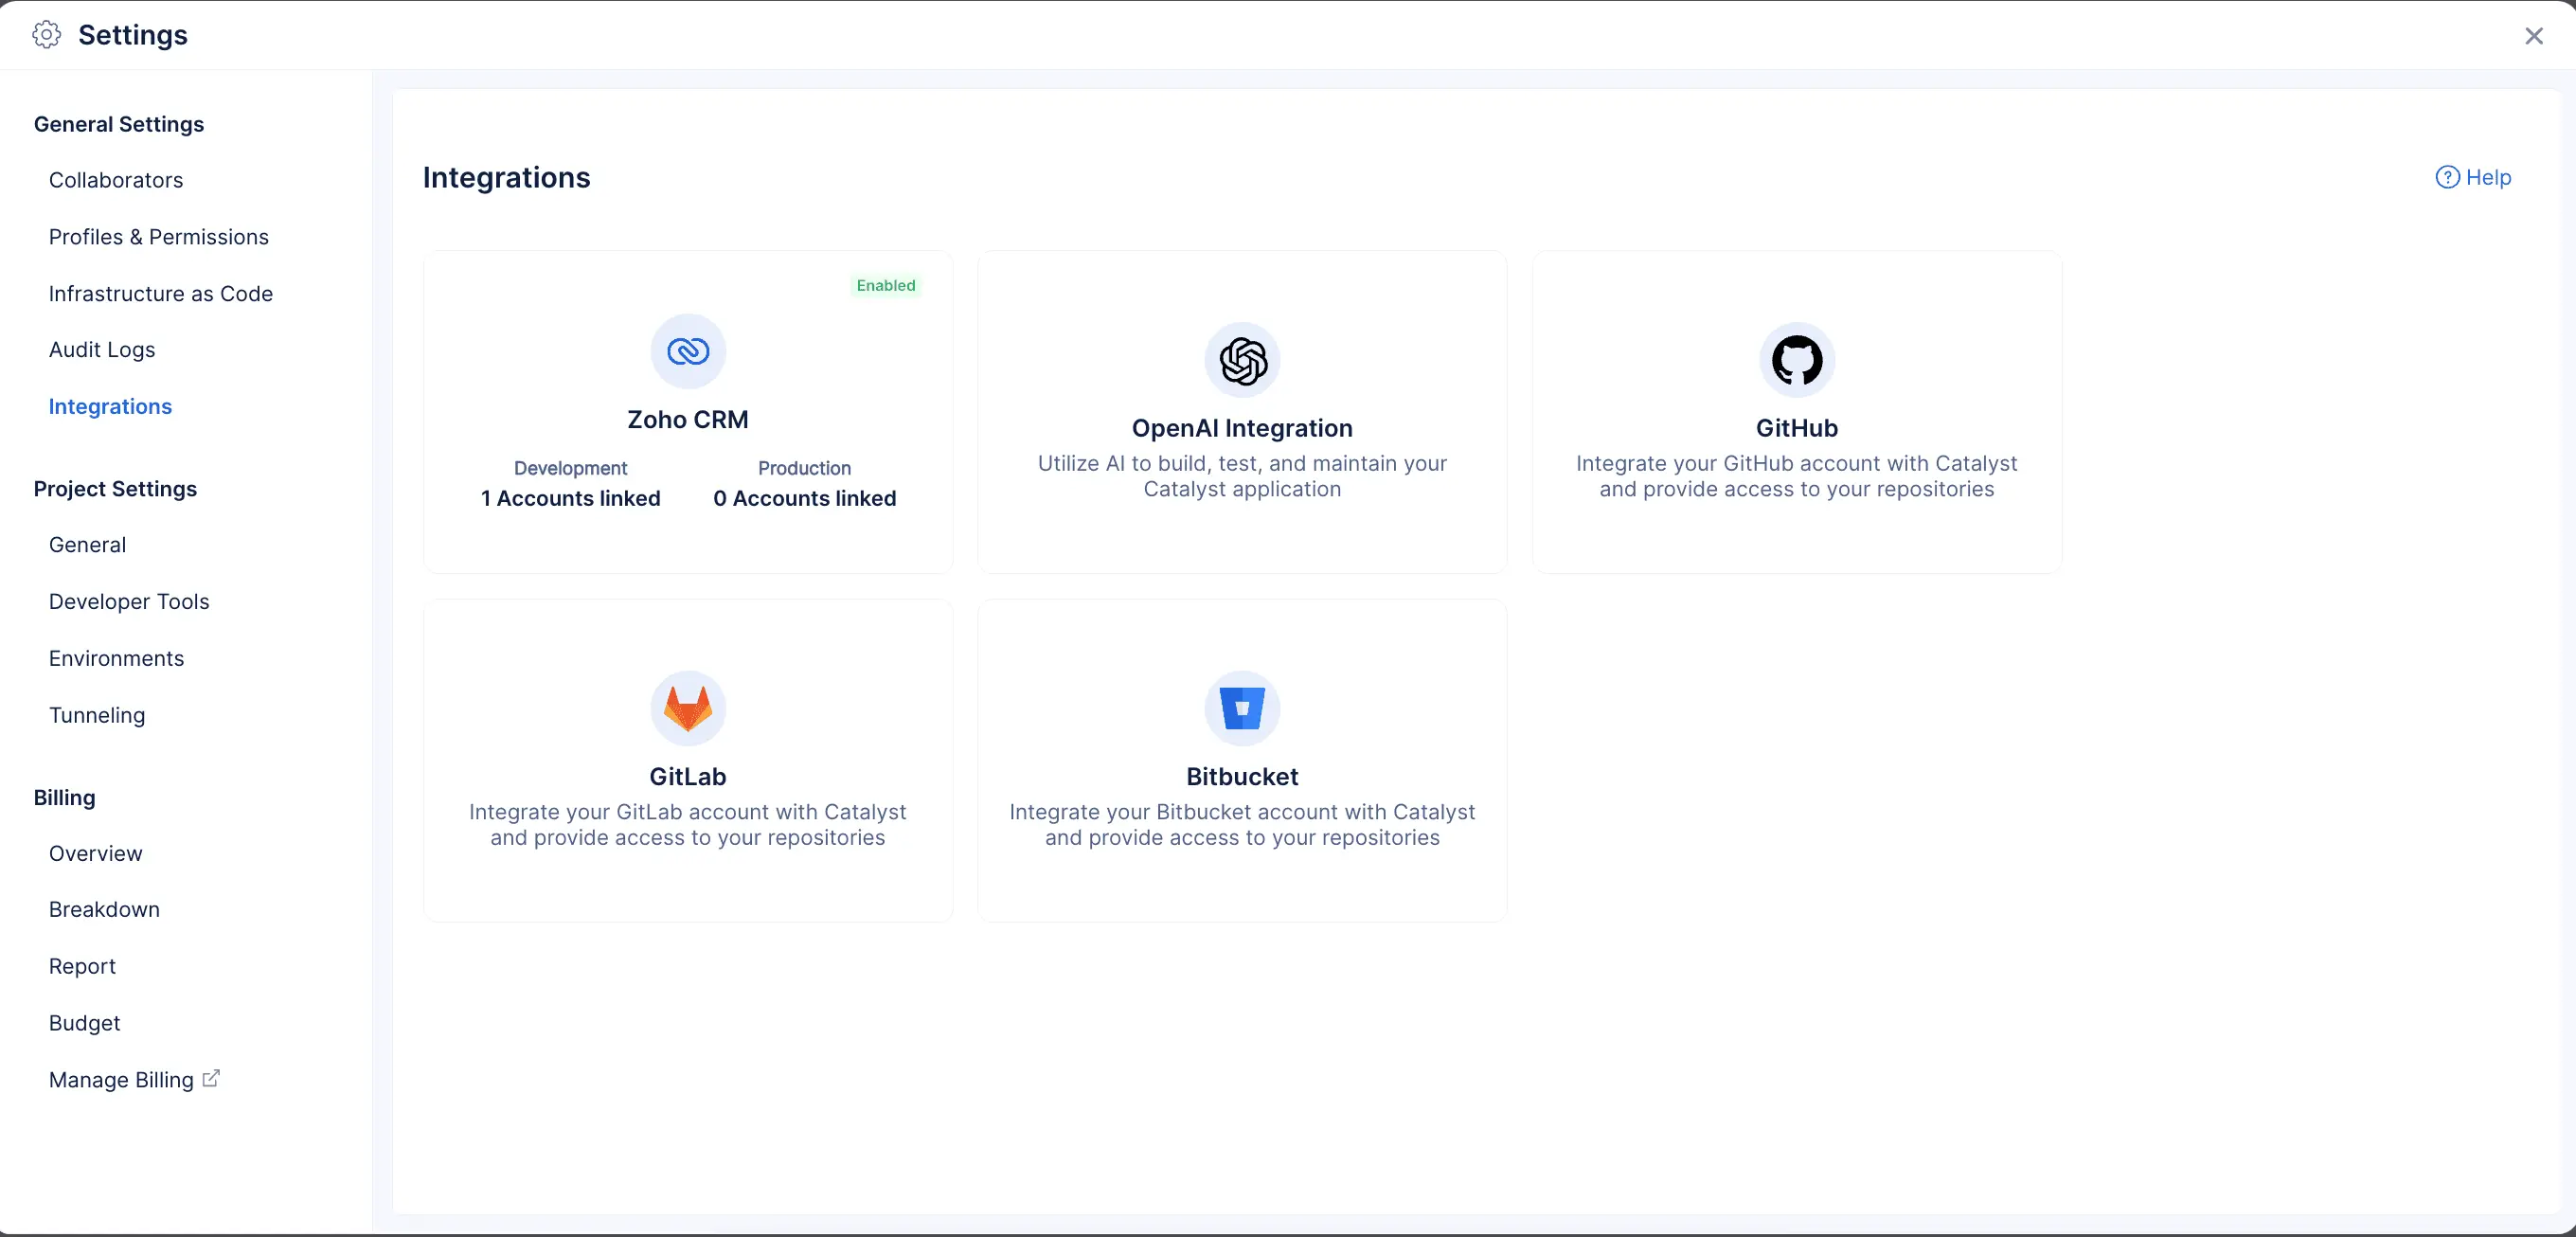
Integrations Settings
Introduction
The Integrations settings section enables you to configure and manage Catalyst integrations with other Zoho services or third-party services. Catalyst handles the backend processes involved in implementing the integrations solely, and enables you to easily integrate your Catalyst account with any of the available external services with a few steps from this section. You can view the details of the integrated accounts, modify them, and also delete the integrations permanently, if required from this section.
Catalyst also provides you with the benefit of associating different accounts in the Zoho services for the development and production environments environments of your project individually. You can add and manage integrations for both environments from this section.
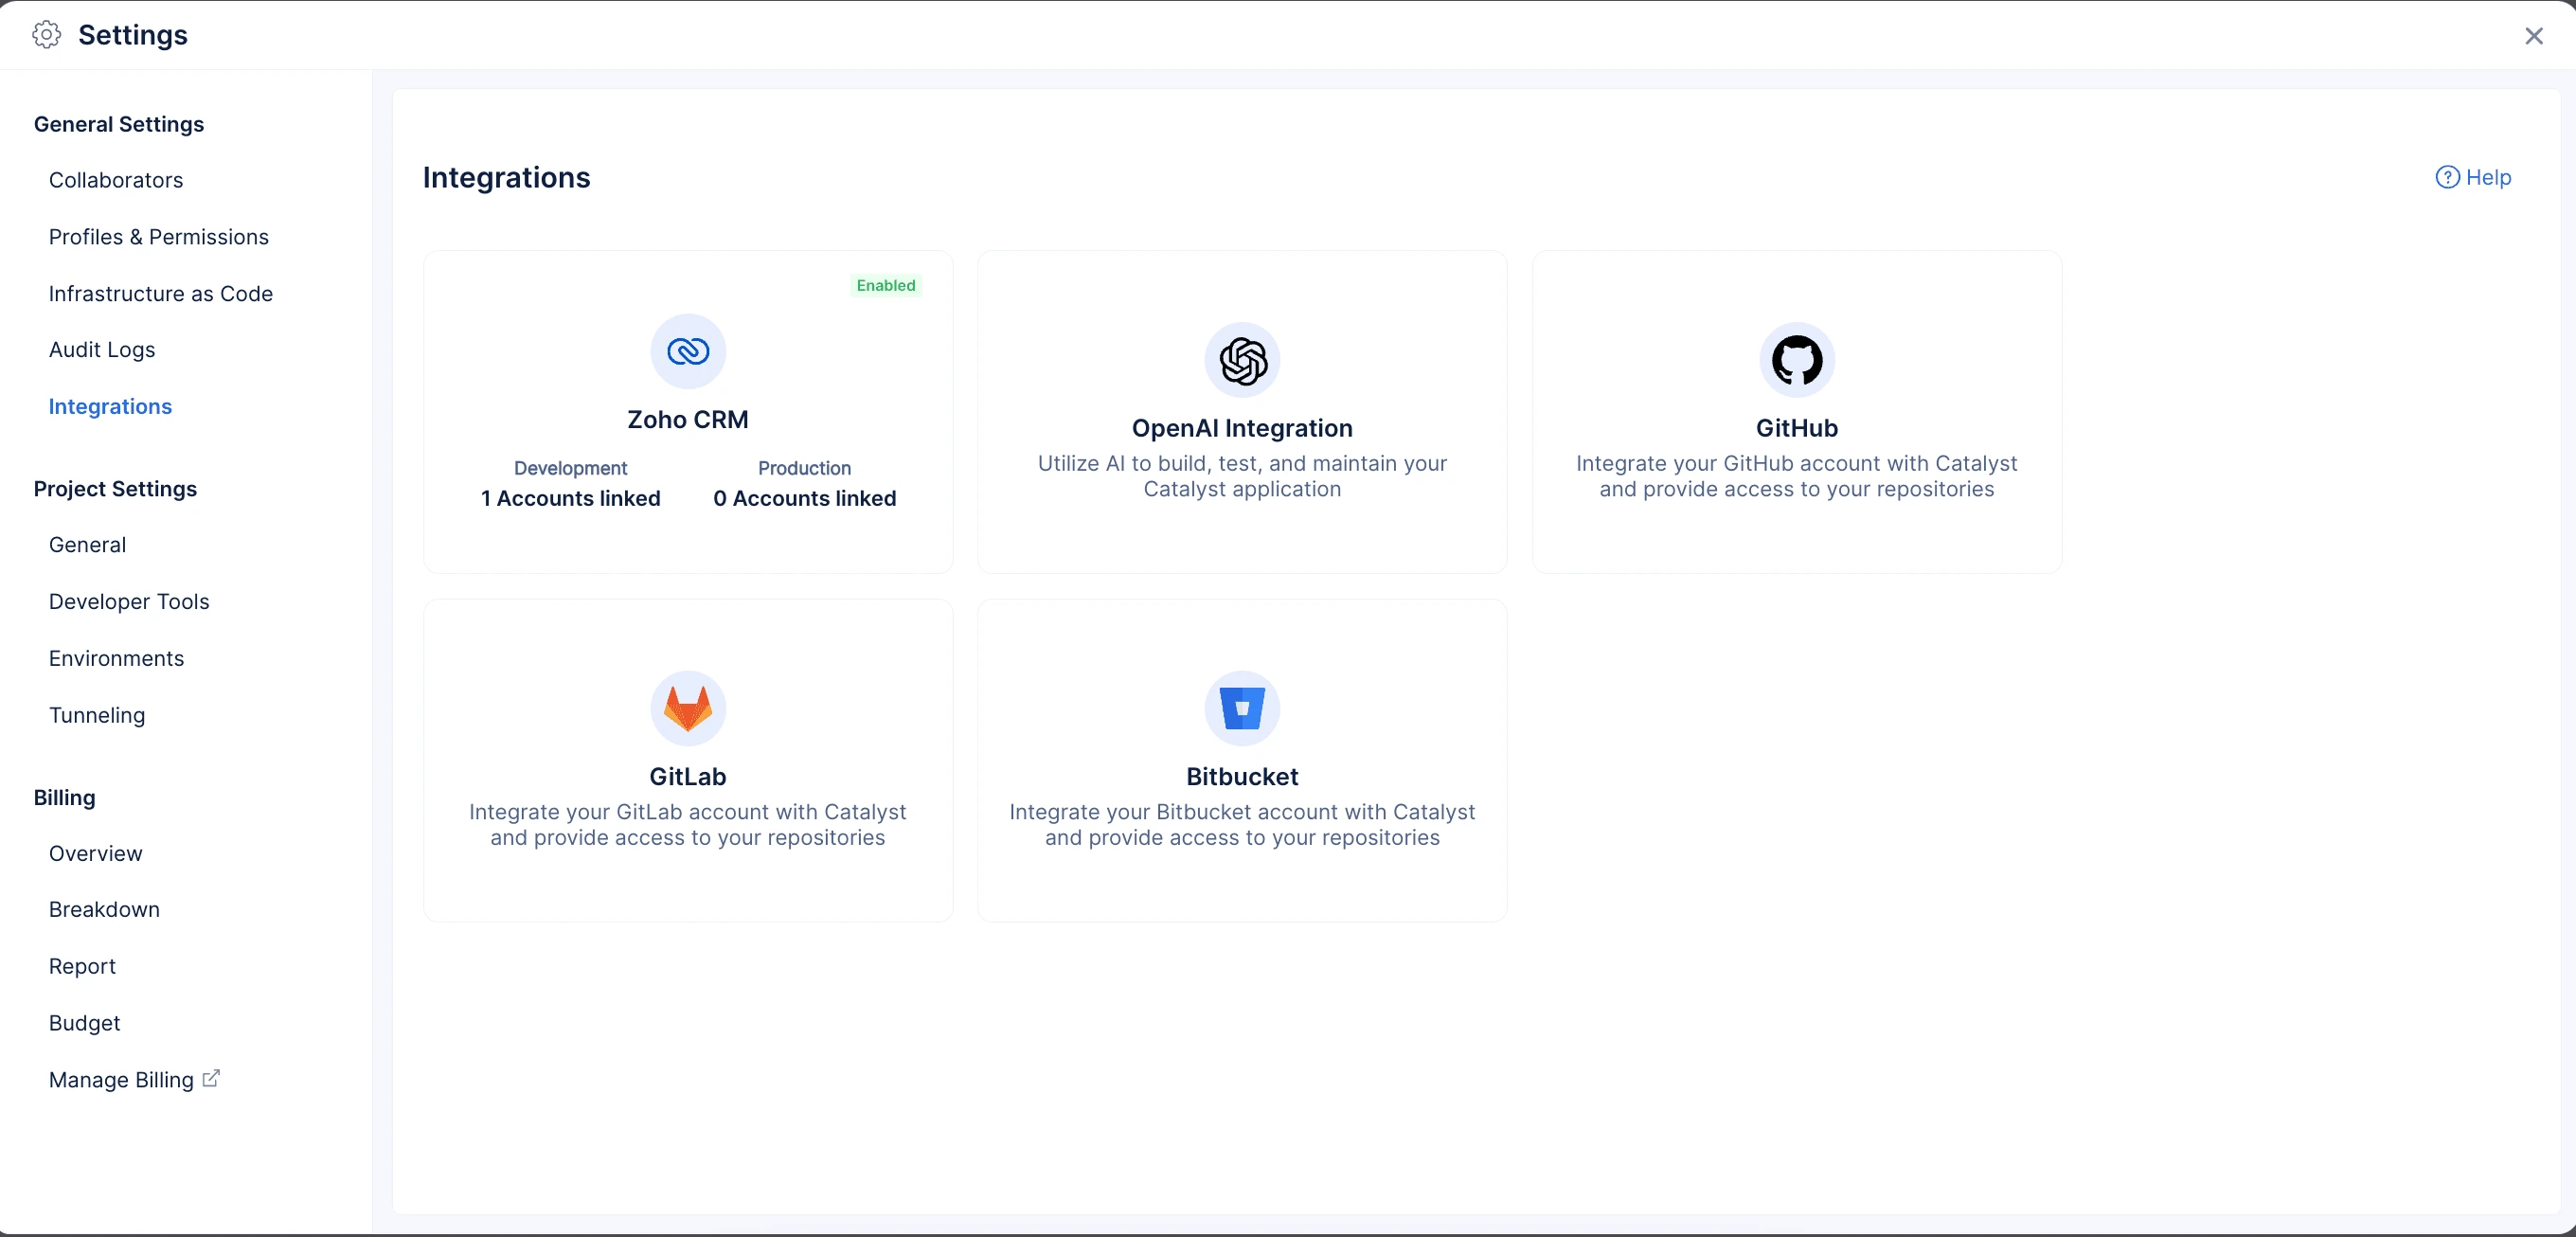
Catalyst provides integration with the following Zoho and third-party services:
Zoho CRM Integration
The Zoho CRM integration allows you to establish a connection between your Catalyst project and your existing Zoho CRM accounts. This integration uses the Zoho Event Listeners to listen for events occurring in CRM and invoke the associated event functions upon their occurrence.
You can add Catalyst integrations with your existing accounts in Zoho CRM directly, while configuring event listener rules, or from the Integrations settings section. You can also temporarily revoke a configured account, delete an account, or delete integration with an entire service from this section.
-
You must already have an account in Zoho CRM to be able to integrate it with Catalyst. You can have any tier or edition of account in these services, such as the Standard, Professional, or even the free tiers.
-
Please refer to the Event Listeners help document for details about various types of event listeners available in Catalyst, and about configuring event listener rules.
Add an Integration with Zoho CRM in the Development Environment
To add a Catalyst integration with an account in Zoho CRM for the development environment:
-
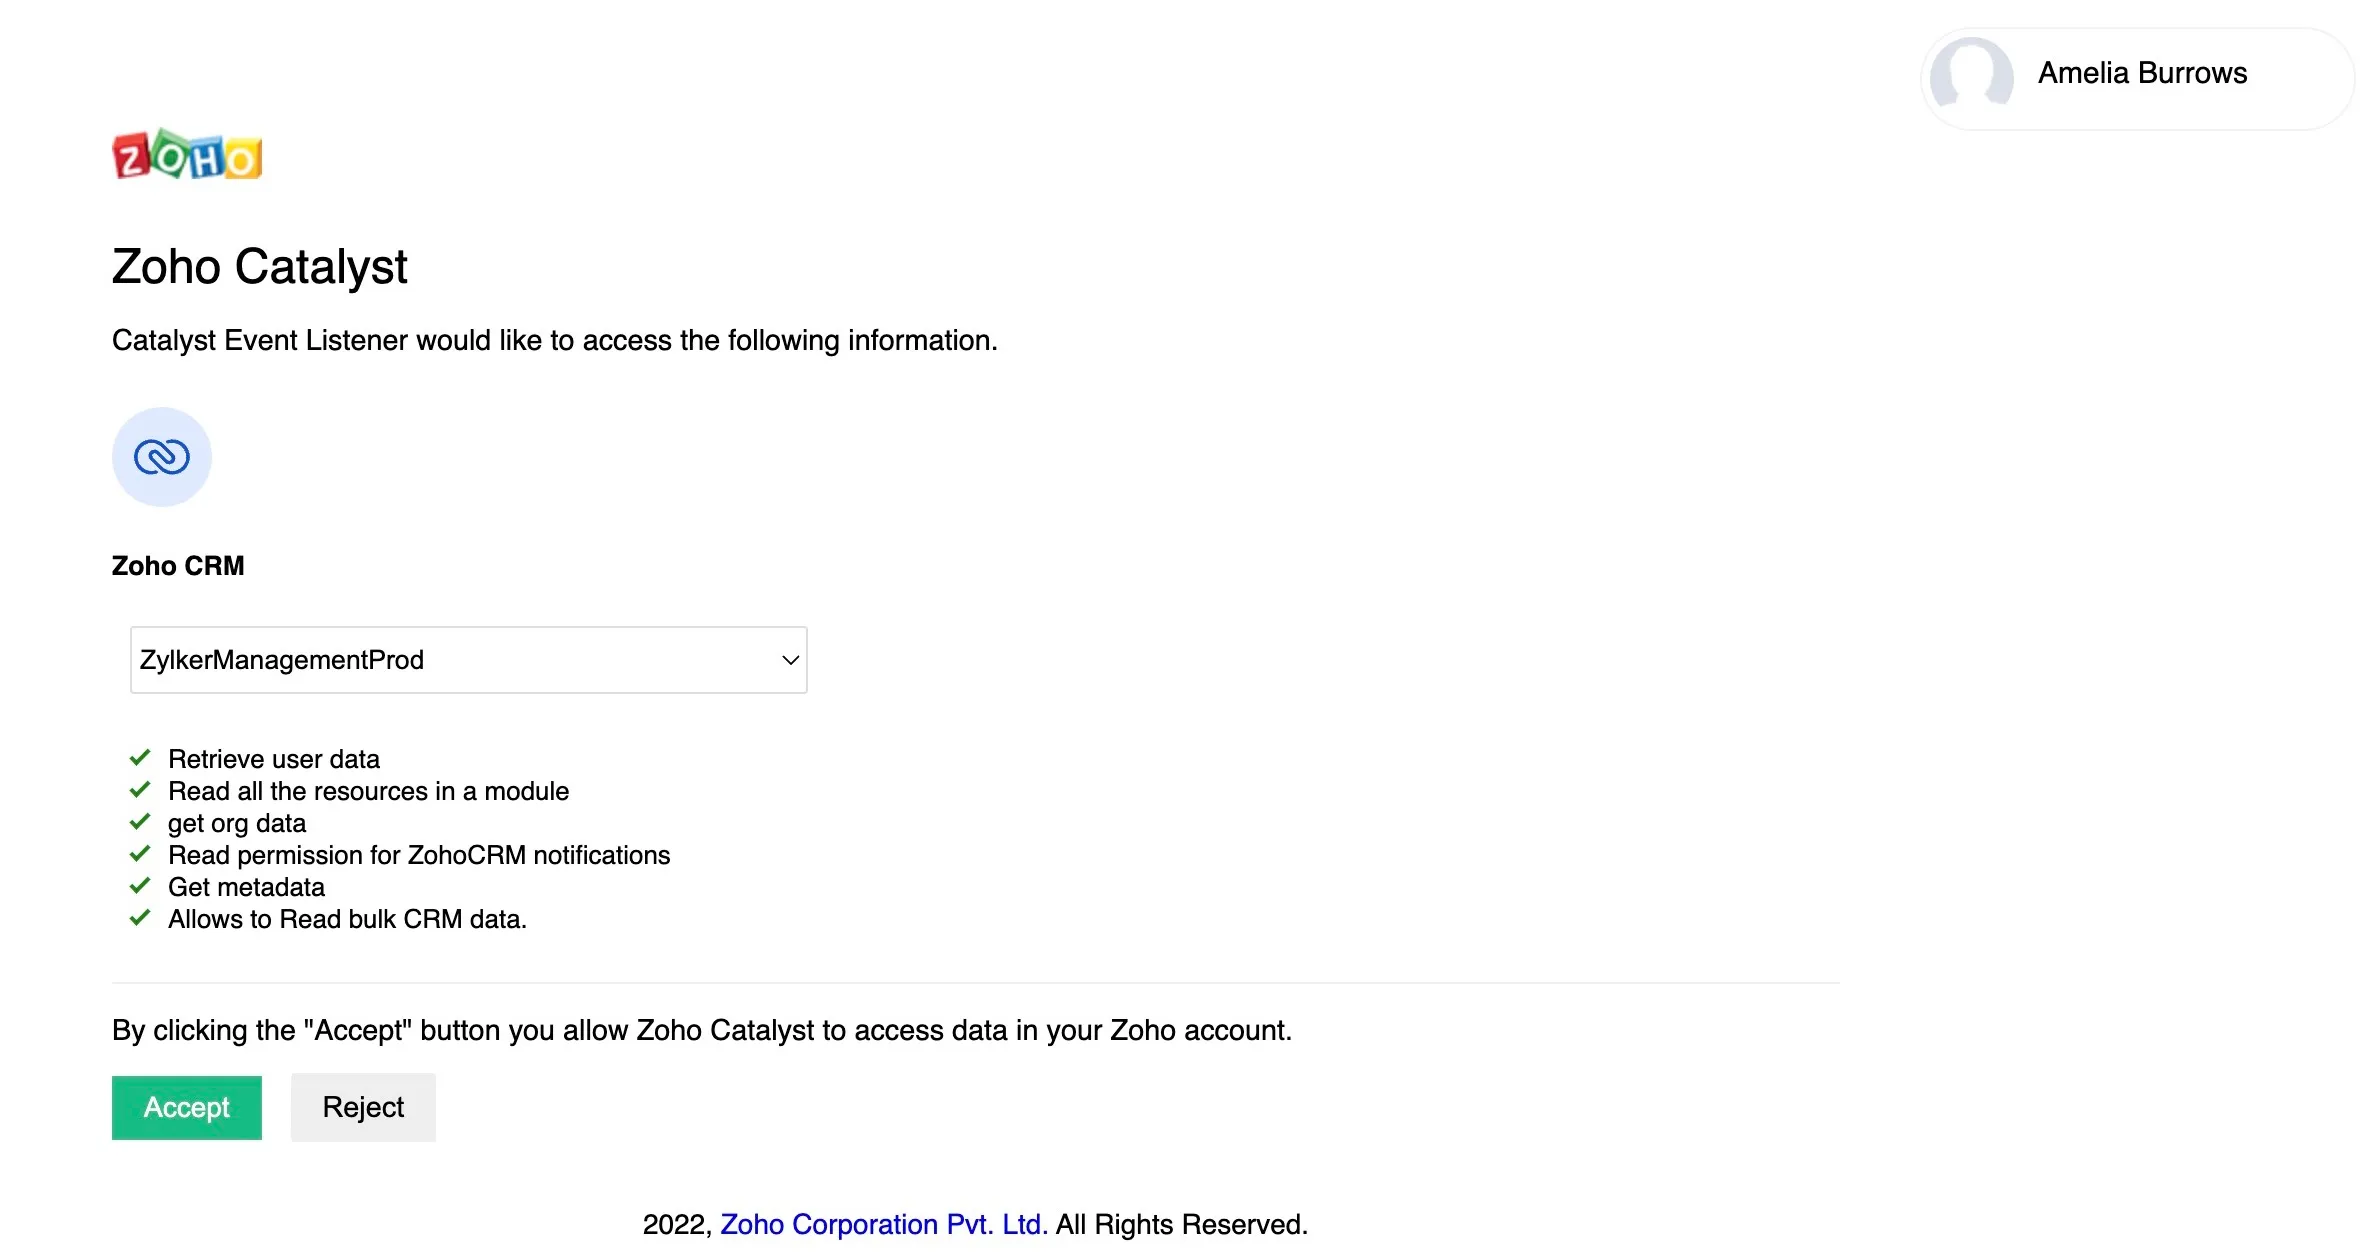
Navigate to Integrations under General Settings from the settings in the console. Click on Zoho CRM to integrate an account in it with Catalyst.

-
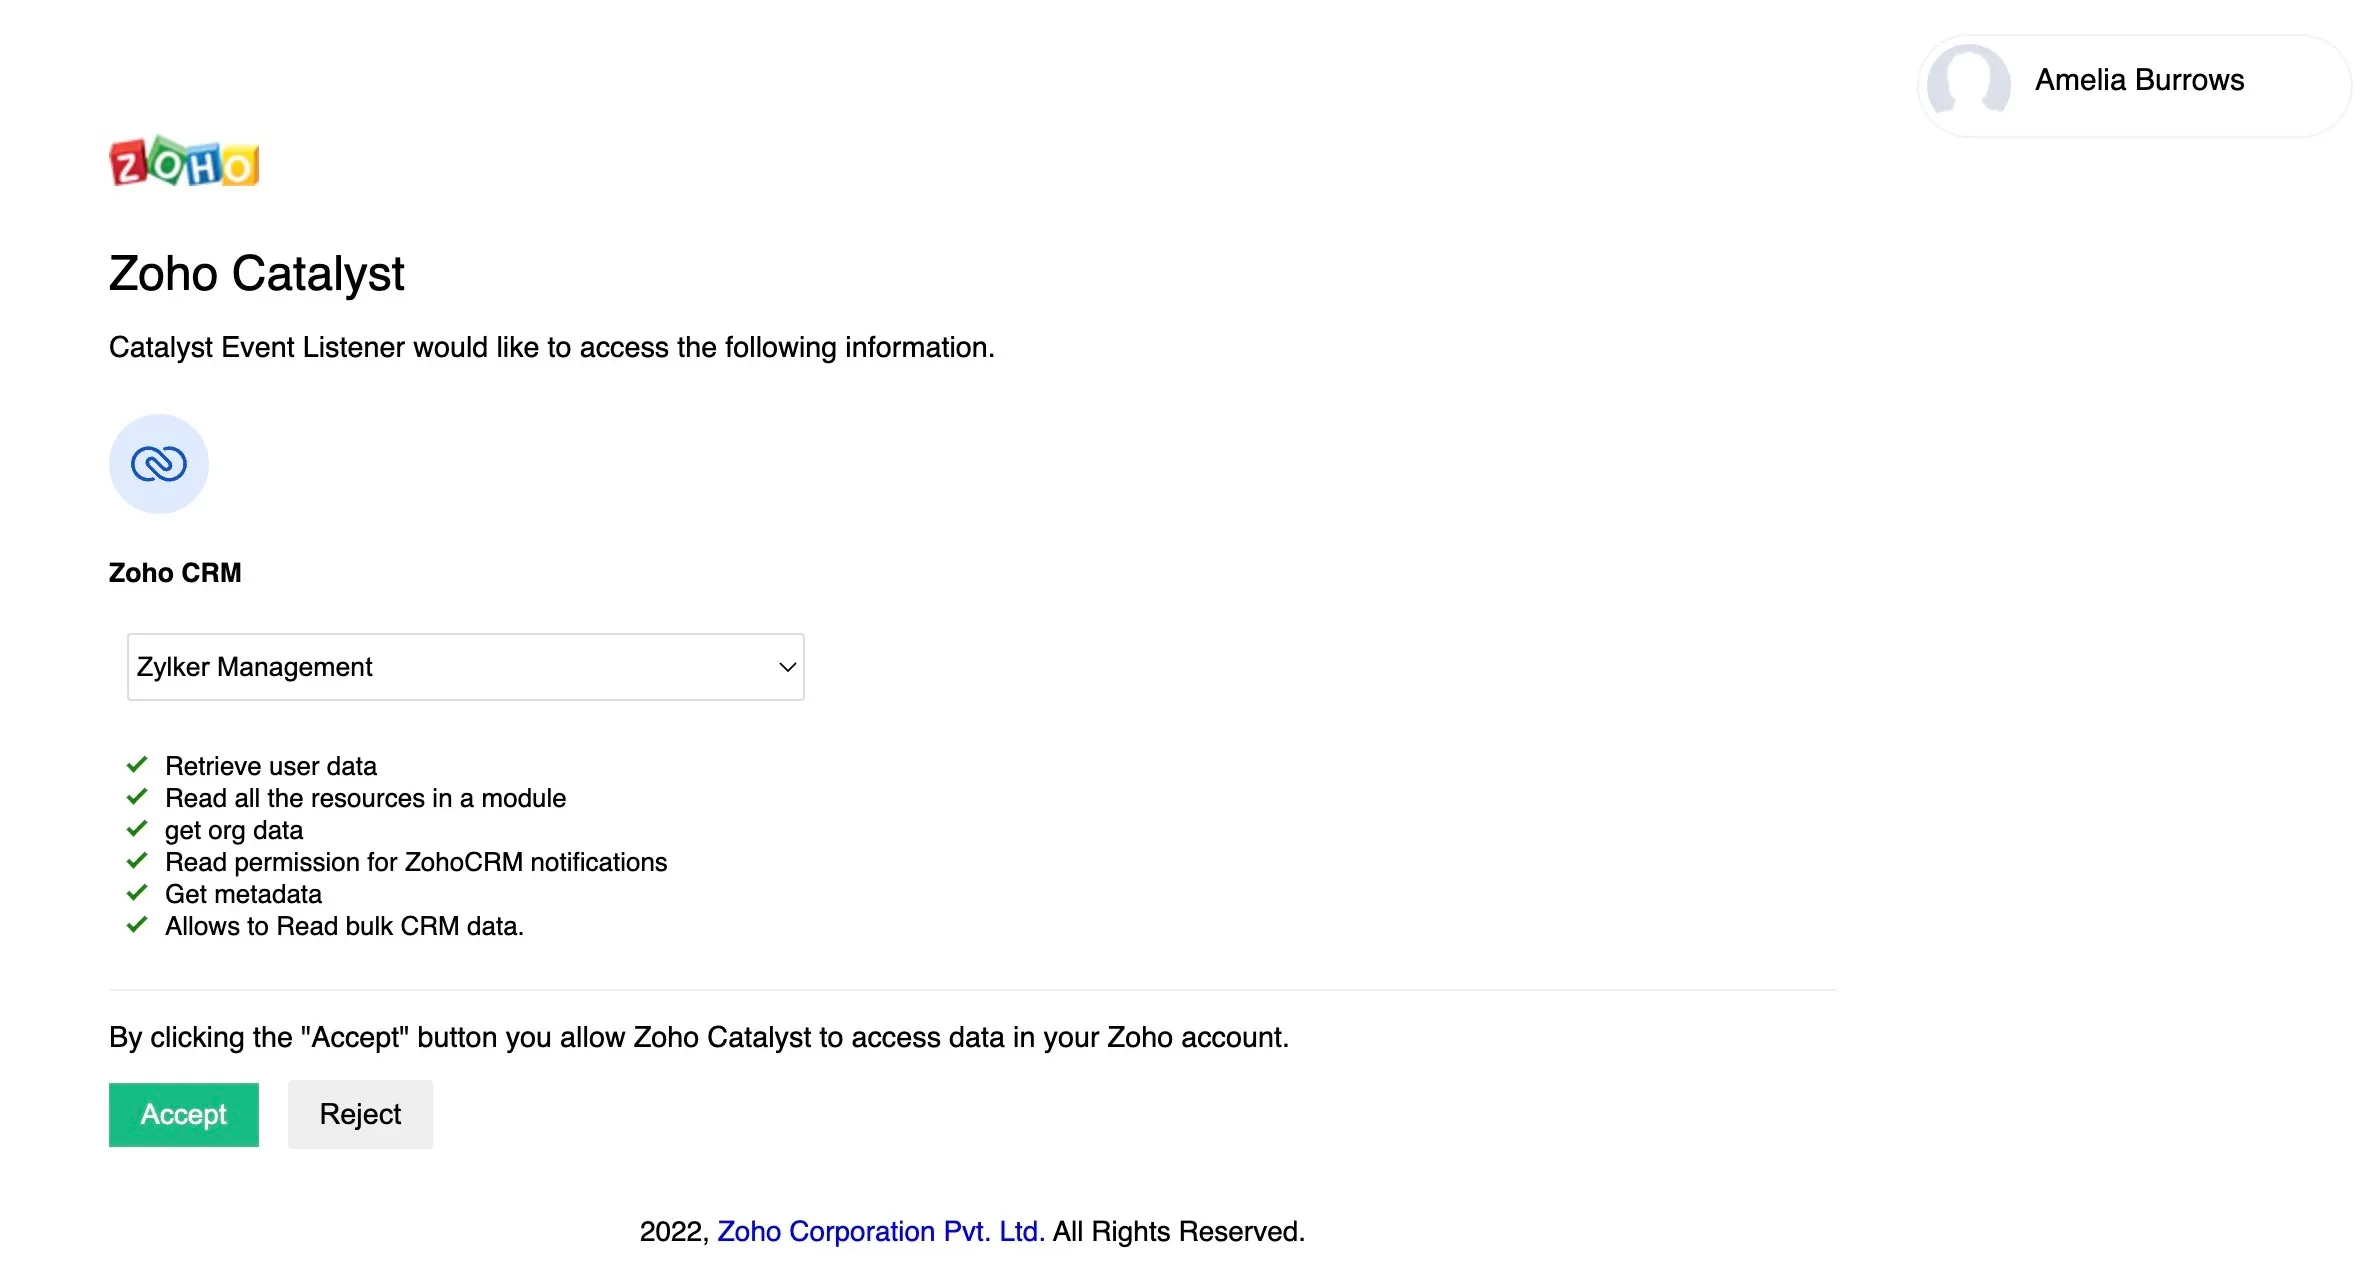
Click Add account from the Development tab for the service.

This will redirect you to a permissions page where you can add an account already created in CRM. -
Select an account from the drop-down to integrate Catalyst with. Then, click Accept to provide the request permissions to Catalyst.
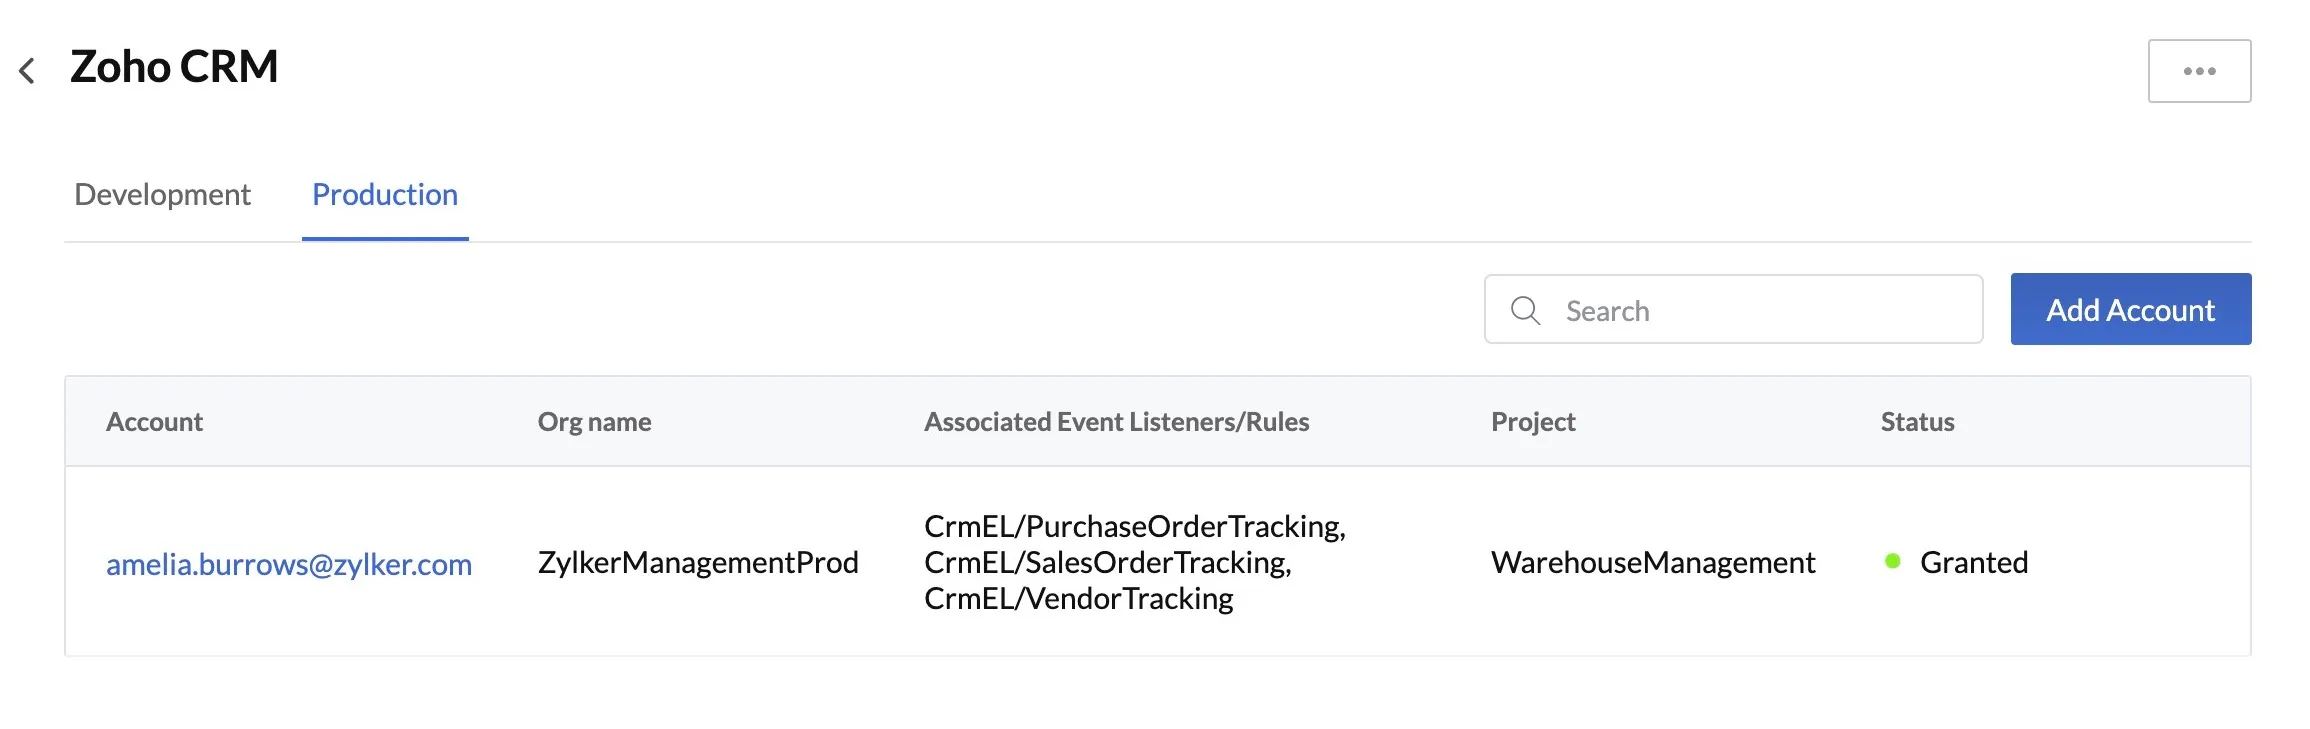
Catalyst will schedule an org synchronization with the newly integrated account. You will be alerted with a pop-up window.
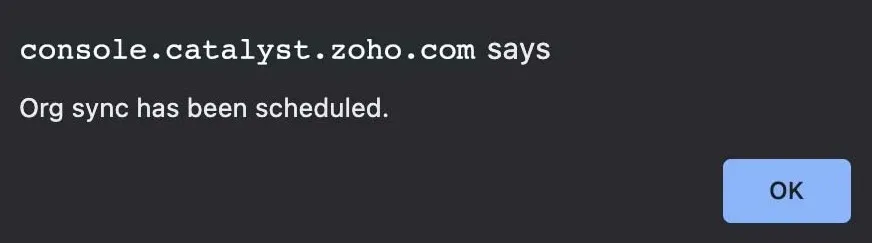
The synchronization will take 2-4 minutes to complete. The service page in the Integrations settings will display the status.
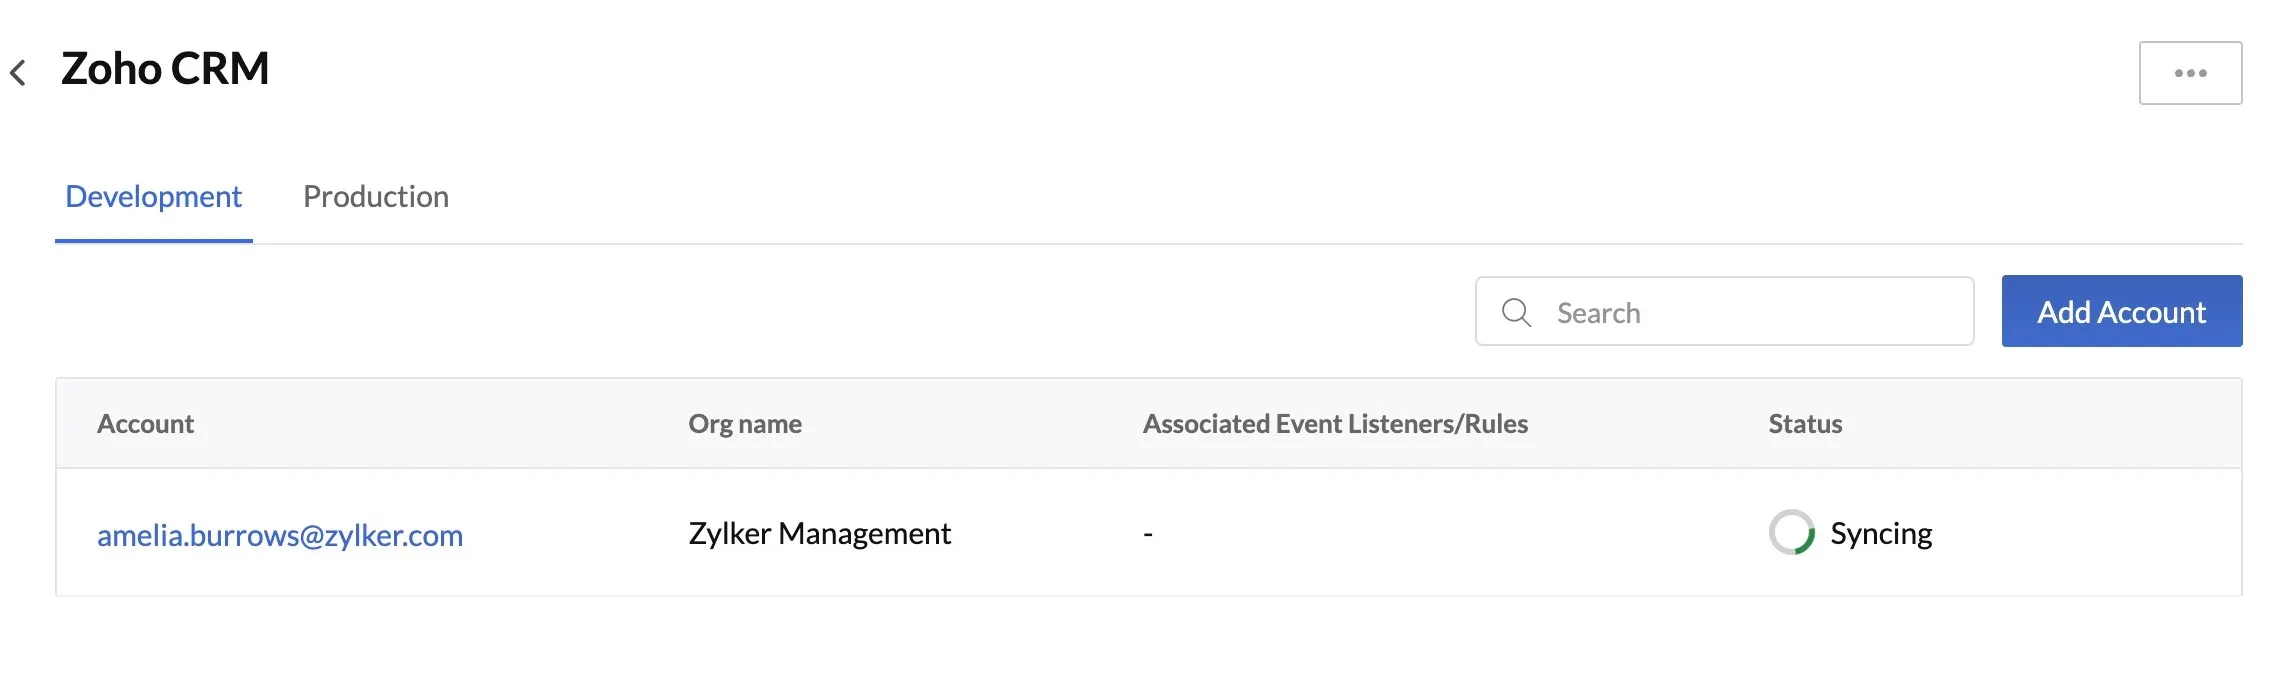
After the sync is completed, the status will be shown as Granted, indicating Catalyst’s authorization to access this service account for the allowed permissions.
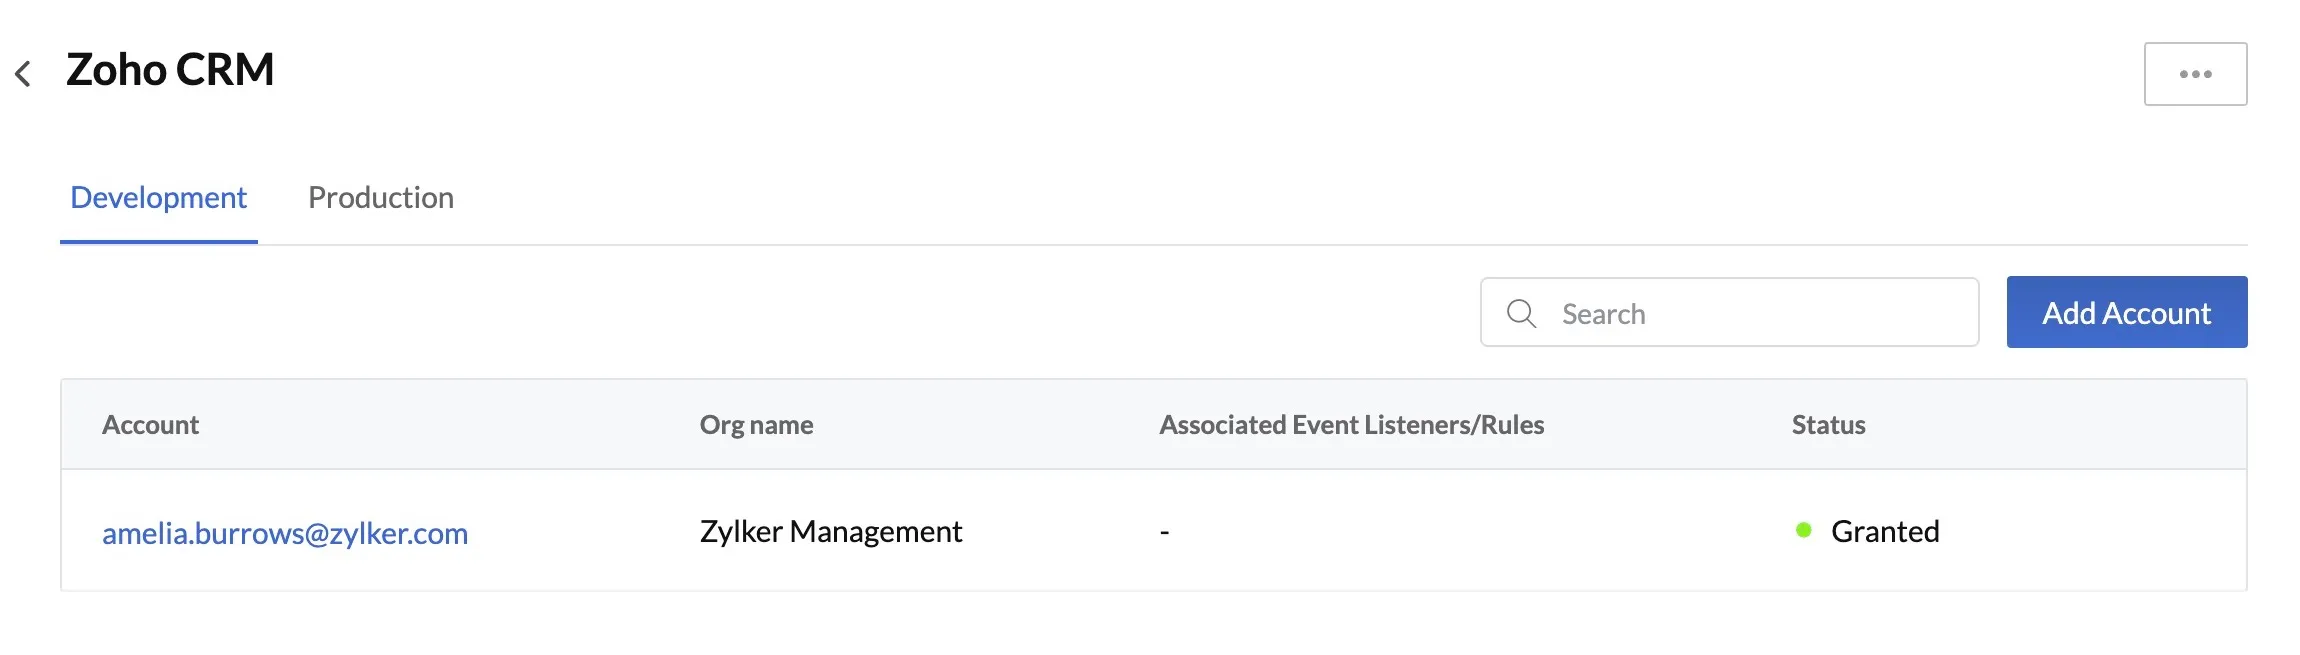
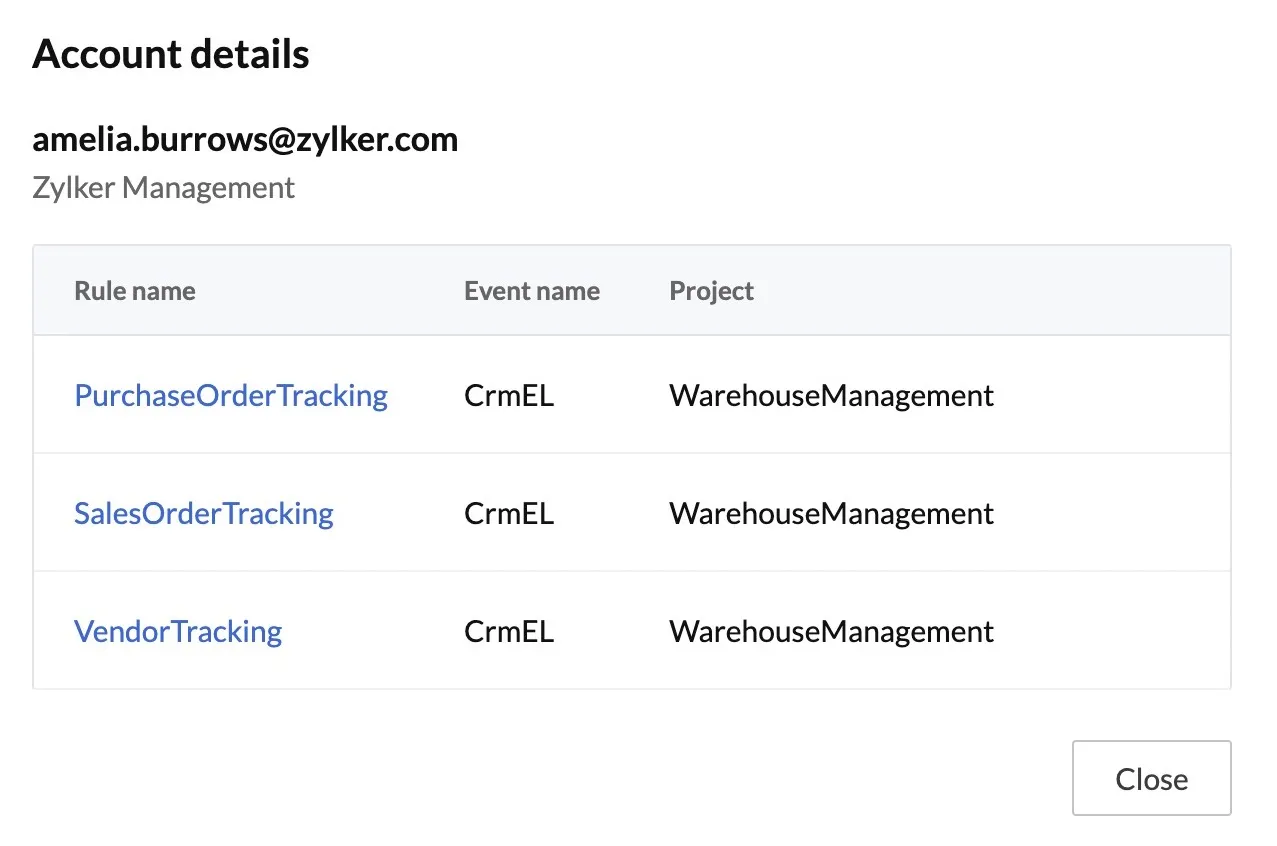
You will now be able to associate event listener rules with this account through Zoho event listeners. This account will be displayed as an option to integrate with, while configuring a rule. The console will display all rules associated with a service account after you configure them.
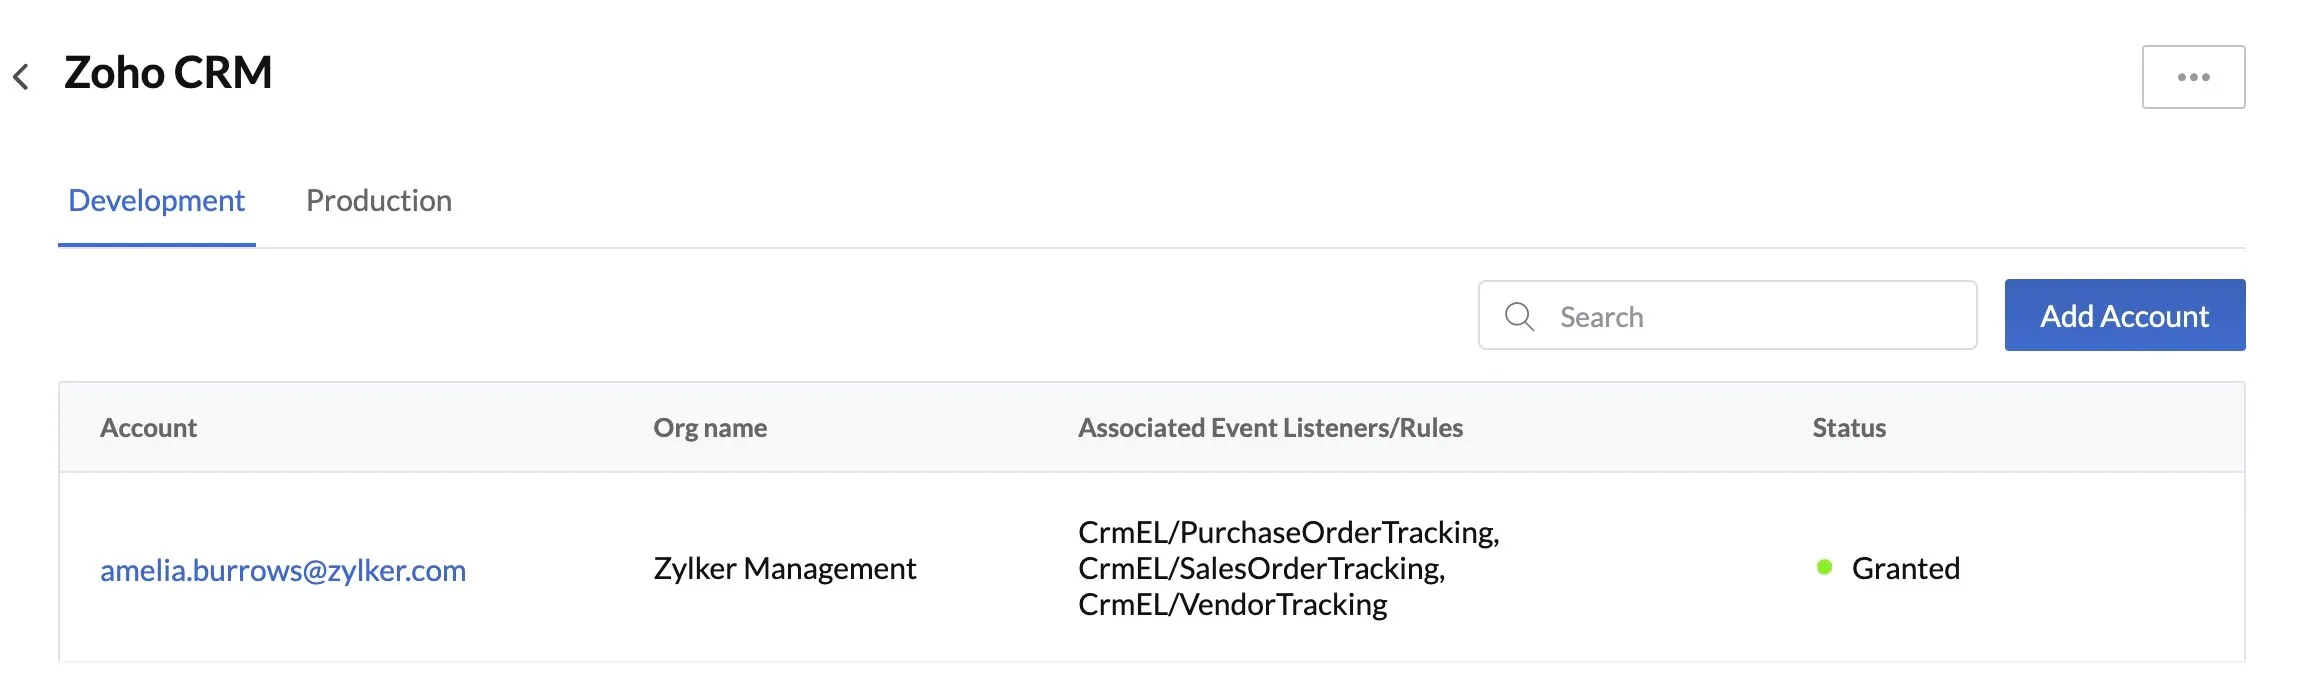
You can also click on the account name to view the details.
Add an Integration with Zoho CRM in the Production Environment
Catalyst requires you to configure accounts for the production environment in the supported Zoho services for all existing Zoho event listener rules before or when you deploy your project to production.
You can manually add integrations with your Zoho CRM account for the production environment in Integrations settings. That is, you can configure production account even before you deploy your project to production and manage this account from the settings.
To add a Catalyst integration with a Zoho CRM account for the production environment:
-
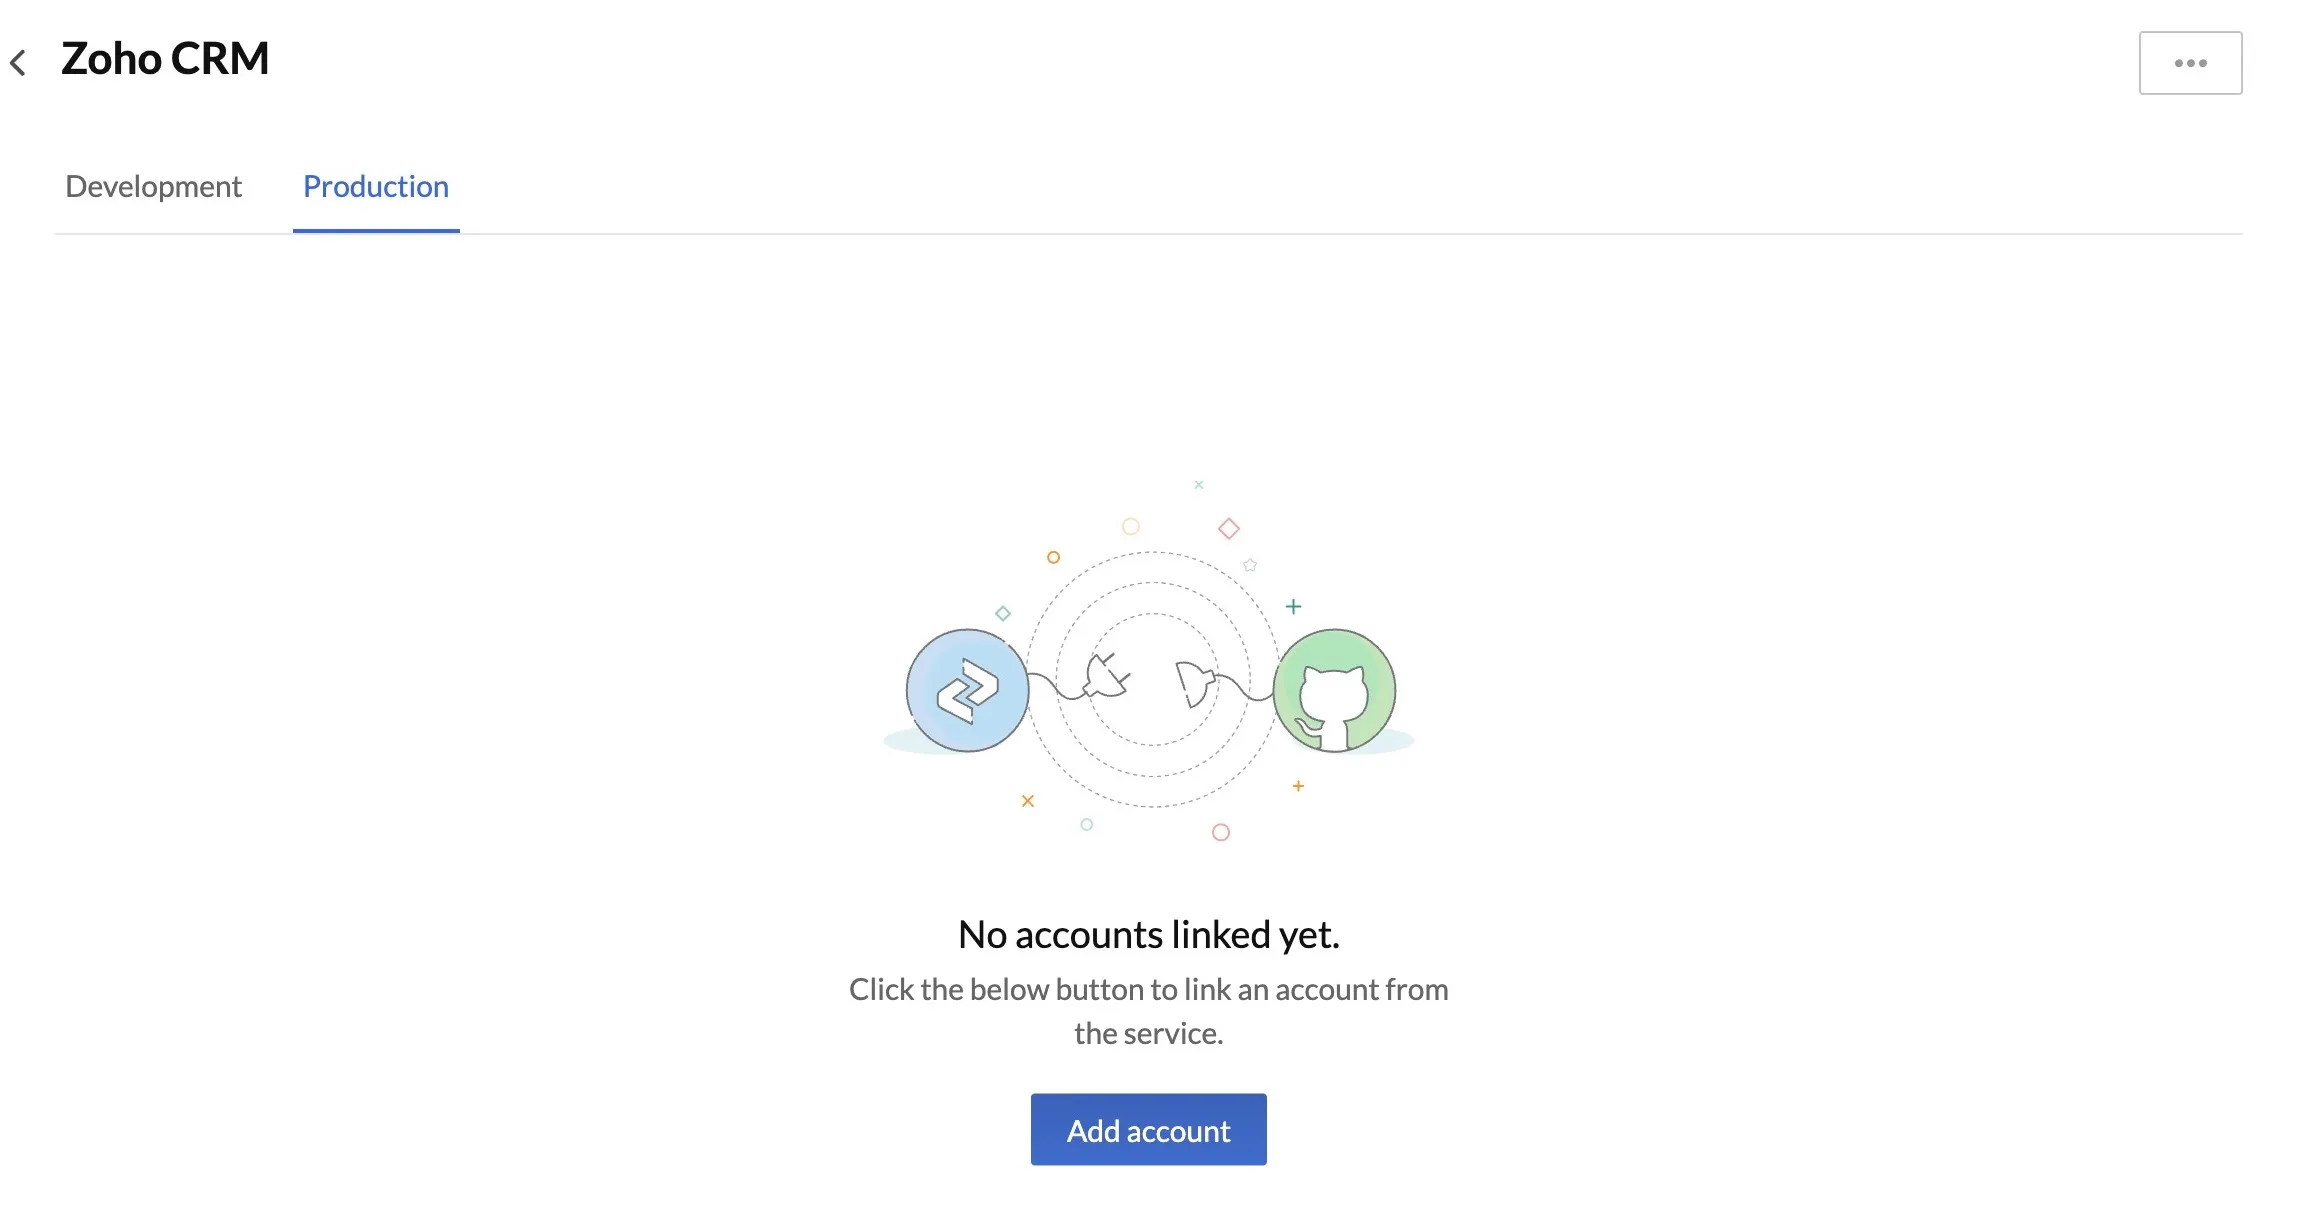
Click on Zoho CRM from the Integrations settings page, then click the Production tab.
-
Click Add account from the Production section.
-
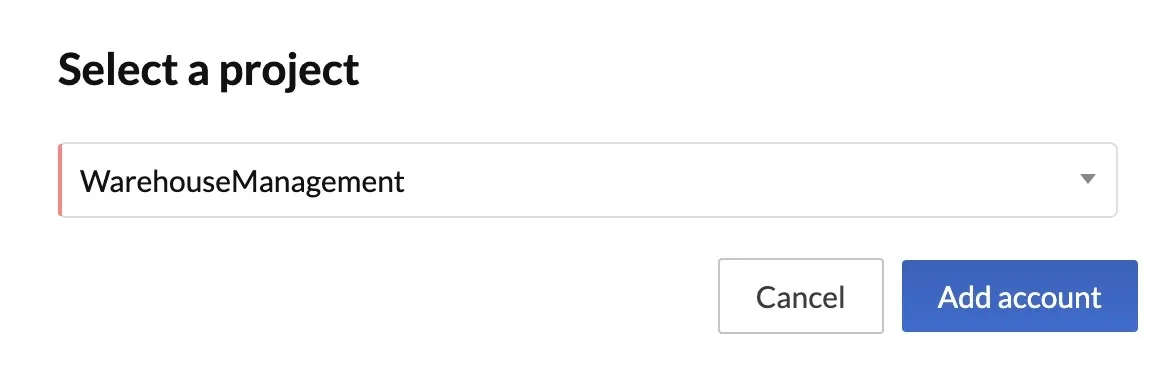
Select a project from the drop-down to add the integration for. Because General settings are common for all projects, you will need to specify the project through this step. Click Add account.
-
You can then select an account from the drop-down to integrate Catalyst with, and click Accept to provide the requested permissions.
The process will be the same as adding an integration in the development environment from here on. An org synchronization will be scheduled and the status of the sync will be displayed in the Production section of the service.
The rules associated with the account in production will also be displayed after they are configured.
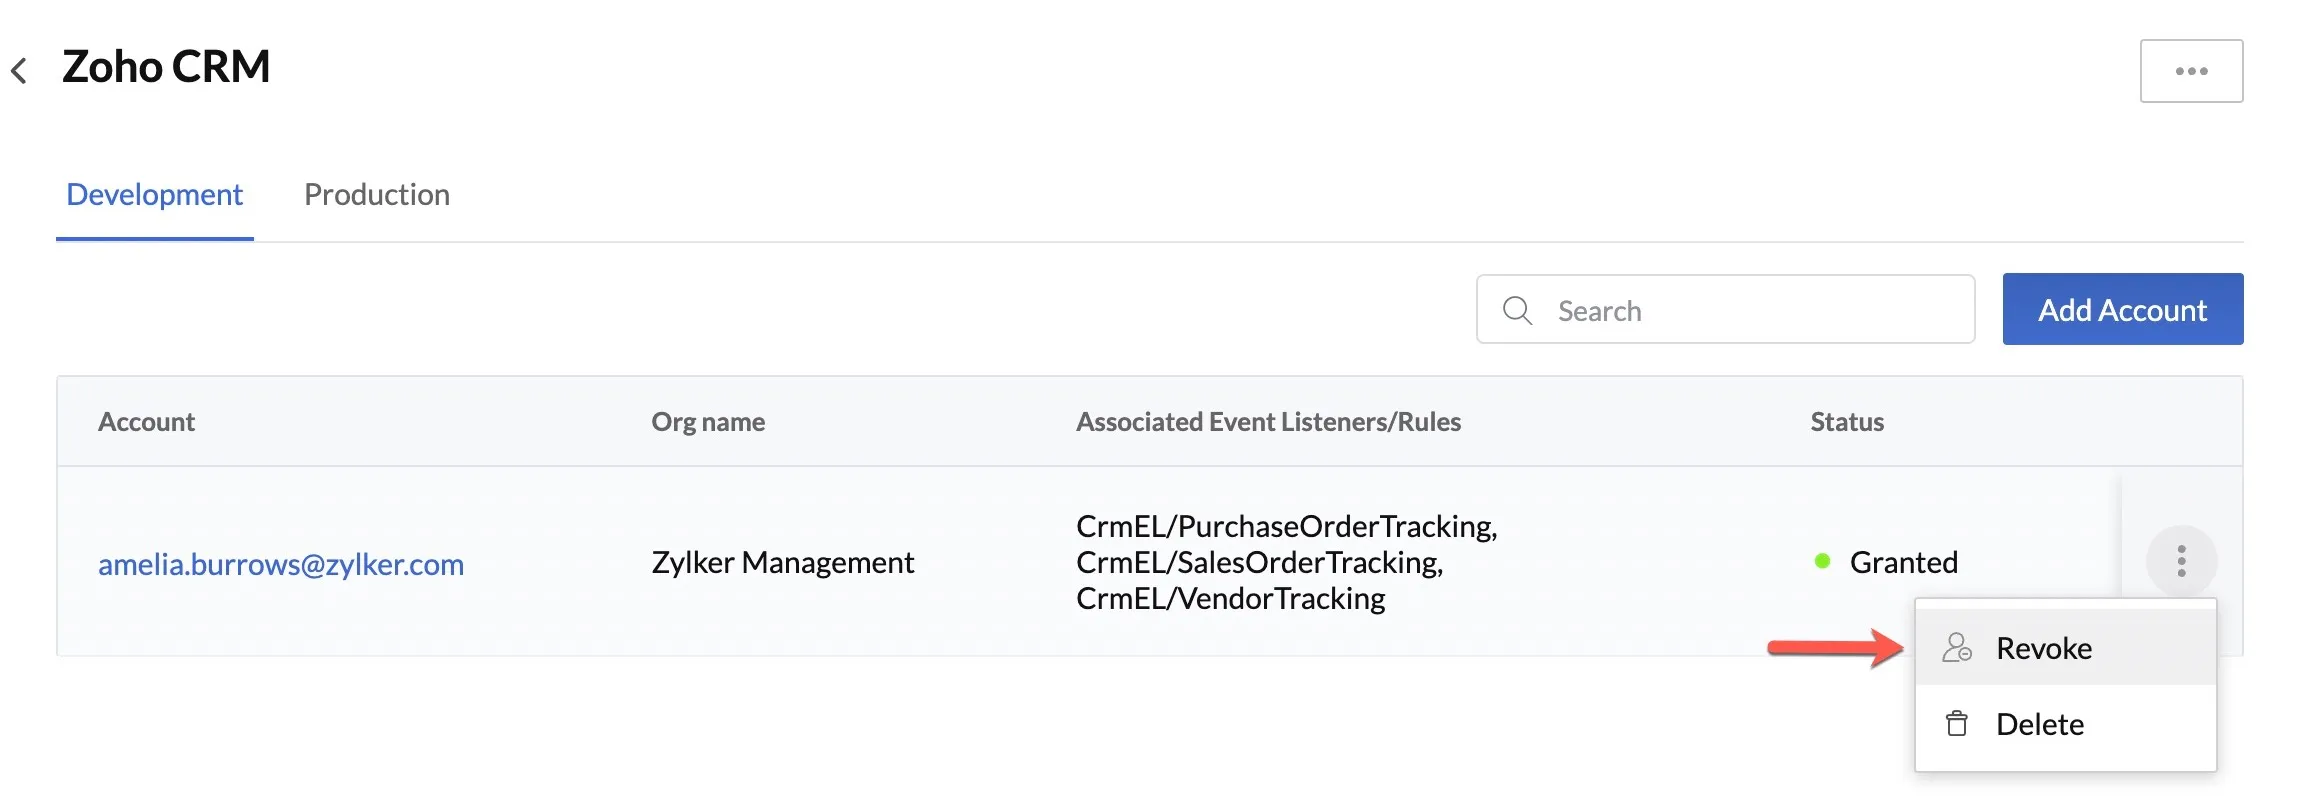
Revoke an Integrated Account with Zoho CRM
Catalyst enables you to revoke the permissions granted for it to access an account in Zoho CRM that was integrated for the development or production environment. Revoking is a temporary hold that will stop the event listener rules associated with that account from being executed, until the permissions are granted again.
To revoke an integrated account in the development or production environment:
-
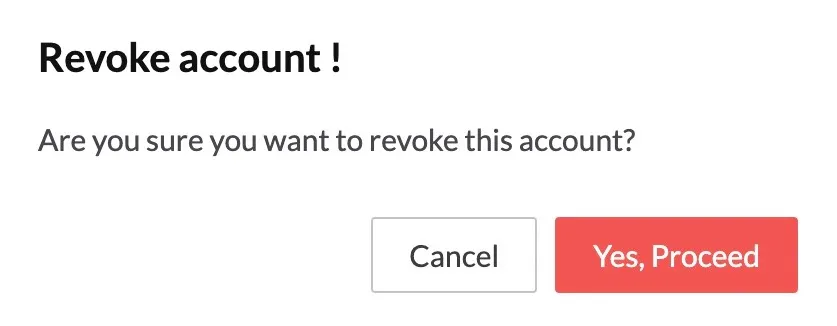
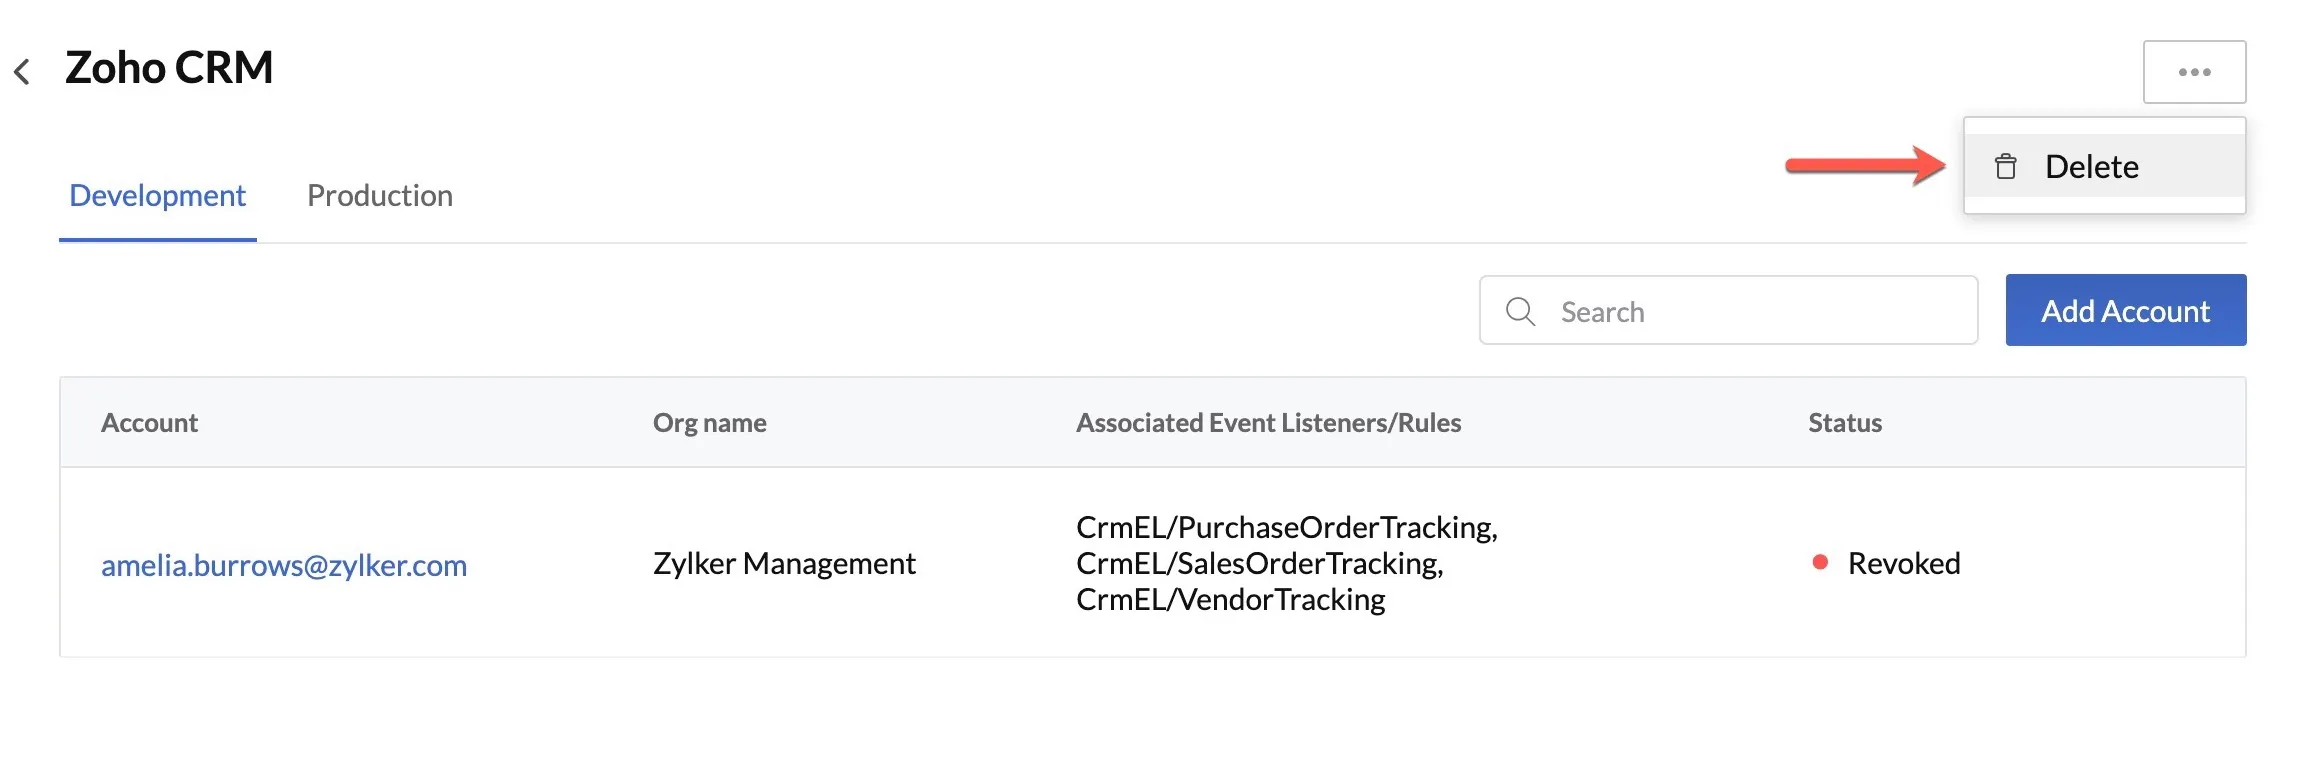
Click the ellipsis icon for the account, then click Revoke.
-
Click Yes, Proceed in the confirmation pop-up.
The status of the account will be shown as Revoked. You can grant permissions to access this account again by clicking the ellipsis icon, then clicking Grant.
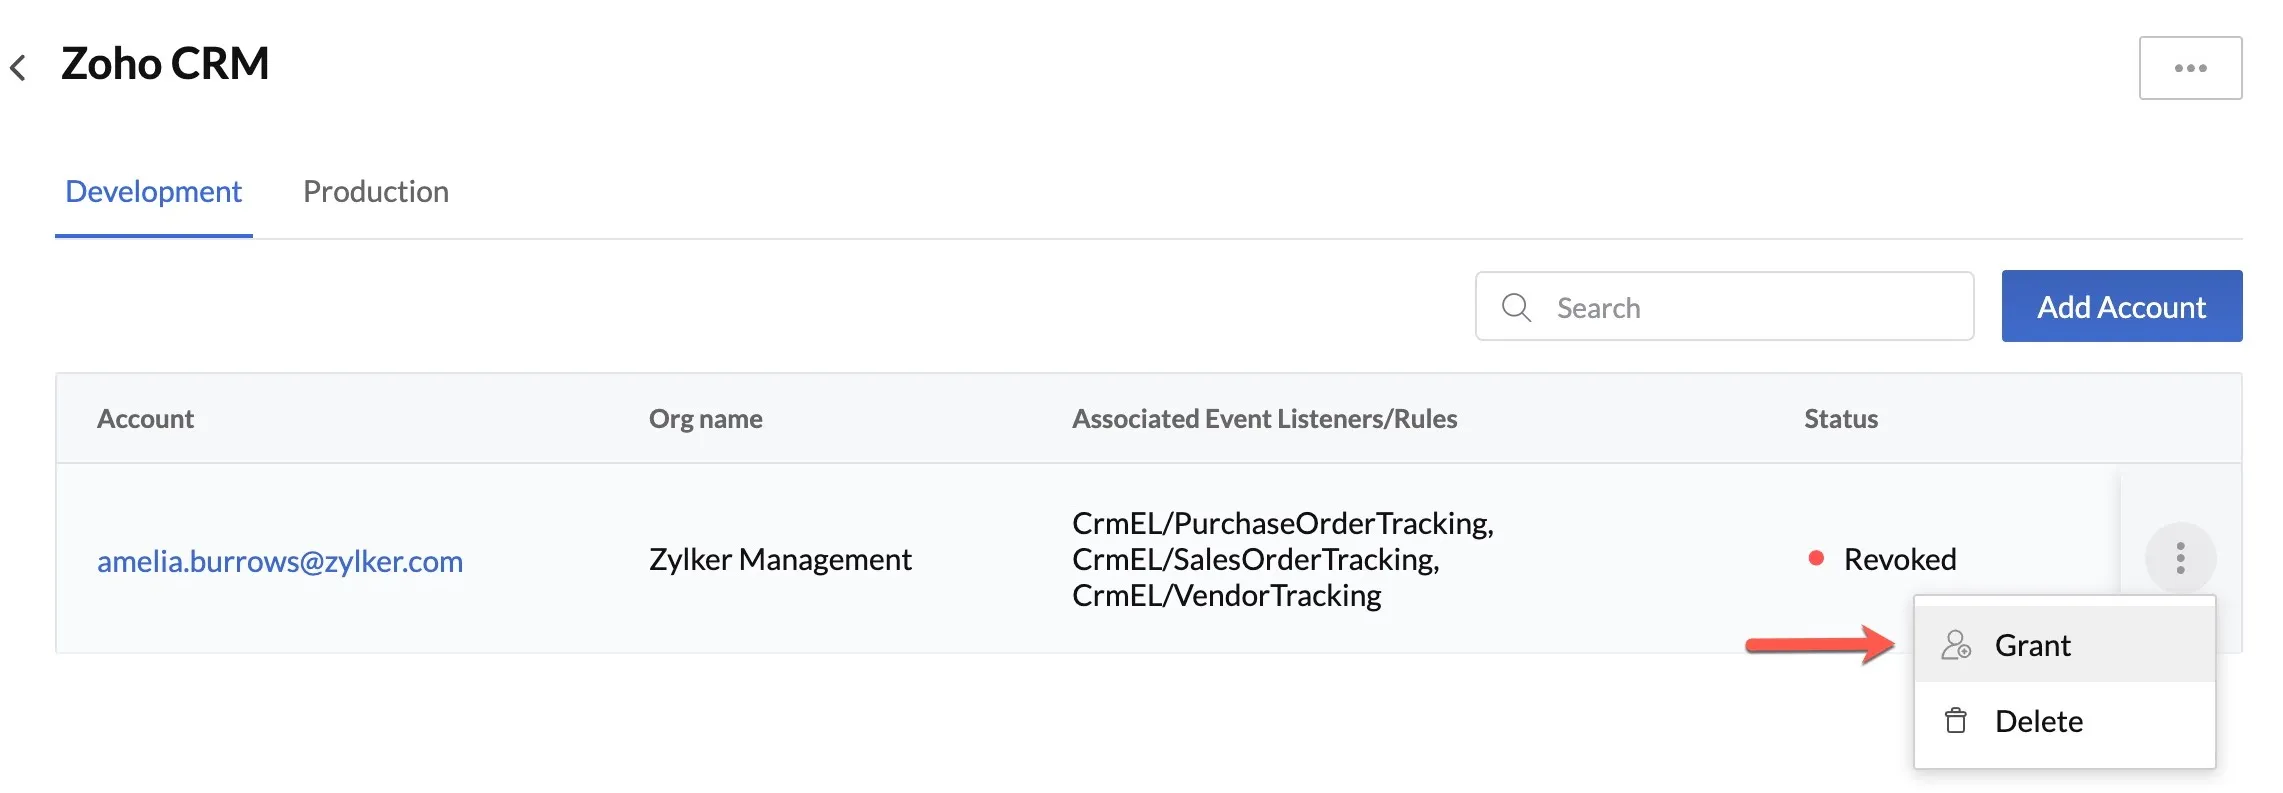
The rules associated with this account will then be executed as configured.
Delete an Integrated Account with Zoho CRM
You can permanently delete an account in Zoho CRM that you integrated with Catalyst for the development or production environment.
-
If you delete an account that has been configured with any Zoho event listener rules, all associations with the rules will be removed. The rules will be disabled and will therefore not be executed until you configure them again. You must ensure that you do not delete any accounts that are associated with any active event listeners.
-
If you add a previously deleted account again, the rules that were associated with that account earlier will not be re-associated with it again automatically. You will need to manually re-configure the rules.
To delete an integrated account in the development or production environment:
-
Click the ellipsis icon for the account, then click Delete.
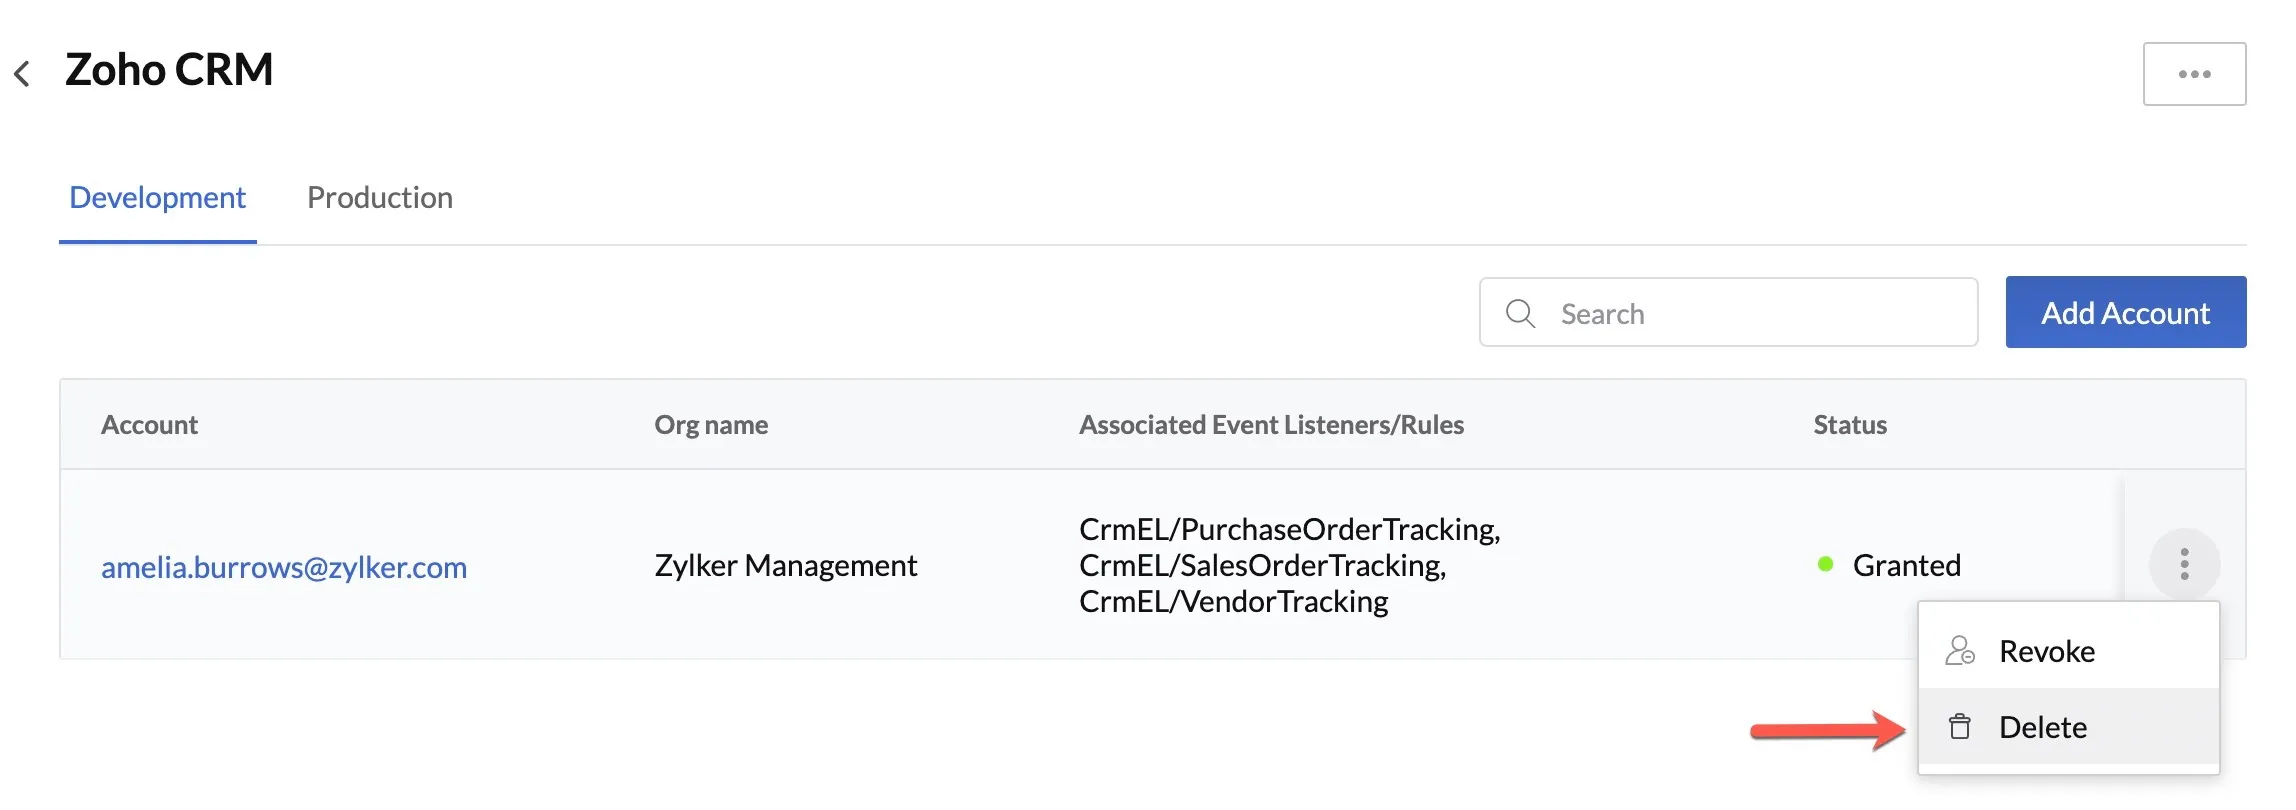
-
Click Yes, Proceed in the confirmation pop-up.
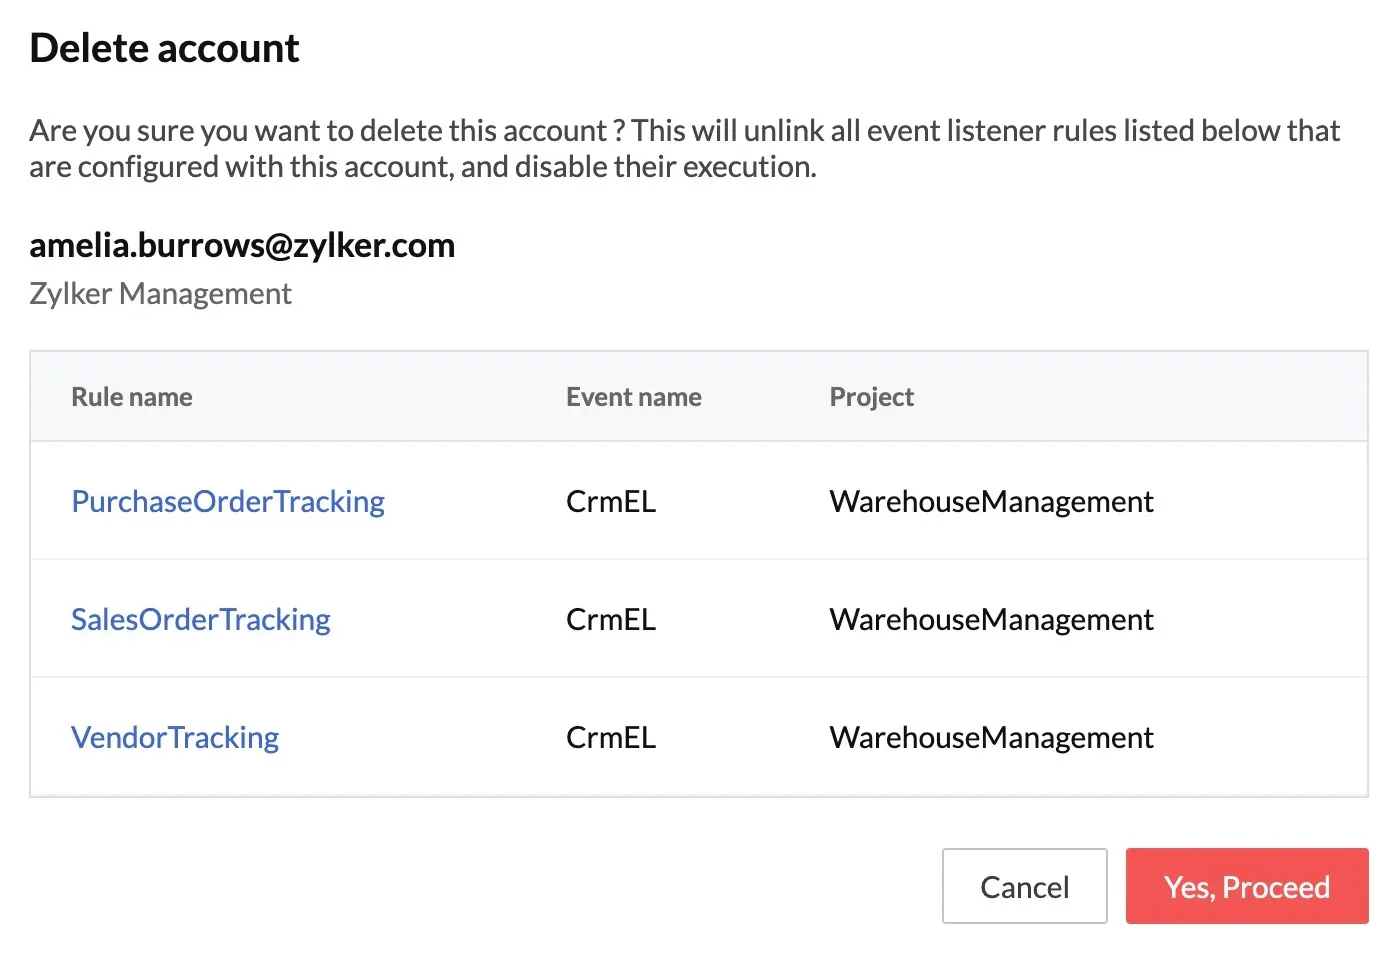
The account will be removed from the service. The Event Listeners component will display a “Configuration Needed” error for all rules that were associated with the deleted account.
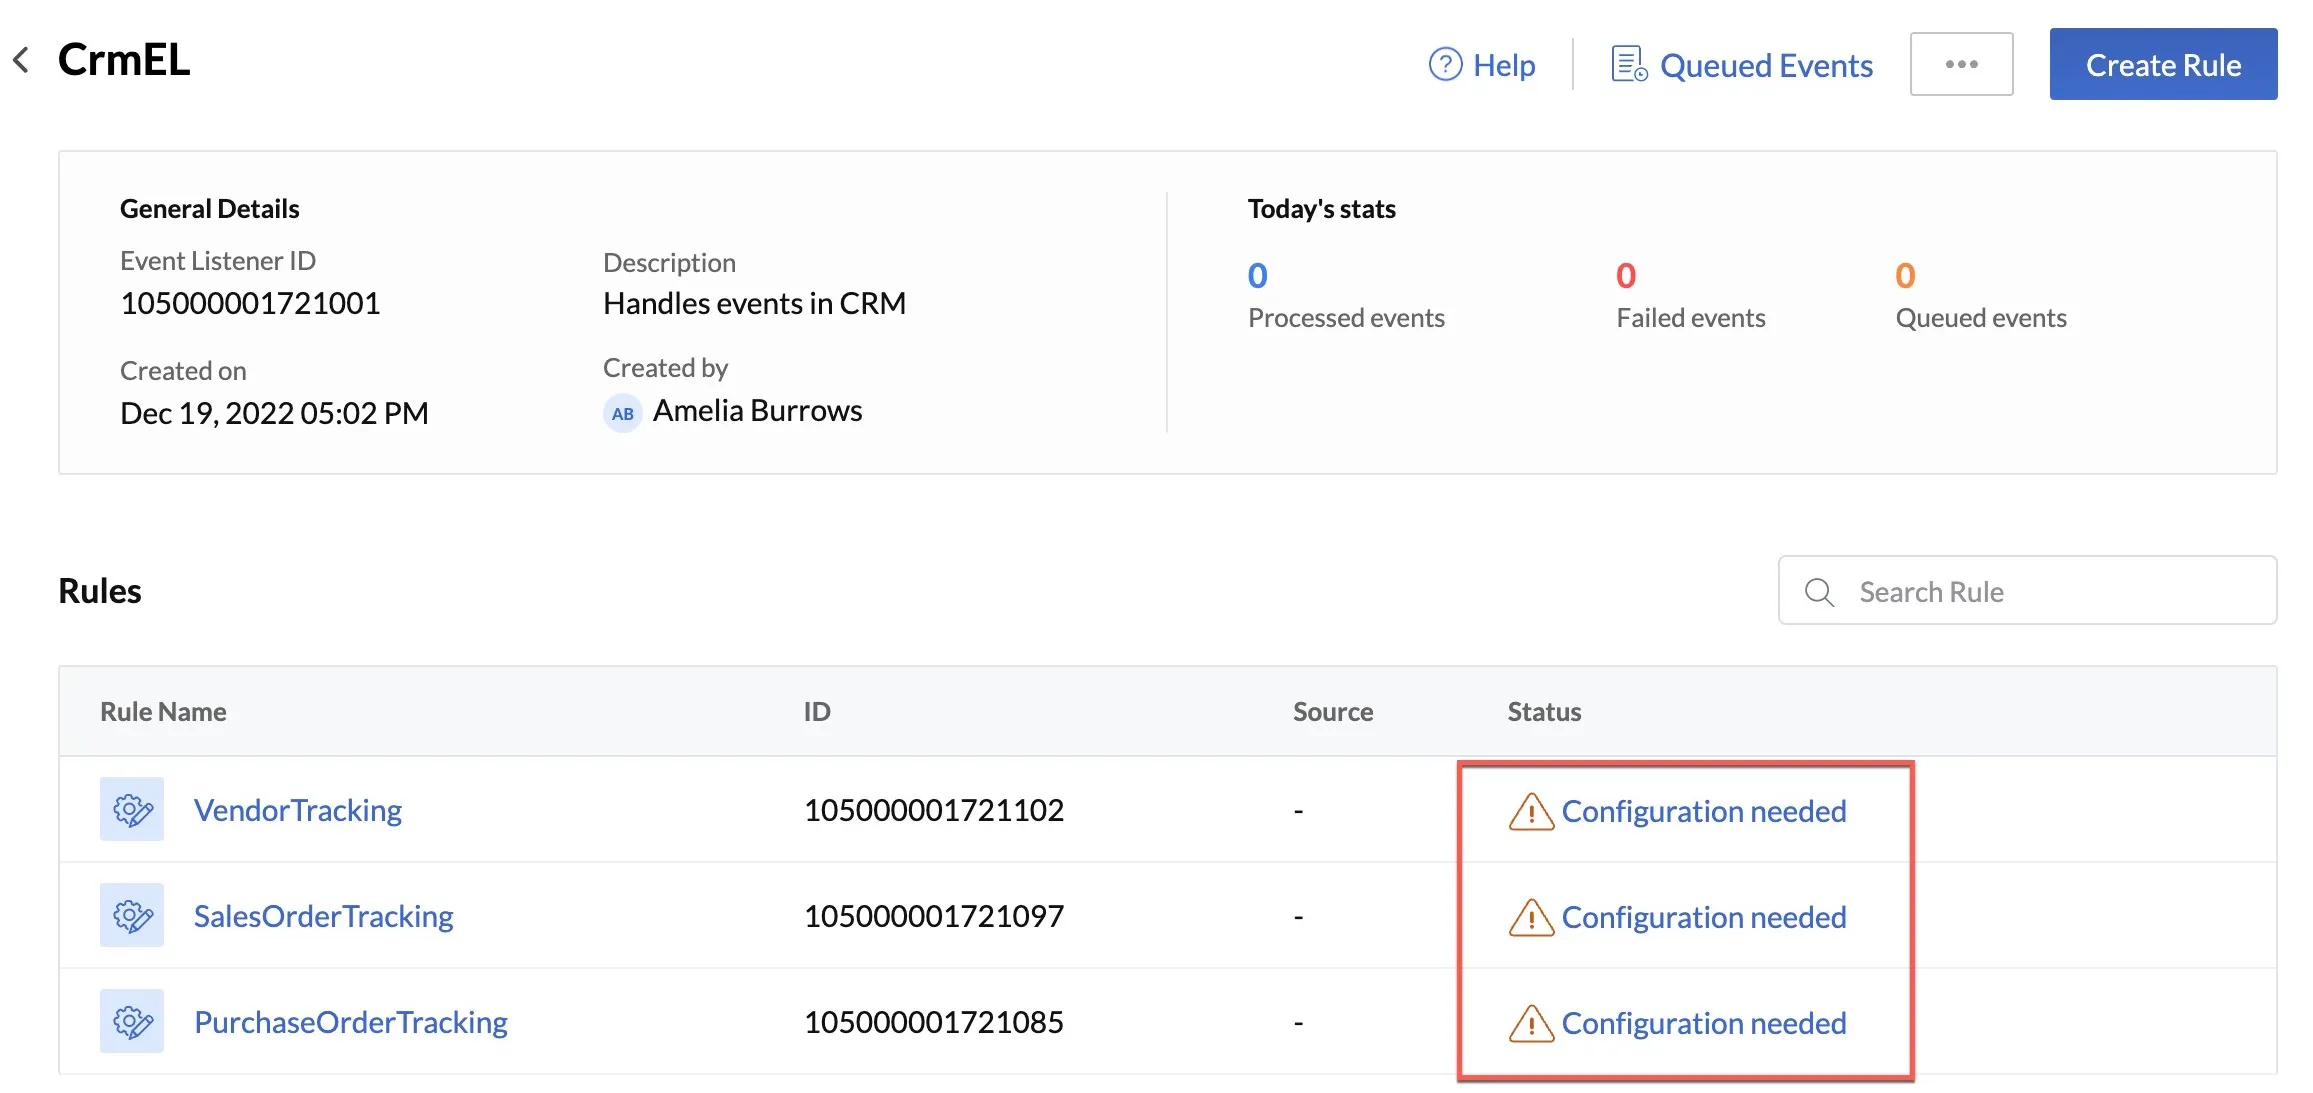
You can associate these rules with a different account by clicking on the error message. You can also integrate the deleted account again in the same manner as explained earlier.
Delete Zoho CRM Service
Catalyst enables you to remove all accounts in Zoho CRM by deleting the entire service. This action will unlink all added accounts in that service in both the development and production environments.
If you delete a Zoho service:
- The Integrations settings will still display the service in its index page. However, all accounts and configurations added for that service will be removed permanently.
- All event listener rules associated with the accounts in that service will be disabled and will therefore not be executed until you configure them again.
You must therefore ensure that you do not delete a service that includes accounts that are associated with any active event listeners.
To delete a Zoho service:
-
Click the ellipsis icon for the service from the top-right corner, then click Delete.
-
Type “DELETE” for confirmation, then click Confirm in the pop-up.
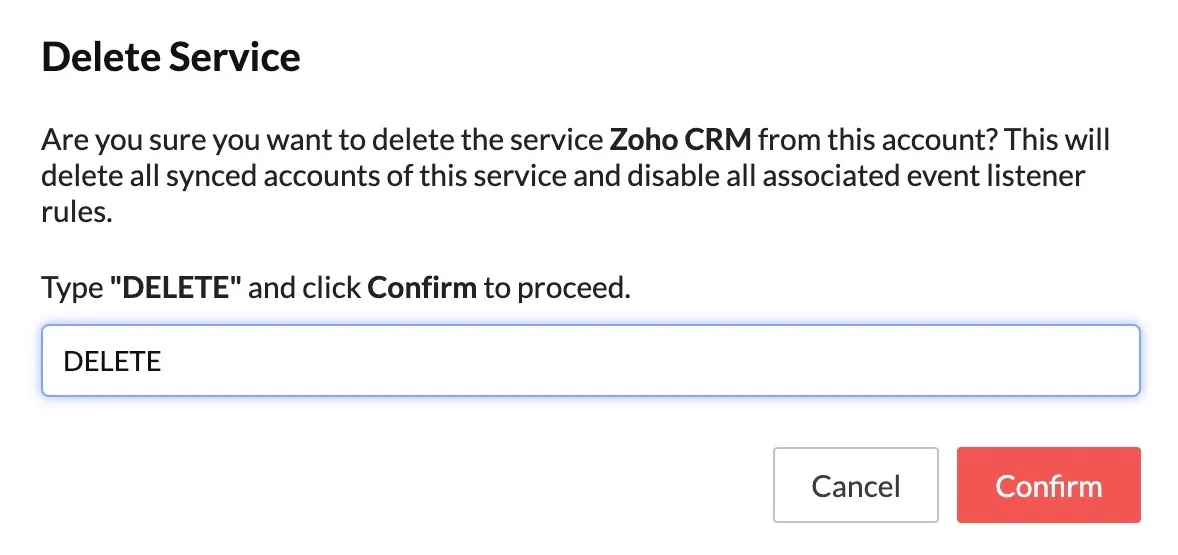
All integrated accounts in the service will be removed from it. The Event Listeners component will display a “Configuration Needed” error for all rules that were associated with the accounts from the deleted service. You can associate these rules with a different service or integrate new accounts in the service.
OpenAI Integration
Catalyst integrates with OpenAI to provide a host of AI-powered automation features that aid in your software development journey through Zia AI Assistant. These features include: Code Converter, Code Generator, Code Debugger, Code Docs Generator, and Test Case Generator. Refer to the Zia AI Assistant help docs to learn more.
Catalyst enables users to perform these supported operations through OpenAI’s API endpoint. To avail the API through Catalyst, you will be required to generate an API secret key with OpenAI and configure it in Catalyst. This key allows Catalyst users to prompt the AI and obtain results, and authenticates these operations.
Catalyst’s integration with OpenAI servers is built upon a Bring Your Own Key (BYOK) configuration that requires Catalyst user to register for an API key with OpenAI through their OpenAI account, and configure it in Catalyst to authenticate their actions. There are no API keys provided by Zoho for the integration.
After you configure the key in Catalyst, all the input prompts you enter in Catalyst Zia AI, such as in the Code Converter, Code Generator, etc., will be shared with OpenAI, and the result will be fetched and rendered in Catalyst, as received from OpenAI without any manipulation or customization.
Configure API Key for OpenAI Integration
The steps to generate an API secret key for your OpenAI account and configure the key for your Catalyst account are described below.
-
Click OpenAI Integration from the Integrations settings section.
-
Click OpenAI Integration.
-
You will be asked to configure the OpenAI API Key. If you had previously configured an OpenAI key with another Zoho product with your Zoho account, or in Catalyst, select the Existing API Key option. Else, select the New API Key option to configure a new key.
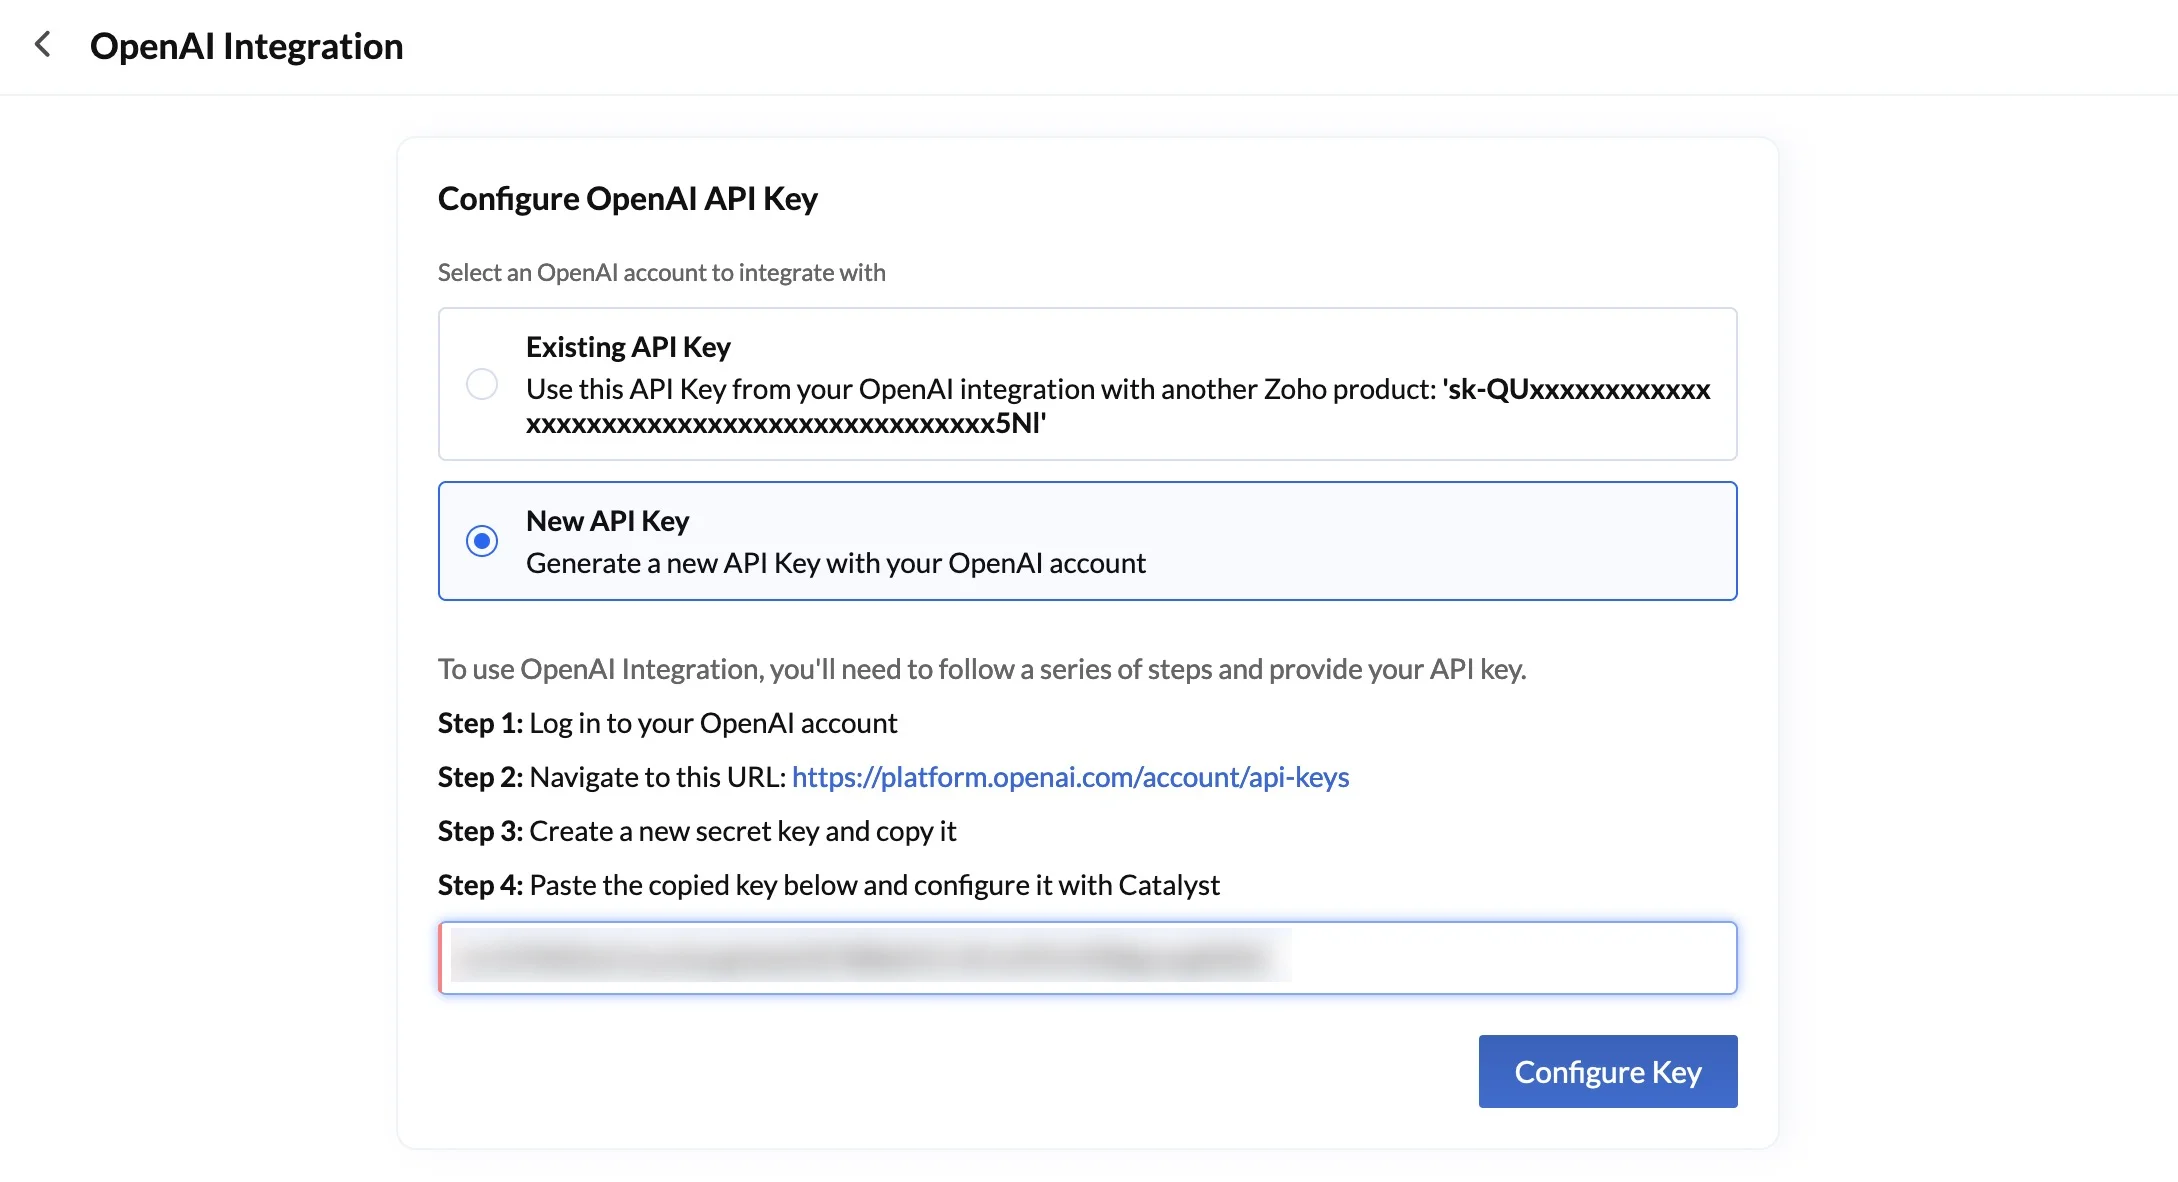
-
If you select the New API Key option, follow the steps displayed in the console to generate a new secret key from the OpenAI platform. After the key is generated, paste it in the text box to configure it in Catalyst. Then, click Configure Key.
If you had selected the Existing API Key option, directly click Configure Key.
-
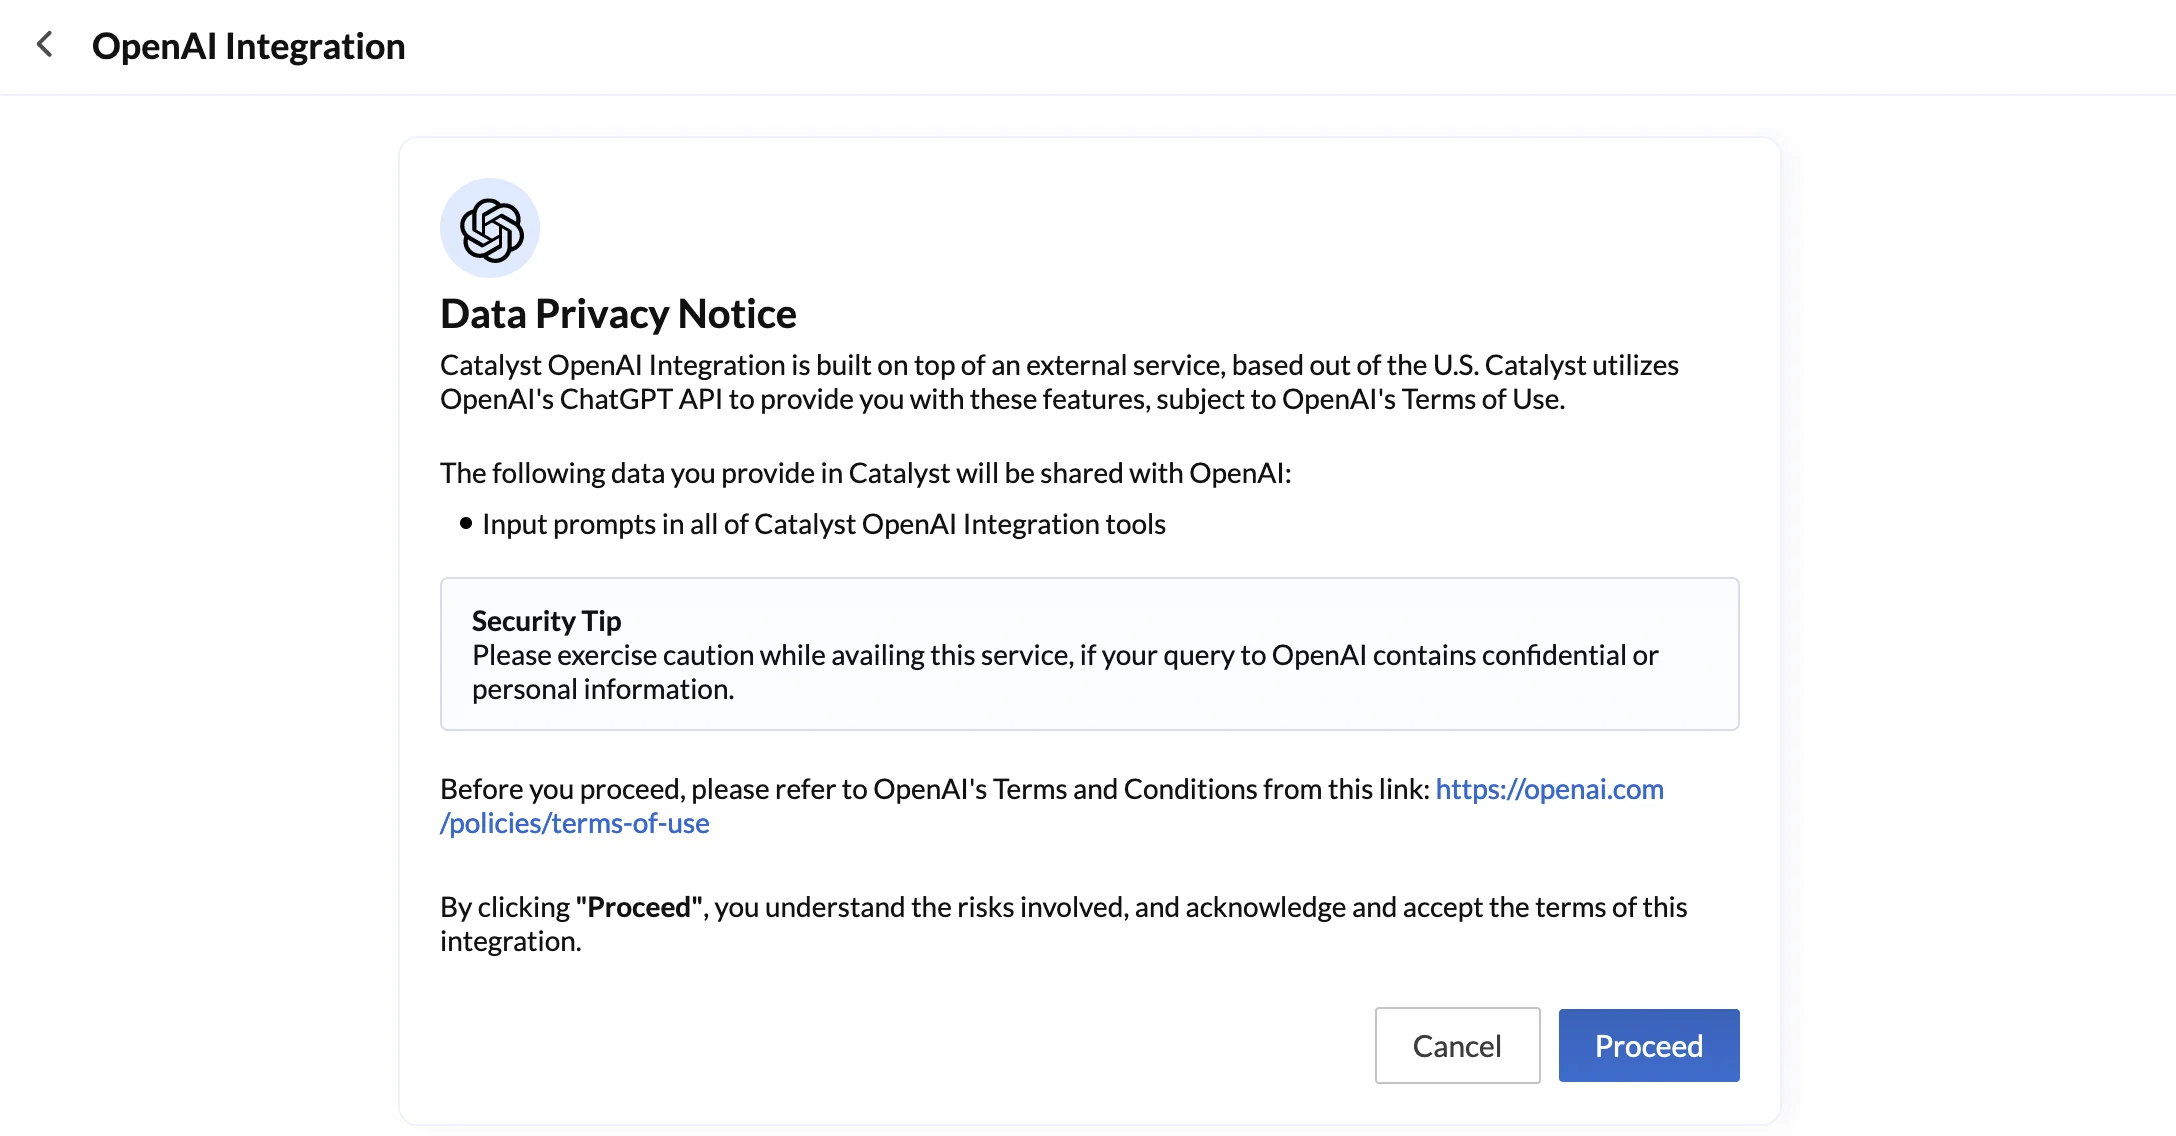
Read the Data Privacy Notice and additionally go through OpenAI’s Terms and Conditions from the link provided. Then, click Proceed.
The API key will be configured with Catalyst. You can now refer to the details of the API key, as well as its status and usage from this section.
Edit API Key
Catalyst enables you to easily edit the OpenAI API key that you have configured and update it as required. This is beneficial in case you re-generate your API secret key or create a new one for your OpenAI account at any point of time.
To edit the configured API key in Catalyst:
- In the OpenAI Integration section of the Integrations settings in your console, click the ellipsis icon, then click Edit.
- Modify your API key, then click Update to confirm.

Disable API Key
If you don’t require an active configuration of an OpenAI API key in Catalyst for any specific reason, you can disable the key for as long as you need. If the API key is disabled, you will not be able to access any of OpenAI’s features, such as Code Generator or Test Case Generator, or provide any prompts. You will be able to access the Zia AI features in Catalyst only after you enable the API key again.
-
Catalyst currently does not provide the functionality to permanently delete an OpenAI integration by deleting the API key. You can disable the configured key and re-enable it, as required. You can also update the key to configure a newly generated key.
-
Catalyst does not support the configuration of multiple API keys simultaneously. Therefore, you will not be able to disable a key and configure another one.
To disable the configured API key in Catalyst:
- In the OpenAI Integration section of the Integrations settings in your console, click the ellipsis icon, then click Disable.
- Click Yes, Proceed in the confirmation pop-up.
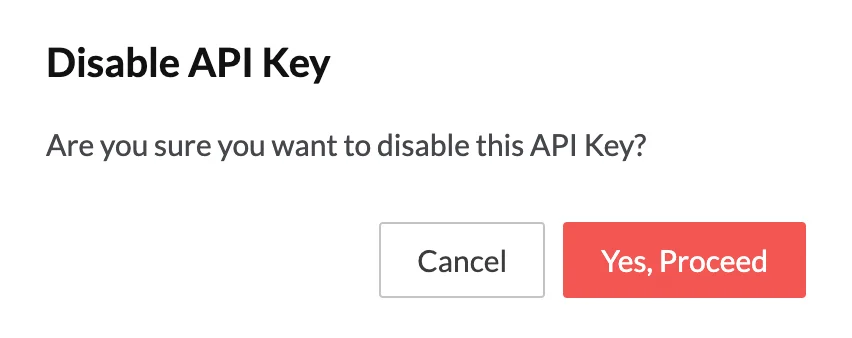
The key will be shown as disabled.
You can re-enable a disabled key in a similar manner:
- In the OpenAI Integration section, click the ellipsis icon, then click Enable.
- Click Yes, Proceed in the confirmation pop-up.
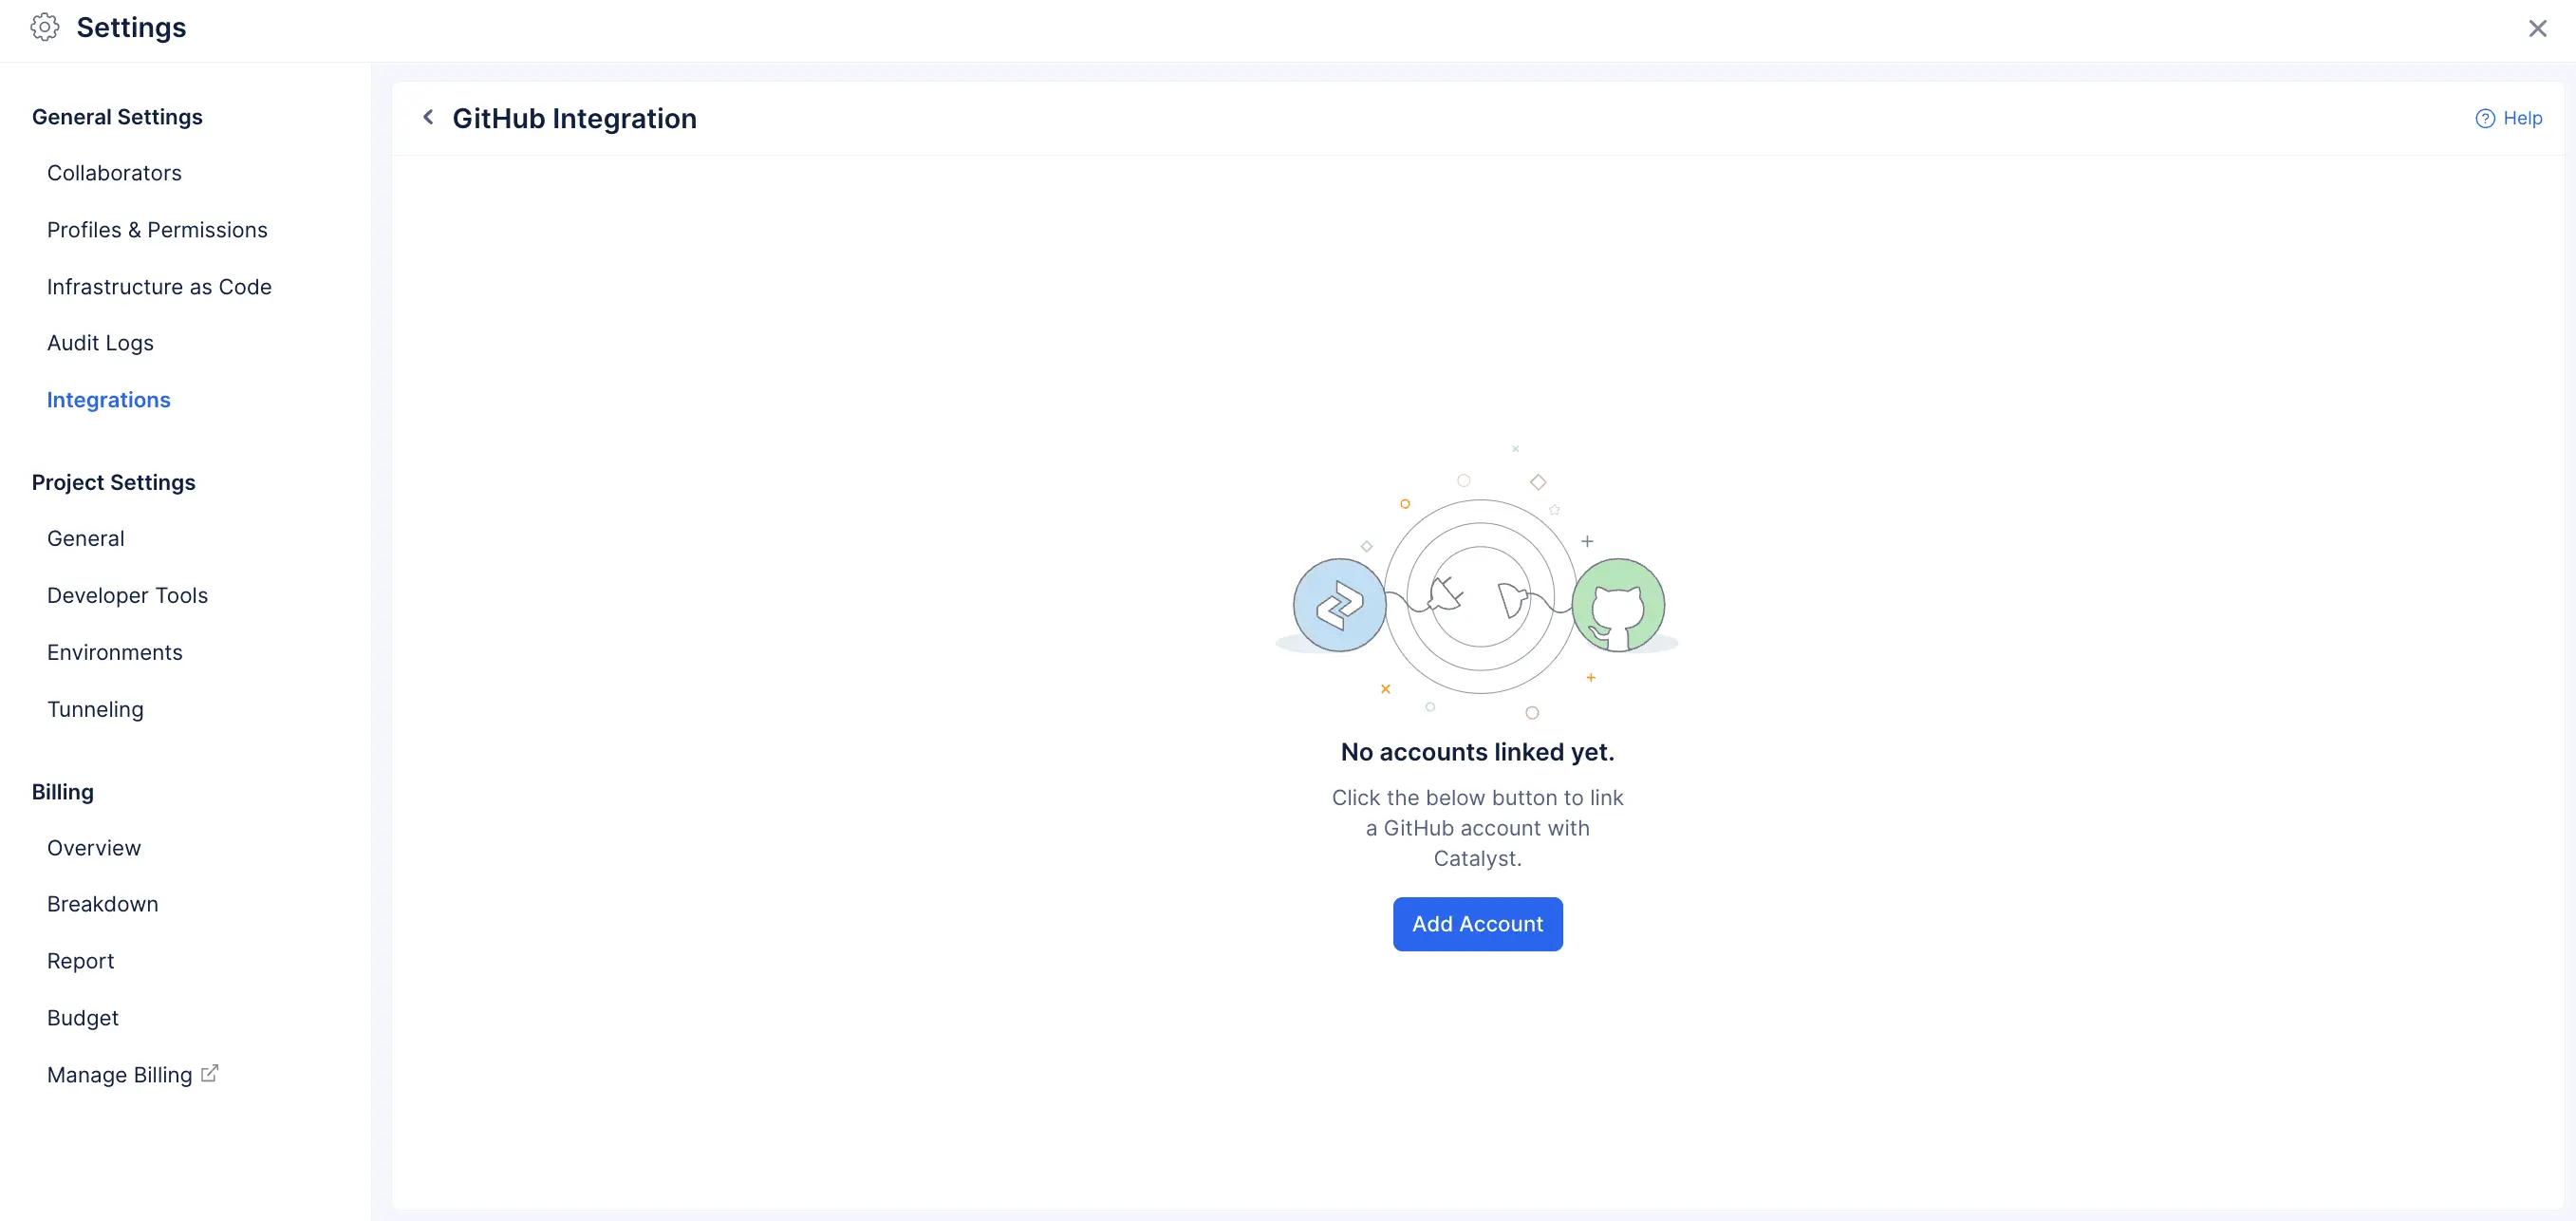
GitHub Integration
The GitHub Integration feature allows you to connect your GitHub account with Catalyst seamlessly, enabling access to the repositories(both public and private), organizations and teams, webhooks, and personal user data. With this integration, you can perform essential operations such as committing, pushing, and pulling code directly within Catalyst.
Supported Services
This integration is available for the following Catalyst service:
-
You can explore our new service, Catalyst Pipelines, an advanced version of the Git component. Catalyst Pipelines enables you to define the entire end-to-end build-to-deployment workflow using commands in a YAML file. To learn more, refer to the help documentation.
-
Please note that this service is currently part of our early access program. If you haven’t gained access yet, you can request it directly through this form.
Benefits of Integration
Catalyst Pipelines
Catalyst Pipelines is the CI/CD service that helps to streamline and automate your software development and deployment process. By integrating your GitHub account with Catalyst Pipelines, the service automatically clones the code from your selected repository. When the pipeline is triggered, the defined commands in your YAML configuration are executed on the cloned codebase seamlessly, ensuring smooth automation of your workflows from build to deployment.. You can learn more about pipelines in this help documentation.
Integrate a GitHub Account
- Click on the GitHub tile.
- Click Add Account to integrate your GitHub account with Catalyst.
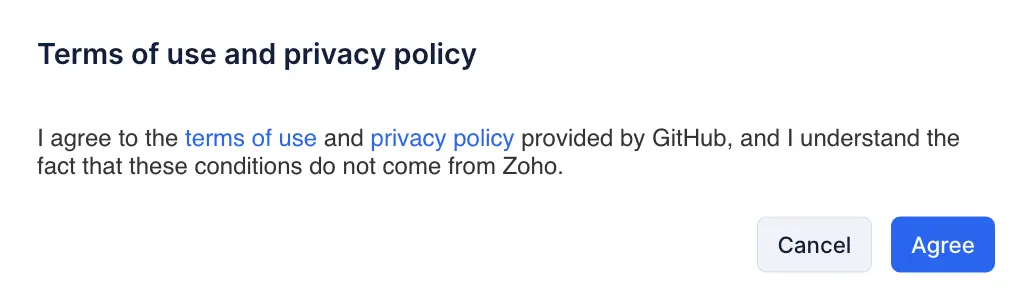
- Click Agree to accept the terms and conditions of GitHub.
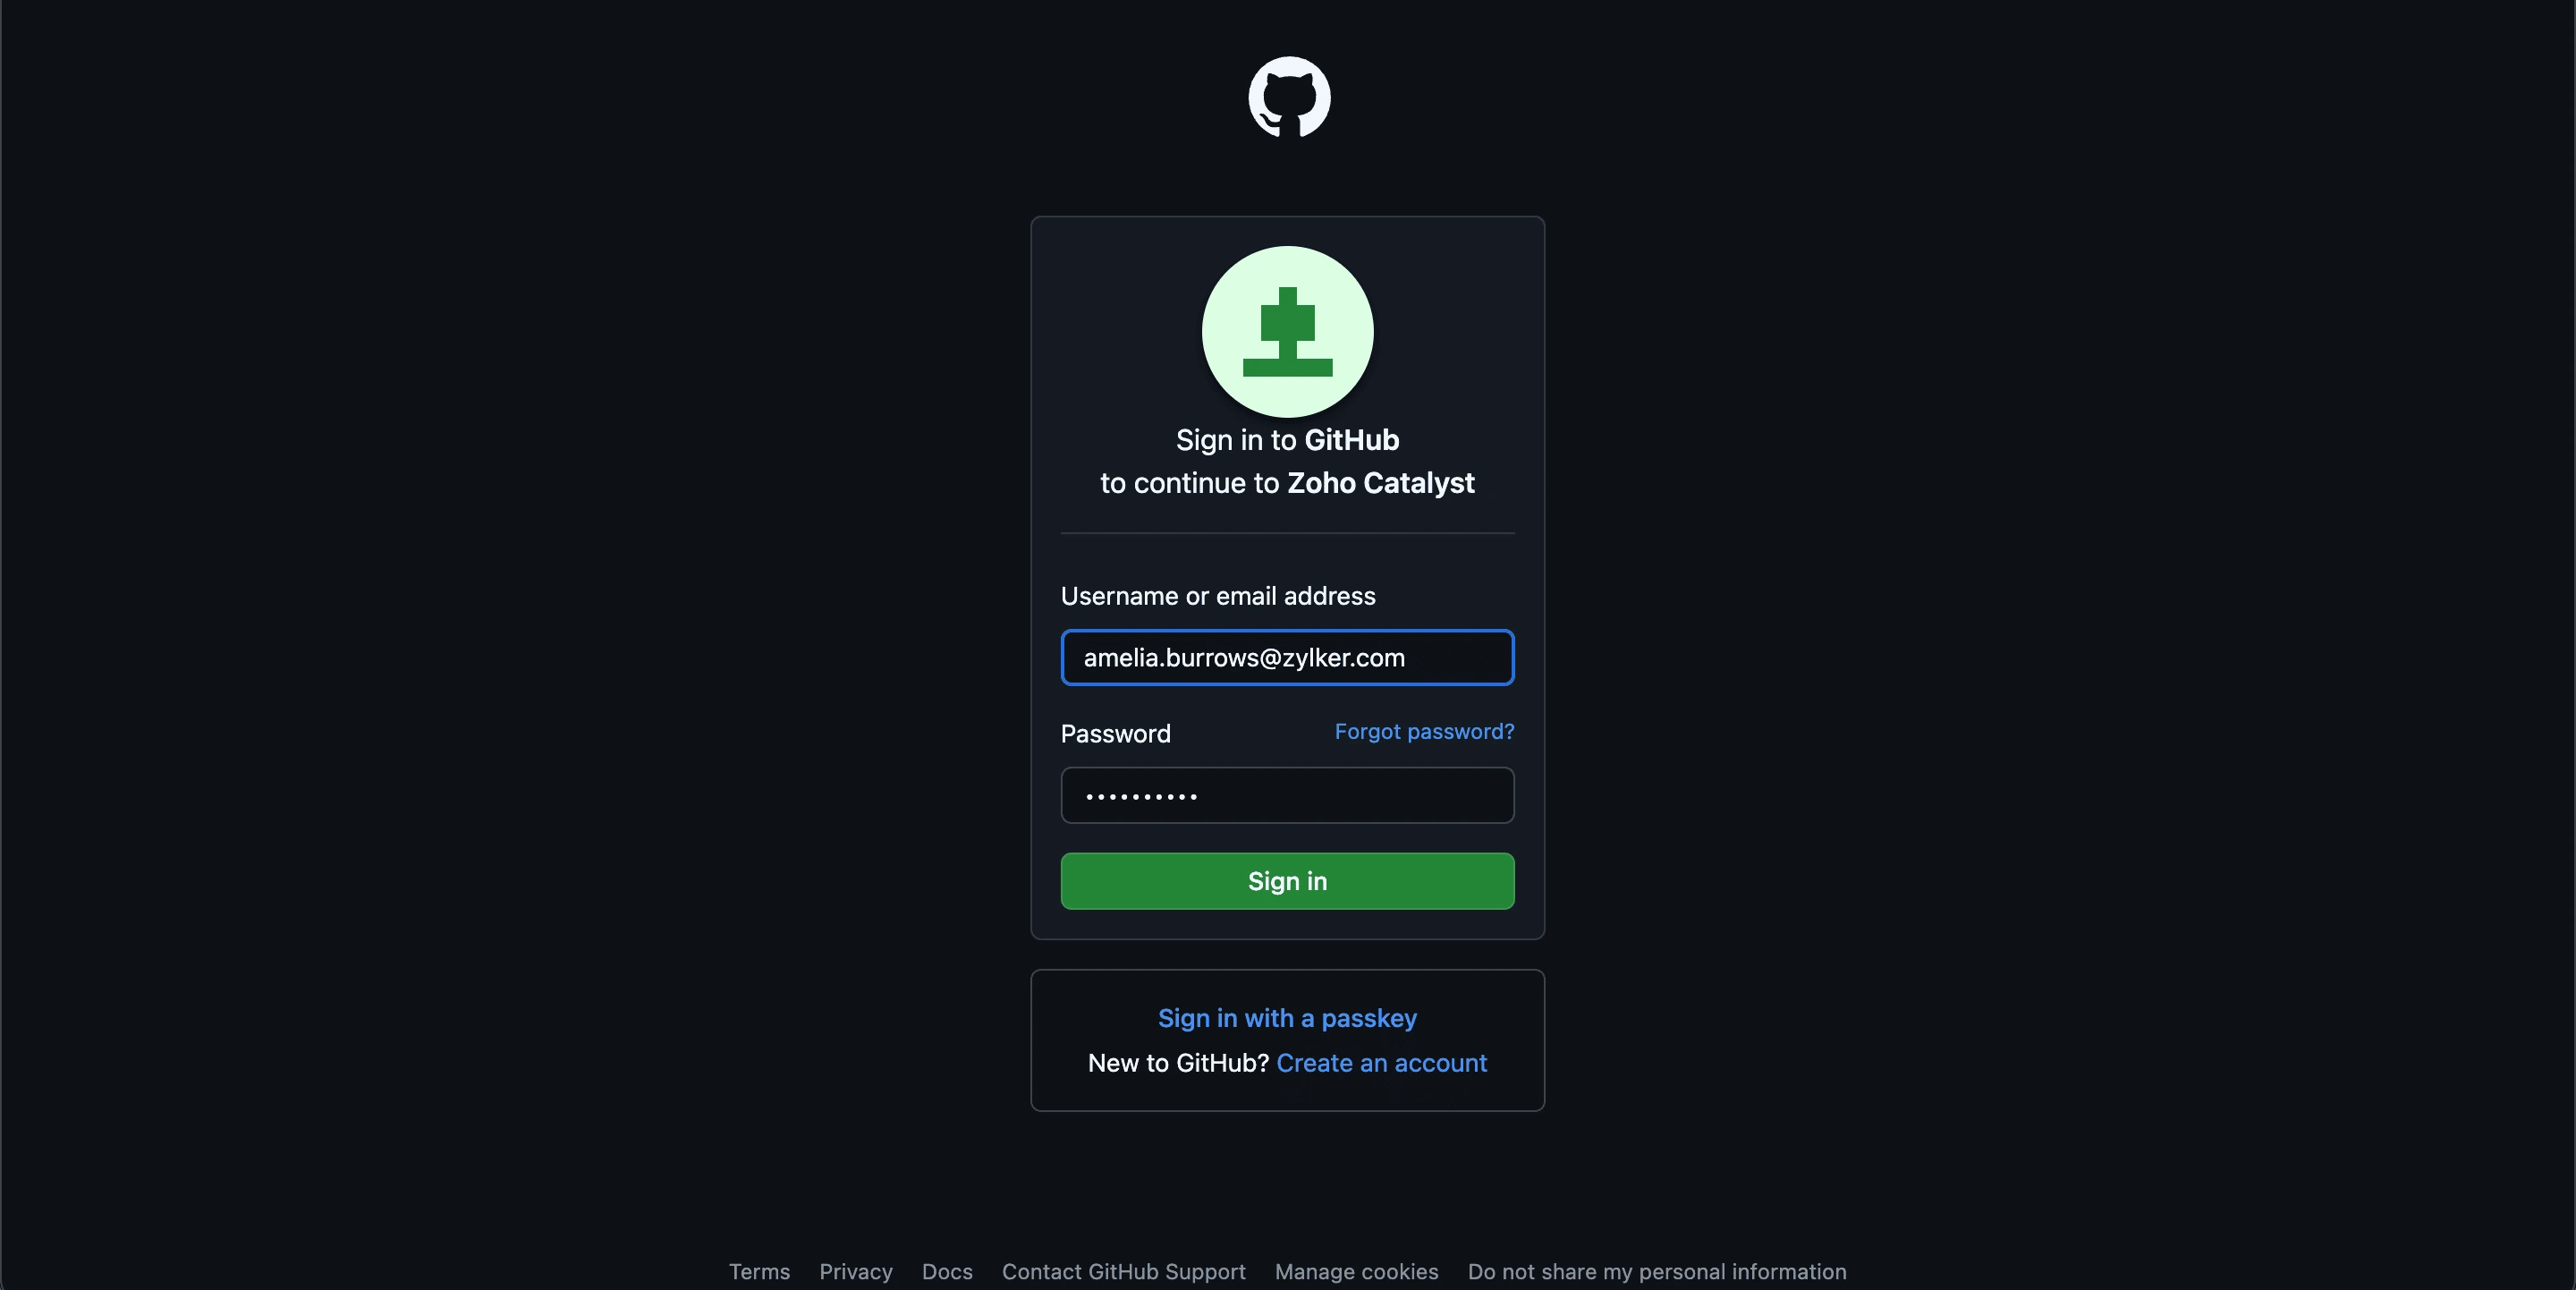
- Provide your username or email address and the password of your GitHub account. Click Sign in.
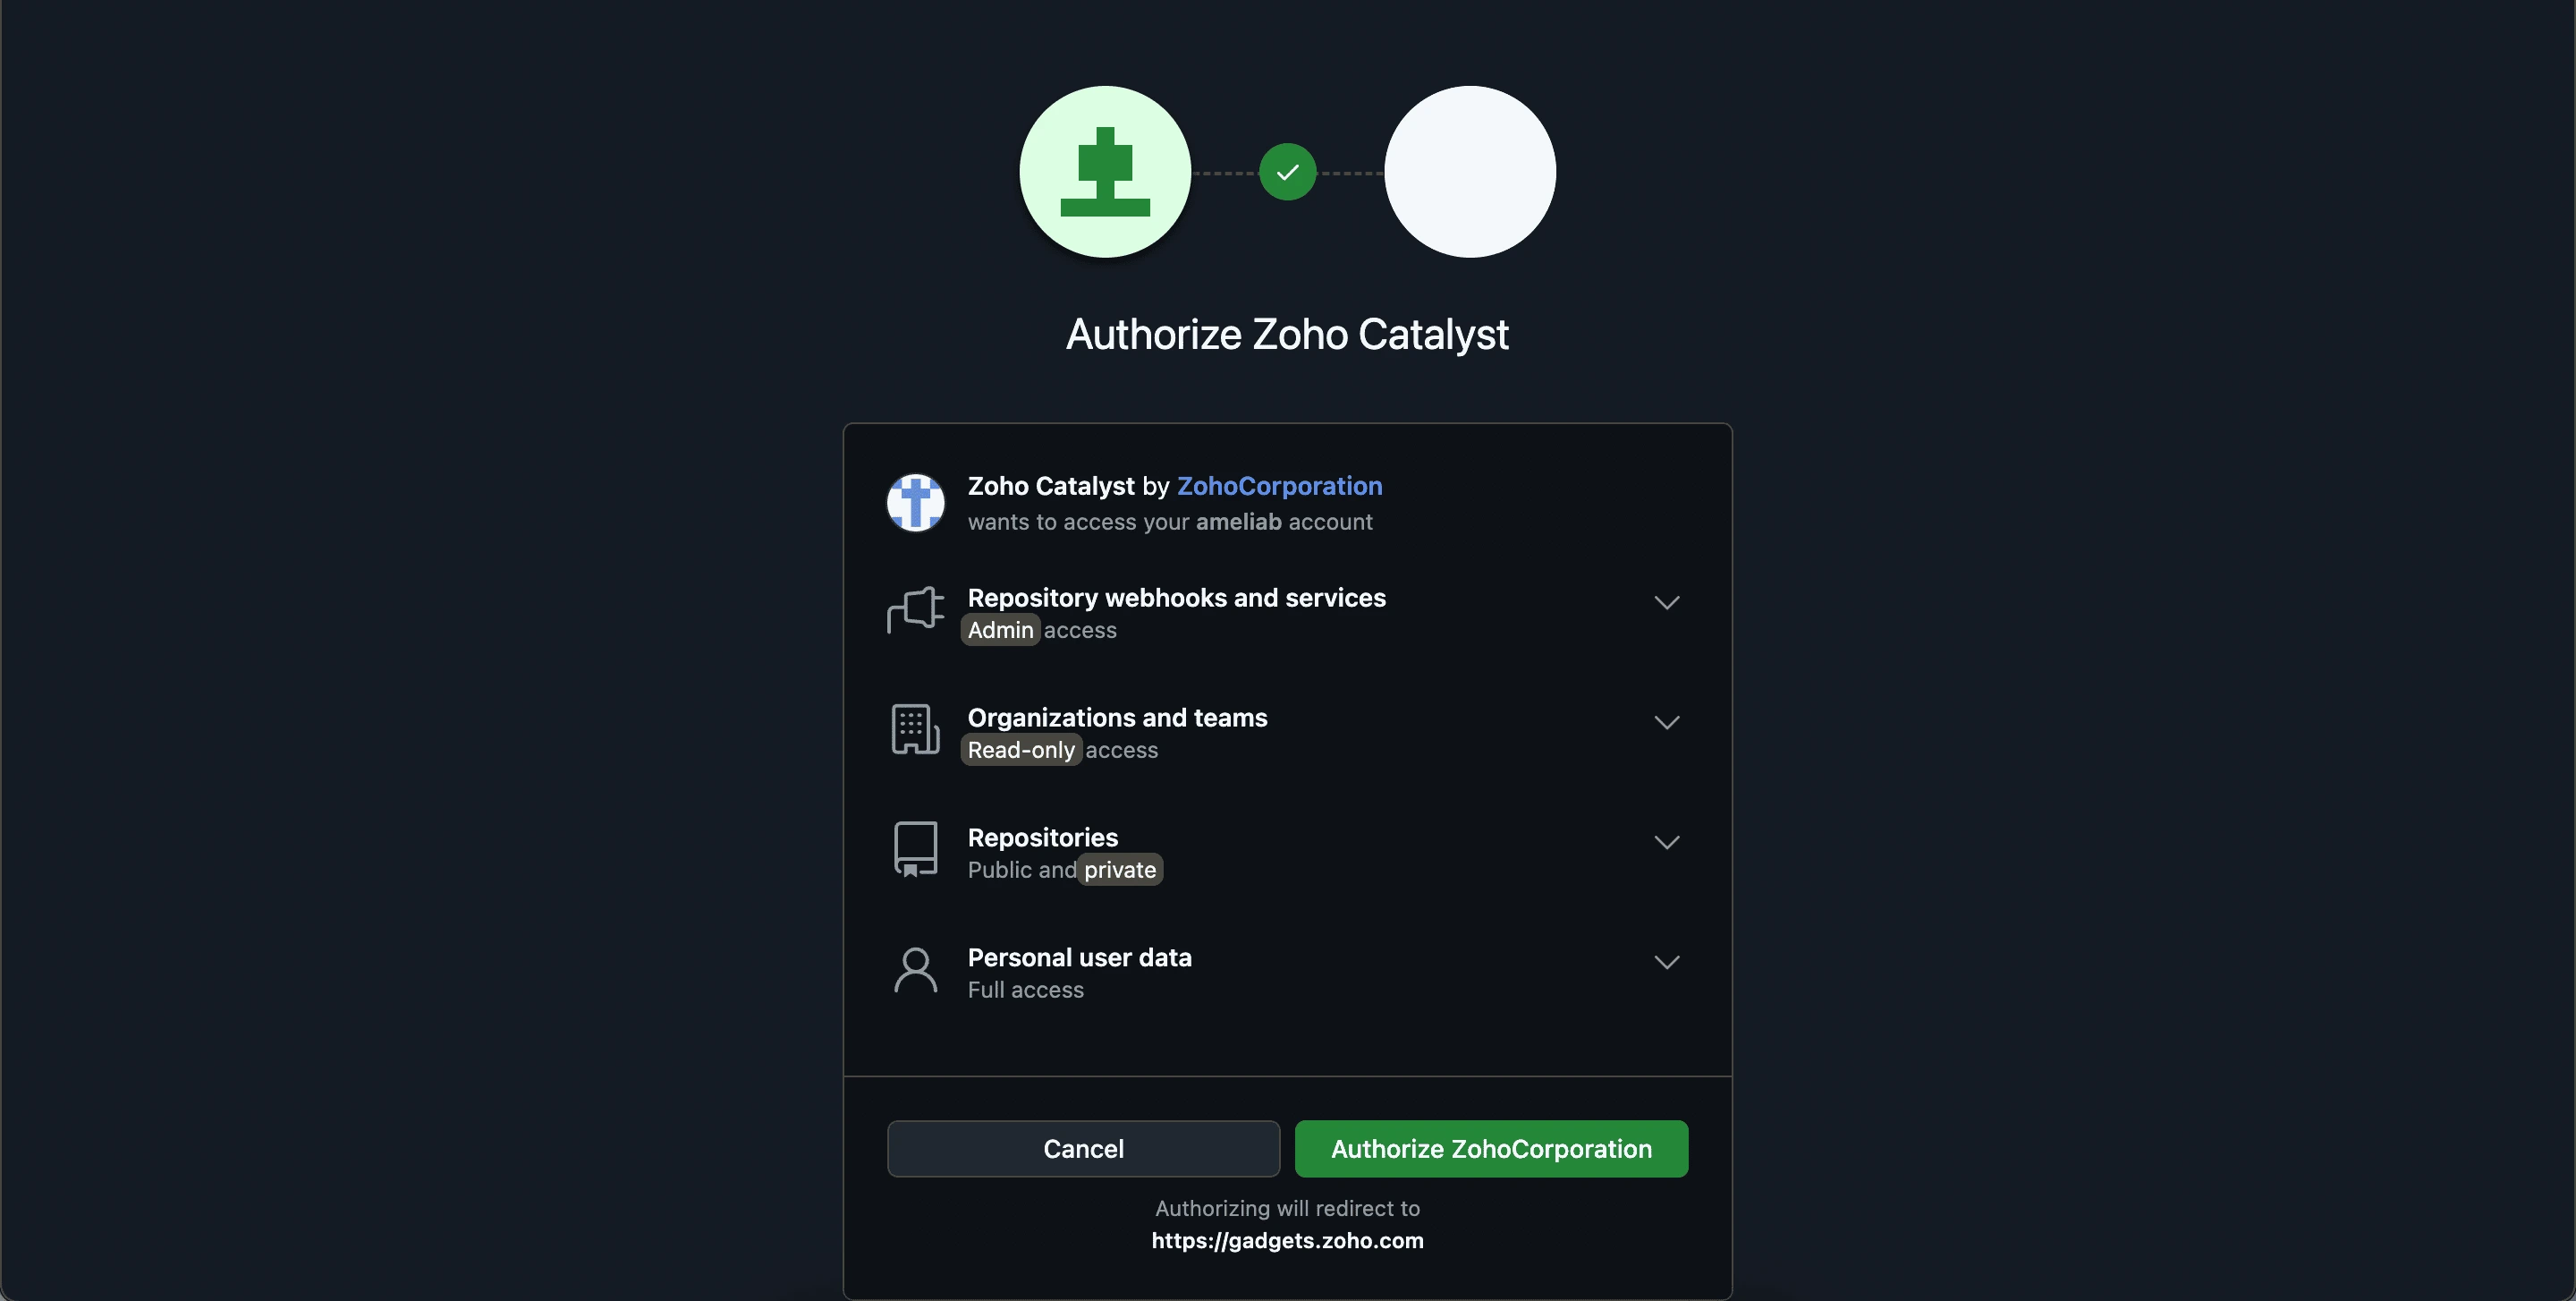
- Click Authorize ZohoCorporation to proceed.
- The integration is successful, and the GitHub account will be listed as shown in the screenshot below.
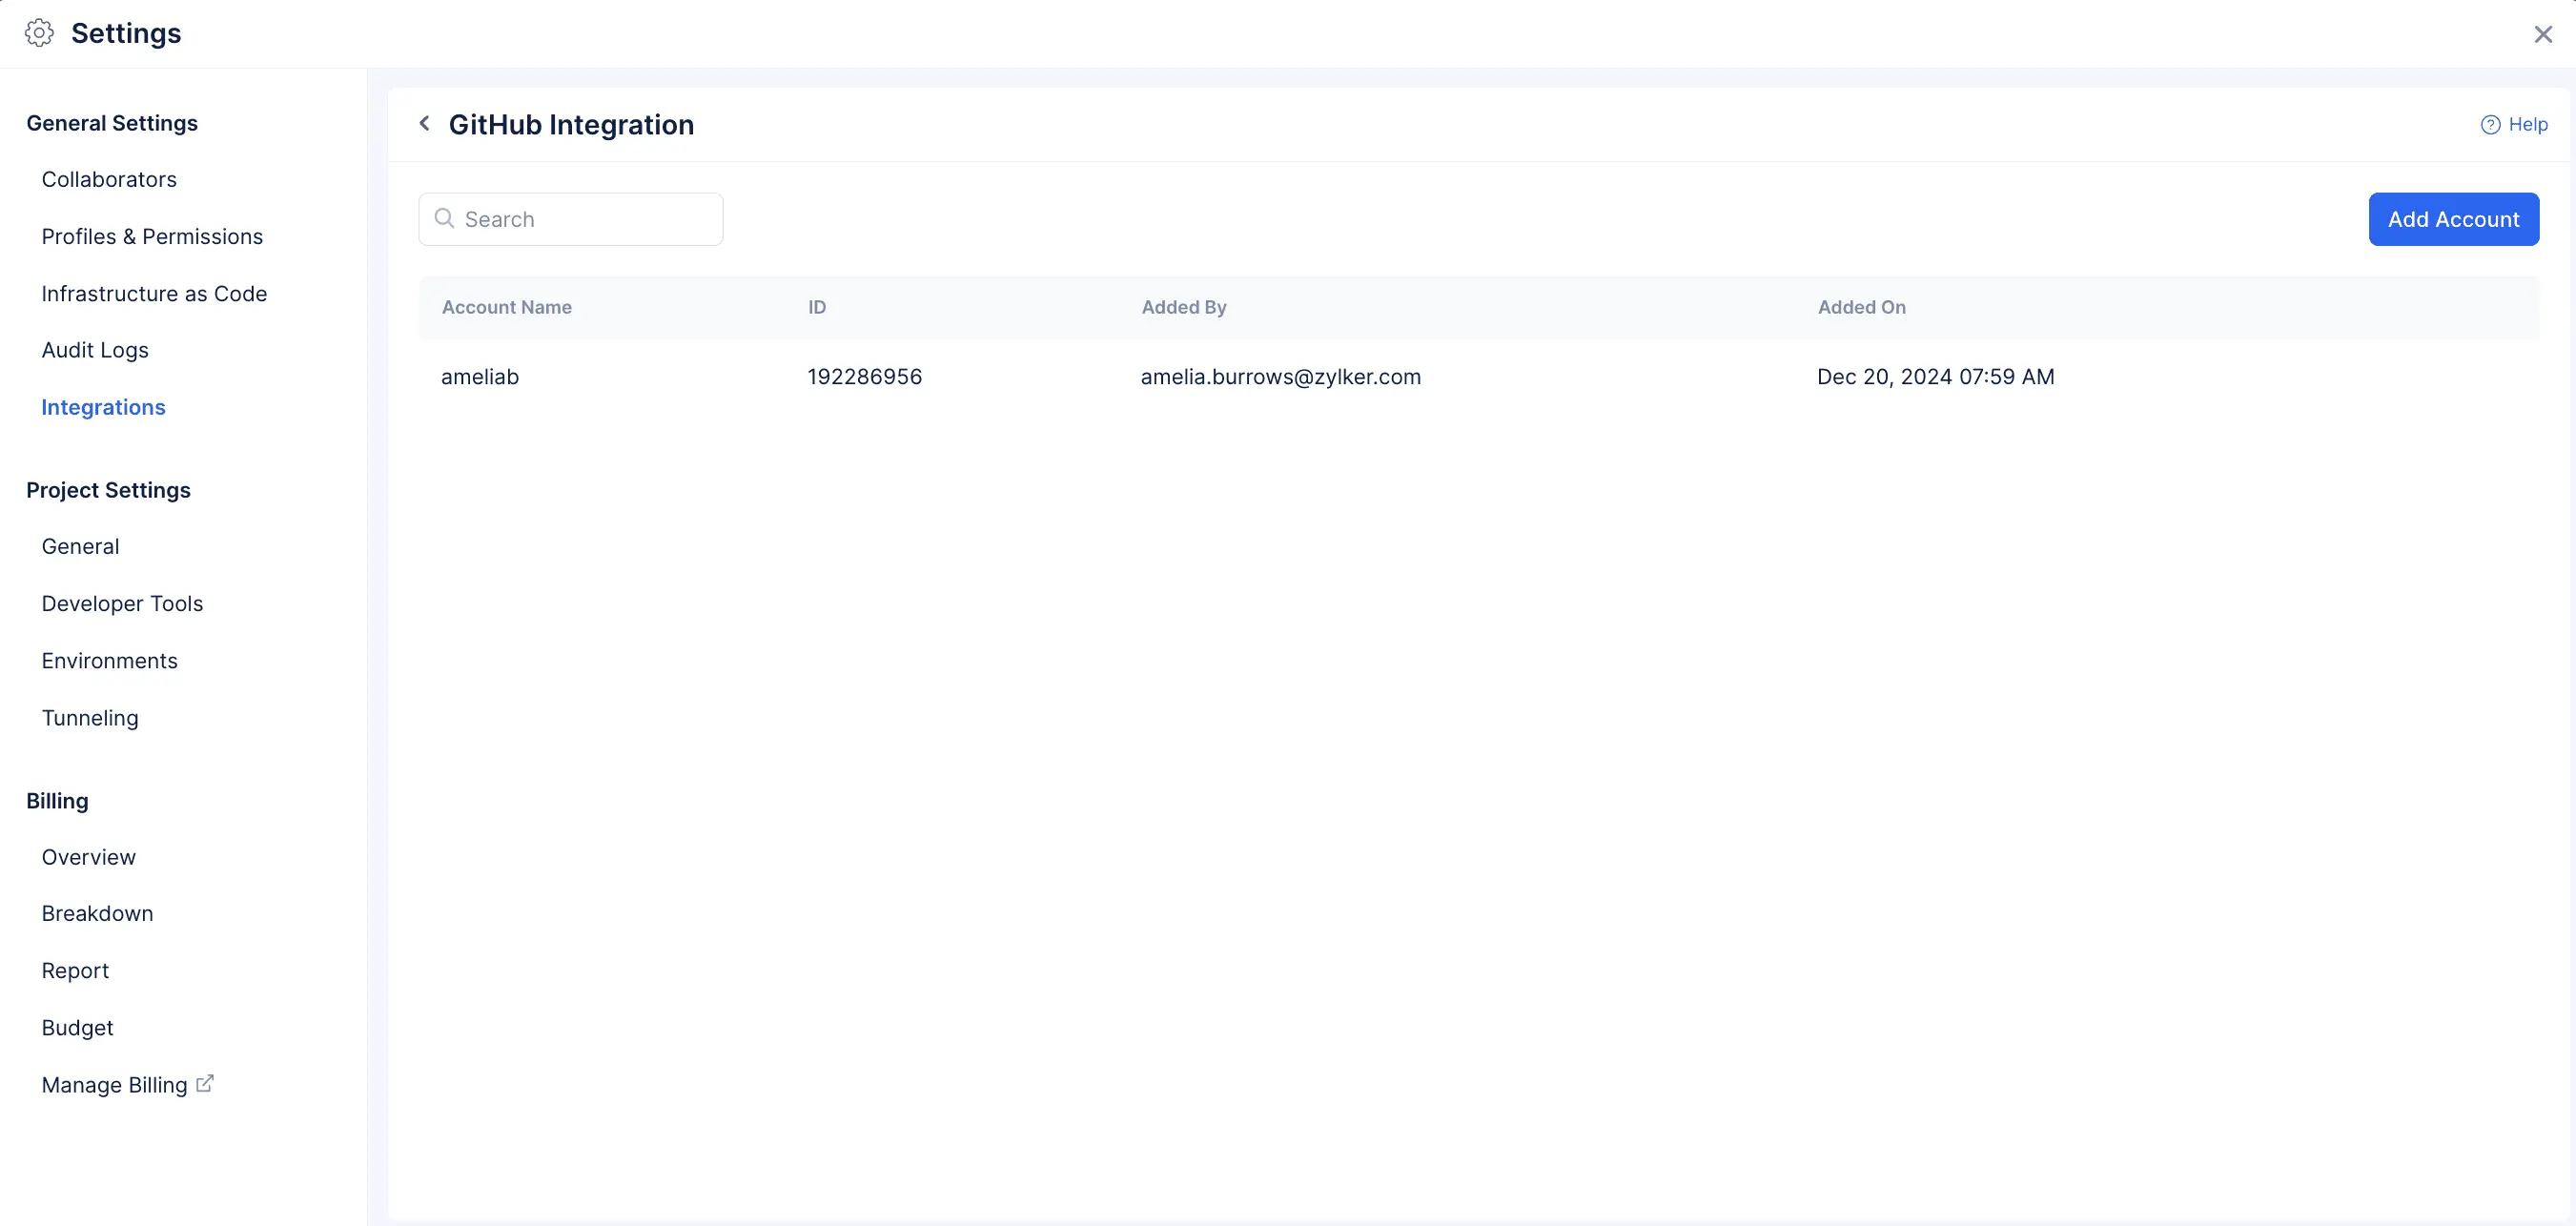
You can add any number of accounts by clicking on the Add Account button.
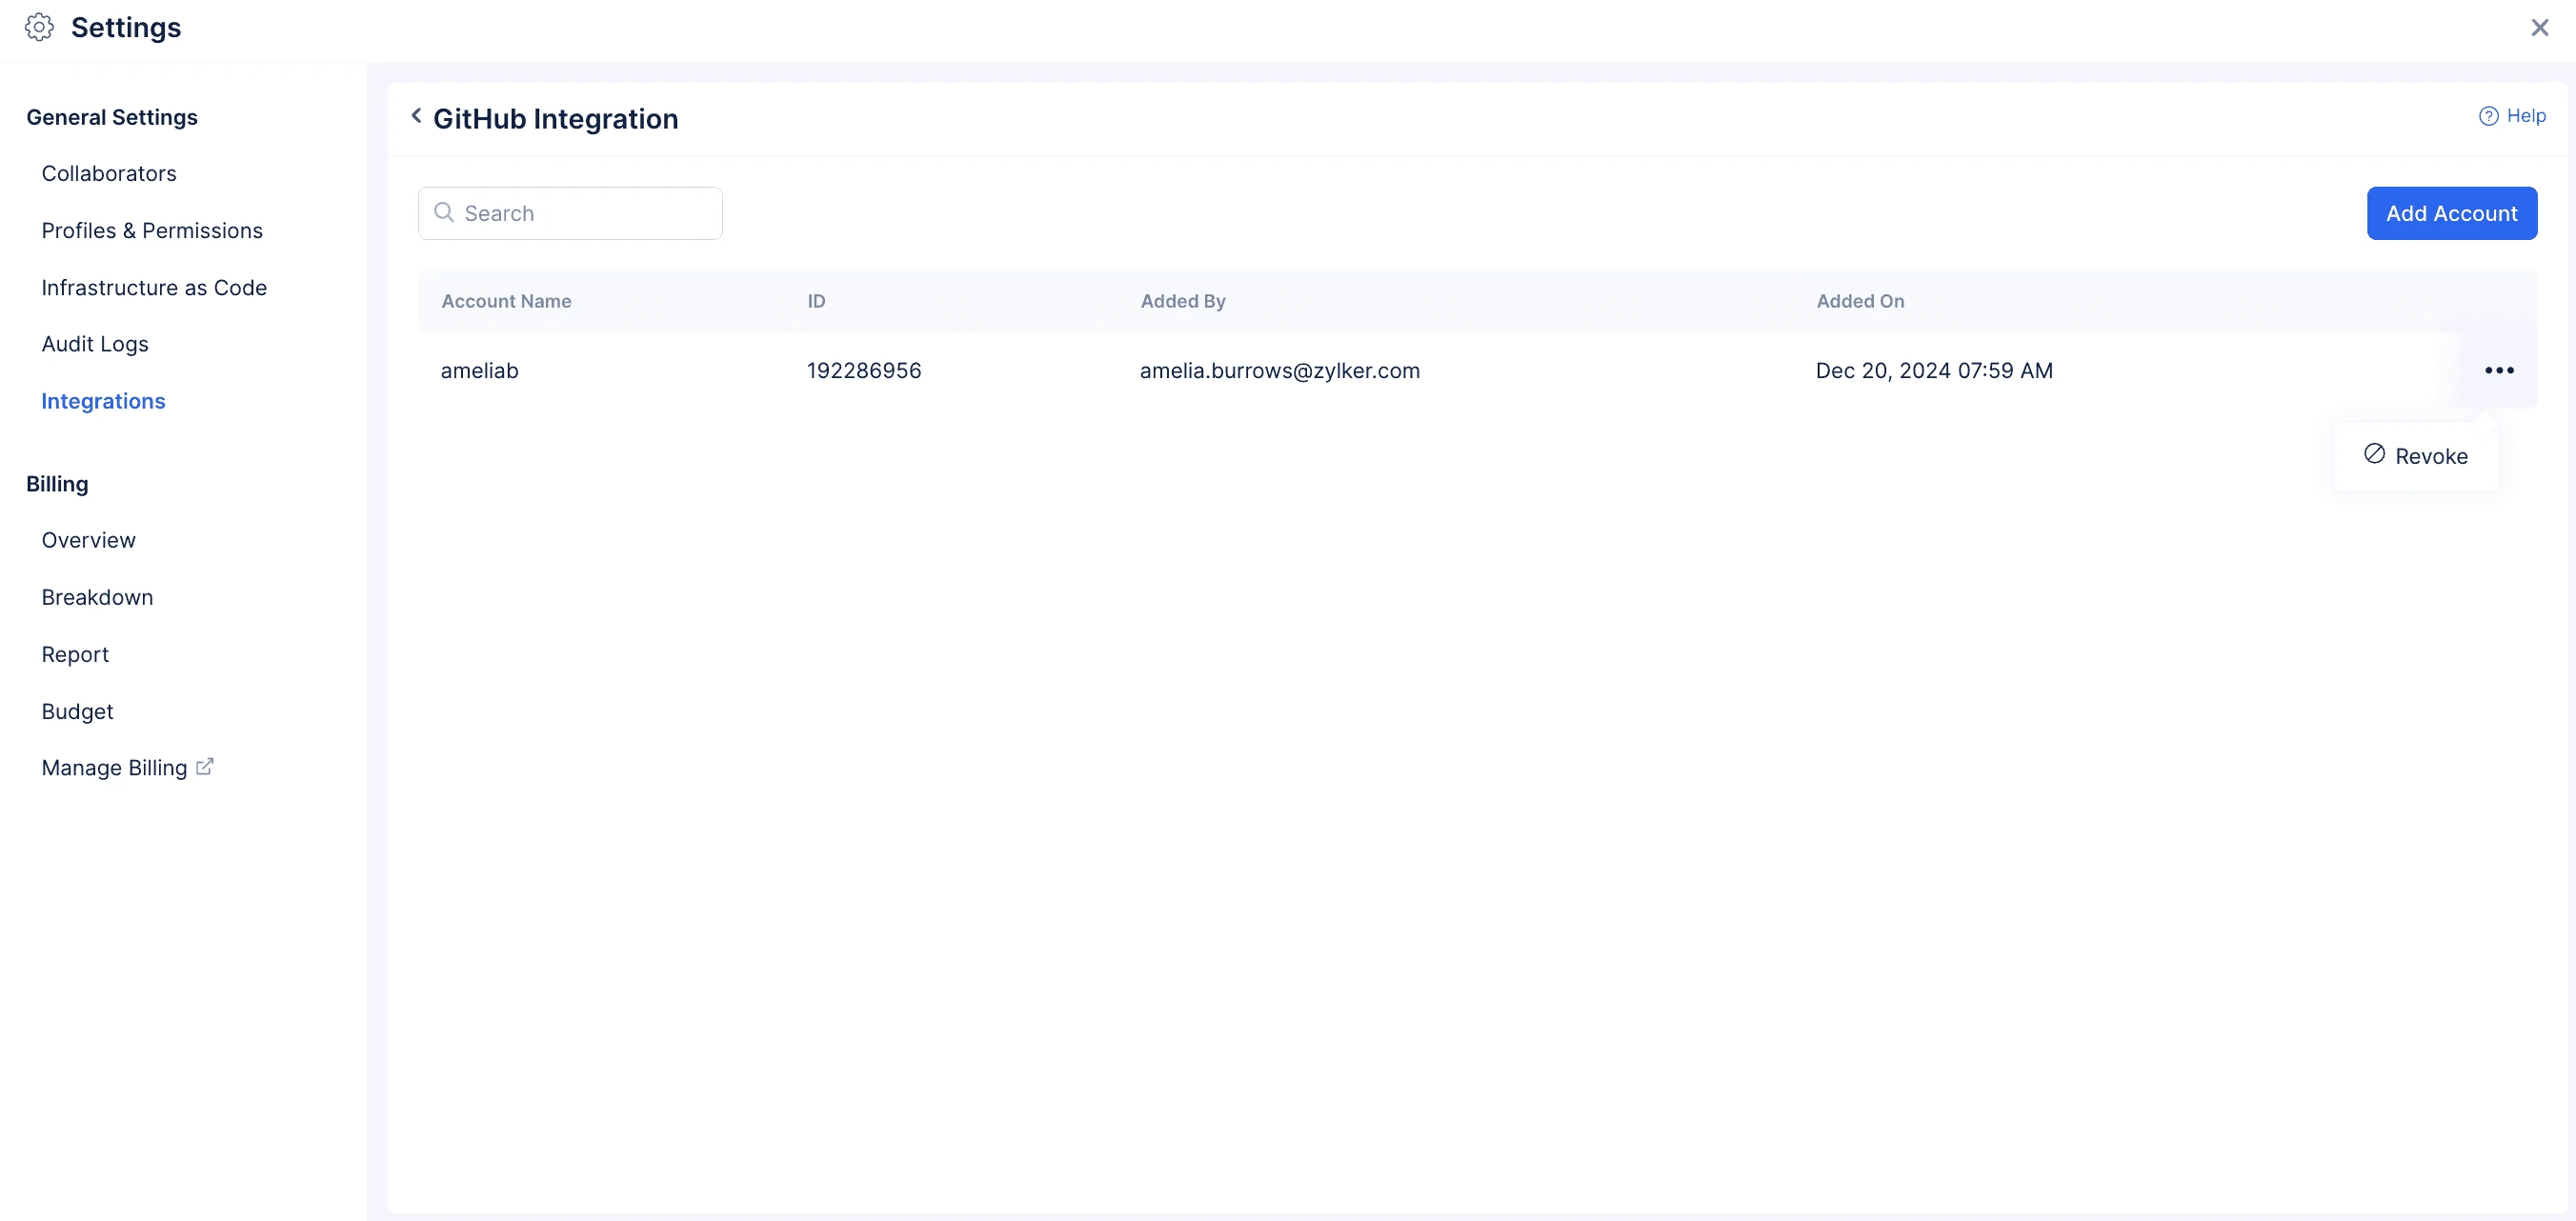
Revoke a GitHub Account
To revoke a GitHub account, please make sure to follow the below mentioned steps:
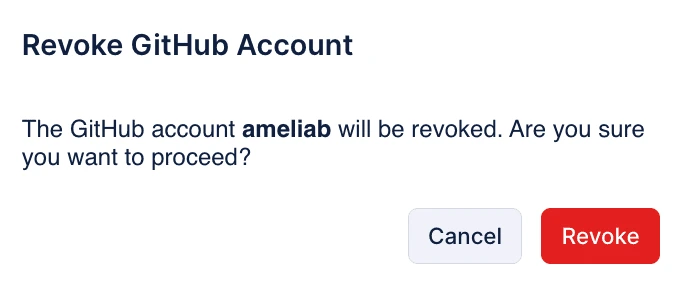
- Click on the ellipsis icon on the right corner and then click Revoke.
- Click Revoke to delete the integration permanently.
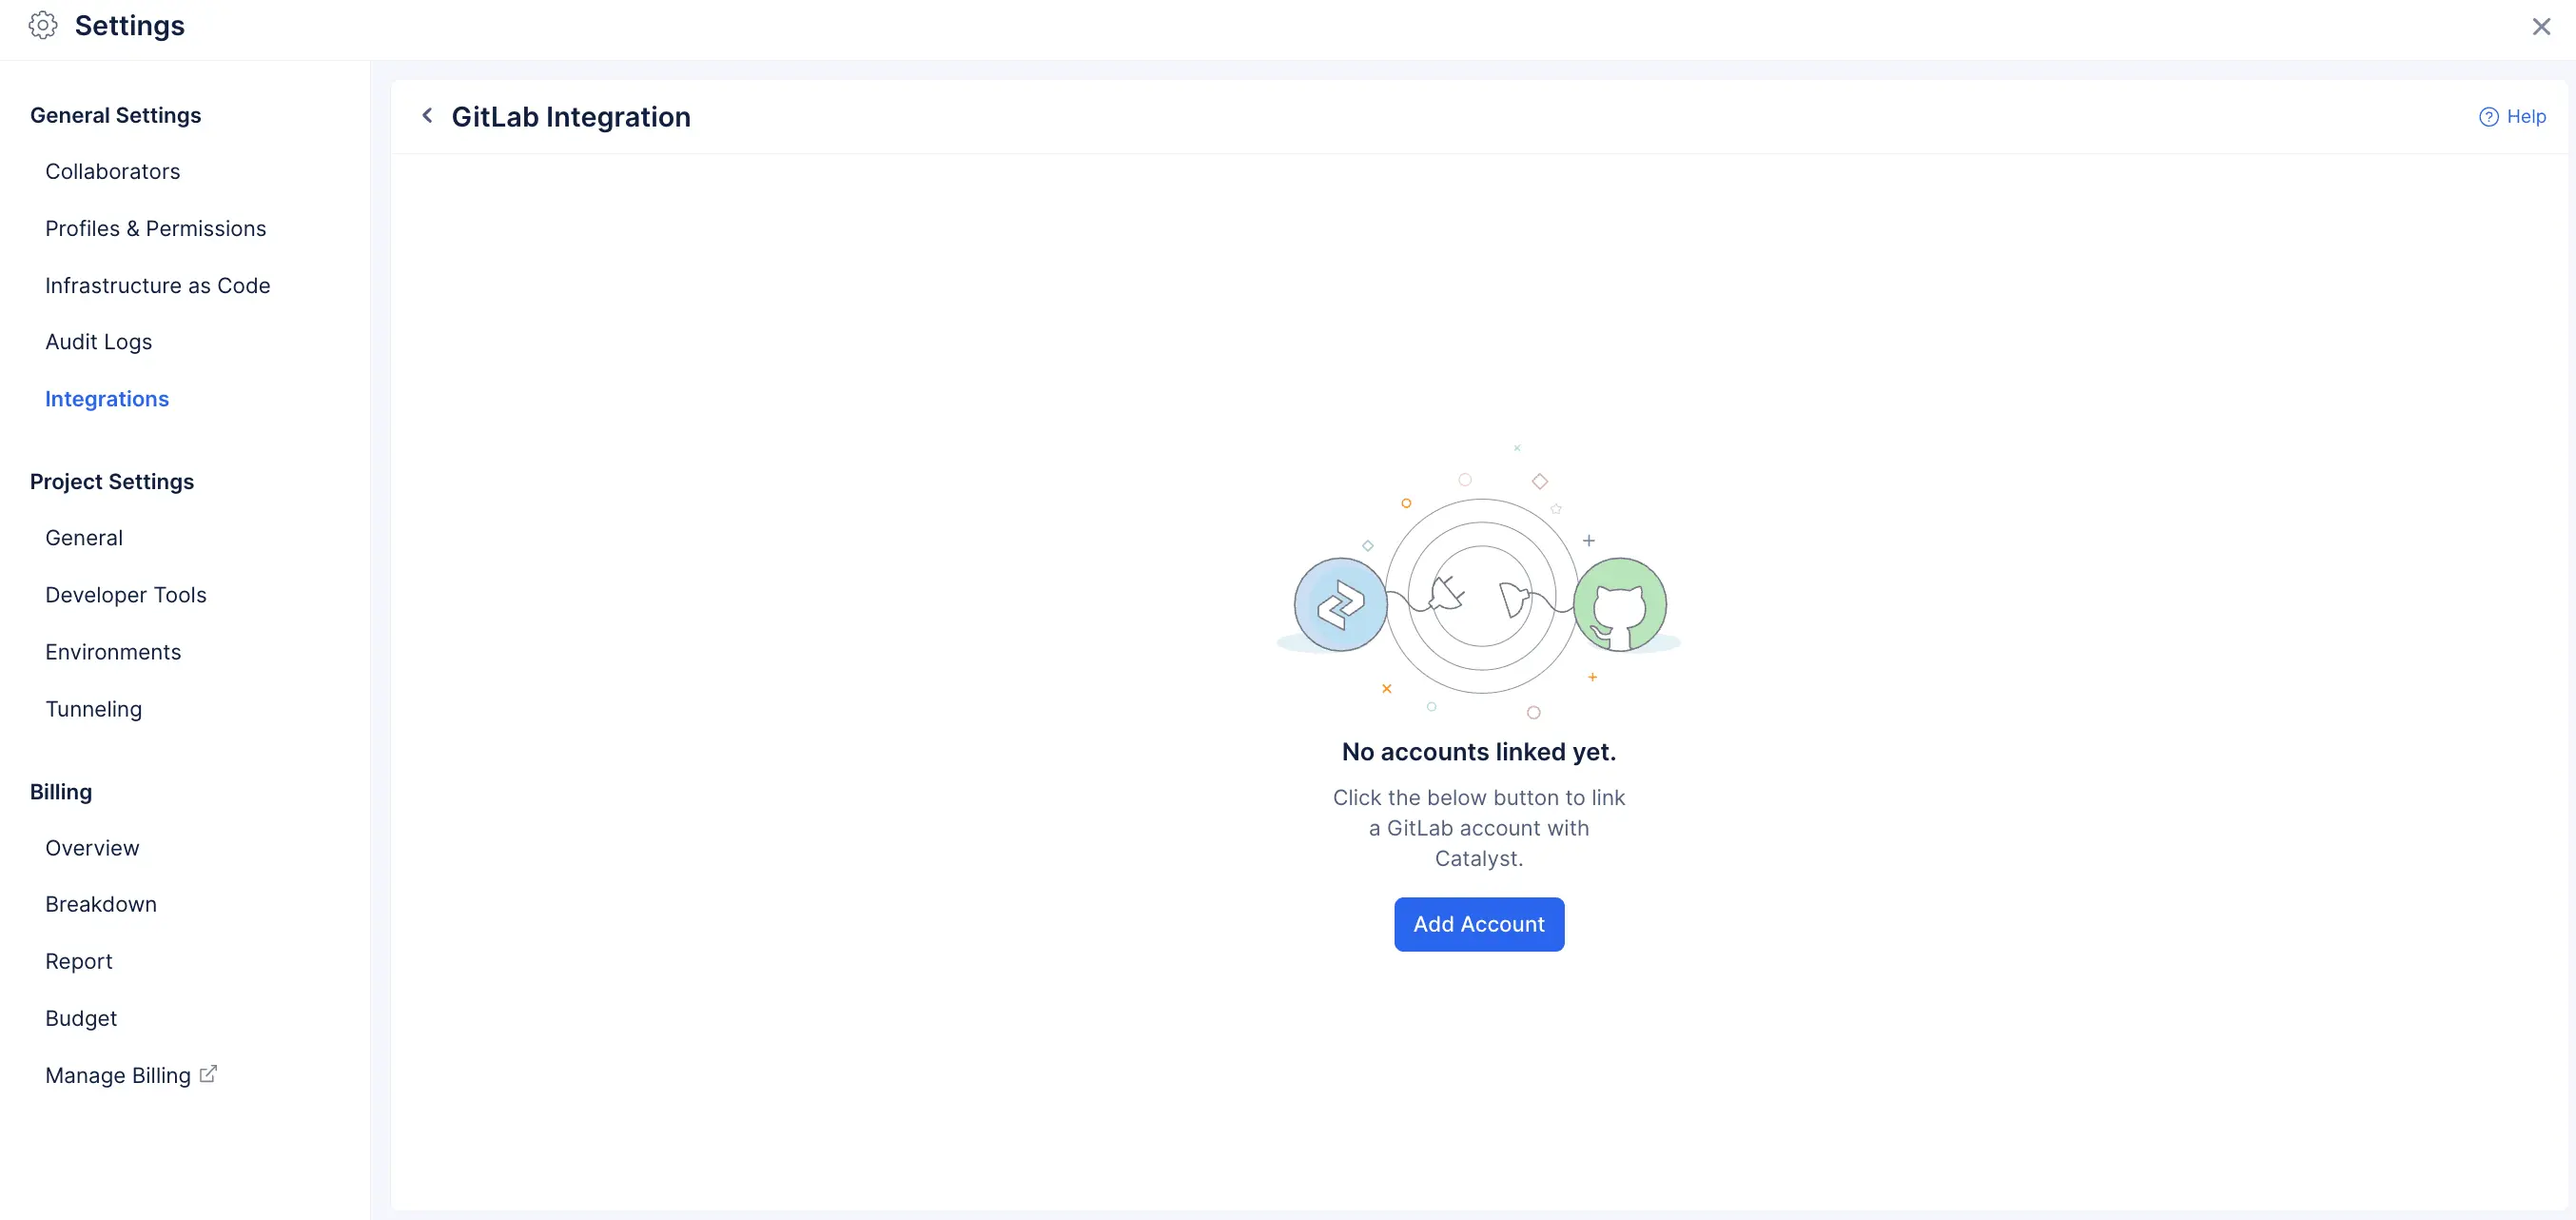
GitLab Integration
The GitLab Integration feature allows you to connect your GitLab account with Catalyst seamlessly, enabling access to the repositories (both public and private), organizations and teams, webhooks, and personal user data. With this integration, you can perform essential operations such as committing, pushing, and pulling code directly within Catalyst.
Supported Services
This integration is available for the following Catalyst service:
-
You can explore our new service, Catalyst Pipelines, an advanced version of the Git component. Catalyst Pipelines enables you to define the entire end-to-end build-to-deployment workflow using commands in a YAML file. To learn more, refer to the help documentation.
-
Please note that this service is currently part of our early access program. If you haven’t gained access yet, you can request it directly through this form.
Benefits of Integration
Catalyst Pipelines
Catalyst Pipelines is the CI/CD service that helps to streamline and automate your software development and deployment process. By integrating your GitLab account with Catalyst Pipelines, the service automatically clones the code from your selected repository. When the pipeline is triggered, the defined commands in your YAML configuration are executed on the cloned codebase seamlessly, ensuring smooth automation of your workflows from build to deployment.. You can learn more about pipelines in this help documentation.
Integrate a GitLab Account
- Click on the GitLab tile.
- Click Add Account to integrate your GitLab account with Catalyst.
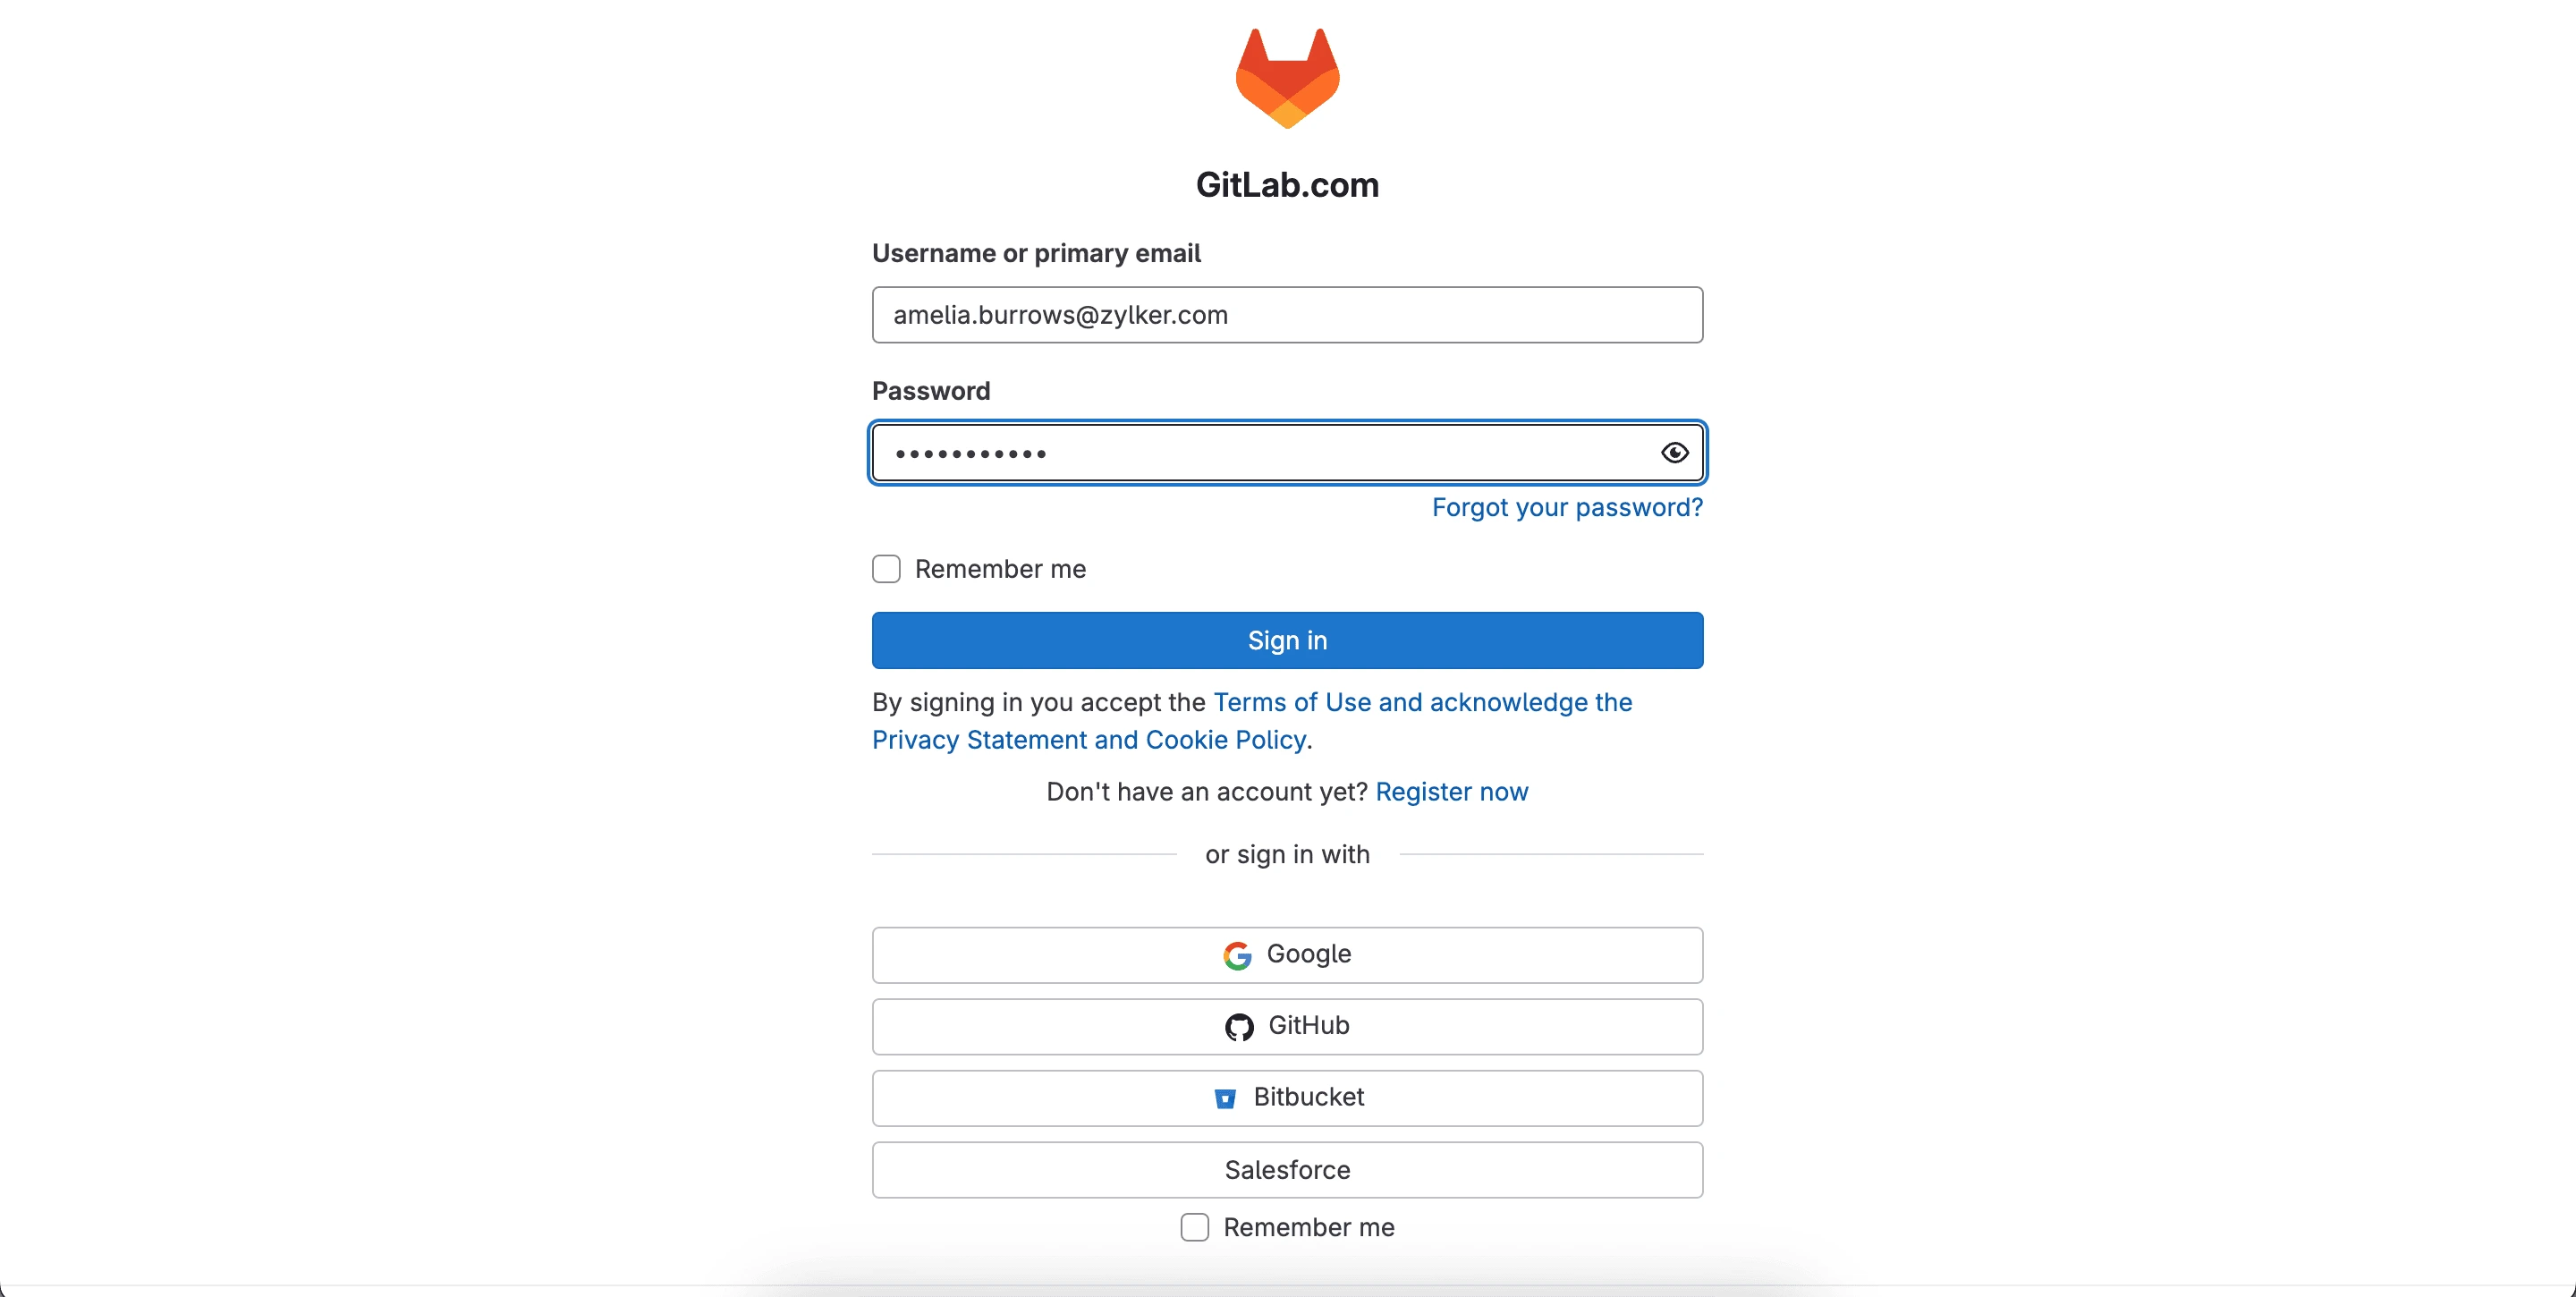
- Click Agree to accept the terms and conditions of GitLab.

- Provide your username or email address and the password of your GitLab account. Click Sign in. You can also sign in using any providers as shown in the screenshot below.
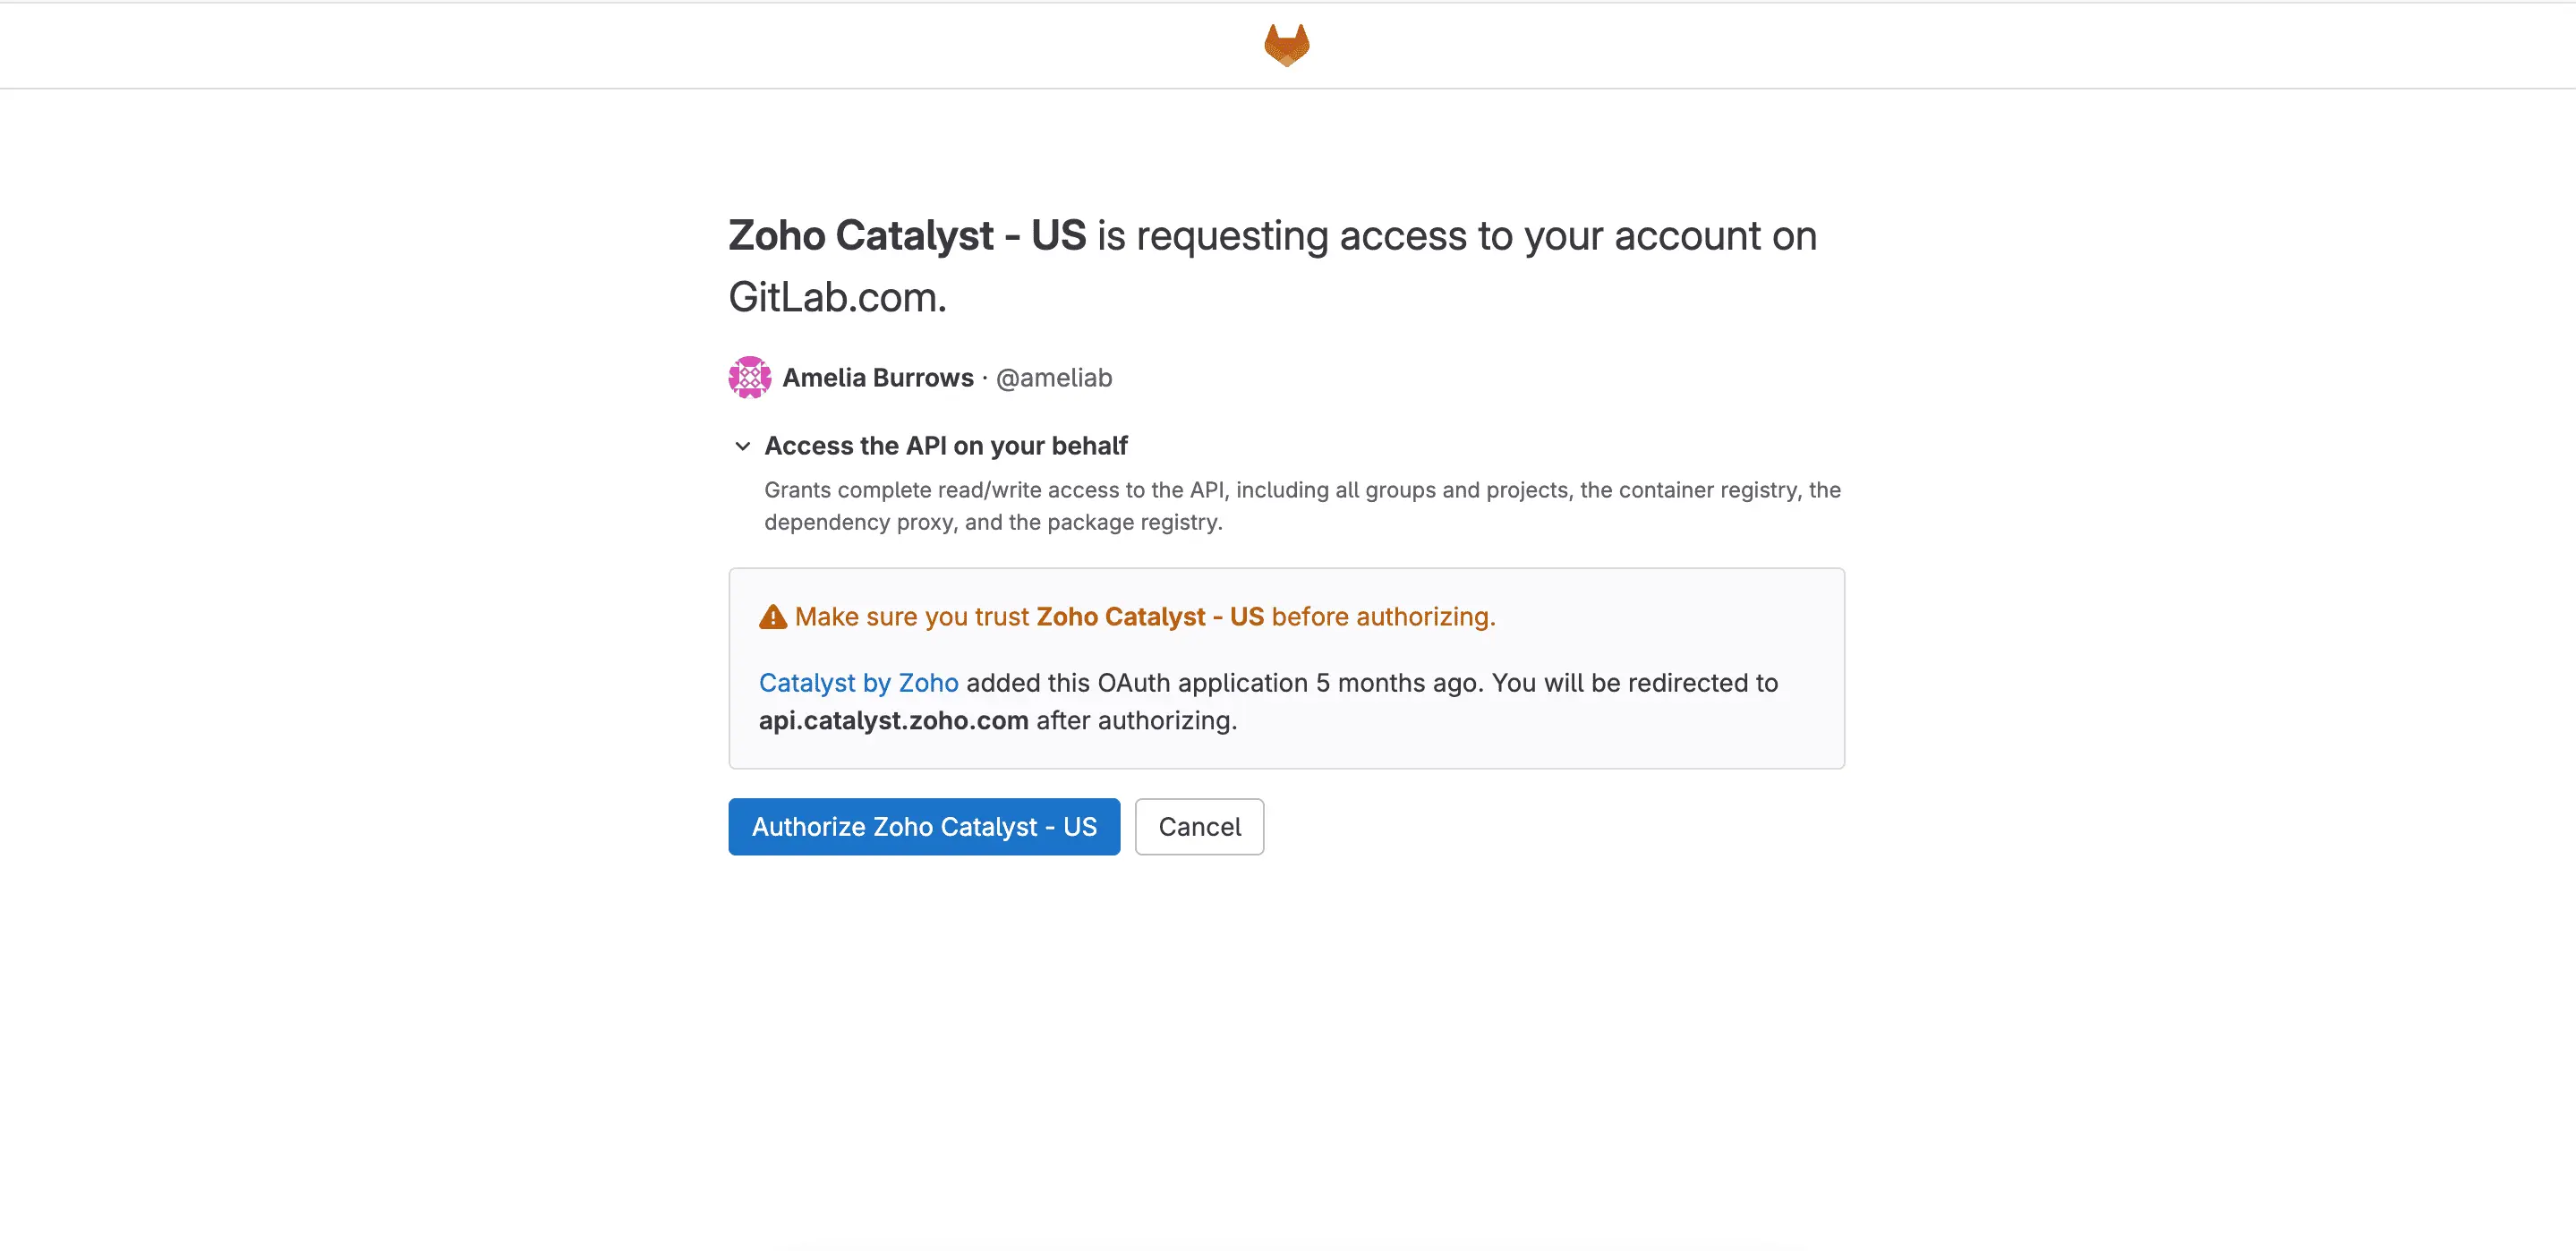
- Click Authorize Zoho Catalyst - US to proceed.
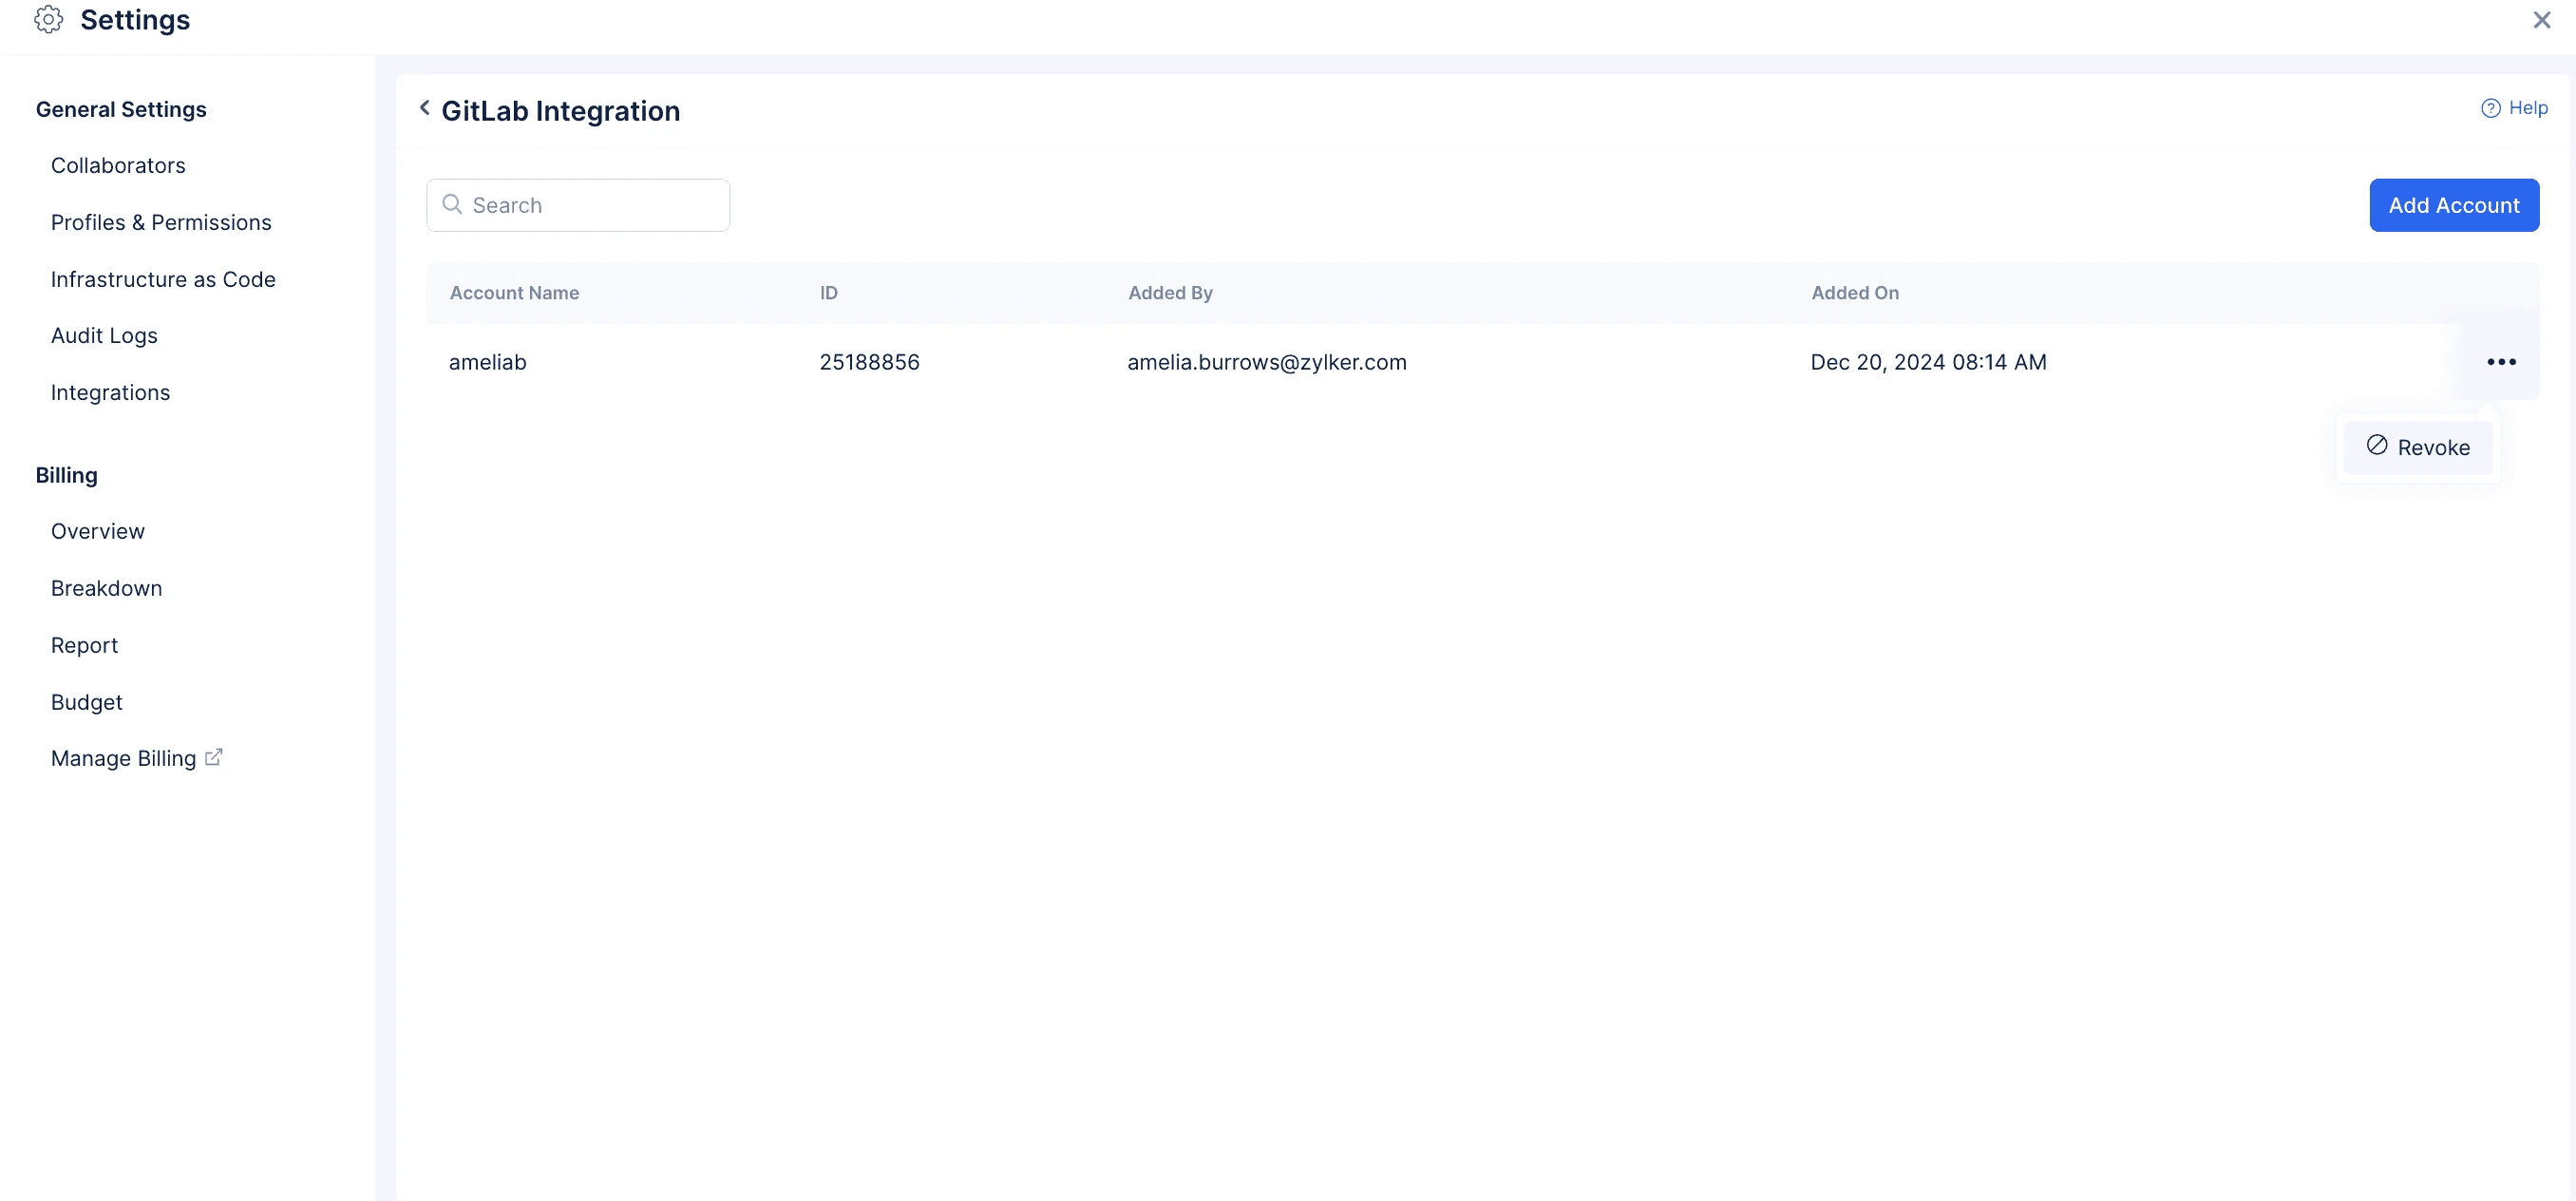
- The integration is successful, and the GitLab account will be listed as shown in the screenshot below.

You can add any number of accounts by clicking on the Add Account button.
Revoke a GitLab Account
To revoke a GitLab account, please make sure to follow the below mentioned steps:
- Click on the ellipsis icon on the right corner and then click Revoke.
- Click Revoke to delete the integration permanently.

Bitbucket Integration
The Bitbucket Integration feature allows you to connect your Bitbucket account with Catalyst seamlessly, enabling access to the repositories (both public and private), organizations and teams, webhooks, and personal user data. With this integration, you can perform essential operations such as committing, pushing, and pulling code directly within Catalyst.
Supported Services
This integration is available for the following Catalyst service:
-
You can explore our new service, Catalyst Pipelines, an advanced version of the Git component. Catalyst Pipelines enables you to define the entire end-to-end build-to-deployment workflow using commands in a YAML file. To learn more, refer to the help documentation.
-
Please note that this service is currently part of our early access program. If you haven’t gained access yet, you can request it directly through this form.
Benefits of Integration
Catalyst Pipelines
Catalyst Pipelines is the CI/CD service that helps to streamline and automate your software development and deployment process. By integrating your Bitbucket account with Catalyst Pipelines, the service automatically clones the code from your selected repository. When the pipeline is triggered, the defined commands in your YAML configuration are executed on the cloned codebase seamlessly, ensuring smooth automation of your workflows from build to deployment.. You can learn more about pipelines in this help documentation.
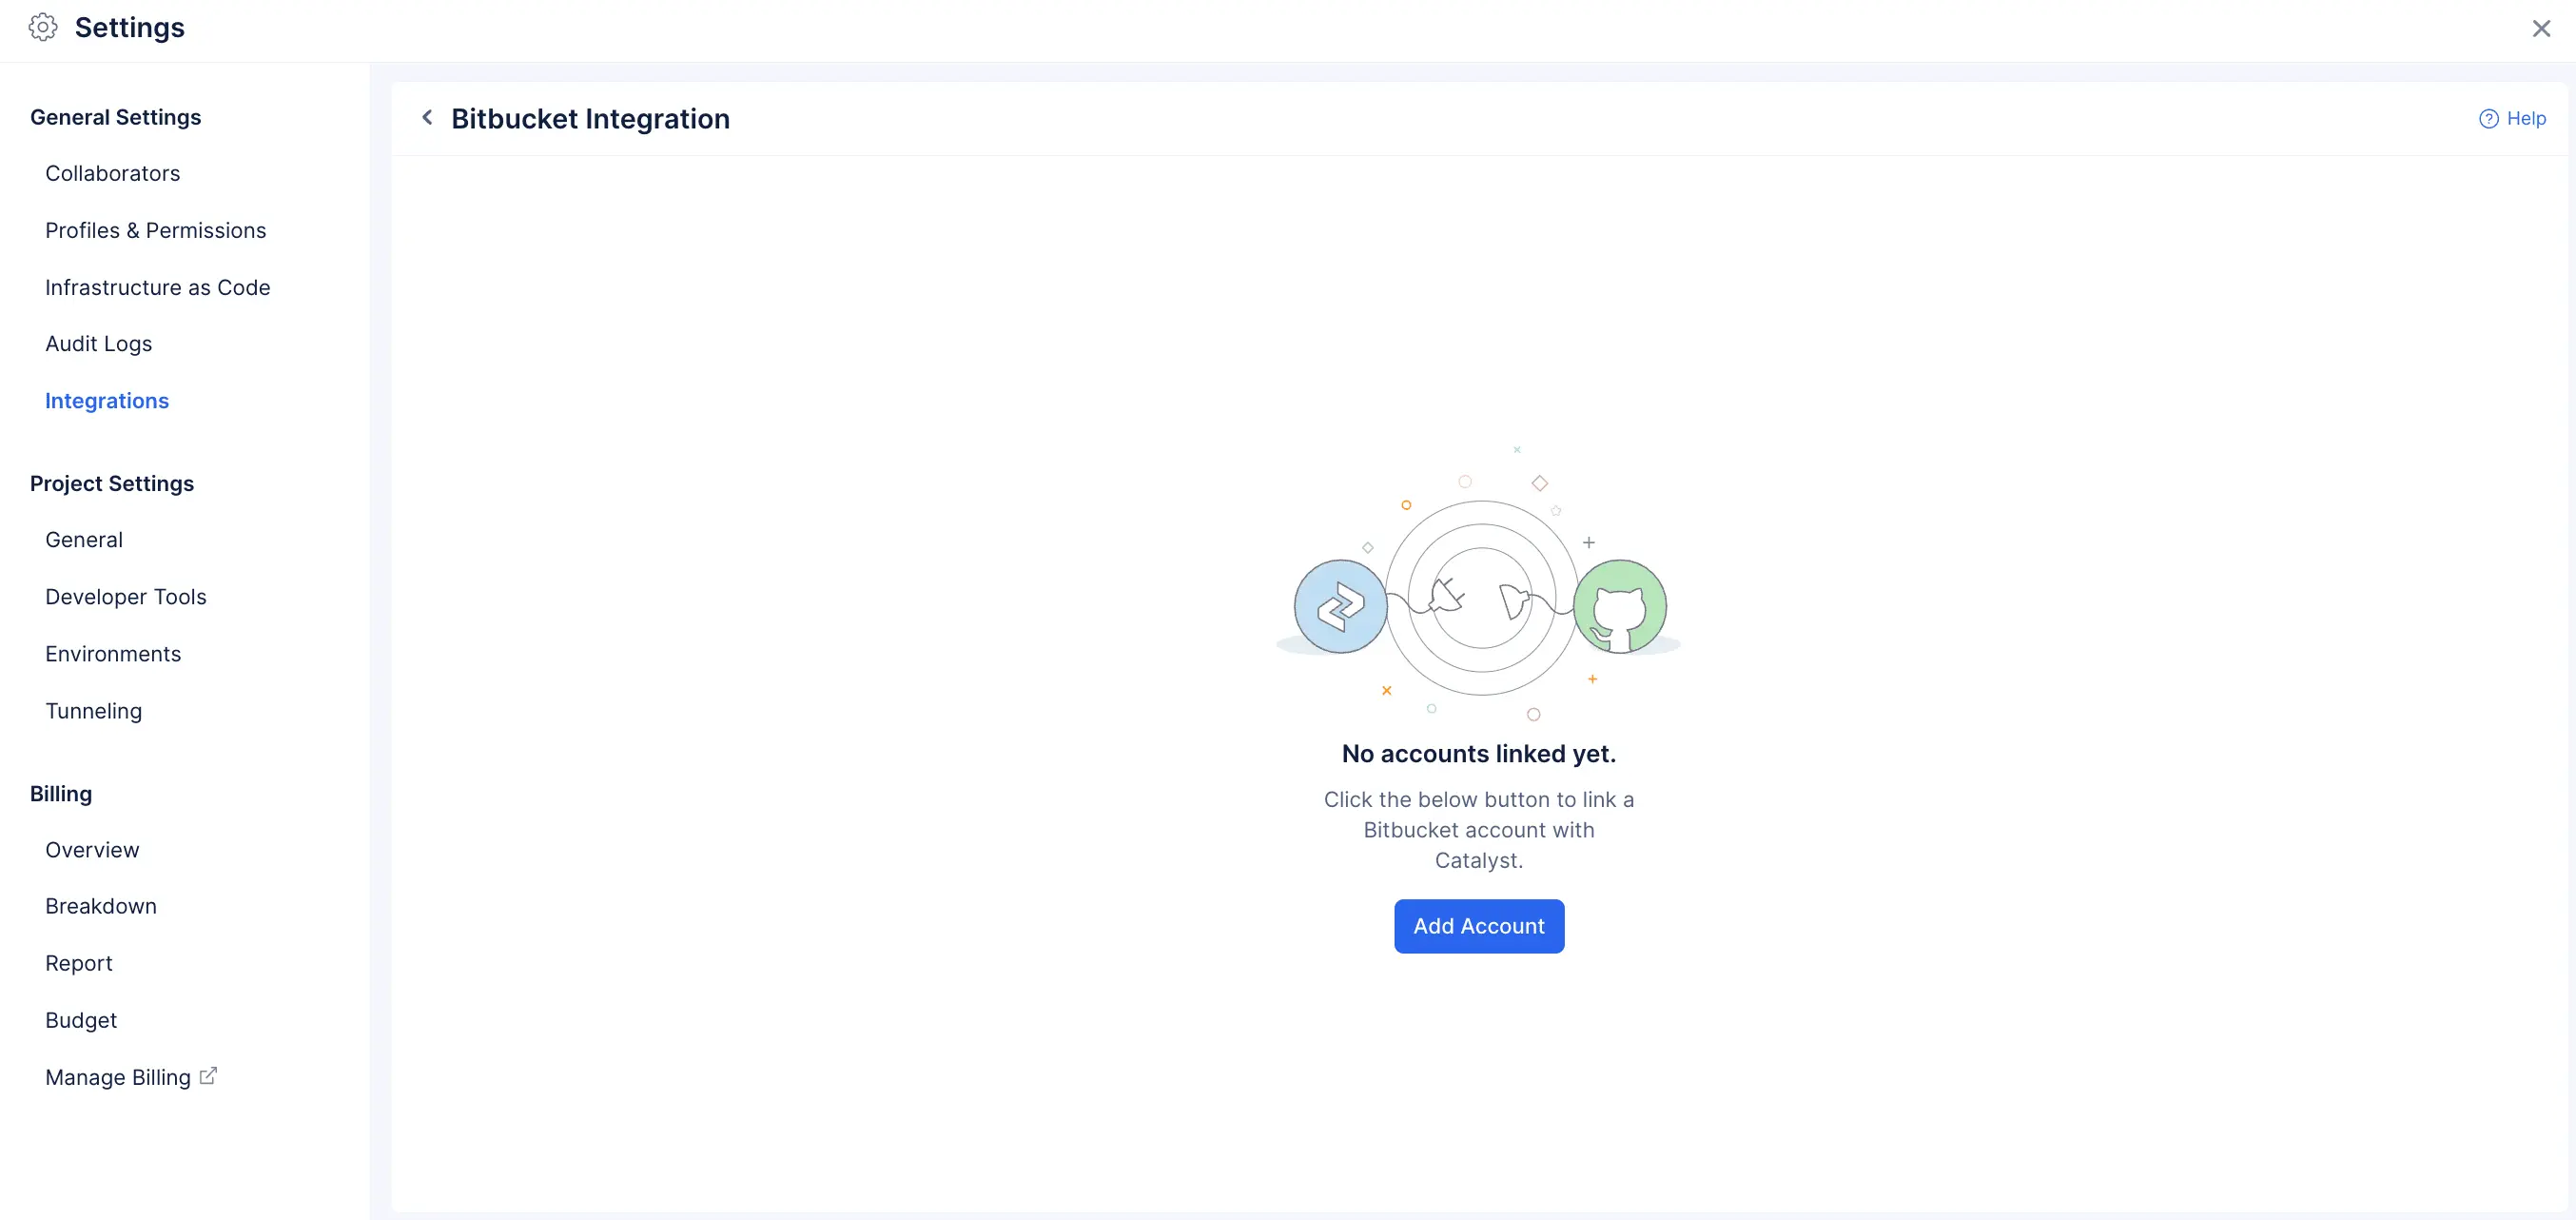
Integrate a Bitbucket Account
- Click on the Bitbucket tile.

- Click Add Account to integrate your Bitbucket account with Catalyst.
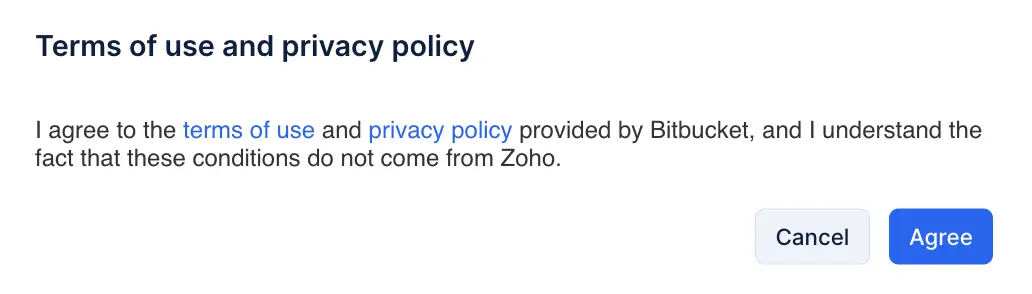
- Click Agree to accept the terms and conditions of Bitbucket.
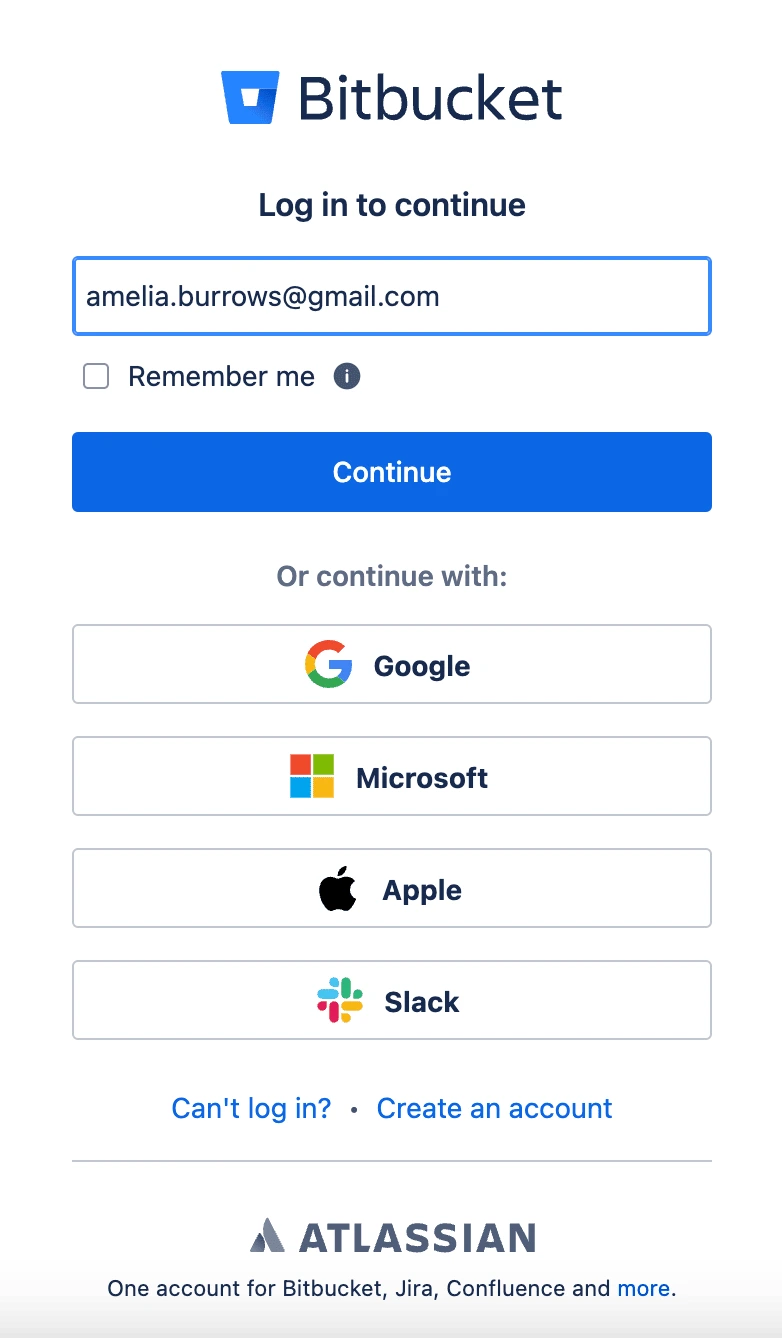
- Provide your username or email address and the password of your Bitbucket account and click Continue. You can also sign-in using any providers as shown in the screenshot below.
- The integration is successful, and the Bitbucket account will be listed as shown in the screenshot below.
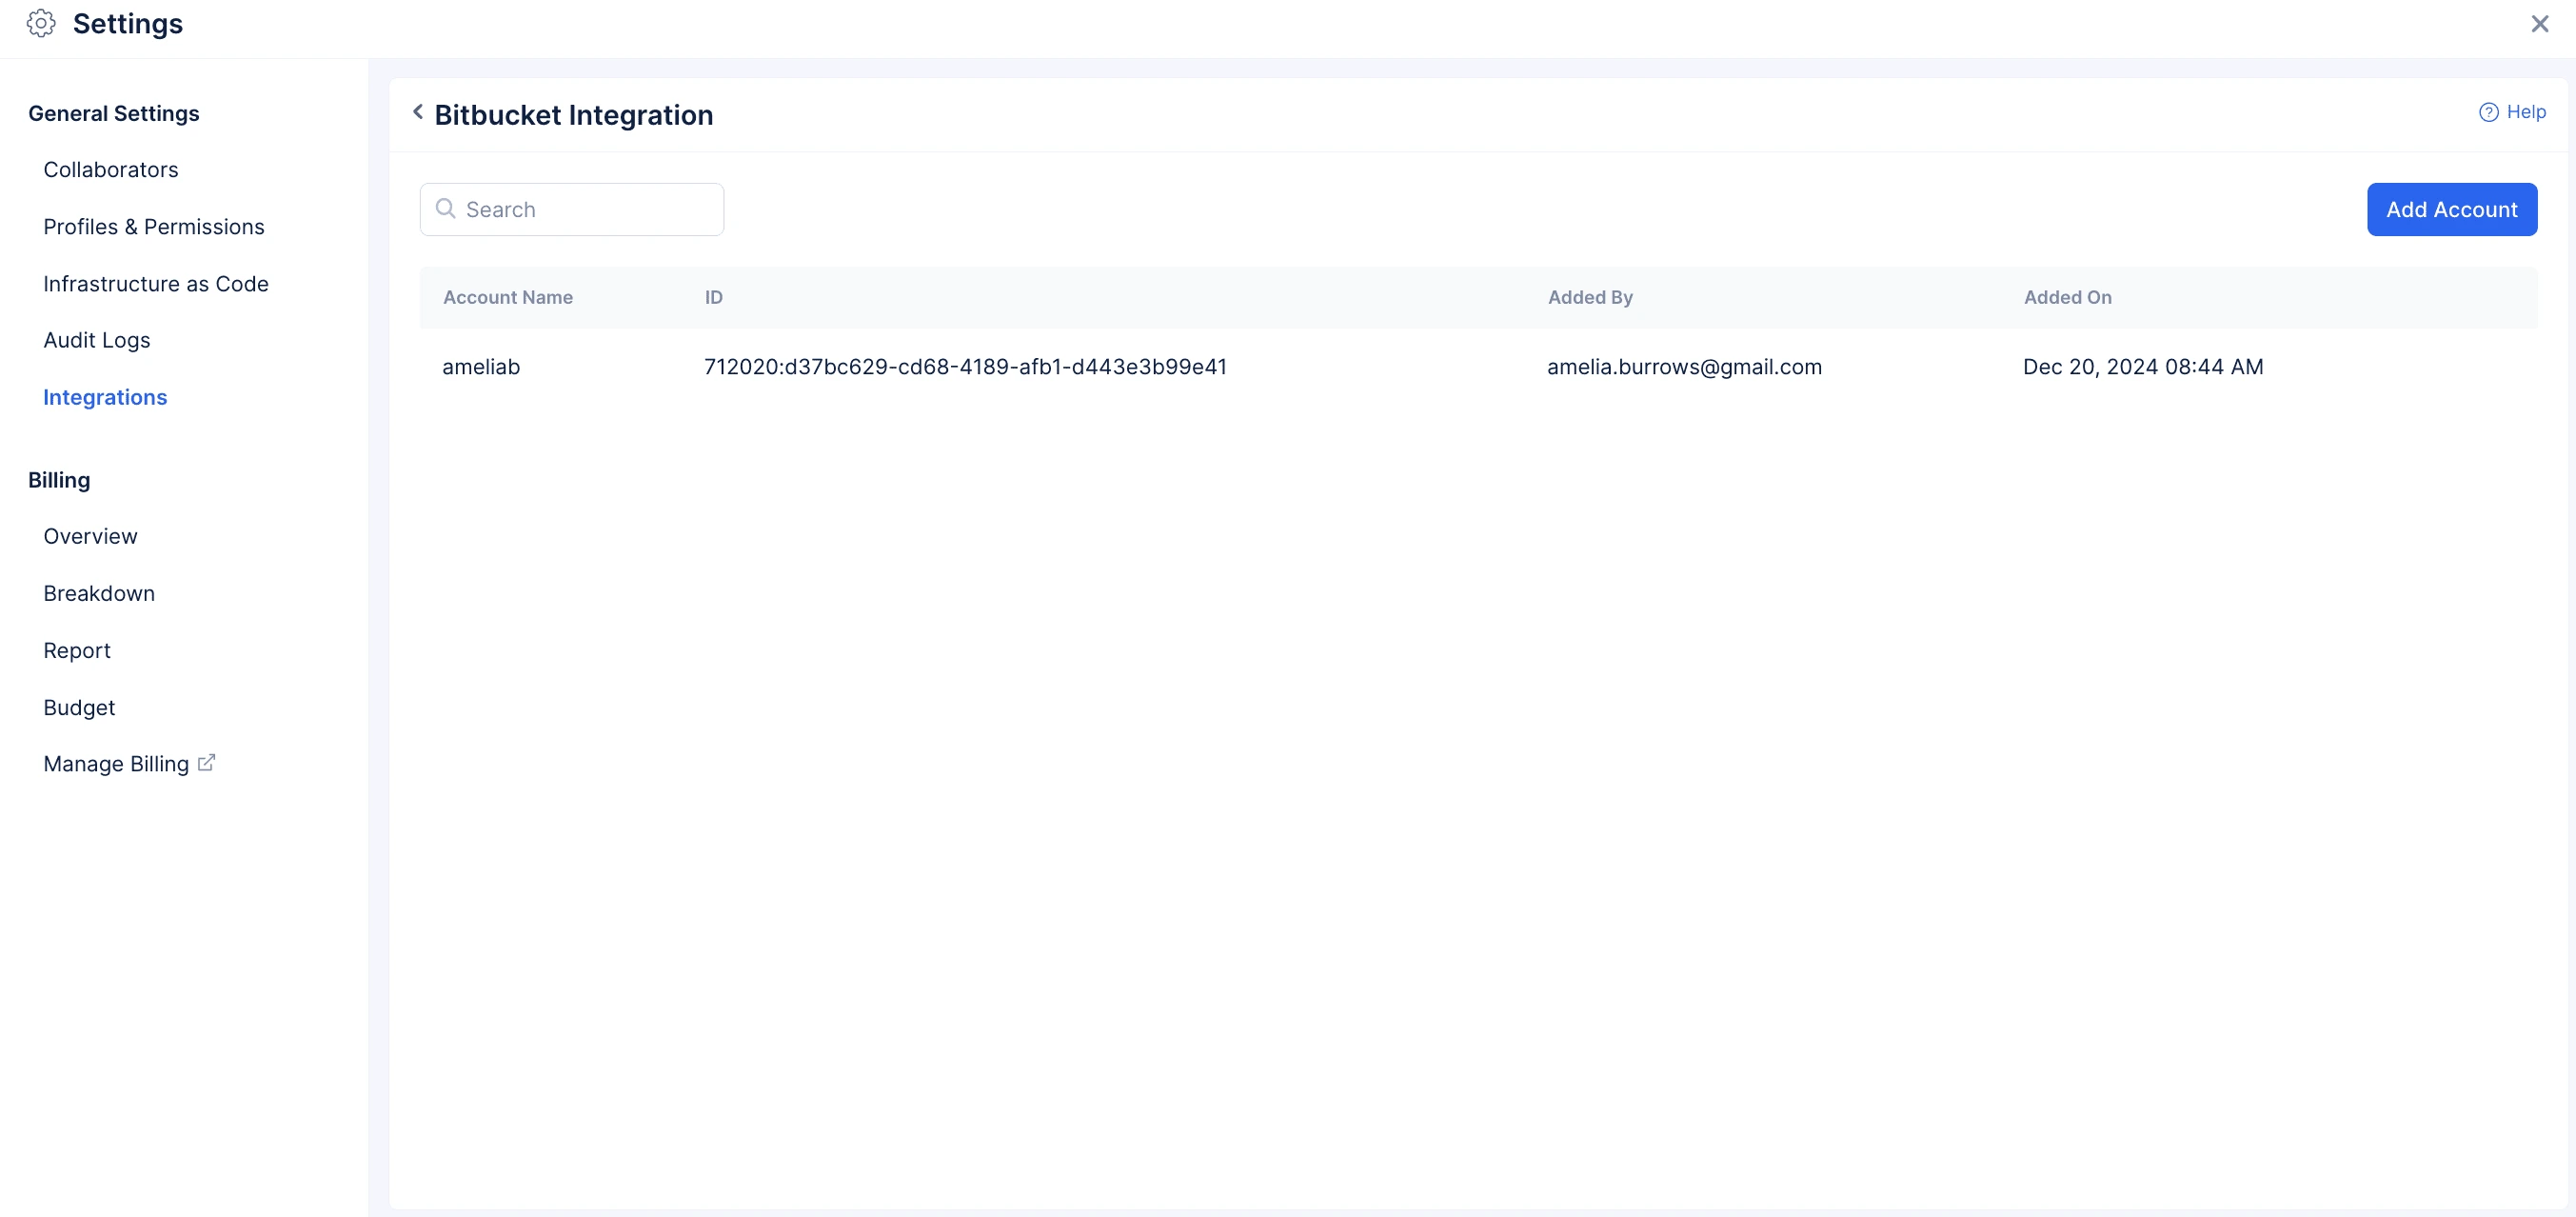
You can add any number of accounts by clicking on the Add Account button.
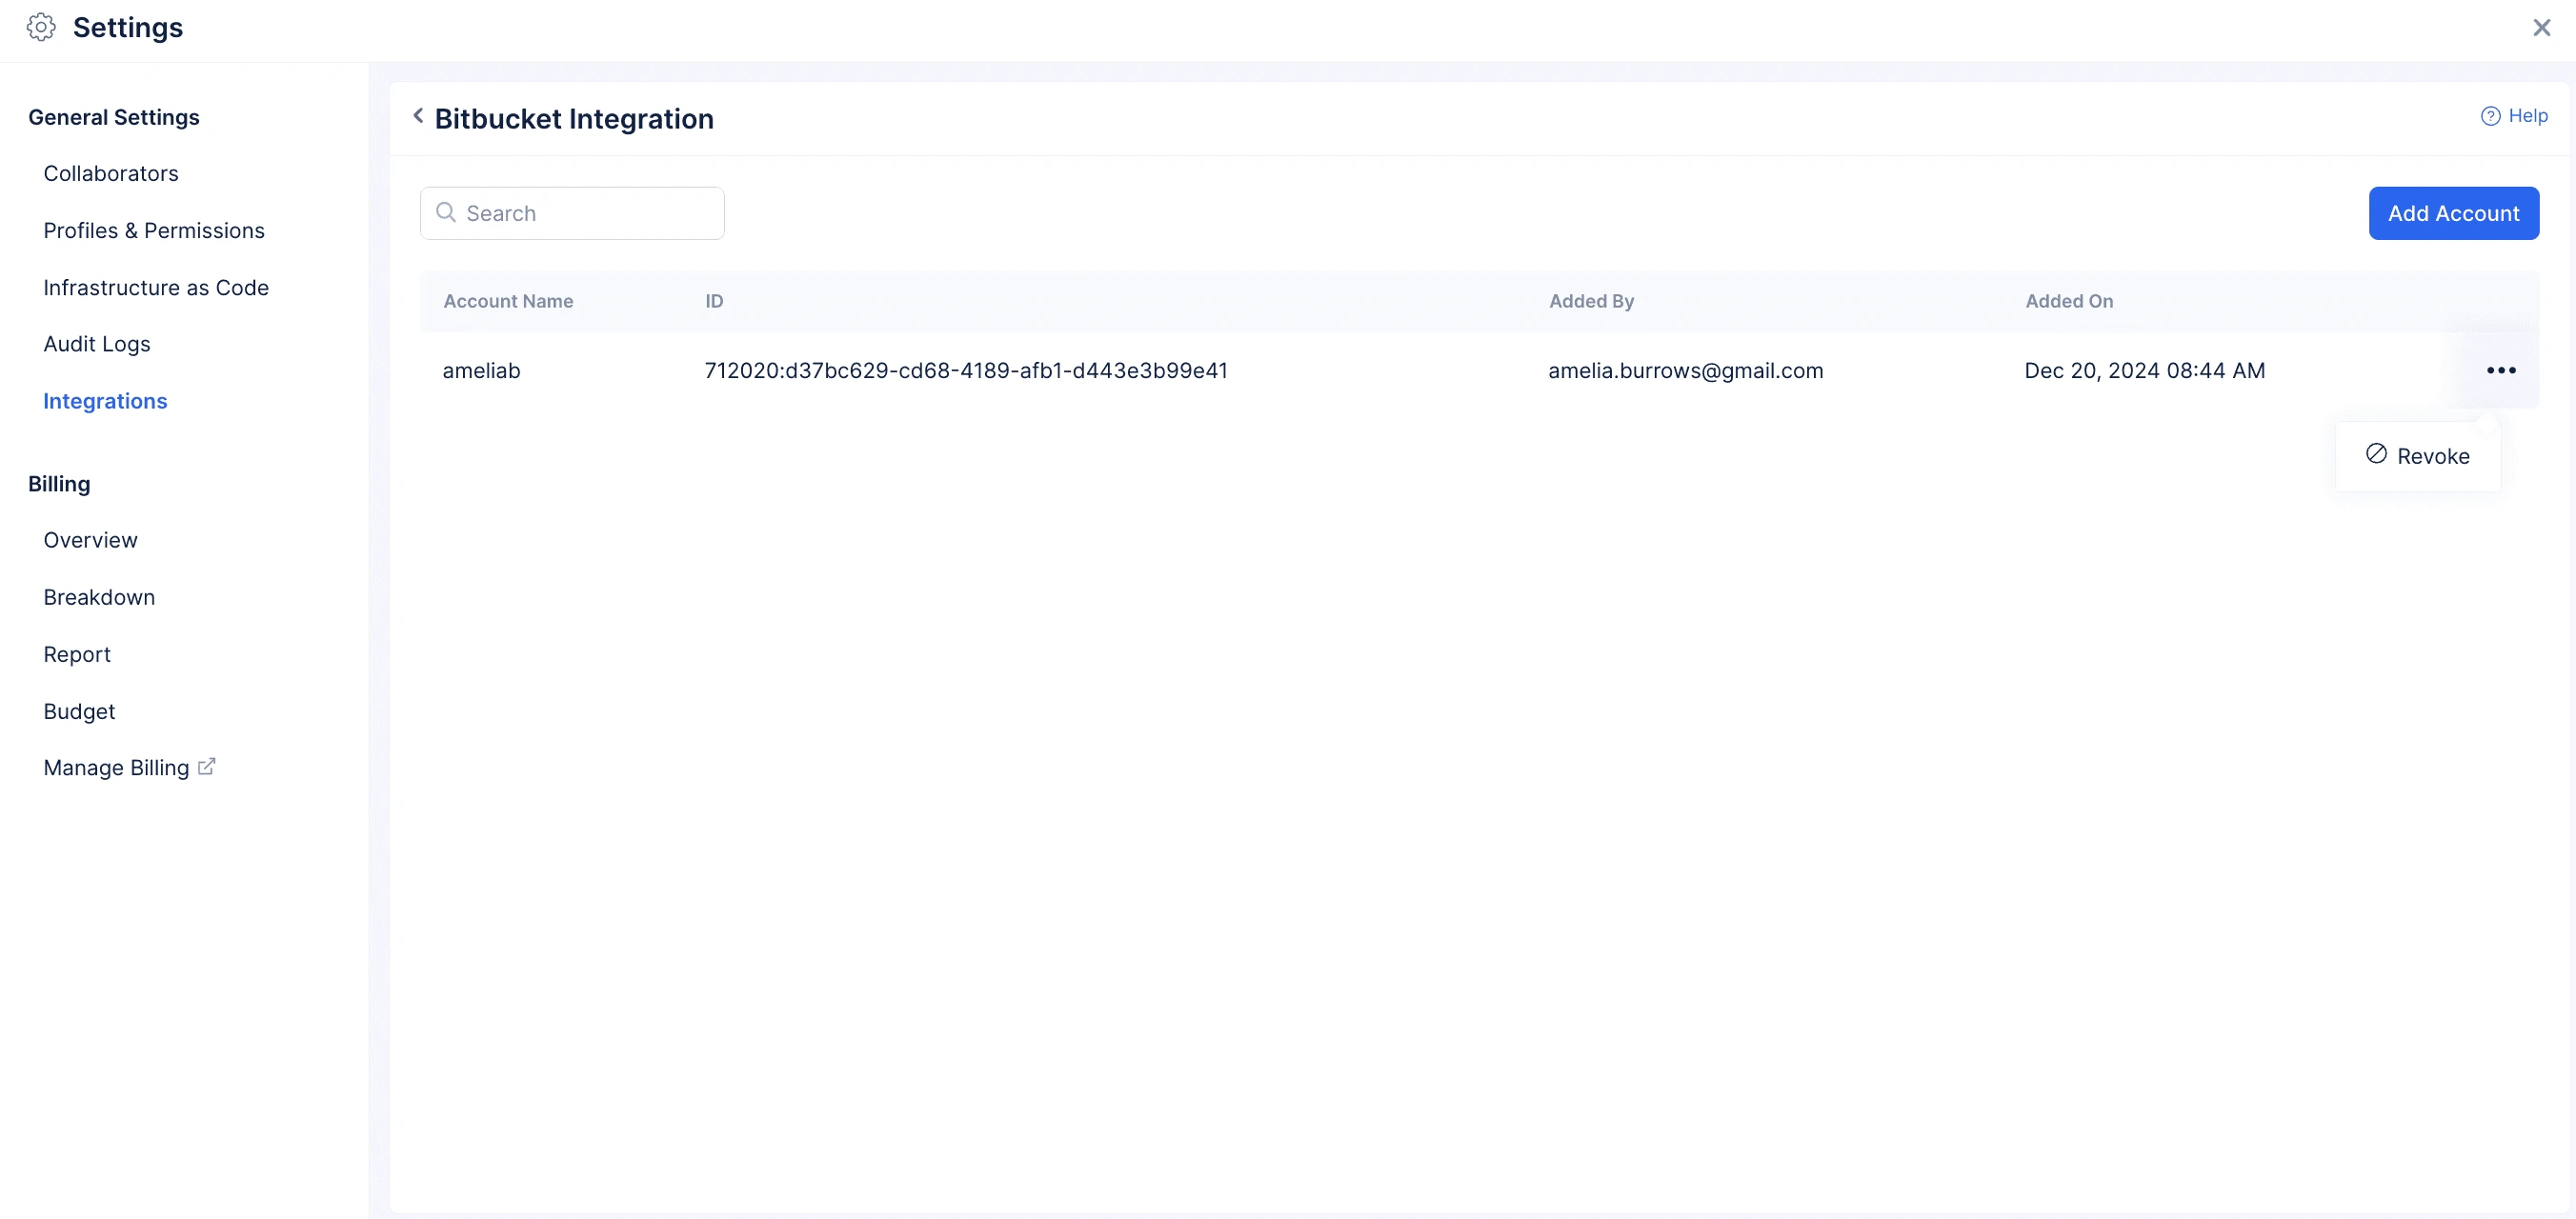
Revoke a Bitbucket Account
To revoke a Bitbucket account, please make sure to follow the below mentioned steps:
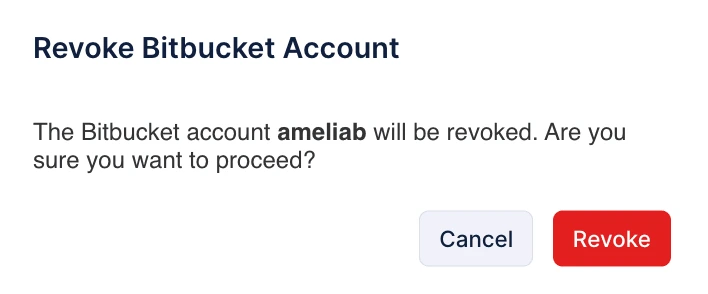
- Click on the ellipsis icon on the right corner and then click Revoke.
- Click Revoke to delete the integration permanently.
Last Updated 2025-06-20 19:01:24 +0530 IST
Yes
No
Send your feedback to us