LLM Serving Endpoints
1. LLM interaction modes
LLM Serving in QuickML now hosts a reasoning model, GLM-4.7-Flash, a 30B-A3B Mixture-of-Experts (MoE) large language model and a Vision-language model, Qwen3.6-35B-A3B, a more efficient 35 Billion parameter Multimodal mixture-of-Experts (MoE) model, with more models planned for future releases.
Each model handles different use cases, as described in the Available models section. The typical interaction flow looks like generating the responses from the LLM with required parameters and providing a text input for text-based models and an image input with prompt for vision-language model.
QuickML is now equipped to generate the responses from the LLM while retaining the previous interactions as context along with the parameters and input requirements. A new interaction mode, the conversation mode, is introduced in the LLM Serving playground.
Quick explanation about the chat interaction modes in LLM Serving:
- Single Shot Interaction: The model handles each prompt sent as a separate query. It doesn’t remember any earlier messages or context discussed prior while generating the responses.
- Conversation Mode: The model maintains context from earlier interaction in the same session, allowing it to remember details from earlier in the conversation. It results in generating a well-informed response with the context.
Currently, the single shot interaction is set as default interaction mode although it is not explicitly mentioned in the LLM chat interface, but it’s just a click away to switch to conversation mode.
Let’s learn more about the interaction modes below:
a. One-shot interaction mode
One-Shot interaction Mode is already an existing capability in QuickML LLM Serving. In this mode, the language model only responds to the current prompt provided as the input, without keeping the context from earlier messages. Every request sent to the LLM must include all the details and instructions needed for the model to generate a proper response. After the model replies, it doesn’t store or reuse that information in future queries; each prompt is treated as a completely new session.
When can I use this?
One-shot Interaction mode is stateless, quick, and best suited for independent or one-time tasks where the answer depends only on the current input, not on any previous conversation. This mode is ideal for tasks that require quick, self-contained responses.
Sample use cases:
-
Generating summaries — Send a transcript of a client meeting to the model and ask for key discussion points. Here, the model will instantly generate a focused summary from the information provided. It doesn’t rely on or remember any past requests.
-
Information extraction — Perform sentiment analysis, intent extraction, tonality identification, and more from each text provided to the model without any bias. These implementations are especially useful for customer-facing businesses, where the subjective feedback of each of their customers on products or services provided impacts the top line and bottom line revenues.
-
Content drafting — Perform tasks like drafting professional emails or news letters to customers based on their interactions or to thank the client for the meeting and confirm next actions. With the necessary information in a prompt, the model will produce a clear, polished email draft based solely on that prompt, which may nudge the customer to take action.
Chat interface
Single shot interaction is a default interaction mode in the LLM serving chat. Once the model is selected, we can see in the interface screen below that conversation mode is turned off.
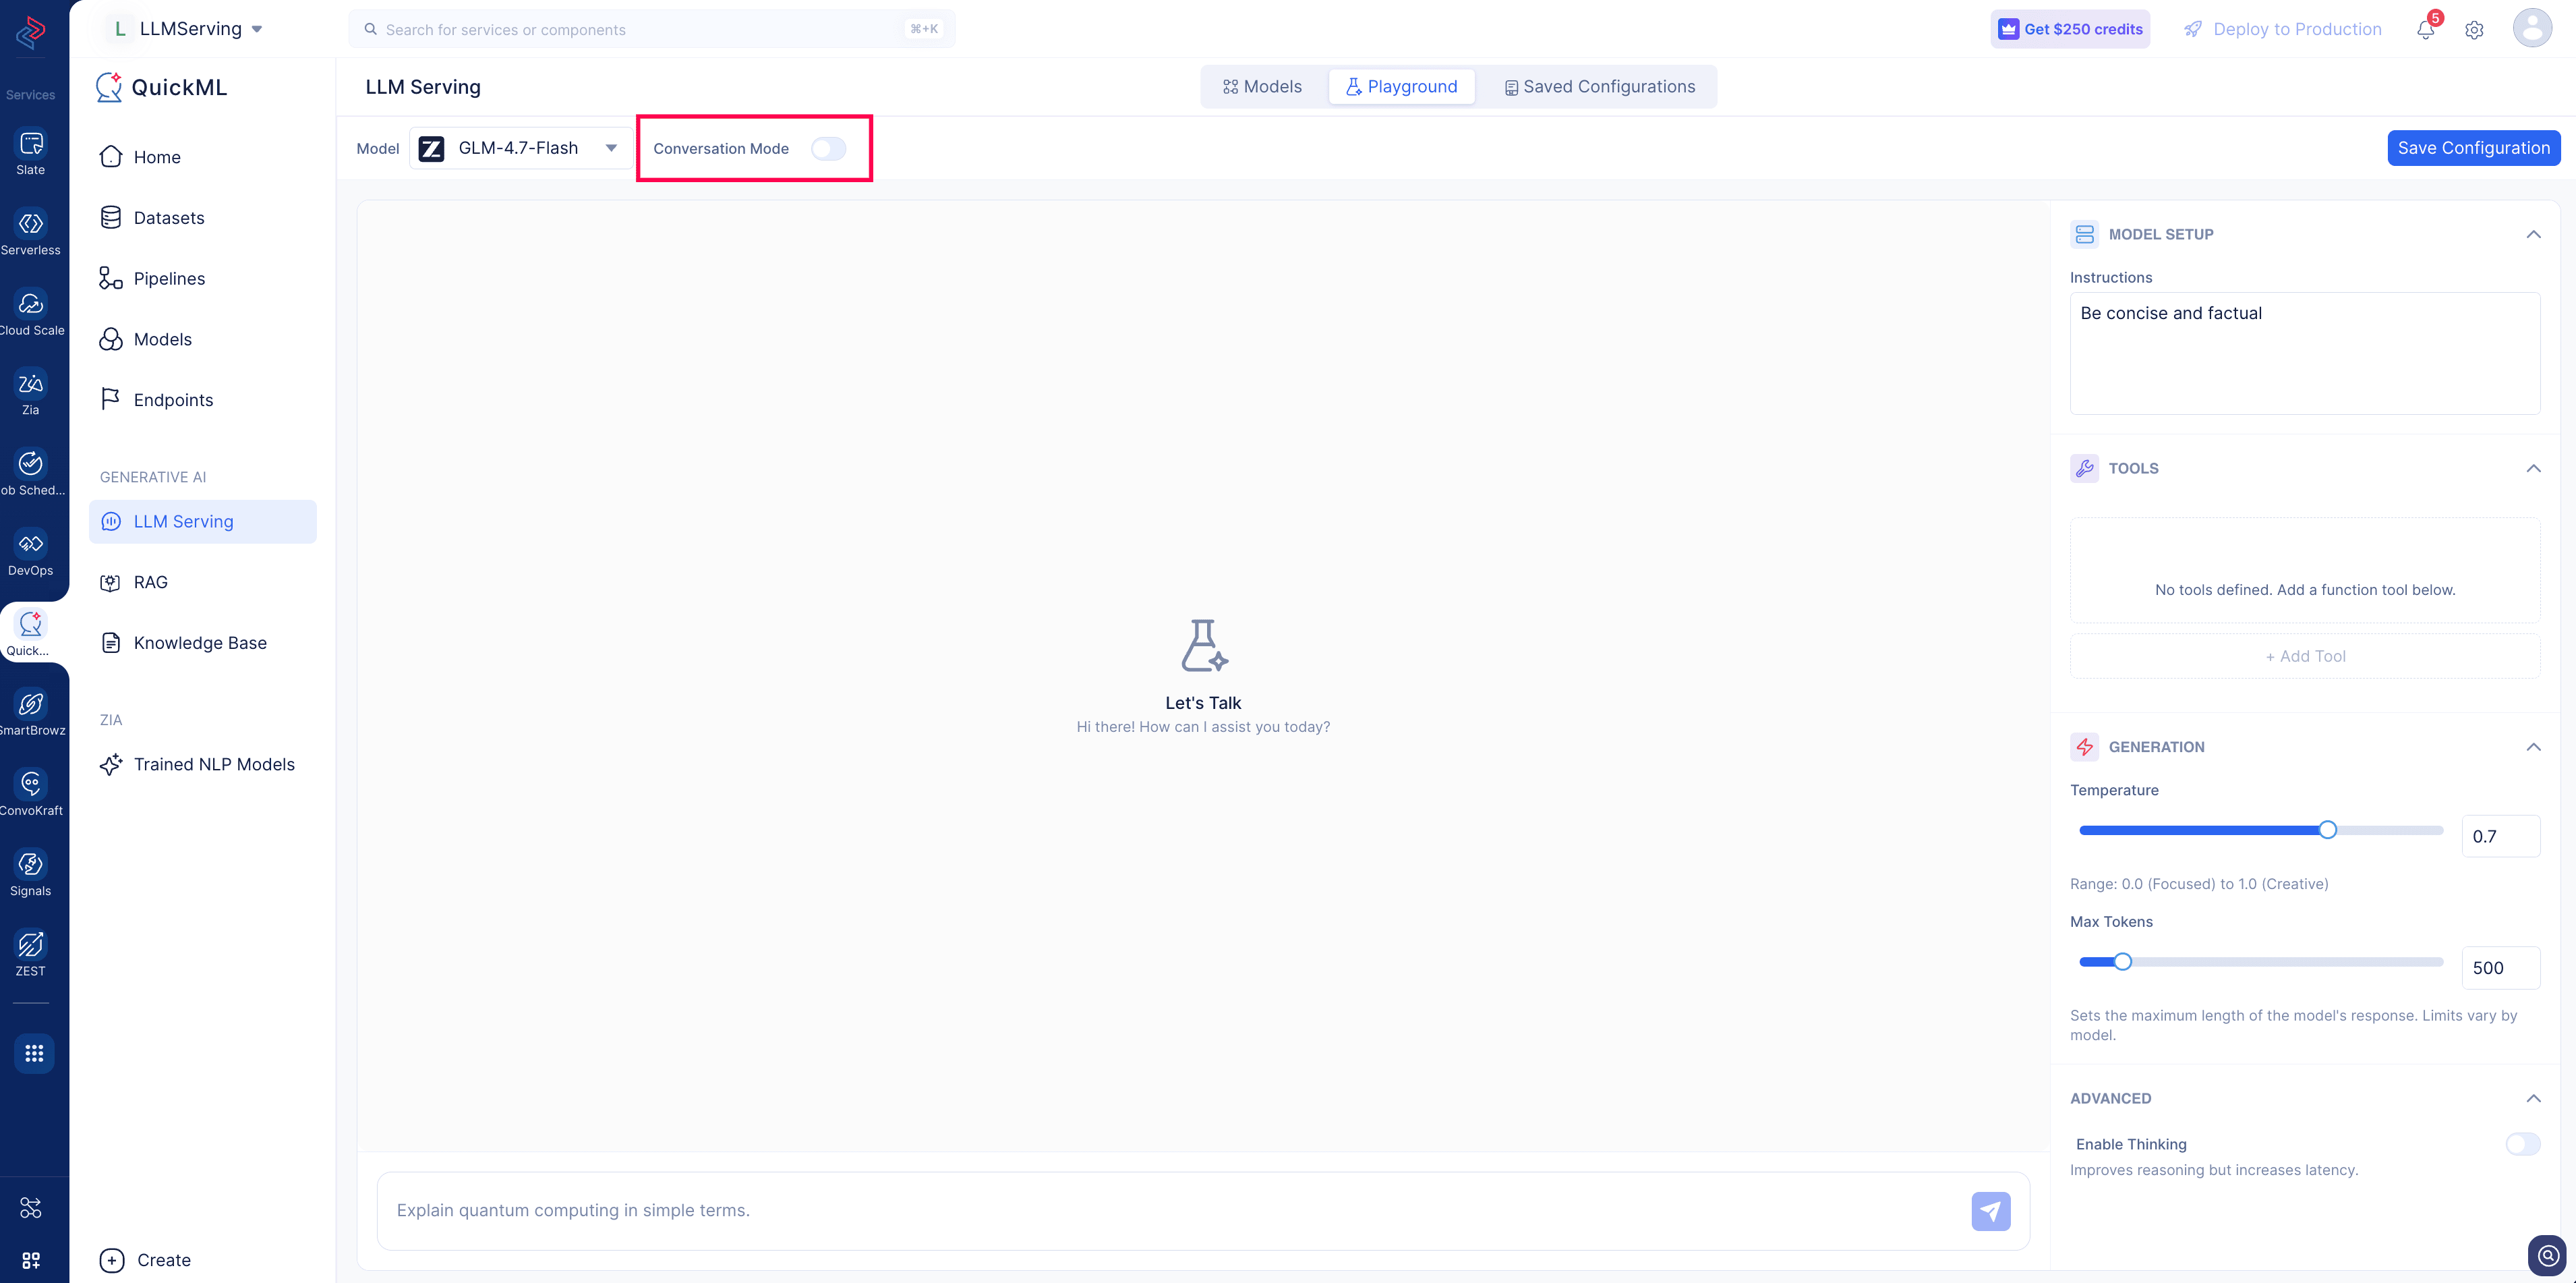
It specifies that the current mode of interaction is set to one-shot interaction mode by default, which will just respond to the prompt provided without previous context.
b. Conversation mode
Conversation Mode is a new capability in QuickML LLM Serving. It enables the multi-turn, context-aware interactions within the interface. It helps the model maintain the context from previous messages just like any chat interaction, allowing it to remember details from earlier parts of the conversation. This means that the model doesn’t just respond to the latest input, it also considers previous messages, questions, and answers to give more meaningful and relevant responses.
When can I use this?
Unlike One-shot mode, Conversation mode is stateful, meaning it keeps track of what has already been discussed in the same session. This makes it ideal for ongoing, interactive tasks where the conversation naturally builds upon previous exchanges.
Sample use case:
1. Drafting a follow-up email from a sales meeting
A sales manager has just wrapped up a client meeting and wants to turn the discussion into a polished follow-up email.
They upload the meeting transcript to the LLM, then begin the conversation:
- “Can you summarize the key points from this transcript?”
- “Turn that into a follow-up email draft.”
- “Make it more formal and mention our new pricing offer.”
In Conversation Mode, the model retains context across each message. It remembers each step, the transcript, the summary it generated, and the draft it produced. Each follow-up refines the previous output naturally, without the user needing to repeat themselves.
In One-Shot Mode, each message is treated independently. When the user asks to “Draft a follow-up email”, the model has no memory of the earlier draft or the transcript it was based on. It may ask for the context again or produce an unrelated response, breaking the flow entirely.
Chat interface
Conversation mode in the LLM serving chat is available only for GLM 4.7 Flash as of now.
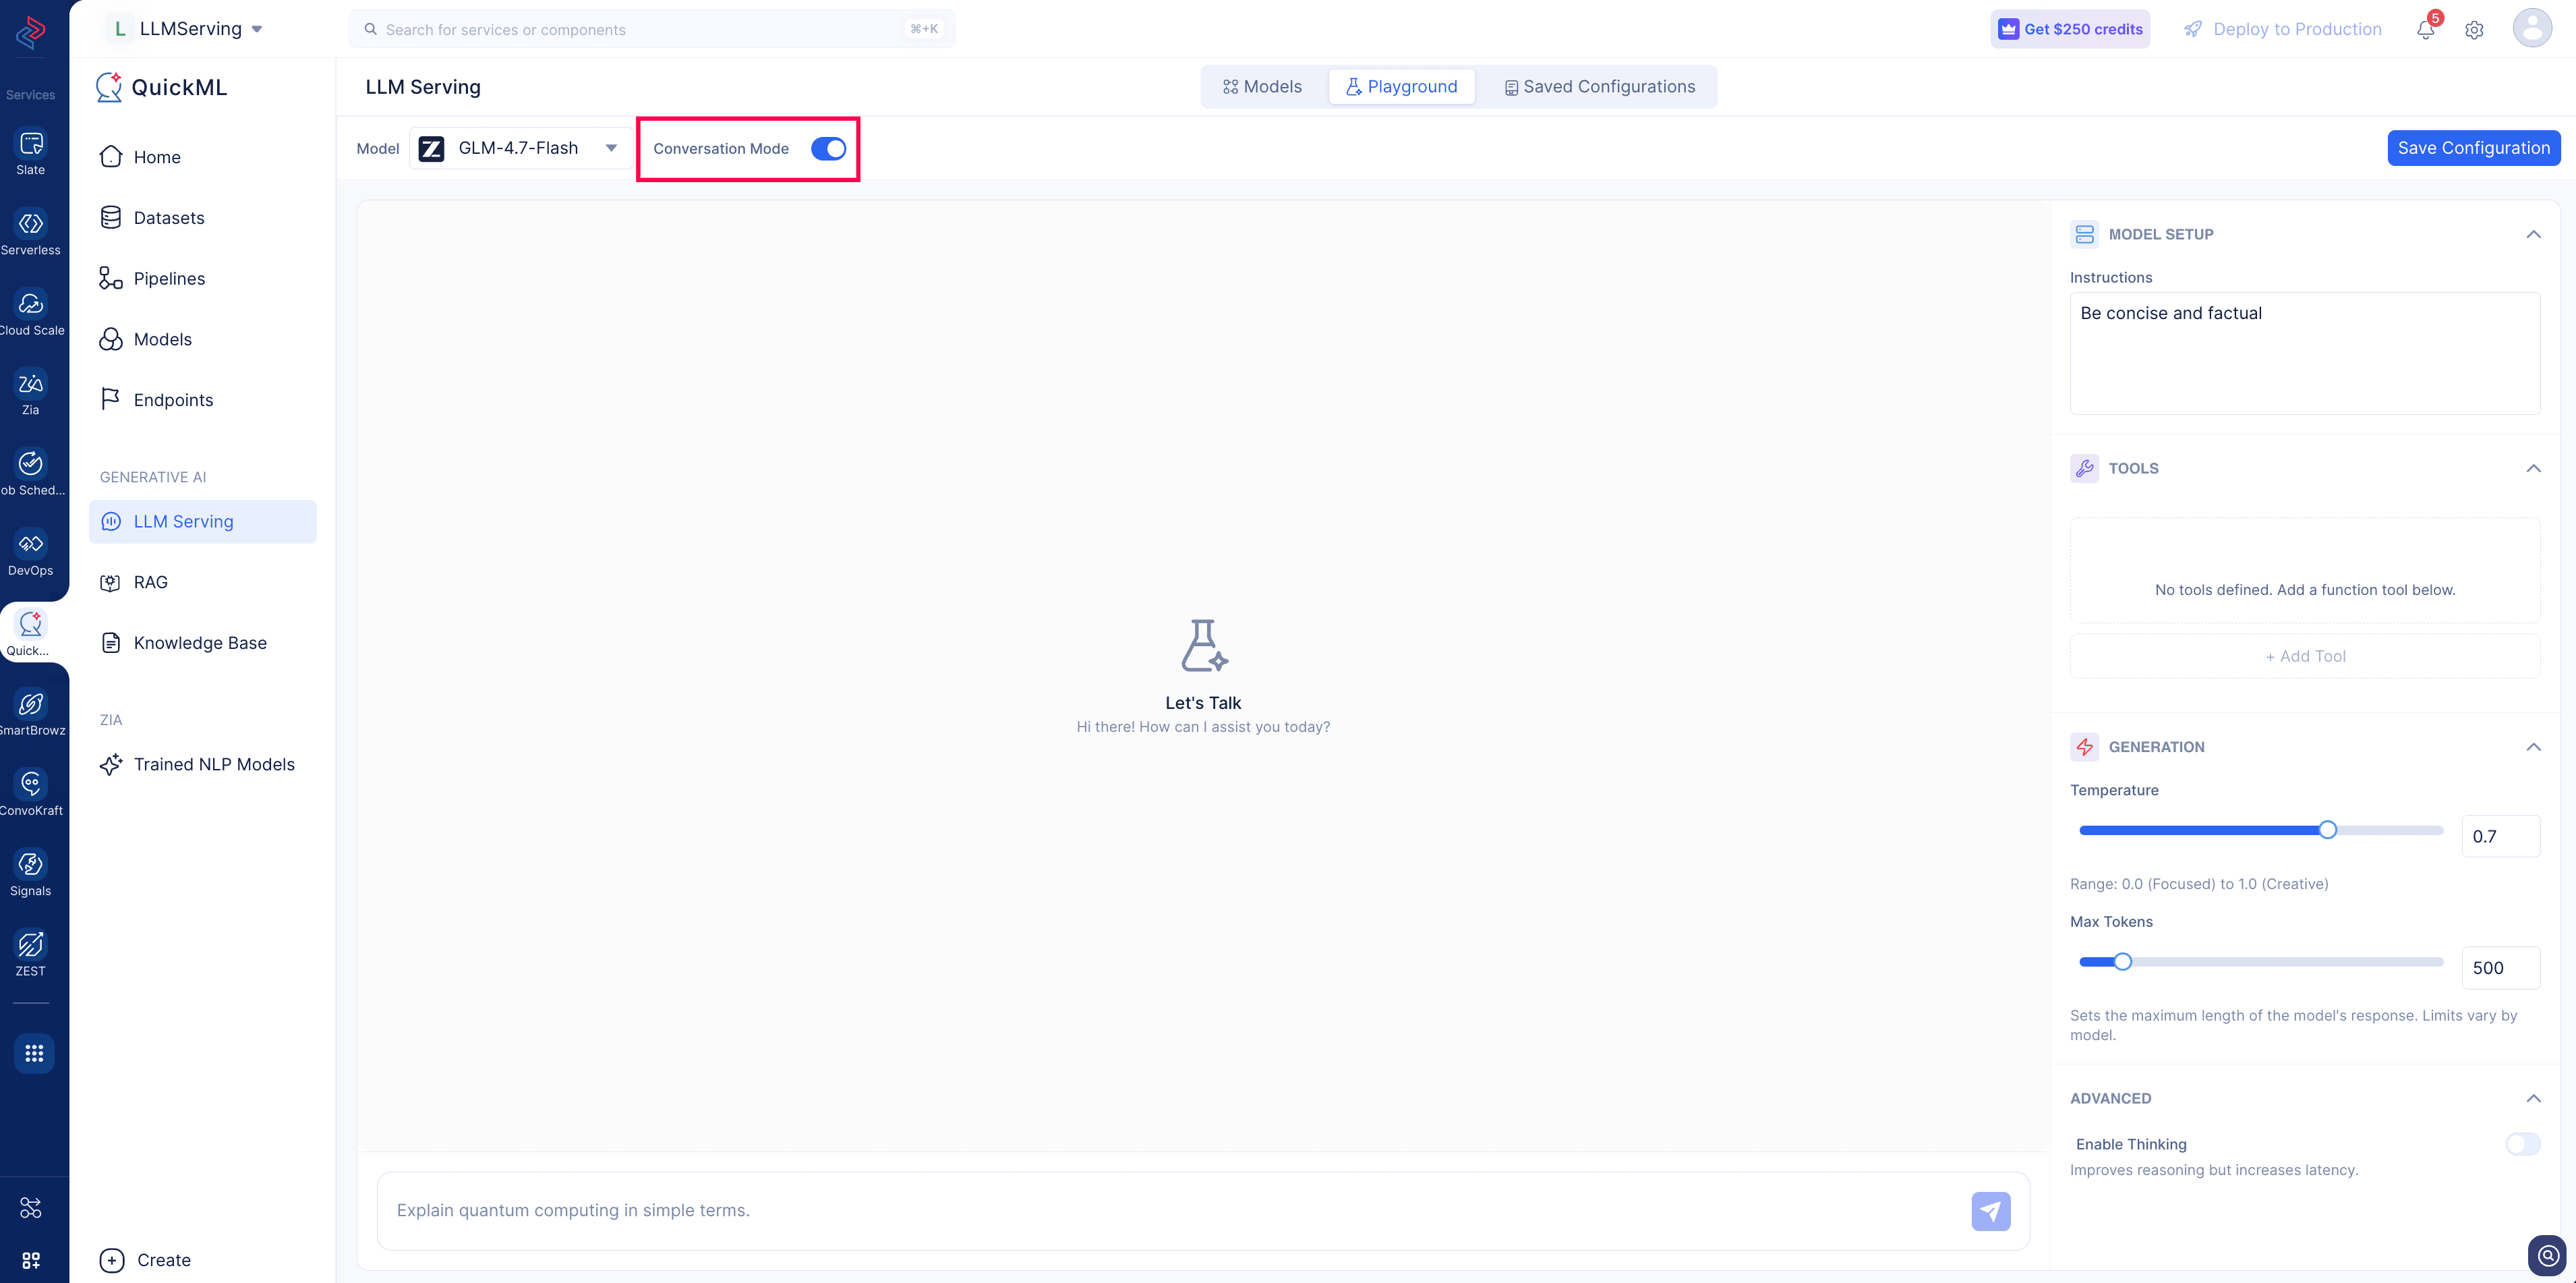
Upon clicking the toggle button as highlighted, the Conversation mode is enabled.
2. LLM tool calling
Tool calling lets the language model go beyond text generation by invoking external functions you define. Instead of answering only from its training, the model recognizes when a query needs an external action such as fetching the live data, performing a calculation, querying a system and creates a structured request.
In QuickML, you define tools in the Tools panel of the LLM Serving configuration, and the model uses them automatically whenever needed.
a. How the LLM utilizes tools
The model does not execute tools itself. It decides when a tool is needed and returns a structured call for your application to run, following this cycle:
- You define one or more tools in the configuration, each with a name, description, and input parameters.
- When a user query matches a tool’s purpose, the model invokes a tool call specifying the tool name with the required argument values it inferred.
- Your application executes the tool and returns the result to the model.
- The model incorporates the result along with the previous context and generates the final response.
The model relies on each tool’s description and parameter definitions to decide which tool to call and what arguments to pass, so clear and specific definitions directly improve accuracy.
Example
Consider a tool defined to create a lead in Zoho CRM:
{
  "name": "create_crm_lead",
  "description": "Creates a new lead in Zoho CRM. Use this when the user wants to capture a potential customer's details such as name, company, email, or phone.",
  "parameters": {
    "type": "object",
    "properties": {
      "last_name": {
        "type": "string",
        "description": "Last name of the lead. This is the mandatory field for creating a lead in Zoho CRM."
      },
      "first_name": {
        "type": "string",
        "description": "First name of the lead."
      },
      "company": {
        "type": "string",
        "description": "Name of the company the lead is associated with."
      },
      "email": {
        "type": "string",
        "description": "Email address of the lead."
      },
      "phone": {
        "type": "string",
        "description": "Contact phone number of the lead."
      },
      "lead_source": {
        "type": "string",
        "description": "Channel through which the lead was acquired.",
        "enum": ["Website", "Advertisement", "Referral", "Cold Call", "Trade Show"]
      }
    },
    "required": ["last_name", "company"]
  }
}
With this tool defined, when a user enters “Add Jane Doe from Acme Corp as a lead, her email is jane@acme.com”, the model returns a tool call to create_crm_lead with the arguments it inferred from the query:
{
  "name": "create_crm_lead",
  "arguments": {
    "first_name": "Jane",
    "last_name": "Doe",
    "company": "Acme Corp",
    "email": "jane@acme.com"
  }
}
Your application executes this call against the Zoho CRM API, then returns the result to the model, which generates the final response confirming the lead was created.
b. Supported models
Tool calling is available only for GLM 4.7 Flash at this time. Other LLM Serving models do not expose the Tools panel.
c. Adding a tool
- In LLM Serving, select the GLM 4.7 Flash model.
- In the configuration panel, expand the Tools section.
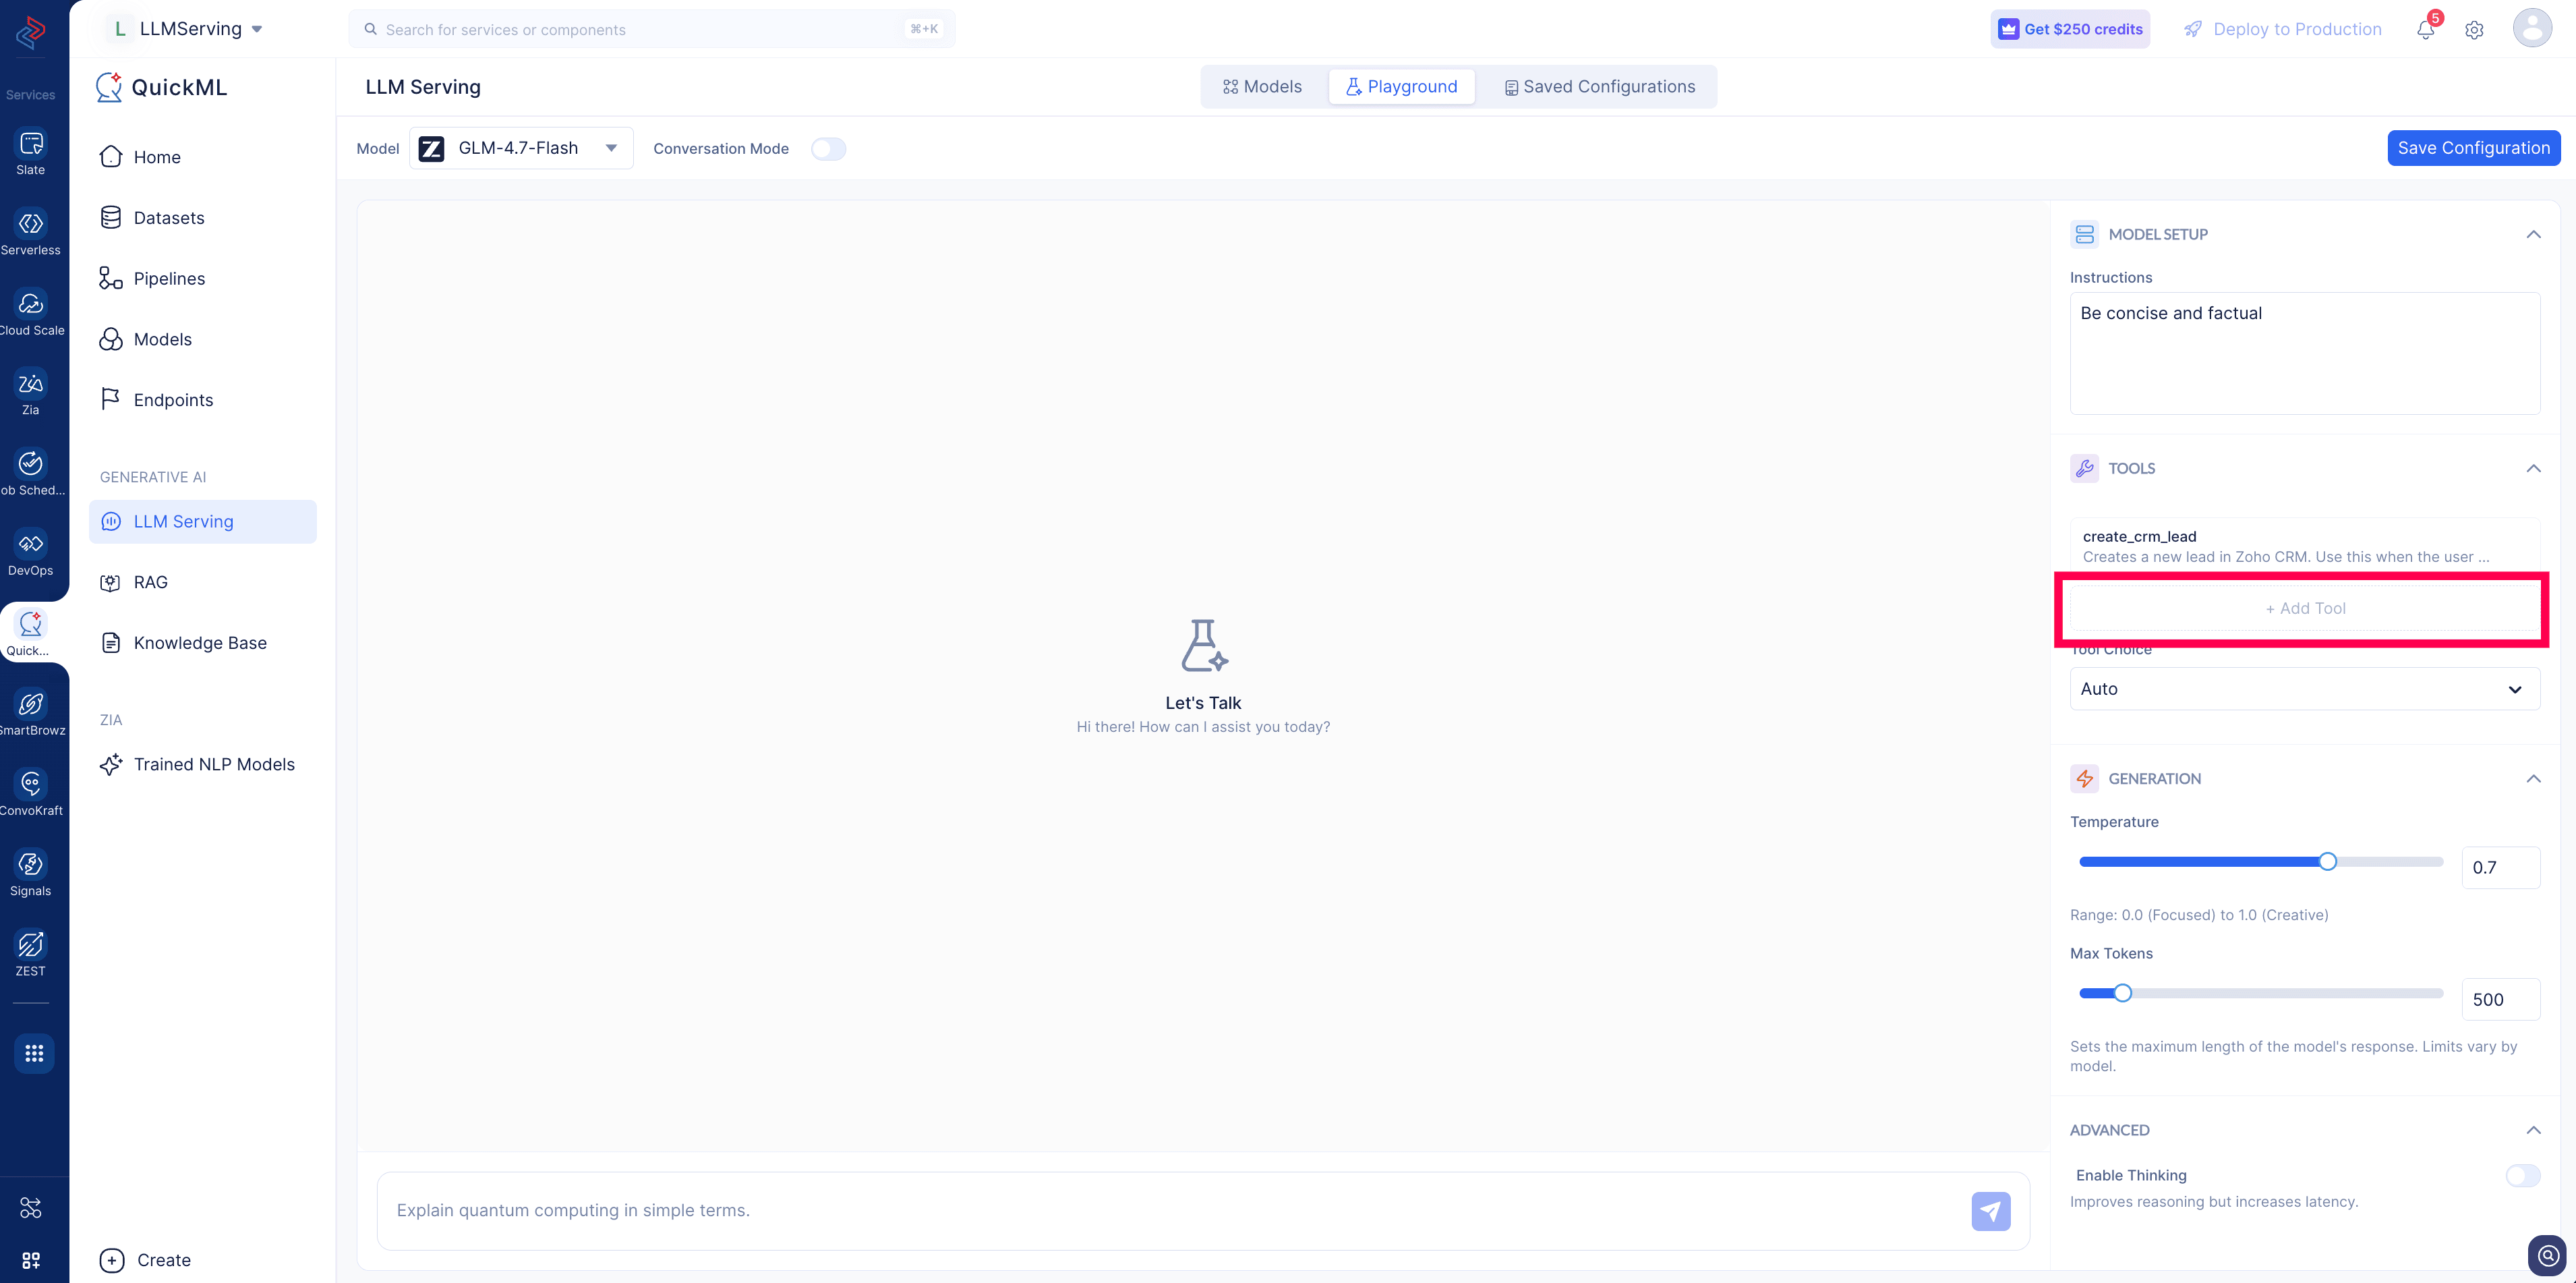
- Click + Add Tool. The Add Tool editor opens with a JSON function template.
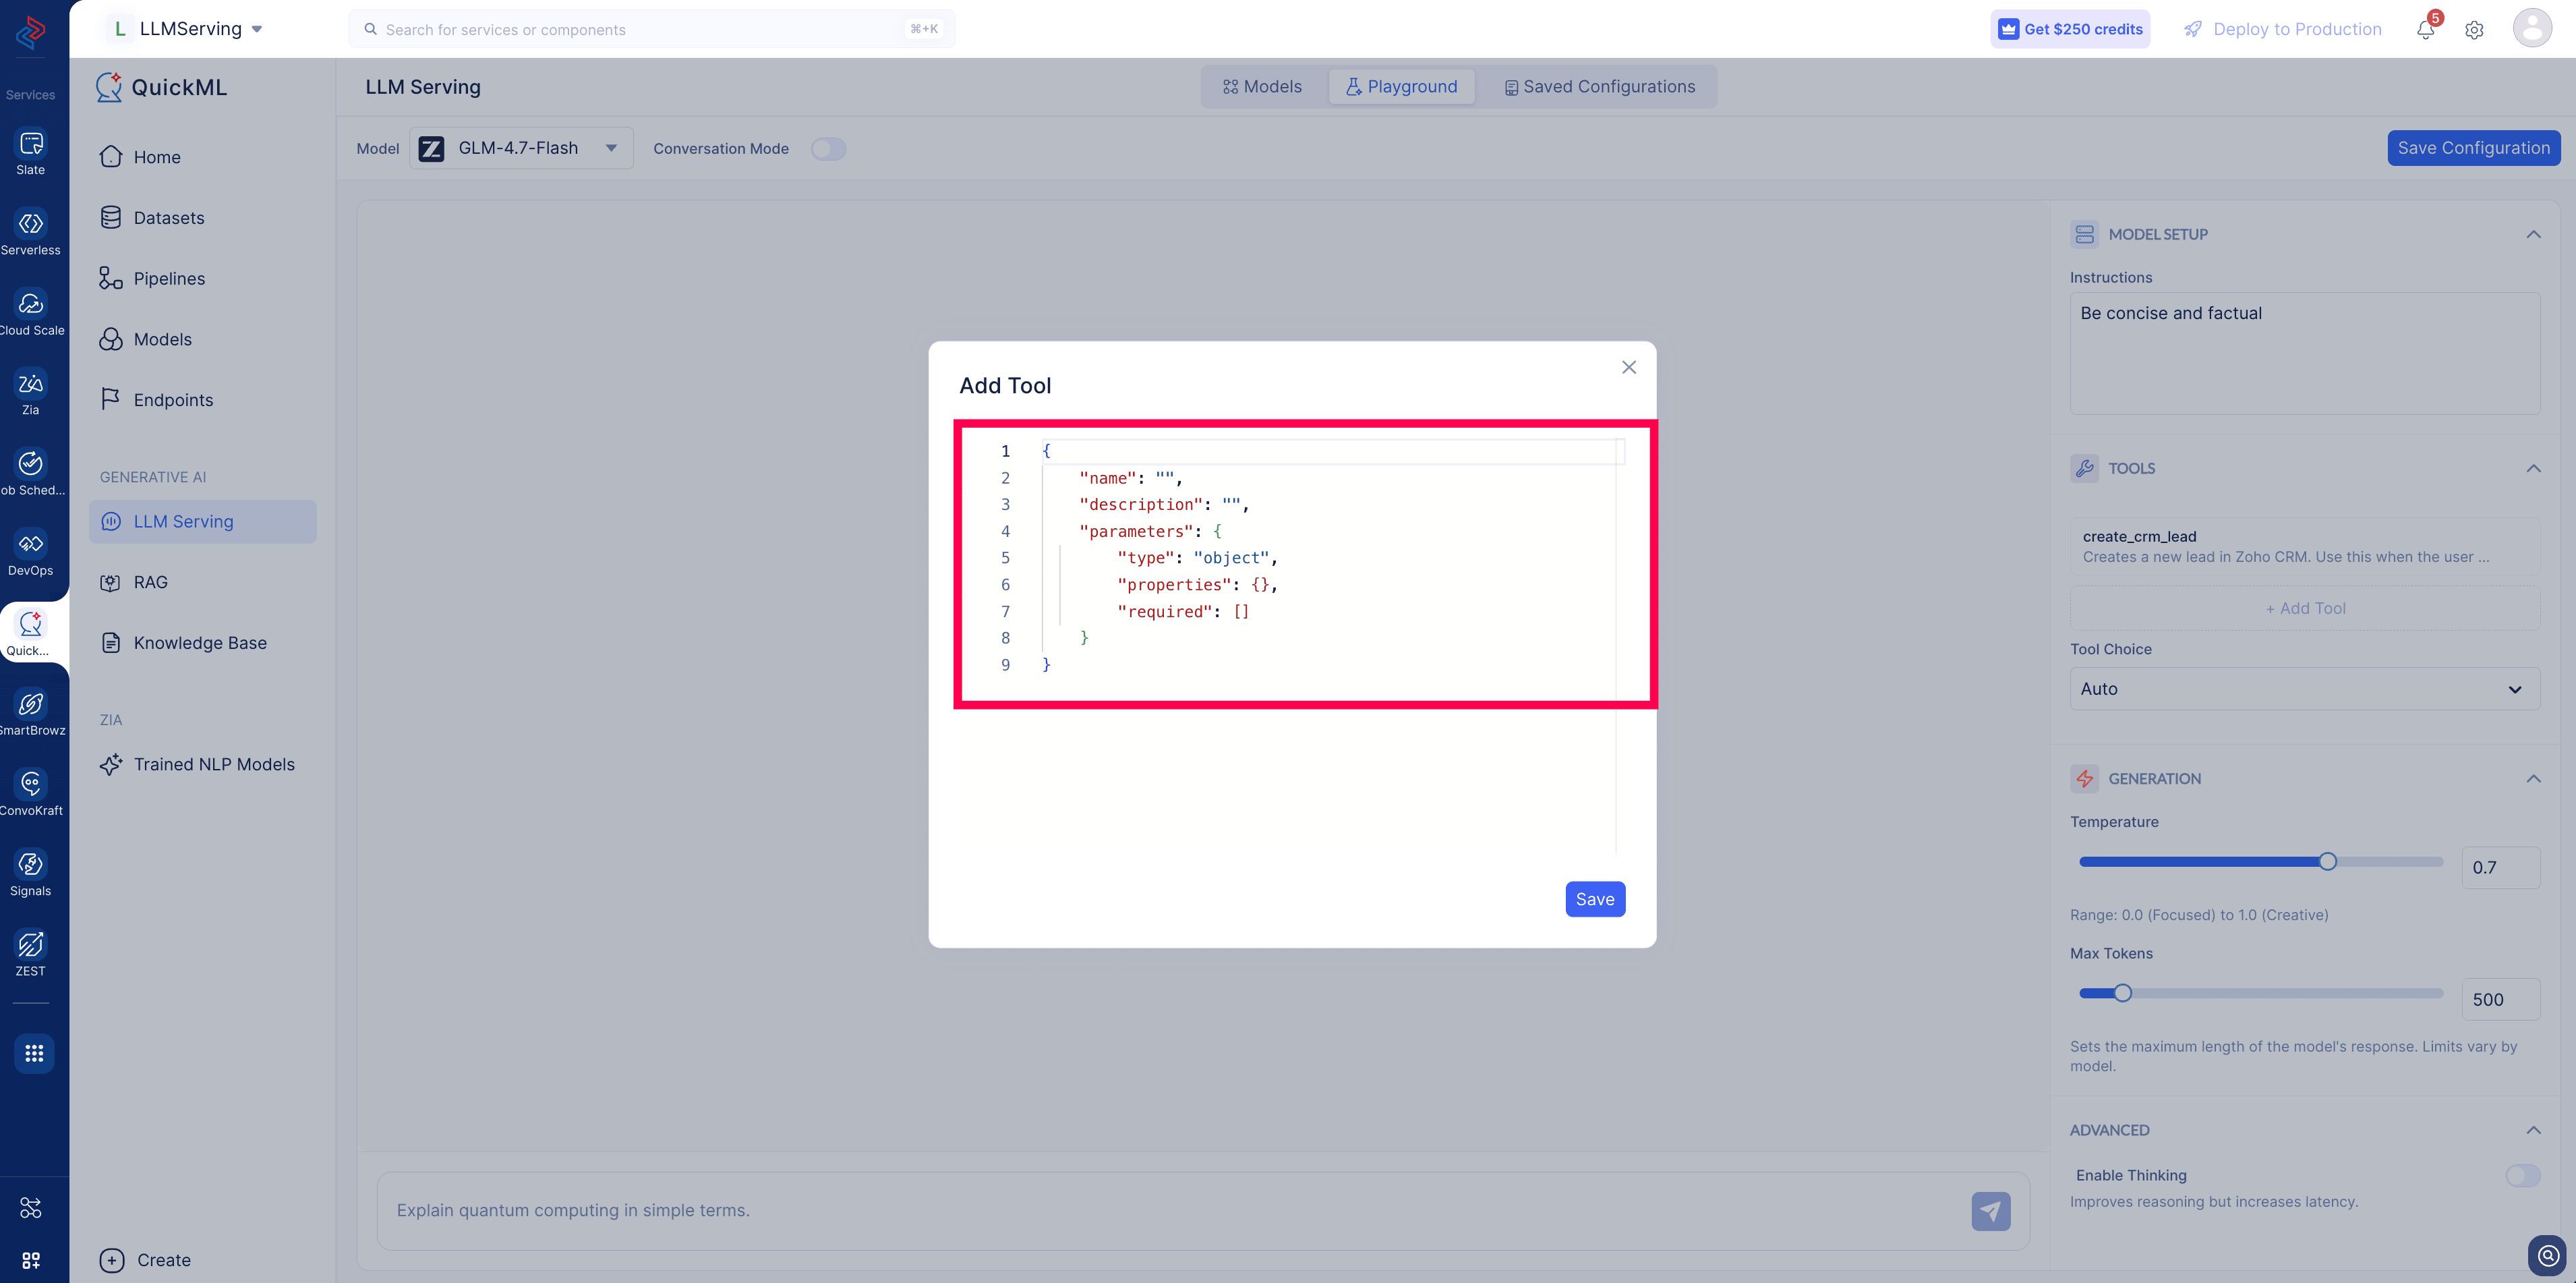
- Define the tool using the schema below, then click Save. The tool appears in the Tools list and can be edited or removed.
d. Tool definition structure
Each tool is defined as a JSON function specification:
{
  "name": "",
  "description": "",
  "parameters": {
    "type": "object",
    "properties": {},
    "required": []
  }
}
- name — A unique identifier for the function (e.g., get_weather).
- description — A clear explanation of what the tool does and when to use it. The model uses this to decide whether to call the tool.
- parameters — A JSON Schema object describing the inputs the tool accepts.
- type — Always object at the top level.
- properties — The individual input fields, each with its own type and description.
- required — The list of property names that must be supplied.
e. Tool calling in endpoints
Tools defined in the LLM serving playground will persist when the configuration is saved, and will carry into any endpoint created from that saved configuration. A deployed endpoint therefore exposes the same tools and tool-calling behavior as tested in the playground. The model invokes tool calls in its API response for your application to execute.
f. Best practices
- Write specific tool descriptions; the model selects tools based on them.
- Give every parameter a clear type and description, and list all mandatory fields under required.
3. LLM endpoints
In QuickML, as you may know, you can train your own custom AI models and access them using an REST API generated after creating an endpoint and publishing it. In the same manner, you can create a Generative AI endpoint for LLMs available in LLM Serving, and access it using a dedicated API and SDK. Beyond interacting with the large language models via chat playground interface, QuickML is equipped to expand the scope of utilization of these models and help businesses integrate them seamlessly into their applications.
Therefore, QuickML’s Generative AI module has been upgraded with endpoint creation capability across both LLM Serving and RAG with chosen parameters as per business needs. While the Custom ML and Gen AI models handles different use cases, the endpoint creation flow, publishing, and generating API & SDK information work the same way for both.
In the Generative AI module, the endpoint creation coupled with the saved parameter configuration with an optional instruct prompt.
a. Save the configuration
QuickML now allows users to save their LLM parameter values. A saved configuration captures all configured parameters from the playground chat interface.
Benefits of saving the parameters
Saved parameter configs can be used for various purposes.
- Reuse the same parameter values across multiple test sessions without re-entering them each time.
- Create an endpoint with the saved parameter configuration, ensuring what’s been tested is being deployed without errors.
- Publish multiple endpoints using the same configuration when needed.
How to save the parameters configuration?
Let’s look at the step by step process to save the parameters for the chosen LLM.
- Navigate to the Generative AI section within QuickML.
- Click the LLM Serving tab.
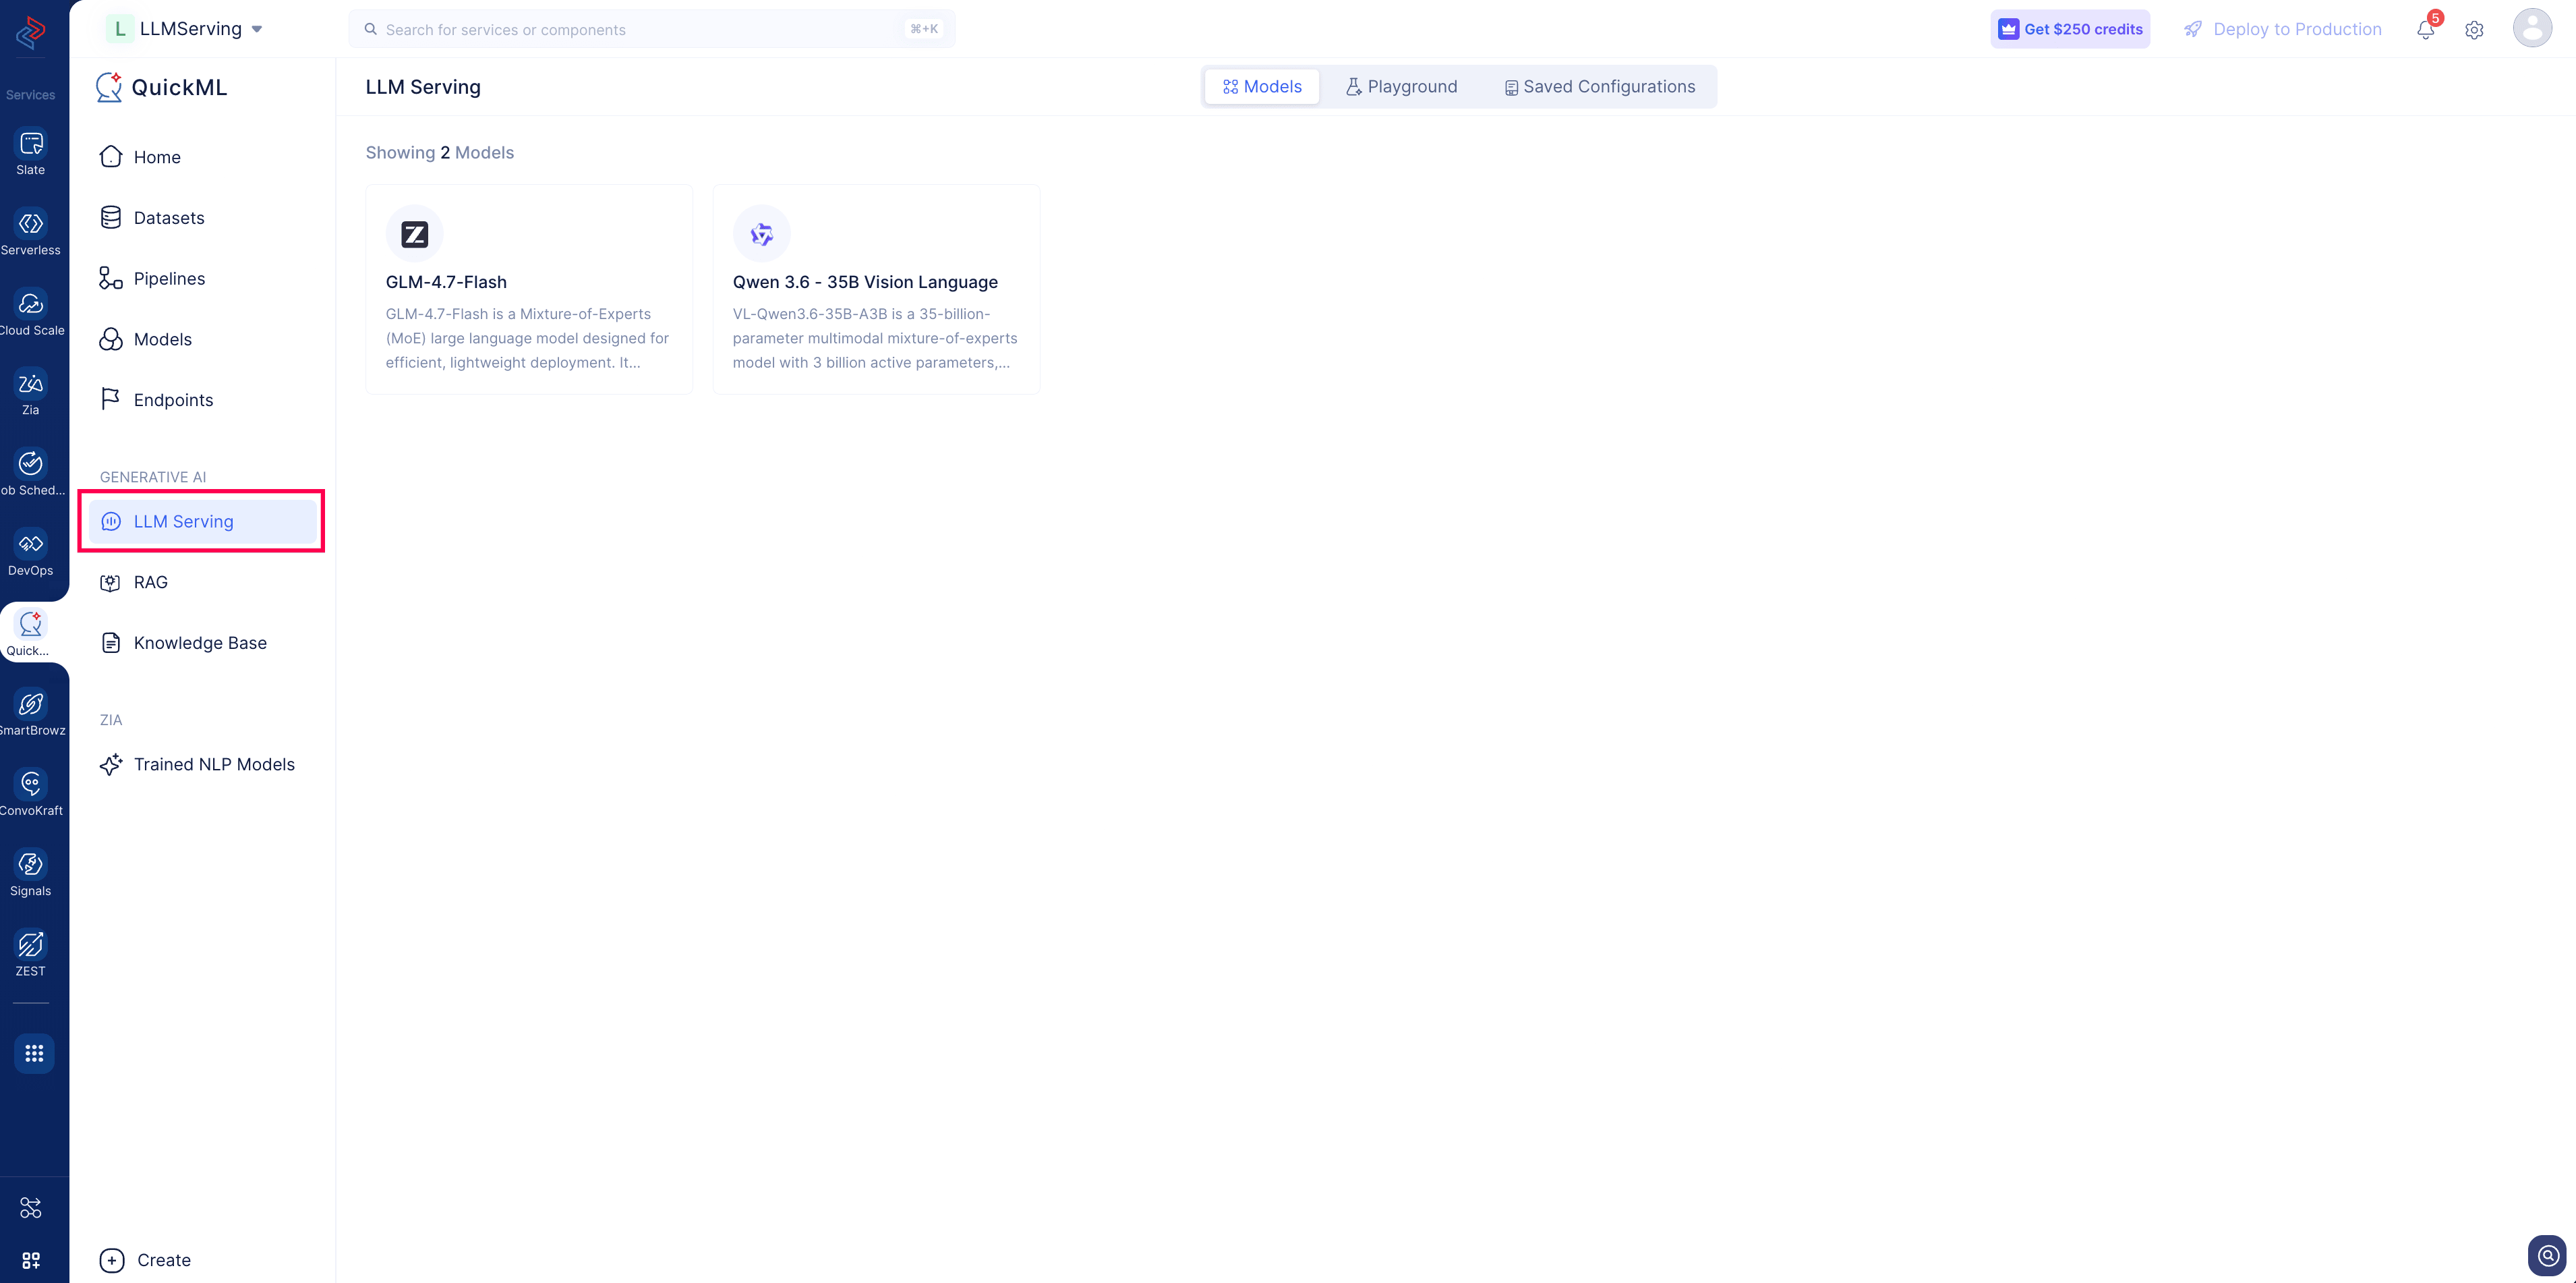
- Verify the available models in the Models tab, click on the chosen model to view model details.
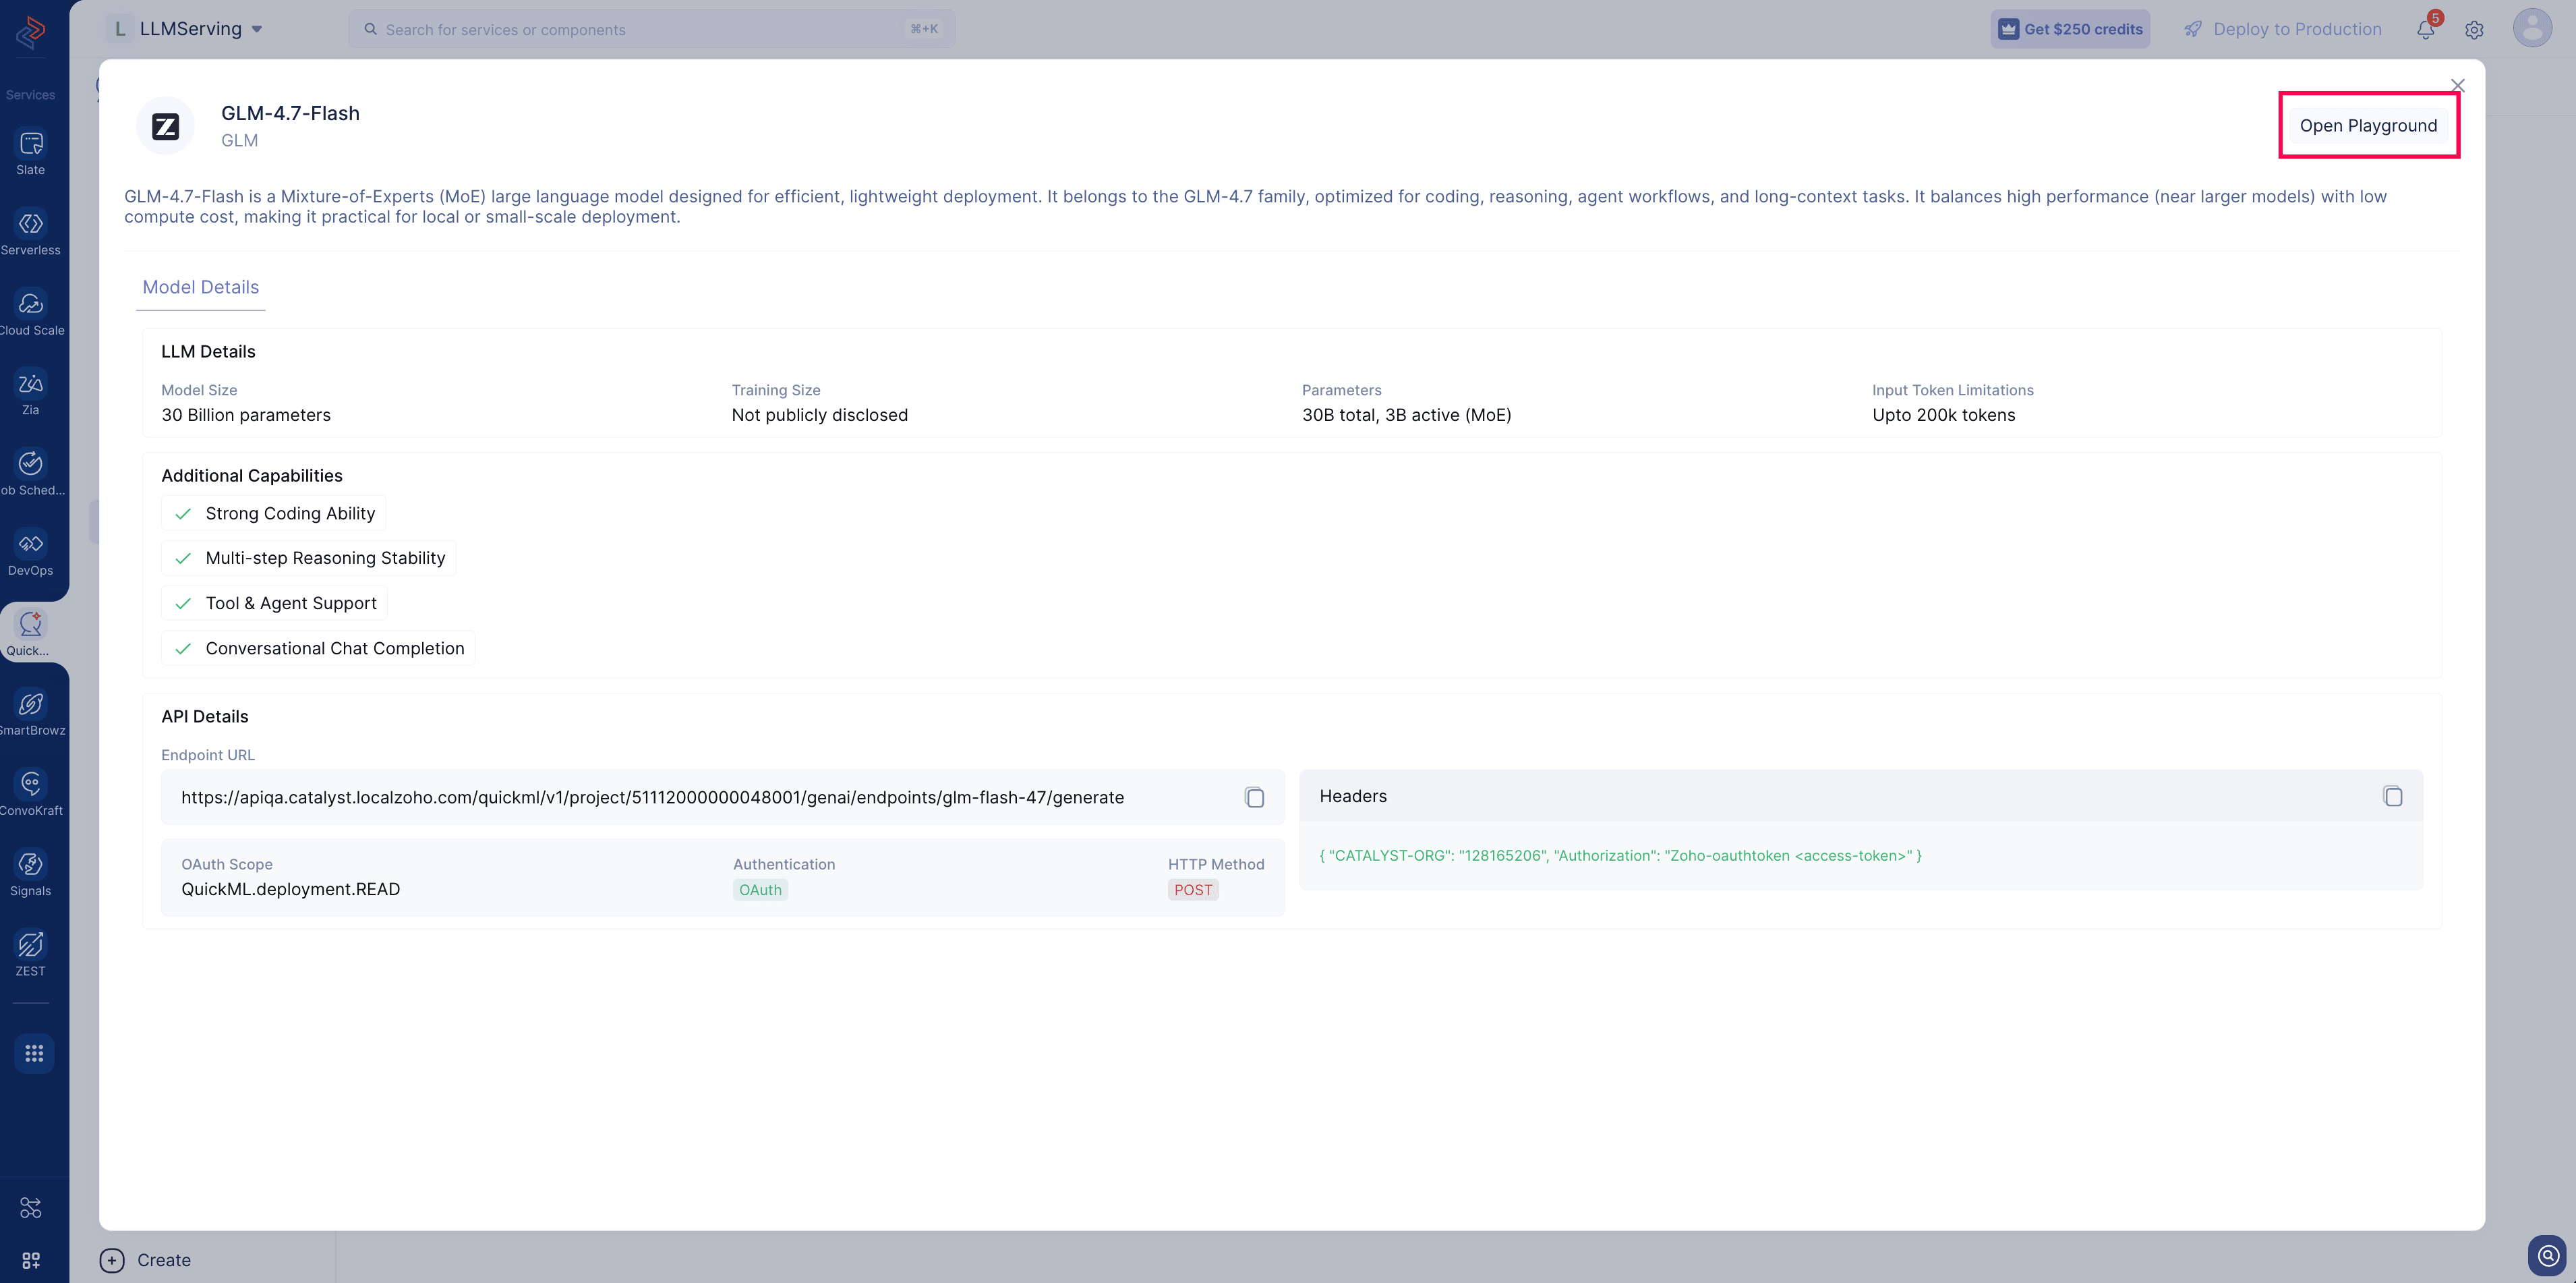
- Click Open Playground to access the test instance.
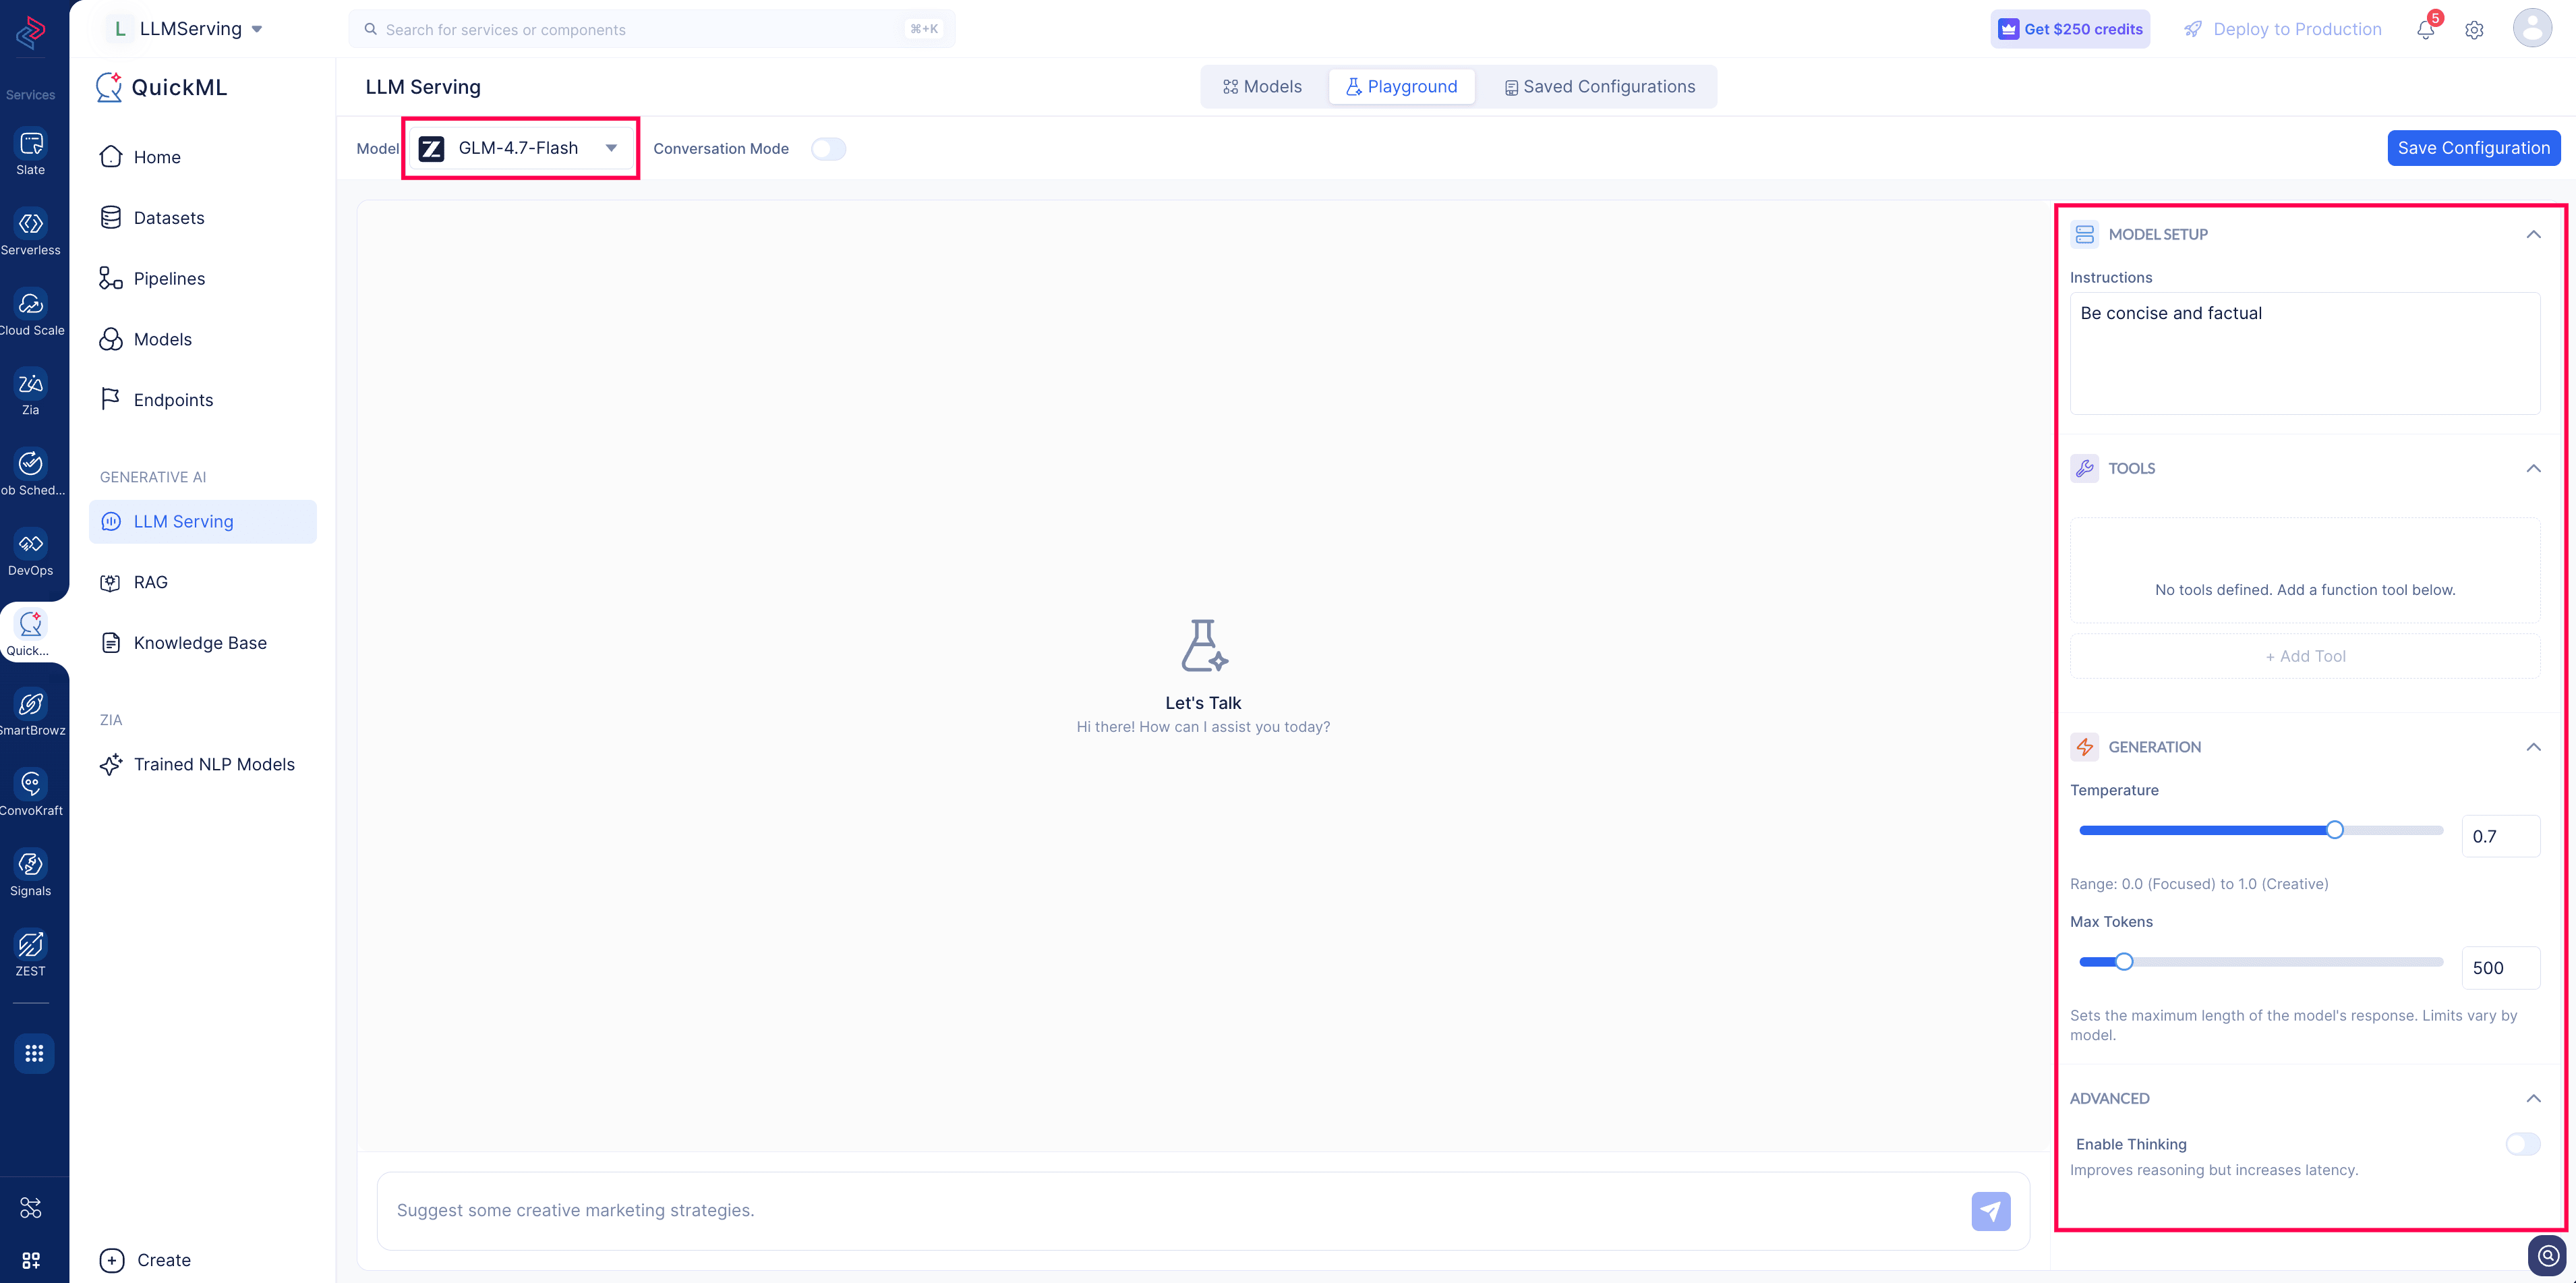
- Set your desired parameters for the selected LLM model.
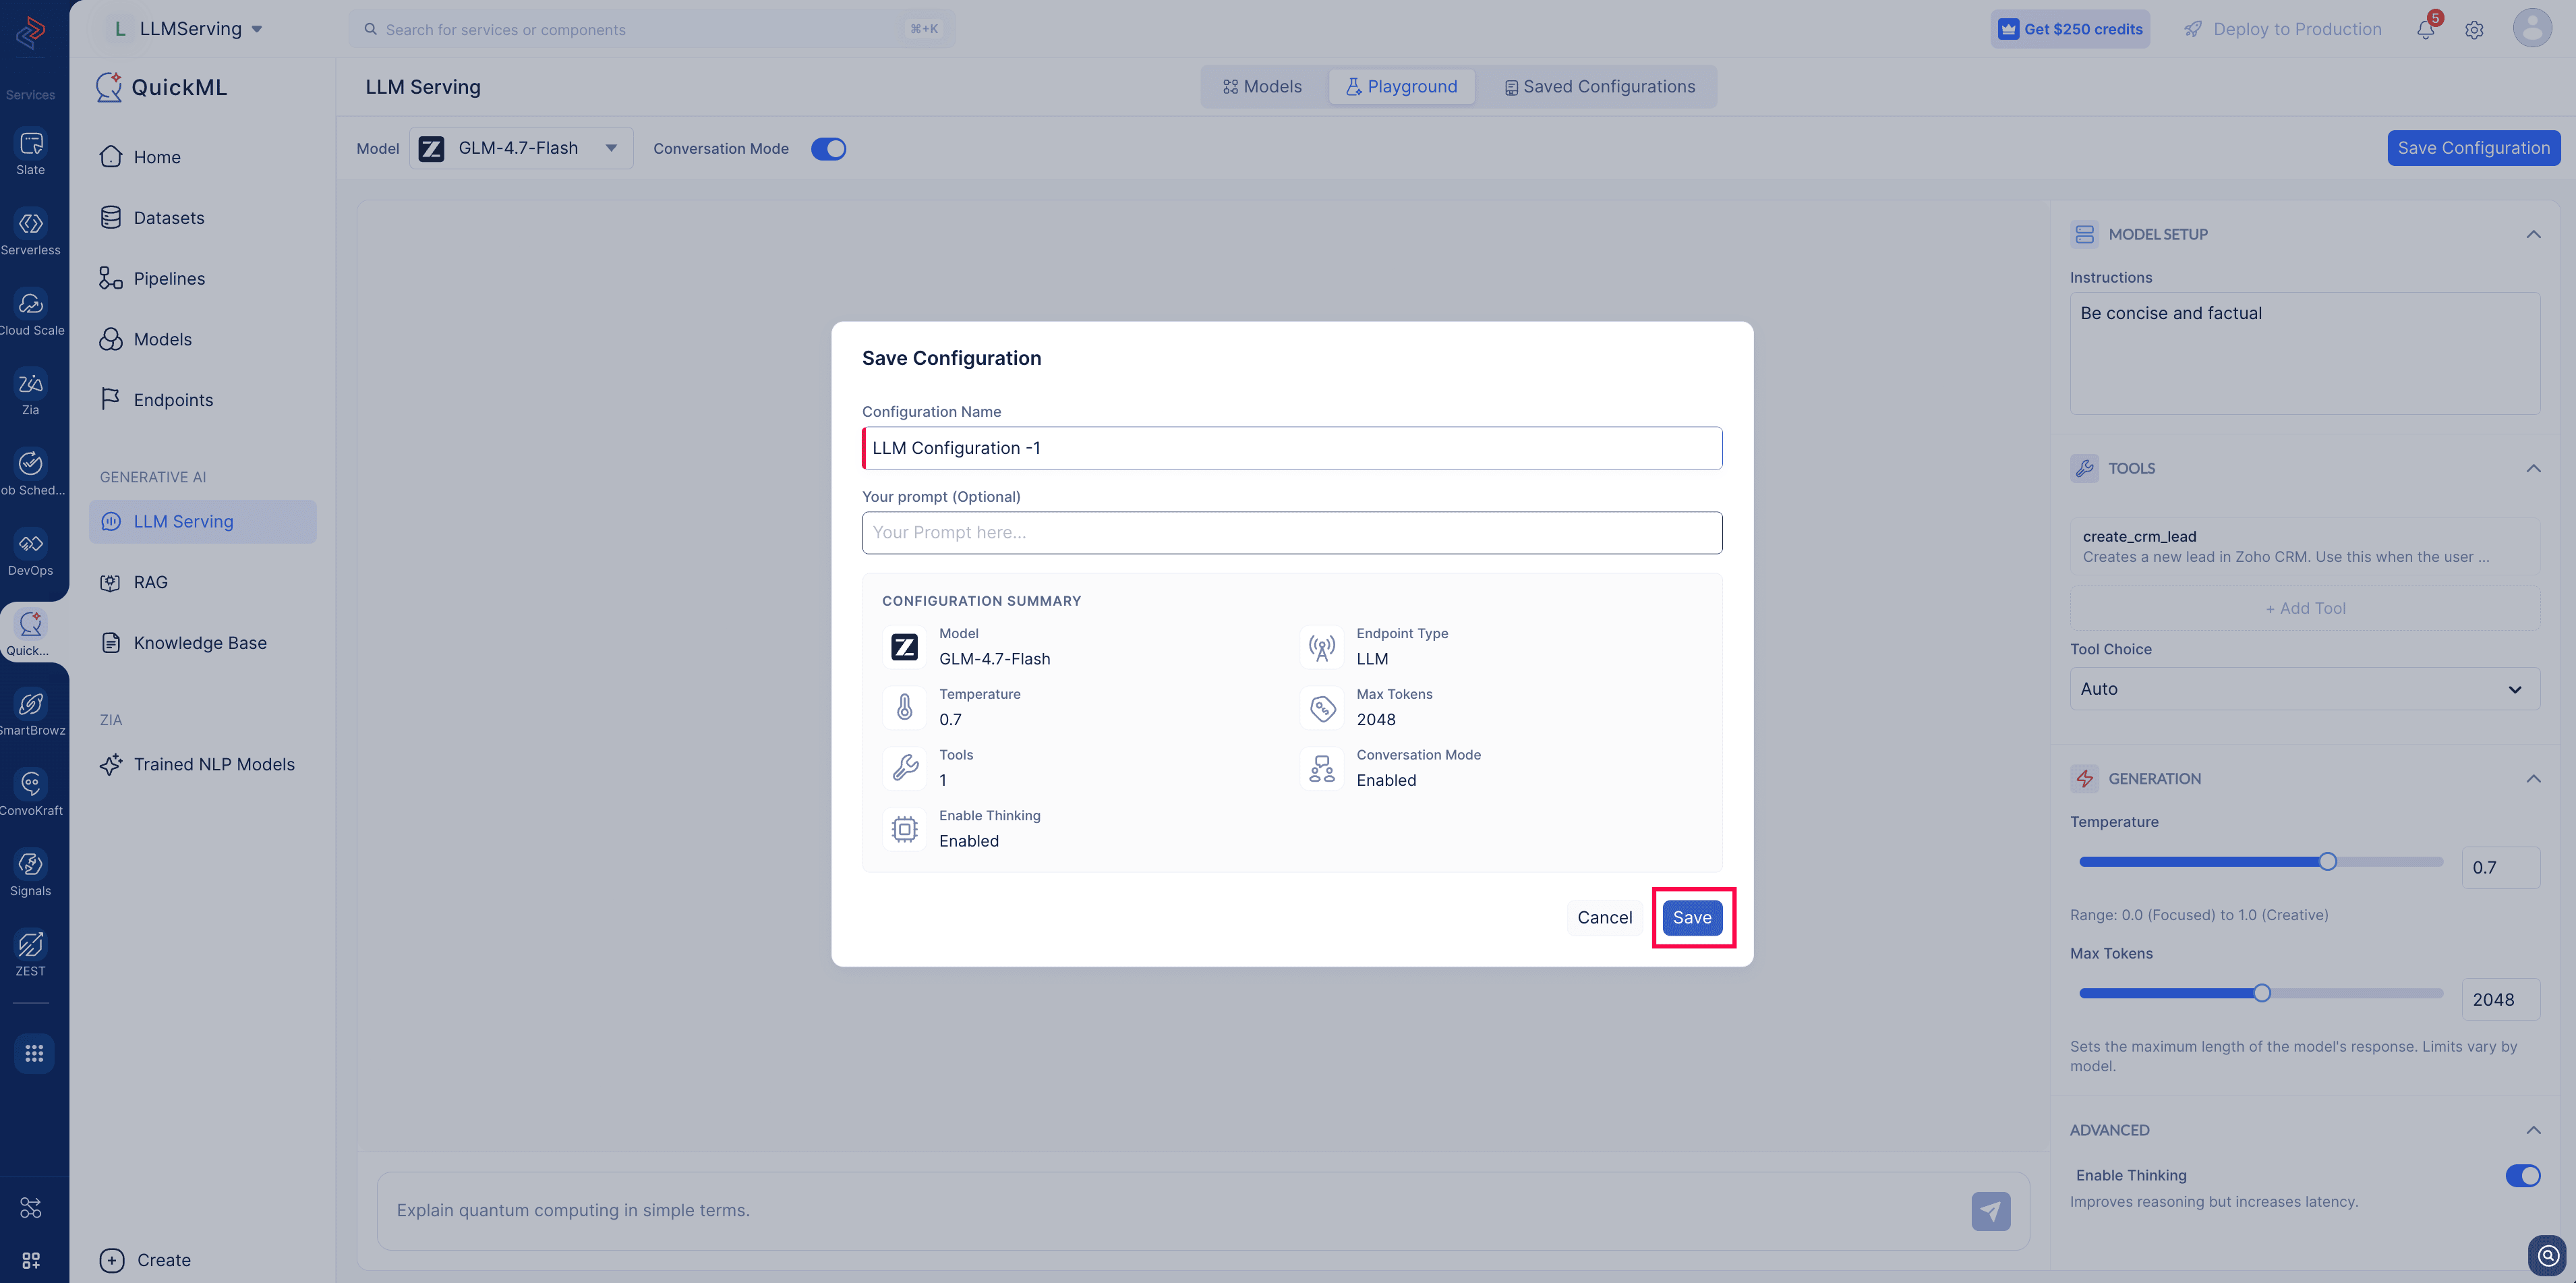
- Click on Save Configuration. The save configuration pop-up window will appear.
-
In the Save Configuration window, do the following:
- Cross verify the parameter values used in the test instance.
- Enter a configuration name. Note the name must start and end with alphanumeric characters and may only include letters, numbers, or underscores.
- Optionally, add Your prompt if needed (the prompt used by default in request).
-
Click Save to save the parameters configuration.
-
Navigate to Saved Configurations tab beside the playground window, which displays the list of saved configurations.
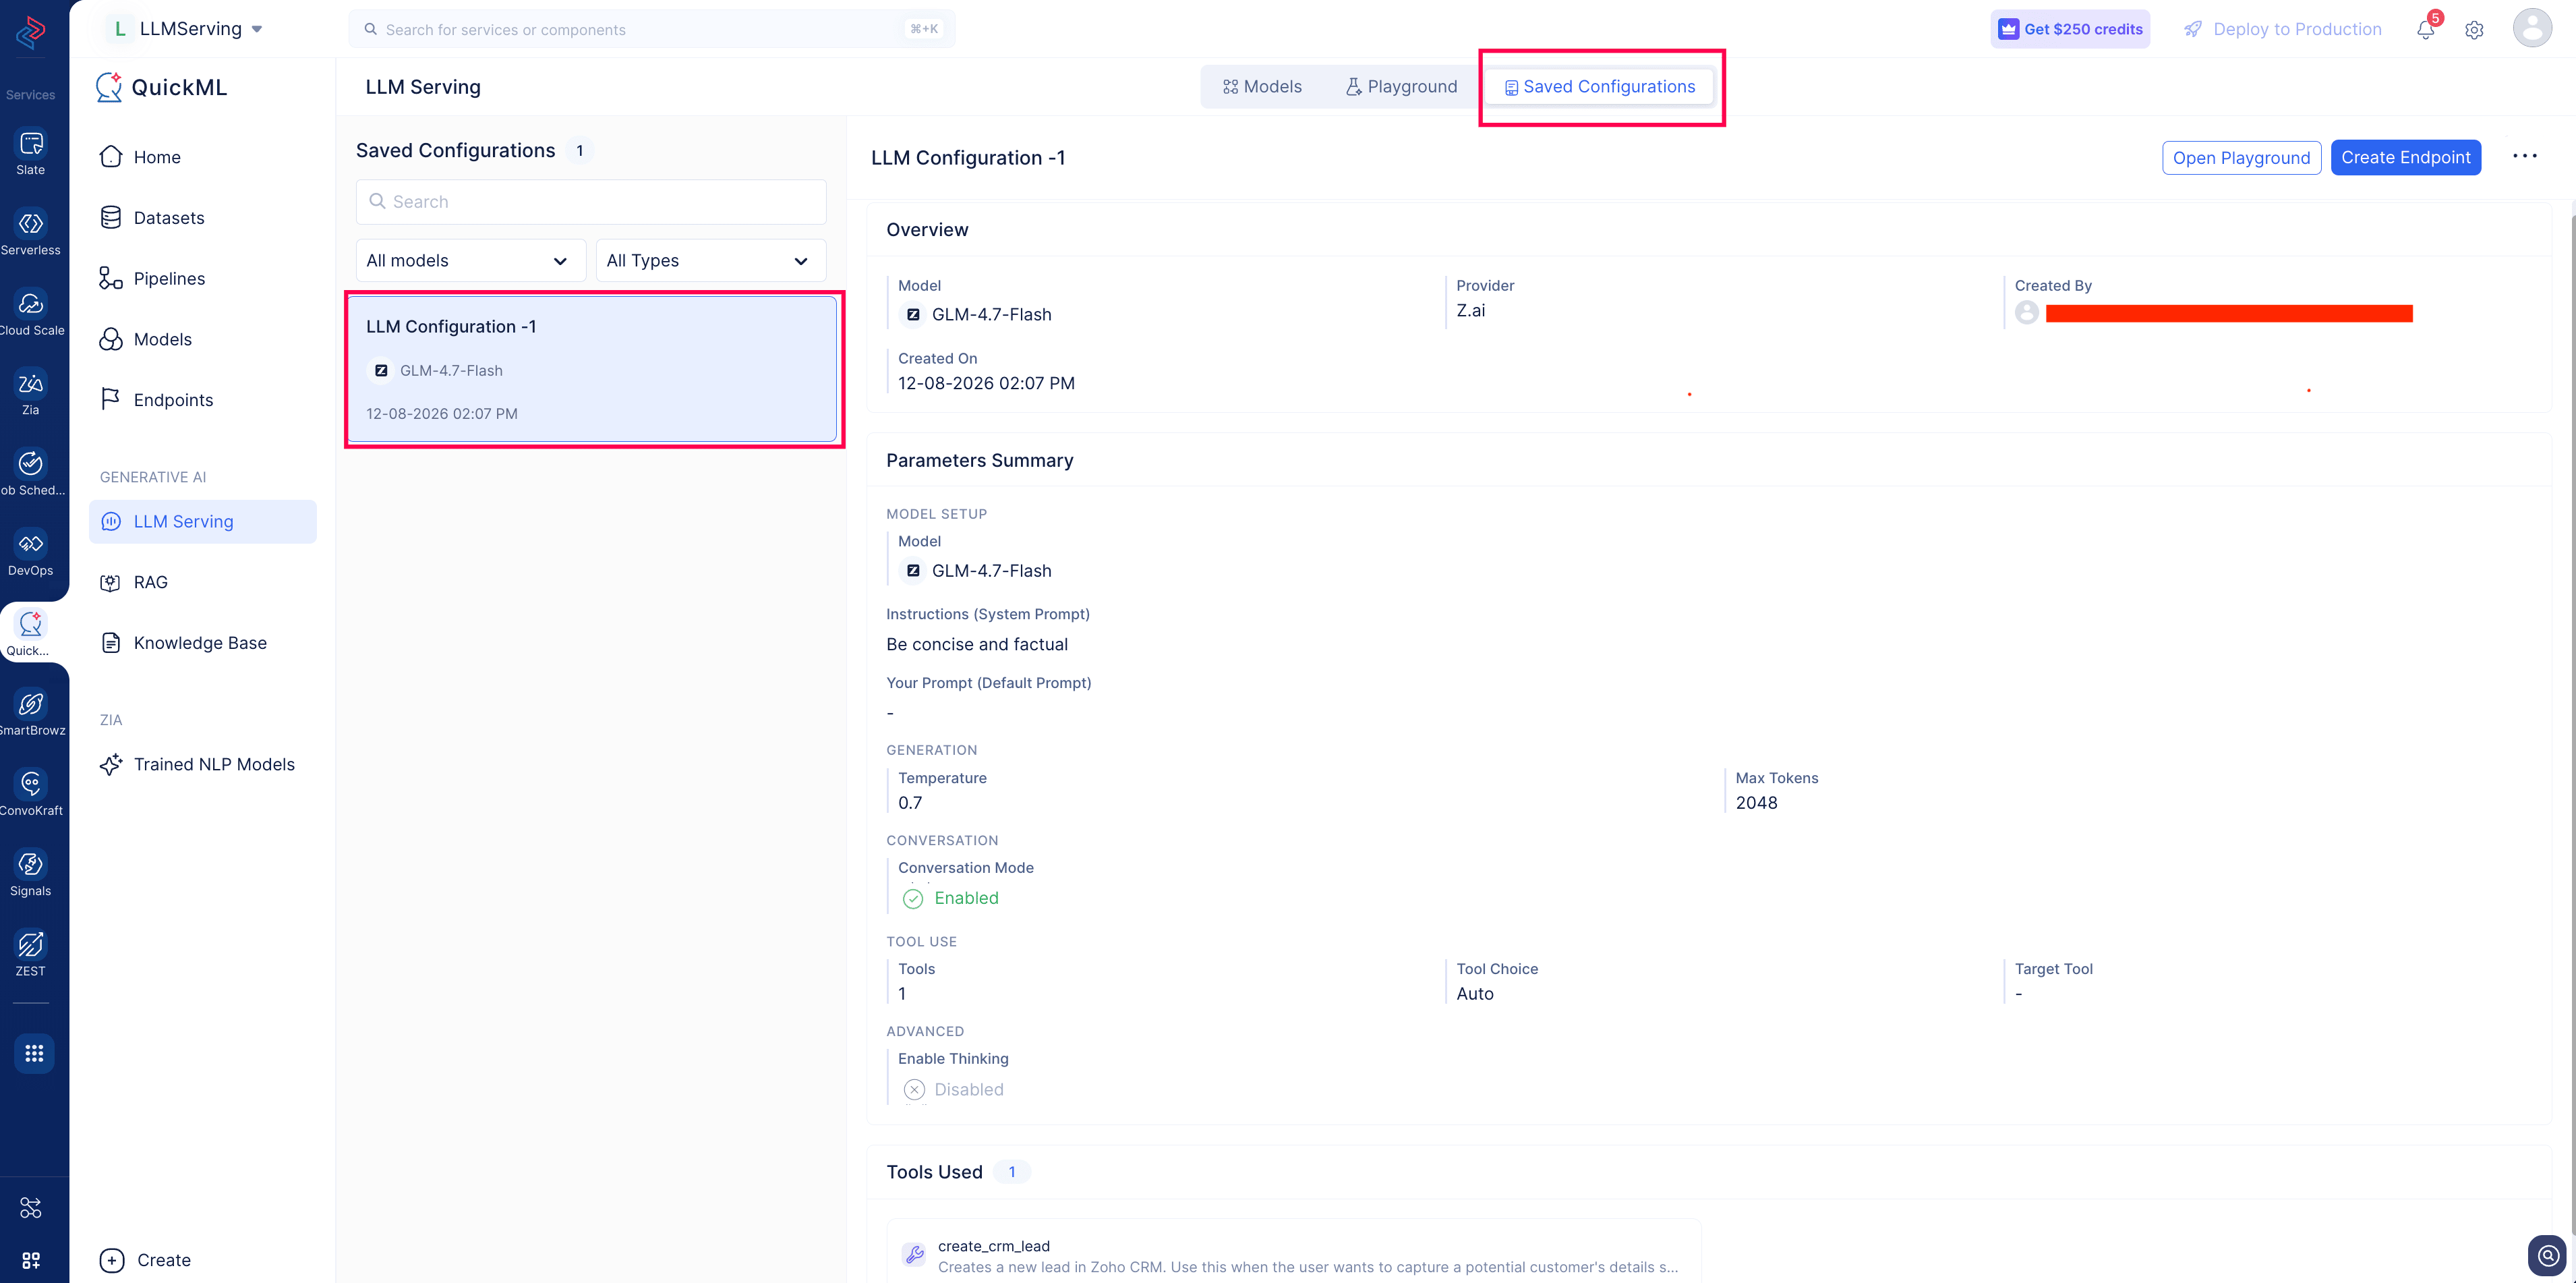
- Select the config. You can verify the overview with details like Model used, Provider and the Parameters summary.
Managing saved configurations
During your testing, you can save multiple parameter configurations, which are accessible via the Saved Configuration tab. The tab displays all saved configs with their necessary details.
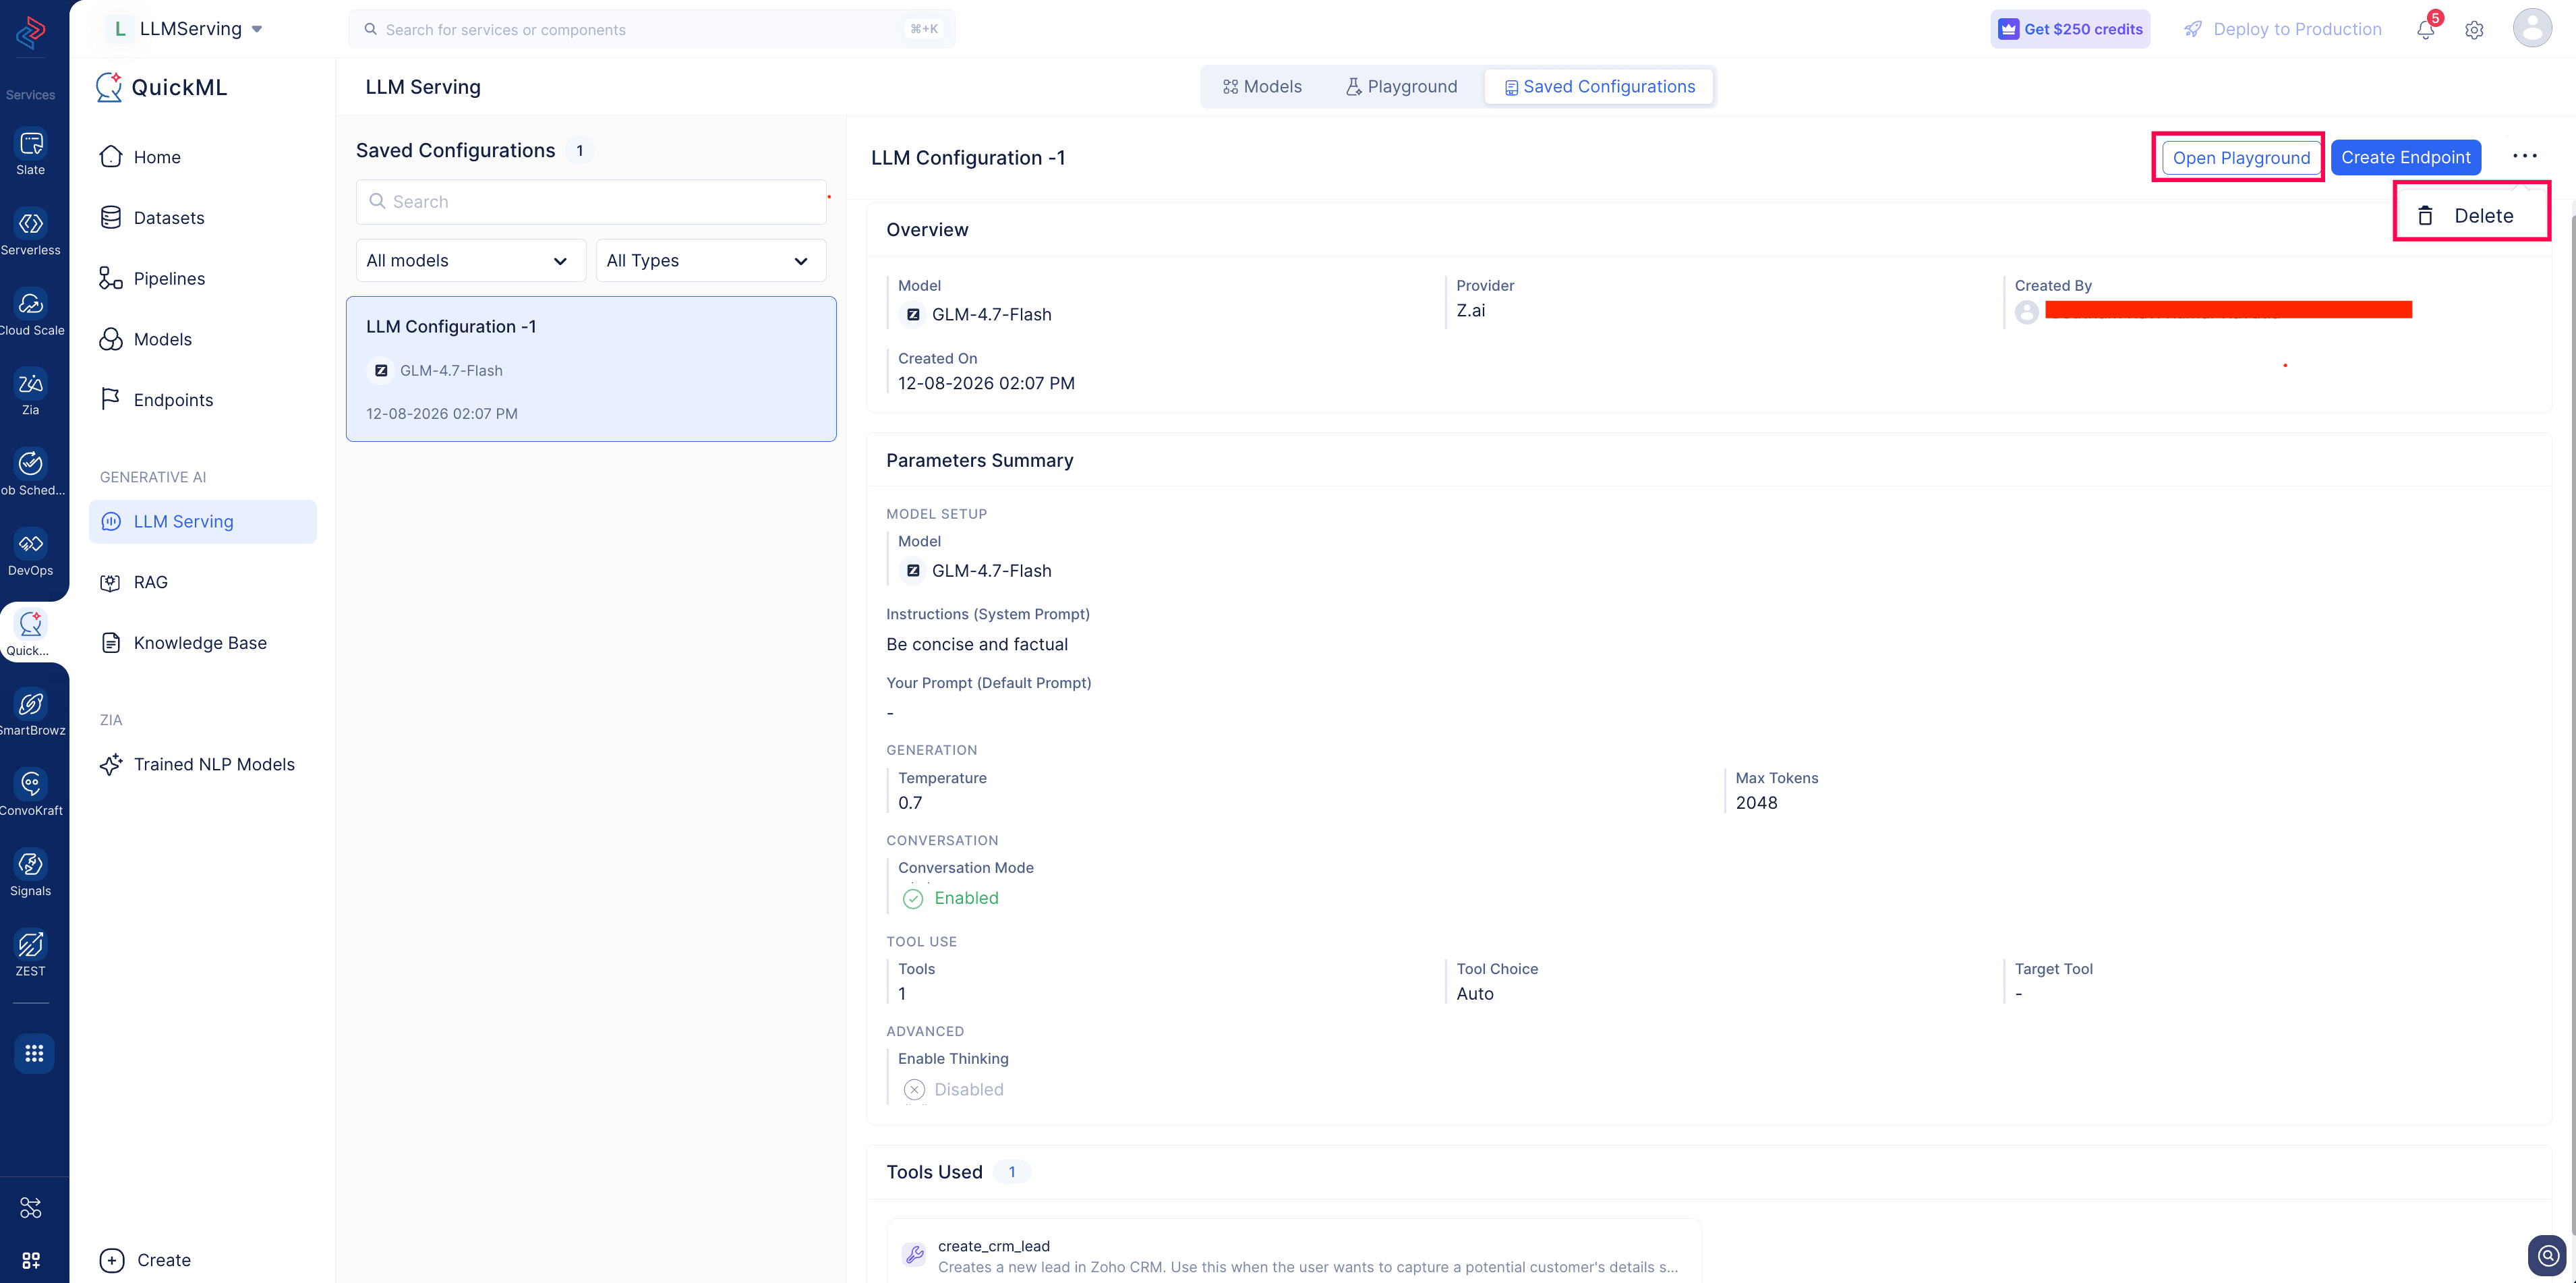
- Open the playground instance with the saved parameters.
- Edit a saved configuration to update parameters and save it as new.
- Delete the selected configuration that is no longer needed.
- Create a new endpoint from the selected configuration.
b. Create an endpoint
QuickML took the user first approach by providing an intuitive way to tune the responses from LLM using the adjustable parameter configuration; use the same to create a deployable REST API endpoint and operationalize the API in a few clicks.
As per the previous step, now the parameters are saved as per the requirement. The next step is to create an endpoint using the same configuration.
I. Step-by-step tutorial Let’s look at the endpoint creation step with the saved parameter configuration for the chosen LLM.
- Go to the Endpoints tab in the left panel.
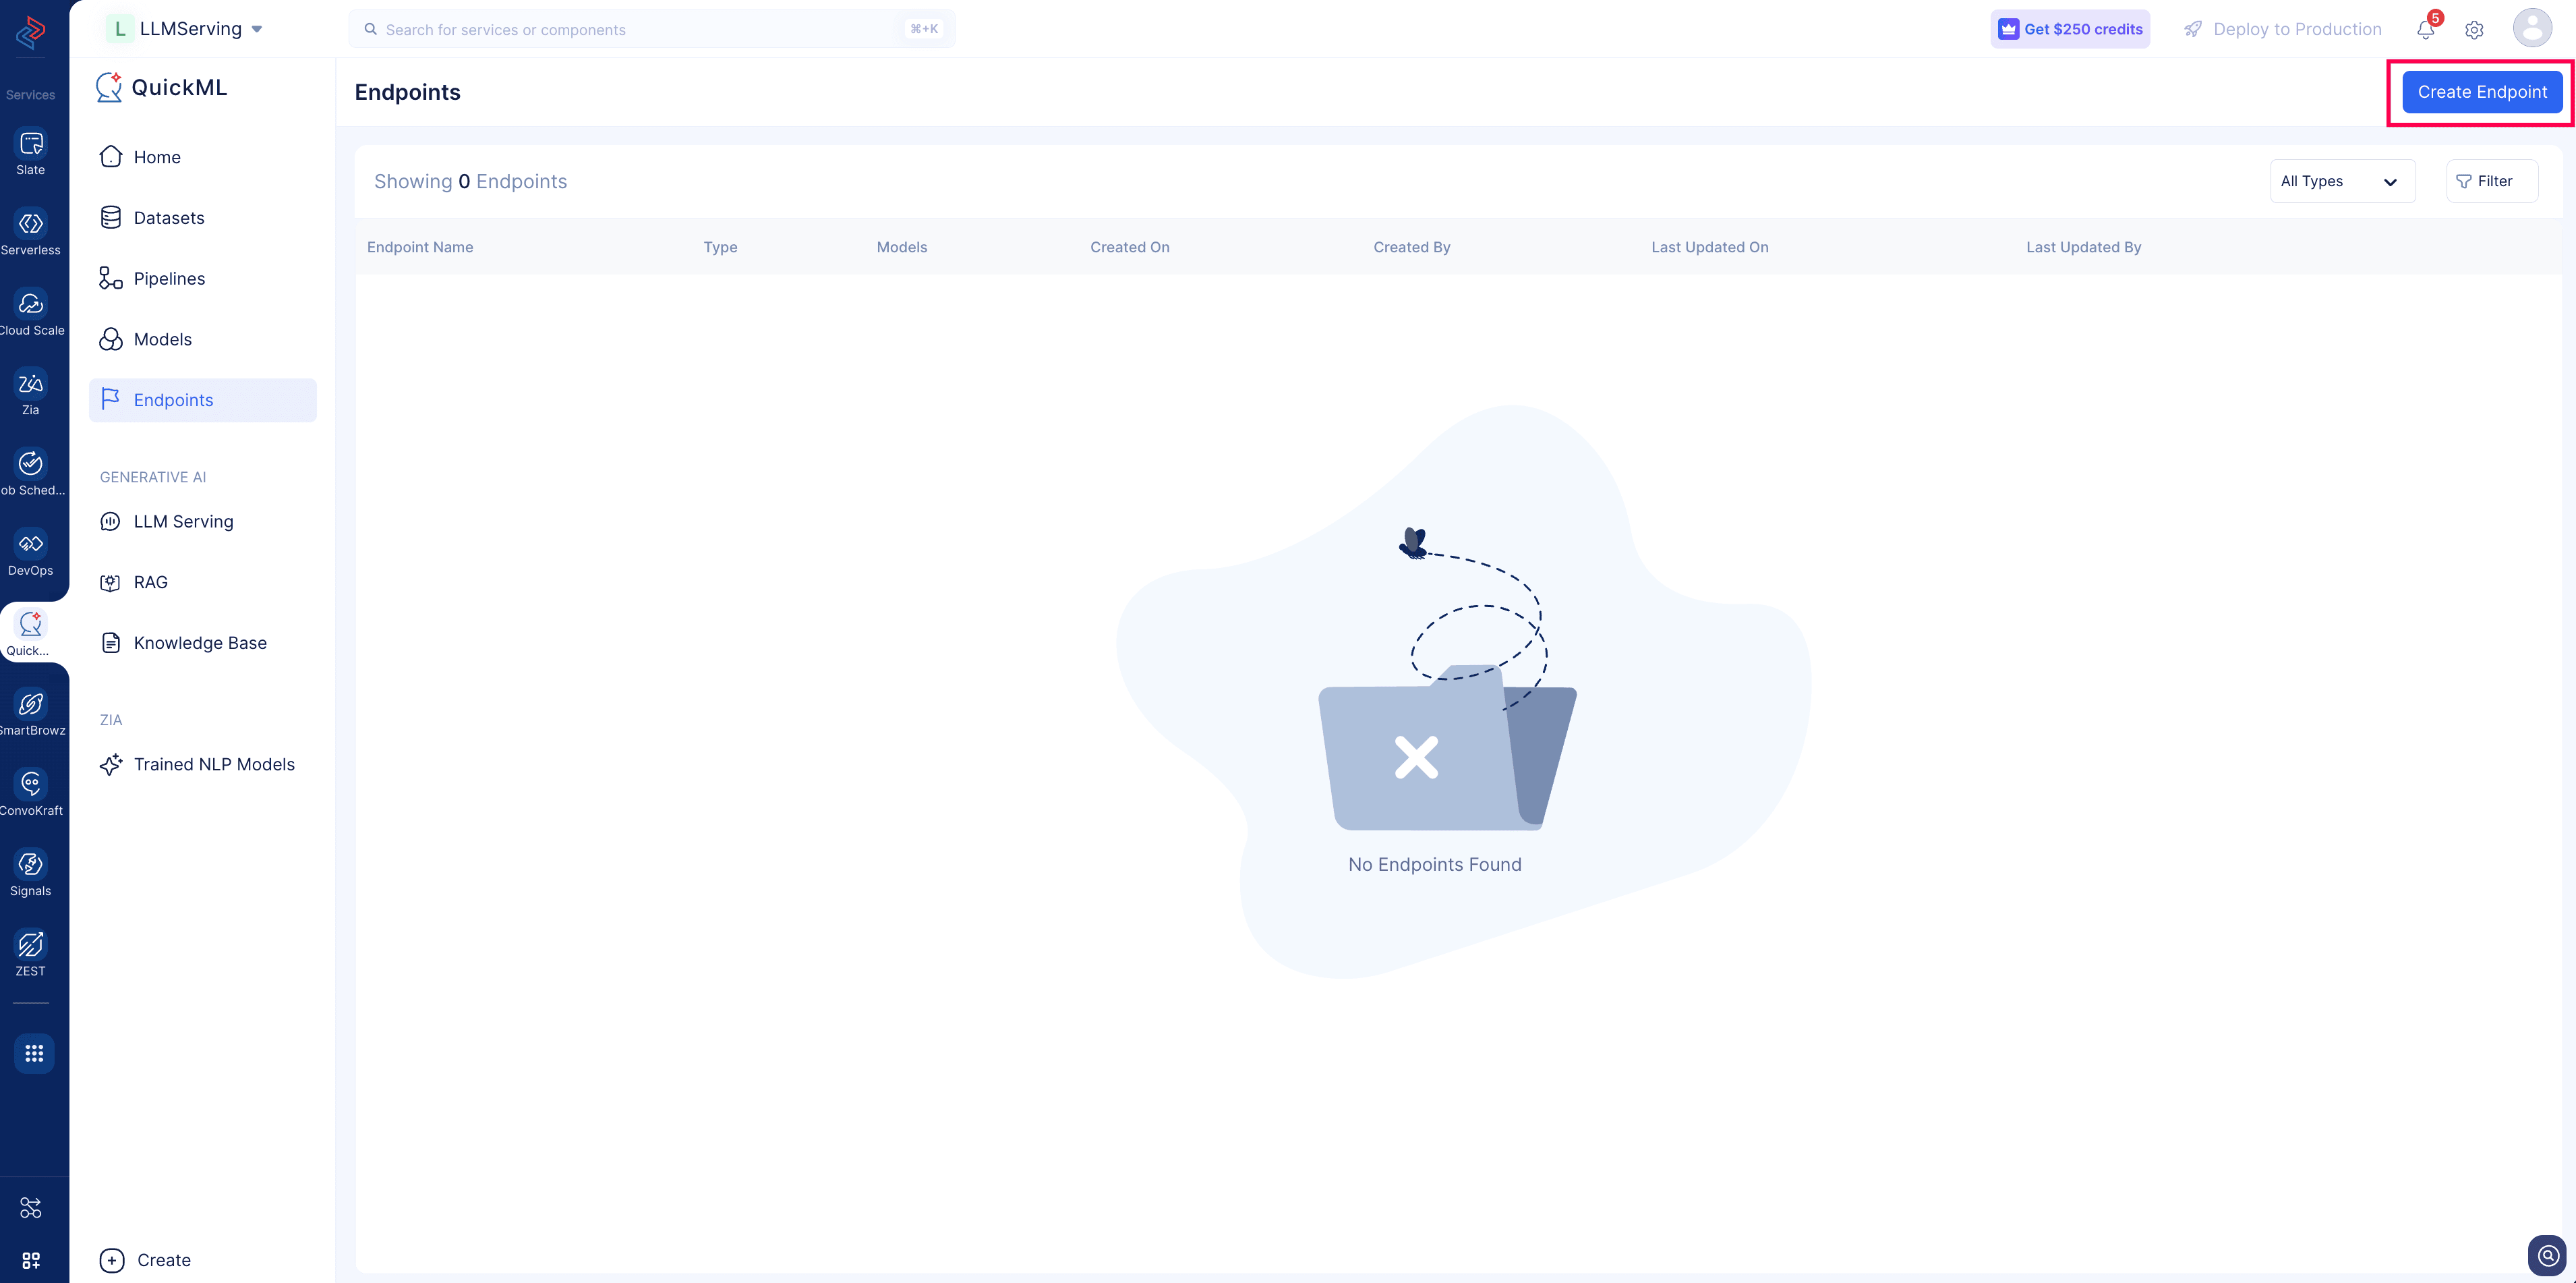
- Click Create Endpoint.
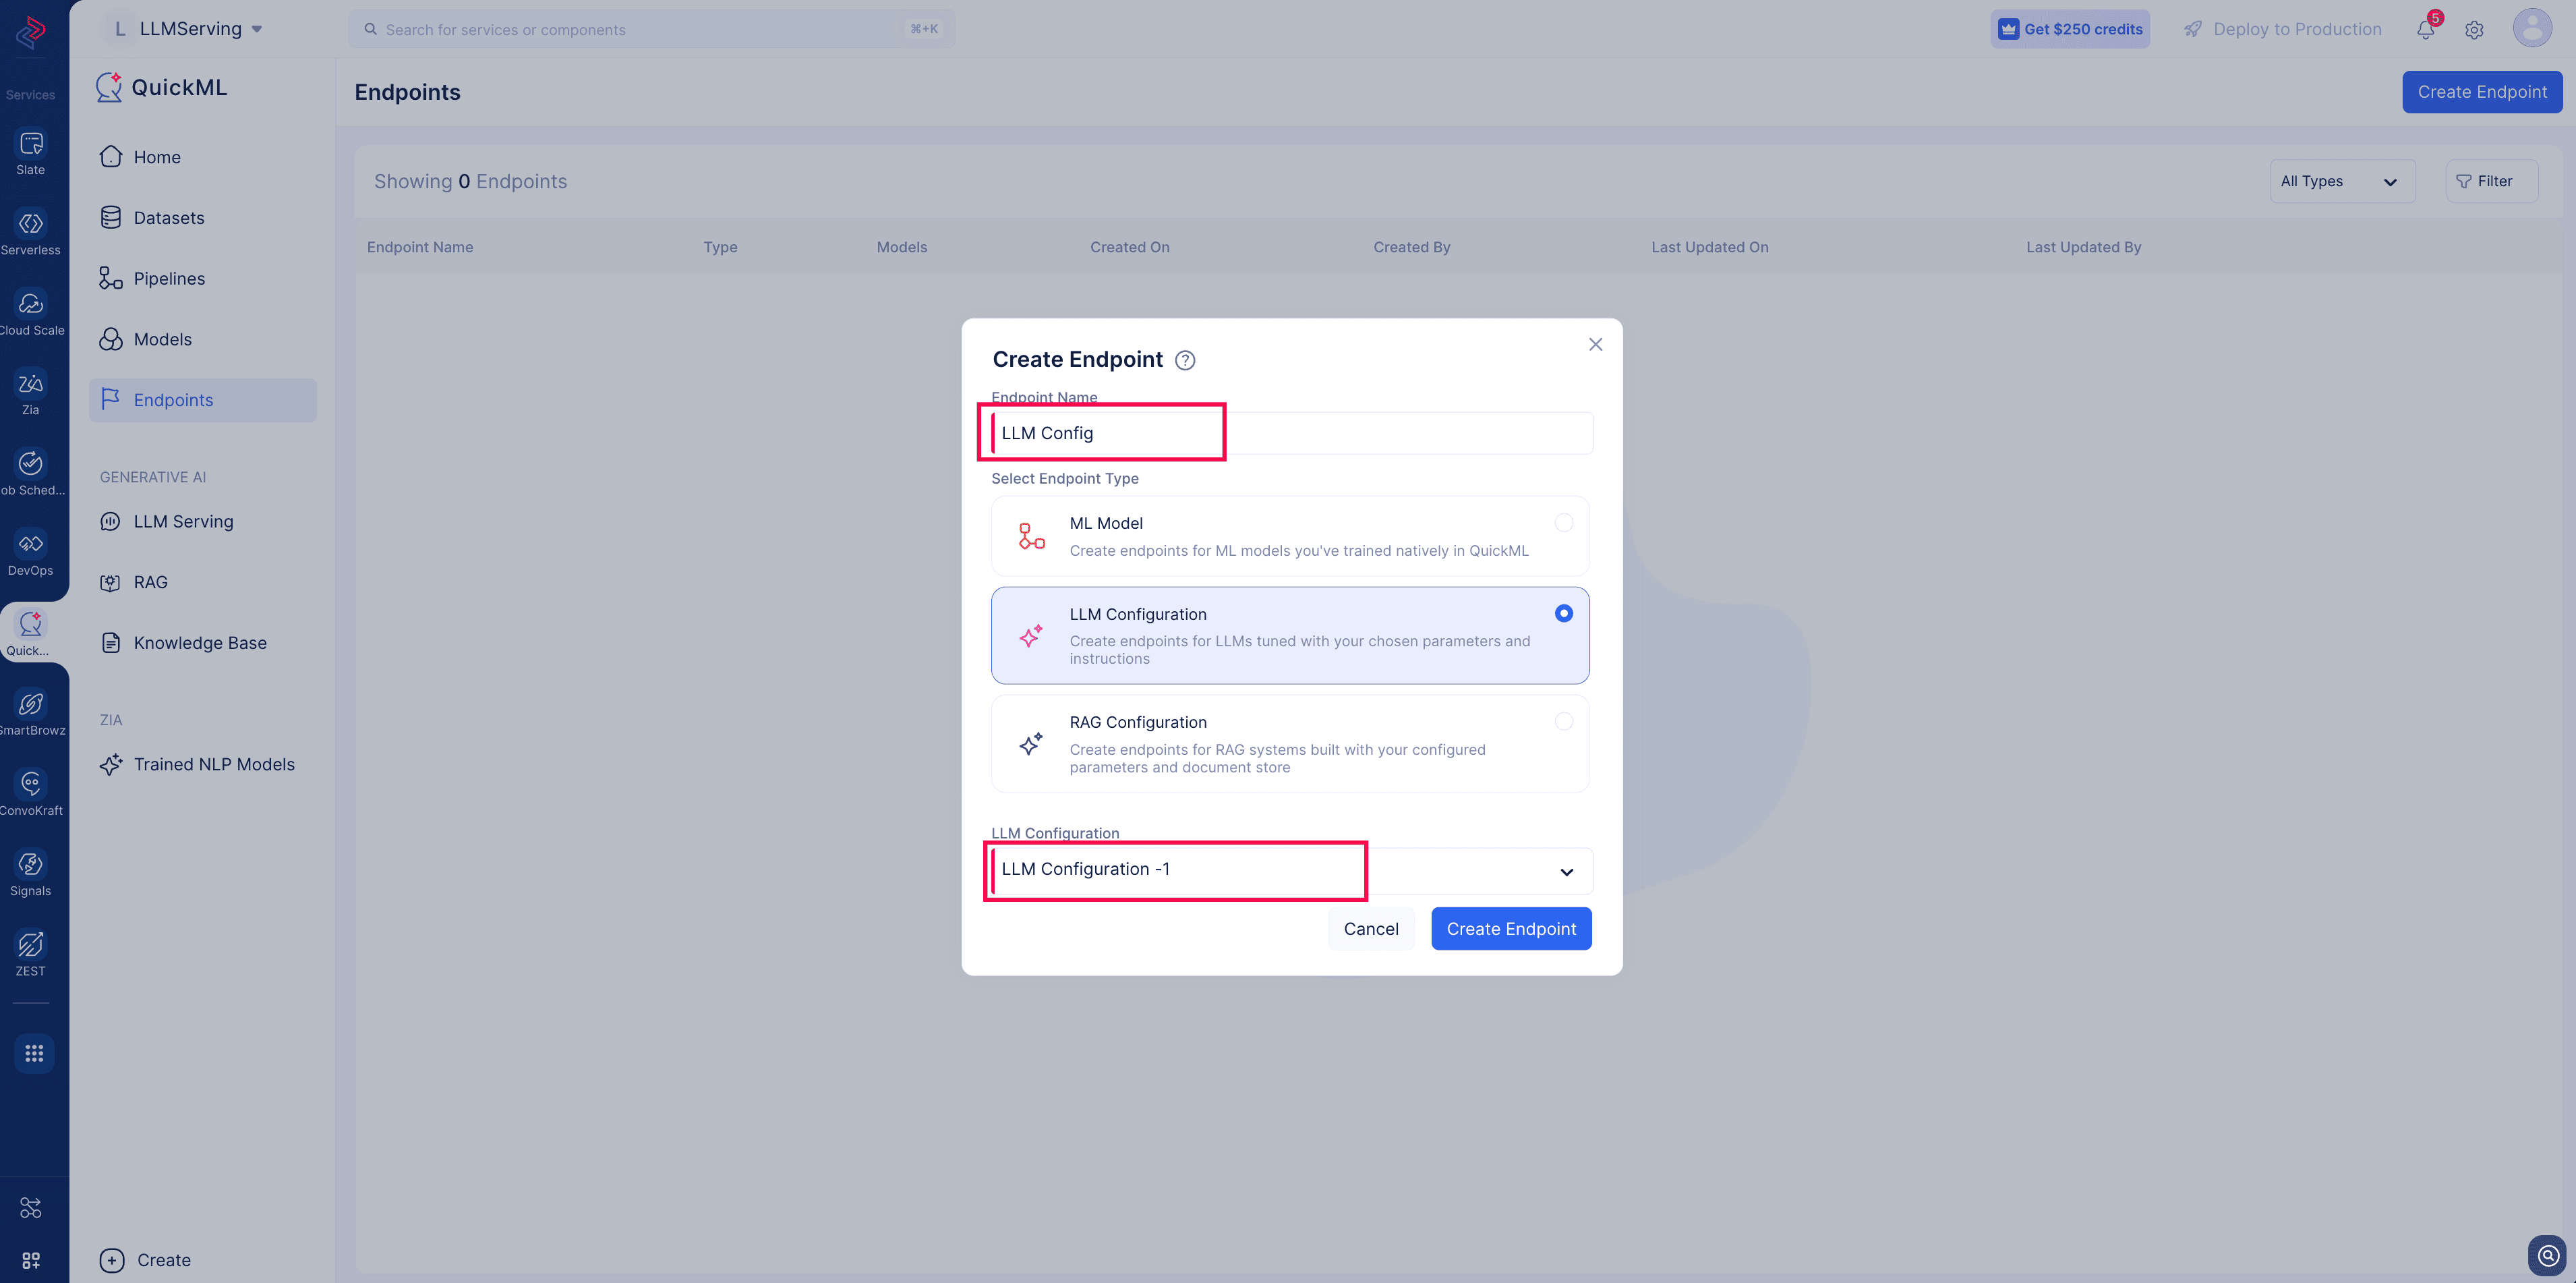
- Enter an Endpoint Name.
- Under Endpoint Type, select LLM Configuration.
- Select a LLM Configuration from the dropdown list.
- Click Create Endpoint.
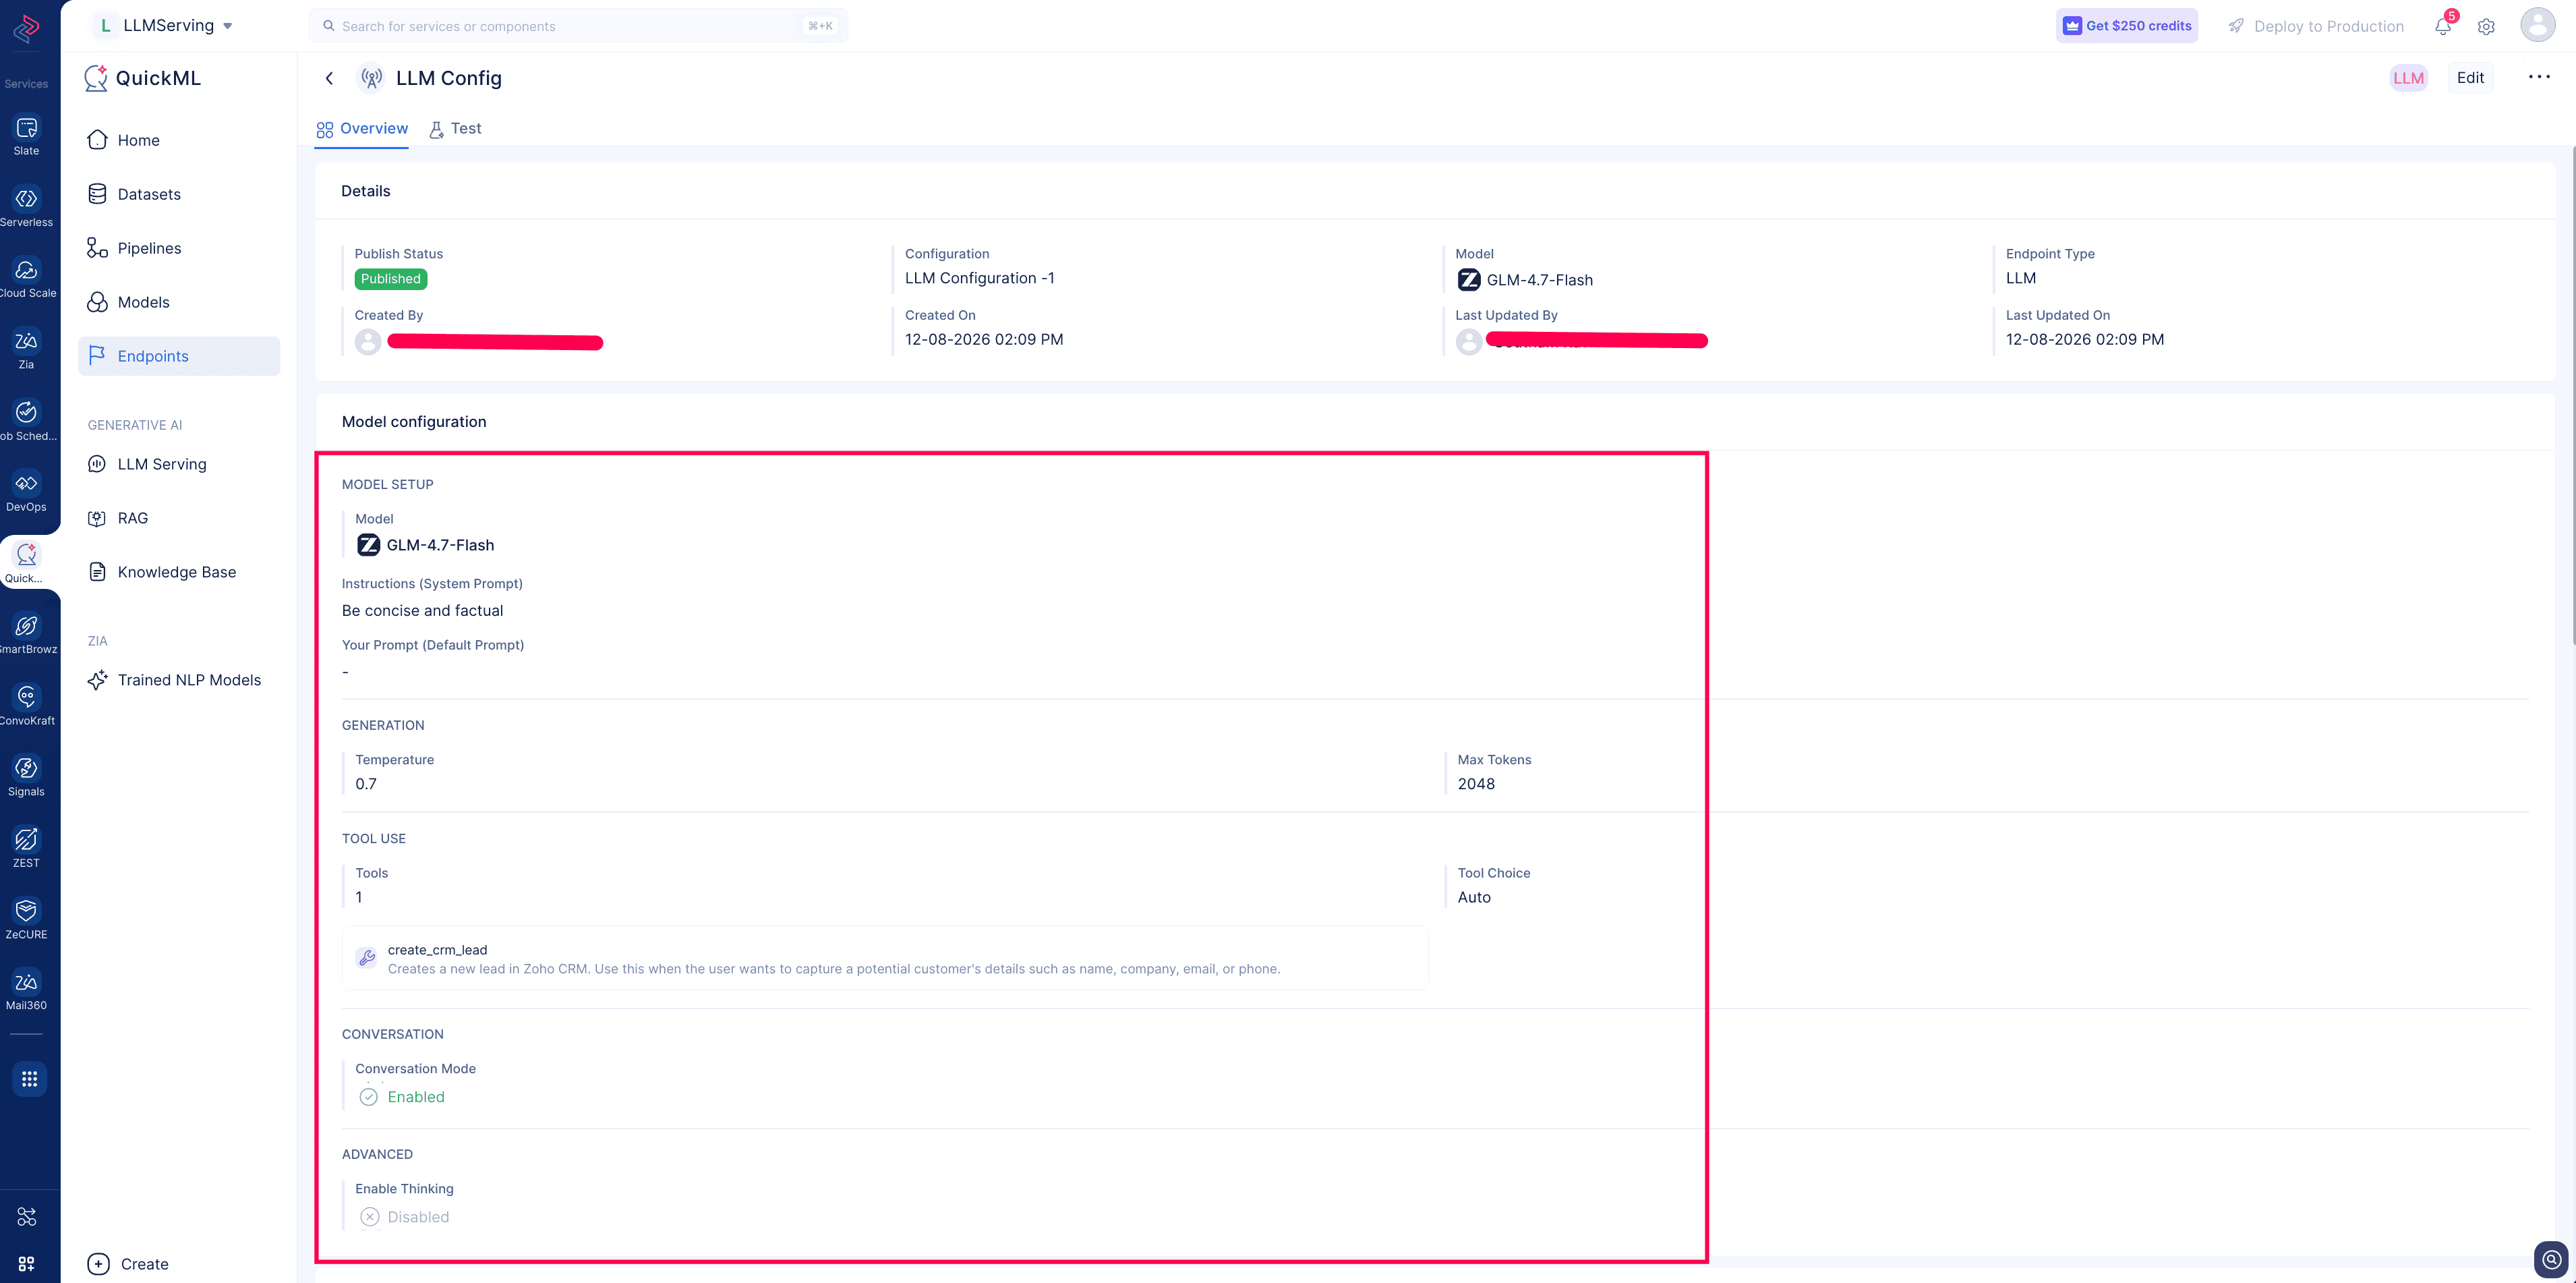
- Once the endpoint is created, You’ll be redirected to the Endpoint details page. You can find the following details.
- Saved parameter values.
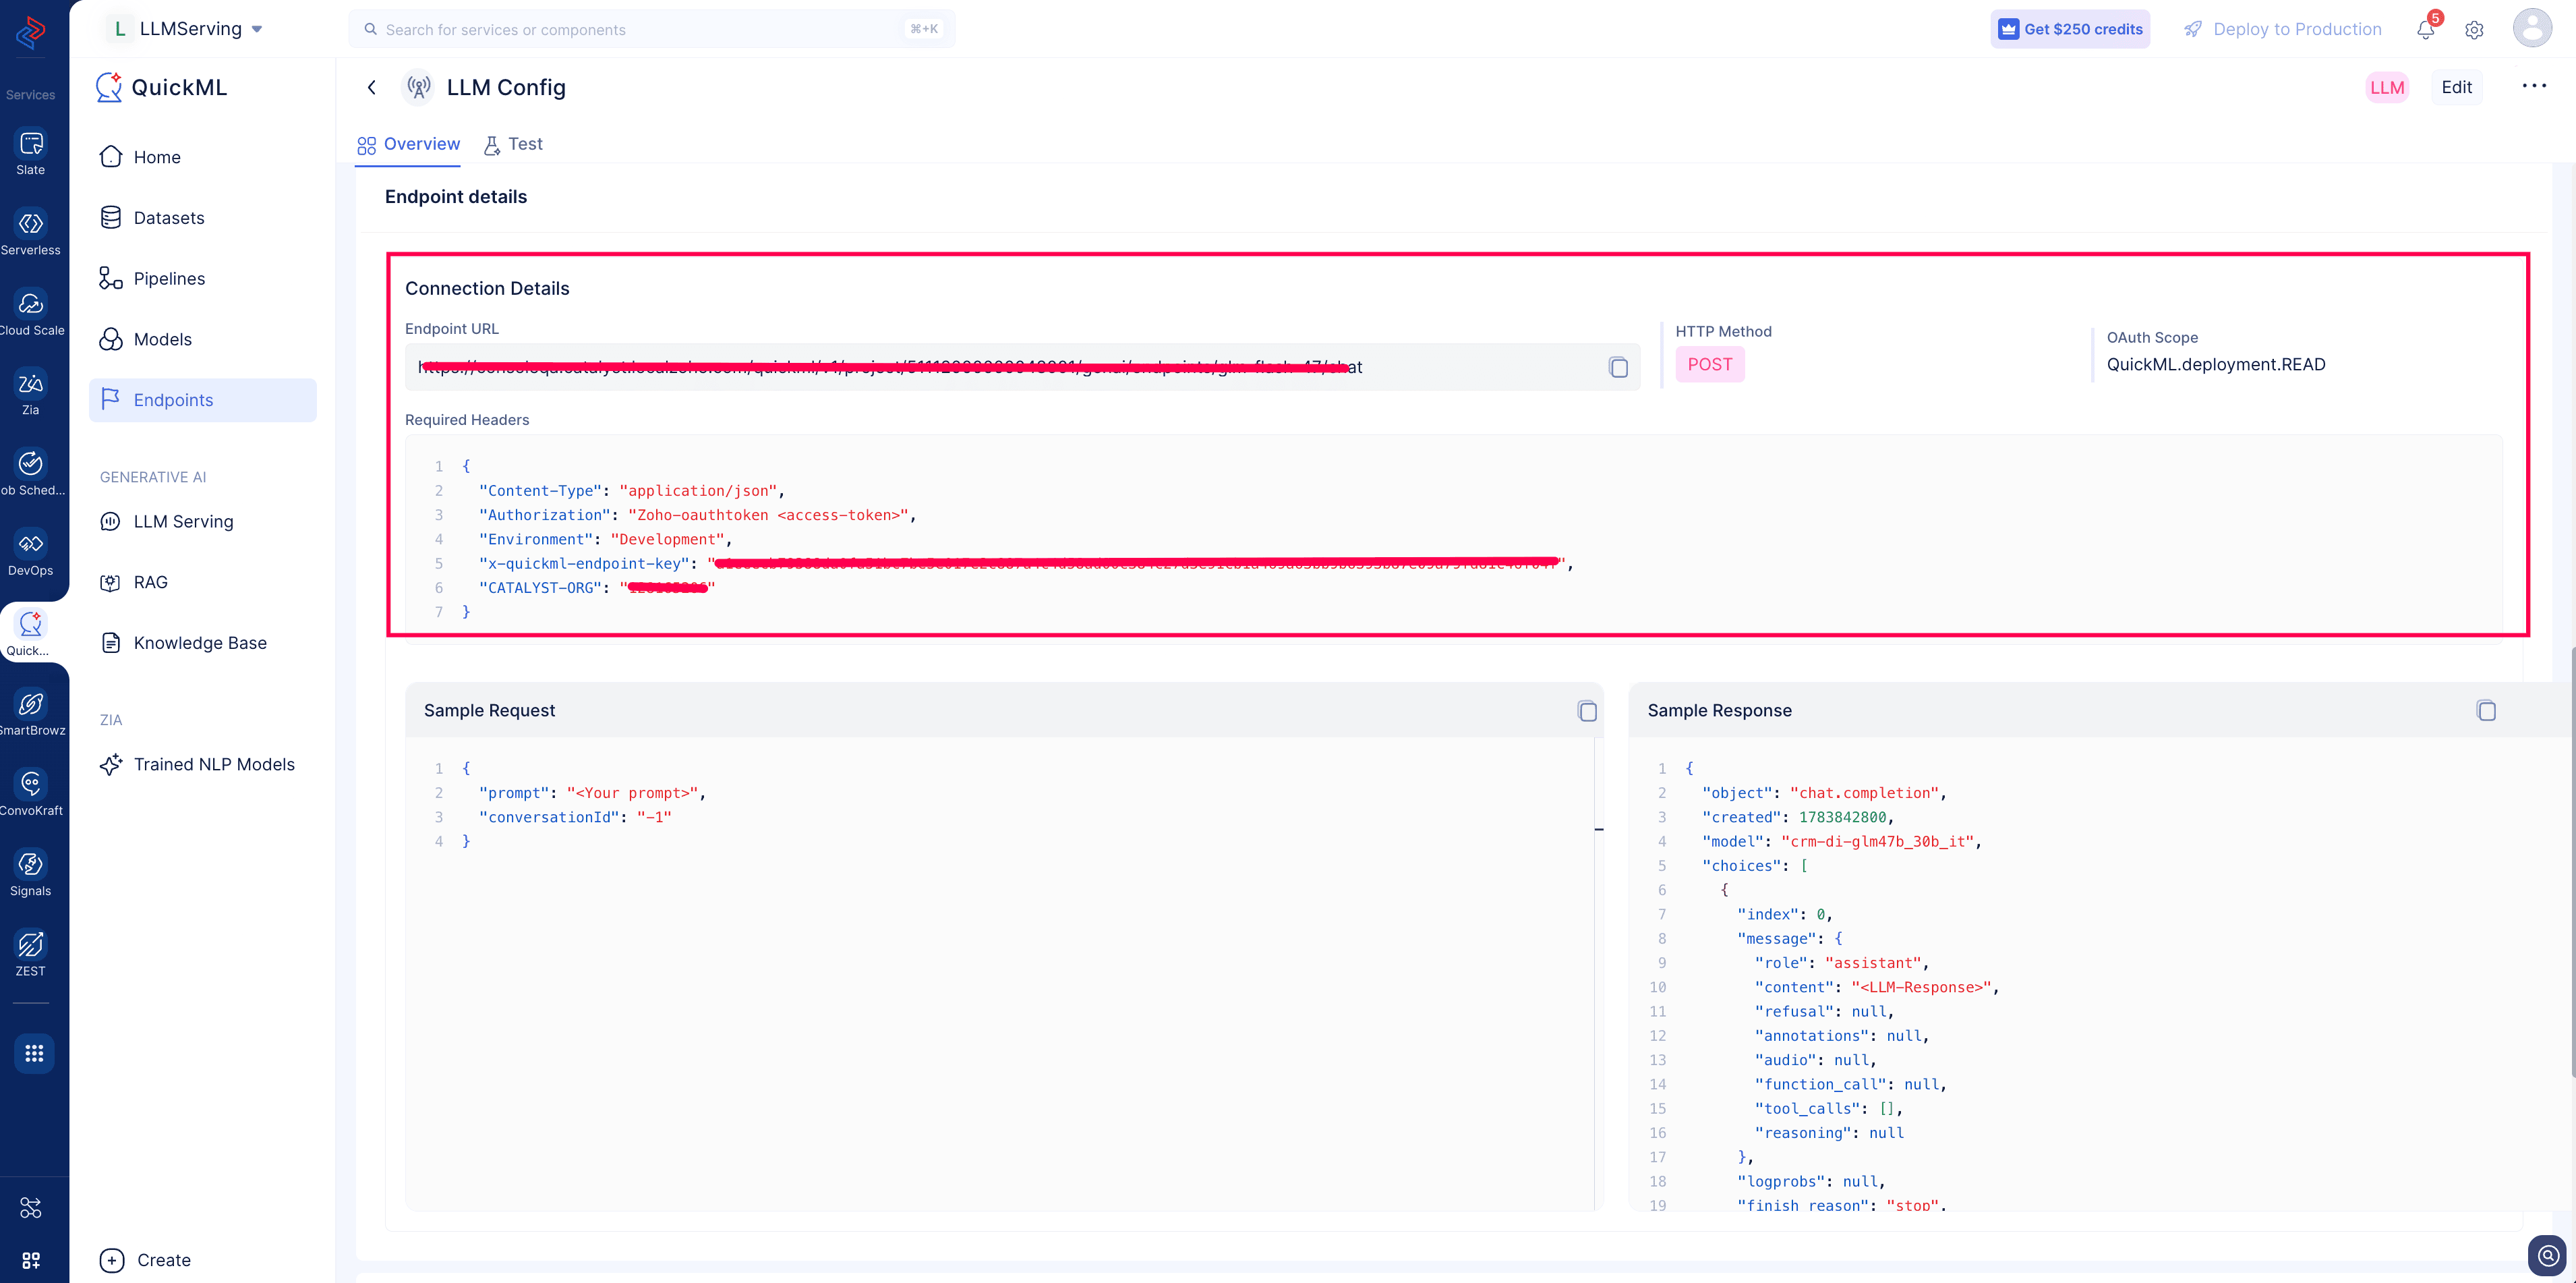
- Endpoint URL details to access the LLM
- Sample request and response
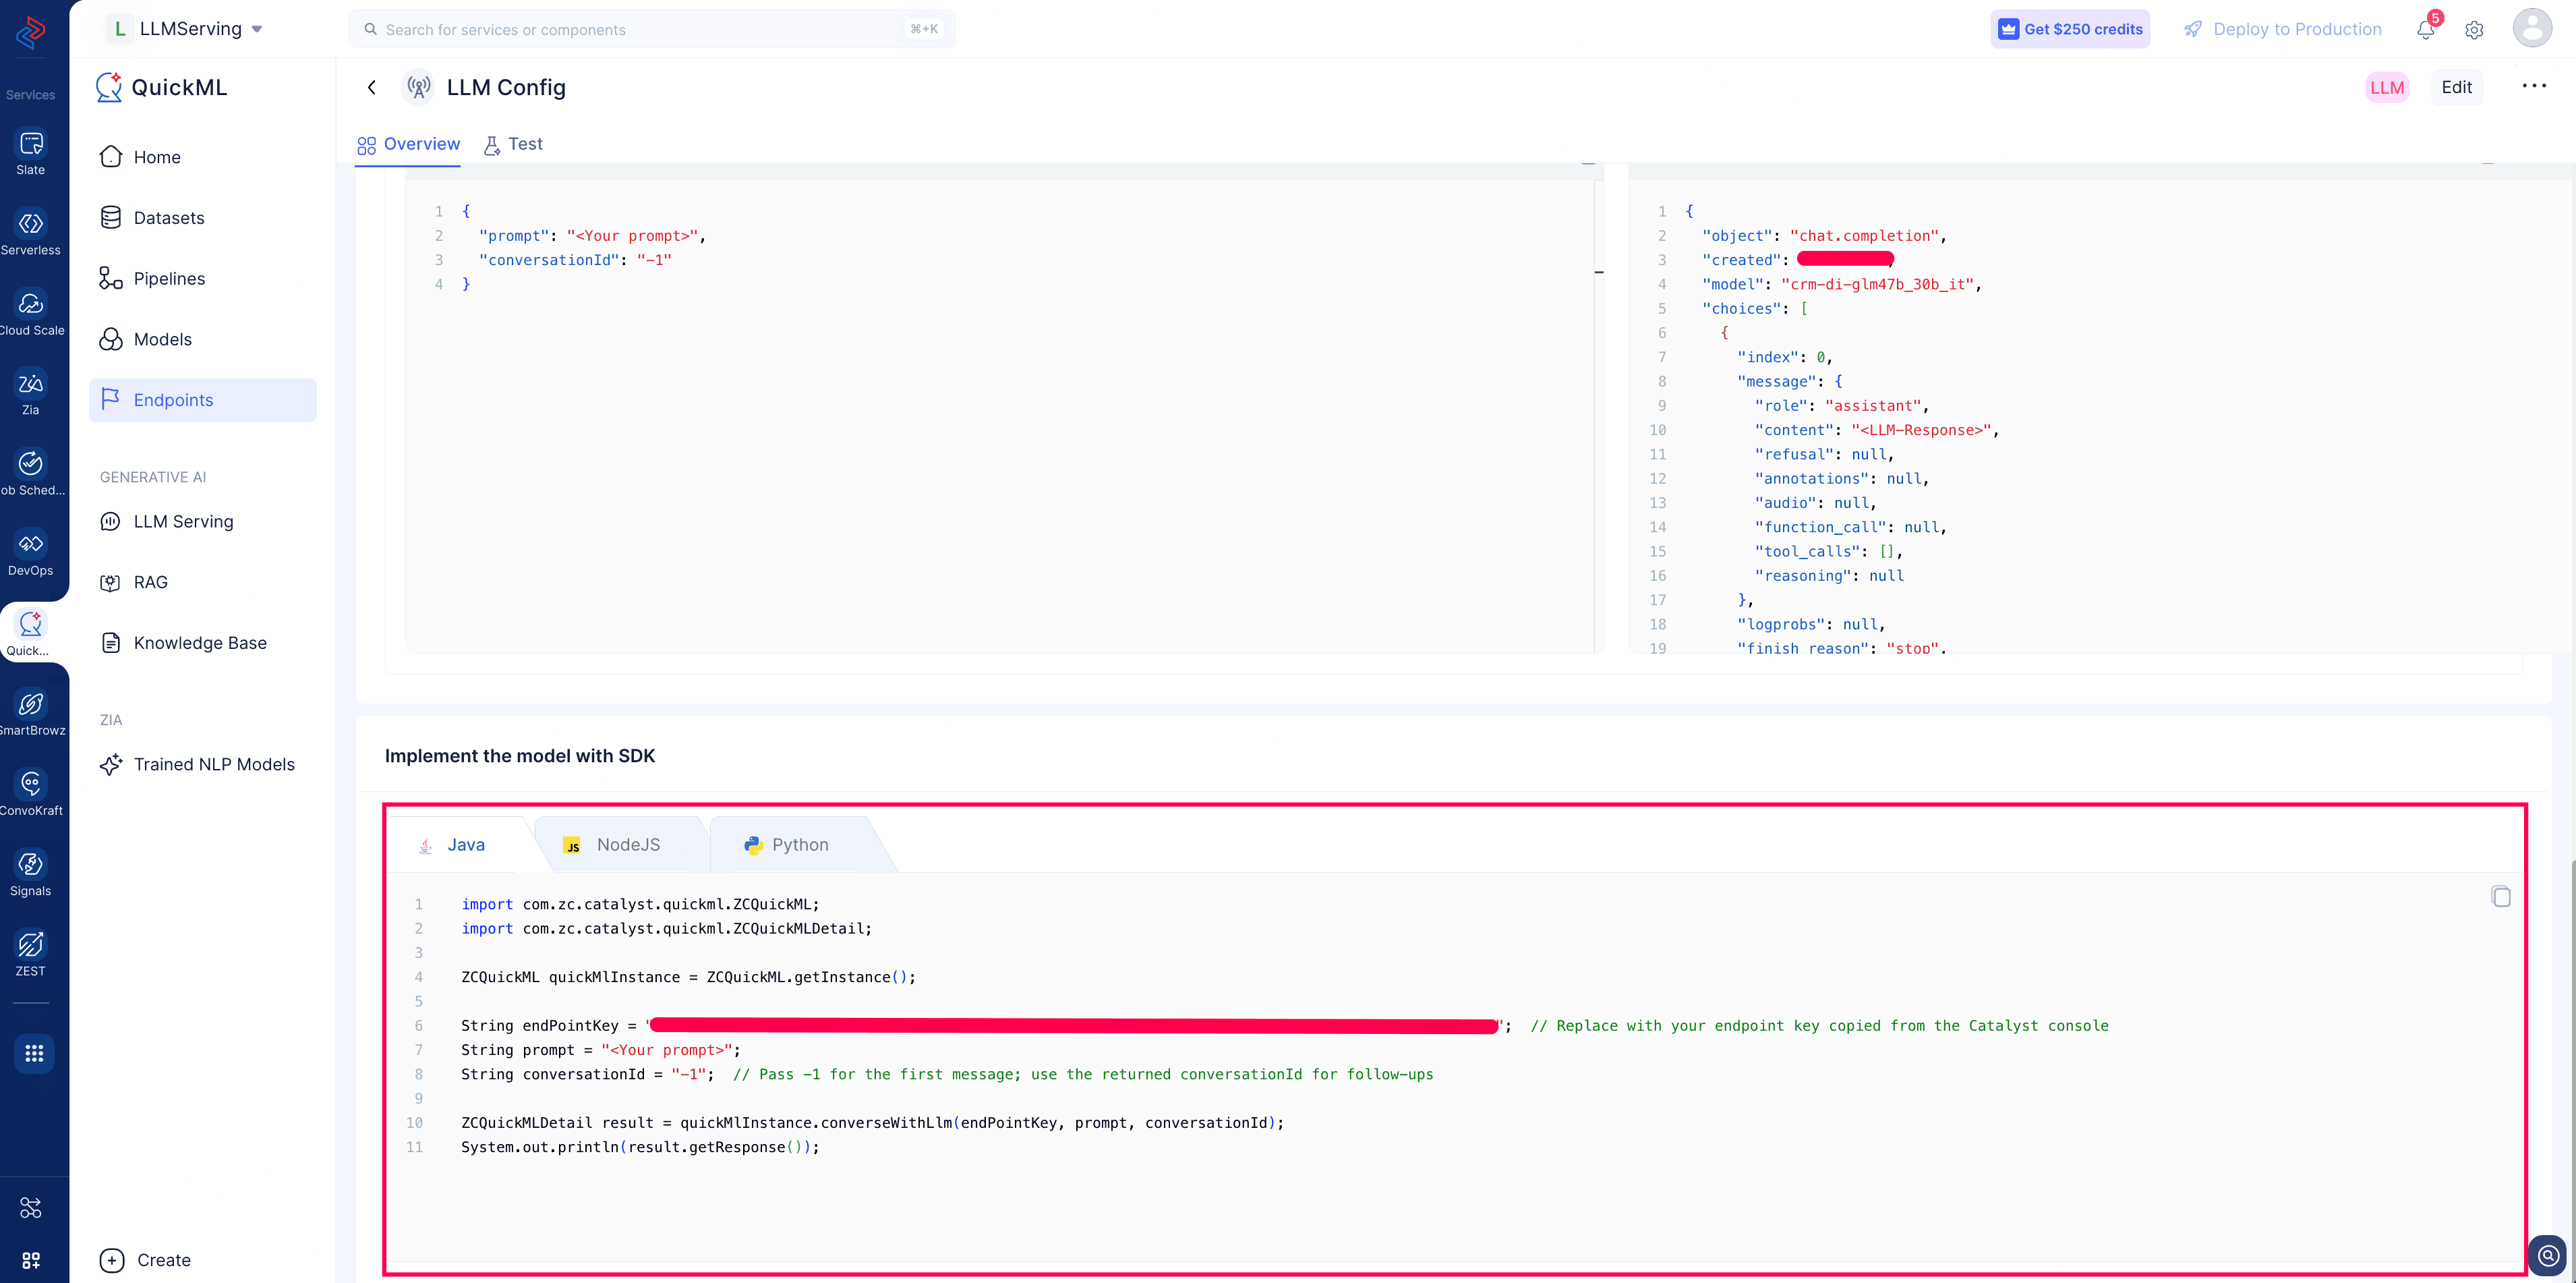
- SDK information to integrate the endpoint
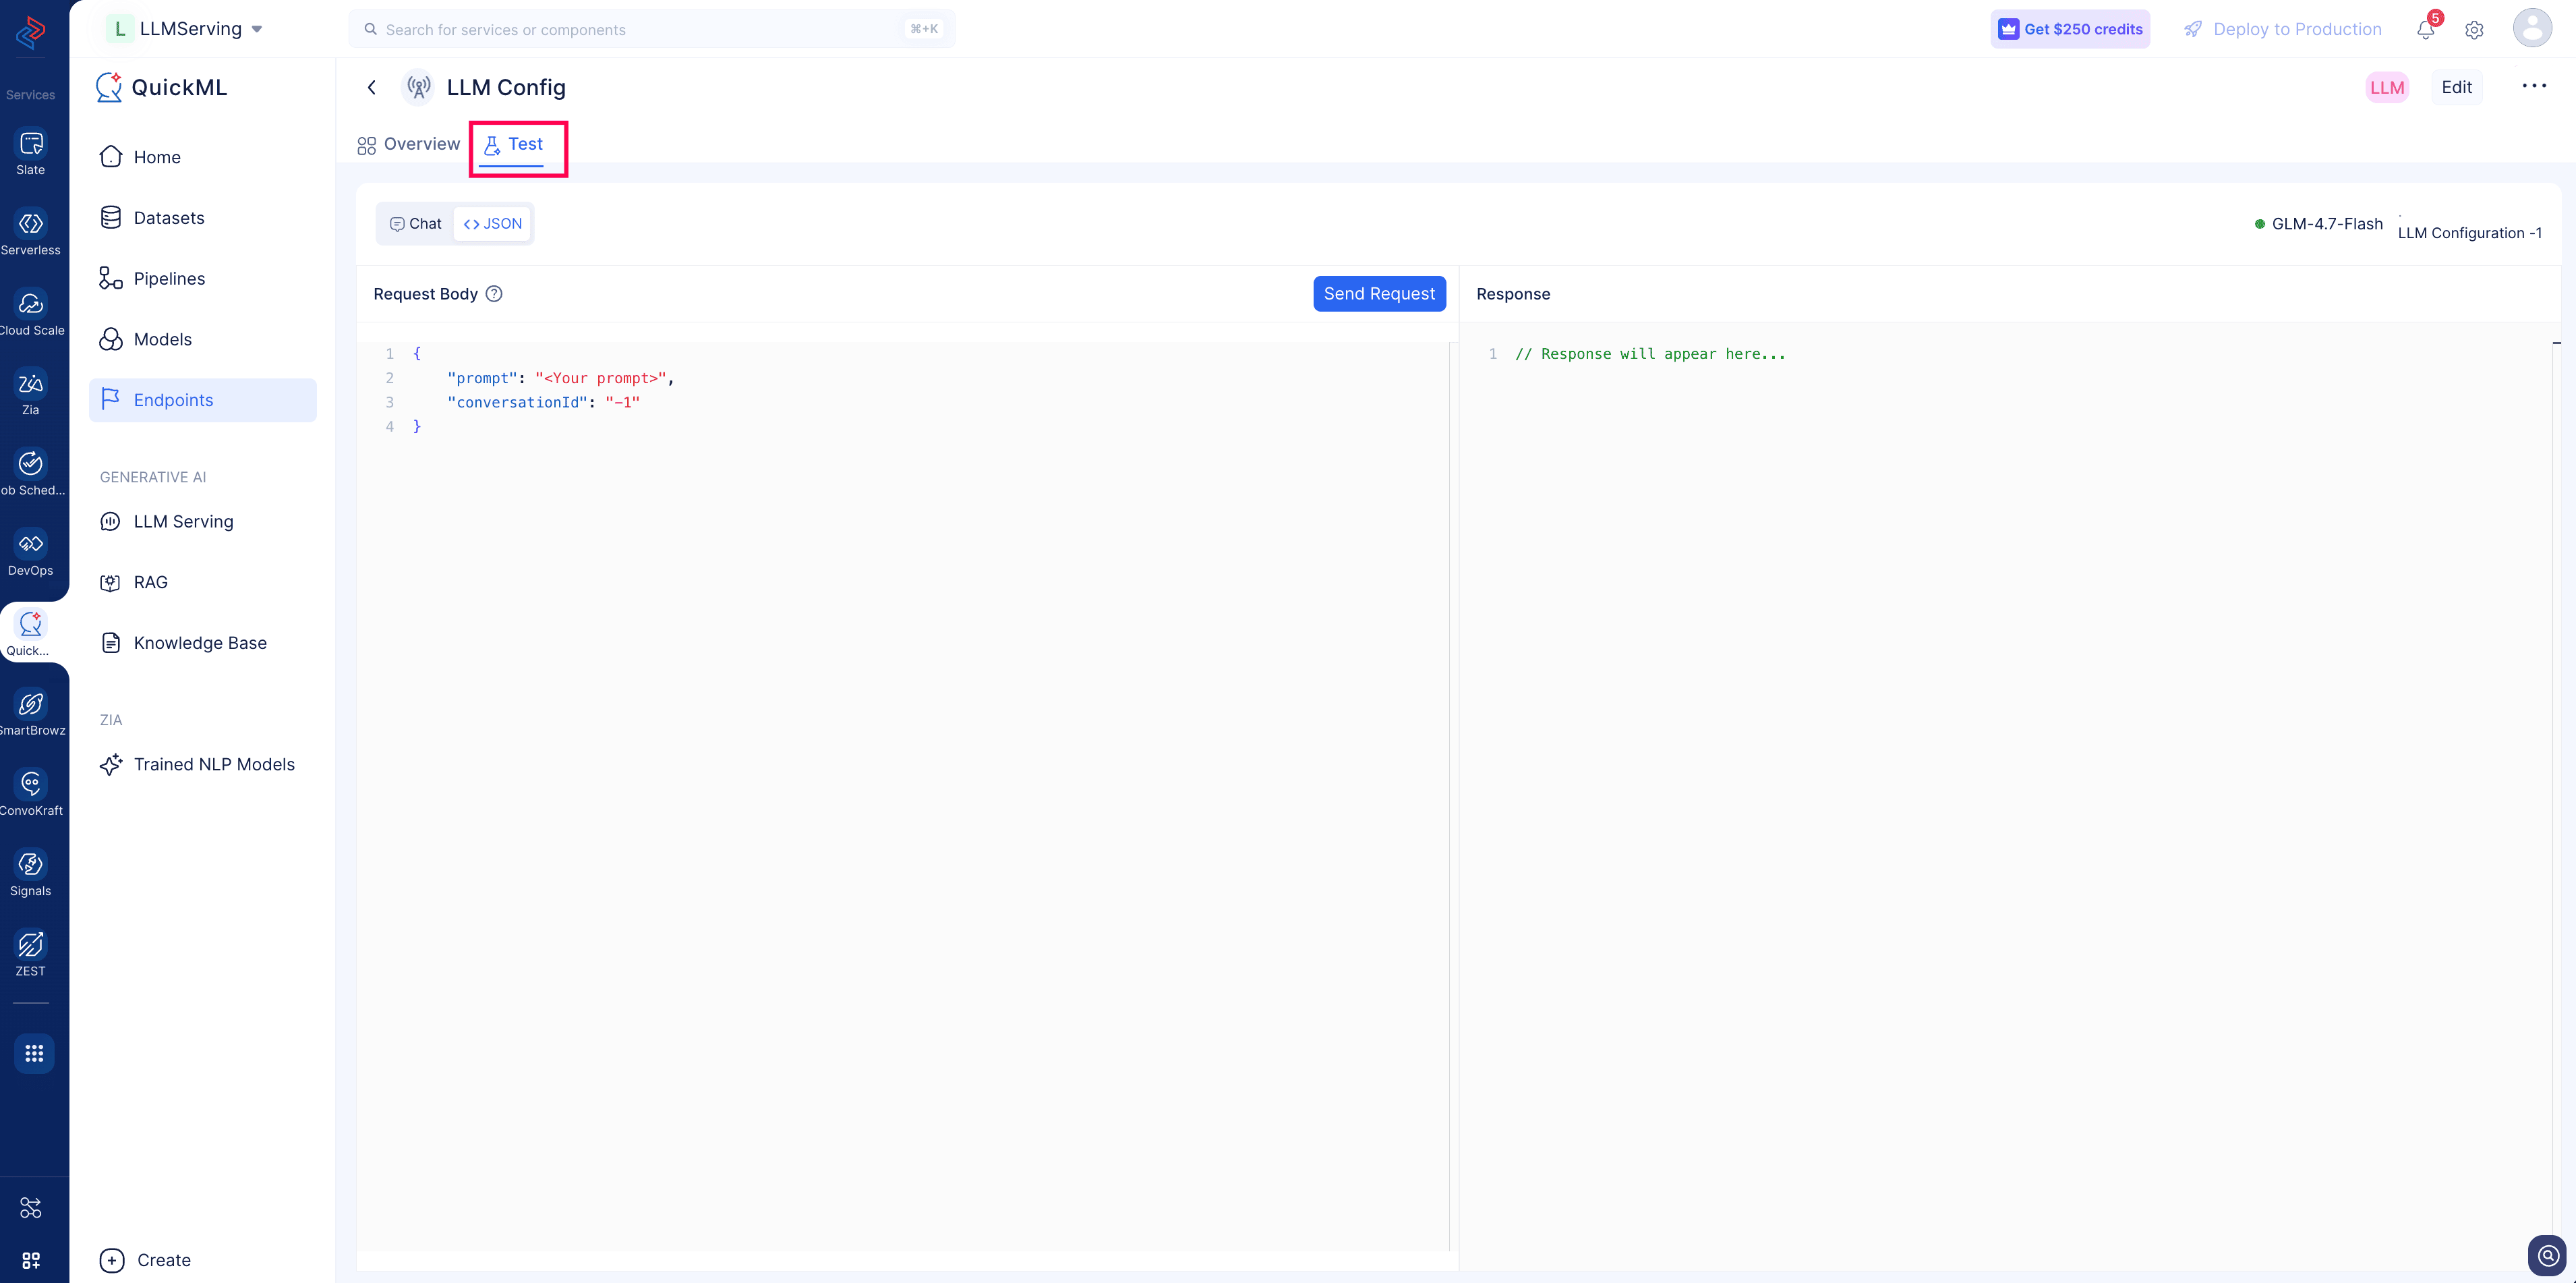
- A basic test interface for the endpoint. Access the basic test interface beside the overview tab.
This flow ensures that every endpoint used for integration reflects a parameter configuration that has been tested and optimized for its purpose, providing greater control and flexibility over how your endpoints behave in production.
c. Authentication
QuickML uses OAuth-based authentication for secure API access and efficient integration. Refer to the OAuth documentation for details on different types of OAuth applications and the steps required to generate and manage access tokens.
d. Pricing
API usage is charged based on token consumption. Refer to the Catalyst Pricing page for details.
4. Endpoint details page
The endpoint detail page provides a complete view of the deployed configuration and the integration details required to call it from an external application.
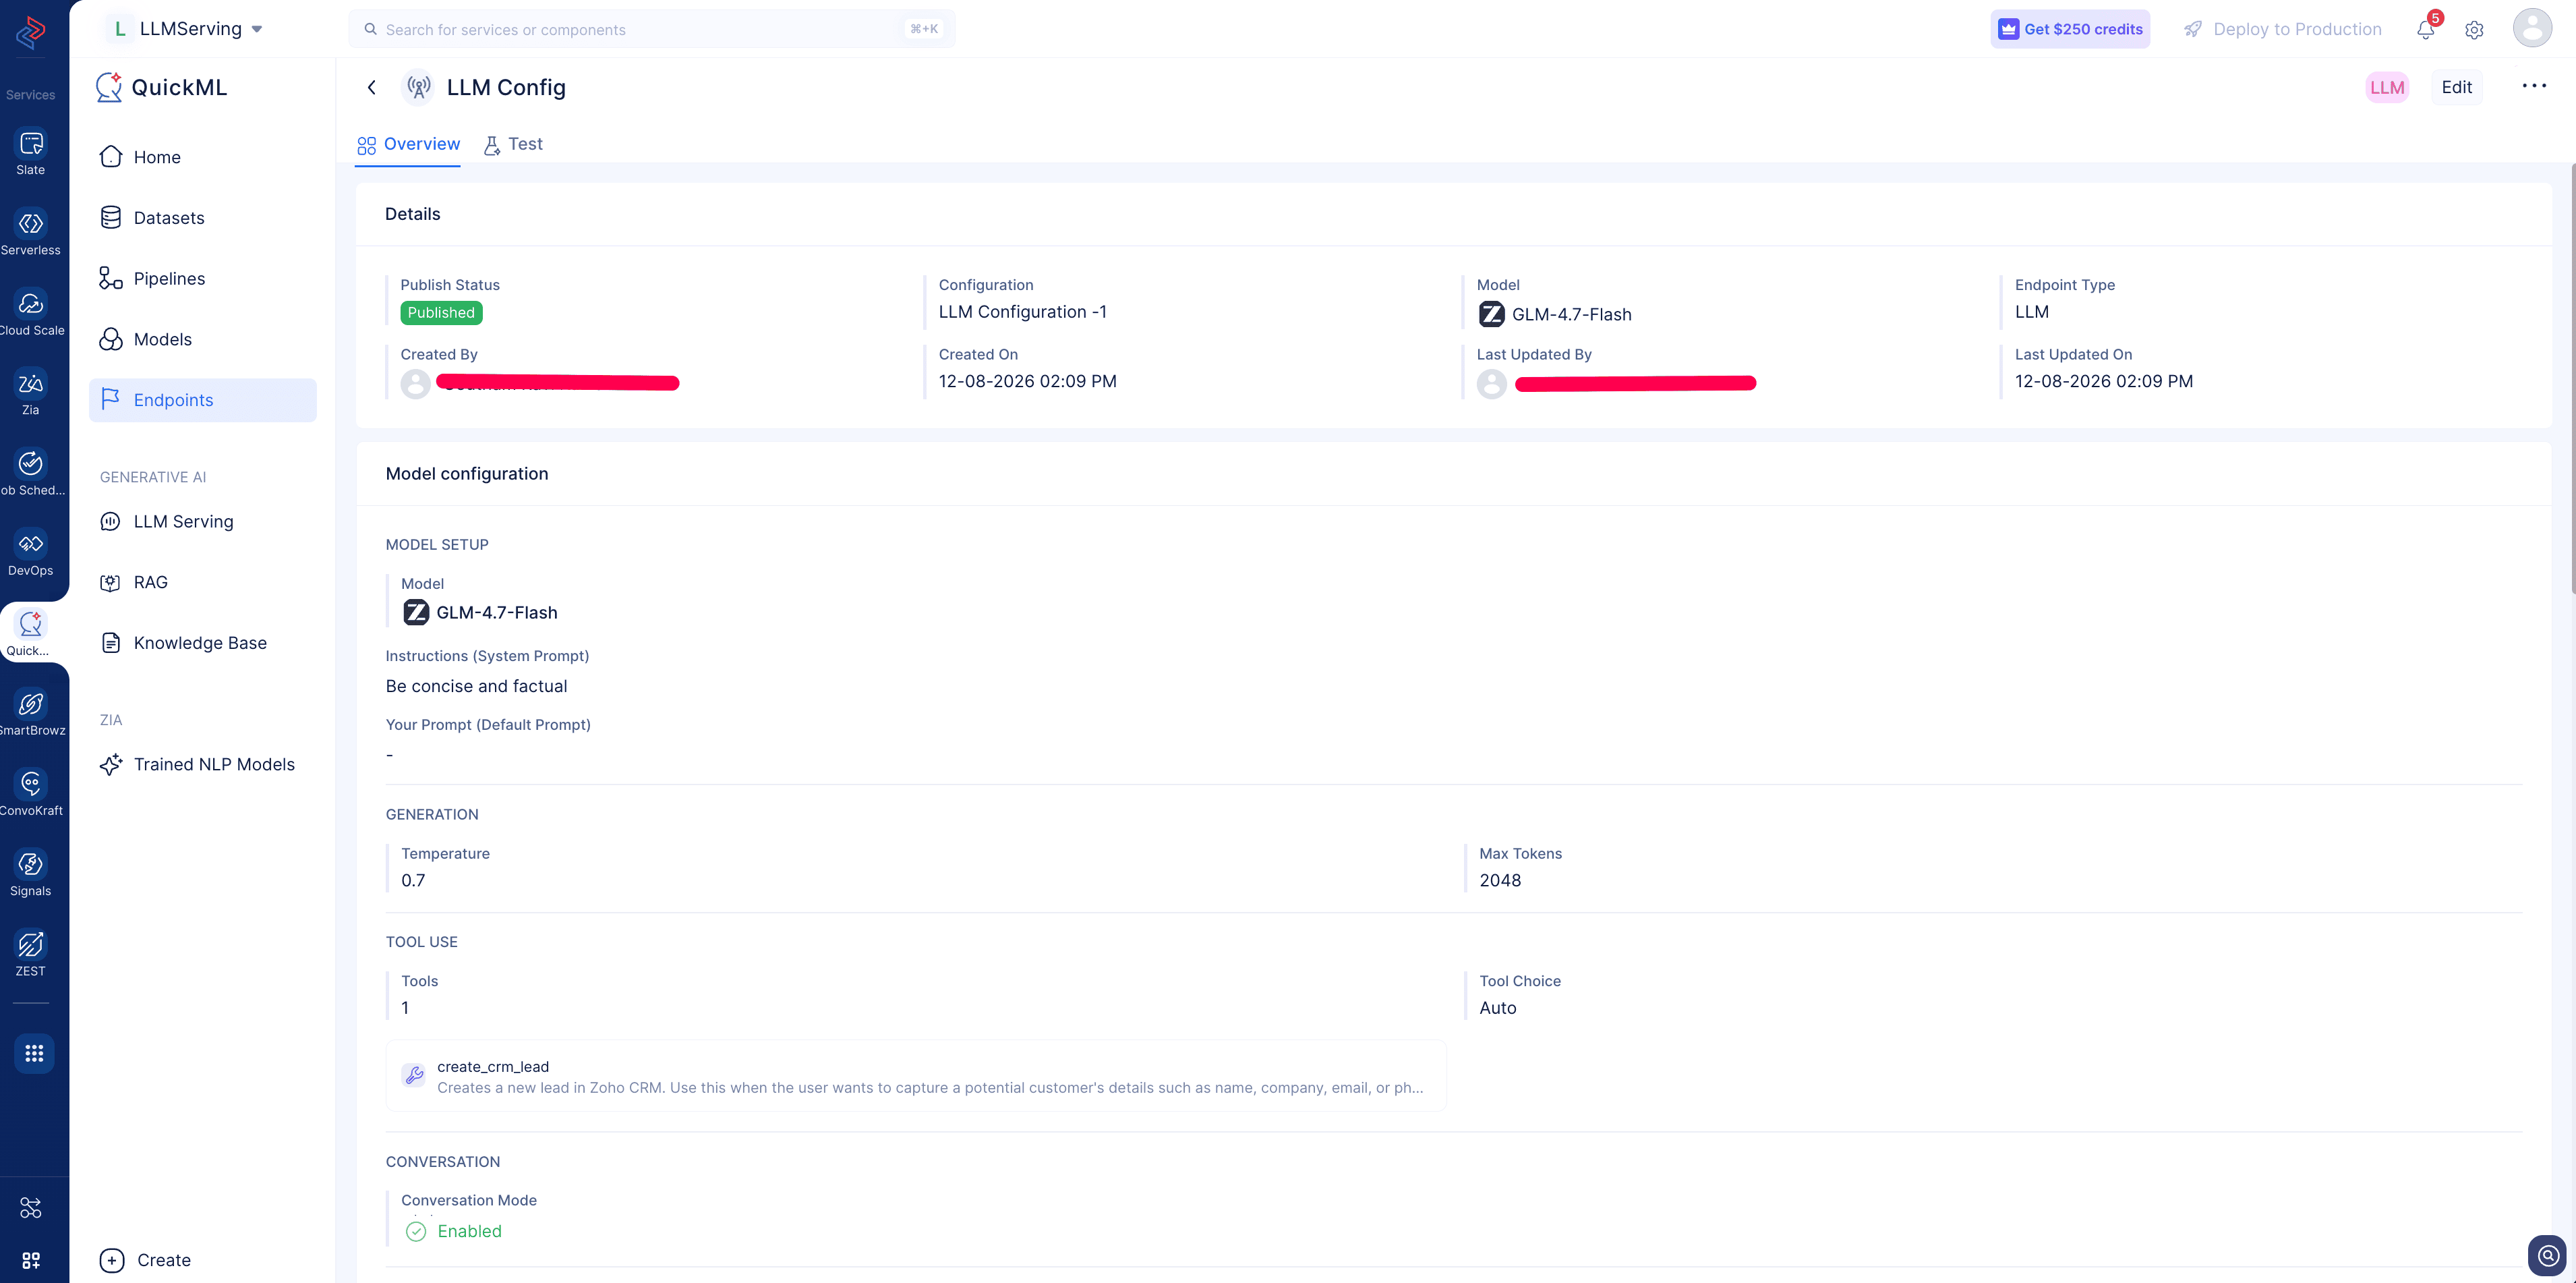
a. Details
The Details section provides the basic metadata of the endpoint and its current publishing status.
| Parameter | Description | Values |
|---|---|---|
| Configuration | Associated LLM saved configuration | Configuration name |
| Endpoint type | Type of endpoint created | LLM |
| Generative AI Model | Model associated | GLM-4.7 Flash |
| Publish Status | Status of the endpoint | Published / Unpublished |
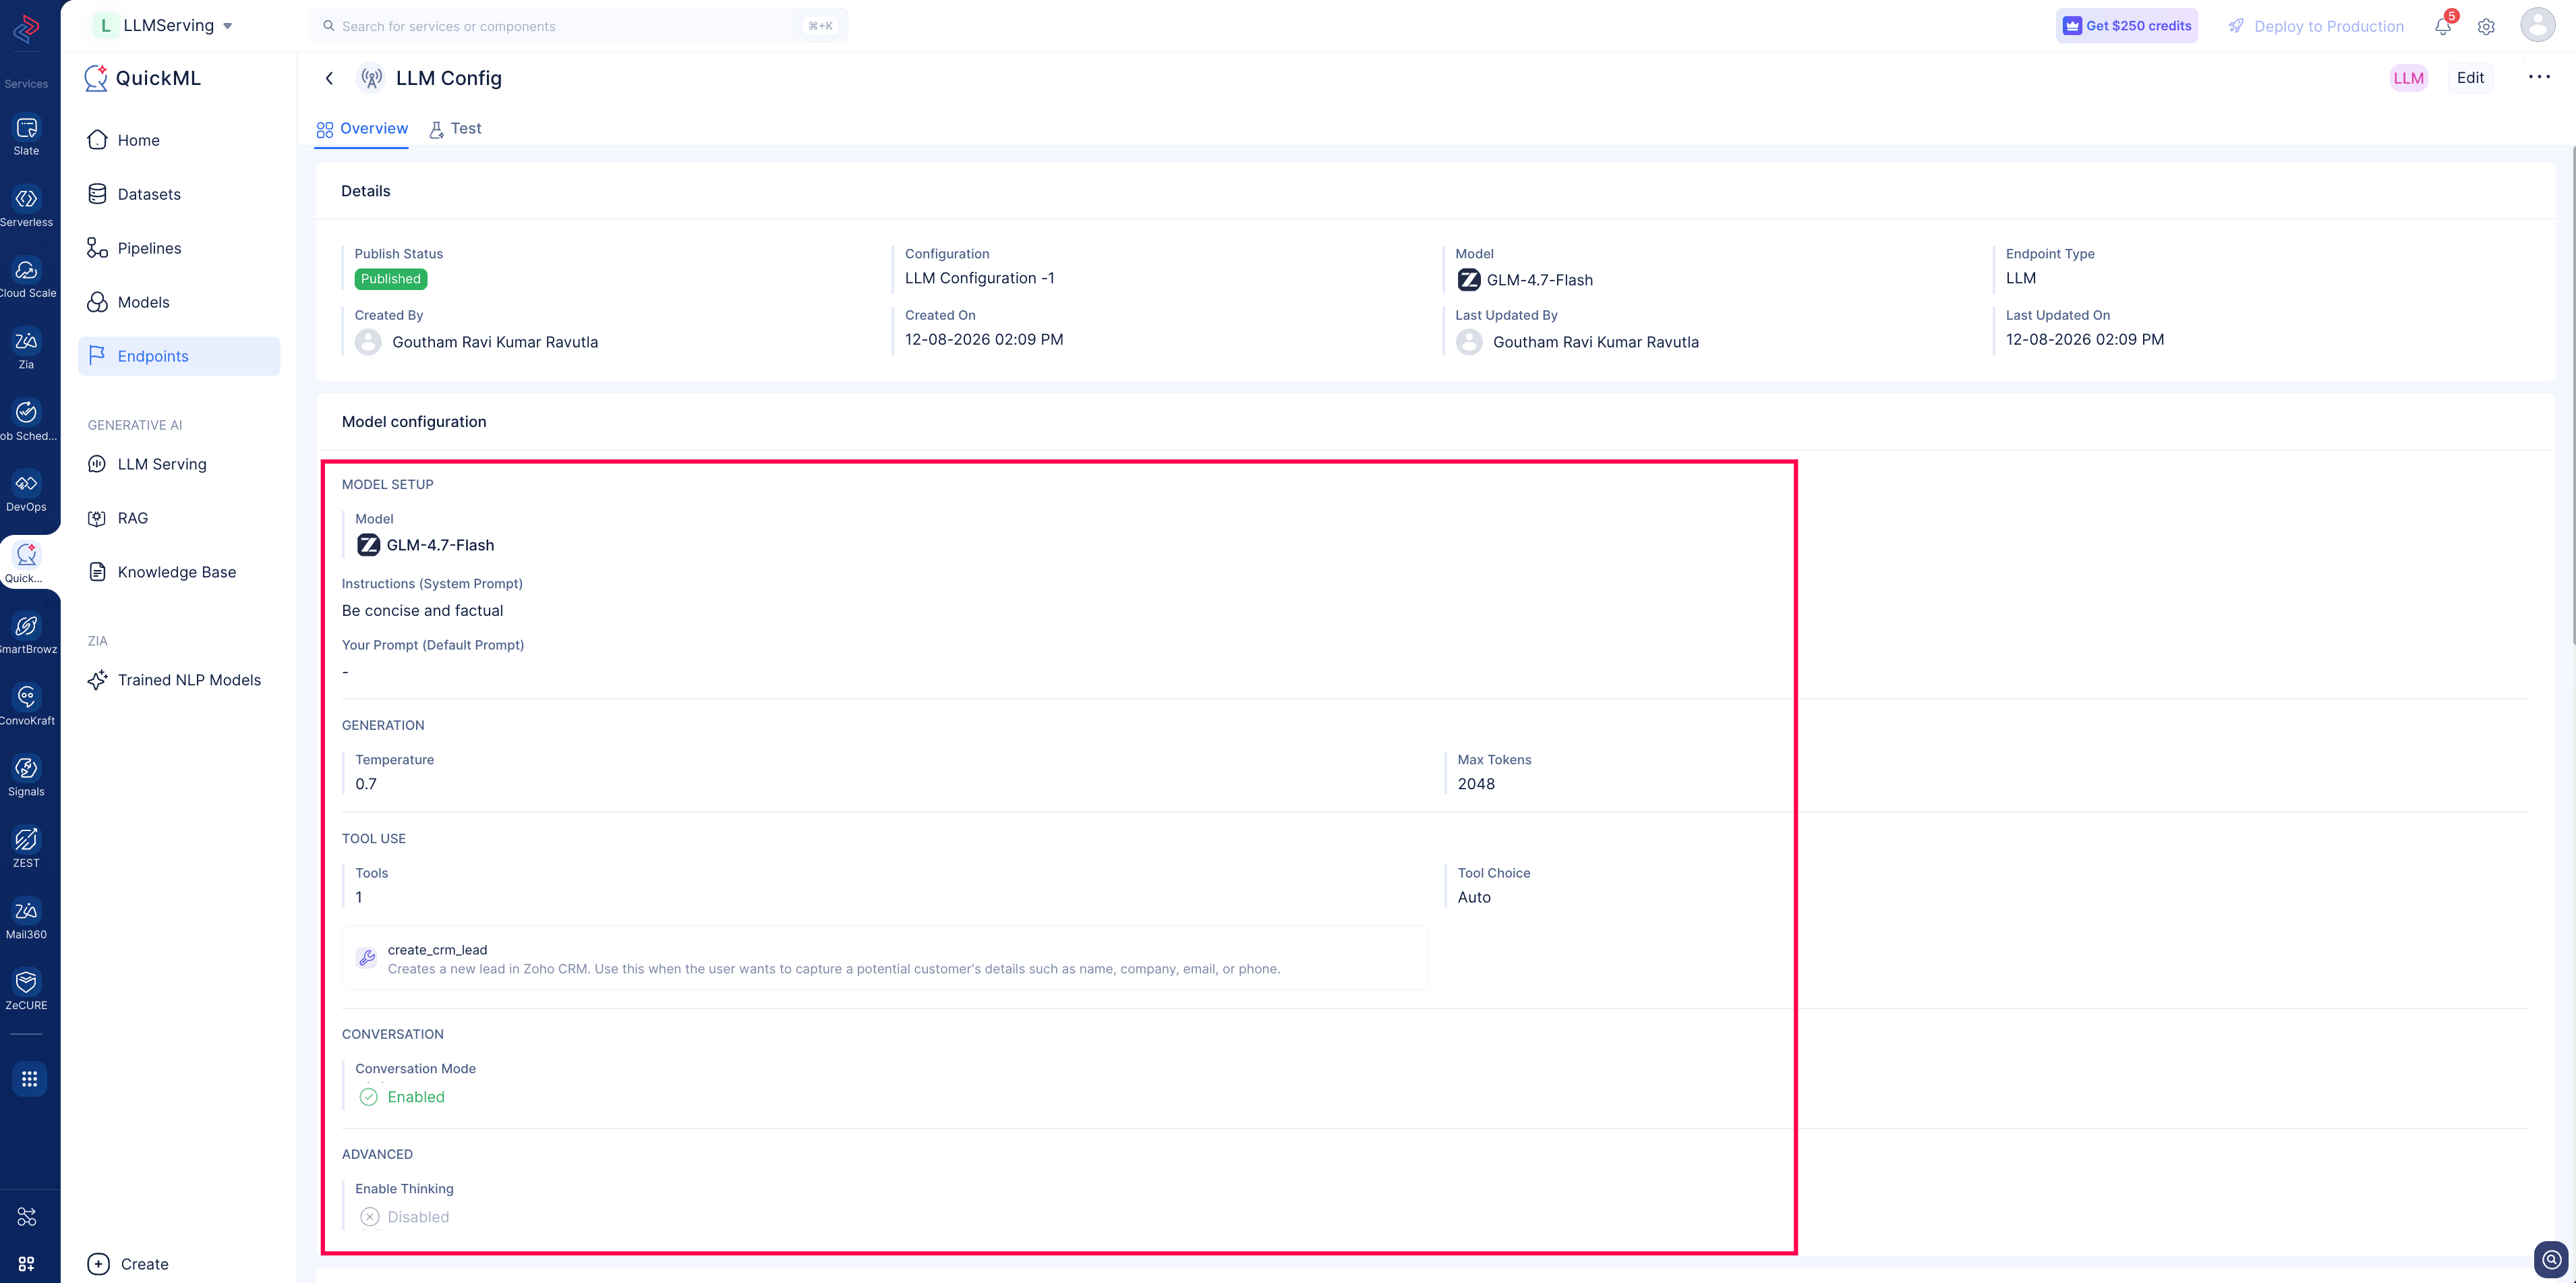
b. Model configuration
Displays the parameters with captured values from the saved configuration at the time of endpoint creation.
c. Endpoint details
The Endpoint Details section lists the connection information required to call the endpoint from an external application.
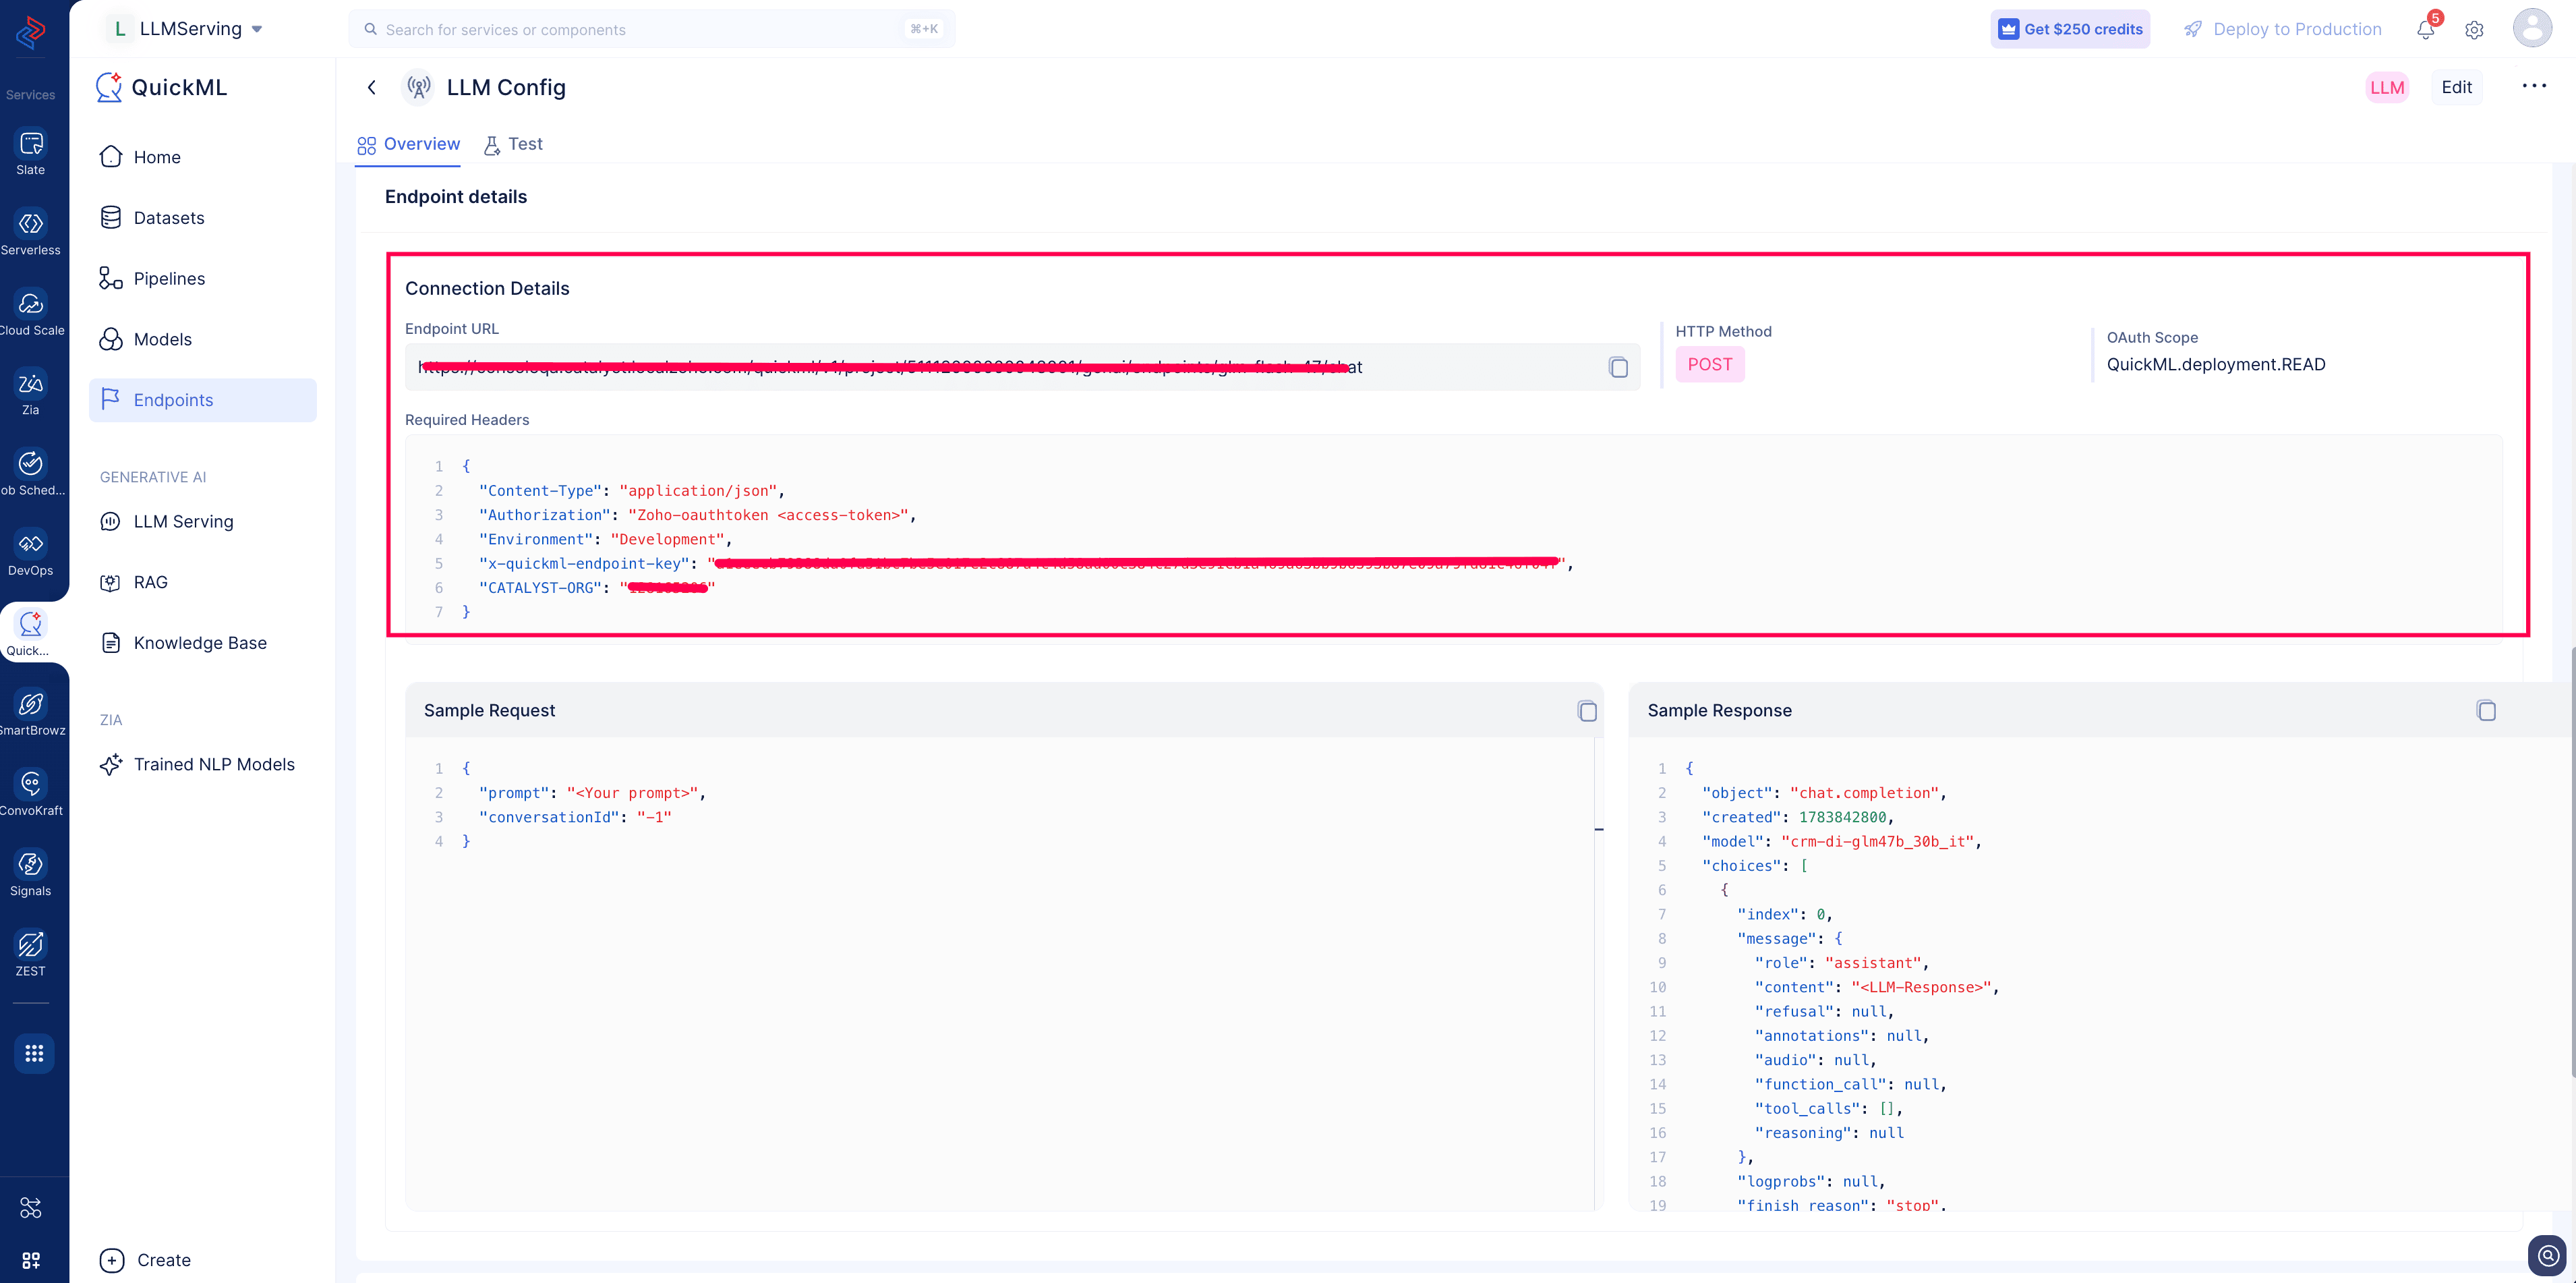
| Parameter | Description | Values |
|---|---|---|
| Endpoint URL | The REST API URL used to send prediction requests. |
https://api.catalyst.zoho.com/quickml/v1/project/.../endpoints/predict
|
| HTTP Method | The HTTP method used for prediction requests. | POST |
| OAuth Scope | Required OAuth scope for authentication. | QuickML.deployment.READ |
| Headers | Required request headers for authorization and organization identification. |
CATALYST-ORGAuthorization: Zoho-oauthtoken <access_token>
|
d. Test
The endpoint detail page includes a built-in Test Interface that allows users to send queries and inspect responses directly from the UI without writing code.
Evaluate the model in the test interface via a generic chat instance and a JSON format to identify how the request and response are being processed:
-
Chat Interface UI:
A conversation-style panel with user and system message threads, and an input box. Enter a query, send it, and view the endpoint’s response inline.
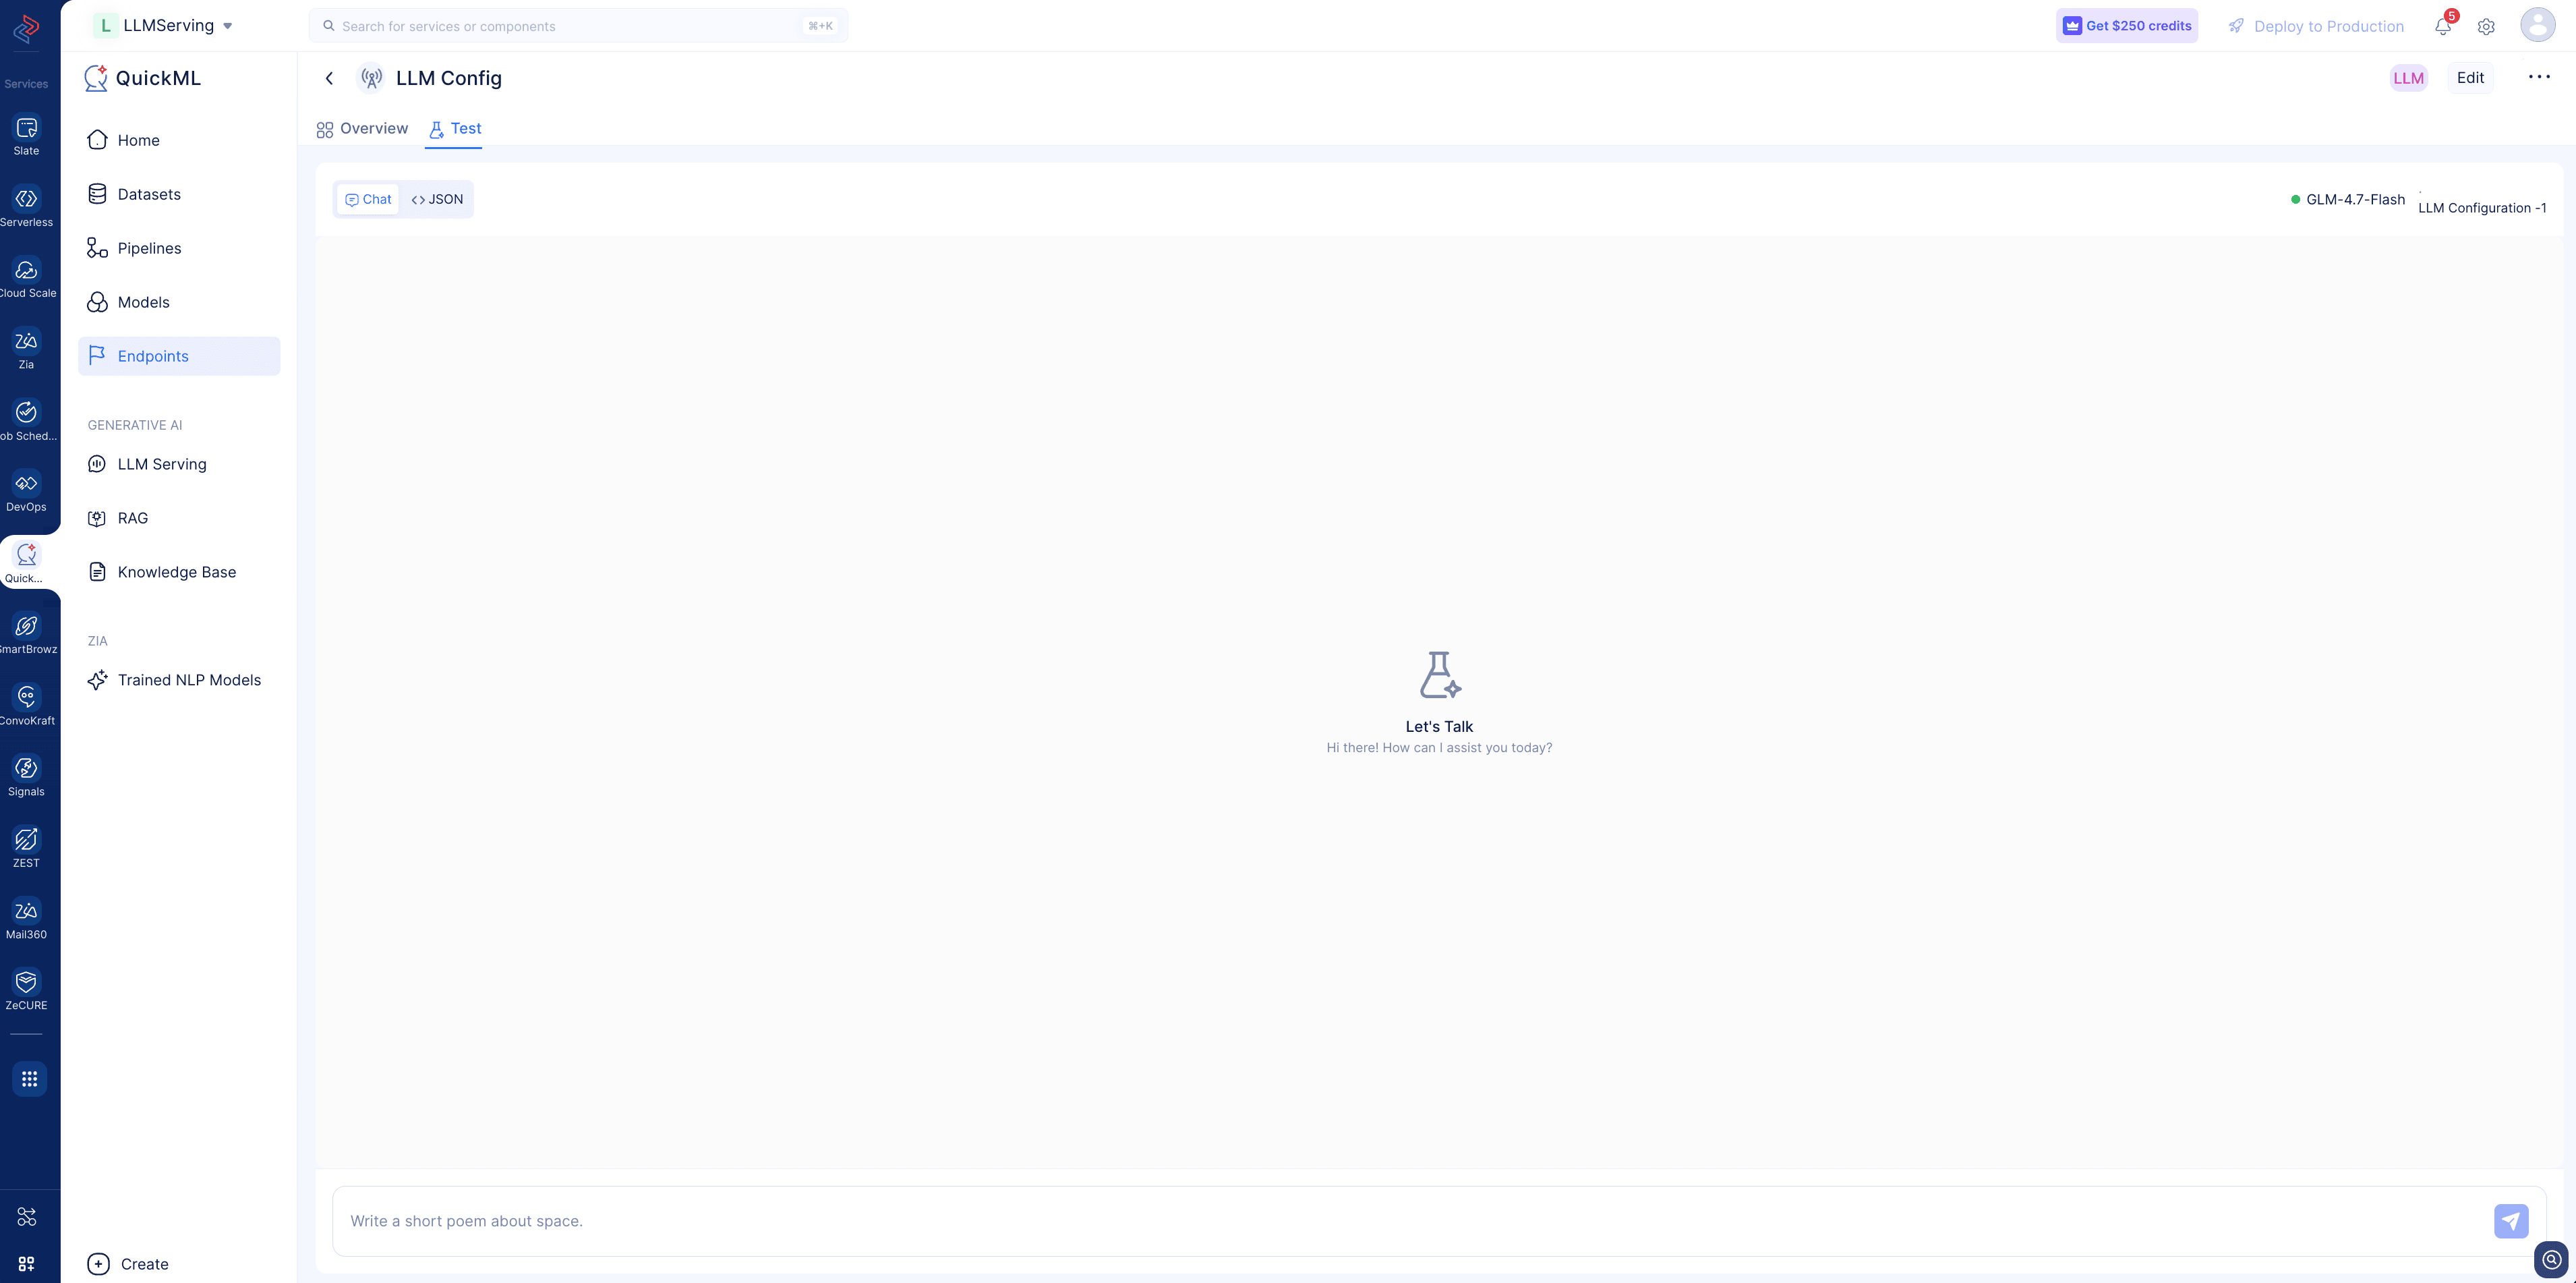
This mode is best for quickly checking response quality and behavior in a natural, interactive way.
-
JSON Format:
A raw JSON request/response view that lets you validate the exact input payload and inspect the structured output. Use this mode to confirm your request body matches the expected input schema and to verify the format of the returned response before integrating the endpoint into your application.
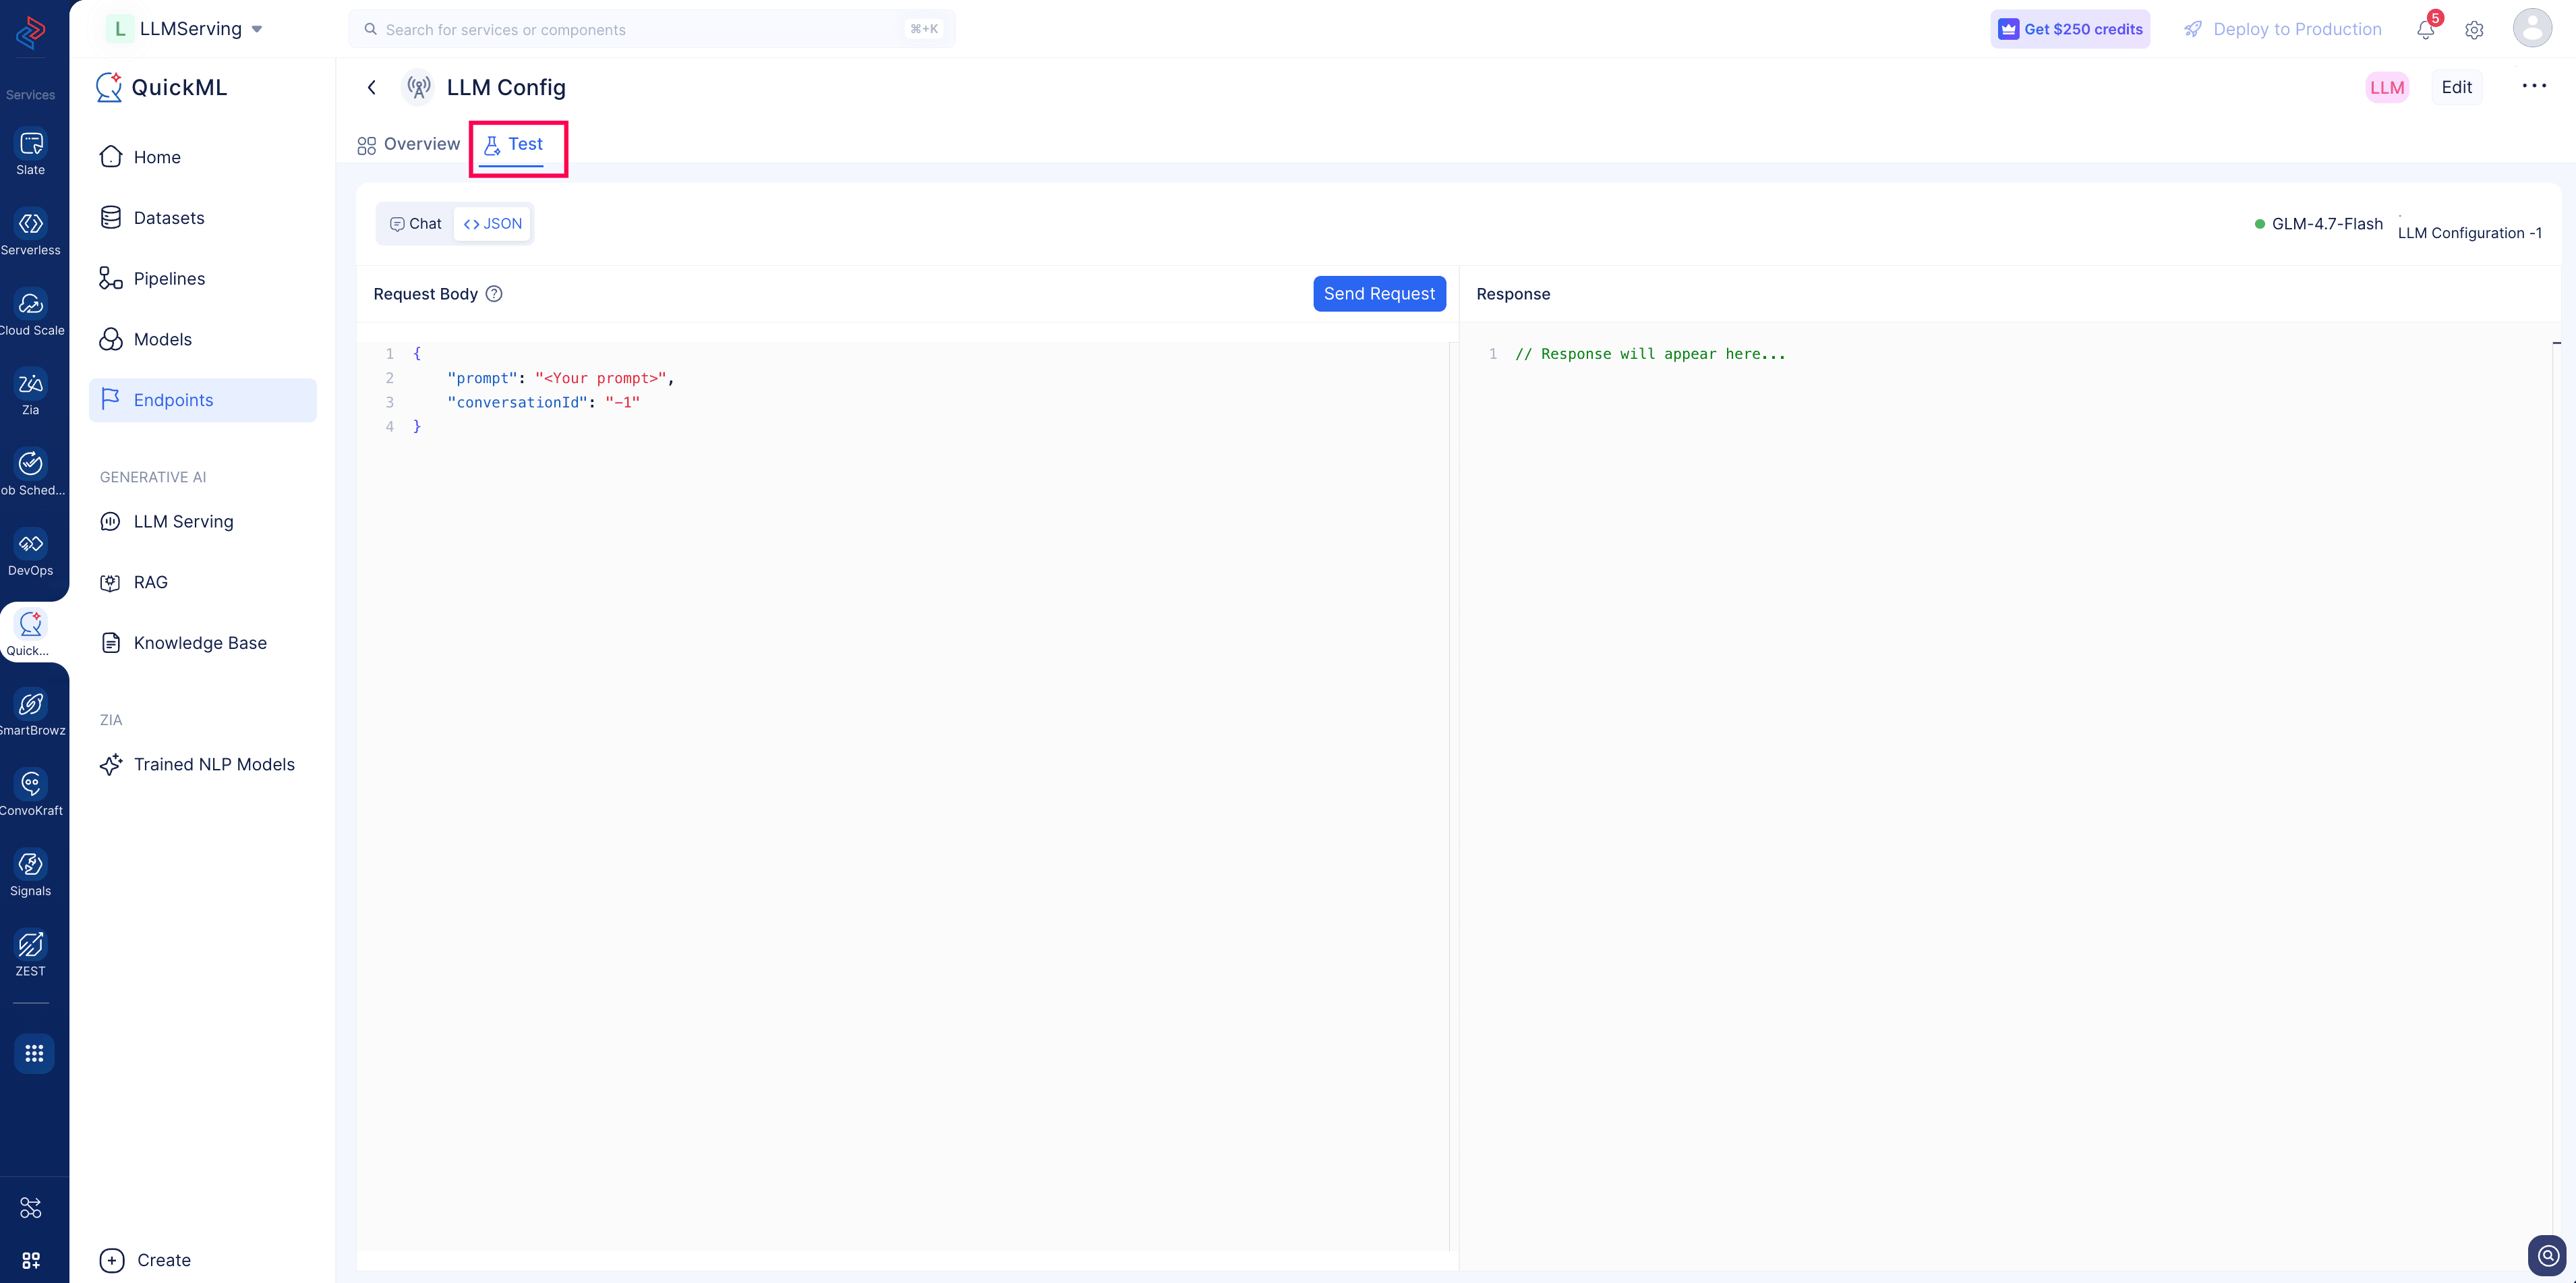
This is best for checking field names, data types, and the overall request/response contract that your code will rely on.
e. Publish
After creation, an endpoint will be callable by default. Hence, there is no publishing of endpoint is required unlike the traditional custom ML endpoints.
Last Updated 2026-08-20 12:42:54 +0530 IST
Yes
No
Send your feedback to us
 Ask ChatGPT
 Ask Claude
 Ask Perplexity