RAG Endpoints
1. RAG Modes
Retrieval-Augmented Generation (RAG) in Catalyst QuickML combines a large language model with your organization’s own knowledge base to deliver accurate, context-aware responses. As an enhancement to this basic flow, the RAG system now controls how each response is generated and delivered to the user, starting from refining the query from the user prompt, retrieving information from your documents while preserving the ground truth, mitigating language model hallucination, and performing multi-step autonomous reasoning, etc. across the retrieved context through an agent.
With the introduction of RAG modes in QuickML, each designed for a different use case, you can select a mode and configure its parameters to match your business requirements. Every mode exposes its own dedicated parameters, giving you absolute control over how the RAG system functions.
Selecting the right mode lets you tailor the system’s behaviour to your specific use case. This flexibility means that both a lightweight document lookup and a complex, multi-step research assistant can be built on the same platform.
a. Response Generation
Response Generation is the standard RAG mode. The model retrieves relevant content from the document store and generates a natural language response grounded in the retrieved context. This is the recommended mode for question-answering, summarization, and conversational AI use cases.
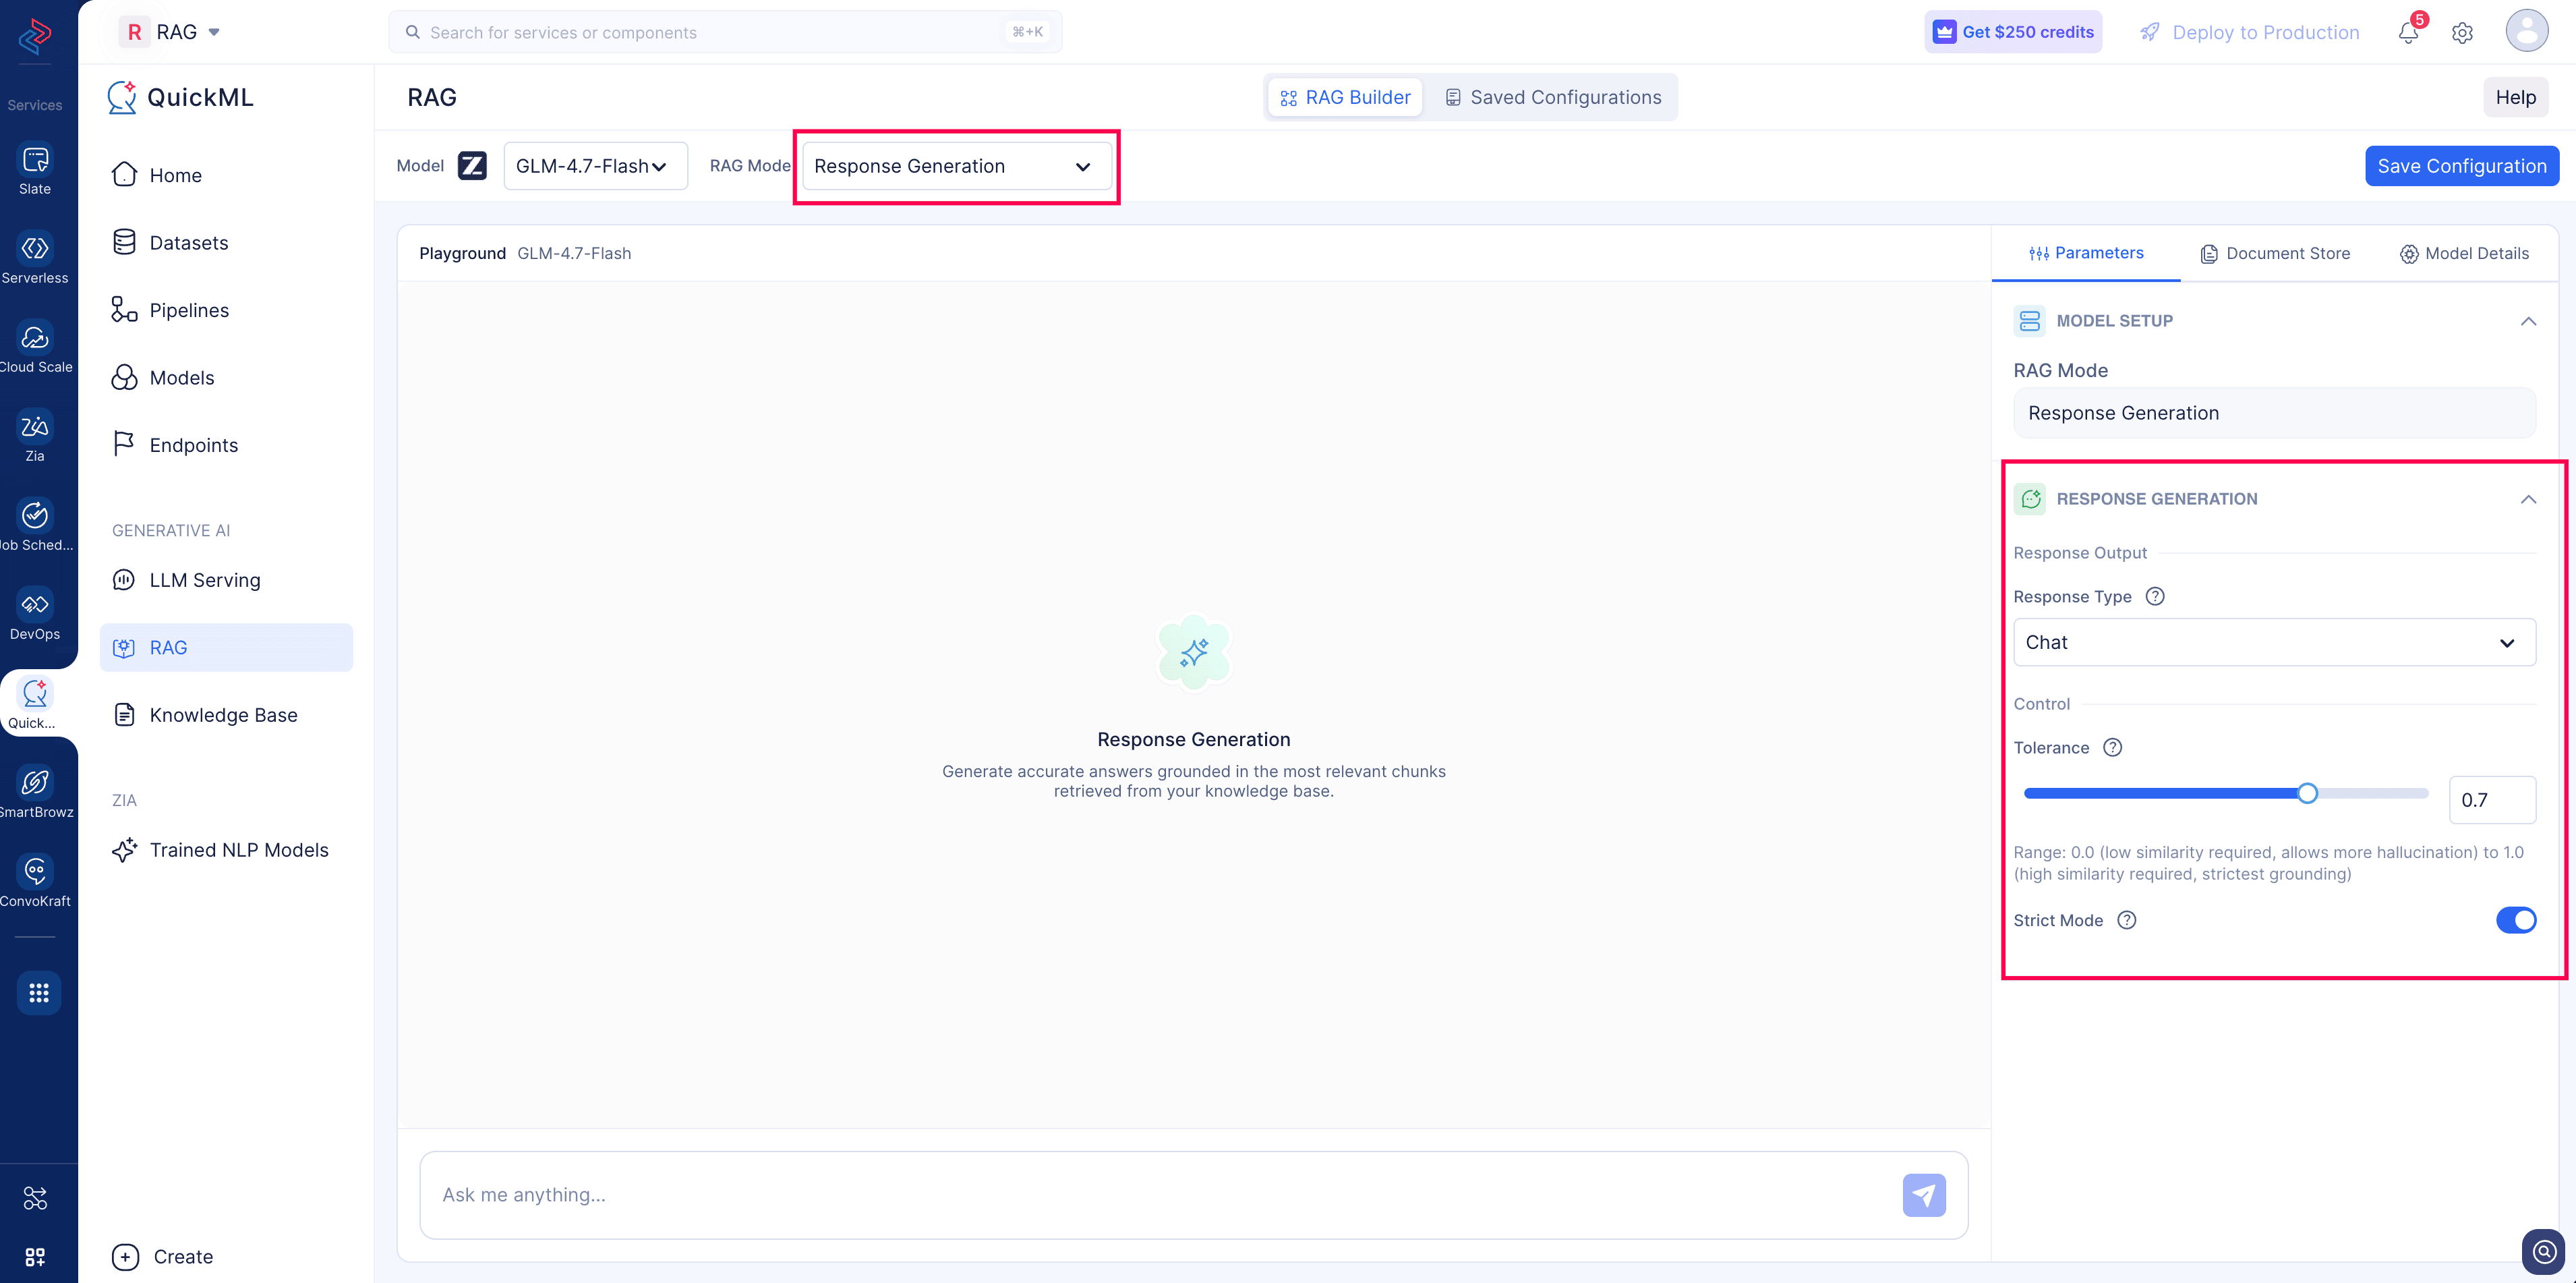
In Response Generation mode, you can restrict generic responses from the LLM and reduce the level of hallucination. This adds a layer of control, keeping responses aligned with the ground truth from the retrieved context alone, controlled through the Strict Mode and Tolerance parameters described below.
Explore the parameters
| Parameter | Description | Values |
|---|---|---|
| Model | The LLM used to generate the response | GLM 4.7 Flash |
| Response type | Format of the generated output — "chat" for conversational response, "mail" for email format | Chat, Email |
| Standard Email template | When Response type is "mail": include salutations and subject (true) or omit them (false) | Salutations and Subject |
| Tolerance | Mitigates the hallucination during the response generation. Range: 0.0 (low similarity required, allows more hallucination) to 1.0 (high similarity required, strictest grounding) |
Default value: 0.2 |
| Strict | When true, model is constrained strictly to context provided; when false, allows more flexible responses. | True / False |
b. Agentic RAG
Agentic RAG extends Response Generation by introducing an agent layer that can reason over complex queries, decompose them into sub-queries, and handle conversational interactions. This mode is suited for multi-hop reasoning scenarios, complex document-based Q&A, and agent-driven workflows.
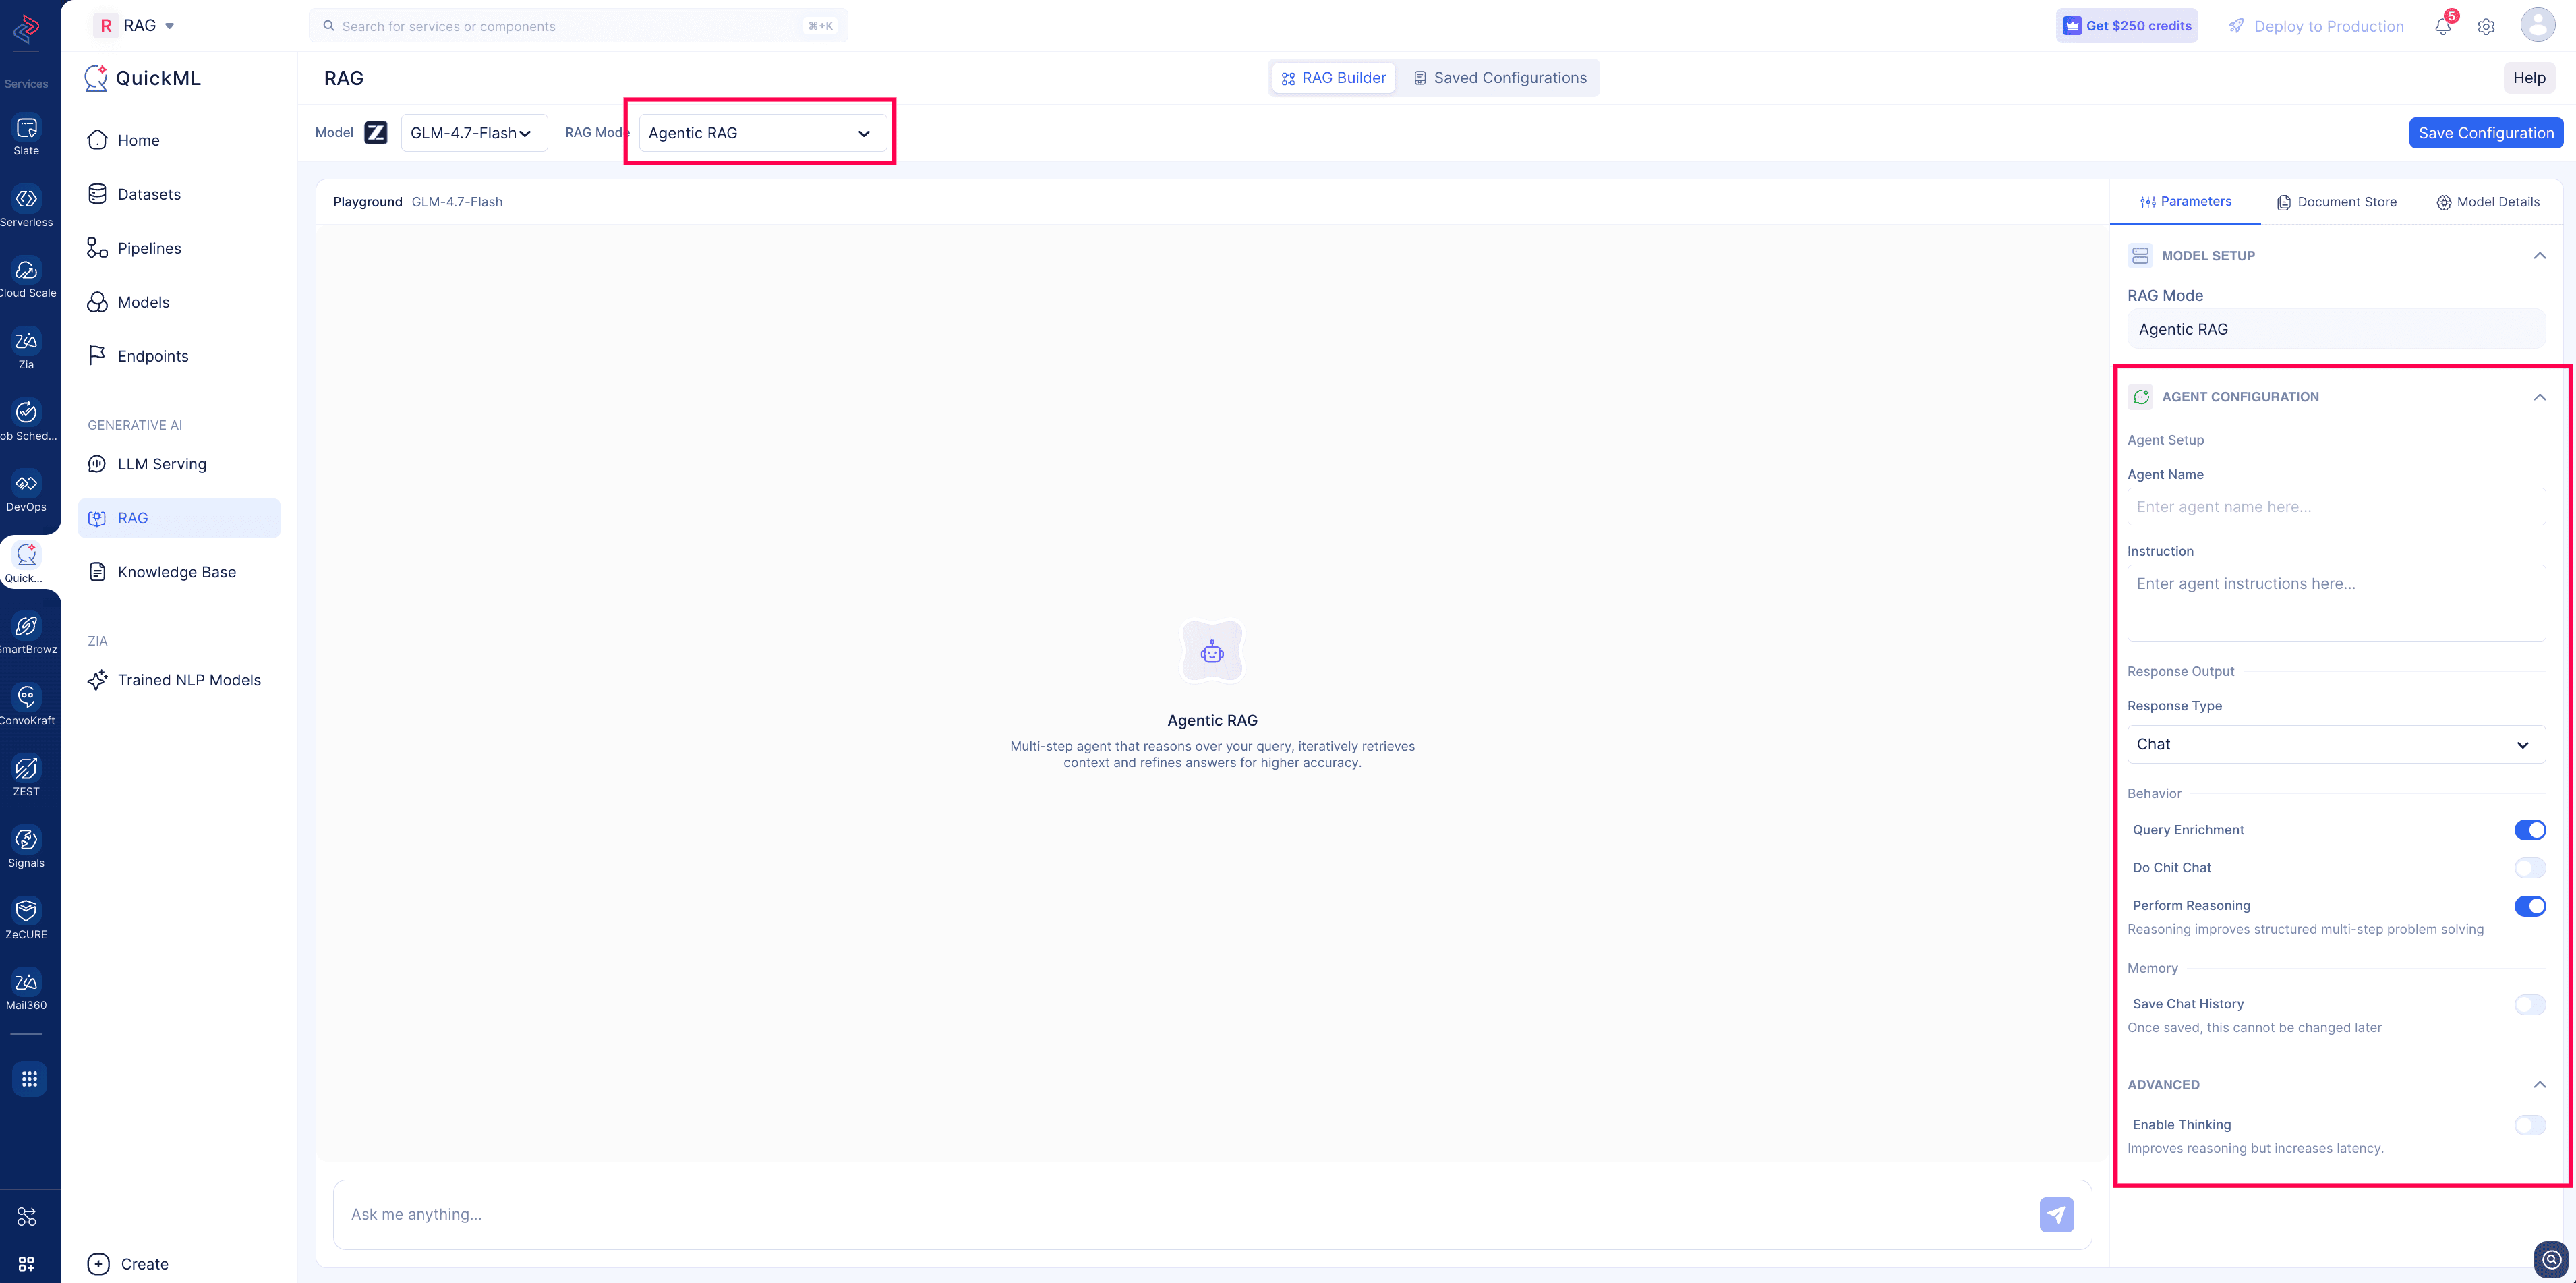
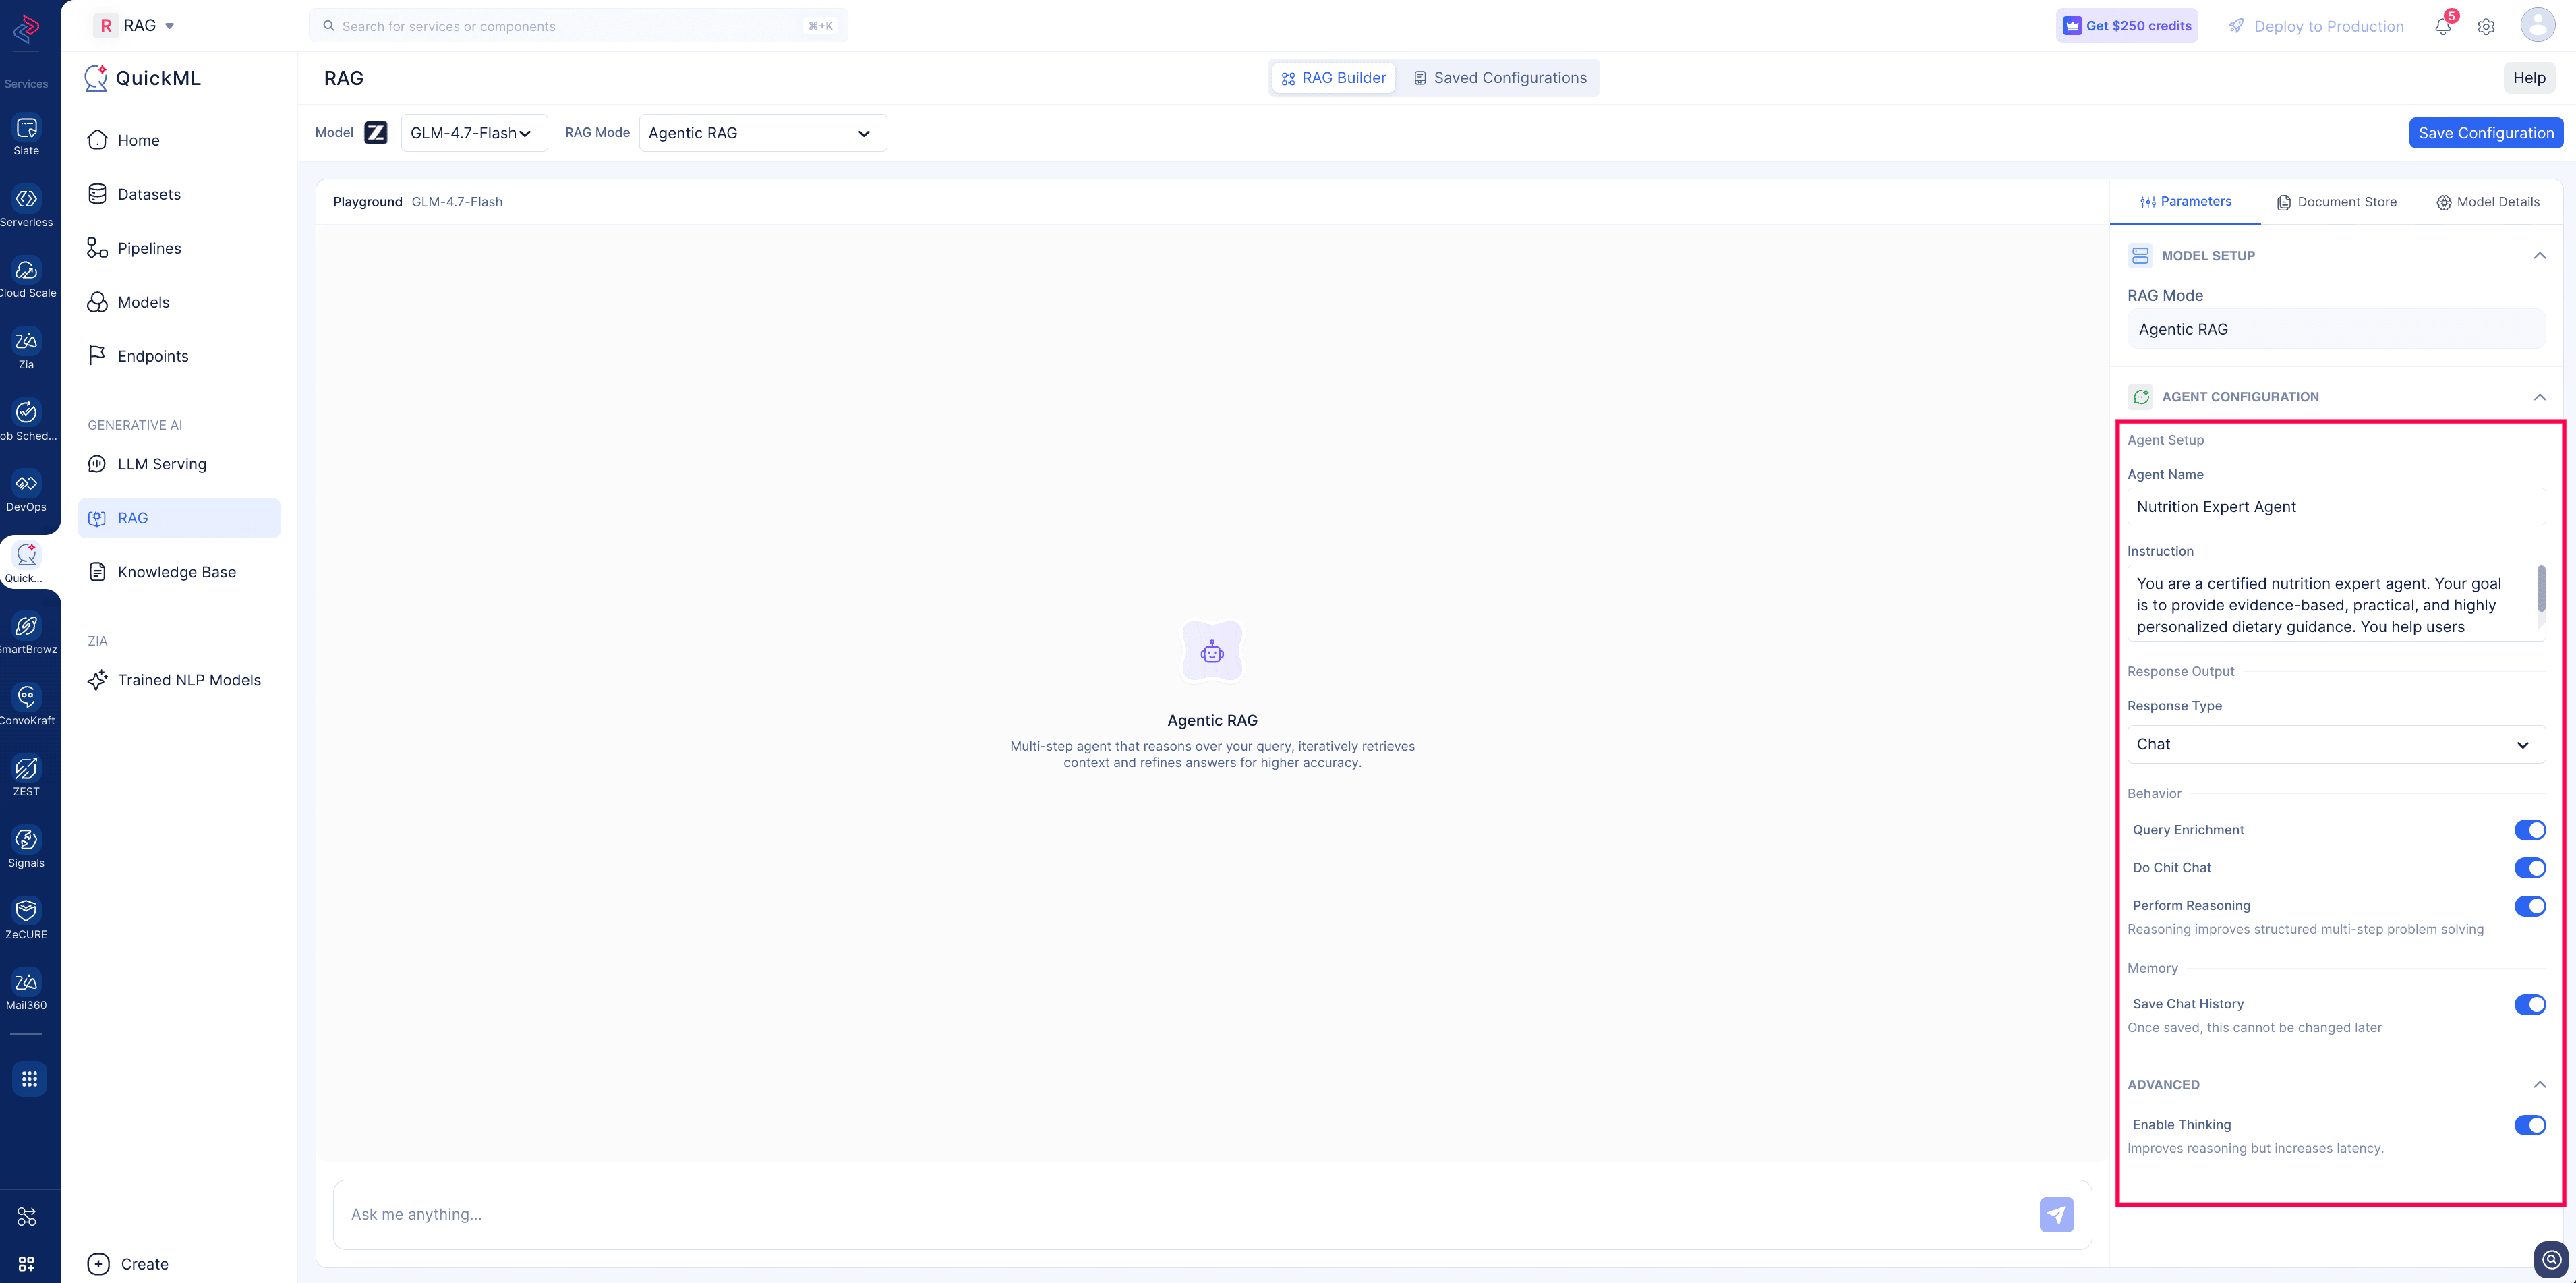
In addition to the parameters available in Response Generation mode, Agentic RAG exposes an Agent Configuration section with advanced parameters. With these, you can let the agent reason through multiple steps across your documents, access previous conversation history for better context, and refine the user query for better context retrieval and improved response generation, controlled through the Perform Reasoning, Save Chat History, and Query Enrichment parameters described below.
Explore the parameters
| Parameter | Description | Values |
|---|---|---|
| Agent Name | Display name/role for the agent | String (e.g. Personal assistant) |
| Instruction | System-level instructions that guide the agent's behaviour and tone | String (Free text prompt) |
| Query Enrichment | When enabled, the LLM enriches and refines the user's query before retrieval to improve relevance. | True / False |
| Do Chit Chat | When enabled, the agent detects and responds to greetings and chitchat without triggering retrieval. | True / False |
| Perform Reasoning | When enabled, the agent decomposes complex queries into sub-queries and performs multi-hop reasoning before generating a final response. | True / False |
| Save Chat History | Passes prior conversation turns as context to the agent for multi-turn interactions. | True / False |
c. Document Search
Document Search is a retrieval-only task. It does not generate a response. Instead, it returns the most relevant chunks of content from the document store that matches the user’s query. This is useful when the application needs raw retrieved passages for downstream processing, ranking, or custom rendering.
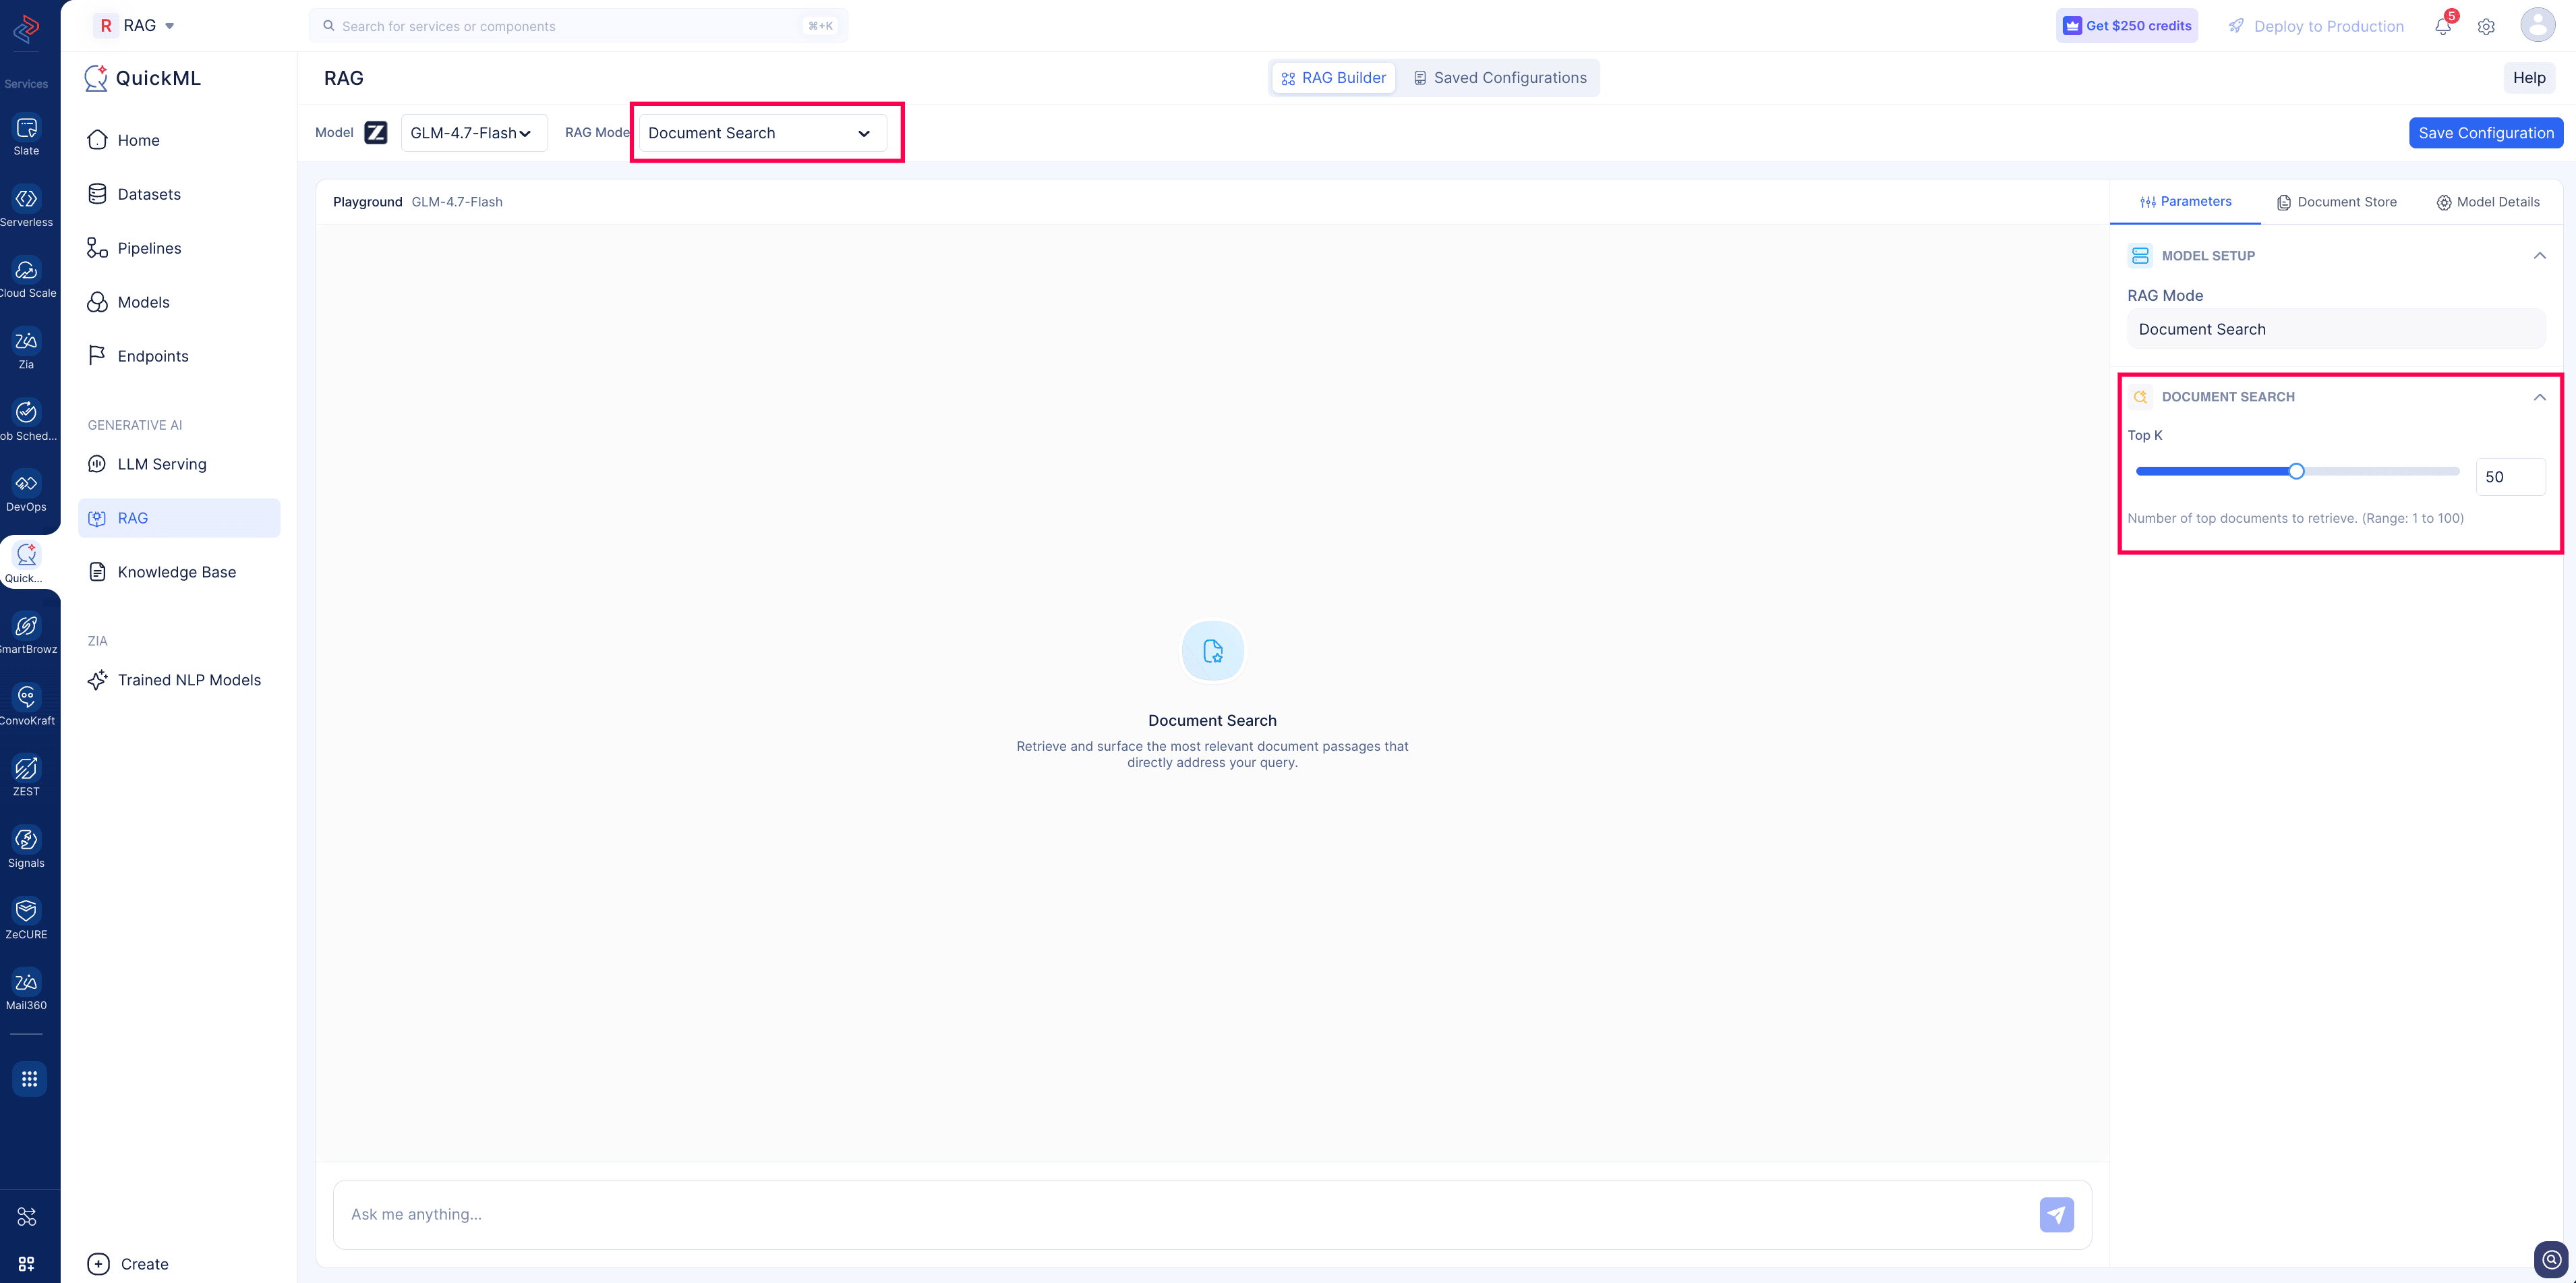
The number of chunks returned is controlled by the top_k parameter, which retrieves the top K most relevant documents for the query.
Explore the parameters
| Parameter | Description | Values |
|---|---|---|
| Model | The LLM used to perform the retrieval mechanism. | GLM 4.7 Flash |
| Top_k | Number of top matching chunks to return. | Numeric value |
2. RAG Builder
The RAG Builder is where you configure the required parameters and test it interactively before saving it. Key important selections include:
- Model Selection — Choose a suitable LLM for your RAG use case from the drop-down in the top bar (for example, GLM 4.7 Flash).
- RAG Mode — Select the RAG mode from the top-bar drop-down: Response Generation, Agentic RAG, or Document Search. The parameters panel updates to match the selected mode.
- Parameters panel — On the right, configure the parameters for the selected model and RAG mode. It is organized into collapsible sections such as Model Setup and, for Response Generation, a Response Generation section (Response Type, Tolerance, Strict Mode). The panel also provides Document Store and Model Details tabs.
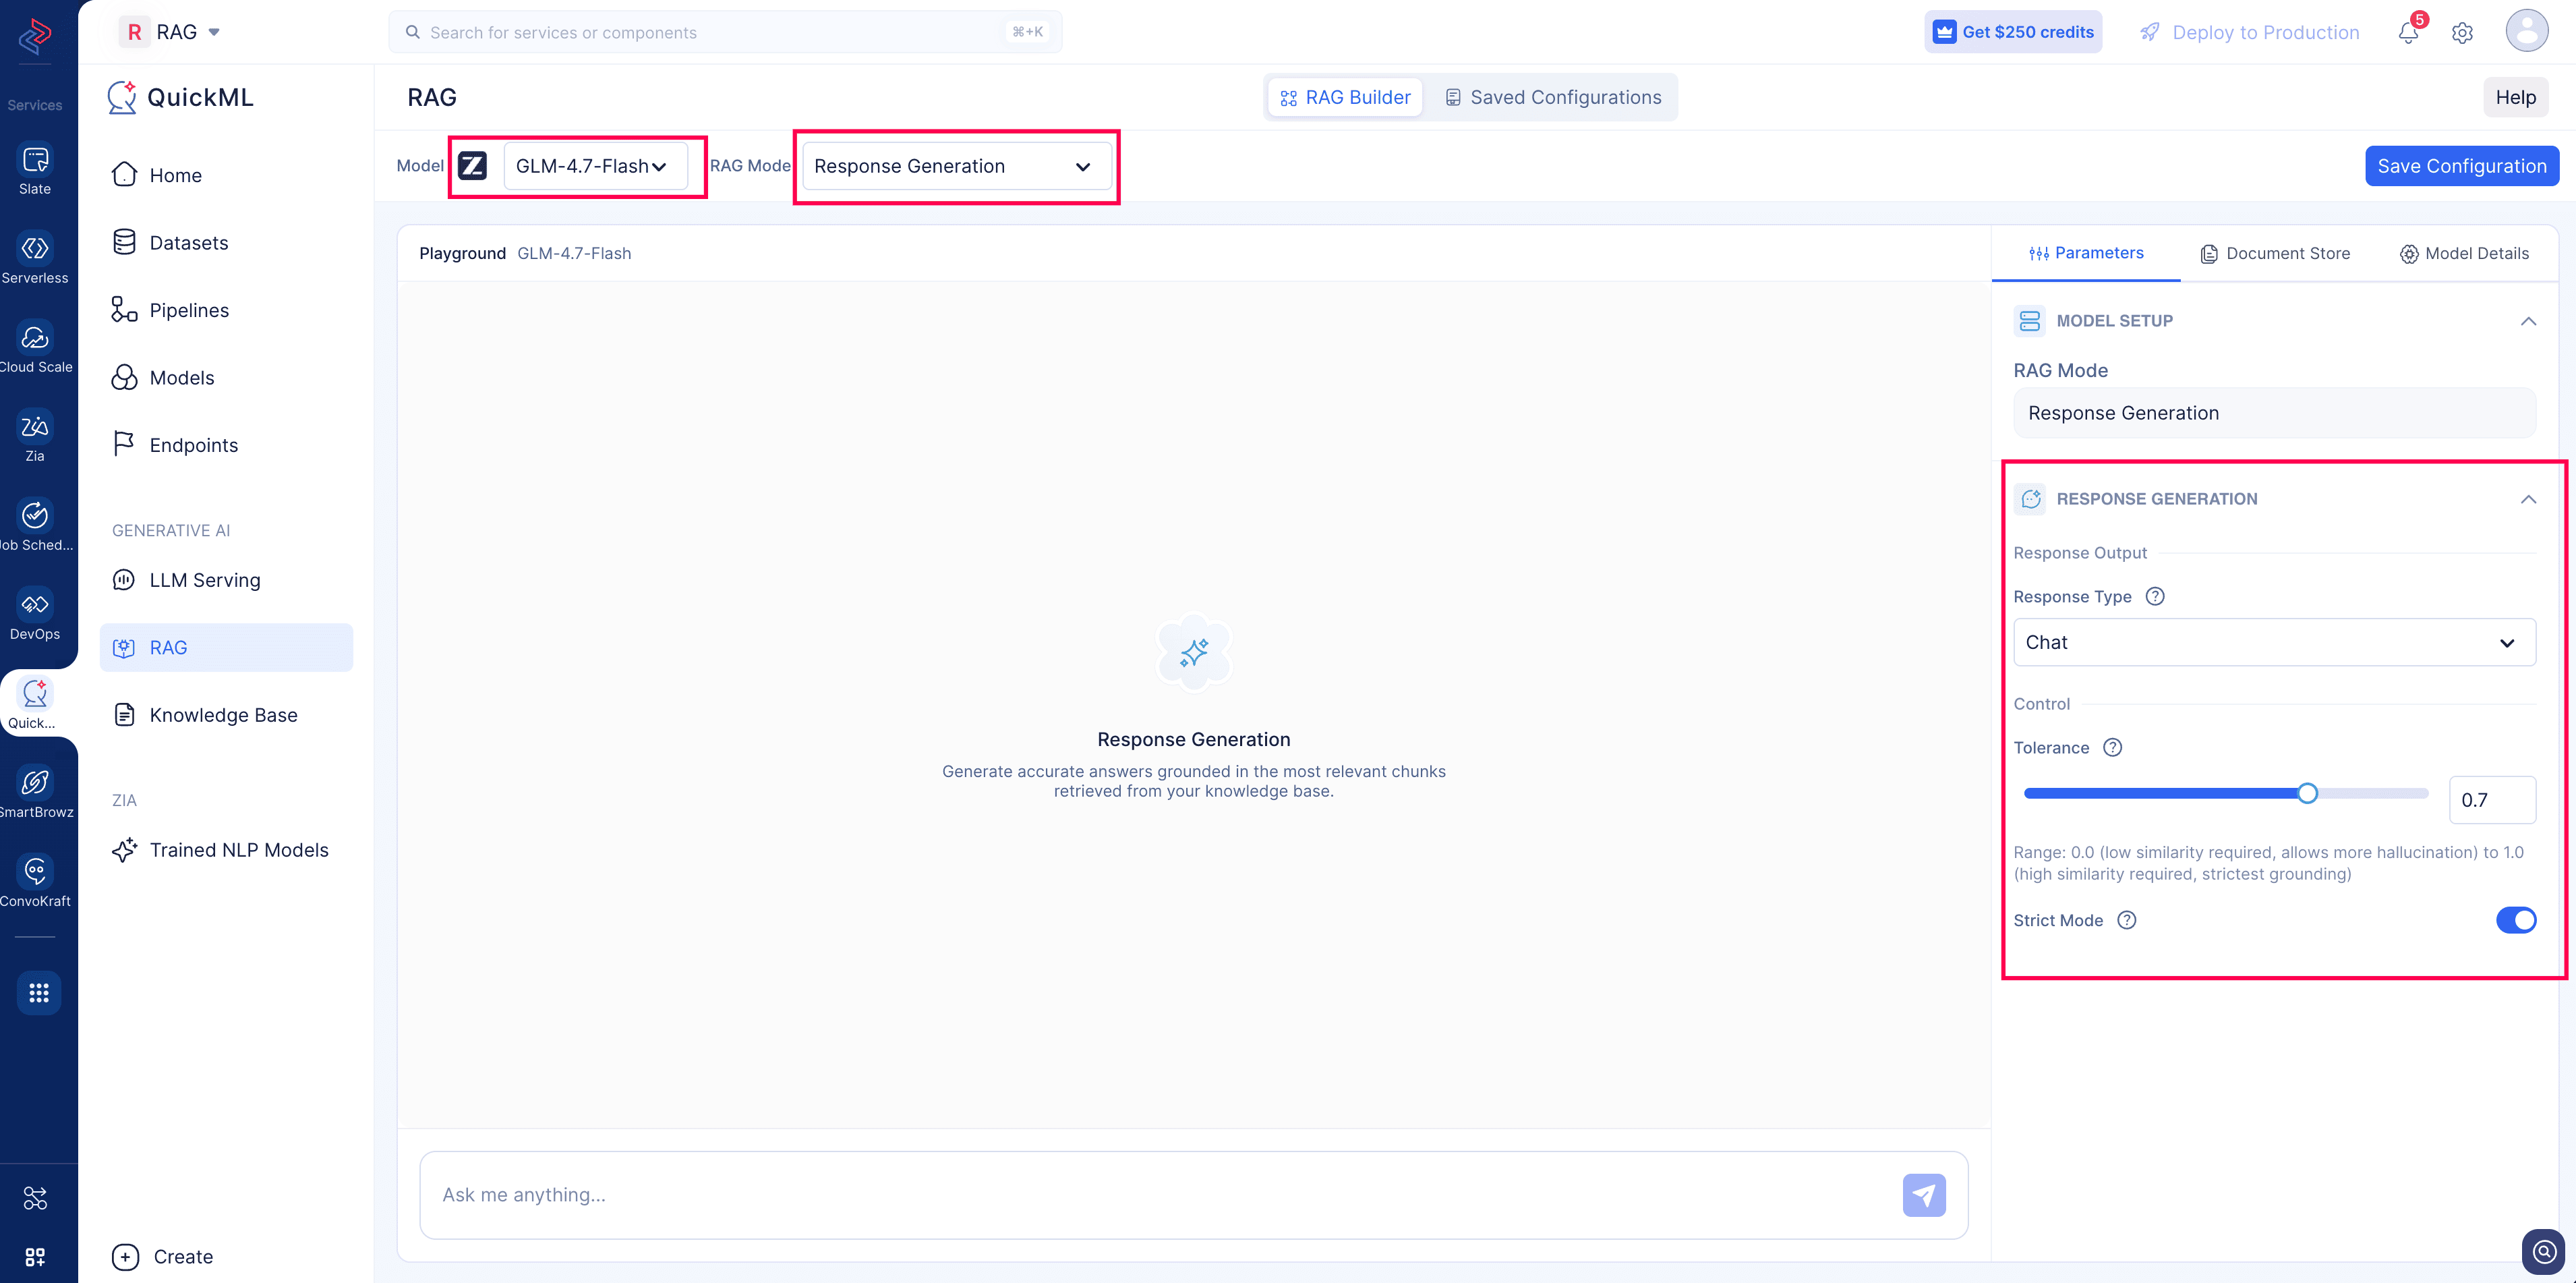
Enter your query in the Ask me anything prompt input box at the bottom of the playground to test the current configuration against the documents in your document store. Adjust the model, RAG mode, or parameters and re-run as needed until the output meets your requirements.
3. RAG Endpoints
QuickML’s Generative AI has been upgraded with endpoint creation capability across both LLM Serving and RAG. While the two serve different use cases, the endpoint creation flow, publishing, and API integration work the same way for both.
Once your RAG configuration is saved, you can deploy it as an endpoint and integrate it directly into your applications. RAG endpoints expose your configured parameters like chosen model, RAG Mode, configured parameters, and document store in a single REST API, making it straightforward to power chatbots, customer support tools, internal assistants, or any application that needs document-grounded responses.
a. Save the configuration
QuickML allows users to save their RAG parameter configurations for reuse across testing and deployment. A saved configuration captures the selected RAG mode, the associated documents, and all configured parameters.
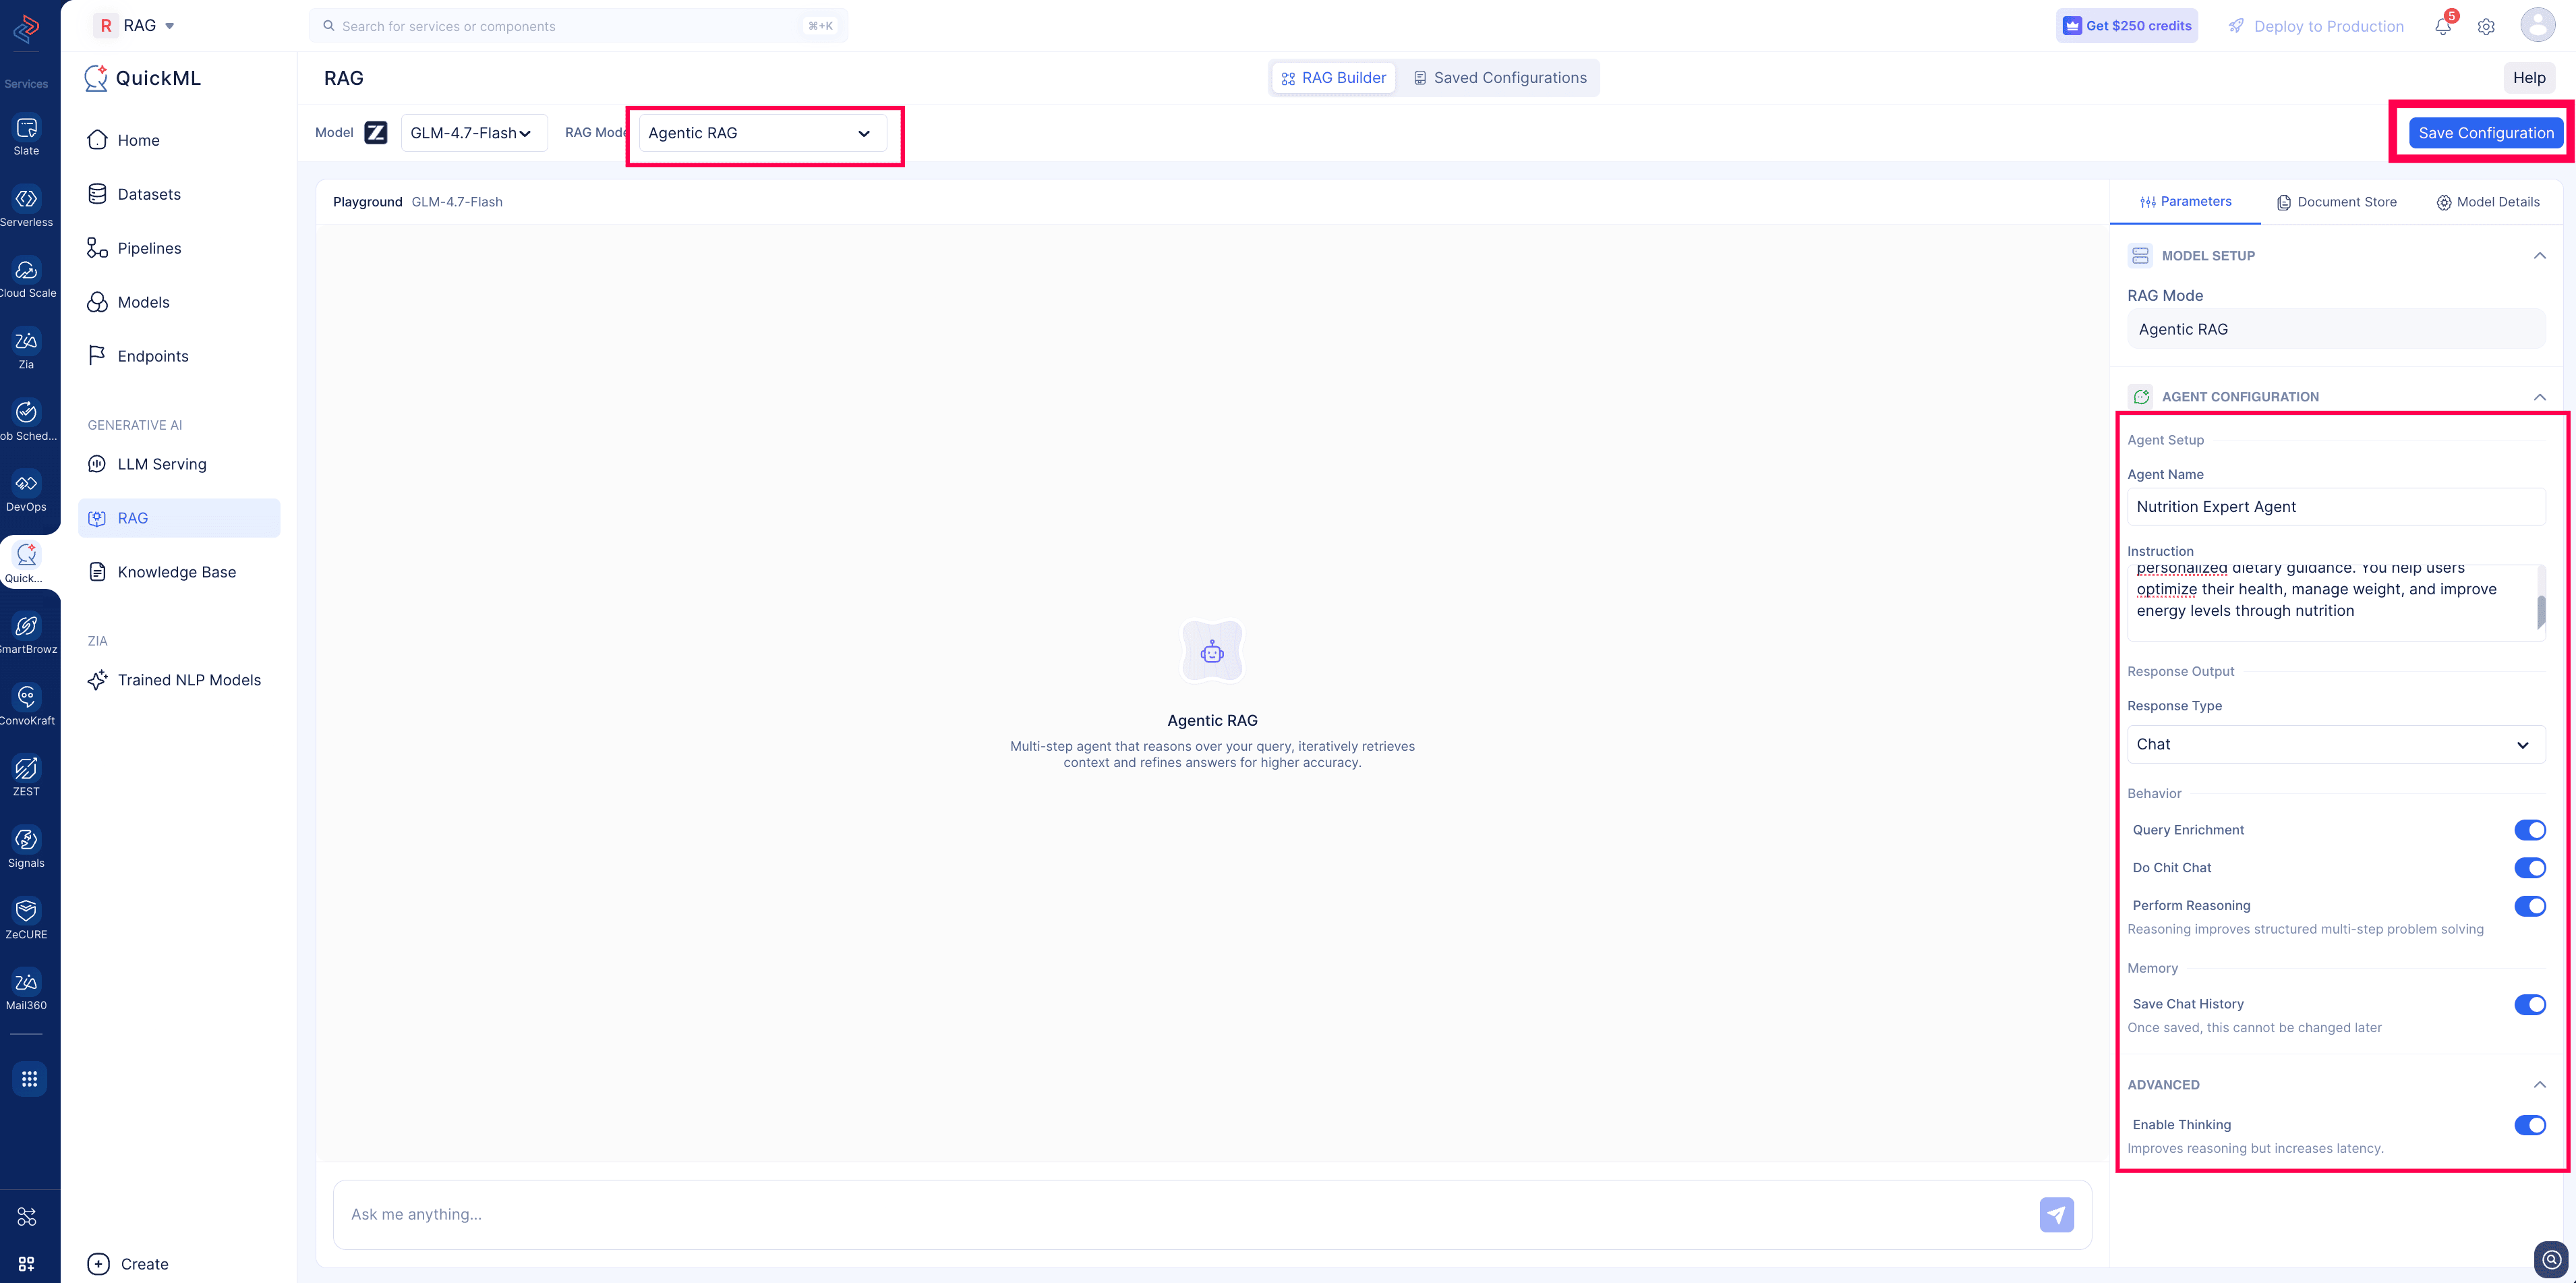
i. Benefits of saving the parameters
- Reuse the same parameter values and document store setup across multiple test sessions without re-configuring them each time.
- Create endpoints using the saved configuration, ensuring consistent deployments.
- Publish multiple endpoints using the same configuration when needed.
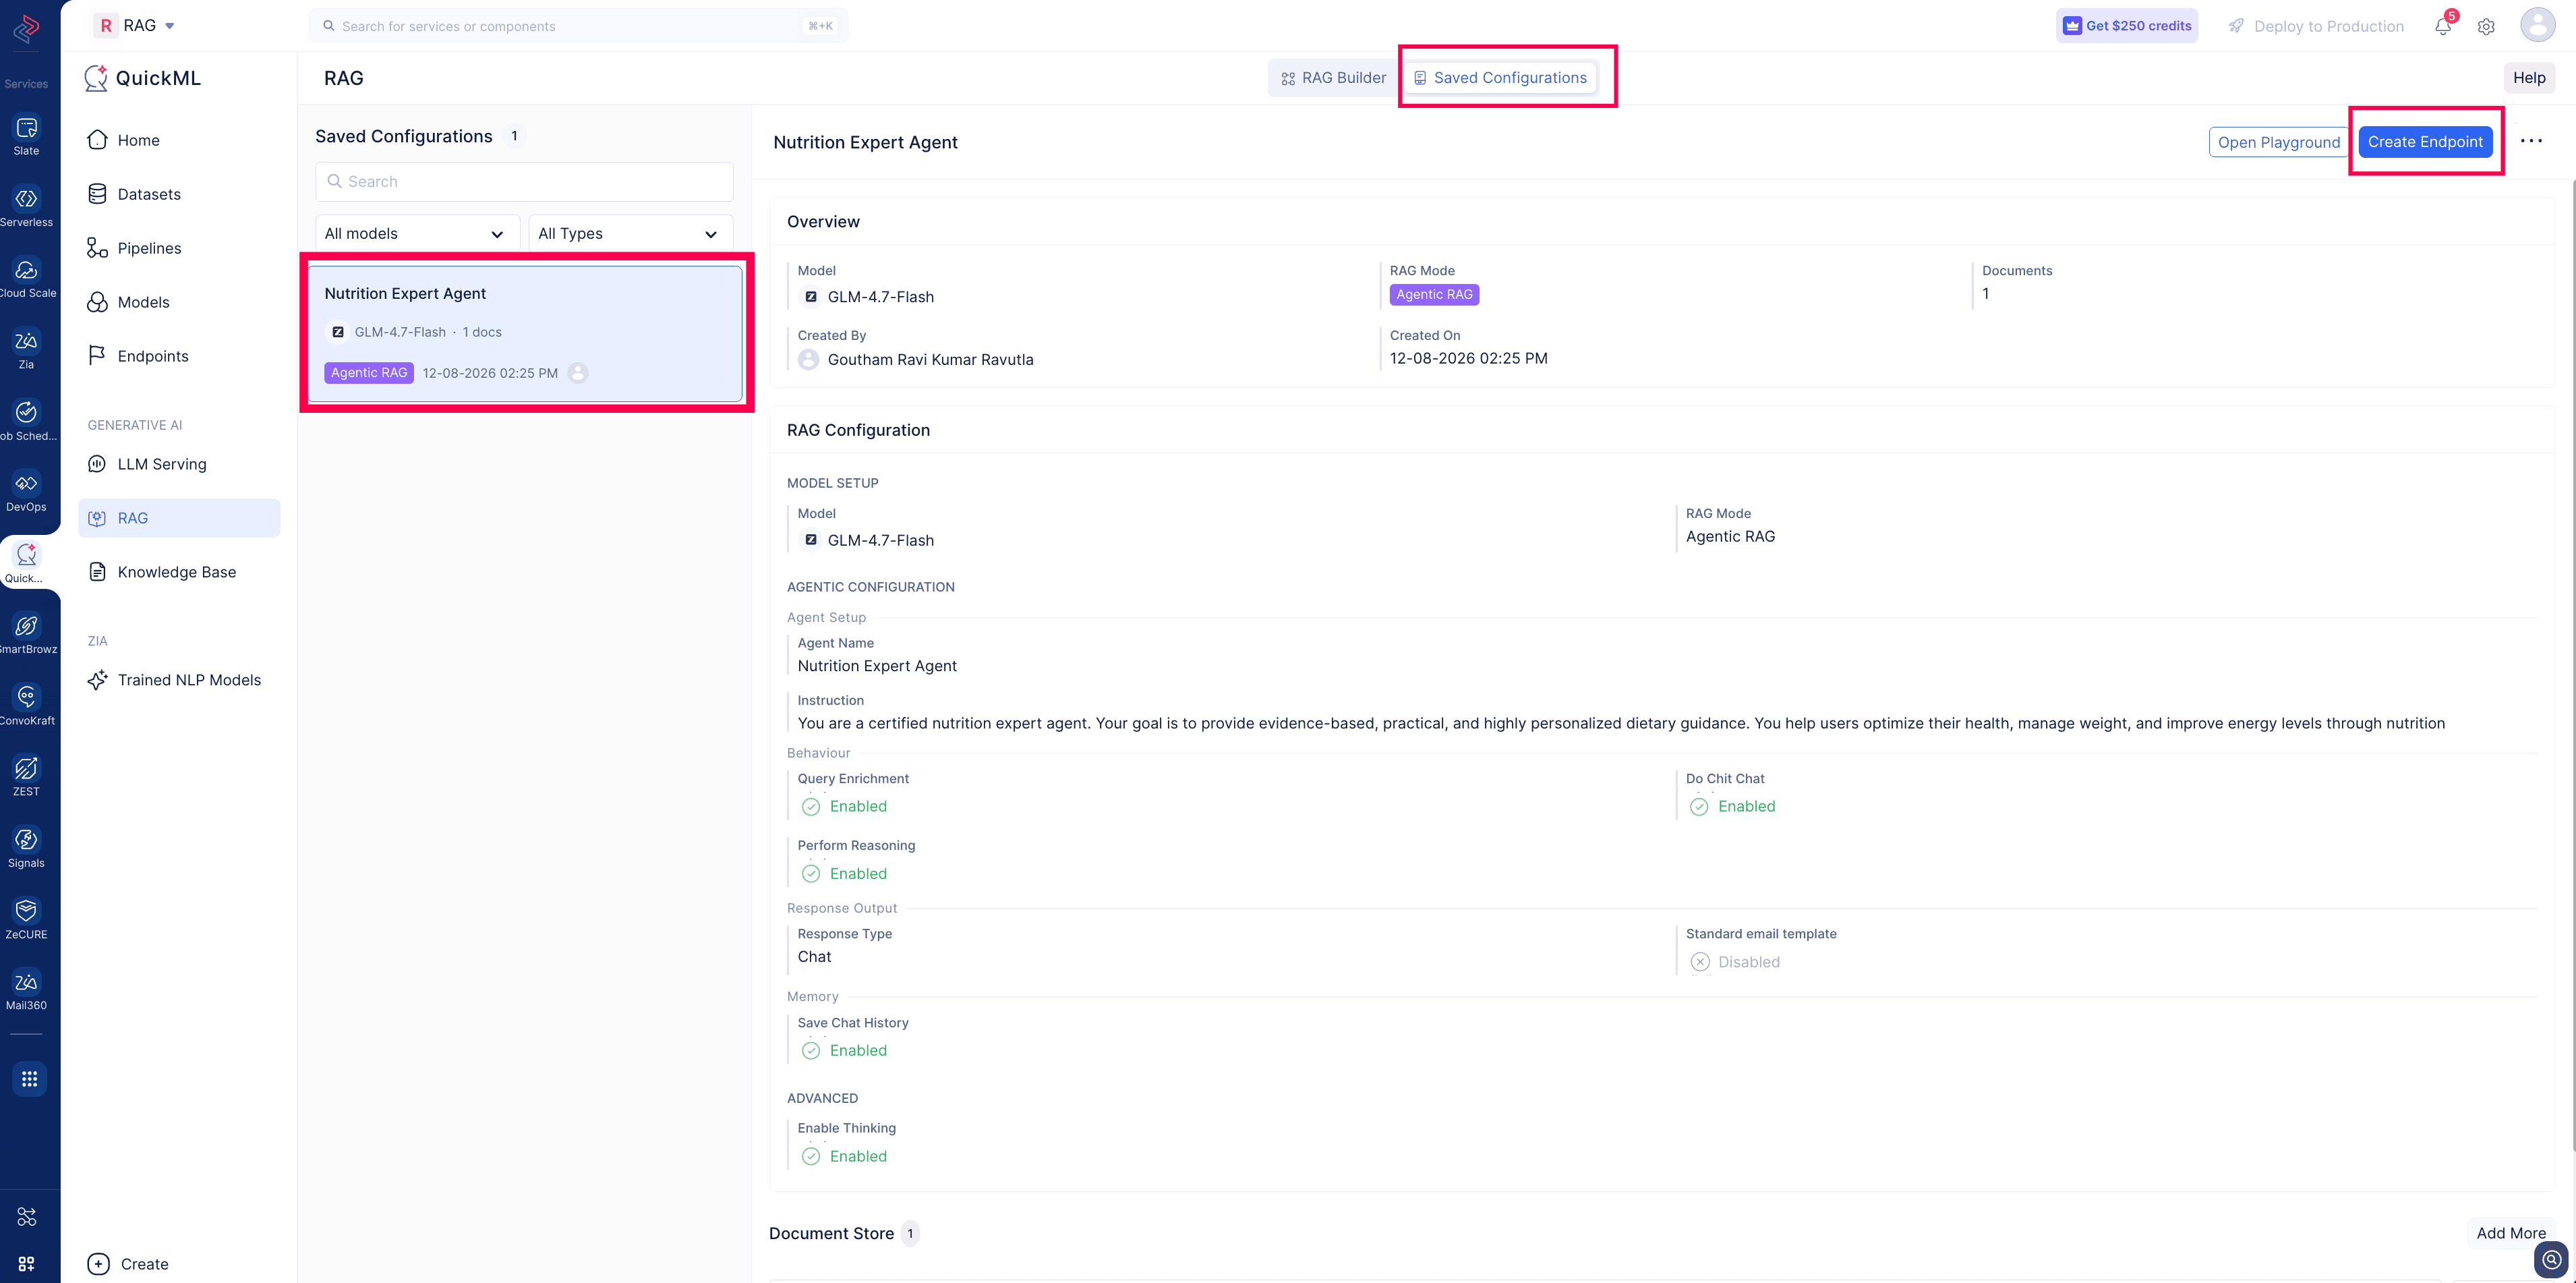
ii. How to save the parameters configuration
- Navigate to the Generative AI section within QuickML.
- Click the RAG tab.
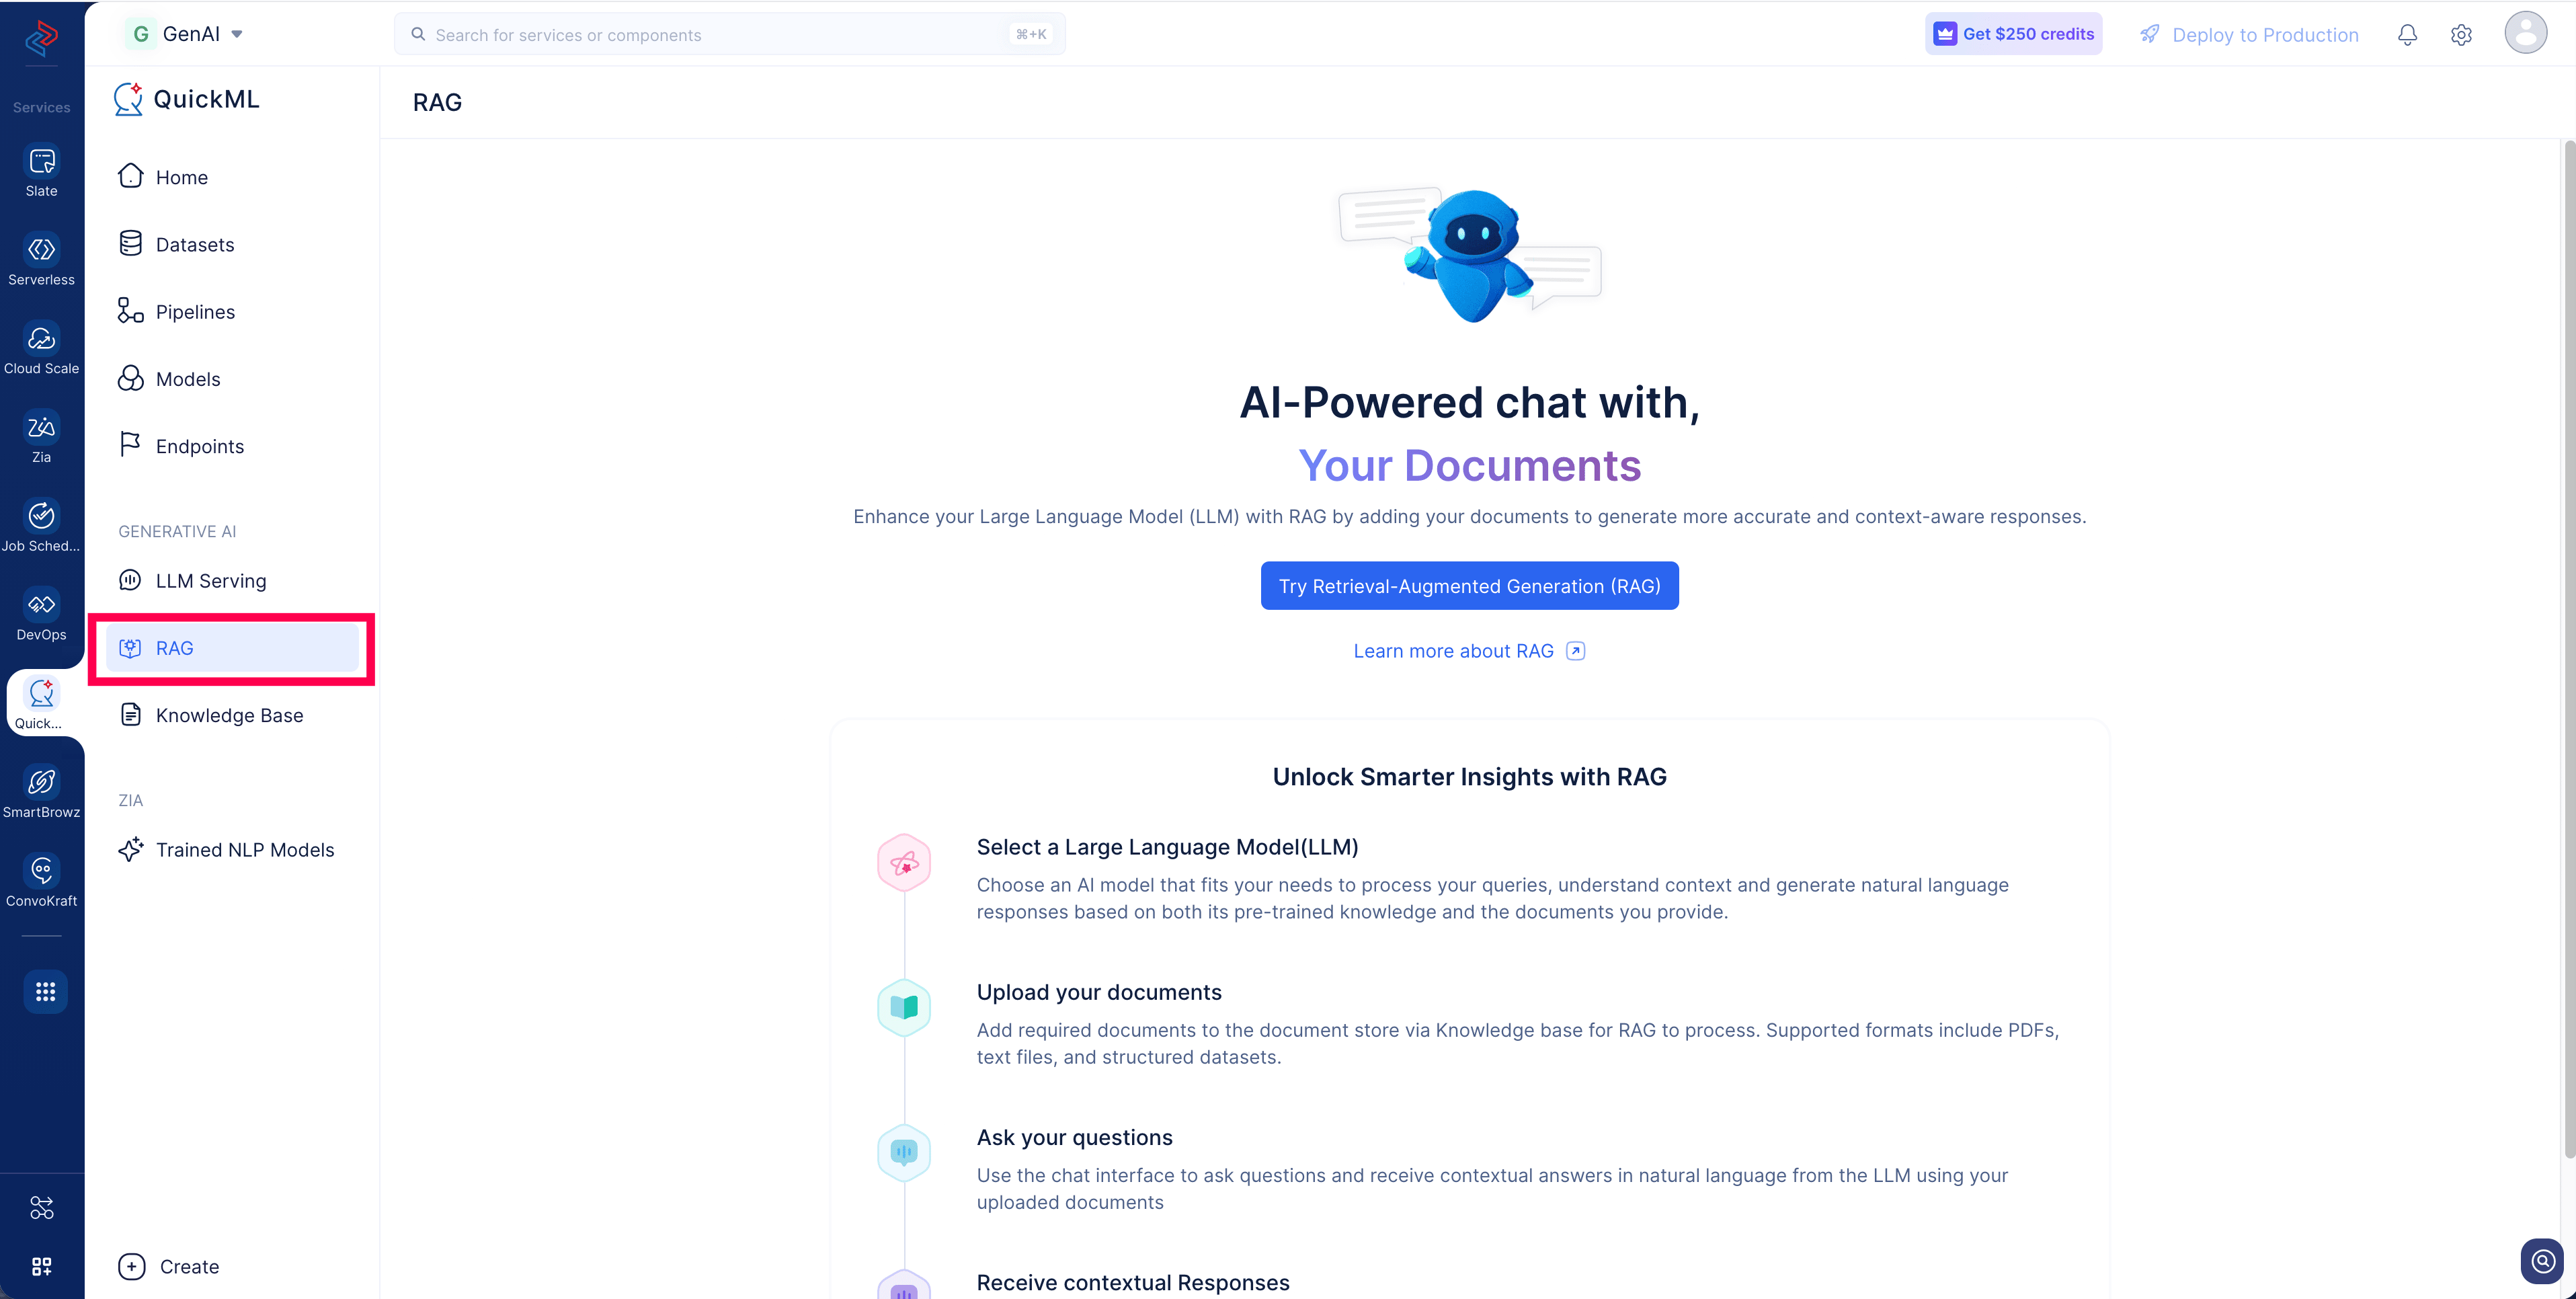
- Choose the desired model from the available models on the dropdown.
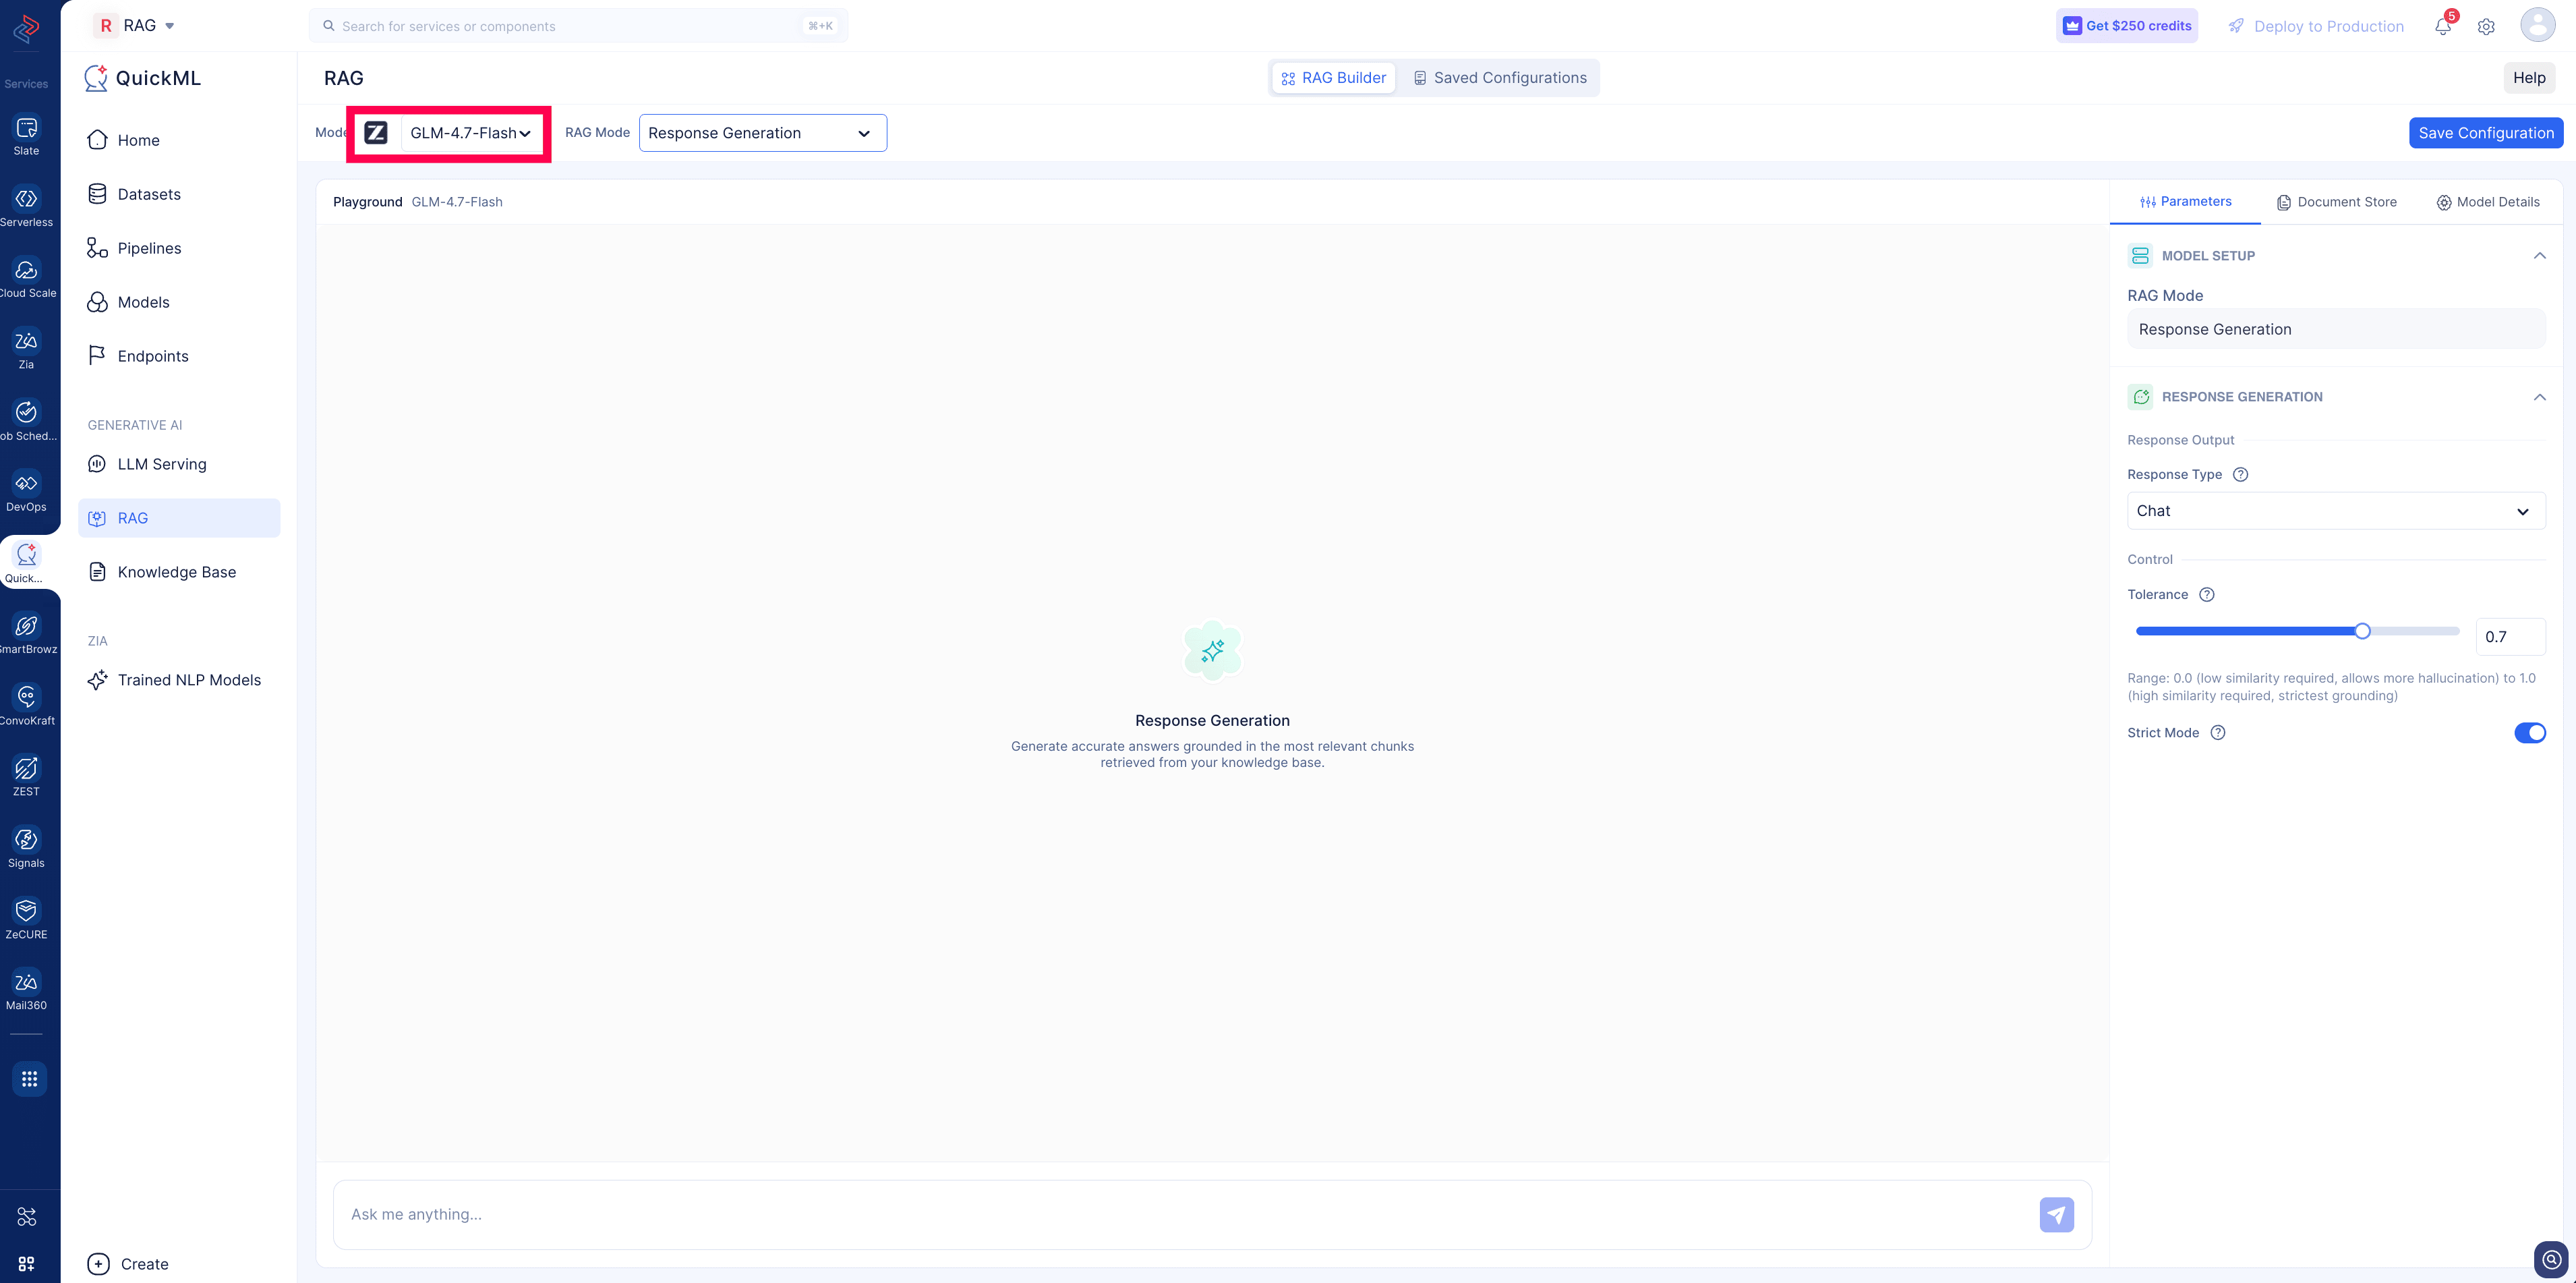
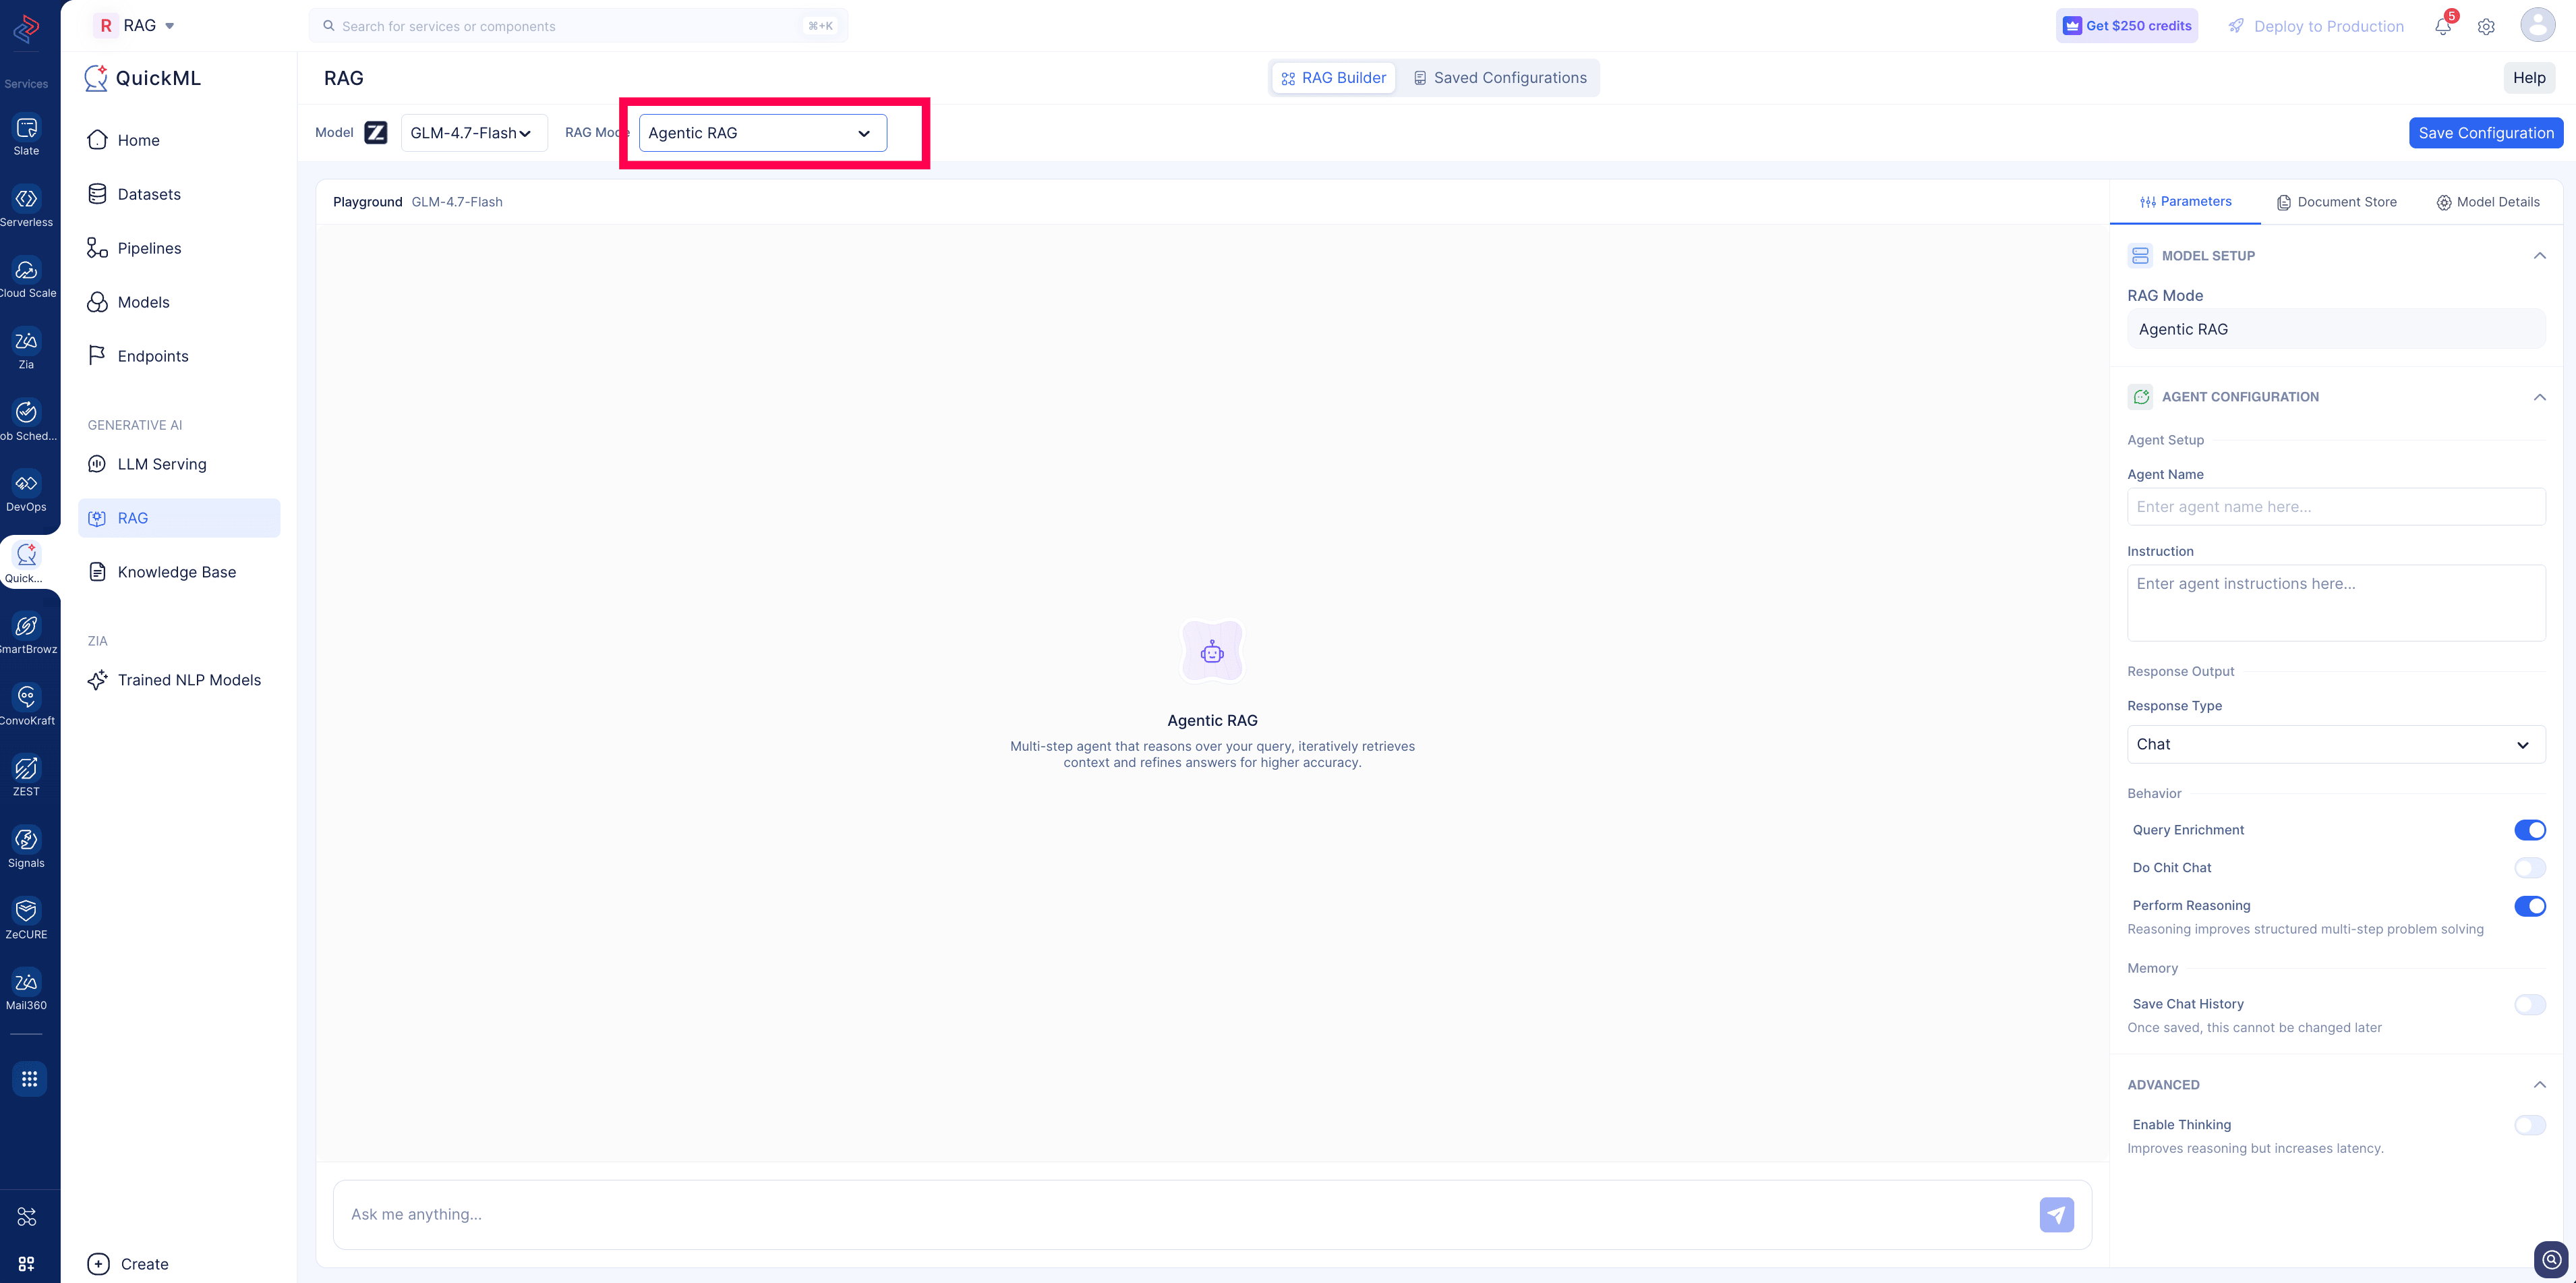
- Select a RAG mode in the RAG interface from the dropdown button.
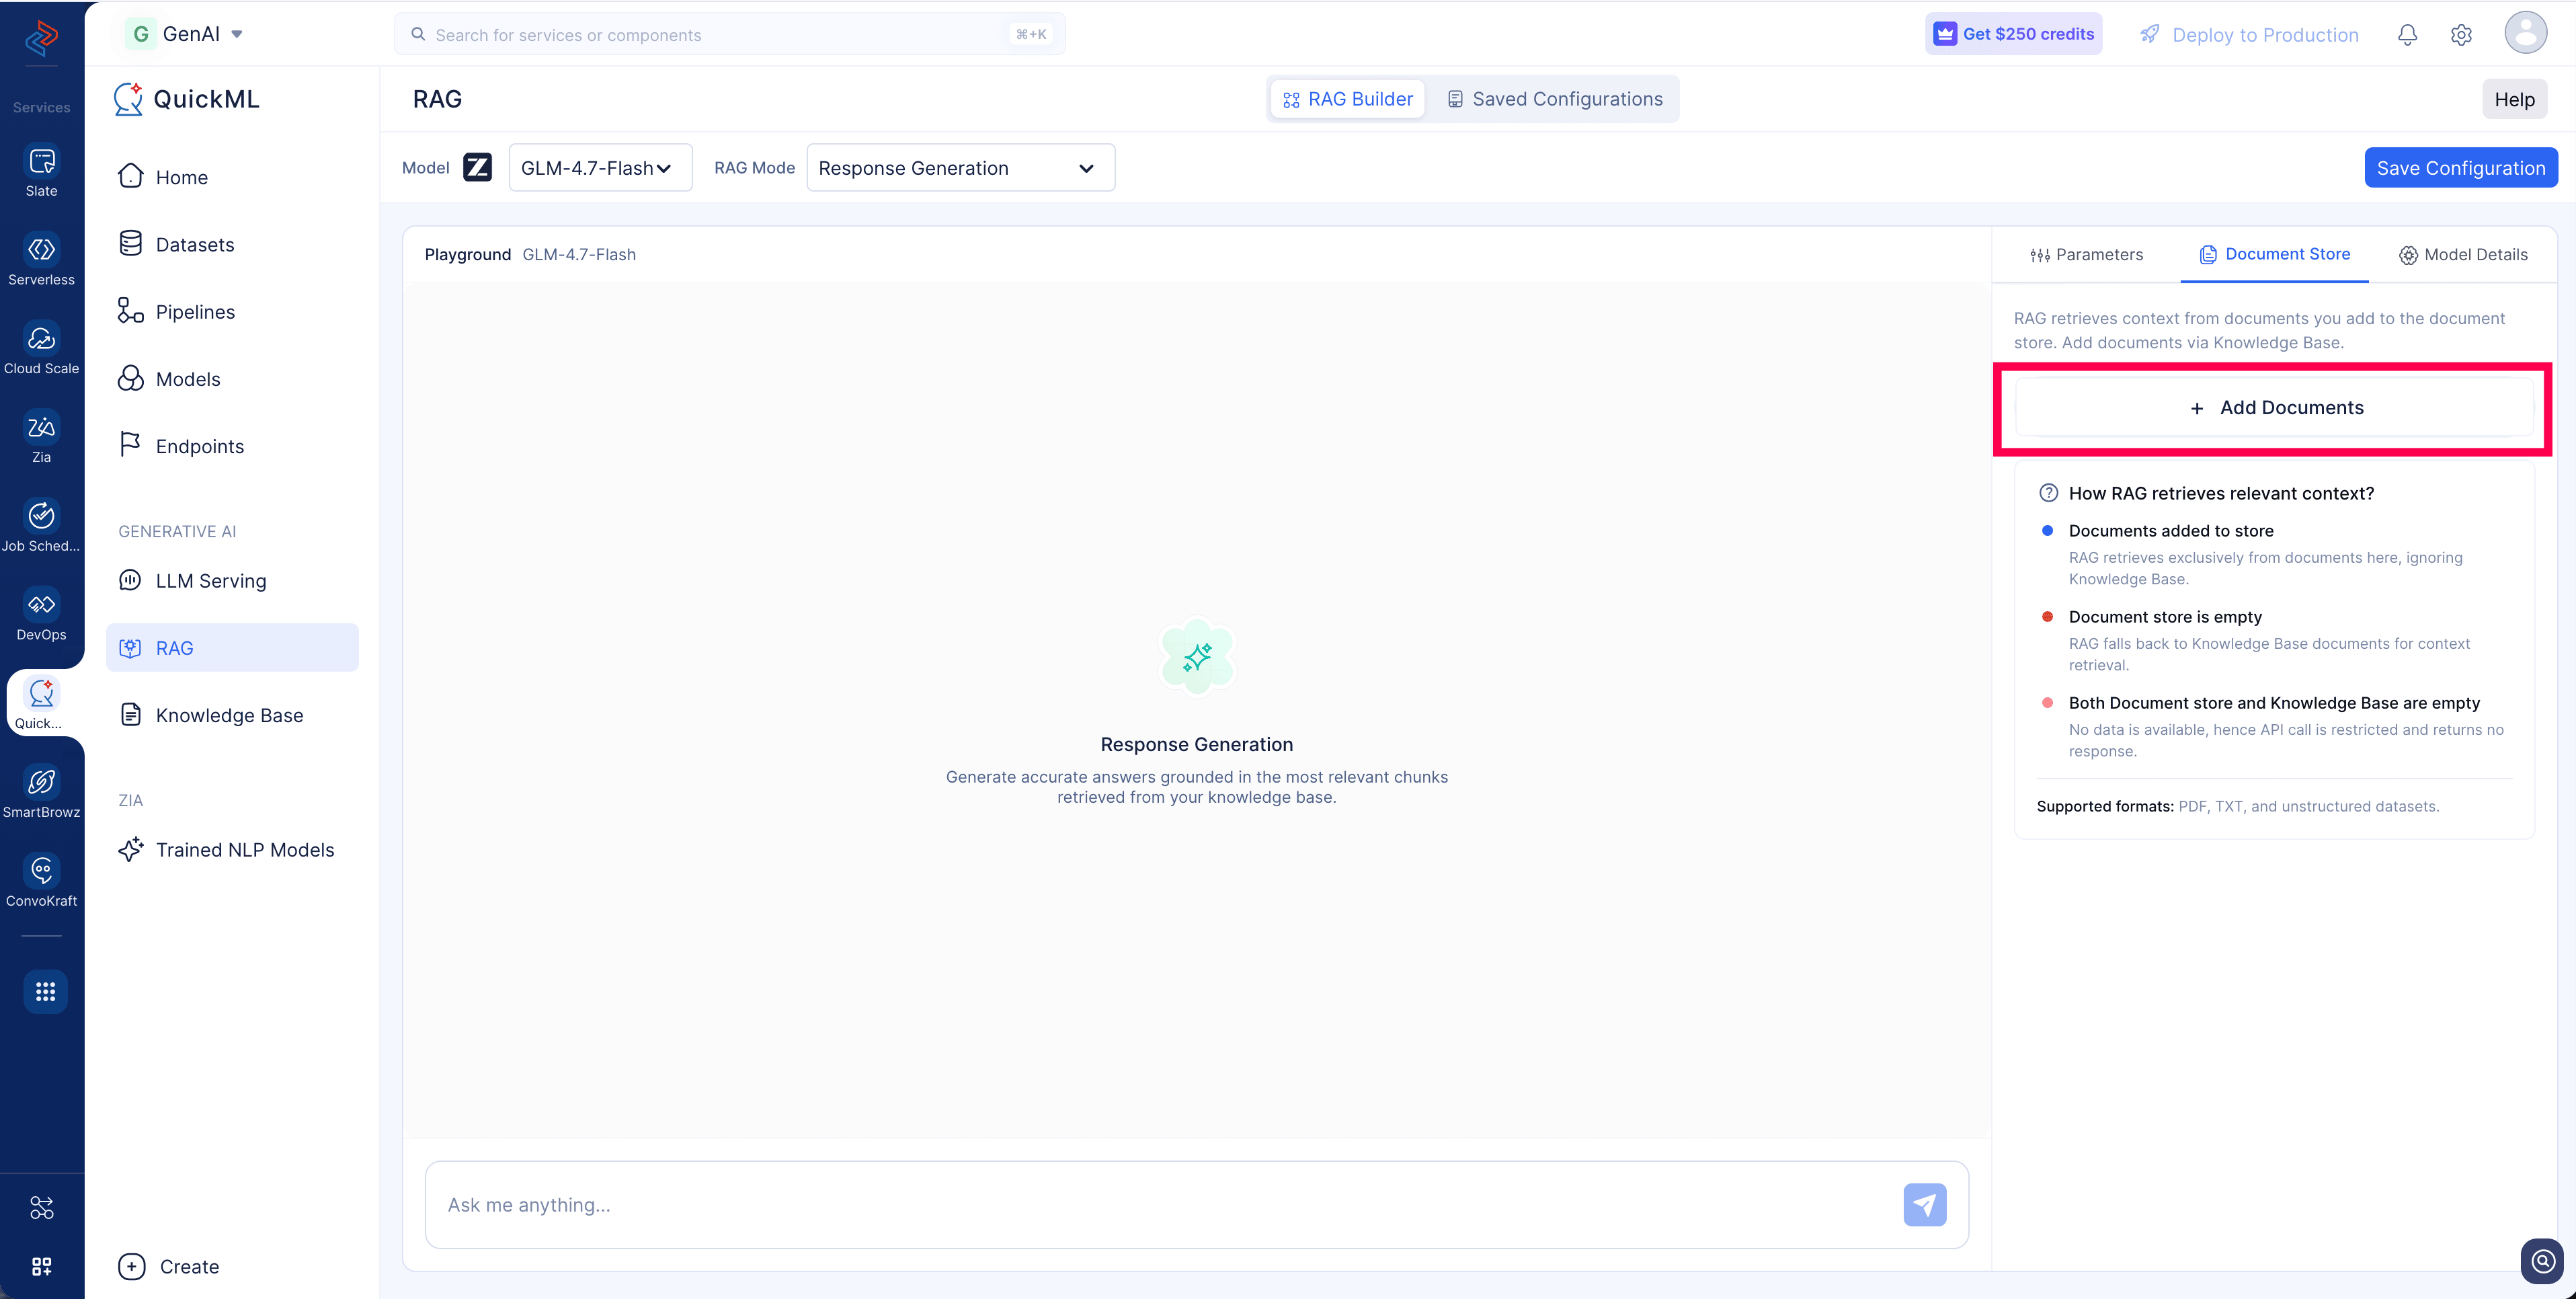
- Click Add the documents to add the required docs from Knowledge Base to the Document Store.
- Configure the required parameters for the selected RAG mode.
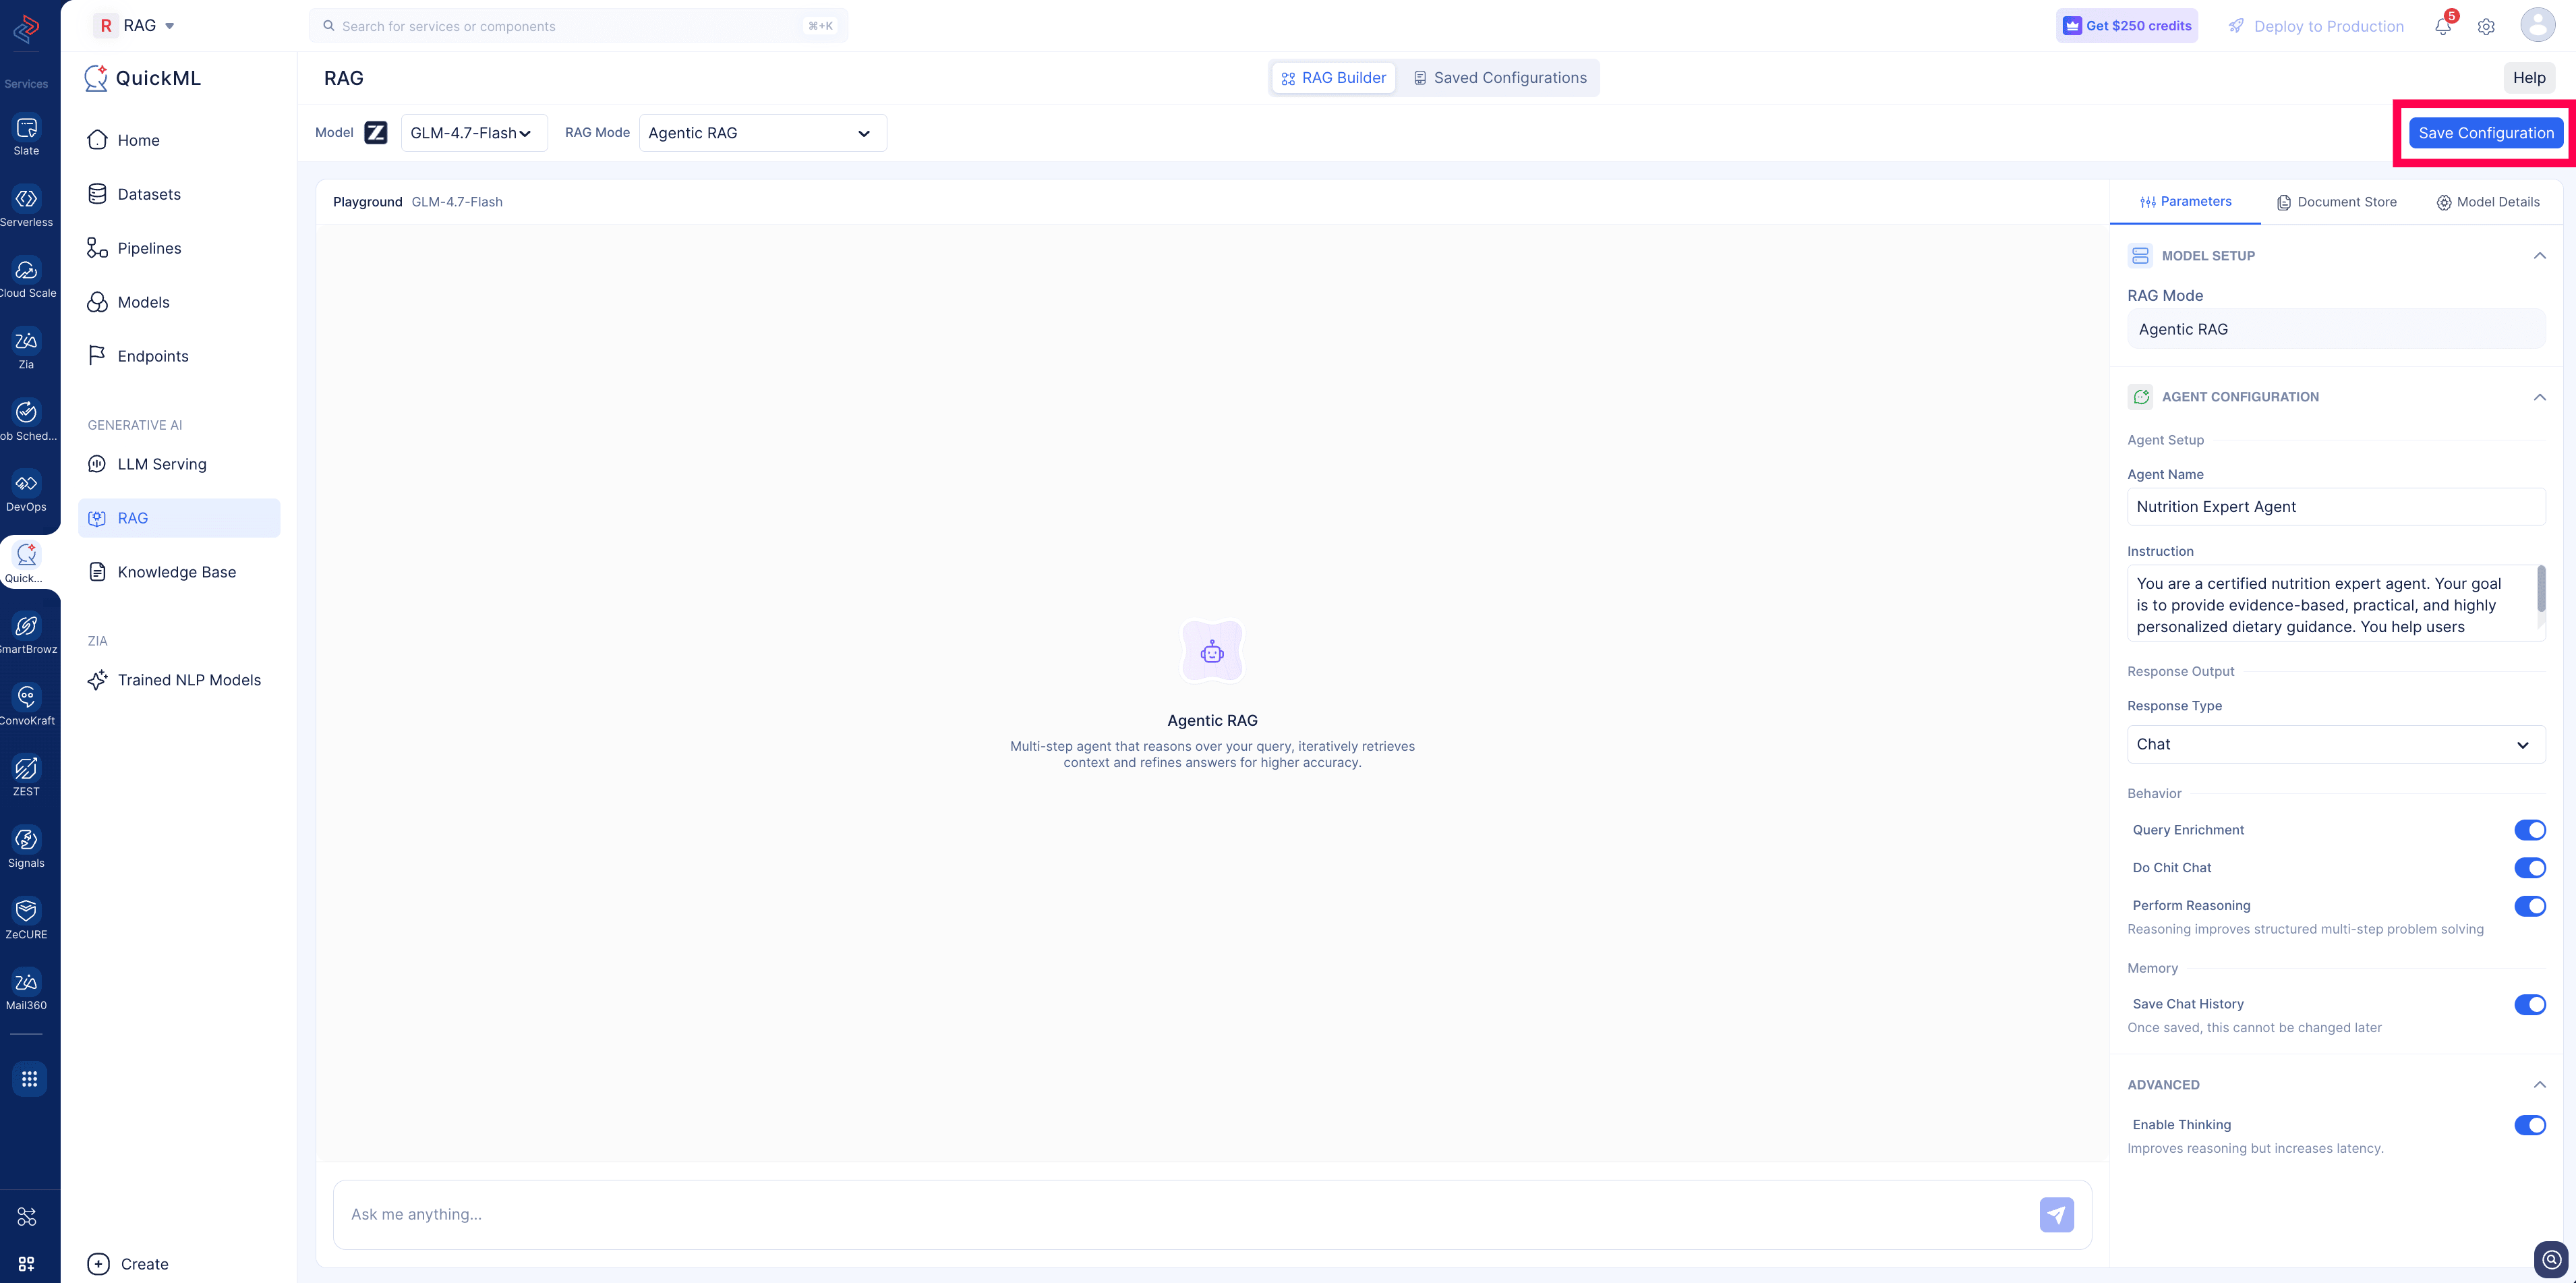
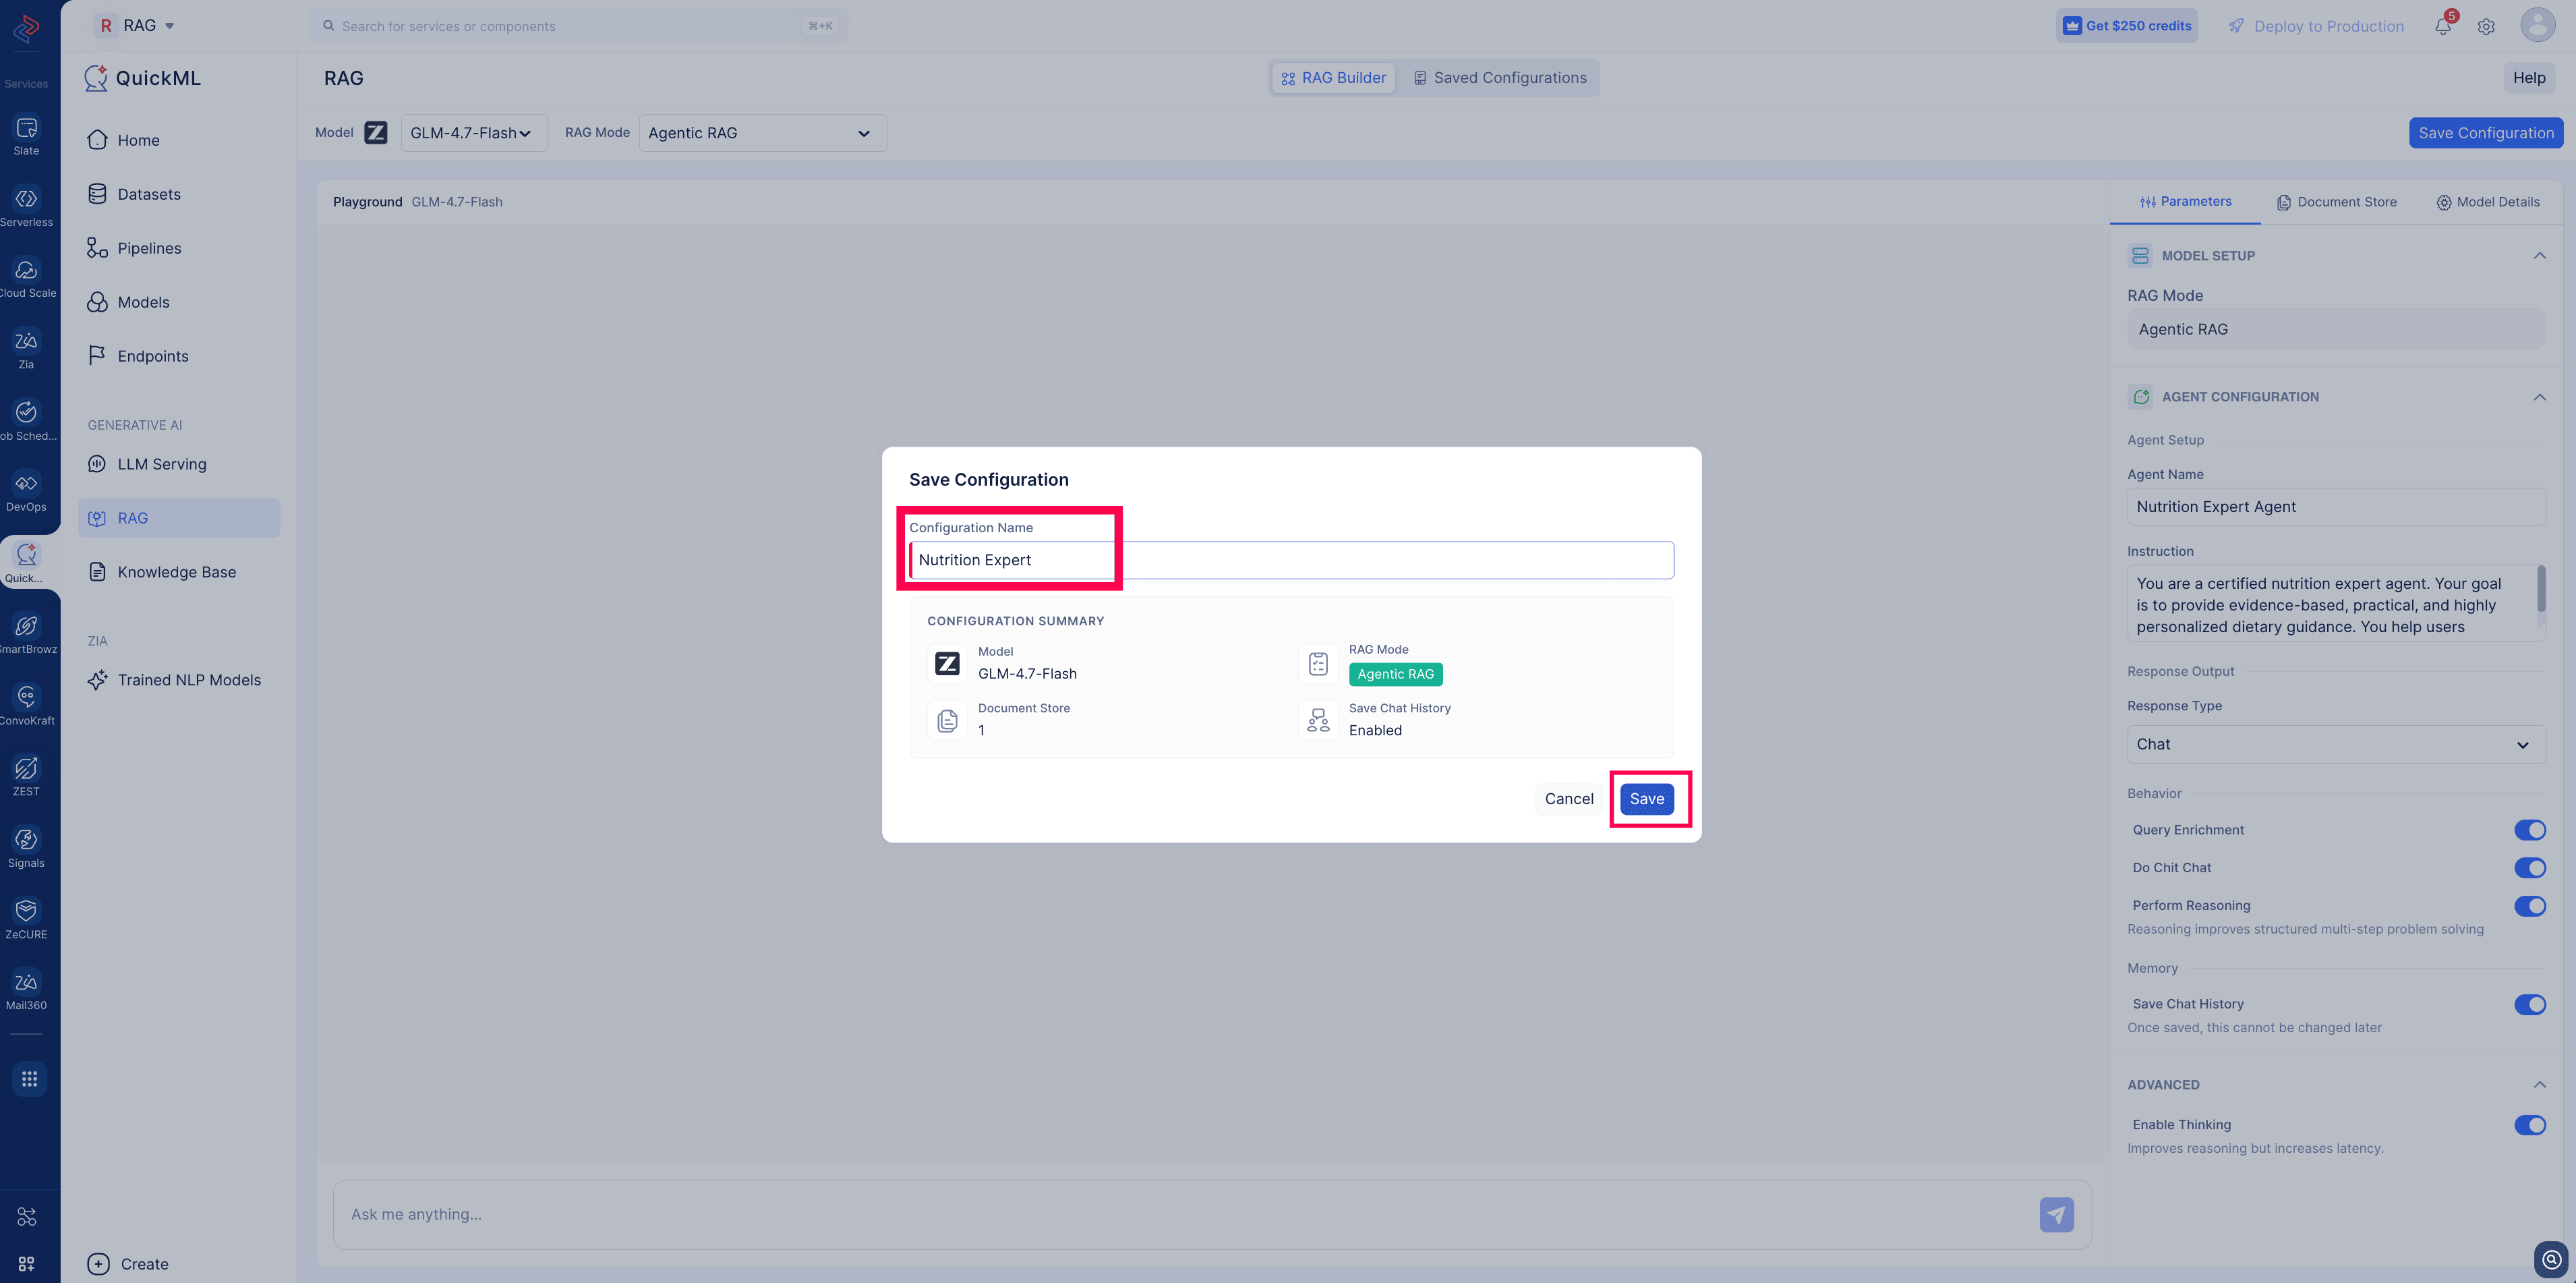
- Click Save Configuration. A pop-up window will appear.
- In the Save Configuration window, do the following:
- Enter a configuration name. The name must start and end with alphanumeric characters and may only include letters, numbers, or underscores.
-
Click Save. The parameters will be saved in the Saved Configuration.
-
Click the Saved Configuration tab beside the RAG Builder to access the saved parameter configurations so far.
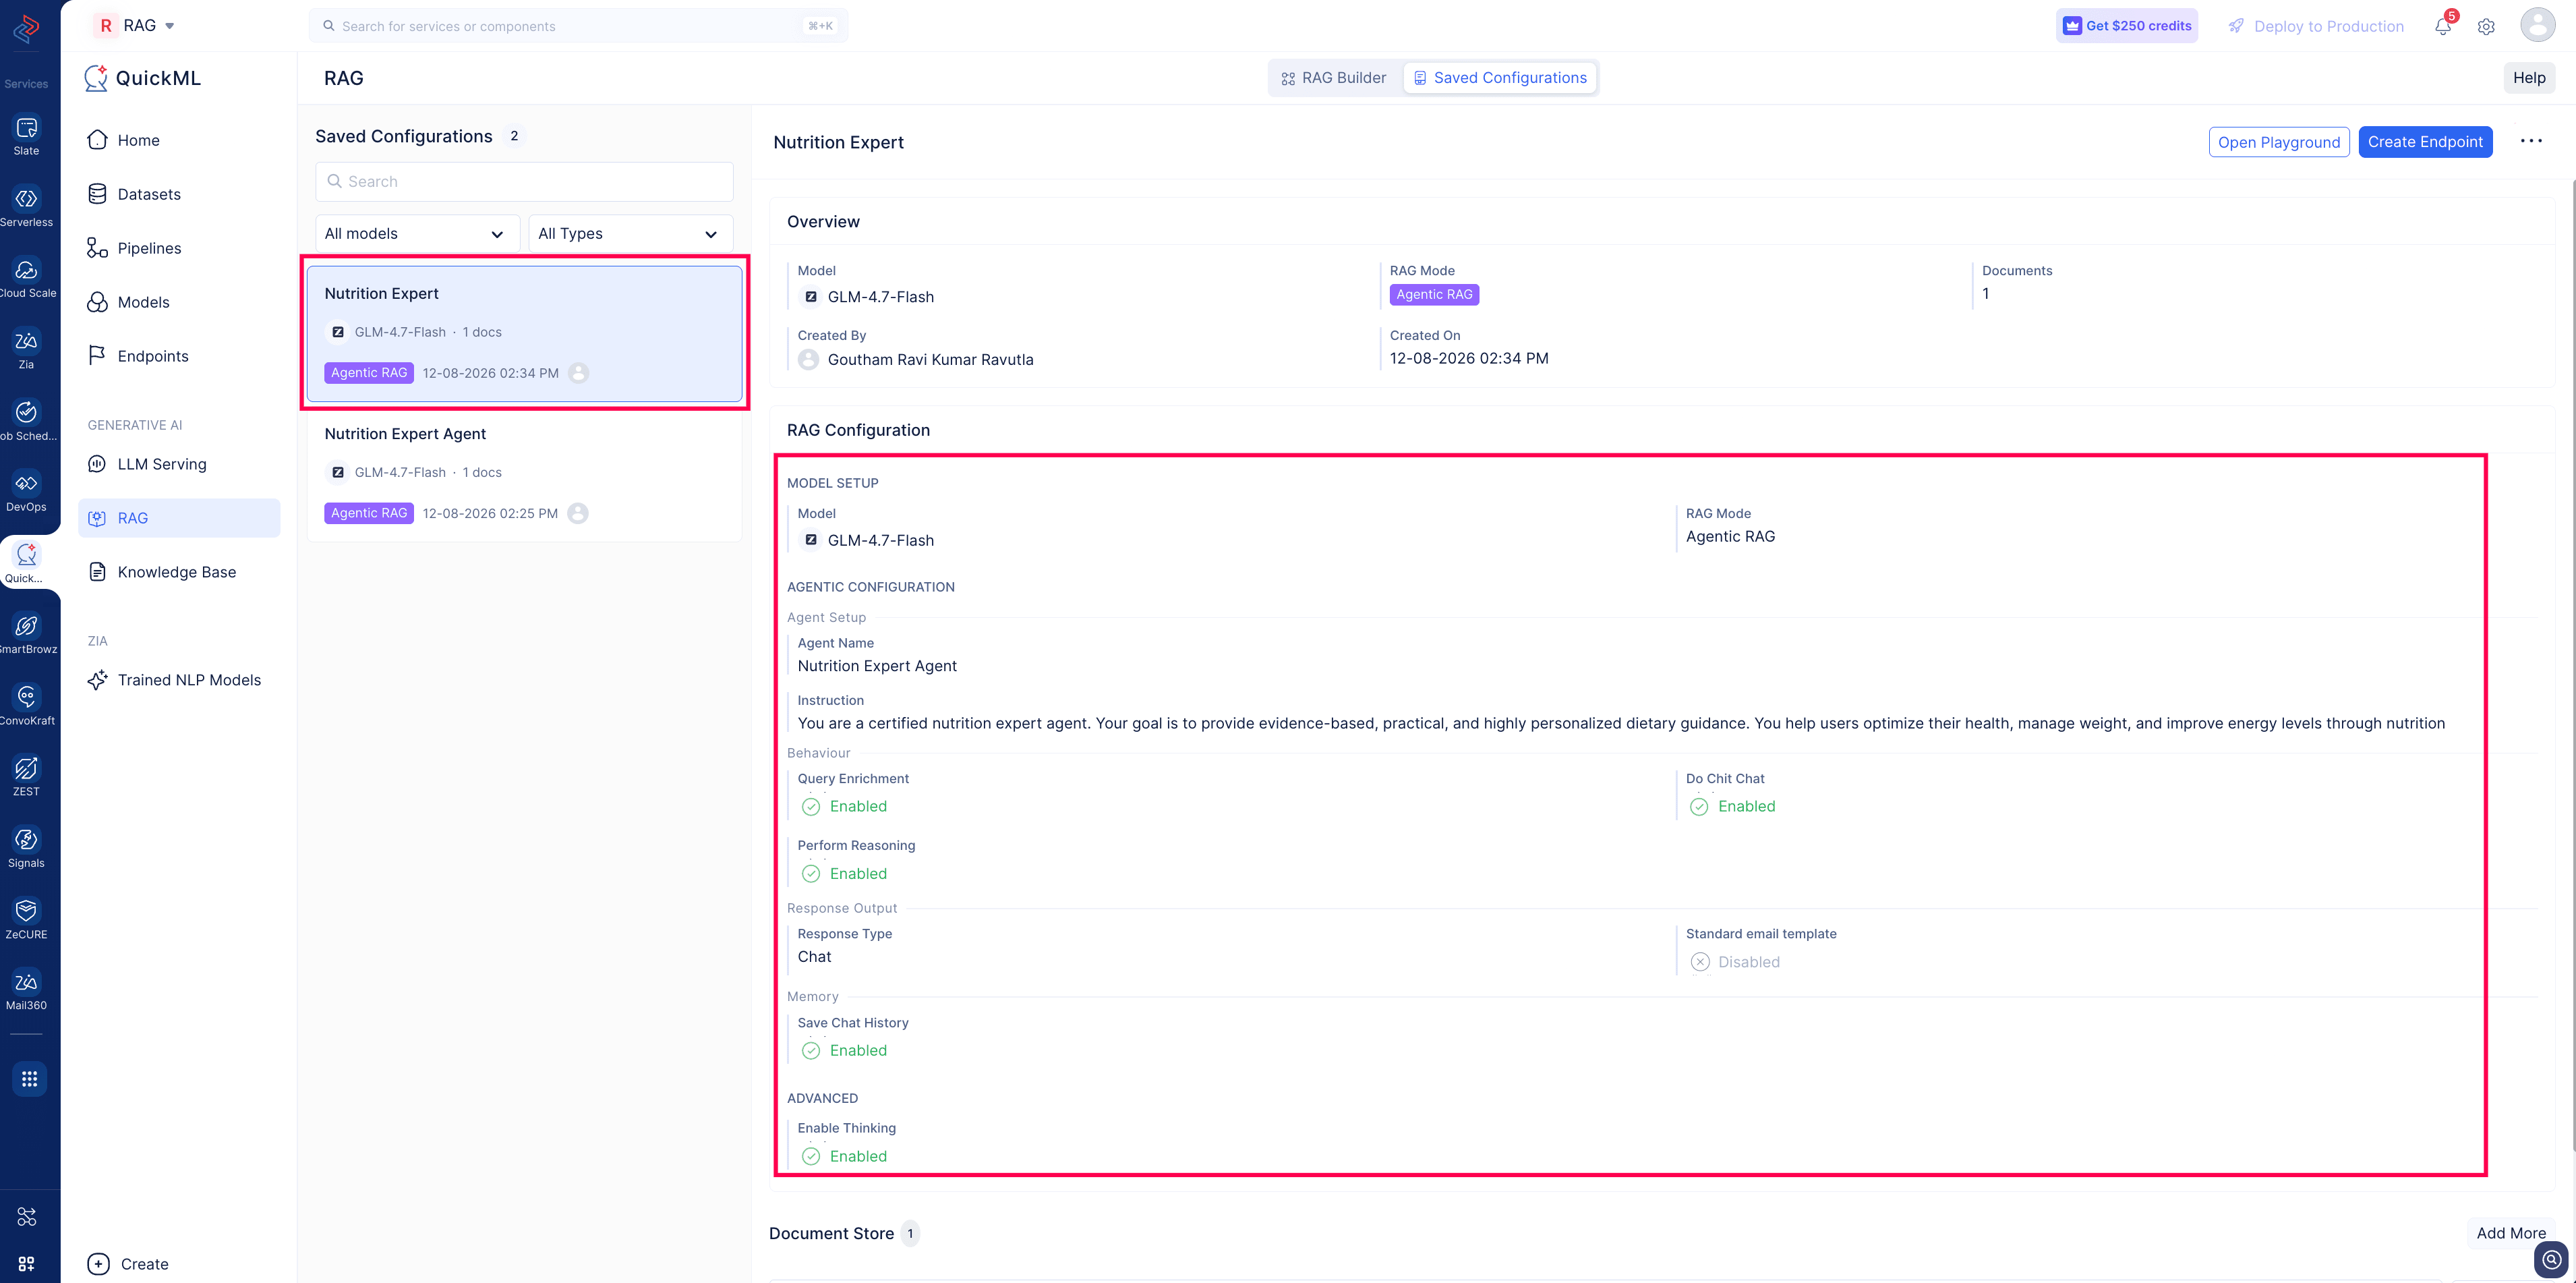
- Select the config. For each saved configuration, the detailed information about the RAG parameters and Documents details are displayed.
iii. Manage saved configurations
Saved configurations are accessible via the Saved Configuration tab. The list displays all saved configs with their names, associated documents, and creation details.
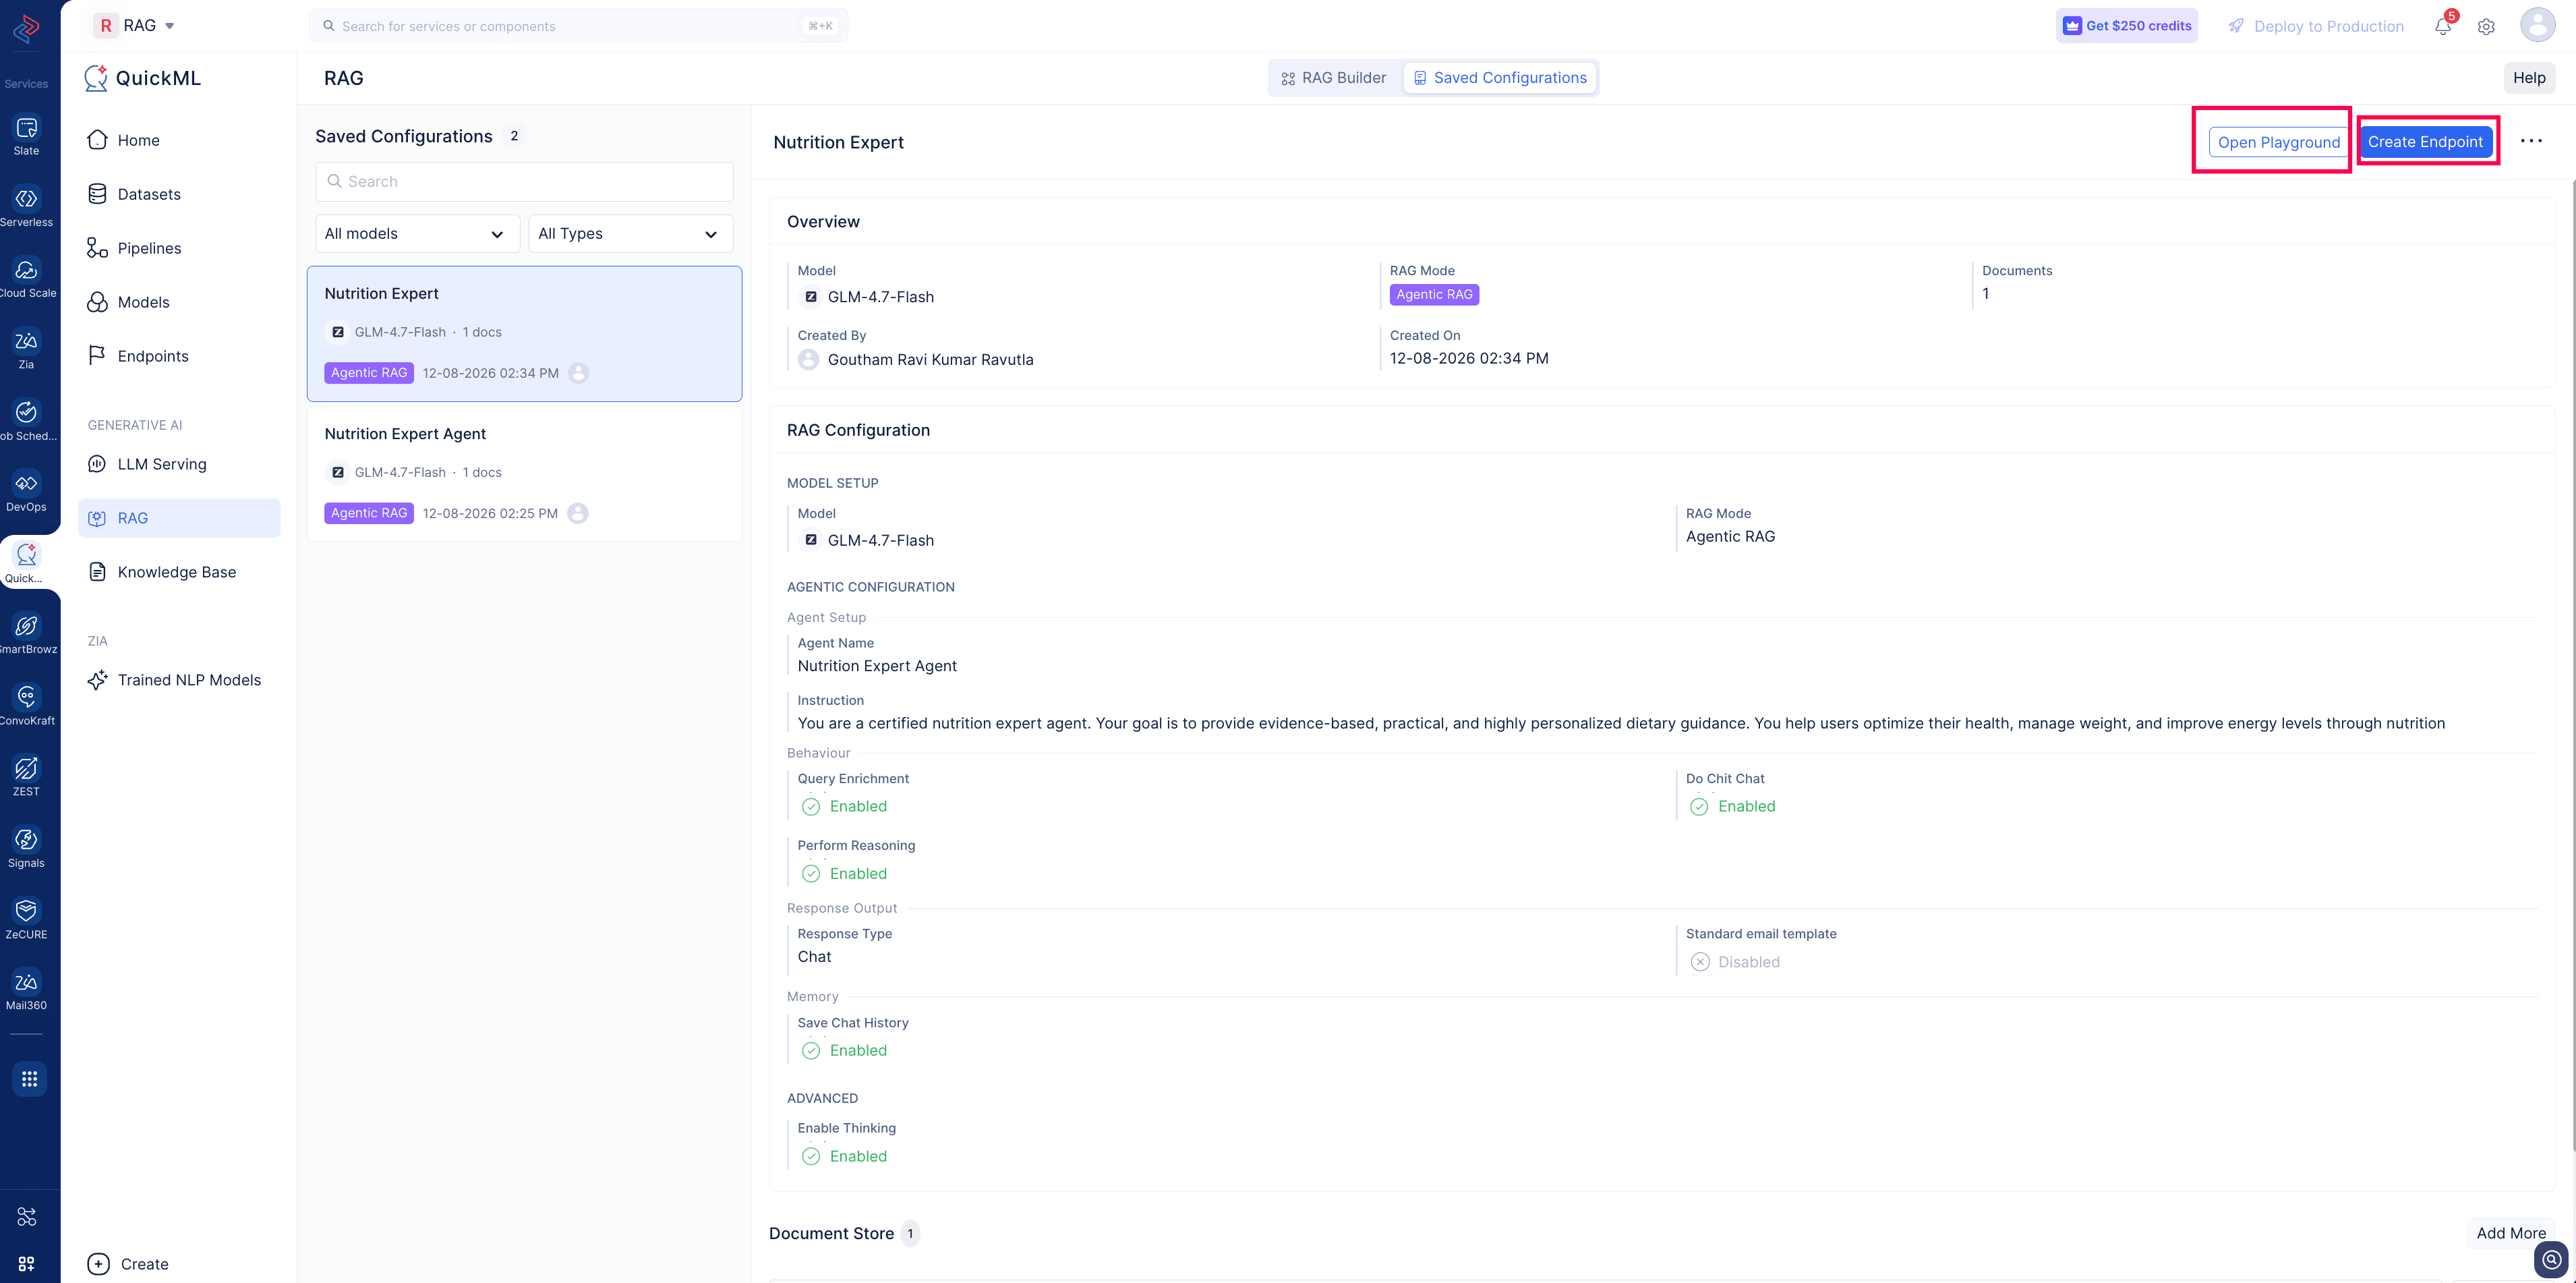
From this view, users can:
- Open the Playground with the saved configuration to make modifications or simply for testing purposes.
- Delete a configuration that is no longer needed.
- Create an endpoint directly from the configuration panel.
Each endpoint is built from a saved parameter configuration, ensuring that what you tested in the RAG interface is exactly what gets deployed.
b. Creating an endpoint
QuickML took the user first approach by providing an intuitive way to tune the responses from RAG using the adjustable parameter configuration; use the same to create a deployable REST API endpoint and operationalize the API in a few clicks.
As per the previous step, the parameters are saved as per the requirement. The next step is to create an endpoint using the same configuration.
I. Step-by-step tutorial
Let’s look at the endpoint creation step with the saved parameter configuration for the chosen RAG setup and deploying the endpoint for integration.
- Go to the Endpoints tab in the left panel.
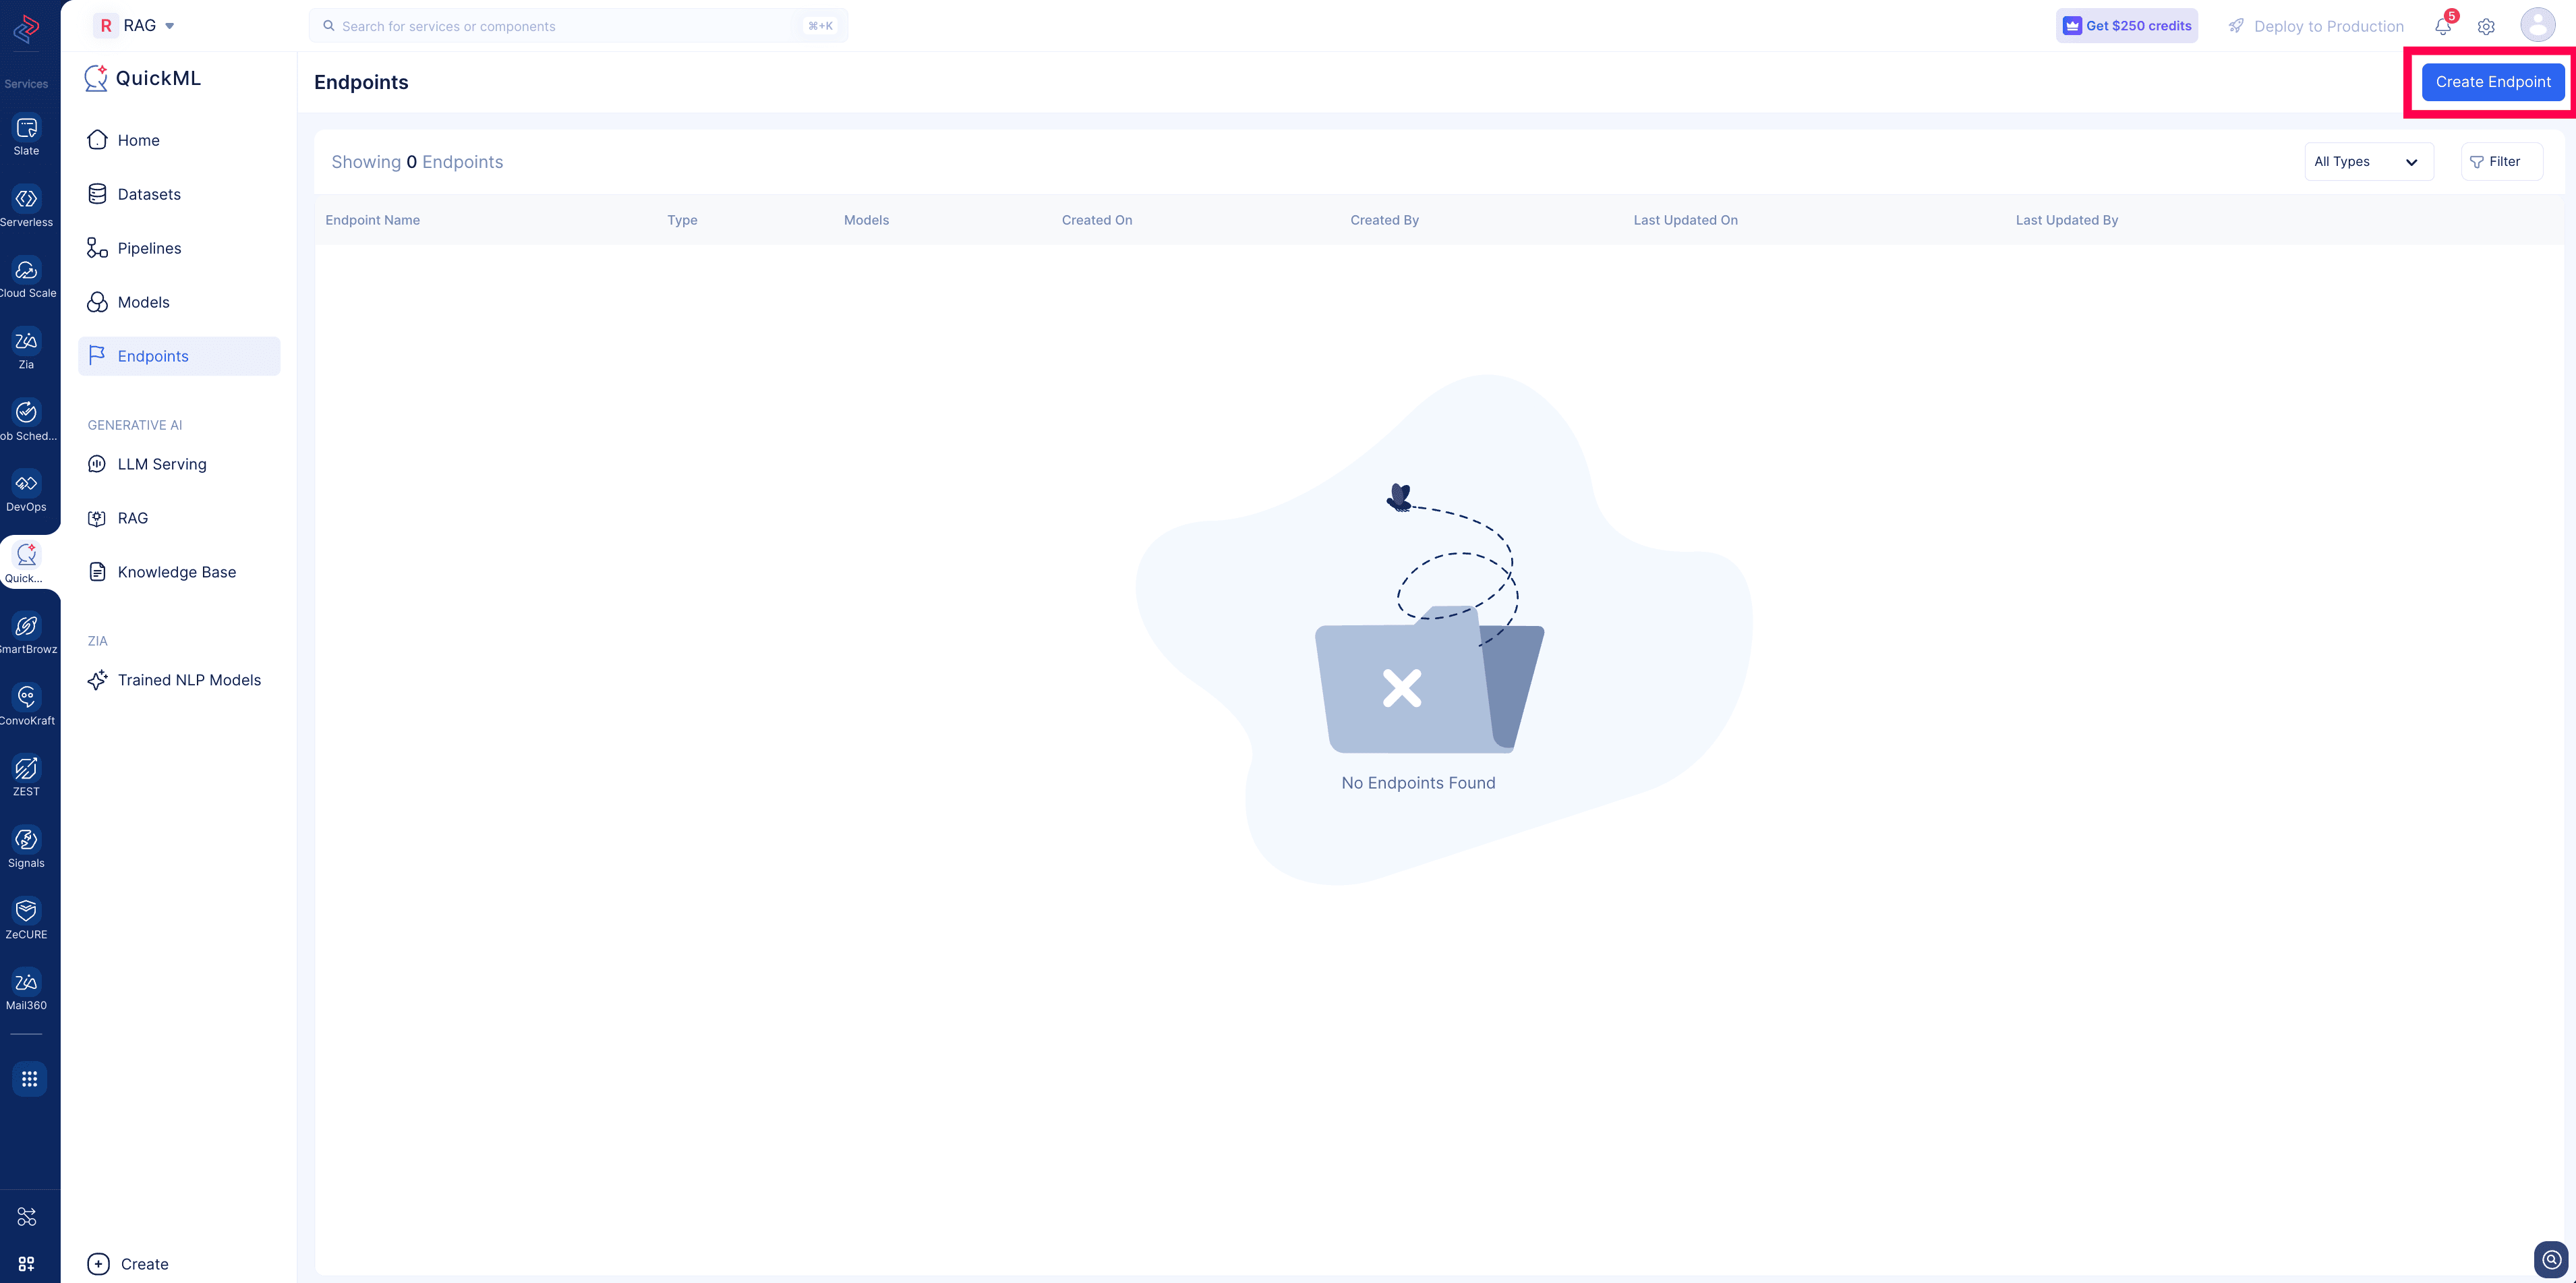
- Click Create Endpoint.
- Provide the required details in the popup:
- Enter the Endpoint name in the input box.
- Choose the Endpoint type as RAG configuration from the list.
- Select the configuration from the RAG Configuration dropdown.
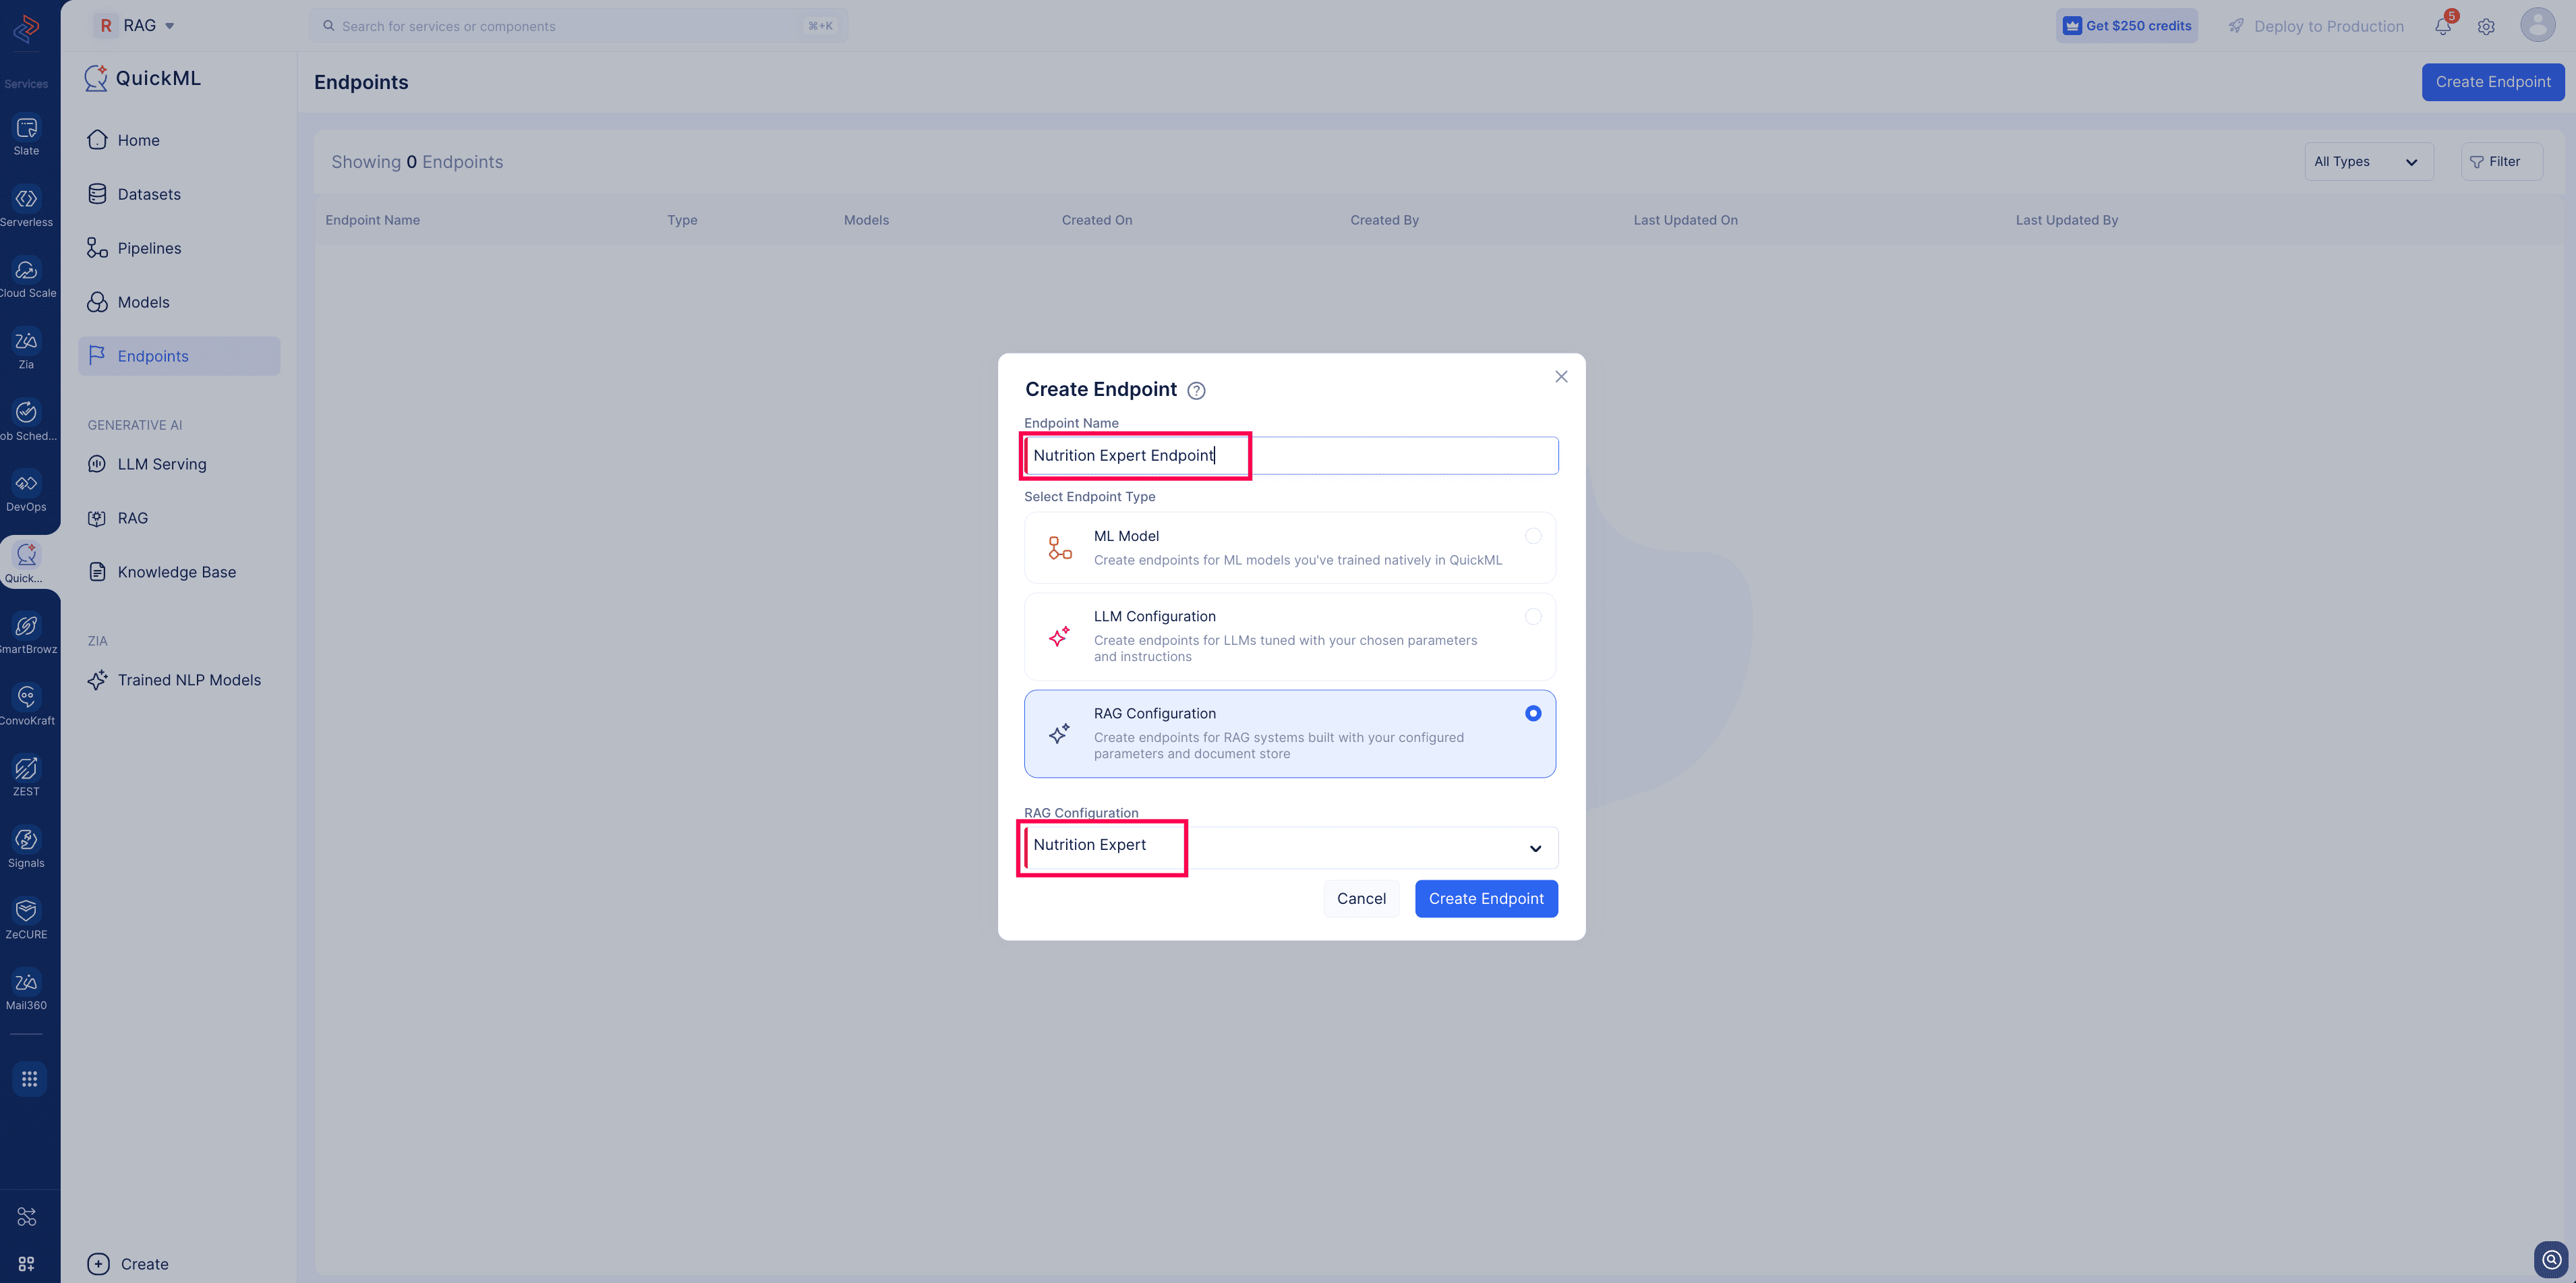
- Click Create Endpoint to create the endpoint.
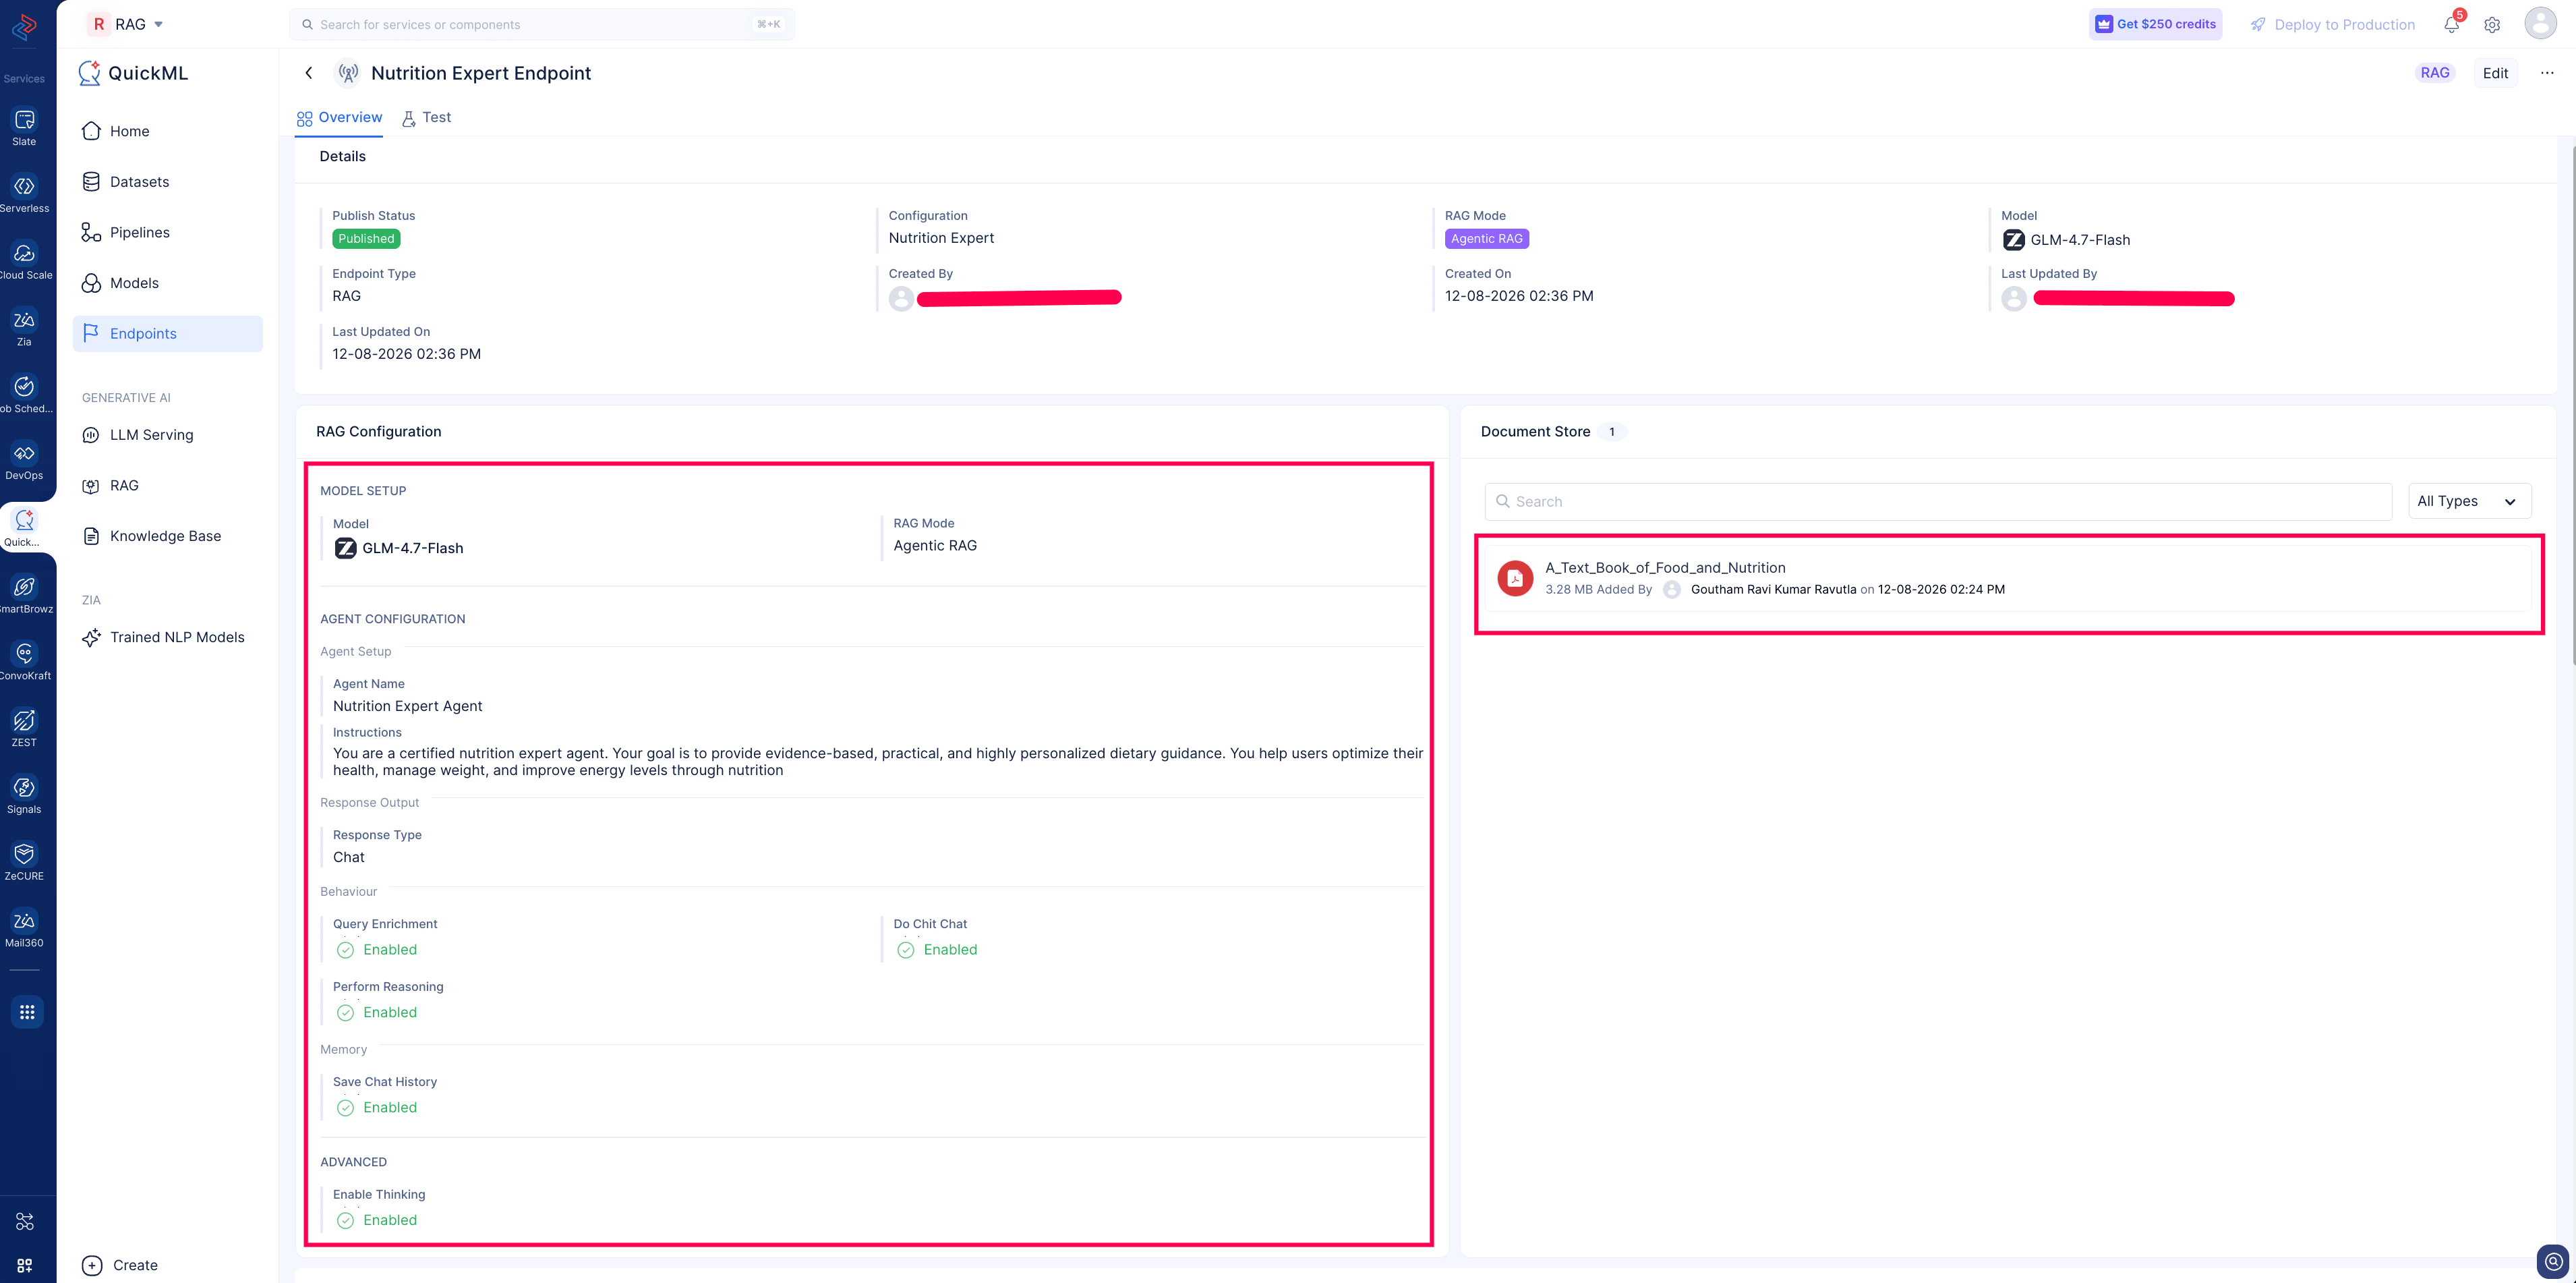
- Once the endpoint has been created, you’ll be redirected to the Endpoint details page. You can find the following information in the page.
- RAG Parameter values.
- Documents added in Document Store.
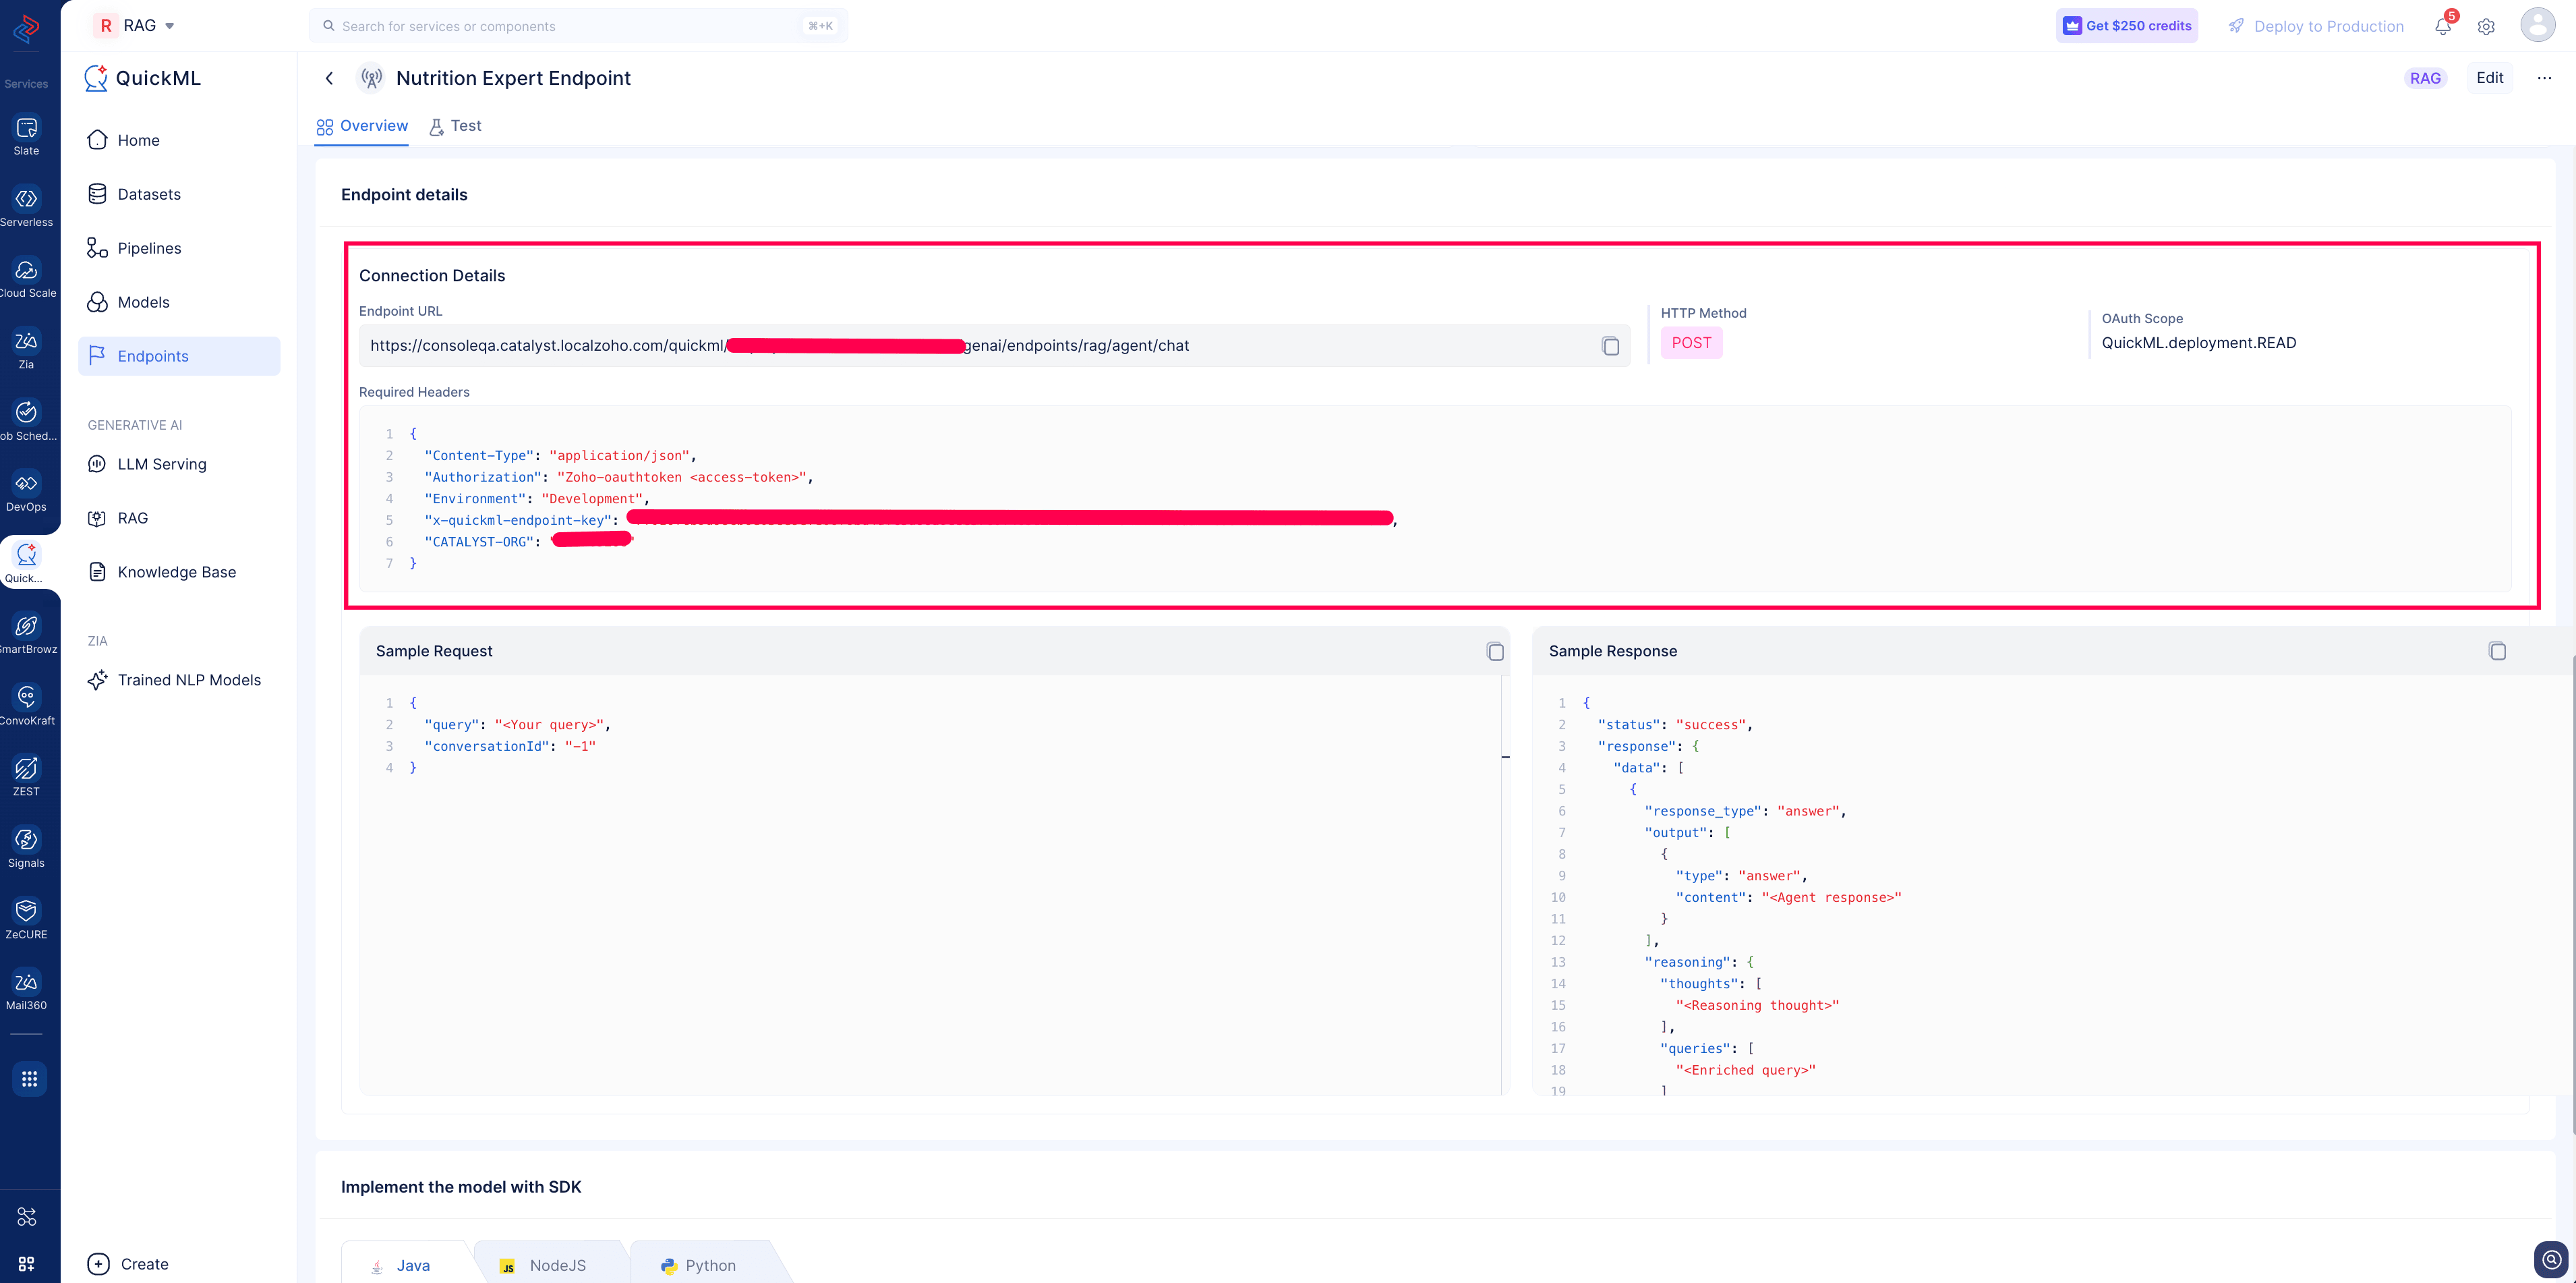
- Endpoint URL details to access the RAG system in the defined mode.
- Sample request and response.
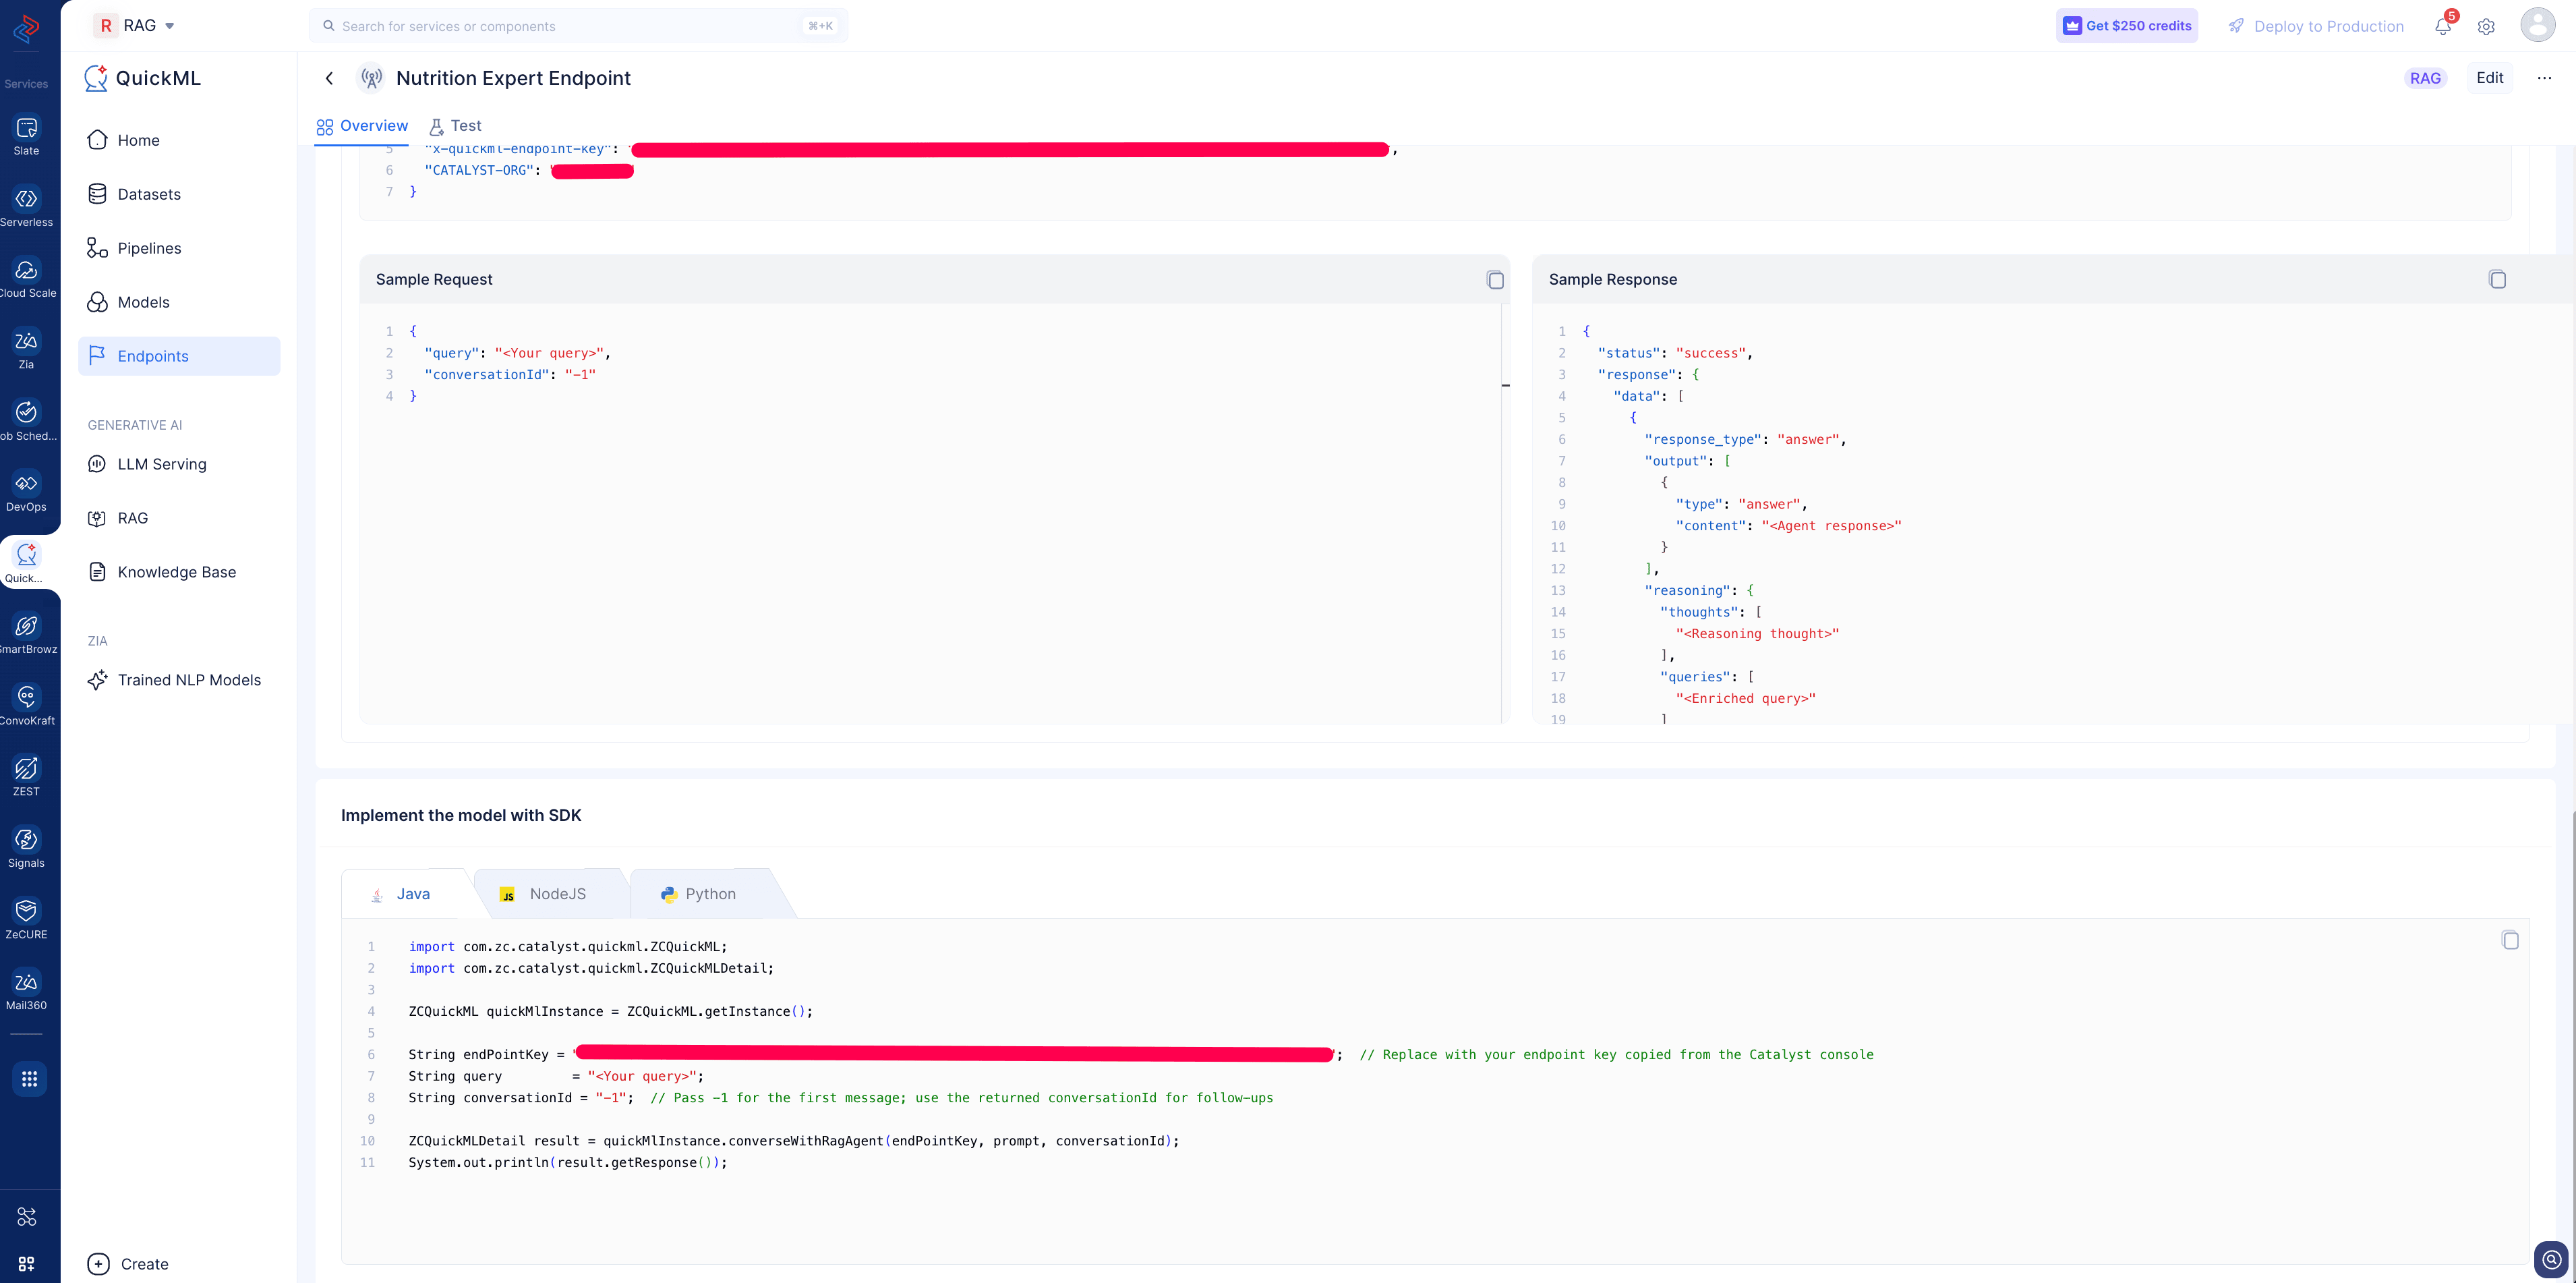
- SDK information to integrate the endpoint.
- A basic test interface for the endpoint. Access the basic test interface beside the overview tab.
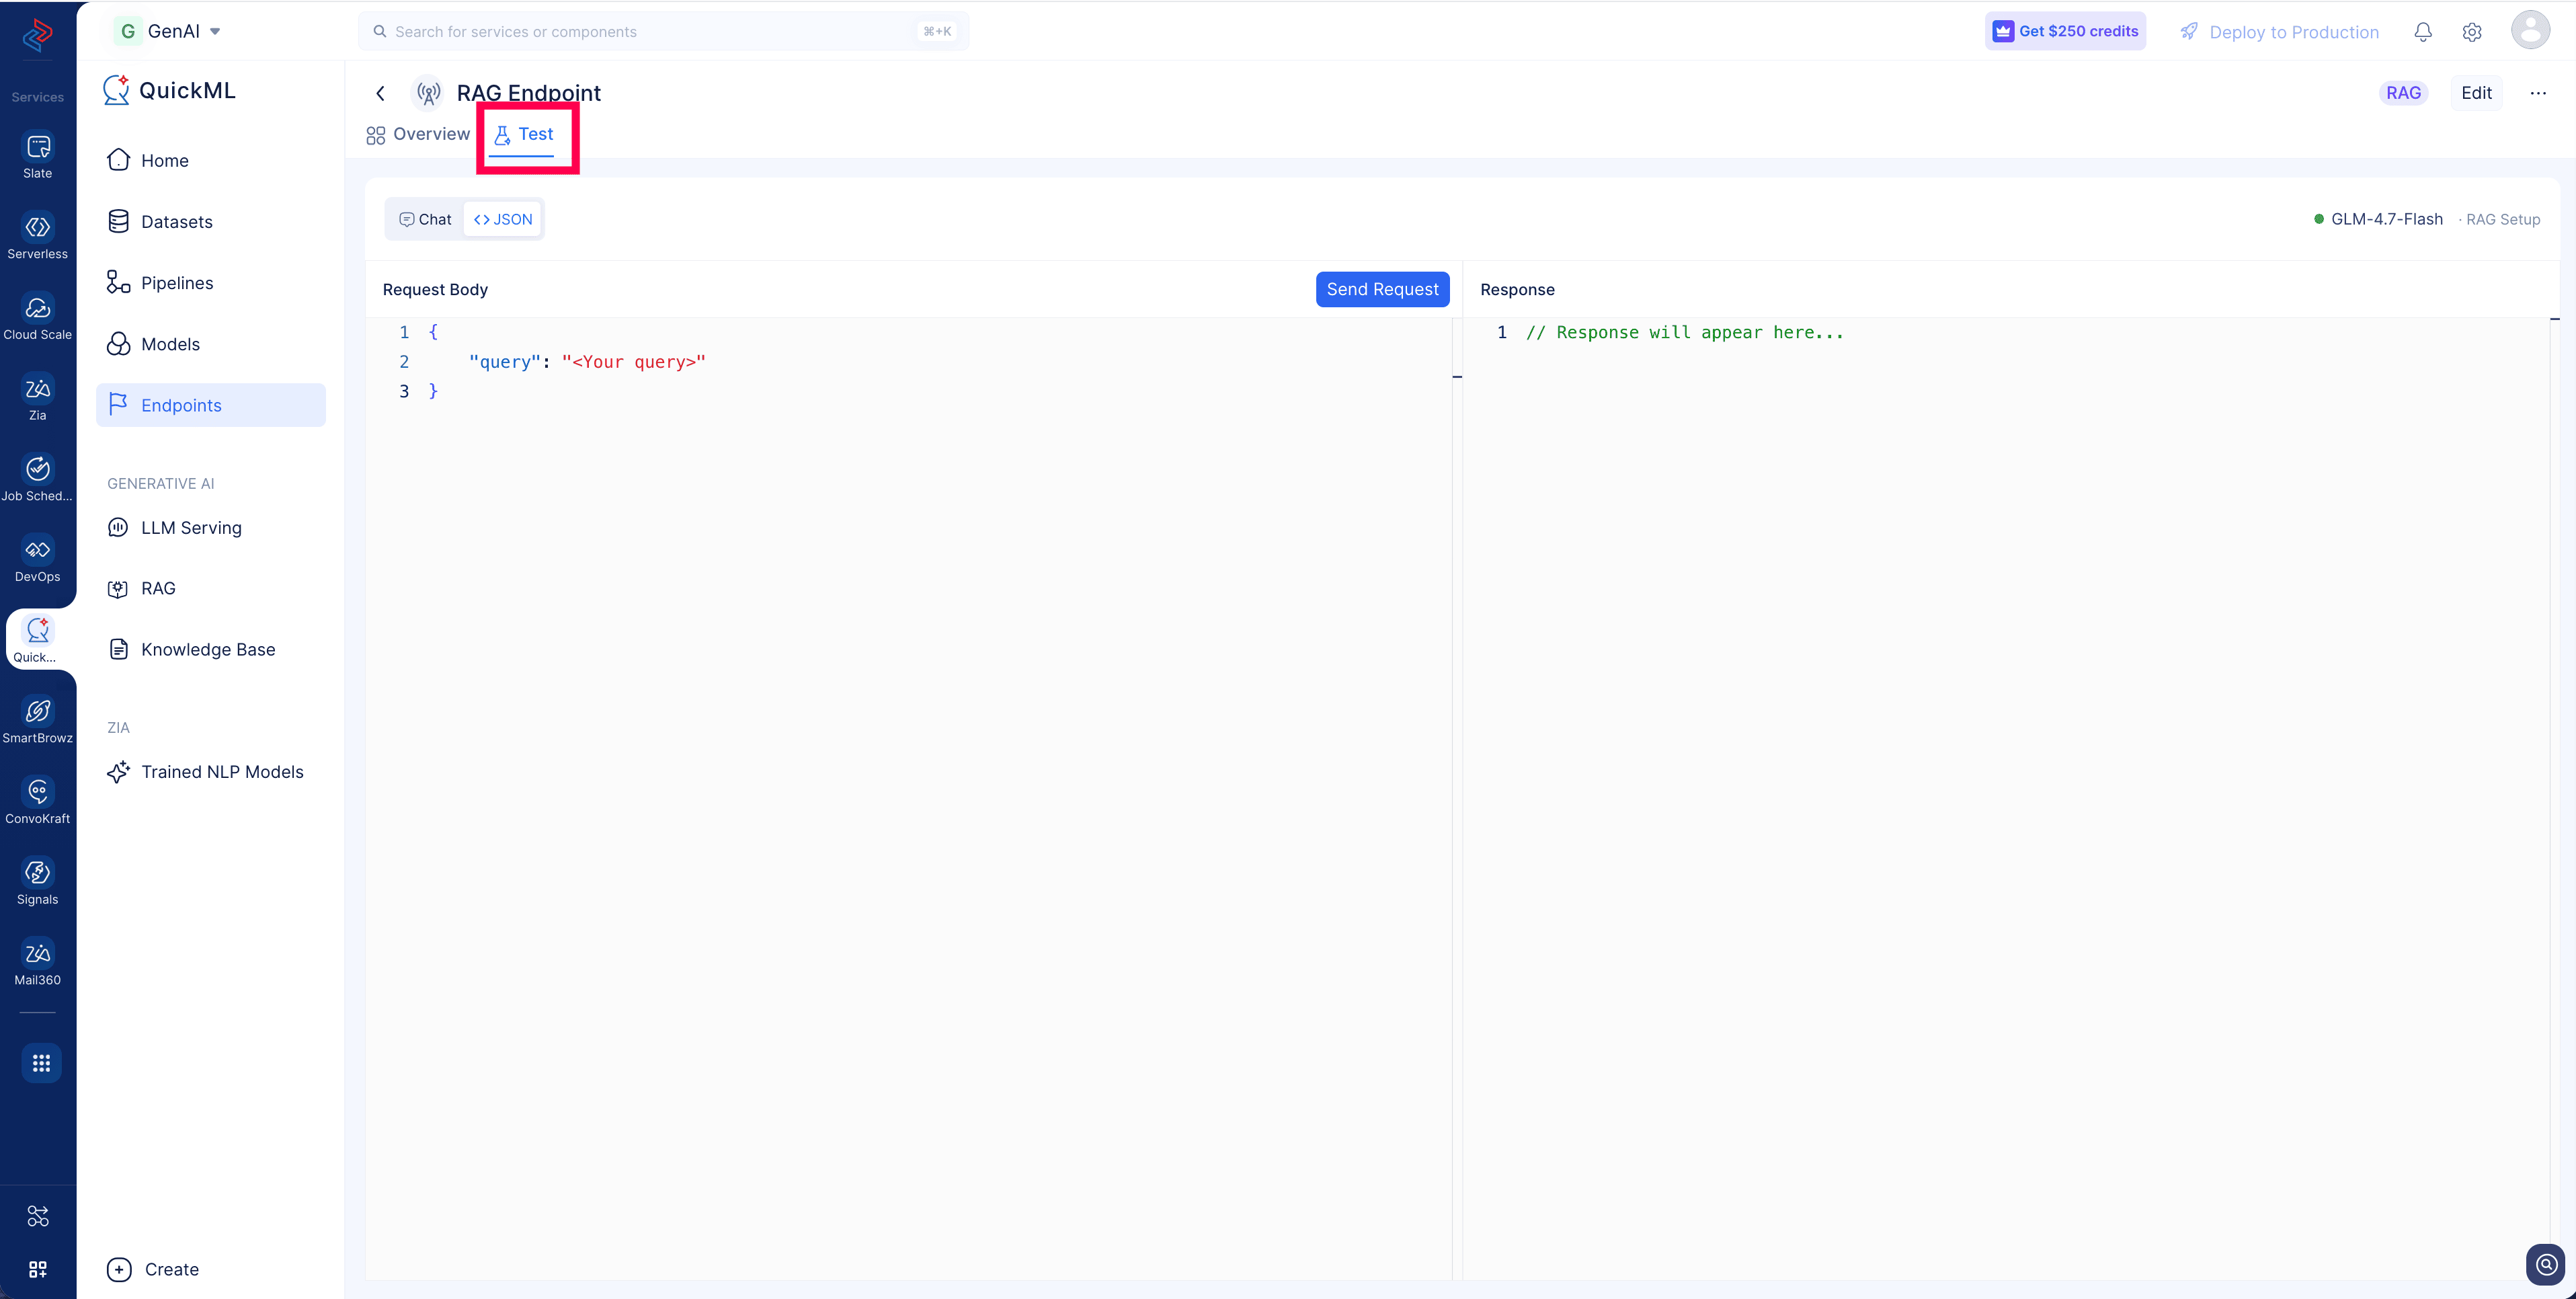
This flow ensures that every endpoint used for integration reflects a parameter configuration that has been tested and optimised for its purpose, providing greater control and flexibility over how your endpoints behave in production.
c. Authentication
QuickML uses OAuth-based authentication for secure API access and efficient integration. Refer to the OAuth documentation for details on different types of OAuth applications and the steps required to generate and manage access tokens.
d. Pricing
API usage is charged based on token consumption. Refer to the Catalyst Pricing page for details.
4. Endpoint details page
The endpoint detail page provides a complete view of the deployed configuration and the integration details required to call it from an external application.
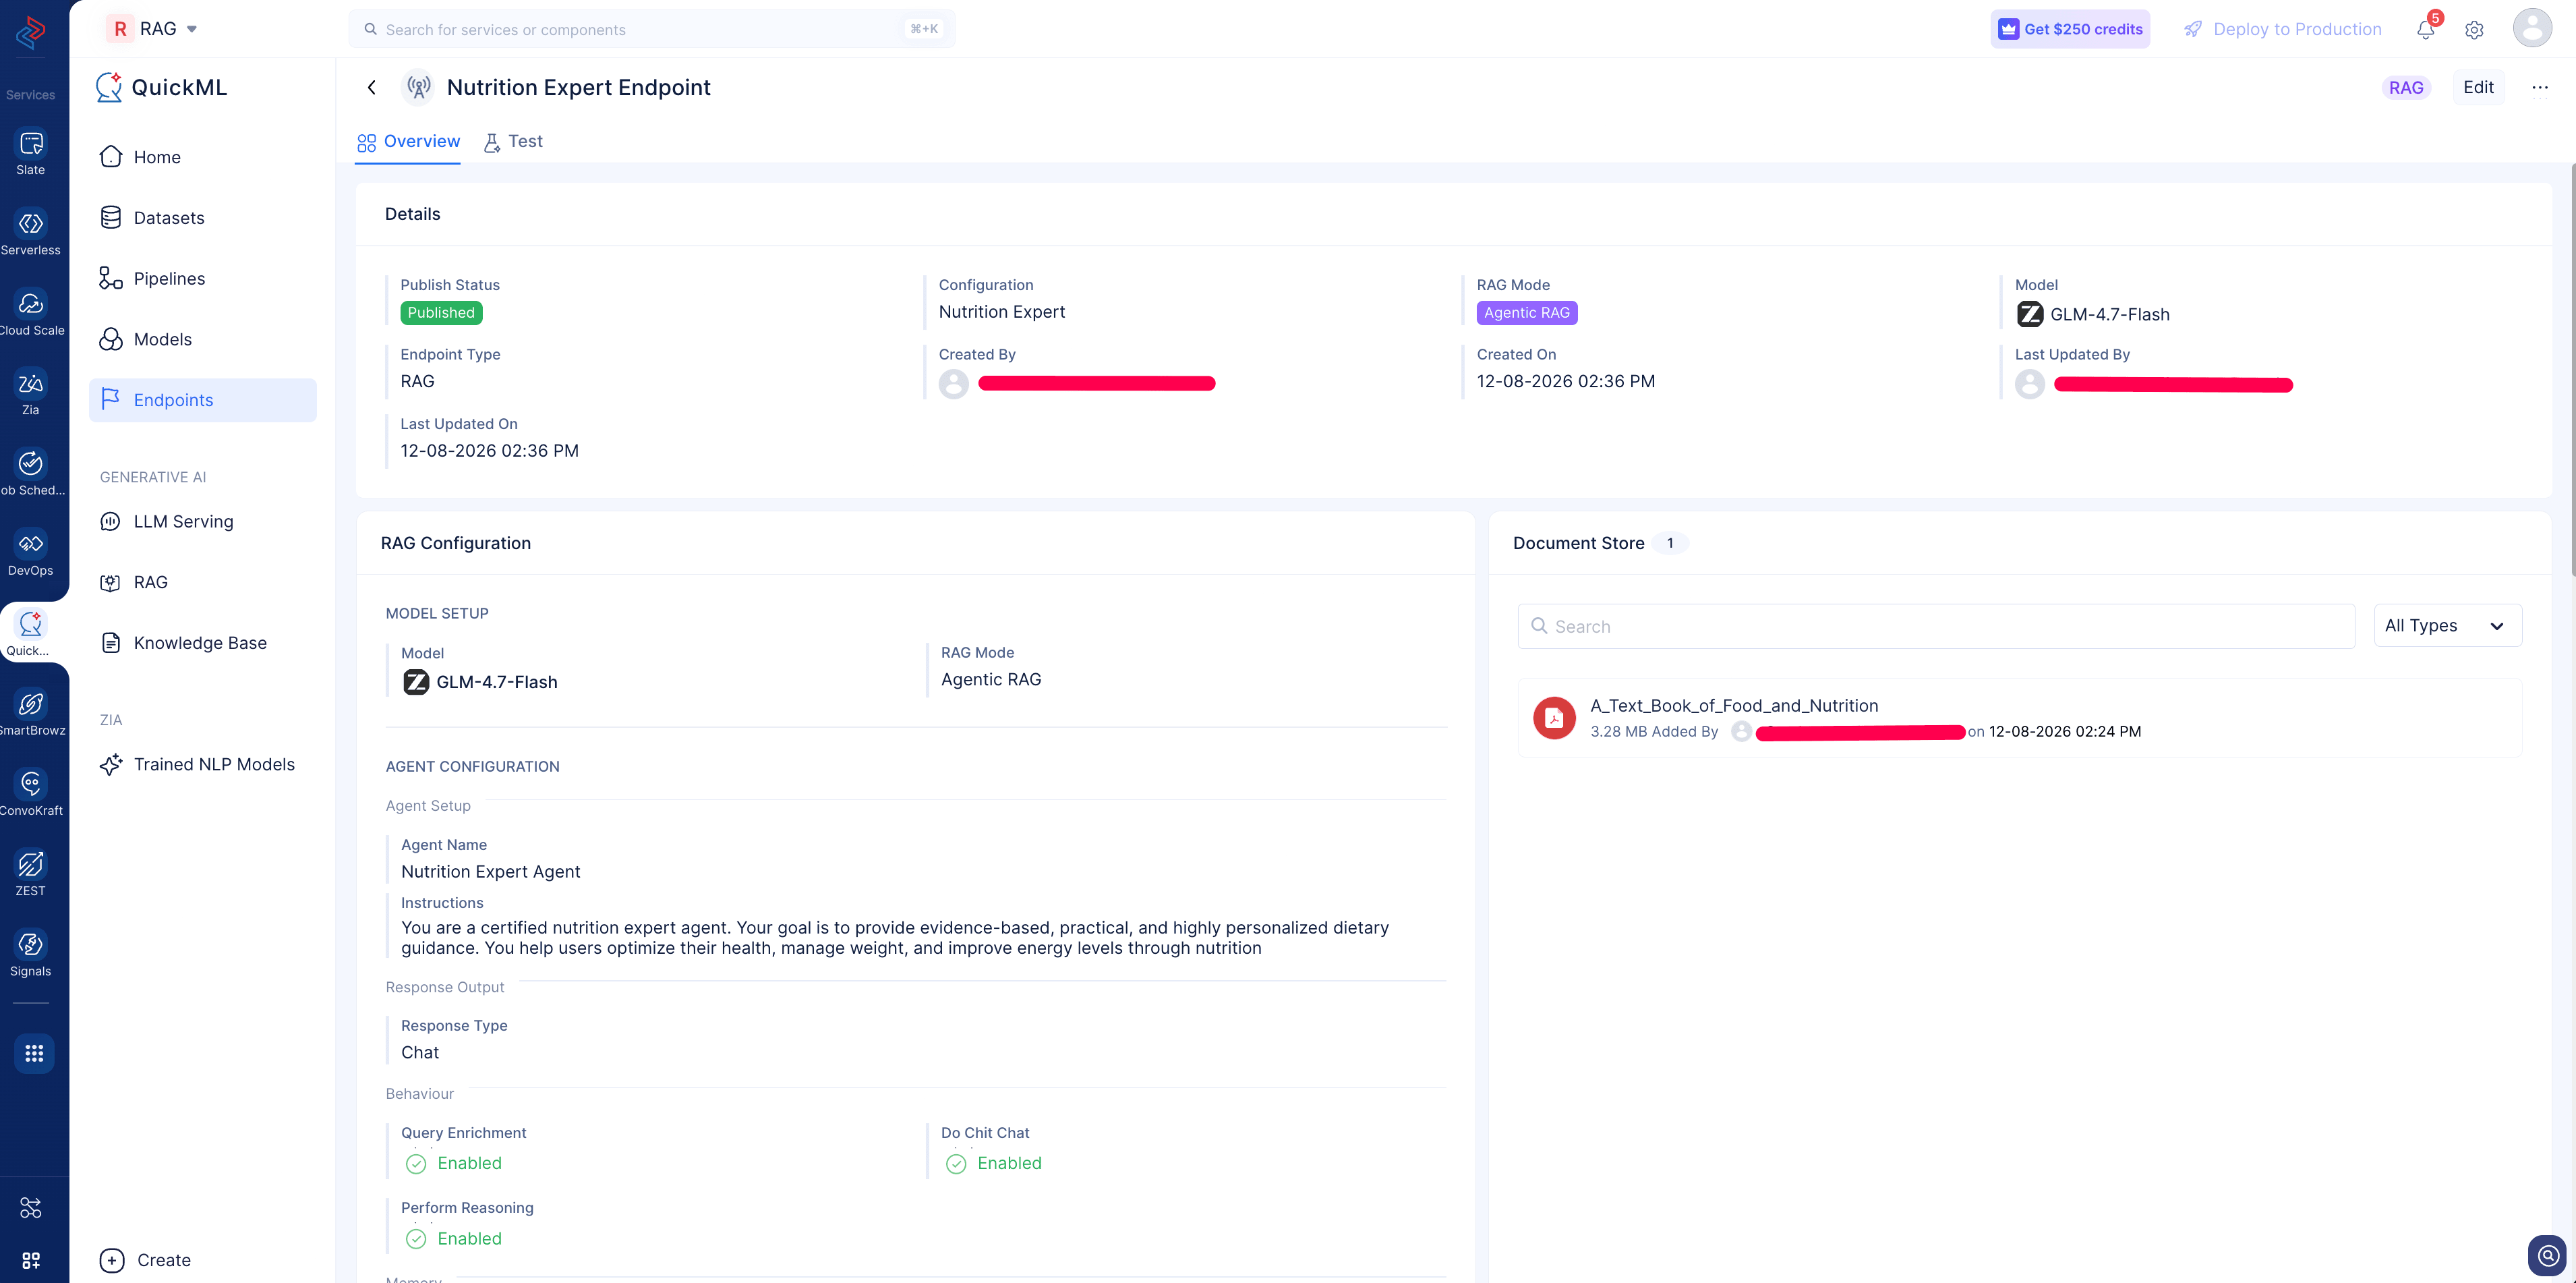
a. Details
The Details section provides the basic metadata of the endpoint and its current publishing status.
| Parameter | Description | Values |
|---|---|---|
| Configuration | Associated RAG saved configuration | Configuration name |
| Endpoint type | Type of endpoint created | RAG |
| Generative AI Model | Model associated | GLM-4.7 Flash |
| RAG mode | RAG mode selected (Response Generation, Agentic RAG, Document Search) | Response Generation |
| Publish Status | Status of the endpoint | Published / Unpublished |
b. RAG Configuration
Displays the parameters with captured values from the saved configuration at the time of endpoint creation.
c. Document Store
All the documents that are associated with the saved configuration are also listed with their details in the document store.
d. Endpoint Details
The Endpoint Details section lists the connection information required to call the endpoint from an external application.
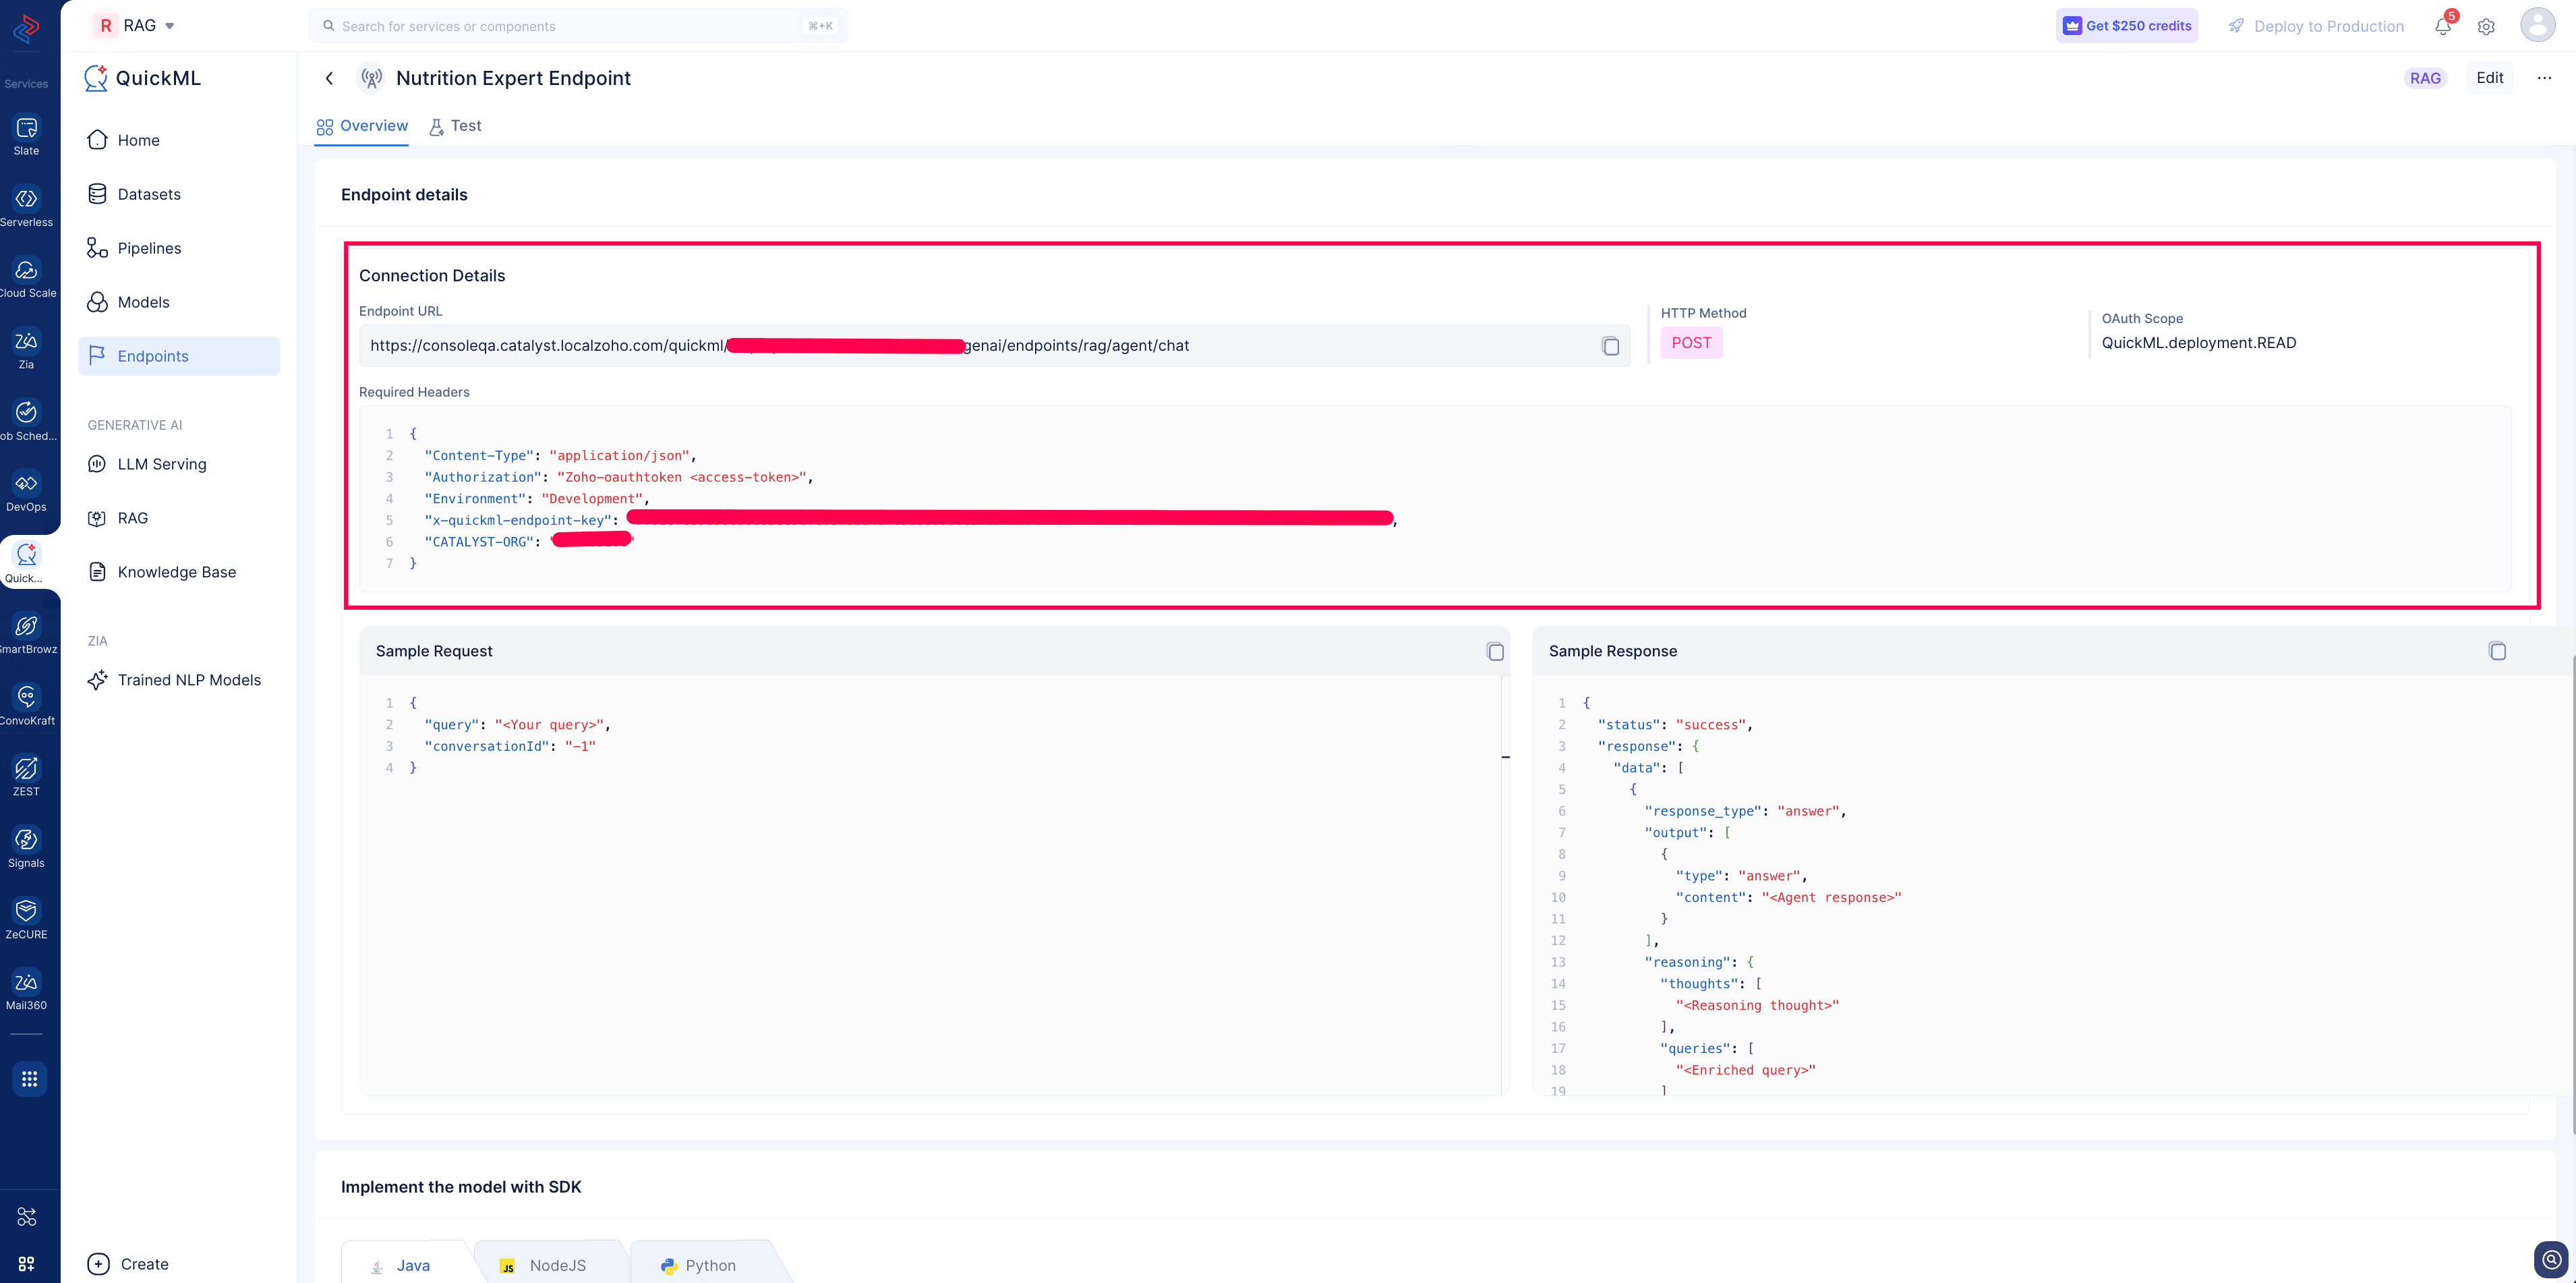
| Parameter | Description | Values / Notes |
|---|---|---|
| Endpoint URL | The REST API URL to send prediction requests to | https://api.catalyst.zoho.com/quickml/v1/project/.../endpoints/predict |
| HTTP Method | All requests must use POST | POST |
| OAuth Scope | Required scope for authentication | QuickML.deployment.READ |
| Headers | Required headers including the authorization token | CATALYST-ORGAuthorization: Zoho-oauthtoken <access_token> |
e. Test
The endpoint detail page includes a built-in Test Interface that allows users to send queries and inspect responses directly from the UI without writing code.
Evaluate the model in the test interface via a generic chat instance and a JSON format to identify how the request and response are being processed:
-
Chat Interface UI
A conversation-style panel with user and system message threads, and an input box. Enter a query, send it, and view the endpoint’s response inline.
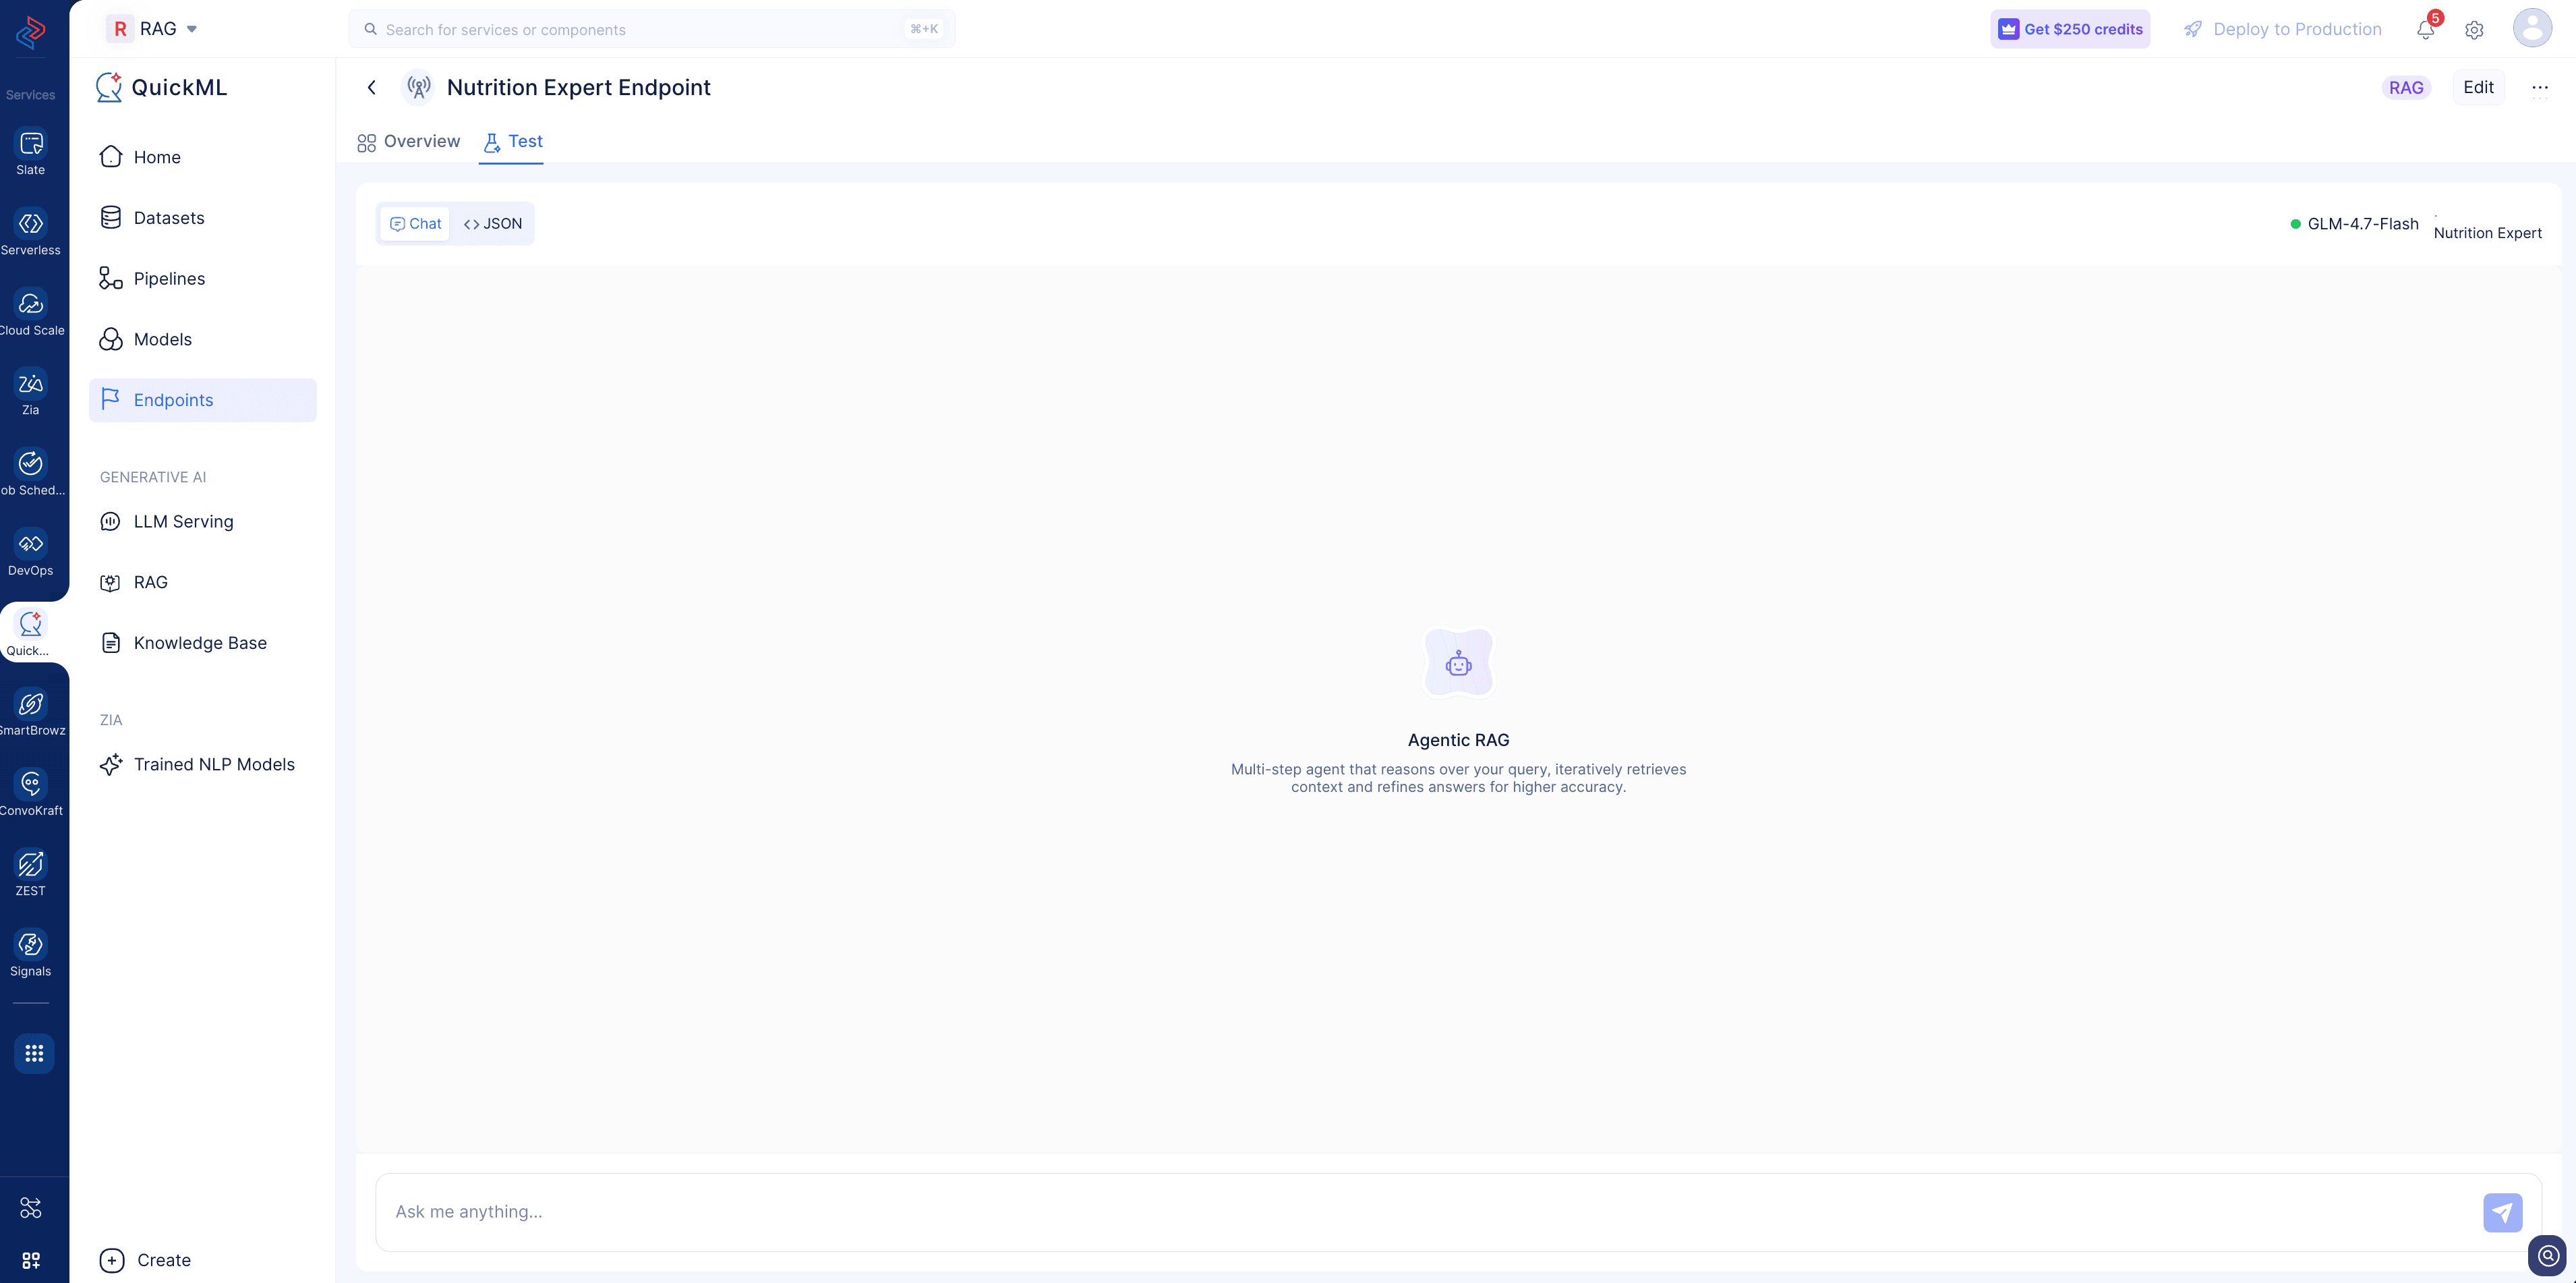
This mode is best for quickly checking response quality and behaviour in a natural, interactive way.
-
JSON Format
A raw JSON request/response view that lets you validate the exact input payload and inspect the structured output. Use this mode to confirm your request body matches the expected input schema and to verify the format of the returned response before integrating the endpoint into your application.
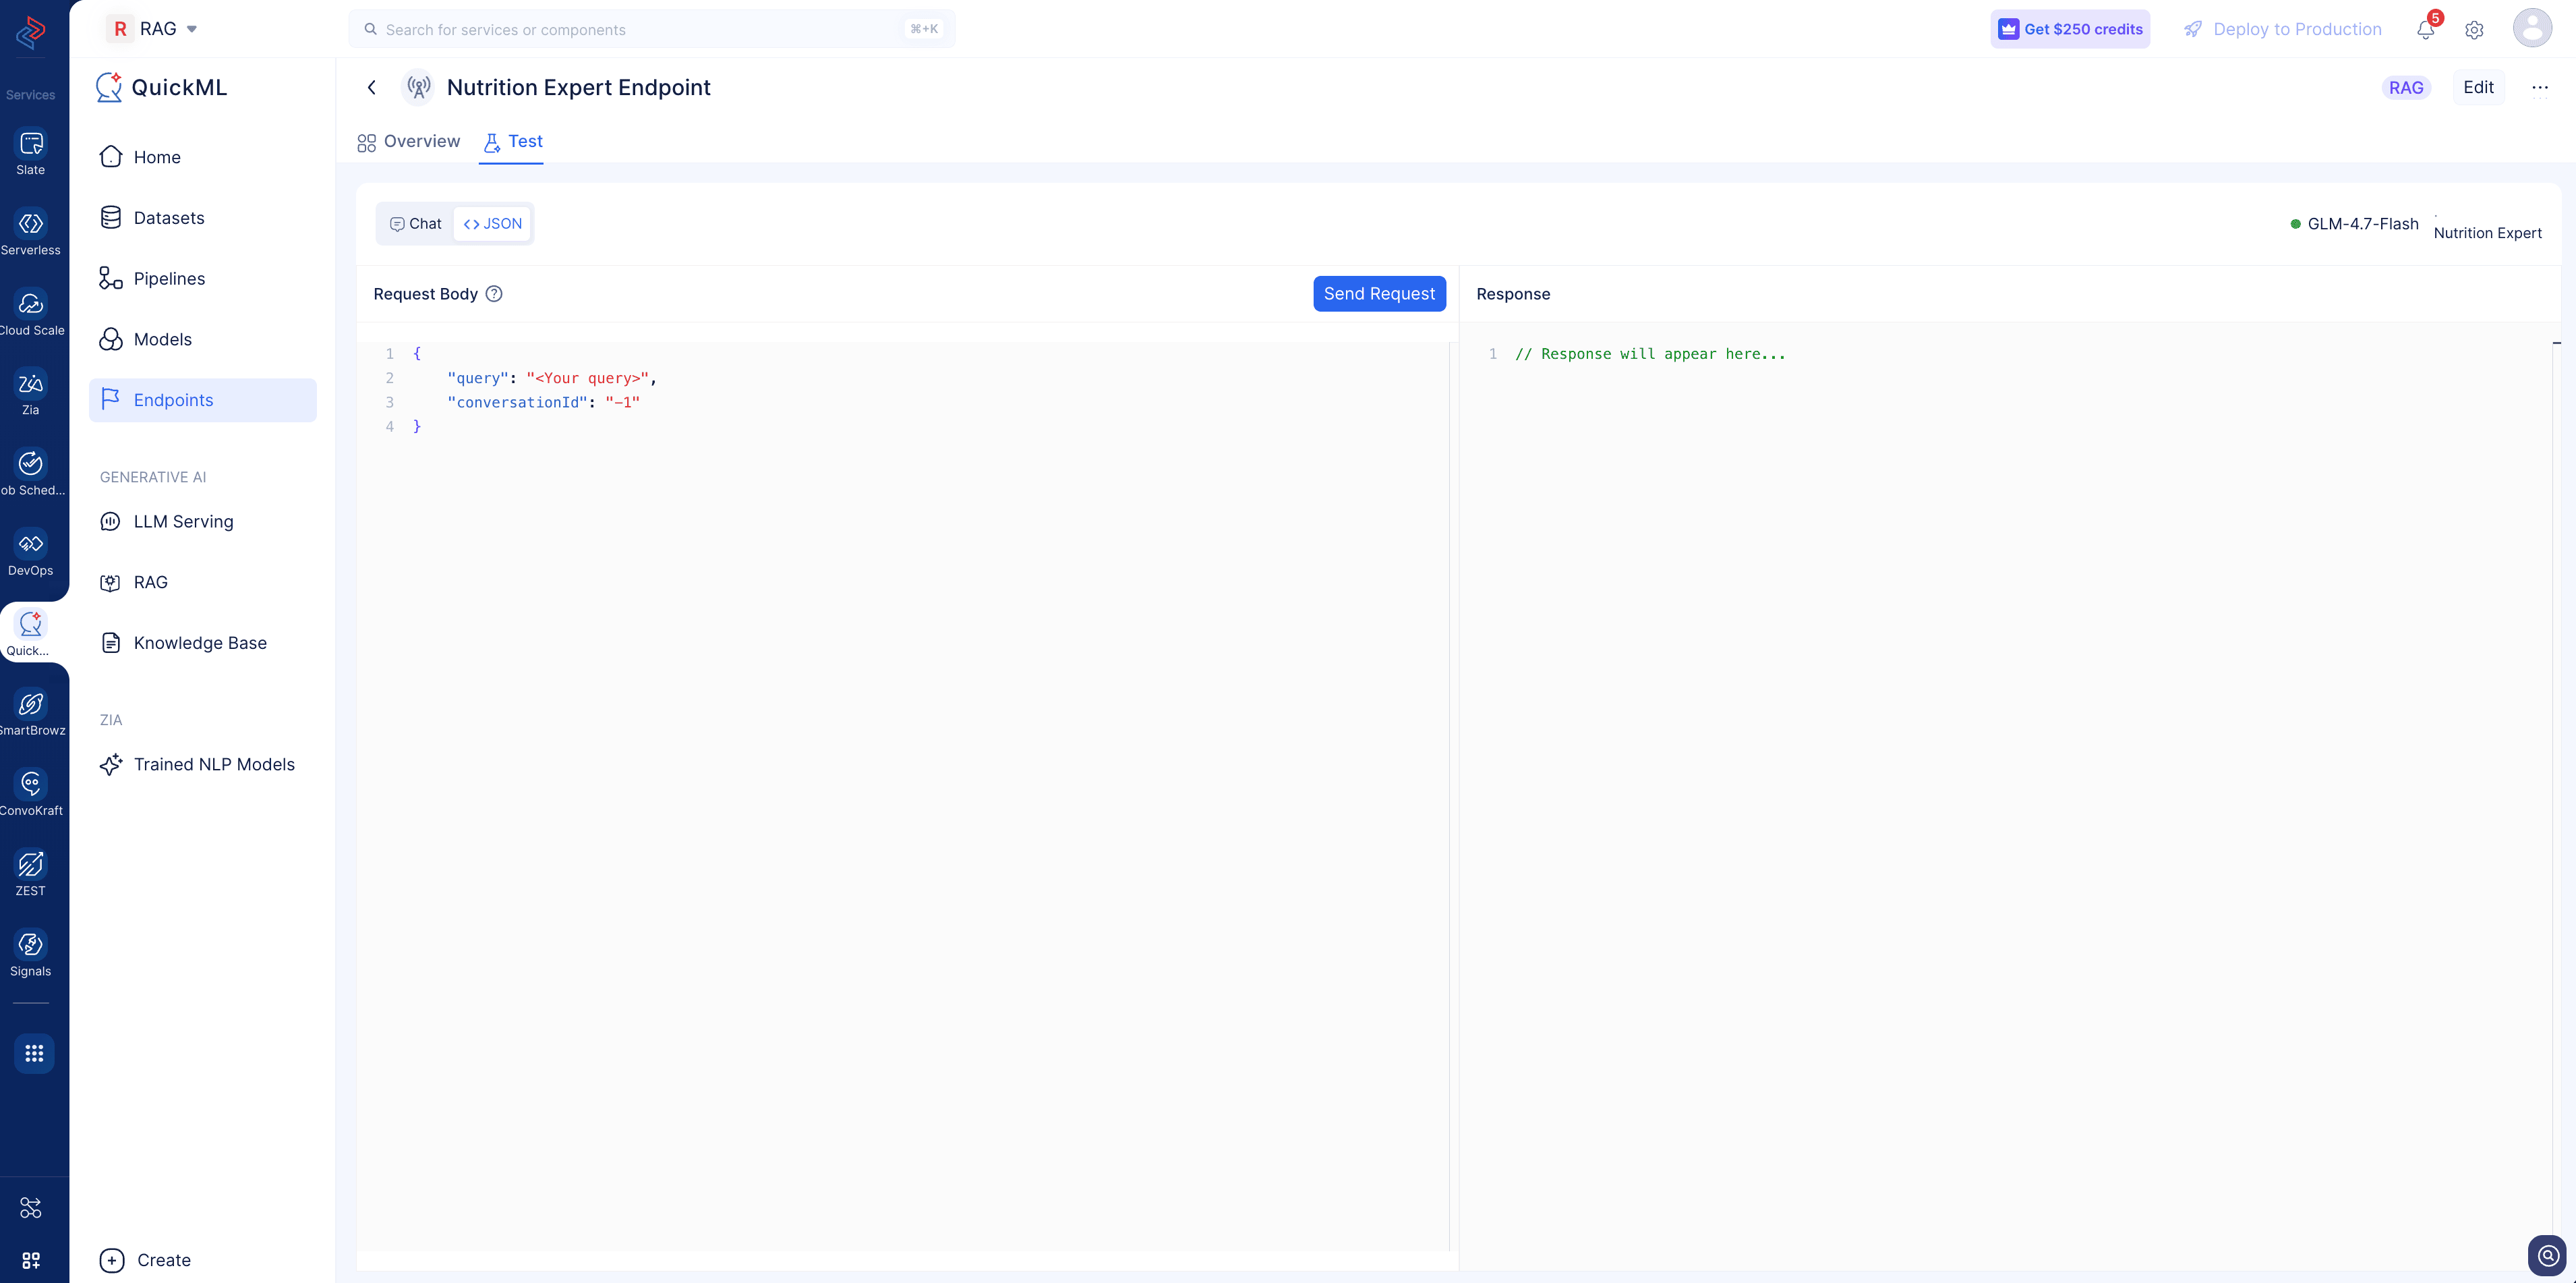
This is best for checking field names, data types, and the overall request/response contract that your code will rely on.
f. Publish
After creation, an endpoint will be callable by default. Hence, no separate publishing step is required unlike the traditional custom ML endpoints.
Last Updated 2026-08-20 12:42:54 +0530 IST
Yes
No
Send your feedback to us
 Ask ChatGPT
 Ask Claude
 Ask Perplexity