Deploy from CLI
Catalyst Slate enables you to deploy applications using the Catalyst CLI. You can execute pre-defined Catalyst commands in the terminal to initialize Slate, set up a Slate template, link or unlink local Slate apps to and from your Catalyst project in the console, and deploy a Slate app.
This section provides step-by-step instructions for performing these operations.
Initialize Slate
Prerequisite : You need to login to the Catalyst CLI using your Catalyst account and then proceed with project and Slate initialization. Refer to this CLI help documentation to know the steps to login.
You can initialize a Slate service directly in your app’s directory, or from a new directory. If you had selected Slate during the project initialization, you can follow the below listed steps:
You can also use the below command to initialize the Slate service directly:
- Select the client framework of the application you wish to deploy in Slate. Press Enter to confirm.
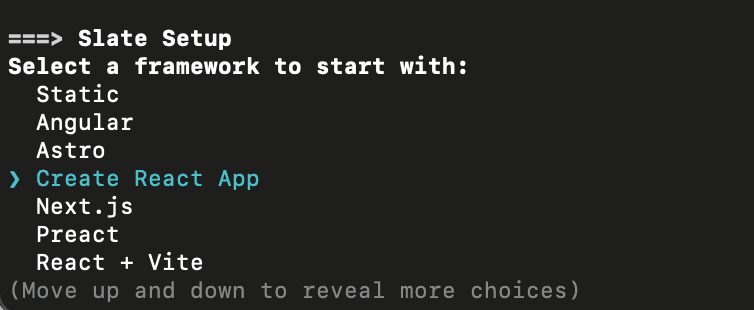
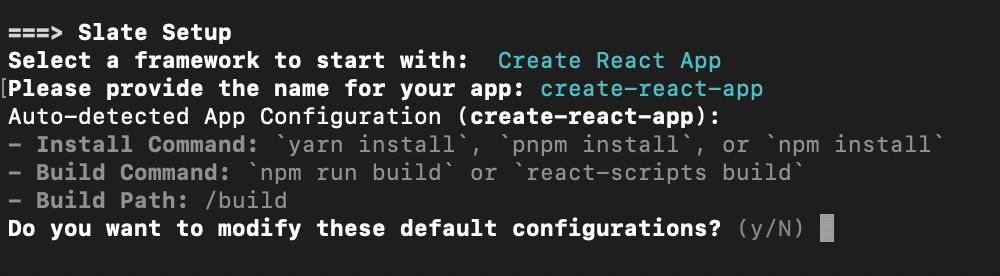
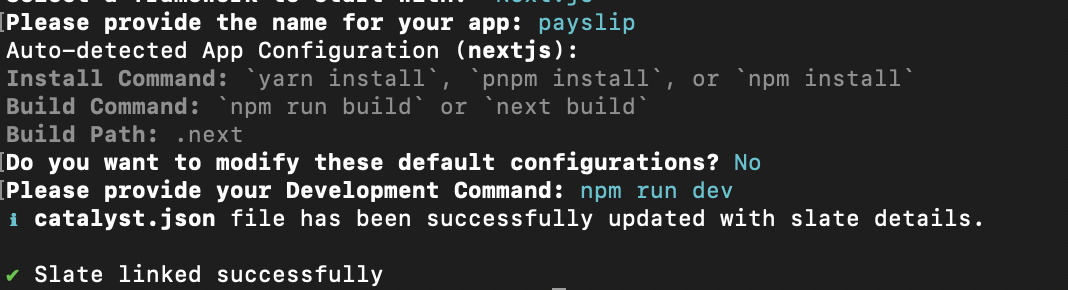
- Provide a name for your application and press Enter. The CLI will set the default configuration for your Slate application based on the chosen framework.
This configuration includes the install and build commands, as well as the build path of the respective framework. If you wish to proceed with the default configuration, enter N. Otherwise, enter Y to make the necessary updates.
-
The install command instals the required dependencies, typically using a package manager.
-
The build command is the script that transforms your development code into production code.
-
The build path is the directory where the production-ready, optimized files are generated after running the build process.
By default, these commands are executed with the npm package manager, i.e., npm install or npm run build. If you would like to change the package manager, you can do so by entering N and providing the required command.
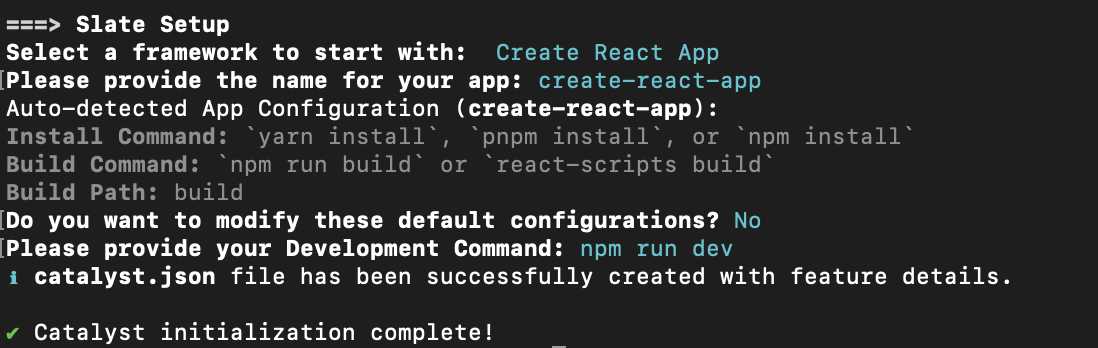
Once you confirm the configuration, the Slate template code of the chosen framework will be downloaded to the project directory, and an entry will be added to the catalyst.json file, which serves as a connection between your project directory and the Catalyst Slate service.
You can provide specific commands to be executed when serving the app locally by entering them as development commands and pressing Enter.
Create an Additional Slate App
If your project directory is already linked to a Catalyst project and Slate is initialized, you can add a new Slate app to your project directory directly using the steps below. This operation will automatically add the Slate template code based on the chosen front-end framework to your project directory.
- Execute the following command in the terminal from the Slate service’s project directory:
- Select the required framework for your Slate application and provide a name for your application.

- Based on the chosen framework, the install and build commands, the build path of the framework will be detected automatically. If you wish to proceed with the default configuration, enter N. Otherwise, enter Y to make the necessary updates.

You can provide specific commands to be executed when serving the app locally by entering them as development commands and pressing Enter.
After all the configurations are updated, the Slate app will be created in your project directory.
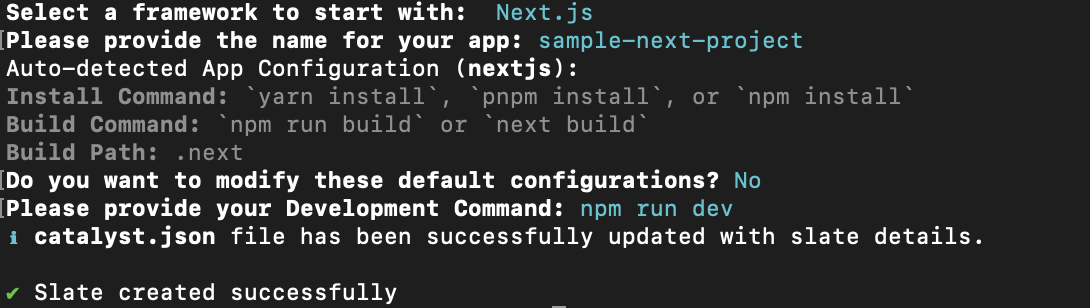
The catalyst.json file will be updated with the details of the newly created Slate app.
You can also create a Slate application by directly providing a name for your application and the required framework. Execute the following command in your terminal:
Link a Slate App
In order to deploy an existing project to Slate, you must link the project’s root path with the Slate service. For this you will have to initialize the Slate service first. This linking establishes a connection between your project directory and the Slate service locally and in order to deploy to the console, you must use the deploy command.
This option can be used when an application of a supported framework by Slate was not originally initialized as a Slate service, but you later prefer to deploy it as a Slate service.
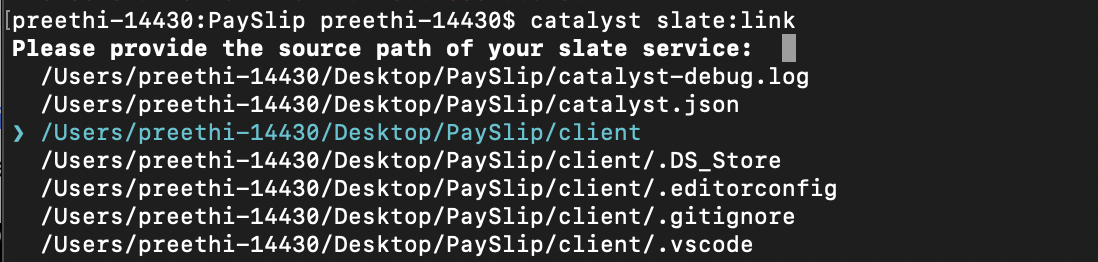
To link the directory with Slate:
- Execute the below command in the terminal from the app’s project directory:
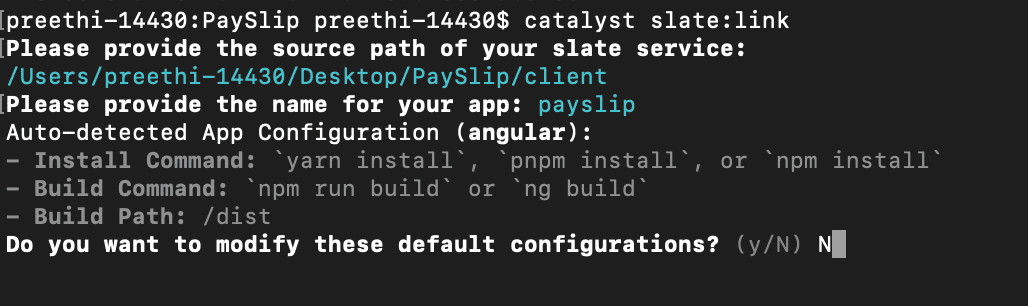
- Select the source path that has to be linked to the Slate service and press Enter.
- Provide a name for your application as required and press Enter.

The framework of the application will be detected automatically and listed along with its install, build commands, and the build path. Otherwise, you will be able to select the framework manually from the terminal.
- If you wish to proceed with the default configuration, enter N. Otherwise, enter Y to make the necessary updates.
You can provide specific commands to be executed when serving the app locally by entering them as development commands and pressing Enter.
After the configurations are set, an entry will be made in the catalyst.json file to establish a connection between the project directory’s path and the Slate service.
Unlink a Slate App
You can remove the connection between your project directory and the Slate service by using the steps listed below. This operation will only remove the Slate configuration in your project directory and not in the Catalyst console, if you have already deployed the application.
- Execute the following command in the terminal from the app’s project directory:
- Navigate using the arrow keys to choose the application and click Enter to confirm.

- Enter Yes to remove the Slate configuration from your application, its entry in the catalyst.json file and the source code of the application. Enter No to remove only the entry in the catalyst.json file while retaining the source code of your application.

For the same operation, you can also use the below command by directly providing the name of the application:
Serve a Slate App Locally
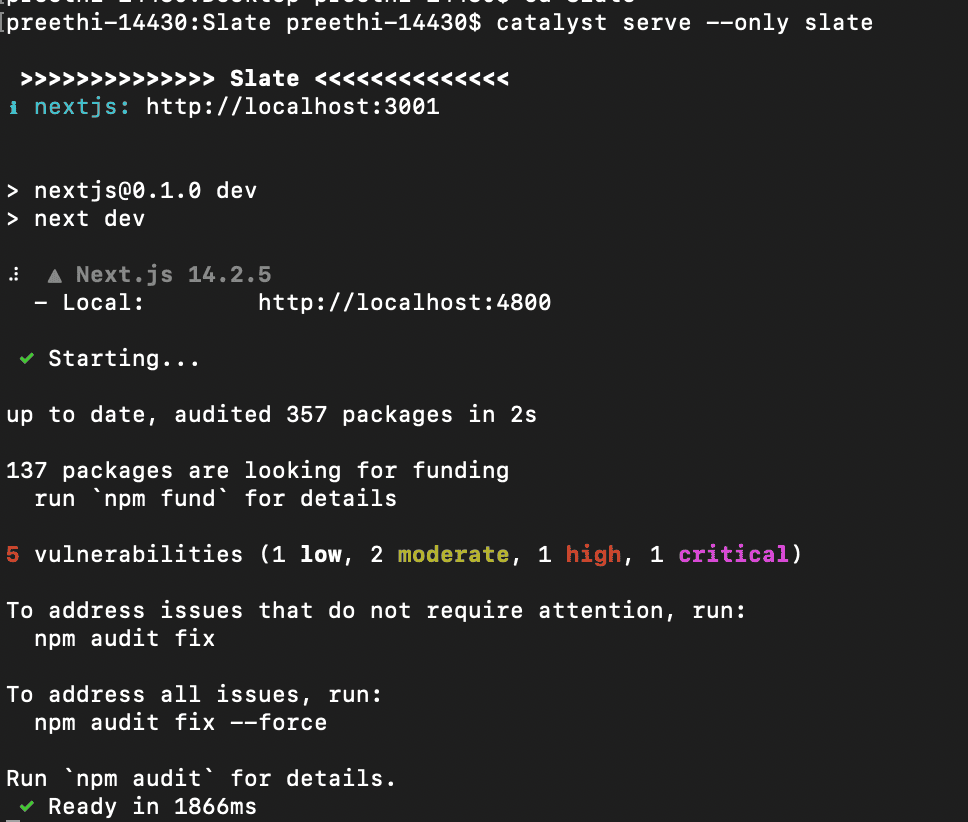
You can host the Slate application in your Catalyst project locally by navigating to your project directory in local and executing the following command:
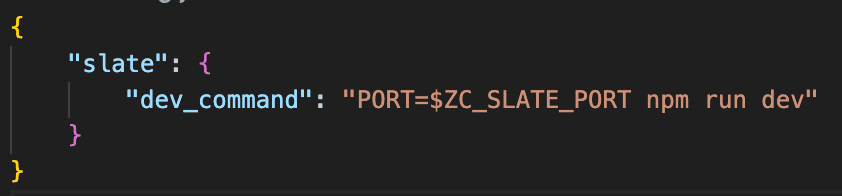
This catalyst serve command launches your Slate app locally by executing the dev_command defined in your cli-config.json file. This dev_command will be configured in the file when you link or create a Slate app.
Before running the catalyst serve command, you must update the ensure that the dev_command to include the start command of your application with the ZC_SLATE_PORT. For example, if you’re working with a React app, update the command to:
PORT=$ZC_SLATE_PORT npm start
You will have to configure your start command here based on the framework of your application. You can refer to the below table for the default start commands of the frameworks supported by Catalyst Slate. You can modify the start command based on your application’s needs, if required.
| Framework | Default Start Command |
|---|---|
| Create React App | PORT=$ZC_SLATE_PORT npm start |
| Solid JS(Vite) | npm run dev -- --port $ZC_SLATE_PORT |
| React + Vite | npm run dev -- --port $ZC_SLATE_PORT |
| Next.js | npm run dev -- --port $ZC_SLATE_PORT |
| Astro | npm run dev -- --port $ZC_SLATE_PORT |
| Angular | npm start -- --port $ZC_SLATE_PORT |
| Vue (Vite) | npm run dev -- --port $ZC_SLATE_PORT |
| Preact | npm run dev -- --port $ZC_SLATE_PORT |
| Svelte | npm run dev -- --port $ZC_SLATE_PORT |
When you serve the slate app, the start command mentioned in the cli-config.json file runs the application on a local server and the CLI will display the URL from which you can access your Slate application.
After you have finished testing your application locally, you can proceed to deploy it to the remote console. We will discuss about the deployment commands in the next section.
Deploy to Slate
You can deploy your front-end web application in Catalyst Slate using the steps below. Before you deploy any application in Slate, please make sure the project directory has been linked to the Slate service. For this, you can use the catalyst slate:link command.
Execute the following command in your terminal from the Slate service’s project directory:
This deploys all the Slate components present in your project directory to the Catalyst development environment.
You can use the below option to provide a deployment message for the Slate deployment.
To deploy a specific app from the project directory to Slate, you can use the following command:
If you wish to deploy the application to the production environment, use the below command. Ensure you have accessed the production environment in the console before initiating a production deployment.
Last Updated 2025-10-24 14:55:18 +0530 IST
Yes
No
Send your feedback to us