Submit an Instant Job to the Job Pool
You can submit an instant job to the Job Pool from two sections in the console:
In this help documentation, we are going to go over the steps required to submit an instant job using the Job Pool component section. For steps on submitting a job to the job pool using the Jobs component section, visit this help documentation.
To submit a job to the job pool:
Submit an Instant Job to the Function Job Pool
-
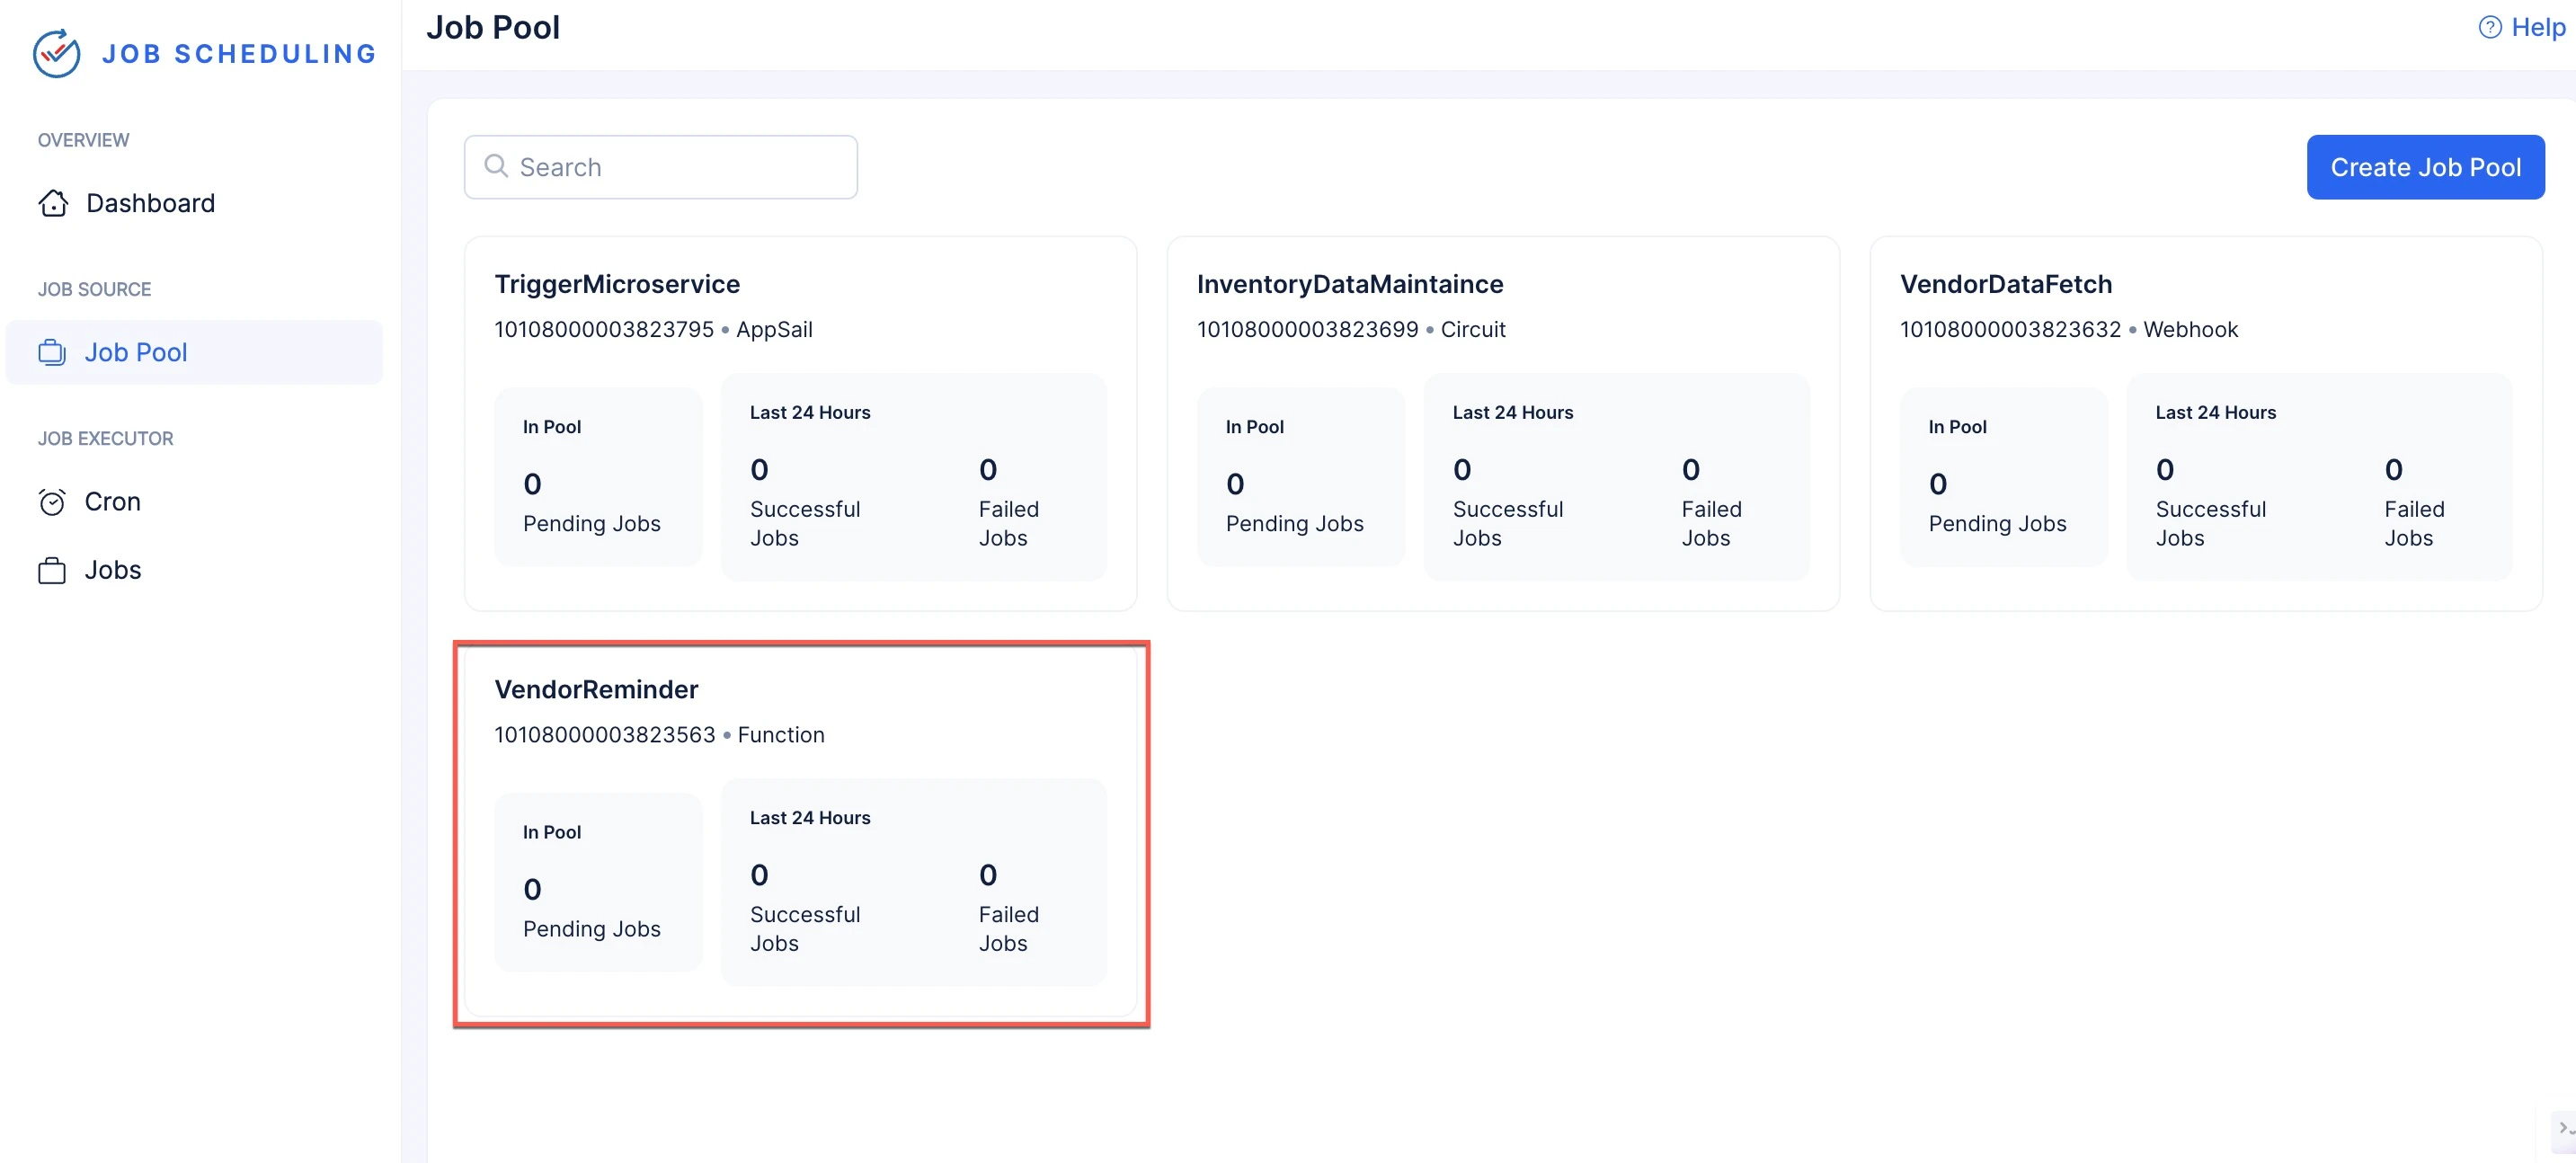
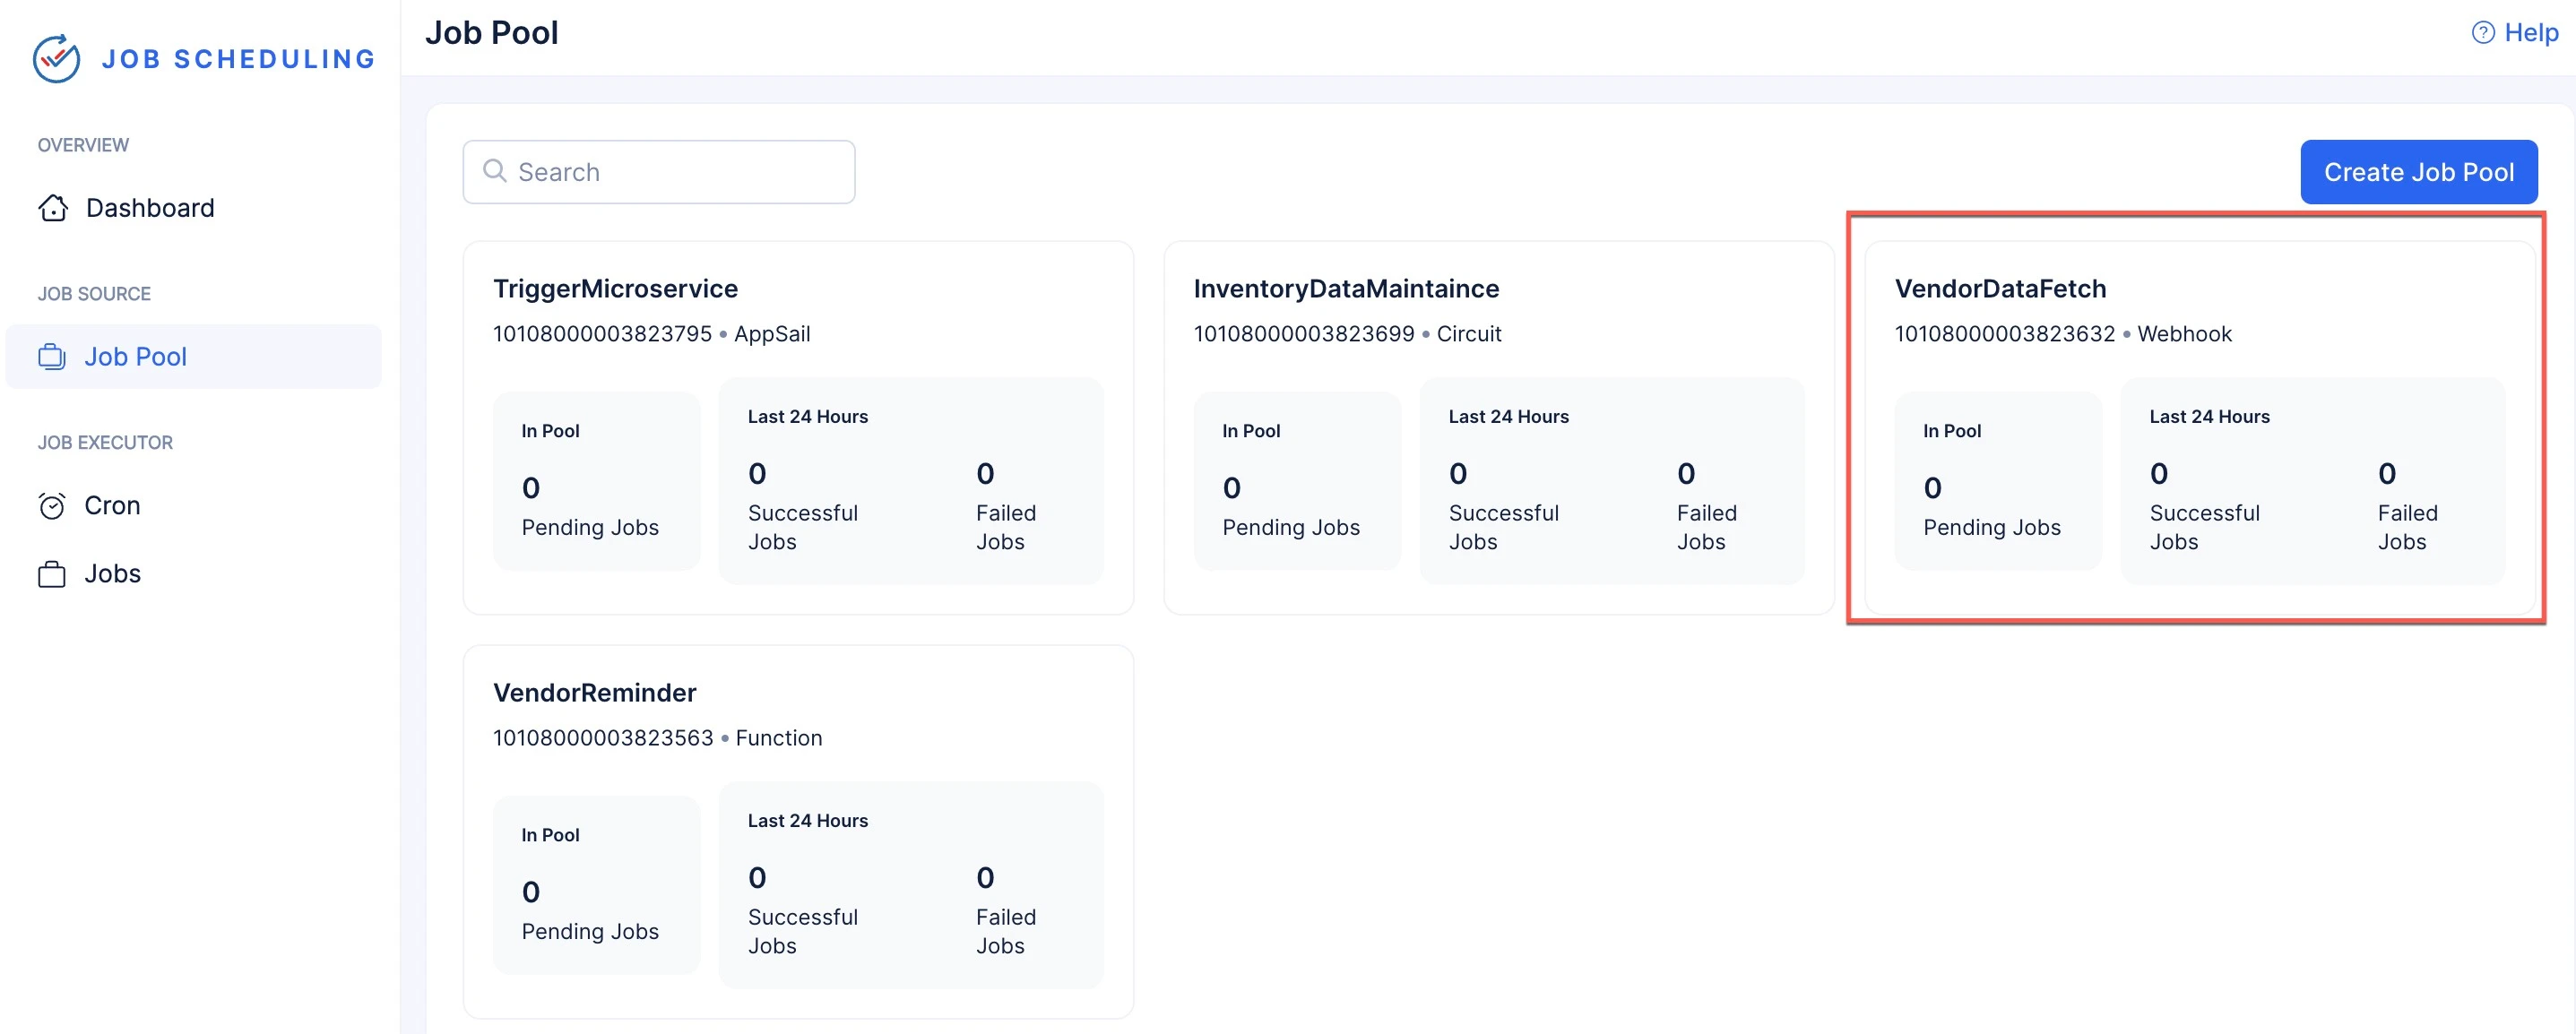
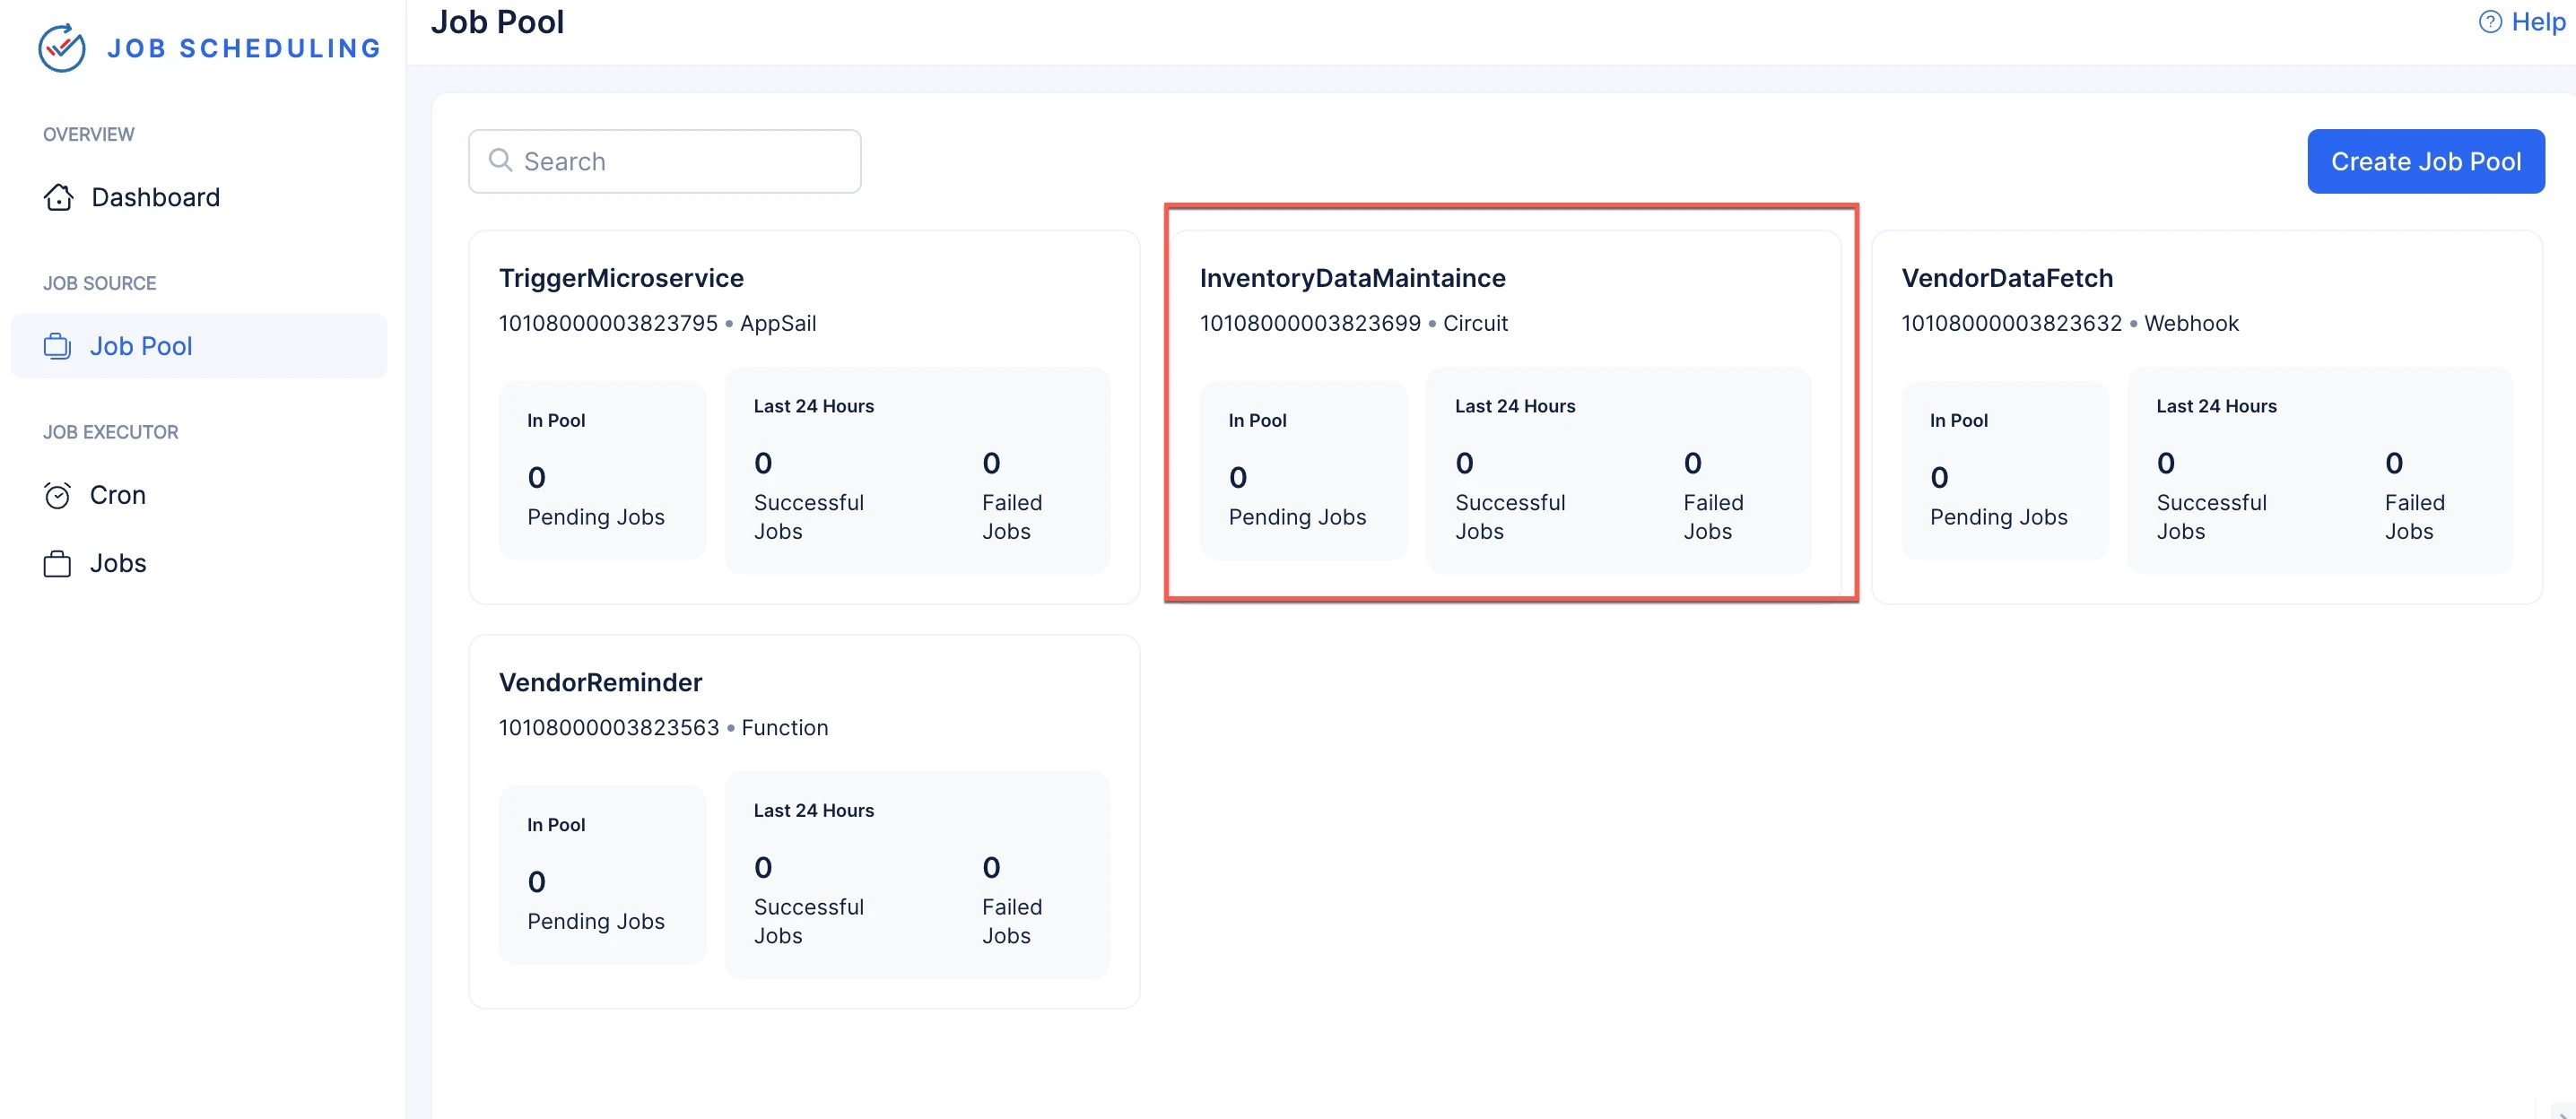
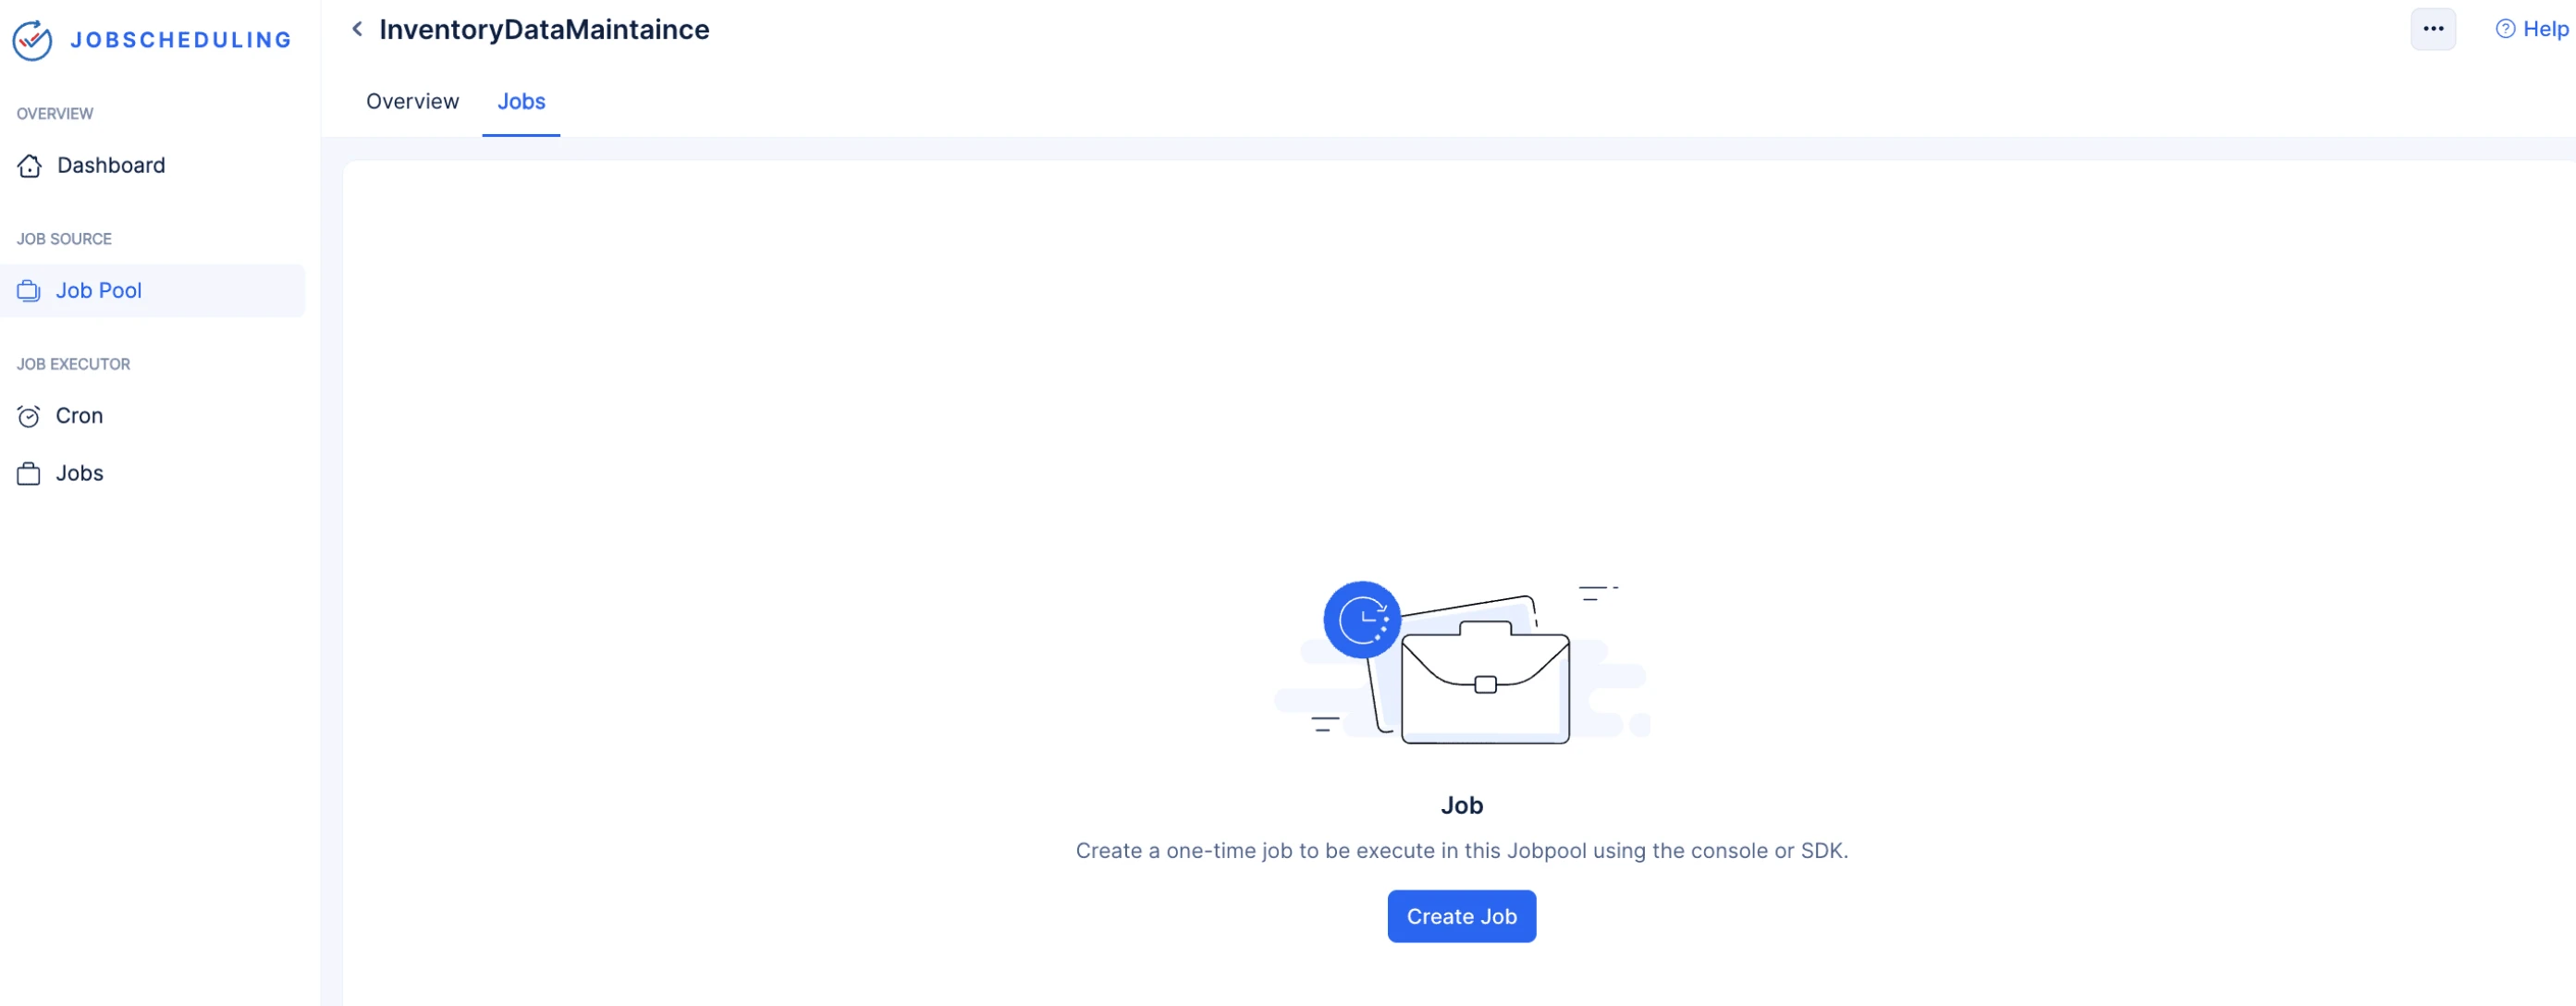
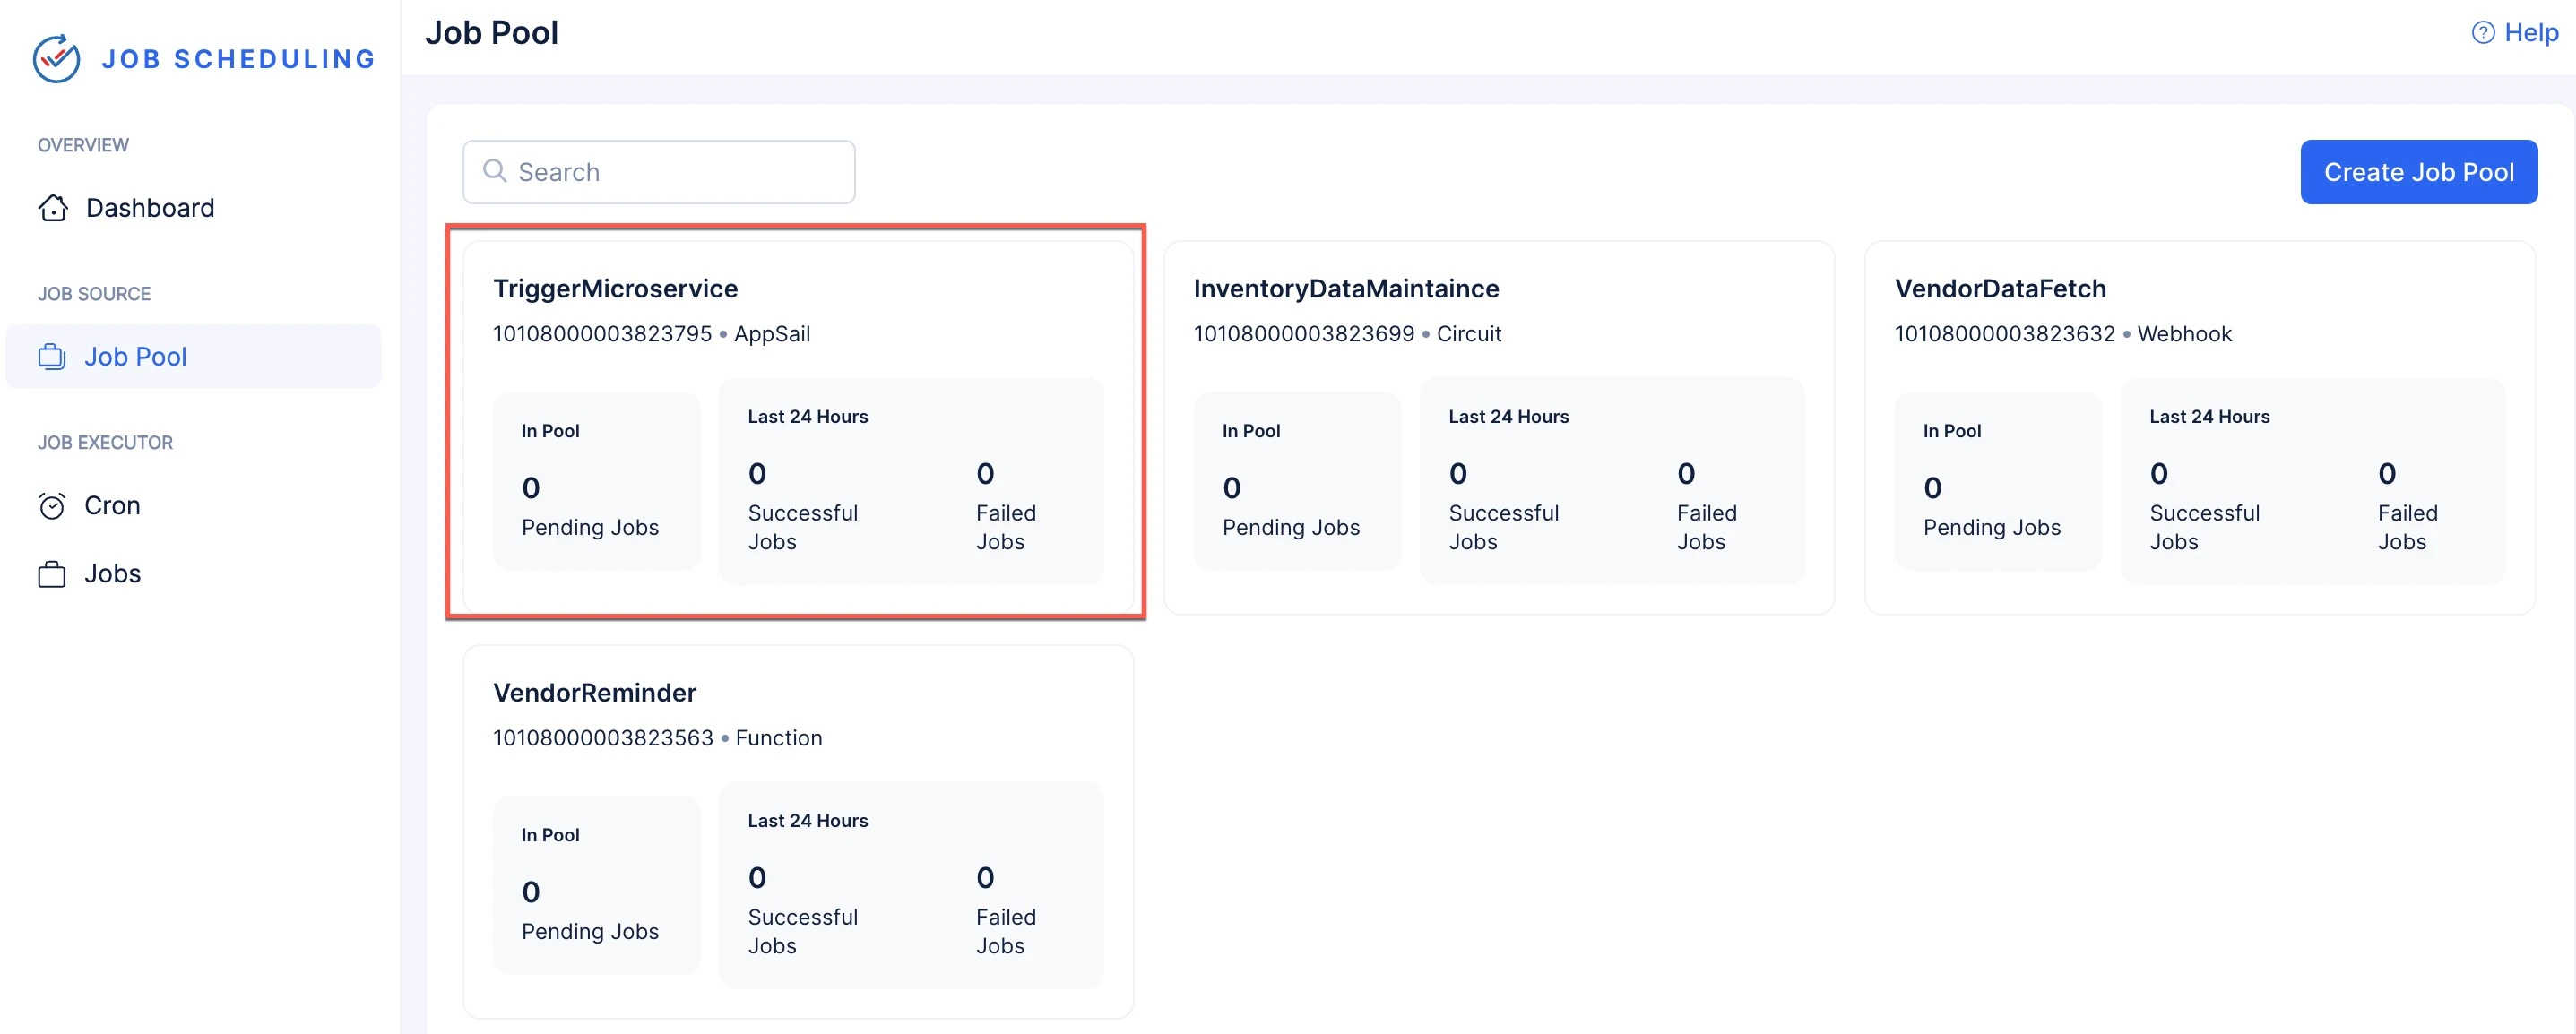
Choose the required job pool from the Job Pool section.
-
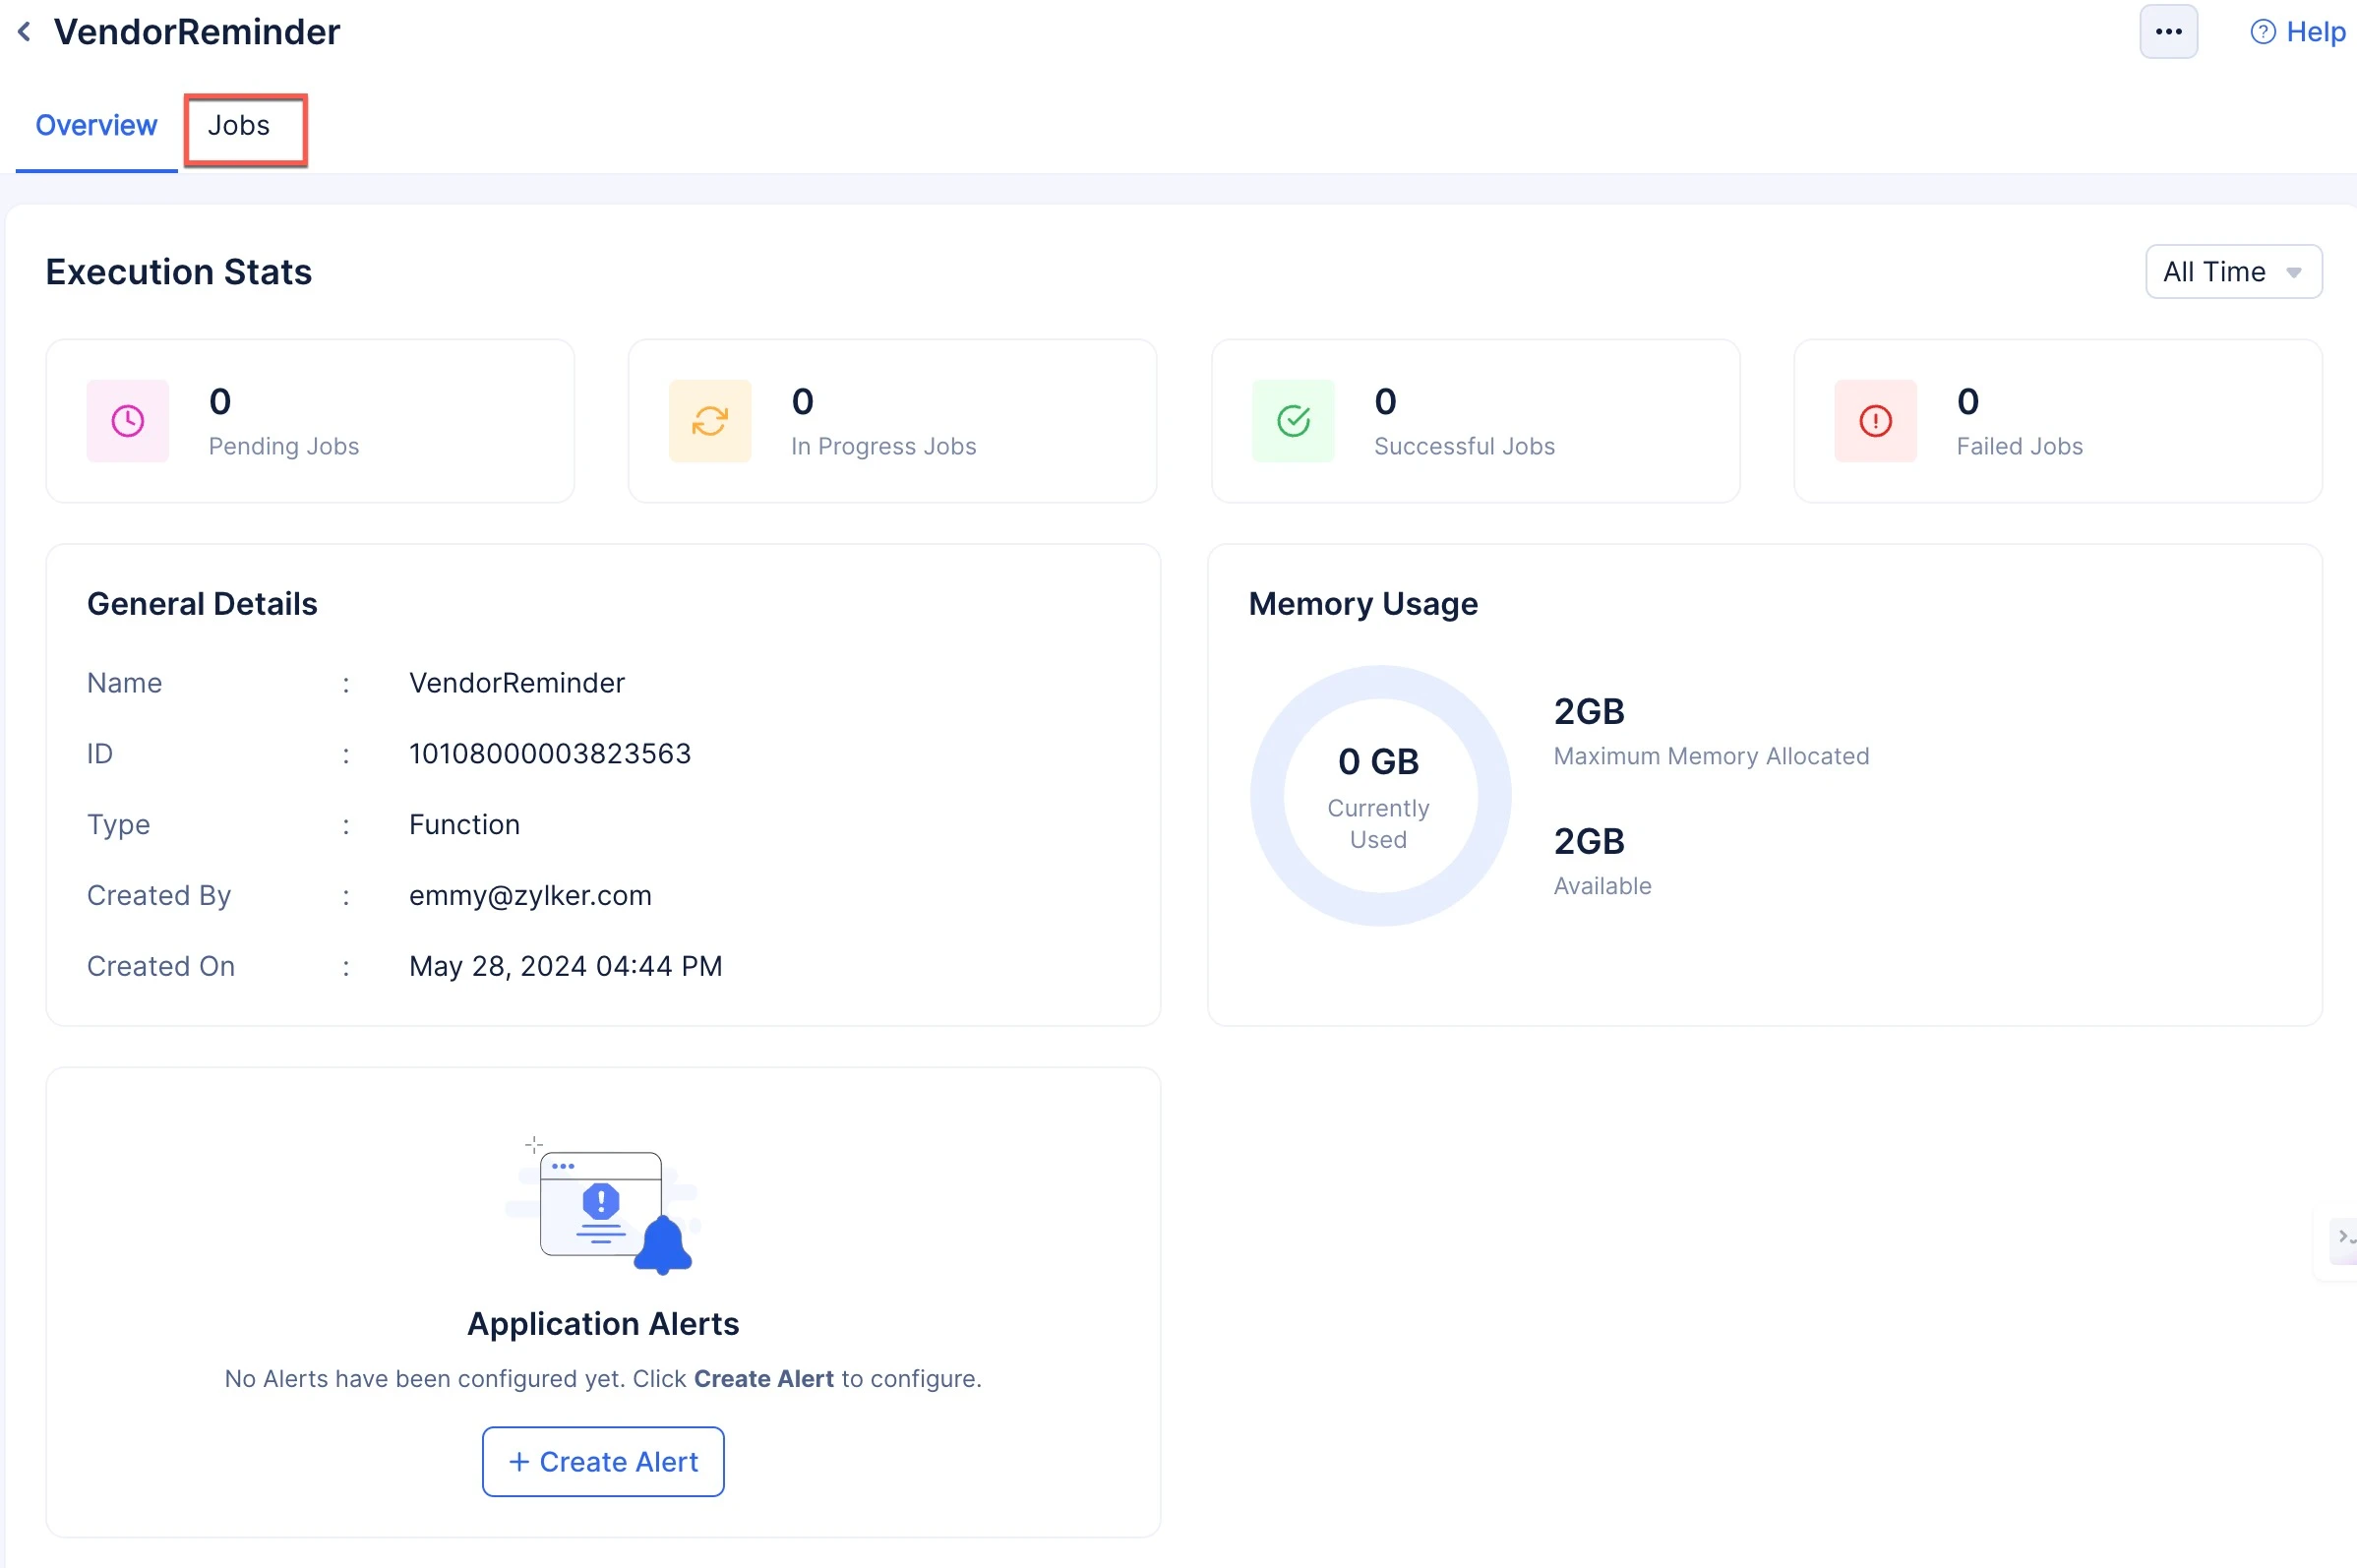
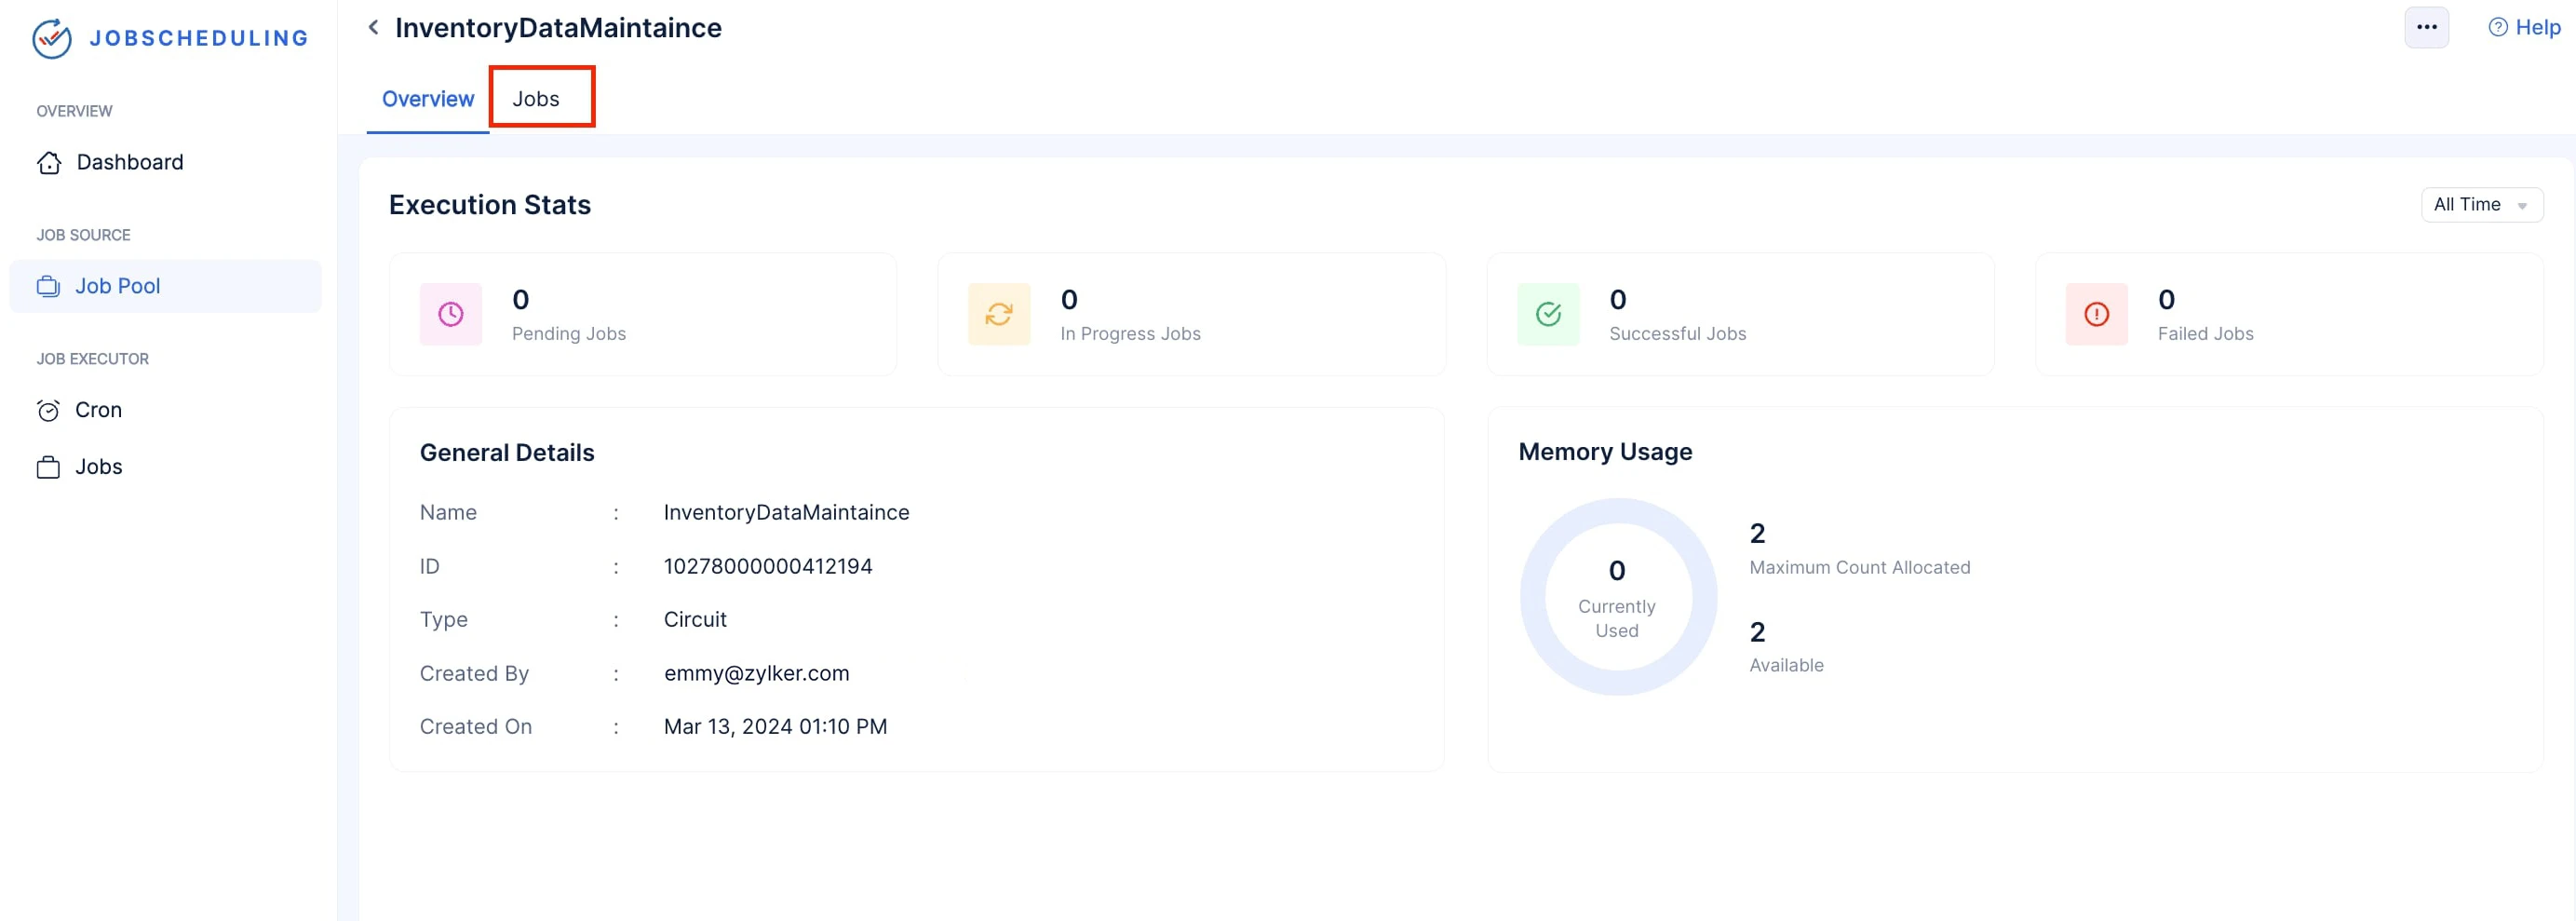
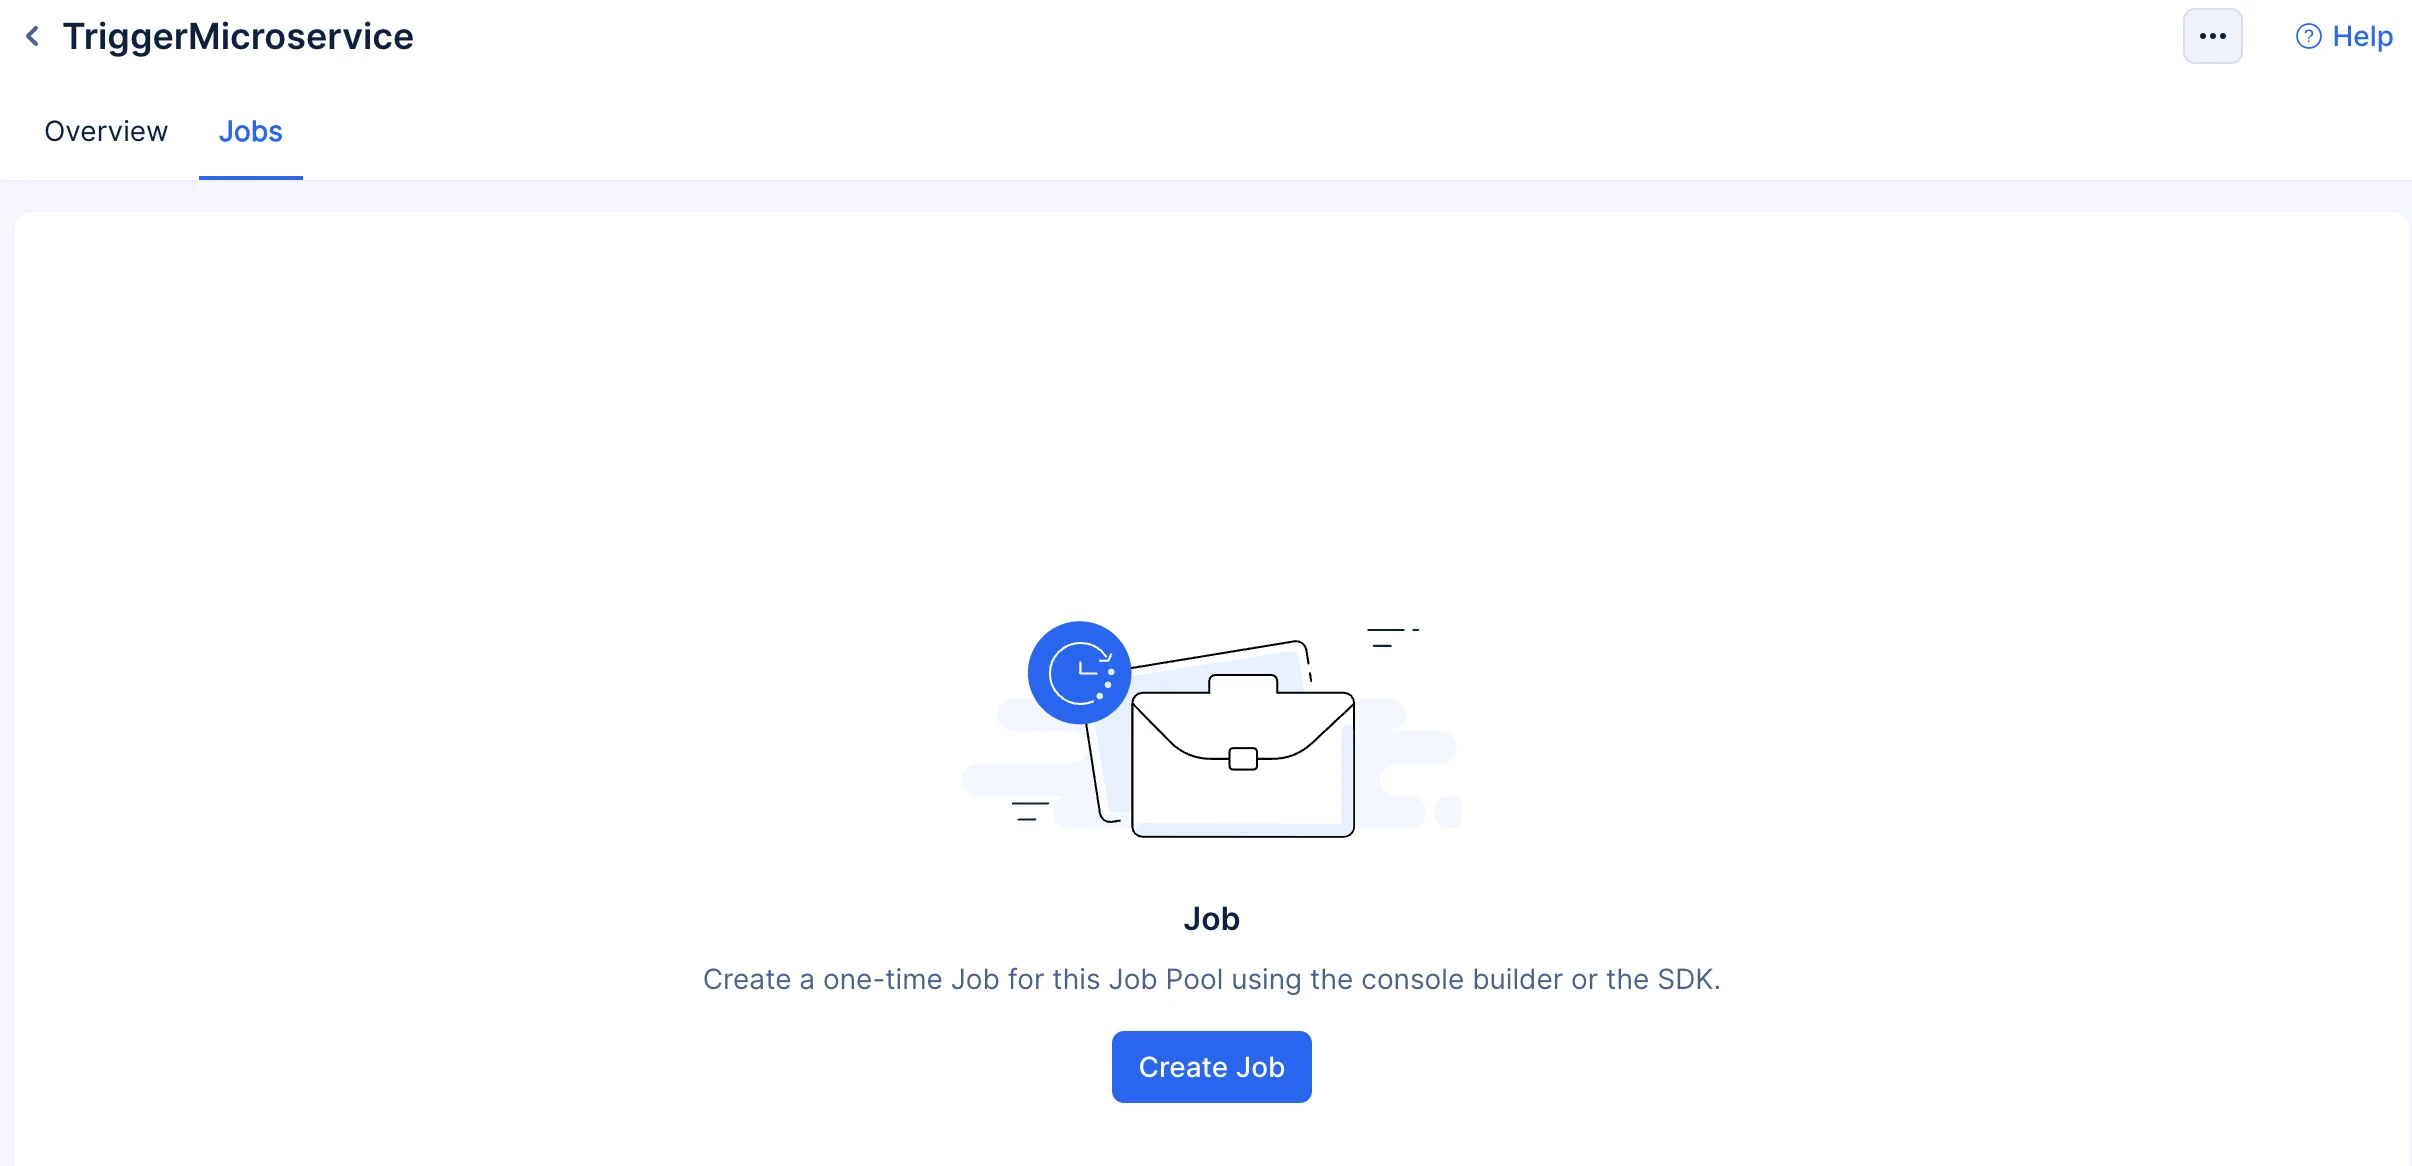
Click the Jobs tab.
-
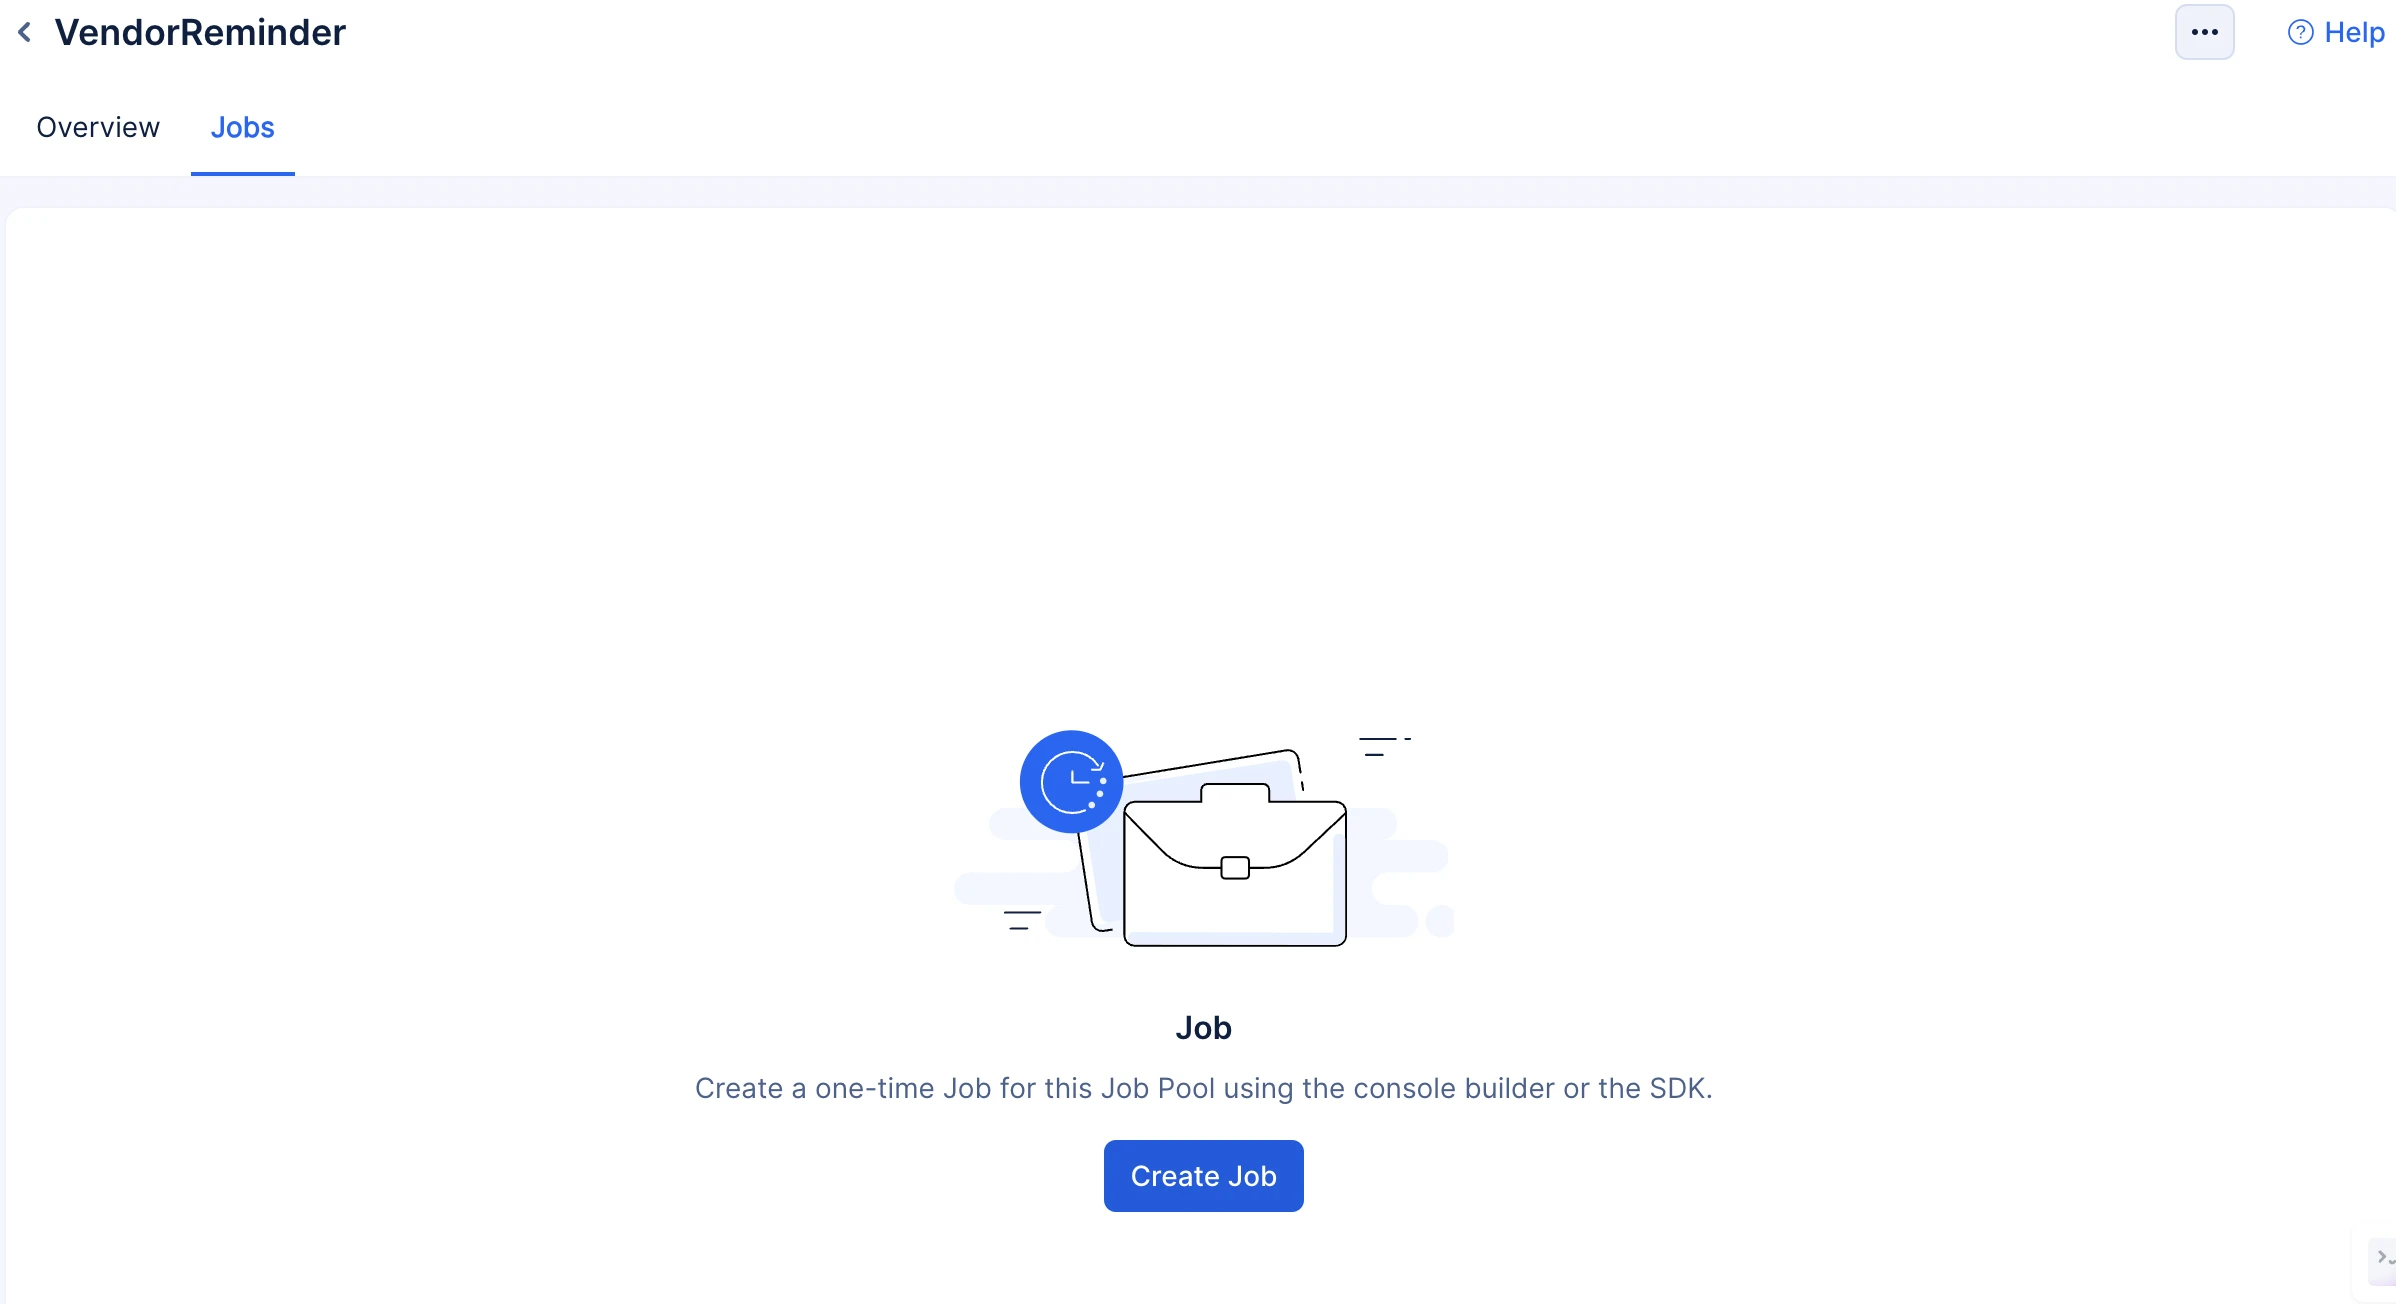
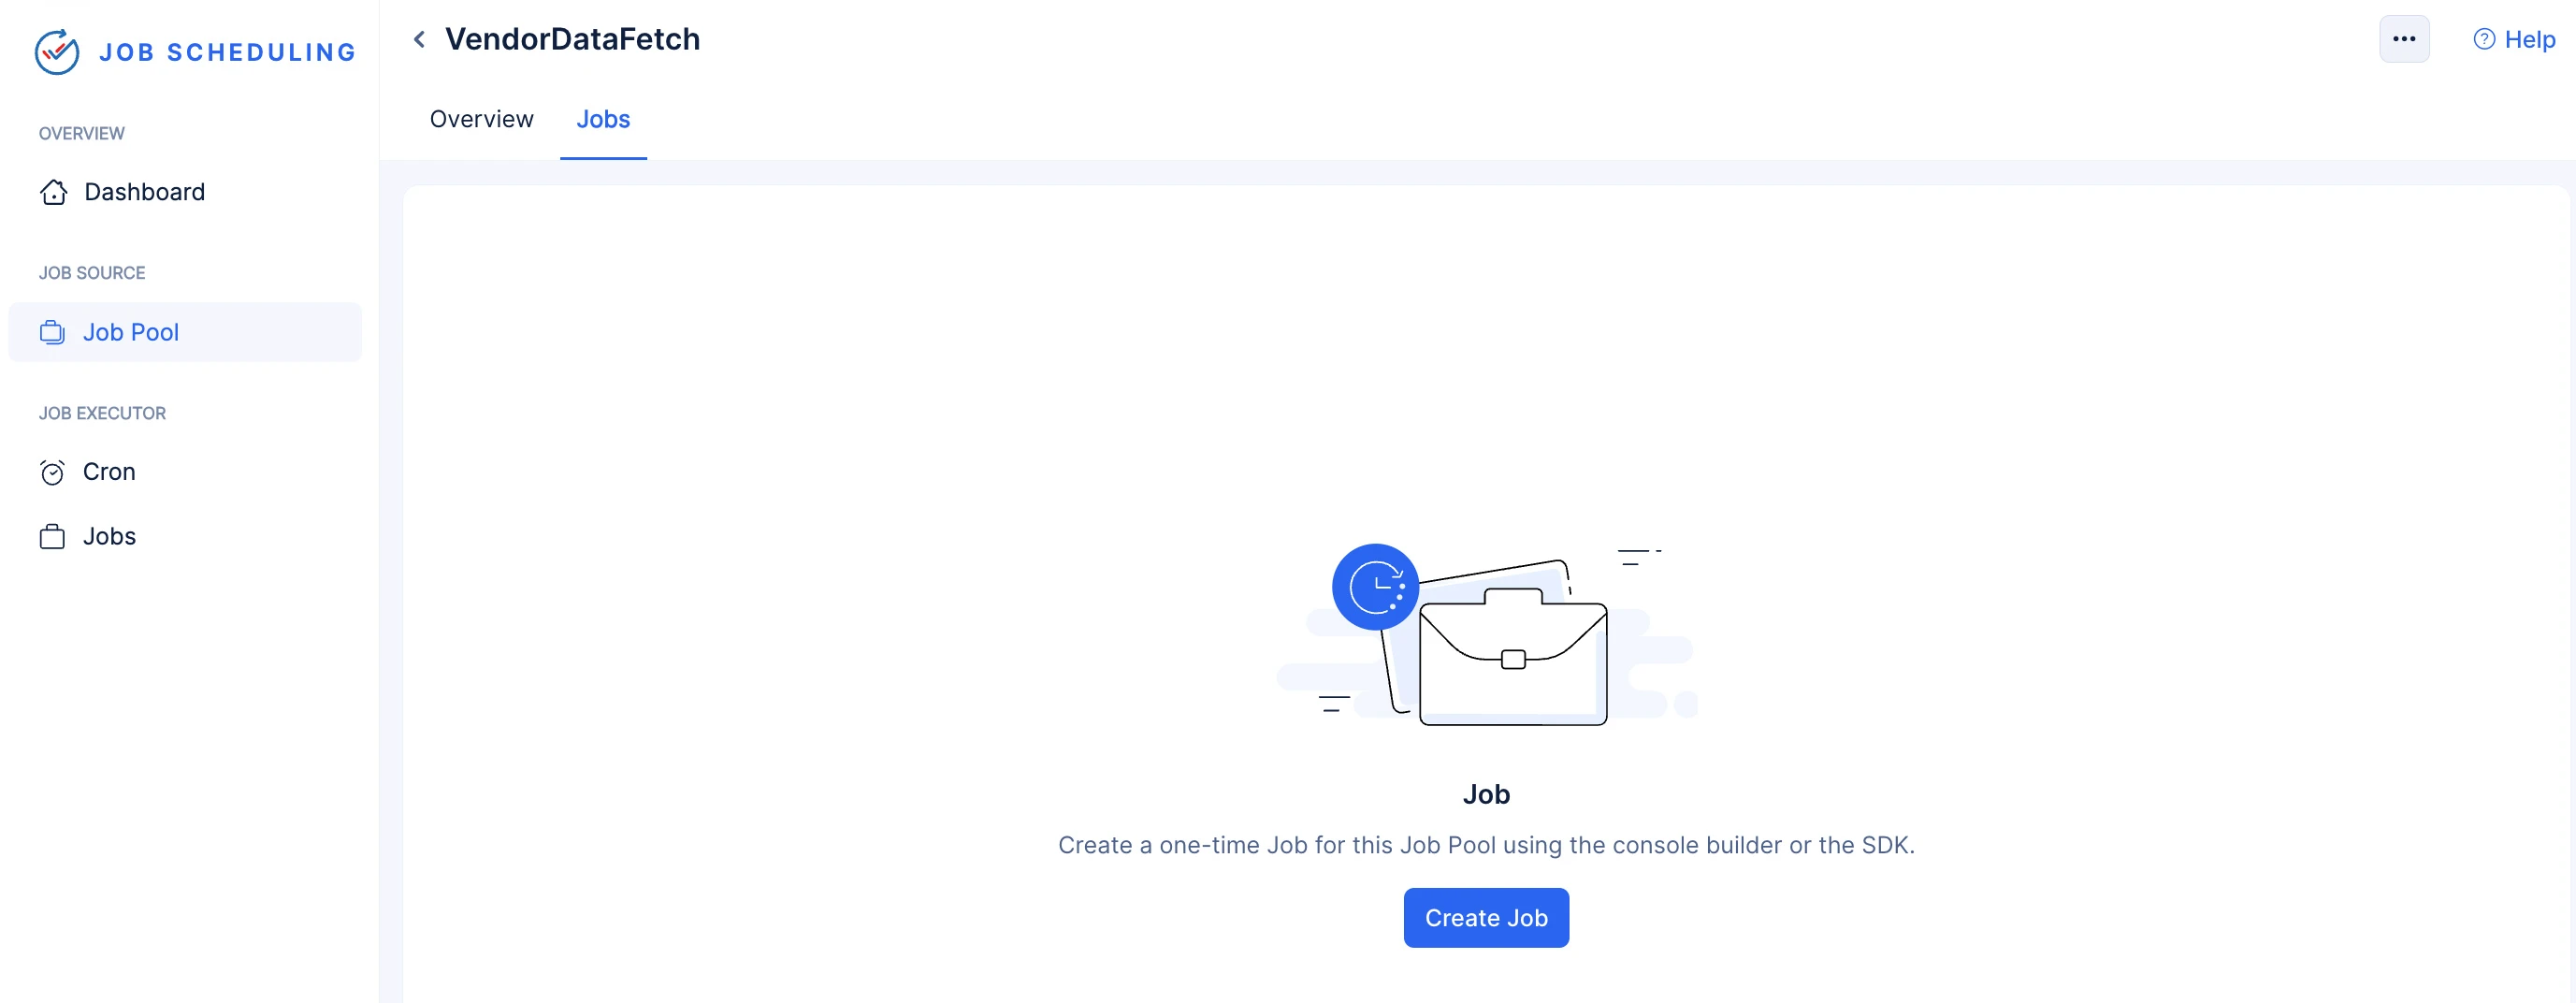
Click Create Job.
-
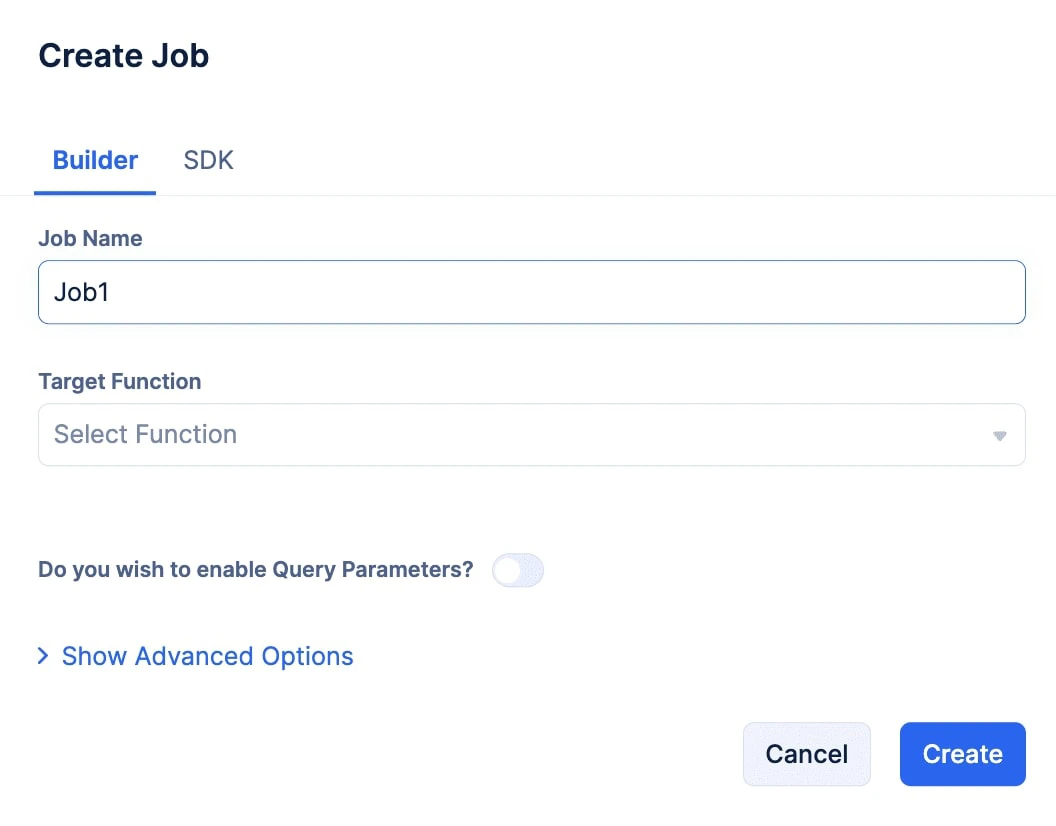
You can create and submit a job to a job pool directly in the console using the Builder option. You can also submit a job to the job pool through code using the Catalyst SDKs that are available in Java, Node.js and Python. The SDK snippets can also be copied from the console.
-
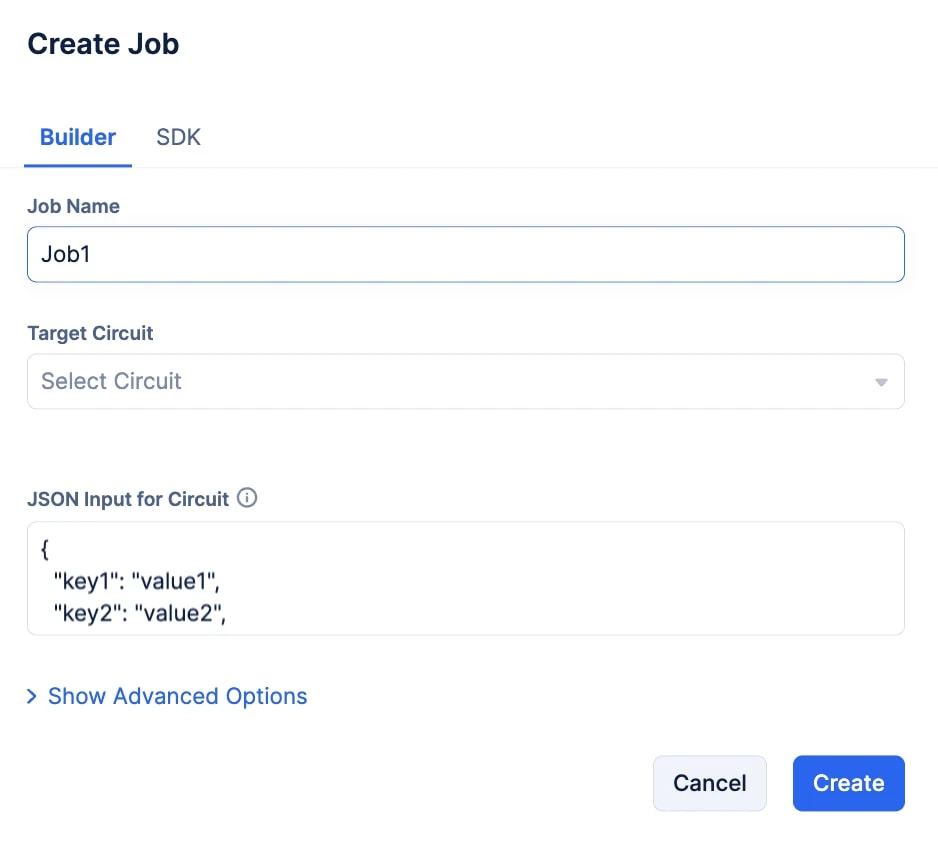
Provide a name for your job in the Job Name input field.
-
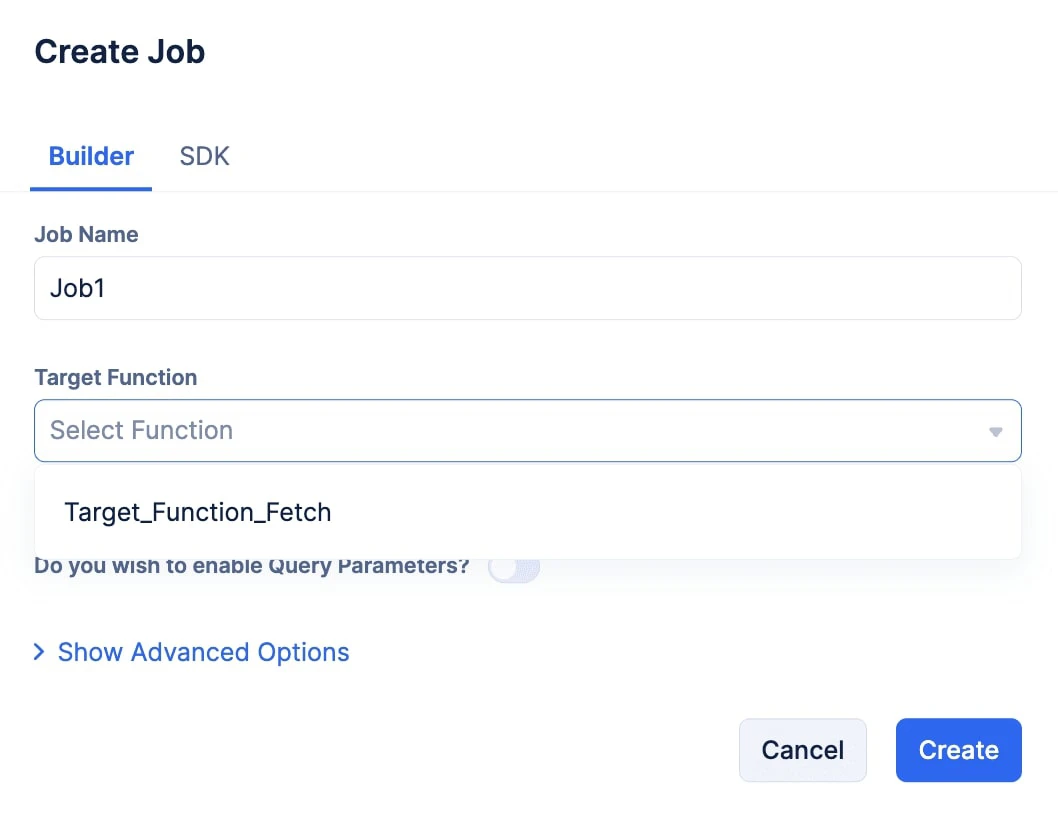
Select the required Job Function you wish to trigger from the Target Function drop-down.
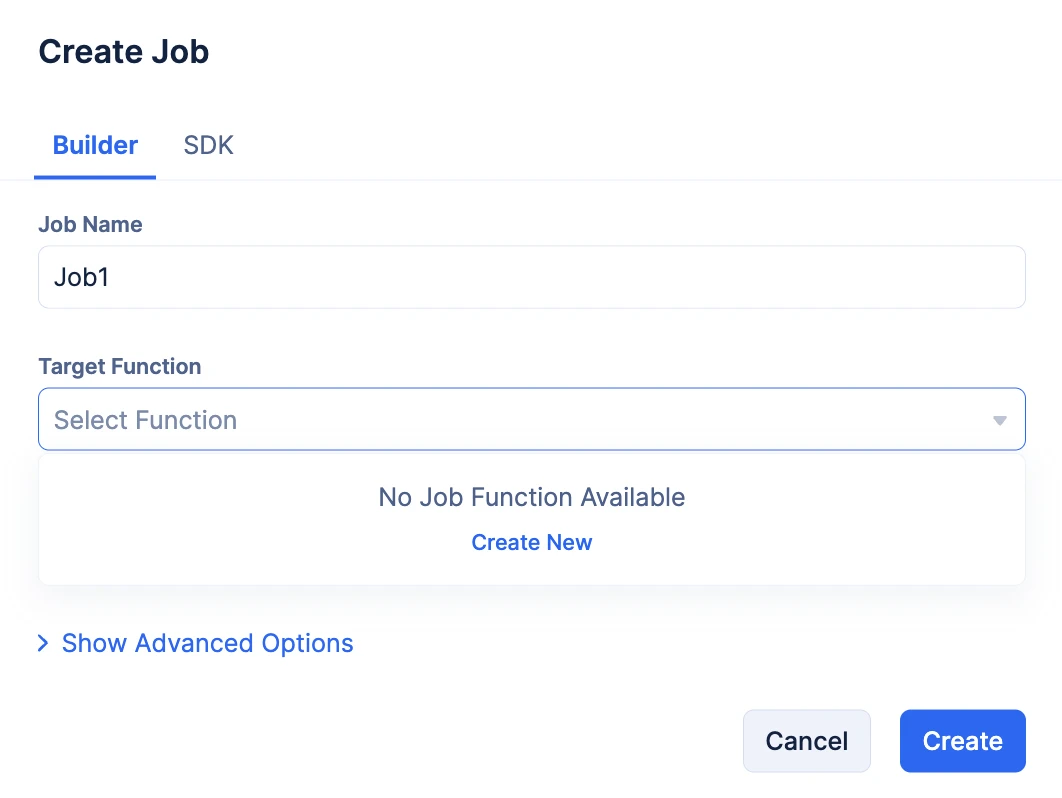
- If you have not created a Job Function, click Create New.
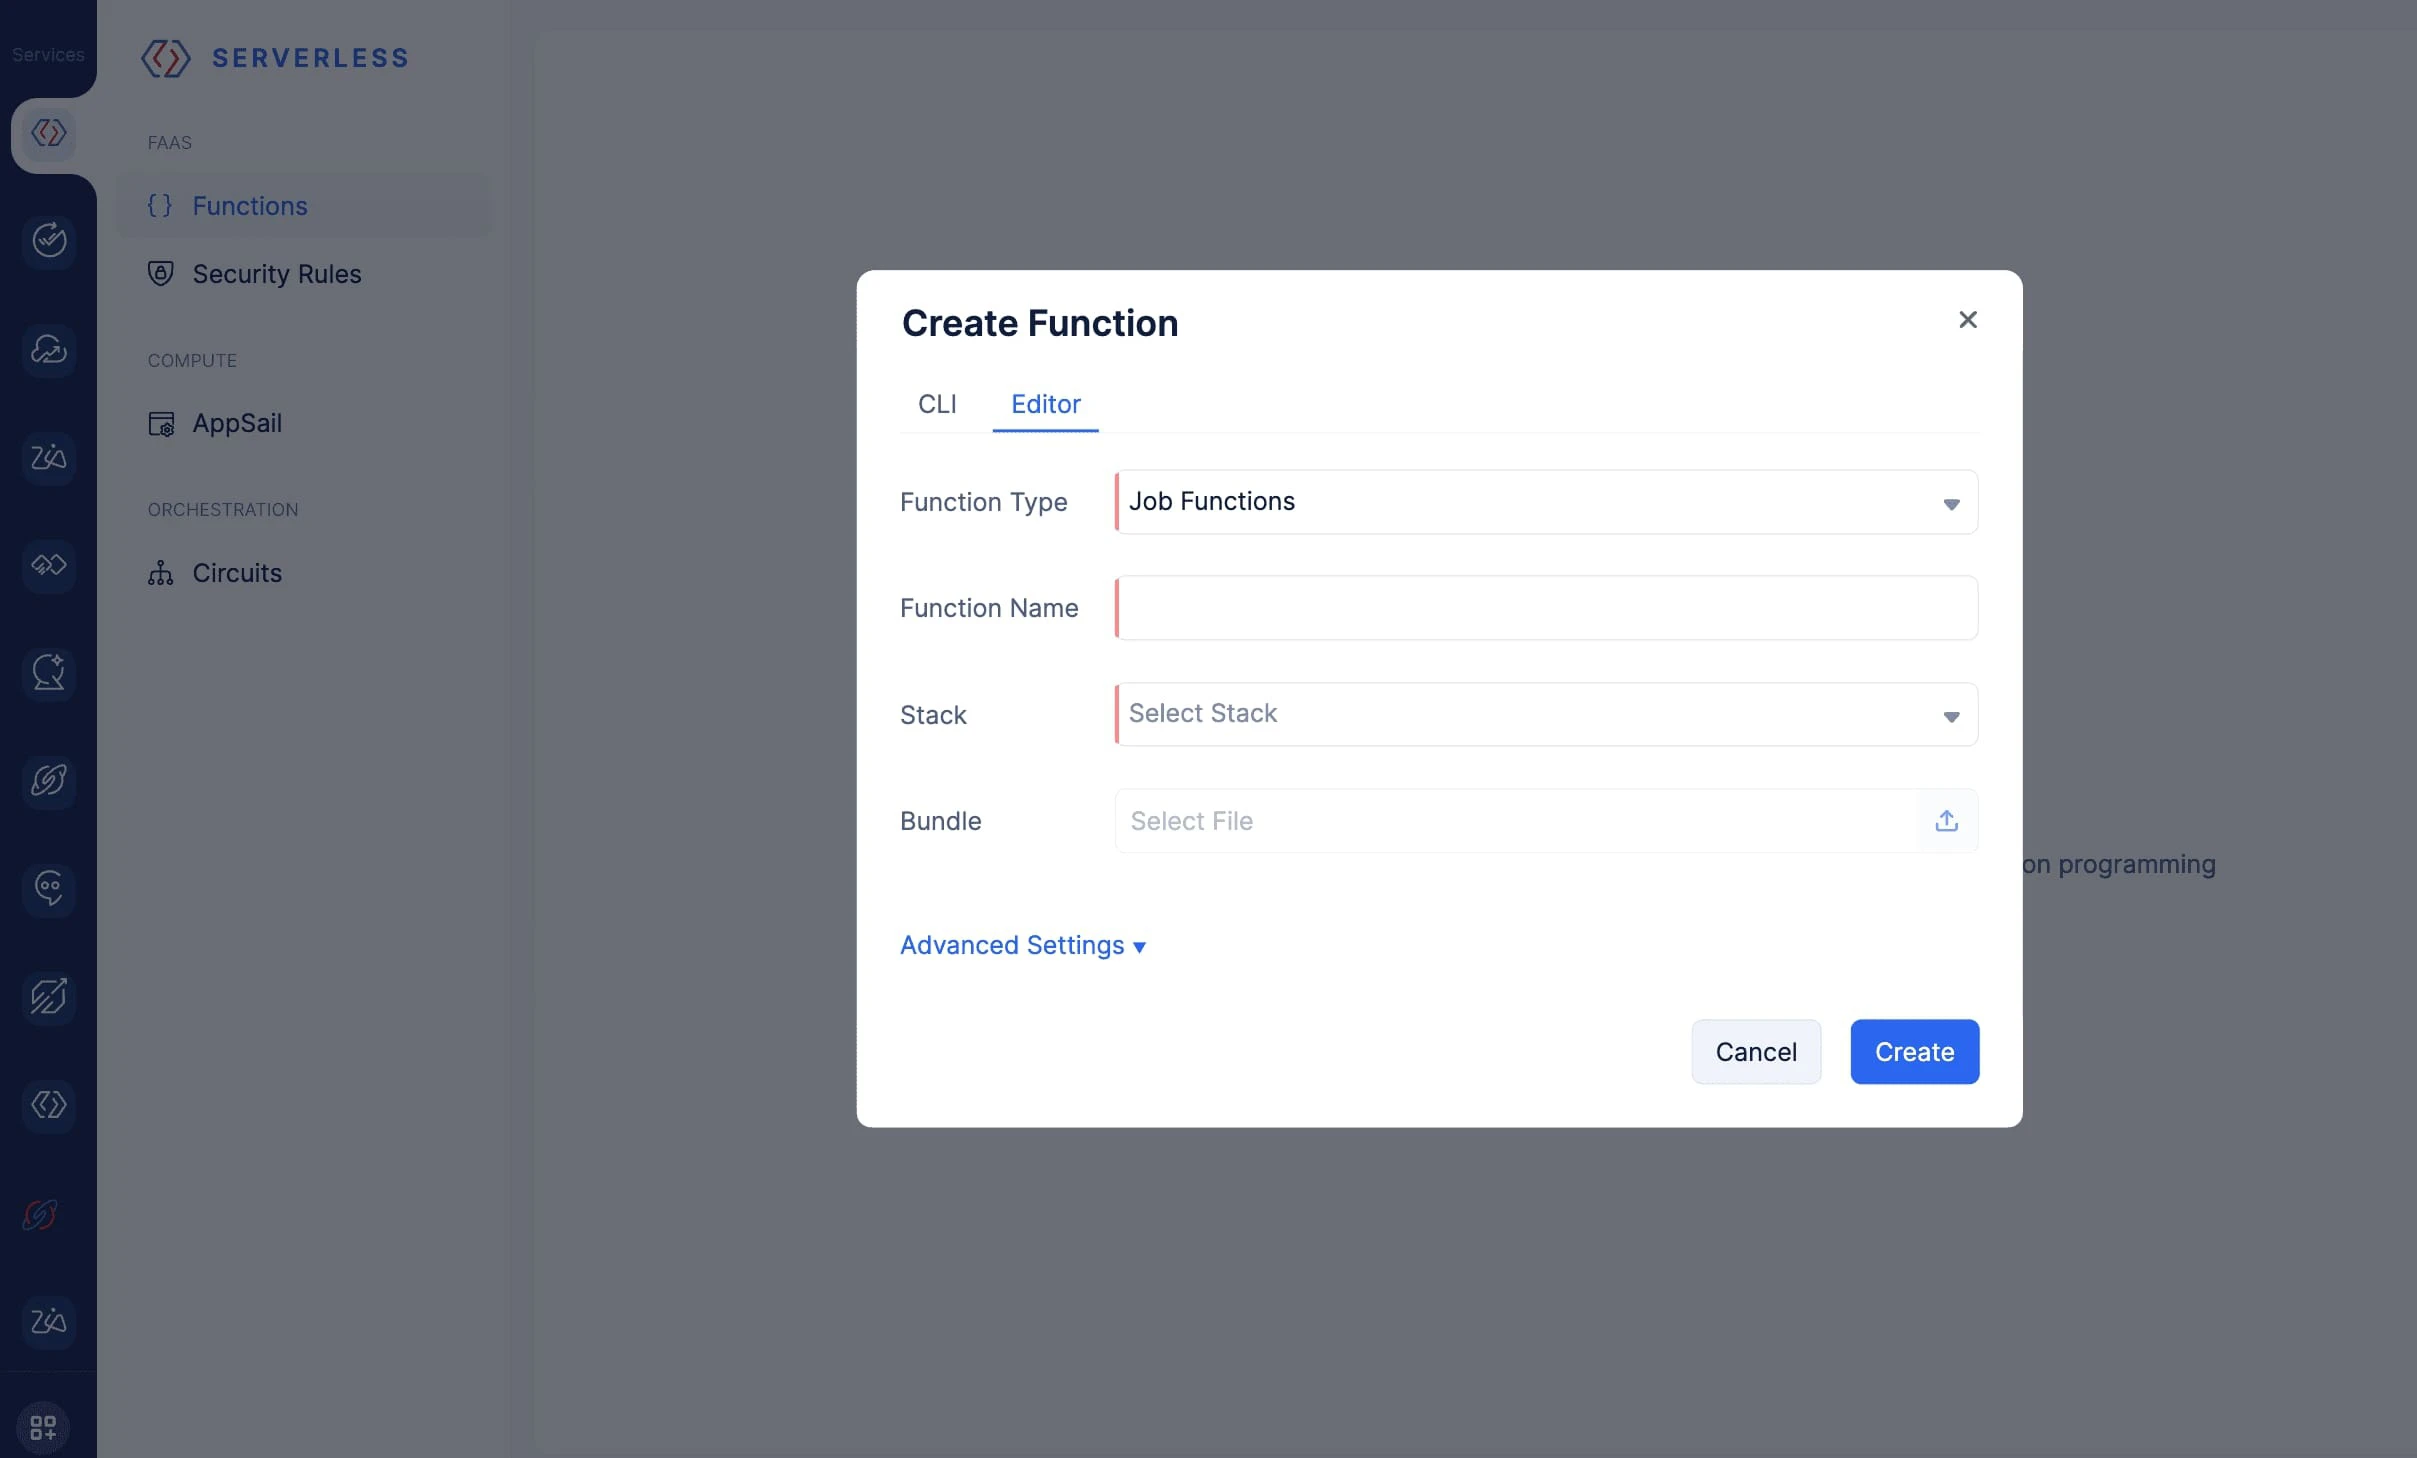
You will be directed to the Catalyst Serverless service to create your Job Function. Steps to create Job Functions using this section are available in this help section.
- Once you create your Job Function, navigate back to the Job Scheduling service and select it from the drop-down.
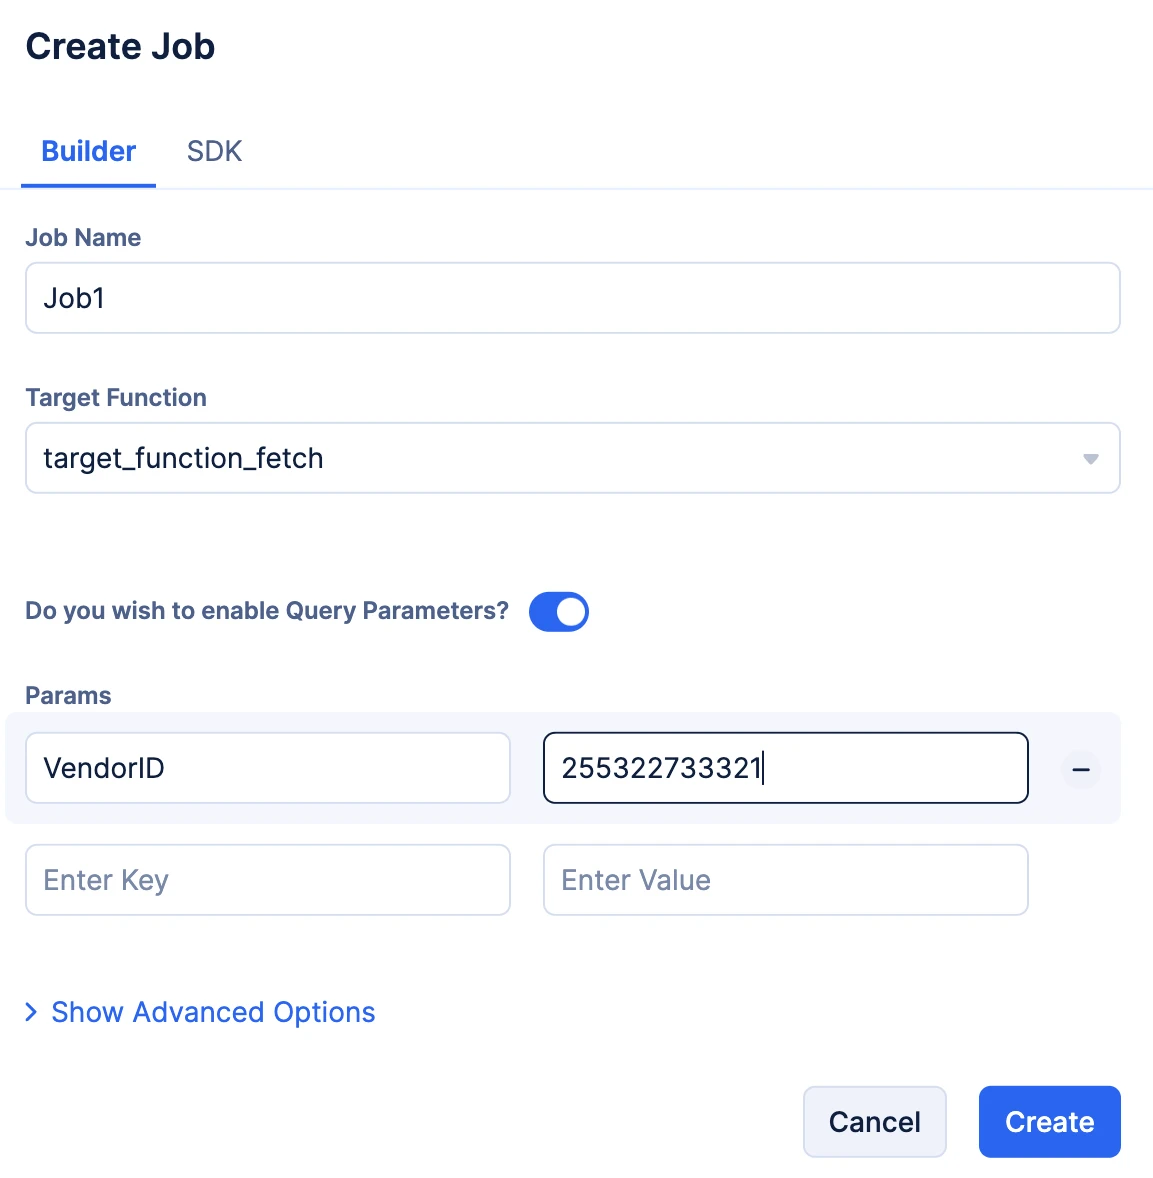
- You can also enable the toggle present in the pop up to pass Query Parameters to your Job Function when the job triggers the function.
-
Optionally, you can click the Show Advanced Options to provide resubmission instructions.

-
You can choose the number of retries you wish to attempt from the No. of Retries drop-down, and you can choose the time interval between each retry attempt using the Retry Interval drop-down.
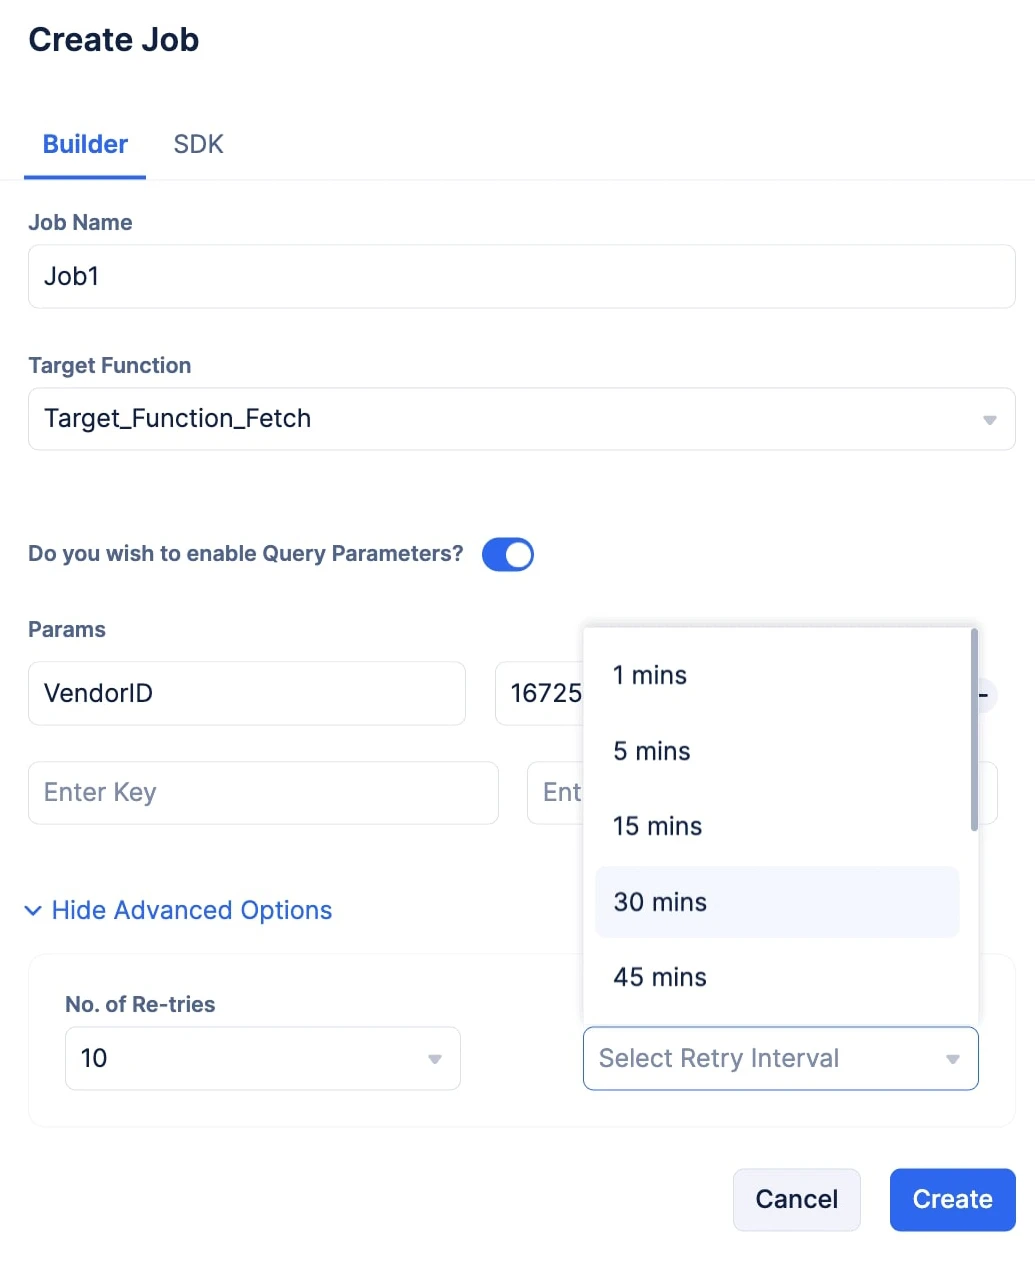
- Click Create
Once you click Create, the job will be immediately submitted to the job pool for execution. This makes the Builder option a great tool to test your job pool’s performance.
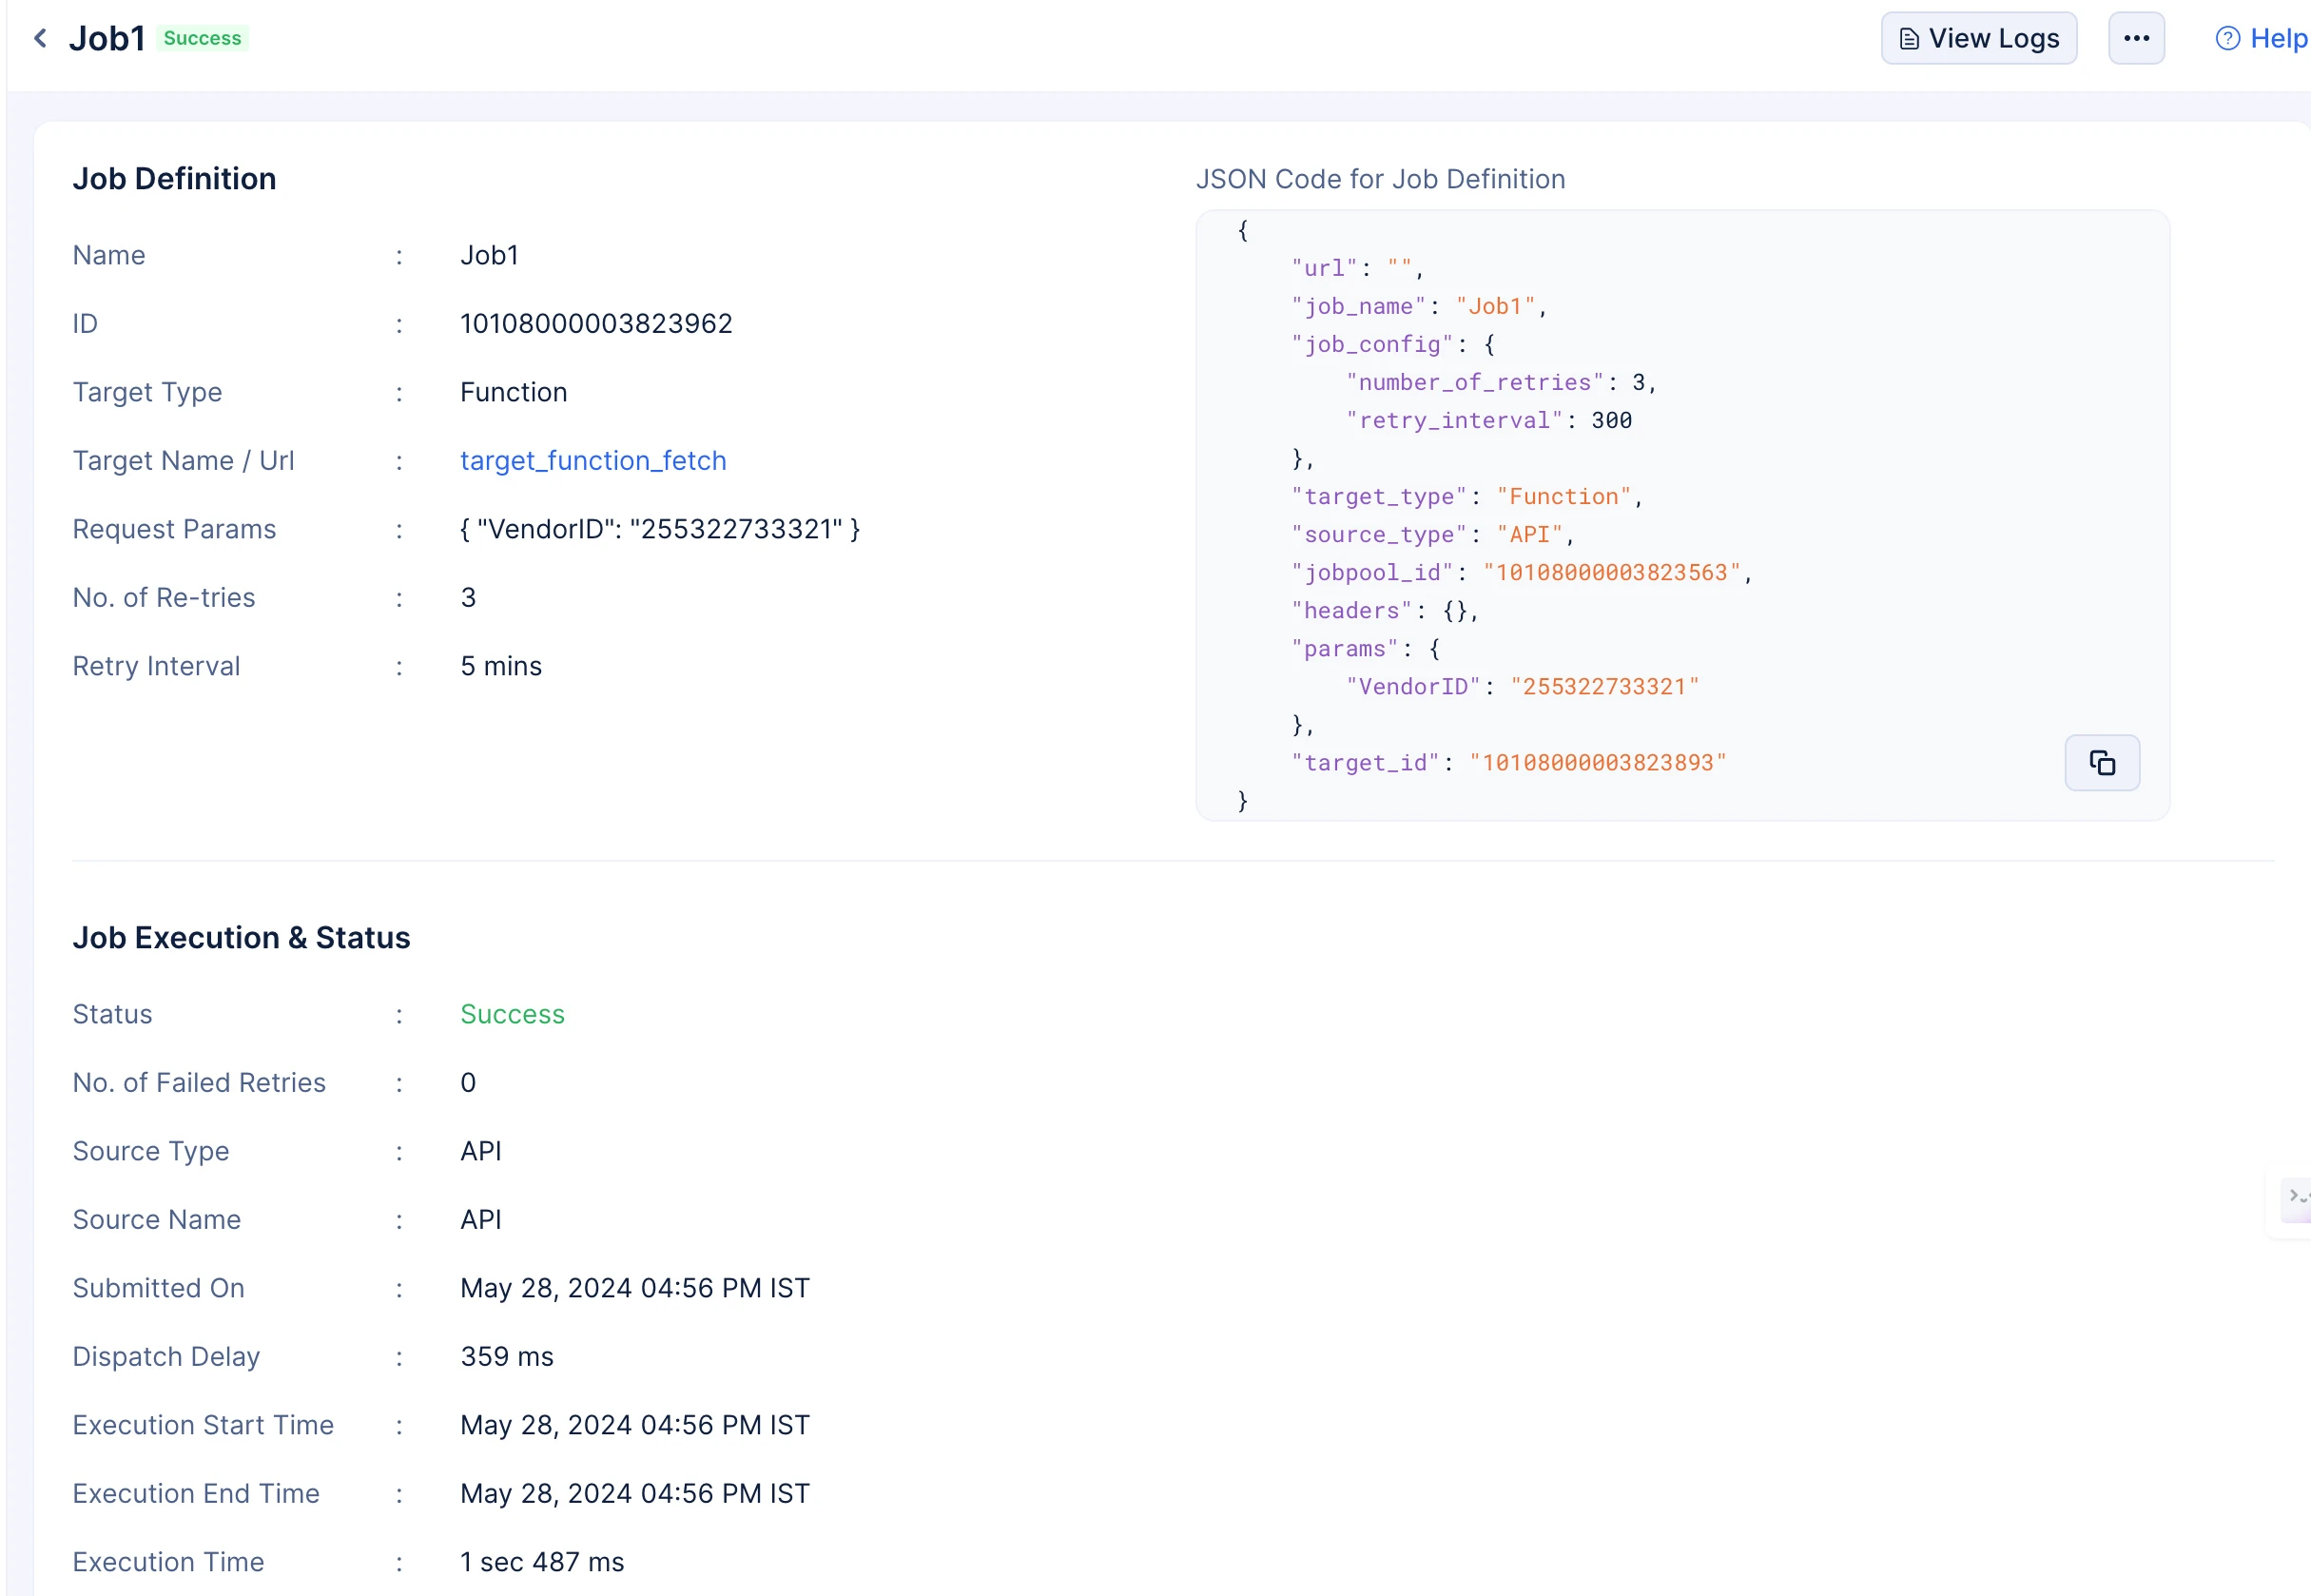
Once the job is submitted, you will be able to view all the general details of the submitted job in the Job Definition section. You will also be able to view the status of the Job Execution in the Job Execution & Status section.
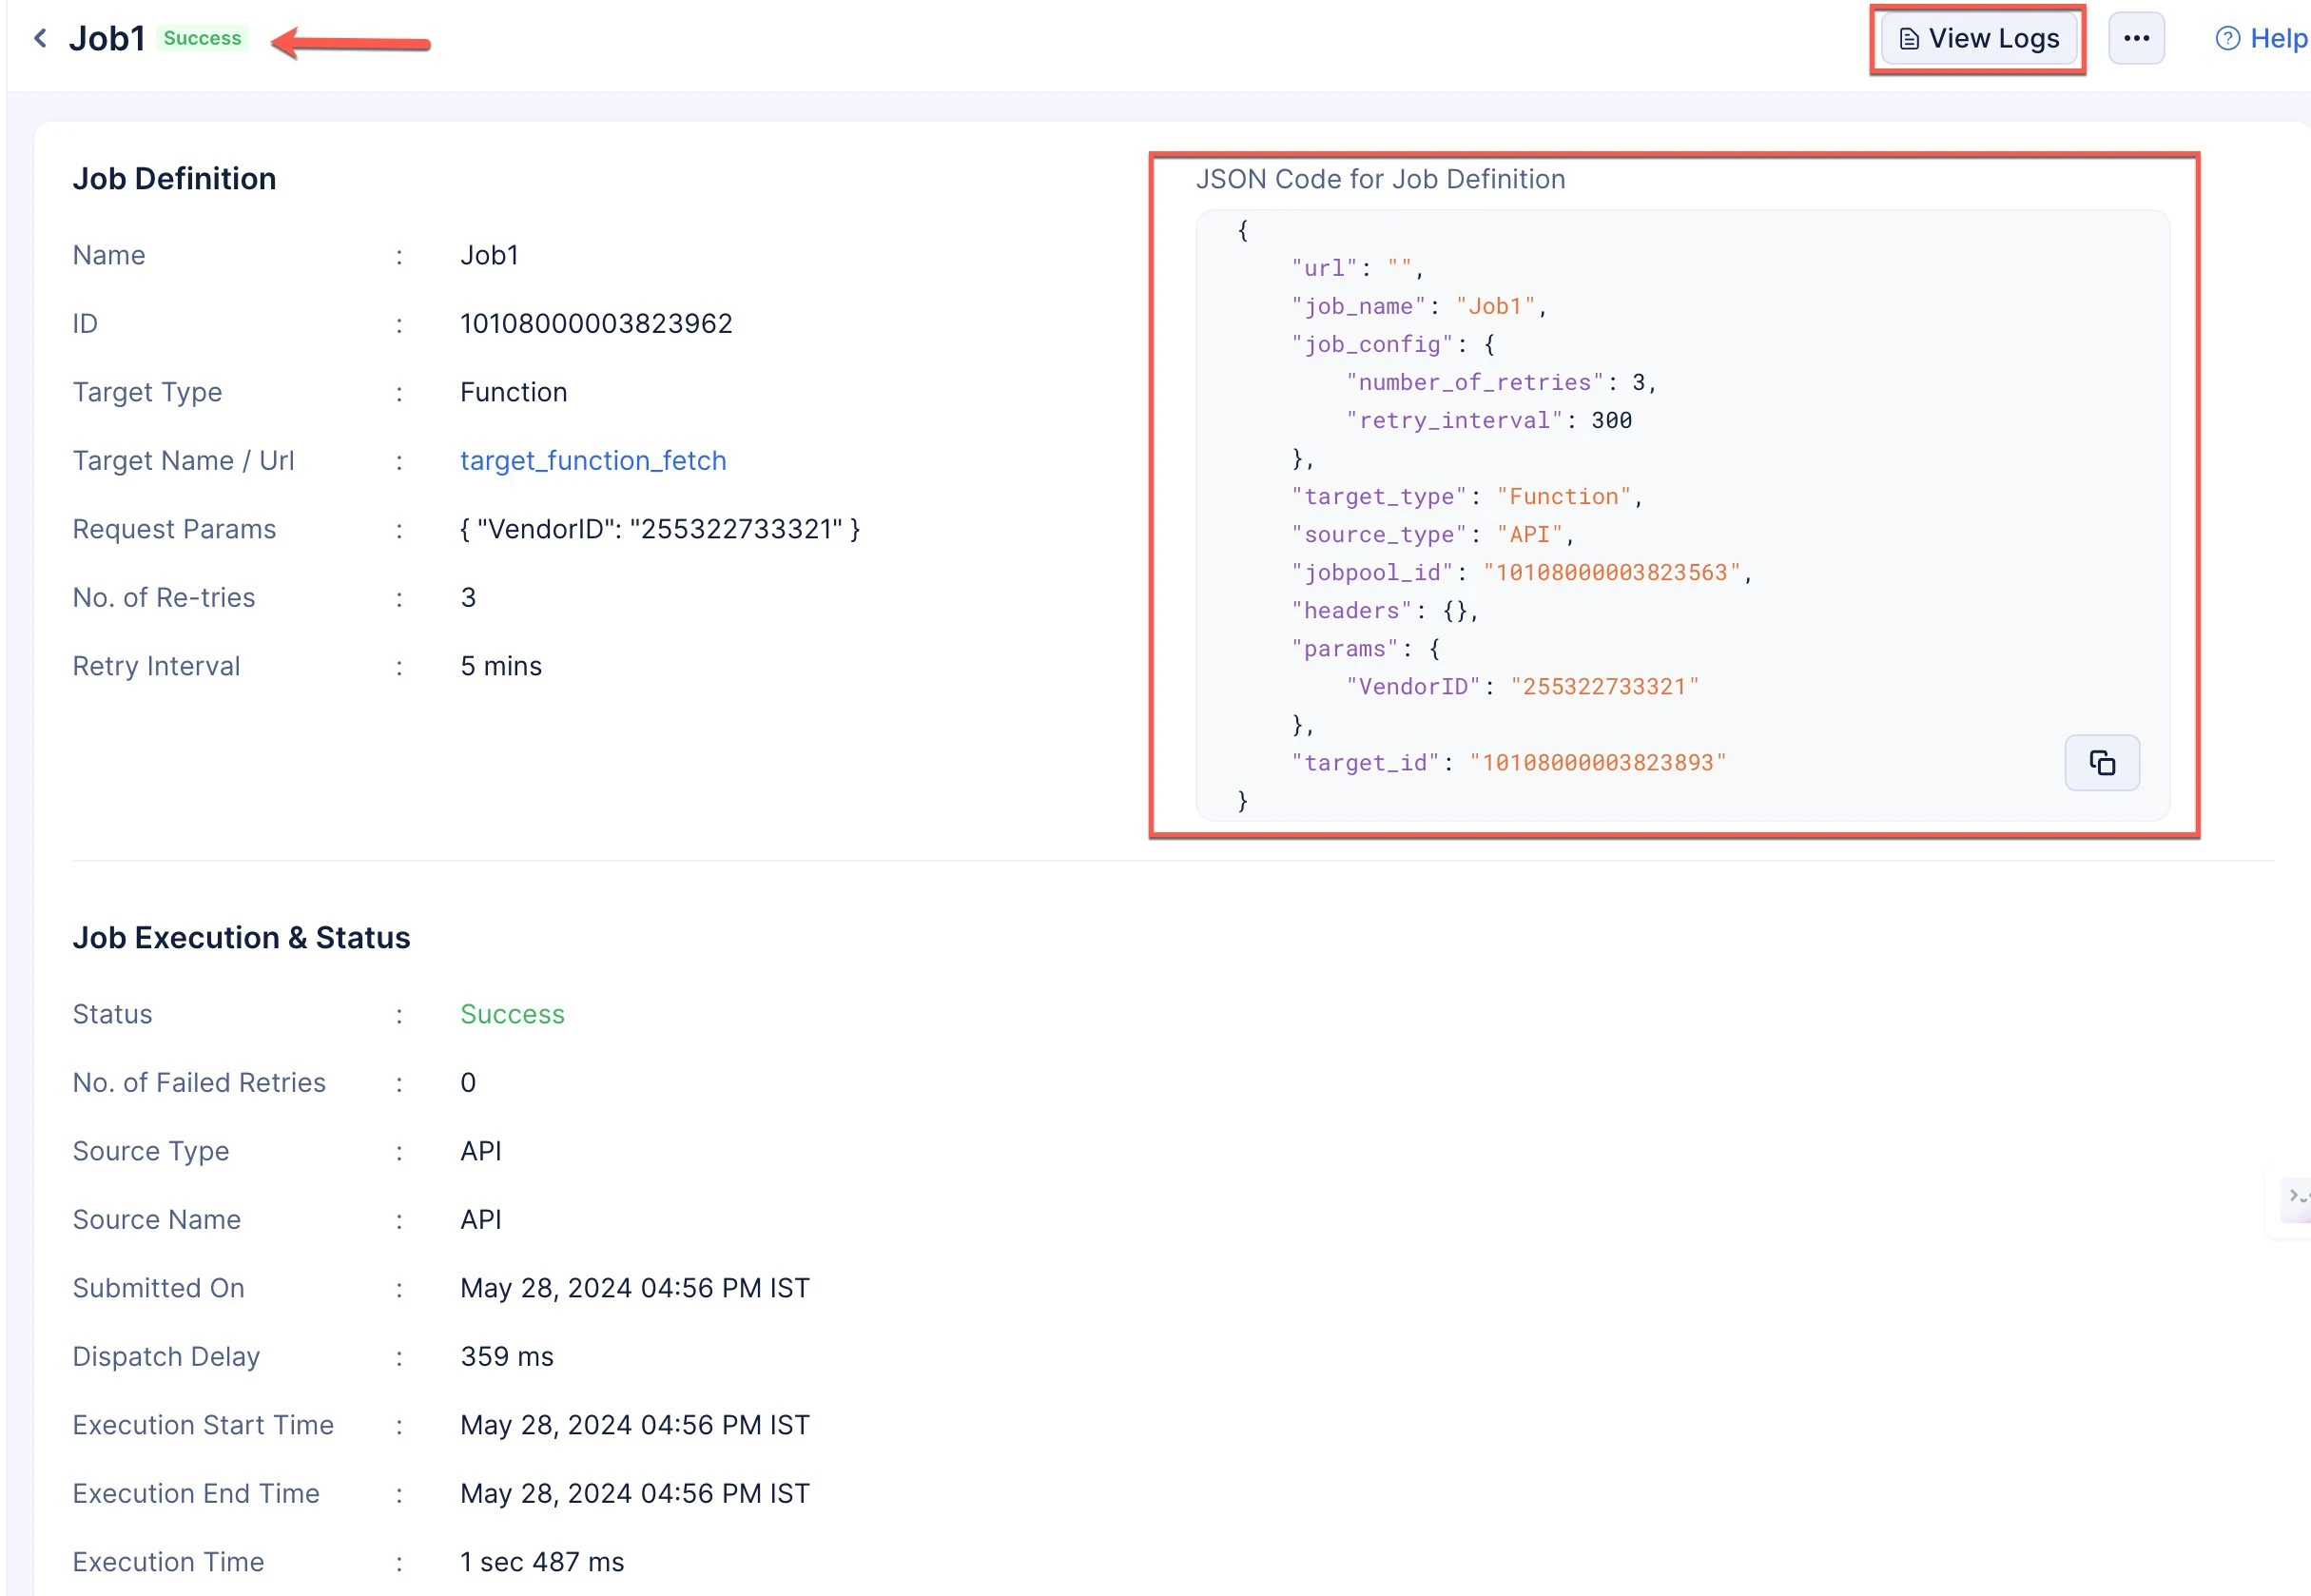
The execution status of the job will also be labeled at the top next to the Job Name. You will also be provided with the Job Definition in a JSON code format that you can copy and use to submit a new job with the same specifications. You can also visit the logs of the execution generated in DevOps’s Logs component by clicking the View Logs button.
- Click the SDK tab.
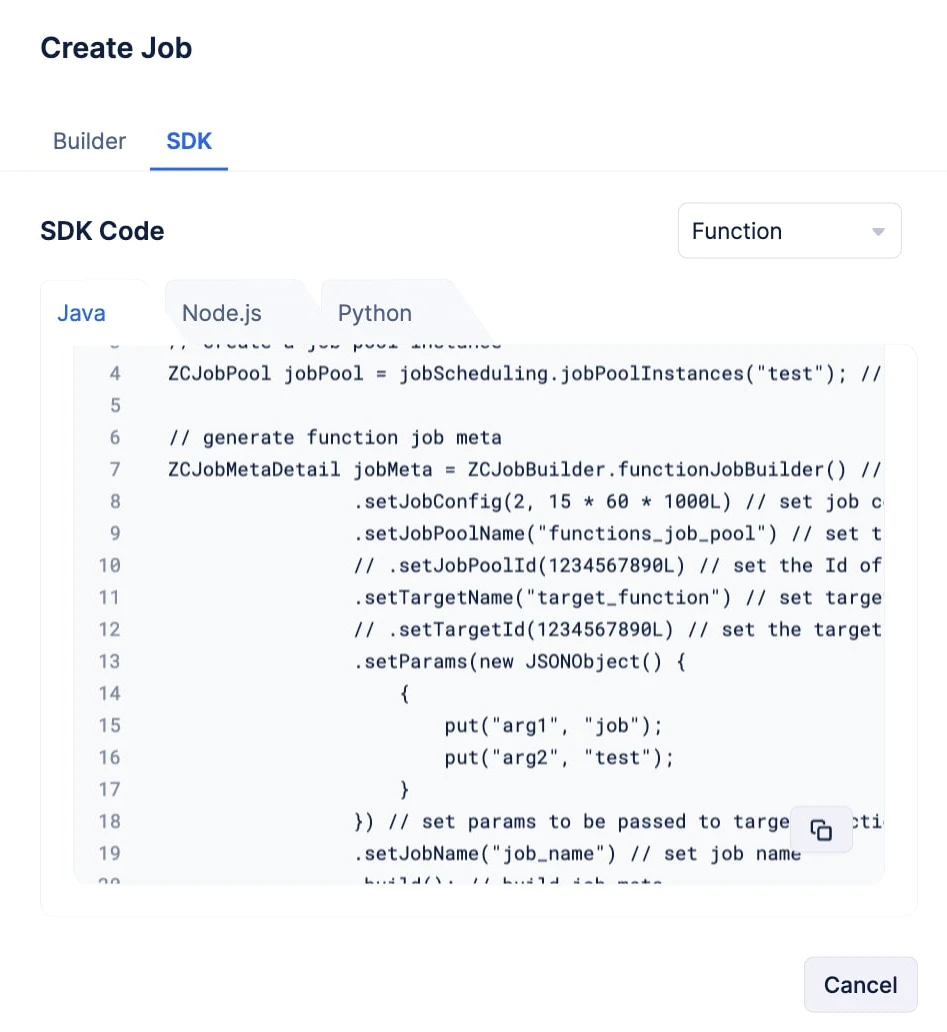
Choose your preferred programming language by navigating the tabs and copy the required code snippet, using the copy-button.
// FUNCTION JOB
// get job scheduling instance
ZCJobScheduling jobScheduling = ZCJobScheduling.getInstance();
ZCJobpool jobpool = jobScheduling.jobpoolInstance(“test”); // create a job pool instance for the function job pool named test
// generate function job meta
ZCJobMetaDetail jobMeta = ZCJobBuilder.functionJobBuilder() // get function job builder
.setJobConfig(2, 15 * 60 * 1000L) // set job config - job retries => 2 retries in 15 mins (optional)
.setTargetName(“target_function”) // set target function’s name (optional) (either TargetName or TargetId is mandatory)
// .setTargetId(1234567890L) // set the target function’s Id (optional) (either TargetName or TargetId is mandatory)
.setParams(new JSONObject() {
{
put(“arg1”, “job”);
put(“arg2”, “test”);
}
}) // set params to be passed to target function (optional)
.setJobName(“job_name”) // set job name
.build(); // build job meta
// submit function job
ZCJobDetails functionJob = jobpool.submitJob(jobMeta);
// FUNCTION JOB
const jobScheduling = app.jobScheduling(); // create job scheduling instance
const jobpool = jobScheduling.jobpool({ name: ’test’ }); // create job pool instance for the function job pool named test
// create function job
const functionJob = await jobpool.submitJob({
job_name: ’test_job’, // set a name for the job
target_type: ‘Function’, // set the target type as Function for function jobs
target_name: ’target_function’, // set the target function’s name (optional) (either target_id or target_name is mandatory)
// target_id: ‘123467890’, // set the target functions’s Id (optional) (either target_id or target_name is mandatory)
params: {
arg1: ’test’,
arg2: ‘job’
}, // set params to be passed to target function (optional)
job_config: {
number_of_retries: 2, // set the number of retries
retry_interval: 15 * 60 * 1000 + ’’ // set the retry  interval
} // set job config - job retries => 2 retries in 15 mins (optional)
});
job_scheduling = app.job_scheduling() # create job scheduling instance
jobpool = job_scheduling.jobpool(jobpool_name=“test”) # create jobpool instance for the function jobpool named test
# create function job

function_job = jobpool.submit_job({
‘job_name’: ’test_job’, # set a name for the job
’target_type’: ‘Function’, # set the target type as Function for function jobs
’target_name’: ’target_function’, # set the target function’s name (optional) (either target_id or target_name is mandatory)
# ’target_id’: ‘123467890’, # set the target functions’s Id (optional) (either target_id or target_name is mandatory)
‘params’: {
‘arg1’: ’test’,
‘arg2’: ‘job’
}, # set params to be passed to target function (optional)
‘job_config’: {
’number_of_retries’: 2, # set the number of retries
‘retry_interval’: 15 * 60 * 1000 # set the retry interval
} # set job config - job retries => 2 retries in 15 mins (optional)
})
These SDKs will also be available in these sections:
- Paste the copied code in your code file and configure the job according to your required logic.
- The job will be submitted to the job pool during run time.
Submit an Instant Job to the Webhook Job Pool
-
Choose the required job pool from the Job Pool section.
-
Click the Jobs tab.
-
Click Create Job.
-
You can create and submit a job to a job pool directly in the console using the Builder option. You can also submit a job to the job pool through code using the Catalyst SDKs that are available in Java, Node.js and Python. The SDK snippets can also be copied from the console.
-
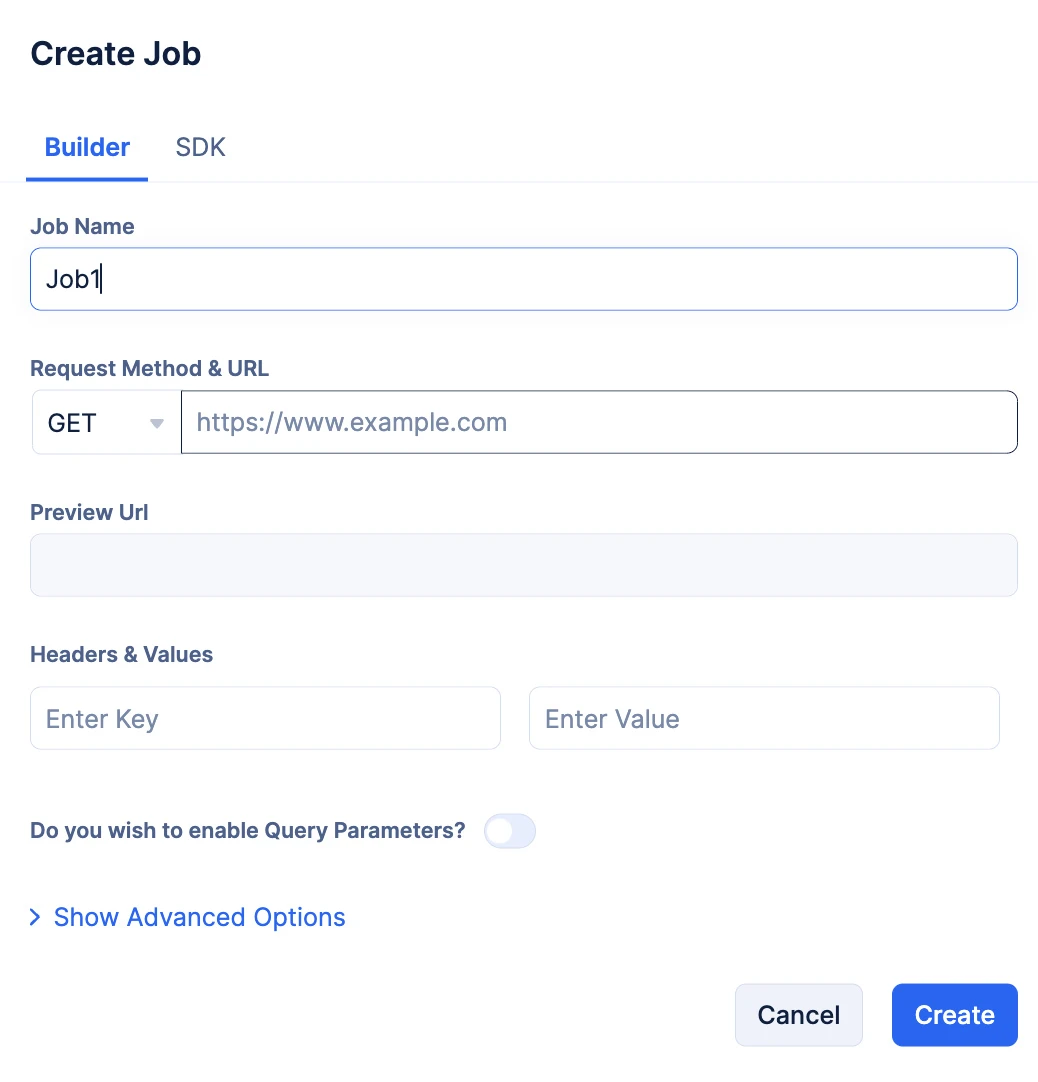
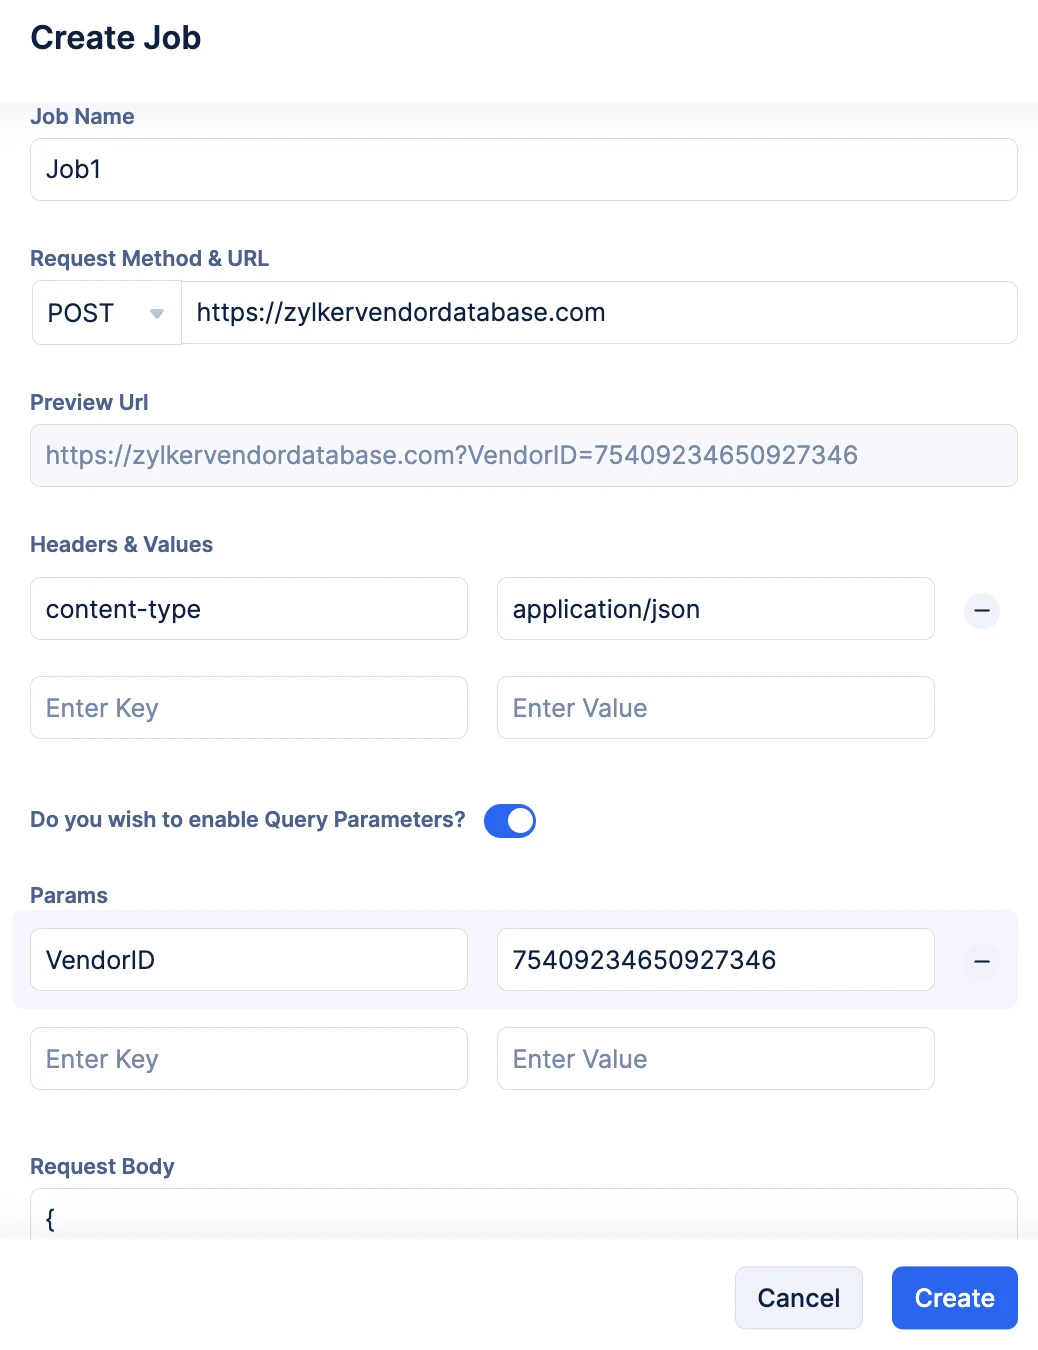
Provide a name for your job in the Job Name input field.
-
Enter the complete URL of the webhook you wish to trigger in the input field and select the Request Method from the drop-down.
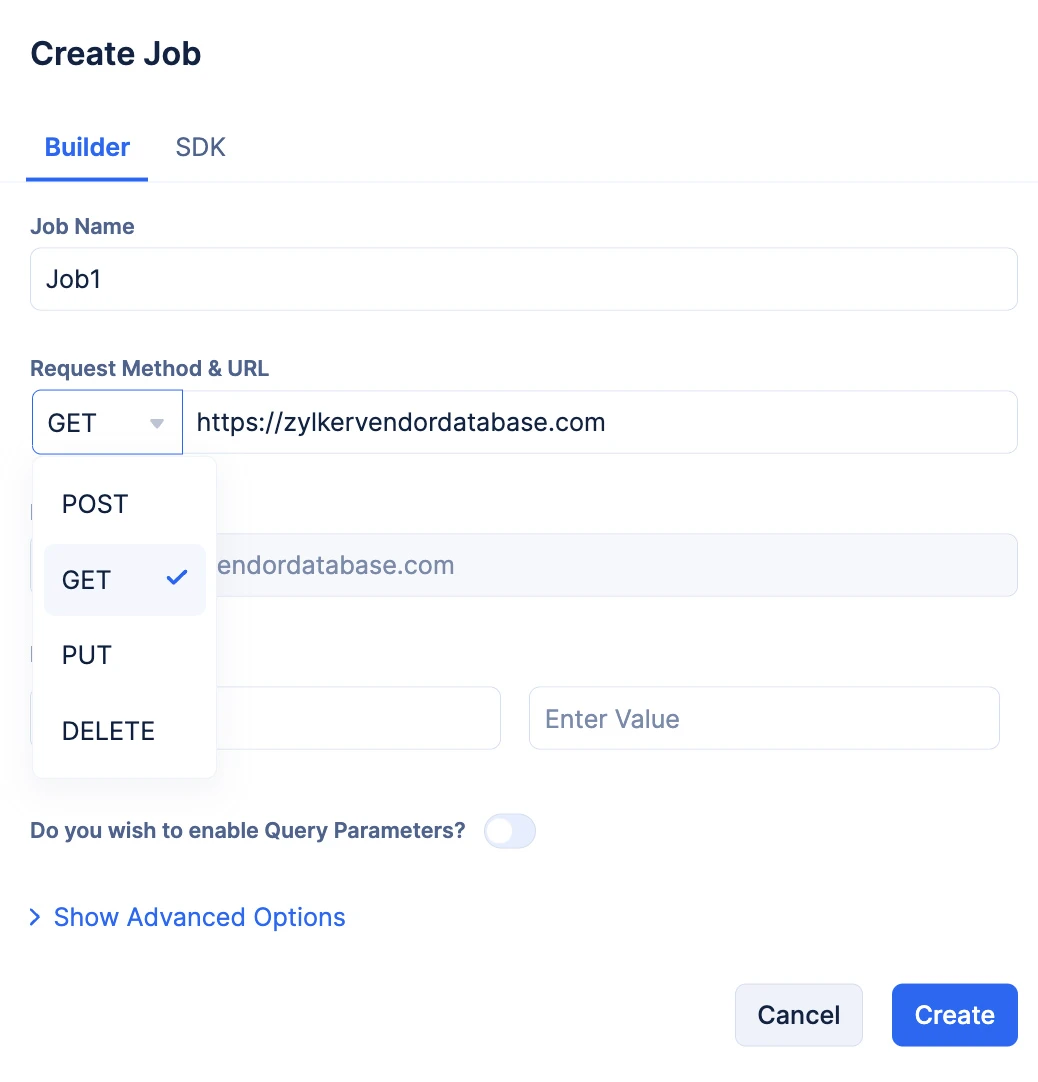
The URL input field and the Preview URL will be populated automatically once you input the URL.
Note:
-
It is vital you enter the complete URL of the webhook you are required to trigger.
-
You can trigger any third-party URL using this job pool.
- You can provide Headers & Value in a key-value pair format. You can also provide Params in a key-value pair format by enabling the Query Parameters toggle.
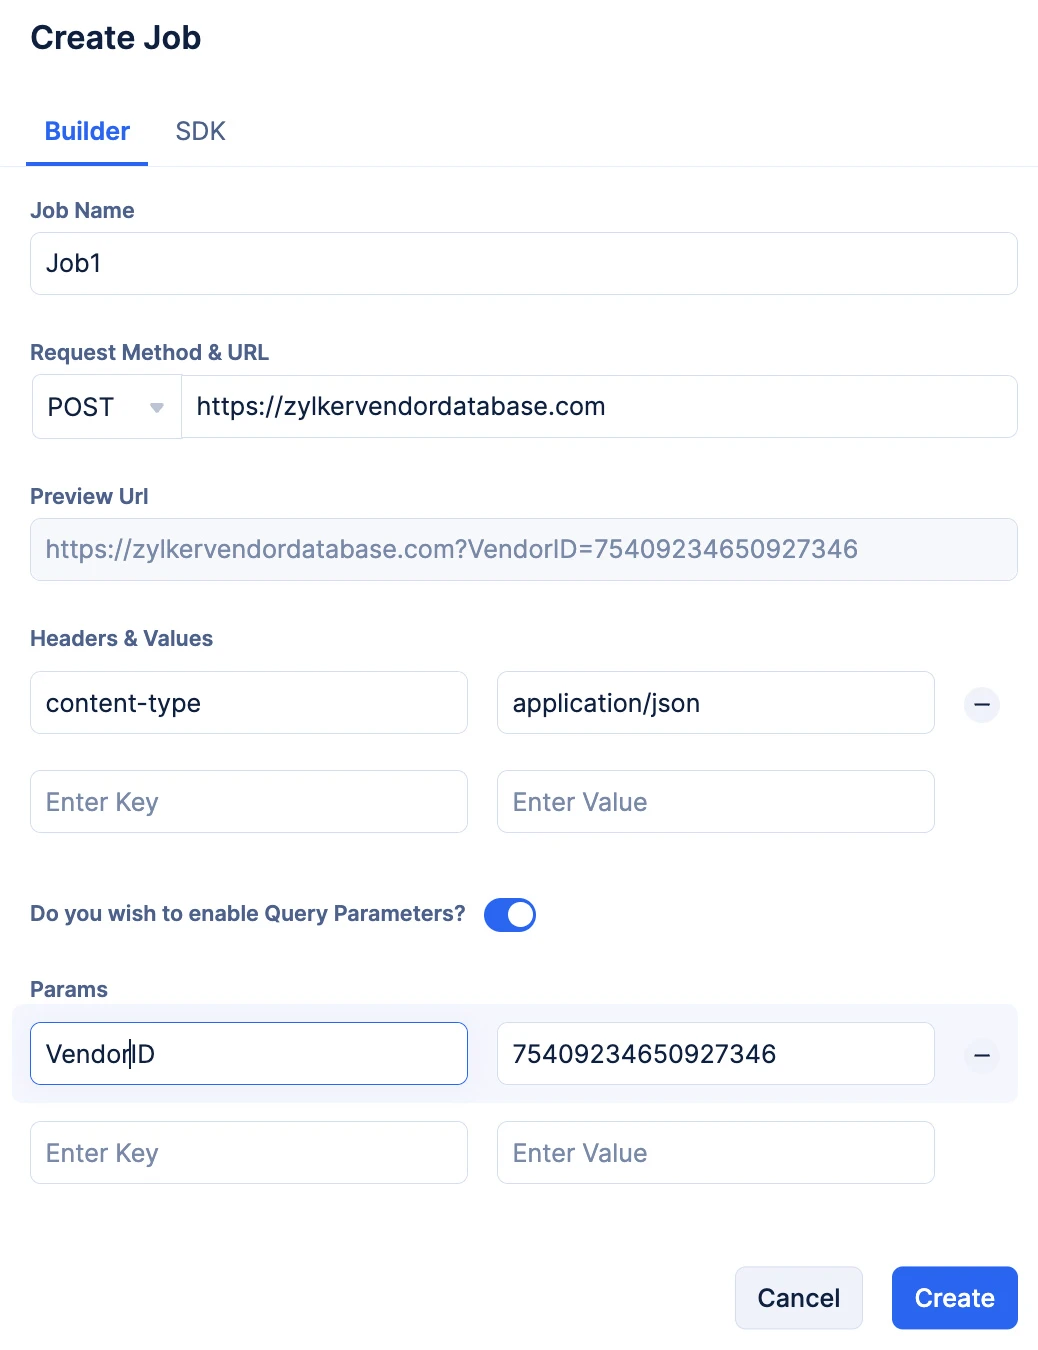
You can verify your Query Params, as the Preview URL section gets populated automatically when you input them.
-
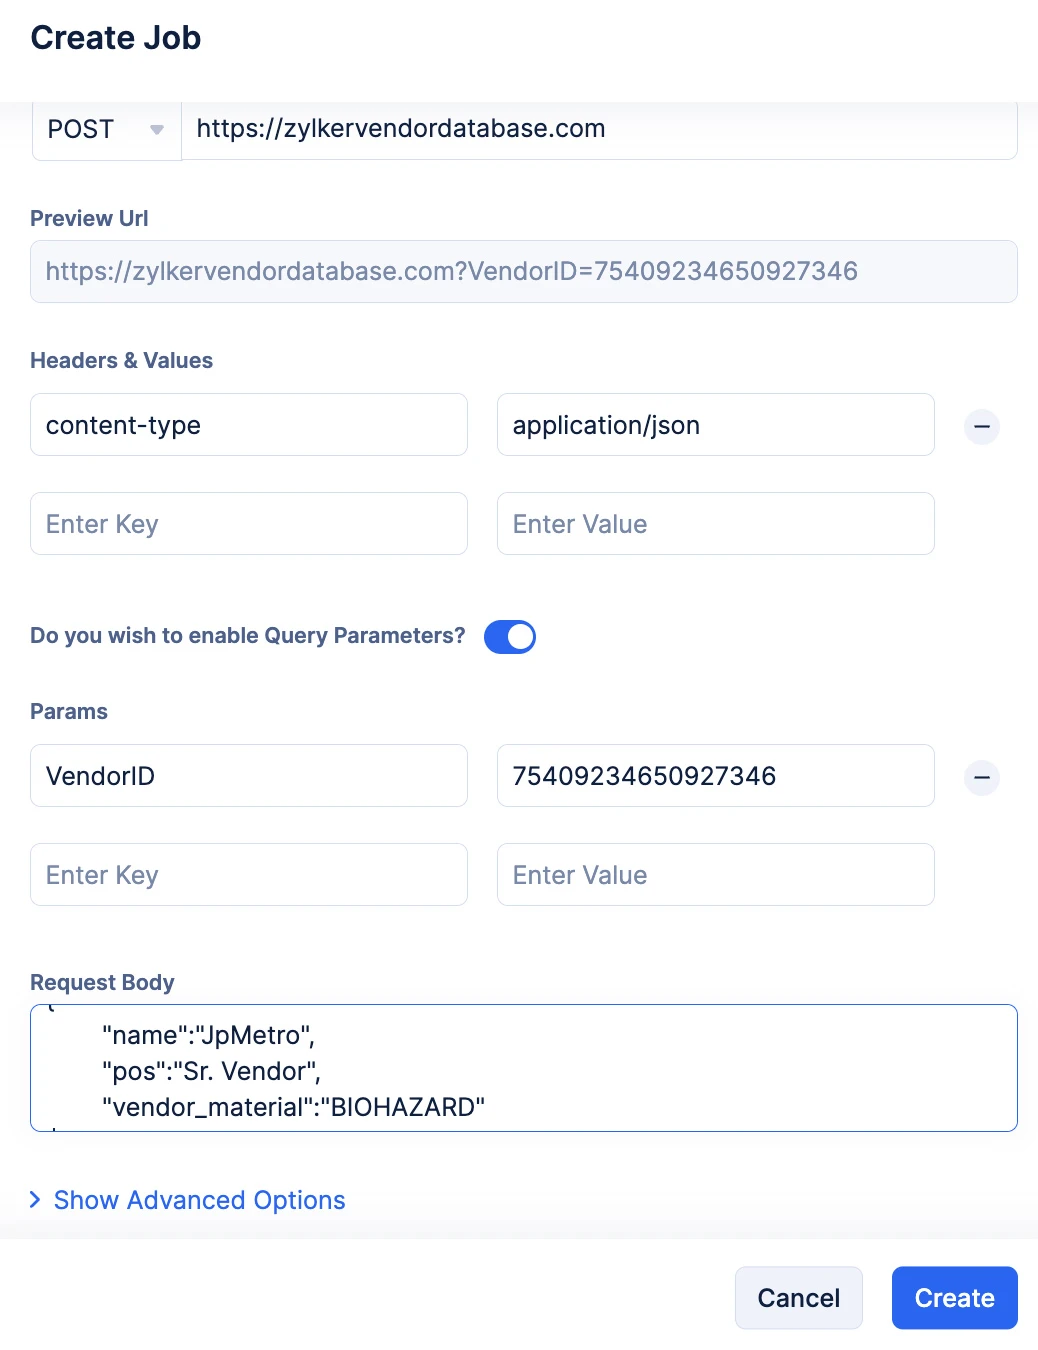
You can provide the required data as a JSON key-value pair in the Request Body section.
-
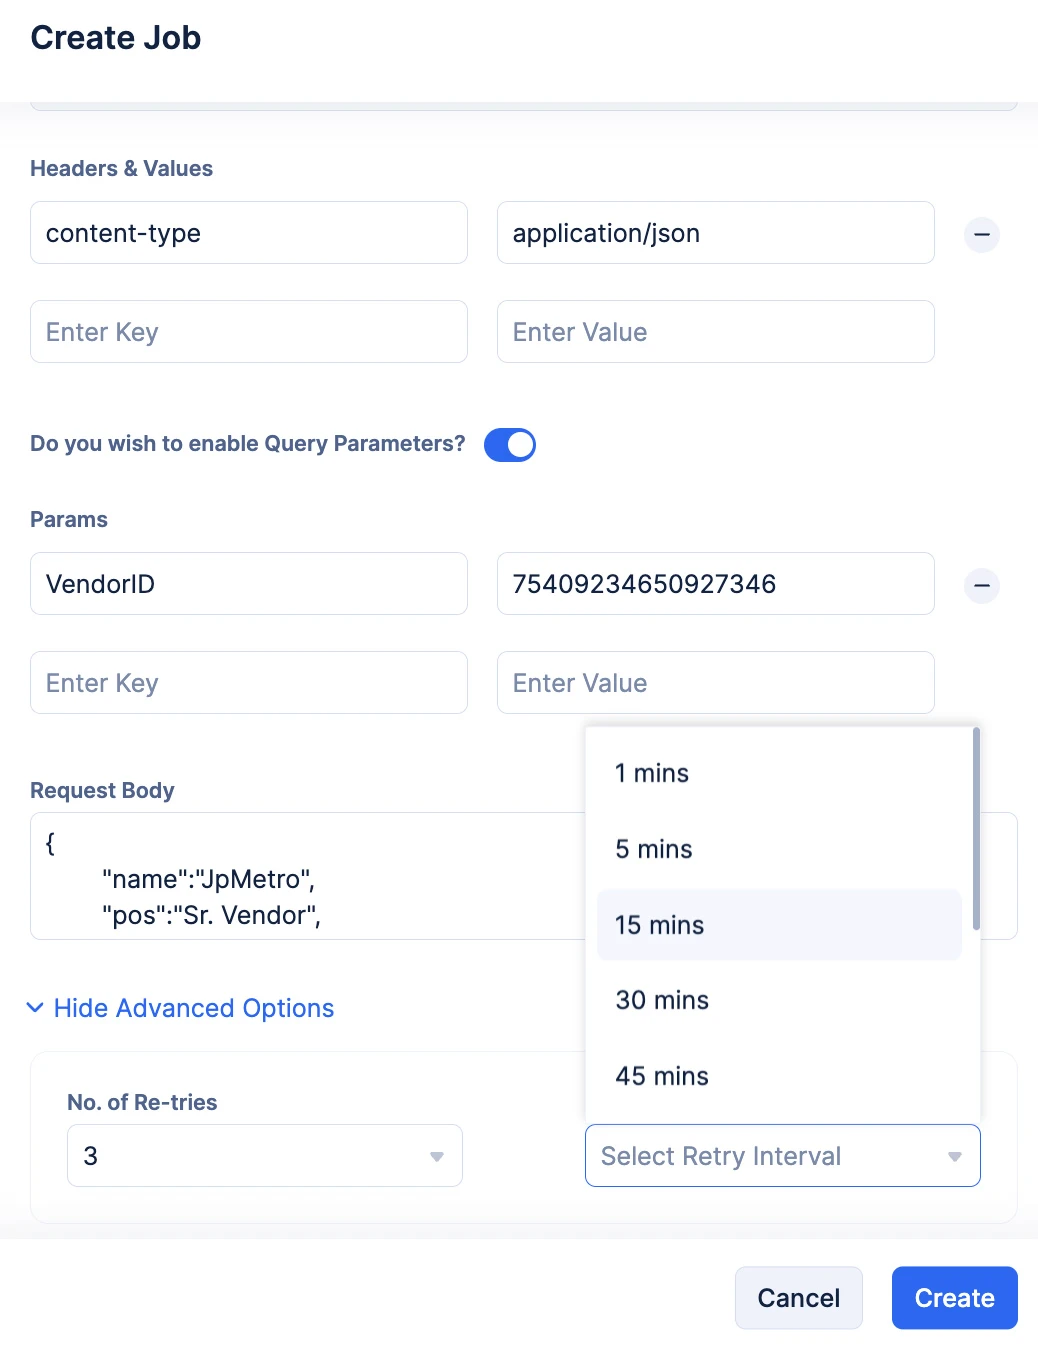
Optionally, you can click the Show Advanced Options to provide resubmission instructions. You can choose the number of retries you wish to attempt from the No. of Retries drop-down, and you can choose the time interval between each retry attempt using the Retry Interval drop-down.
- Click Create, after confirming your configurations.
Once you click Create, the job will be immediately submitted to the job pool for execution. This makes the Builder option a great tool to test your job pool’s performance.
Once the job is submitted, you will be able to view all the general details of the submitted job in the Job Definition section. You will also be able to view the status of the Job Execution in the Job Execution & Status section.
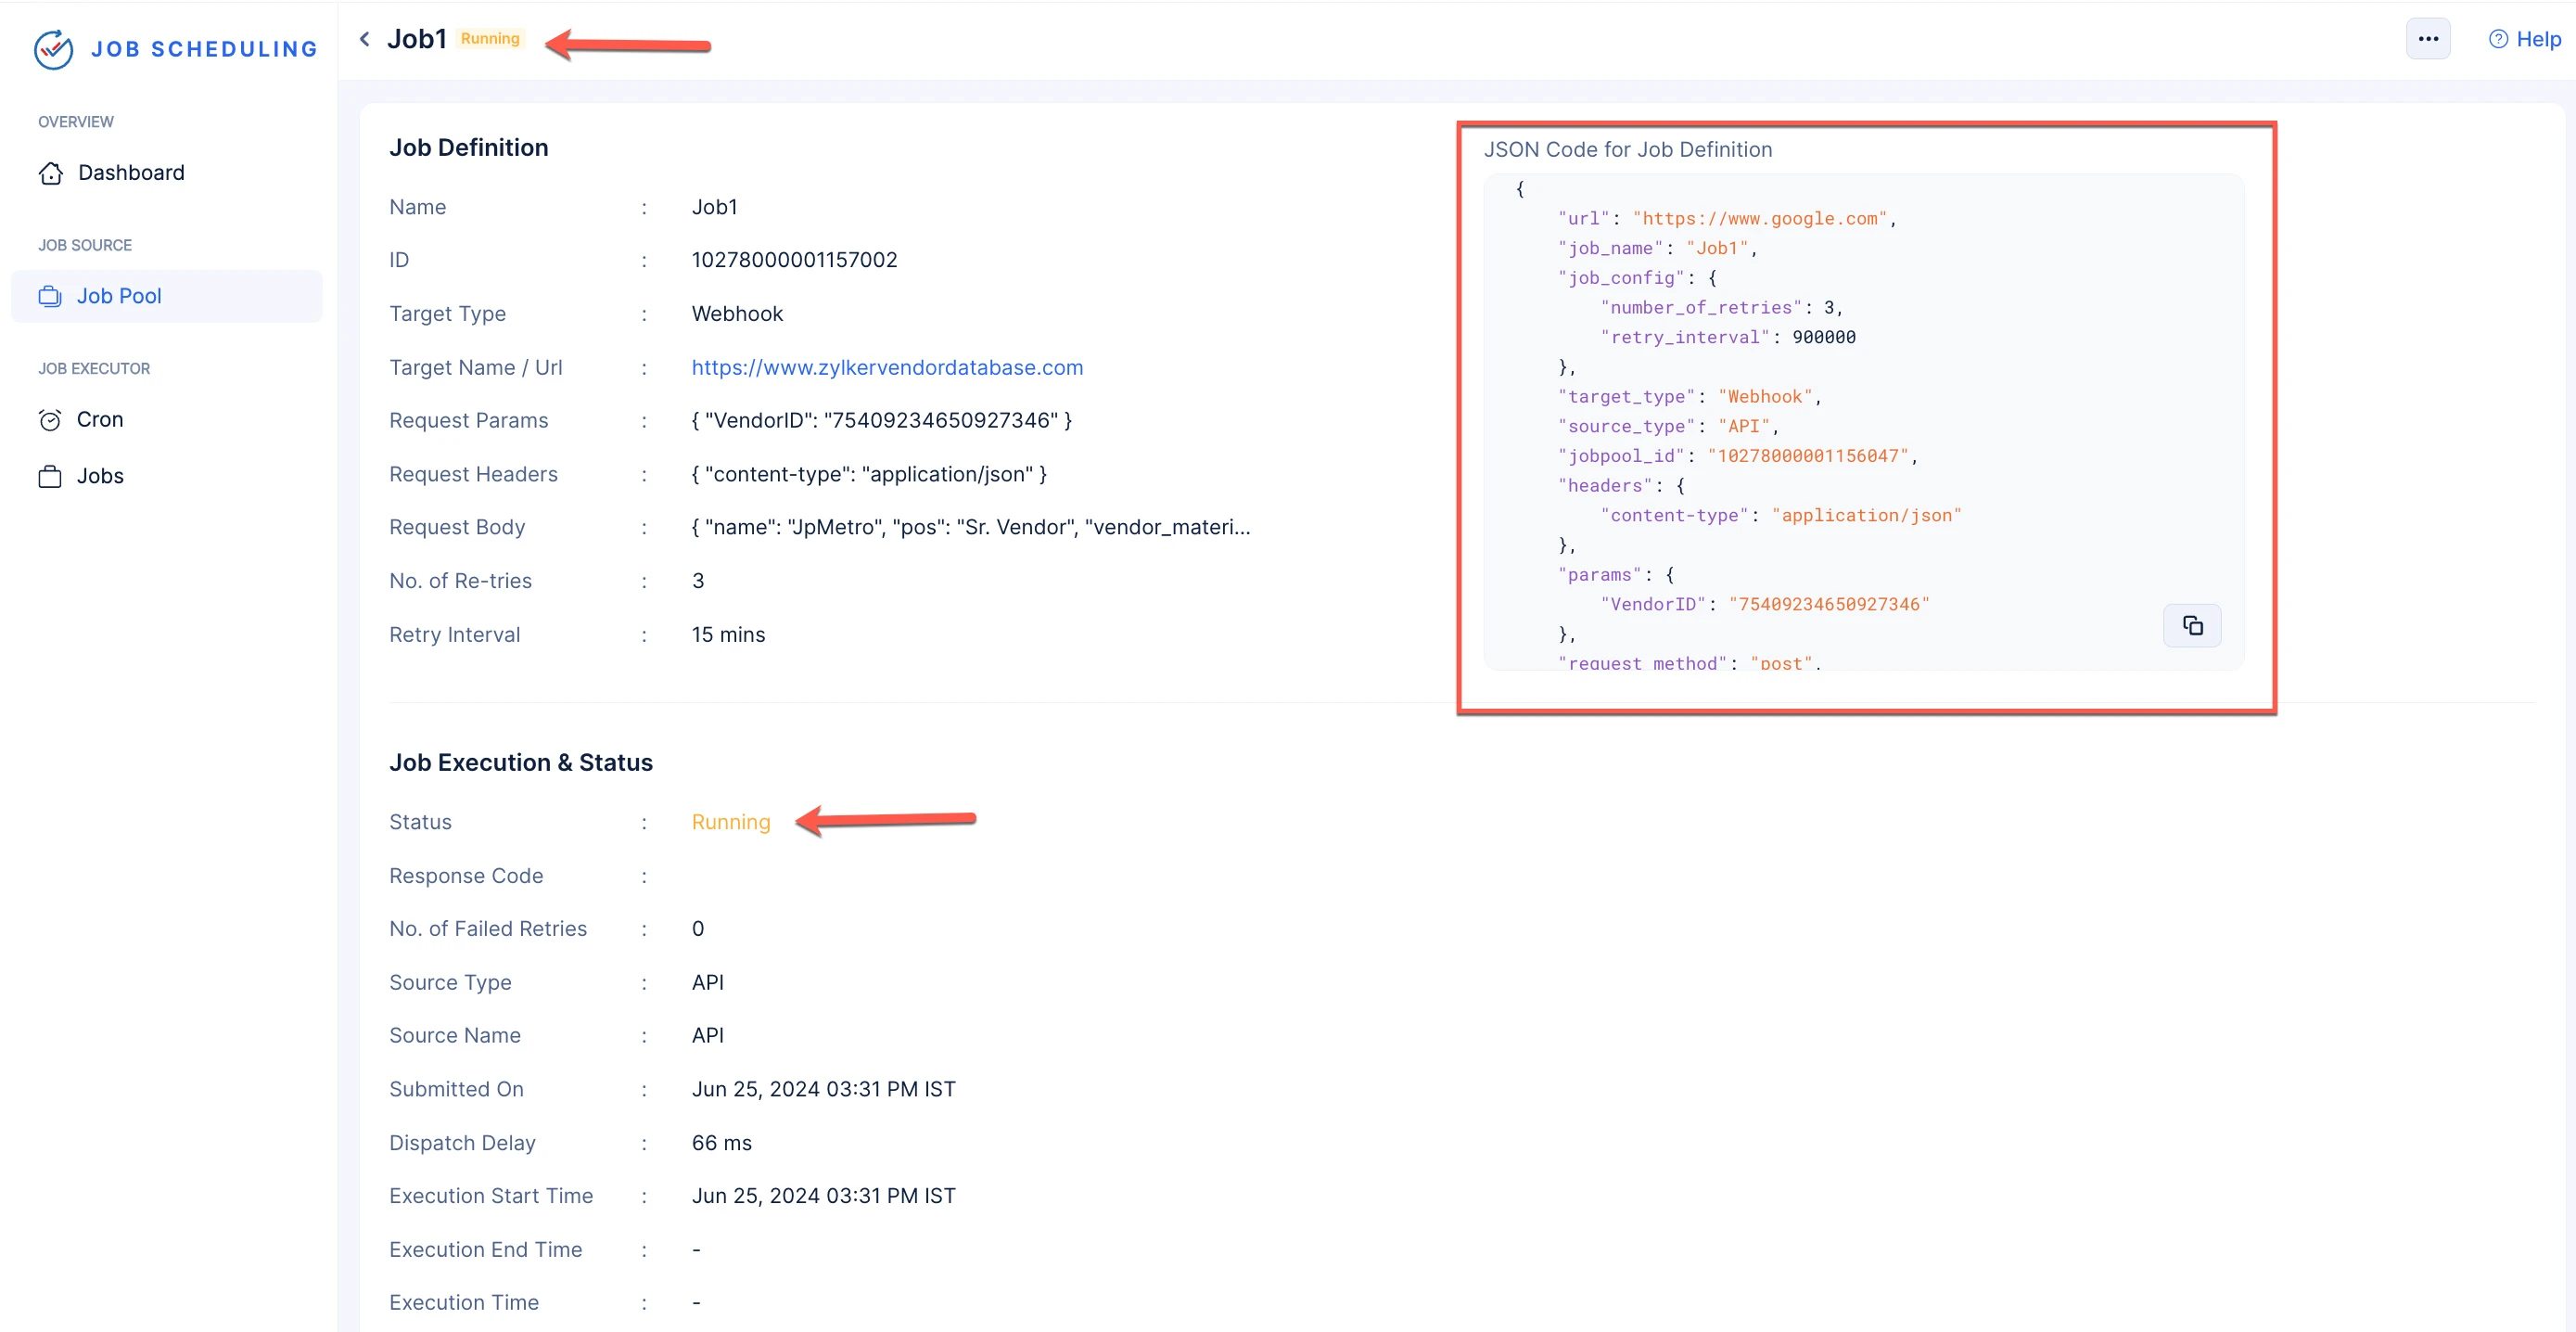
The execution status of the job will also be labeled at the top next to the Job Name. You will also be provided with the Job Definition in a JSON code format that you can copy and use to submit a new job with the same specifications. You can also visit the logs of the execution generated in DevOps’s Logs component by clicking the View Logs button.
- Click the SDK tab.
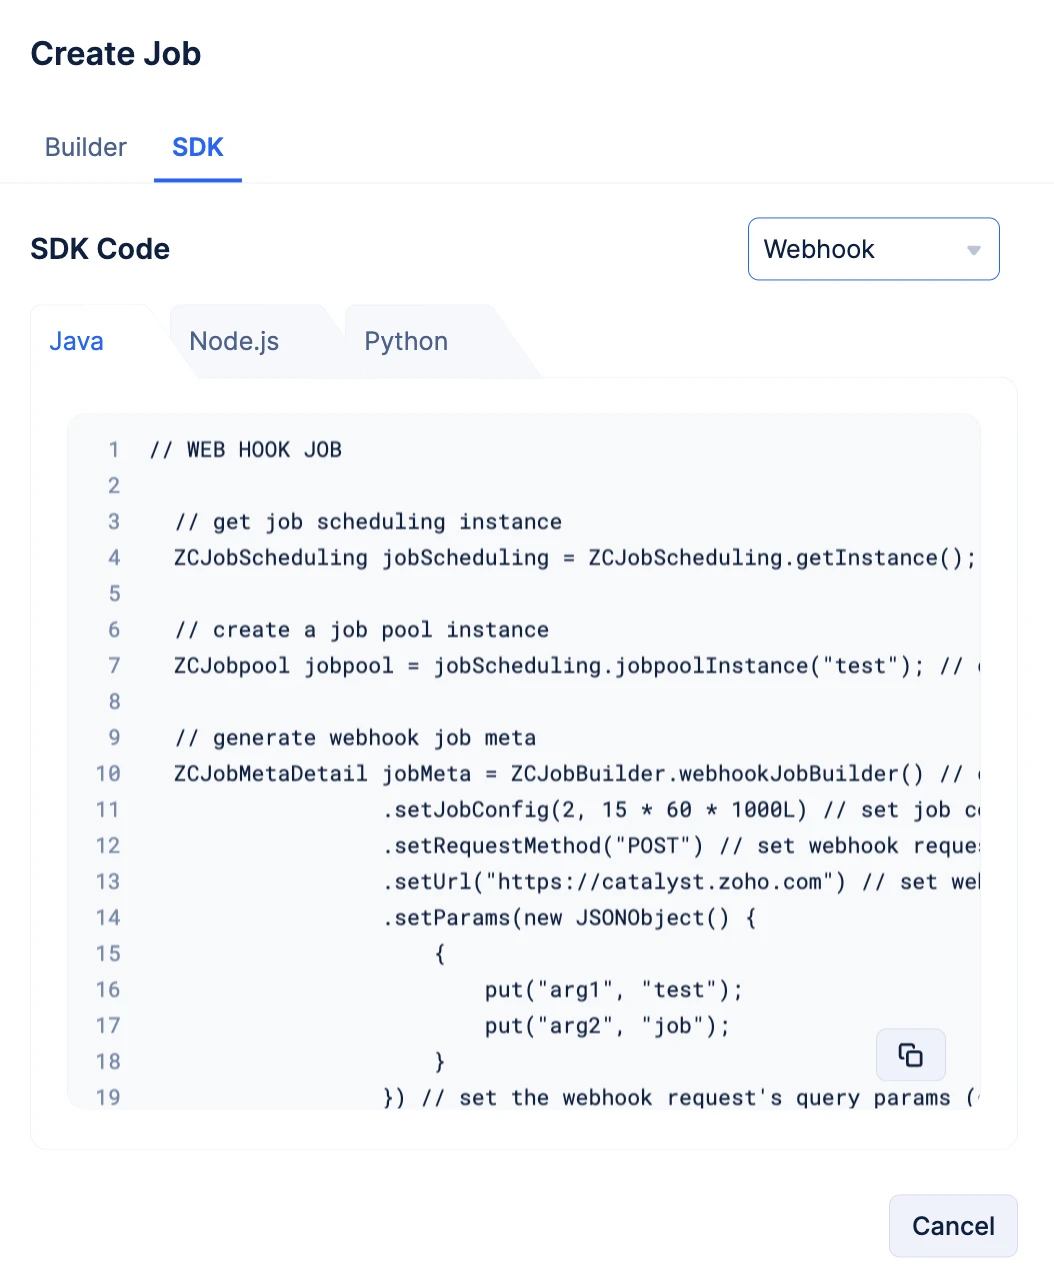
Choose your preferred programming language by navigating the tabs and copy the required code snippet, using the copy-button.
// WEB HOOK JOB
// get job scheduling instance
ZCJobScheduling jobScheduling = ZCJobScheduling.getInstance();
// create a job pool instance
ZCJobpool jobpool = jobScheduling.jobpoolInstance(“test”); // create a job pool instance for the webhook job pool named test
// generate webhook job meta
ZCJobMetaDetail jobMeta = ZCJobBuilder.webhookJobBuilder() // create webhook job builder
.setJobConfig(2, 15 * 60 * 1000L) // set job config - job retries => 2 retries in 15 mins (optional)
.setRequestMethod(“POST”) // set webhook request’s method
.setUrl(“https://catalyst.zoho.com”) // set webhook request’s url
.setParams(new JSONObject() {
{
put(“arg1”, “test”);
put(“arg2”, “job”);
}
}) // set the webhook request’s query params (optional)
.setHeaders(new JSONObject() {
{
put(“IS_TEST_REQUEST”, “true”);
}
}) // set the webhook request’s headers (optional)
.setRequestBody(“test_request”) // set the webhook request’s body (optional)
.setJobName(“test_job”) // set job name
.build(); // build webhook job meta
// submit webhook job
ZCJobDetails webHookJob = jobpool.submitJob(jobMeta);
// WEBHOOK JOB
const jobScheduling = app.jobScheduling(); // create job scheduling instance
const jobpool = jobScheduling.jobpool({ name: ’test’ }); // create job pool instance for the webhook job pool named test
// create webhook job
const webhookJob = await jobpool.submitJob({
job_name: ’test_job’, // set a name for the job
target_type: ‘Webhook’, // set the target type as Webhook for webhook jobs
request_method: ‘POST’, // set the webhook request’s method
url: ‘https://catalyst.zoho.com’, // set the webhook request’s url
params: {
arg1: ’test’,
arg2: ‘job’
}, // set the webhook request’s query params (optional)
headers: {
IS_TEST_REQUEST: ’true’
}, // set the webhook request’s headers (optional)
request_body: ’test_request’, // set the webhook request’s body (optional)
job_config: {
number_of_retries: 2, // set the number of retries
retry_interval: 15 * 60 * 1000 + ’’ // set the retry  interval
} // set job config - job retries => 2 retries in 15 mins (optional)
});
job_scheduling = app.job_scheduling() # create job scheduling instance
jobpool = job_scheduling.jobpool(jobpool_name=“test”) # create jobpool instance for the webhook jobpool named test
# create webhook job

webhook_job = jobpool.submit_job({
‘job_name’: ’test_job’, # set a name for the job
’target_type’: ‘Webhook’, # set the target type as Webhook for webhook jobs
‘request_method’: ‘POST’, # set the webhook request’s method
‘url’: ‘https://catalyst.zoho.com’, # set the webhook request’s url
‘params’: {
‘arg1’: ’test’,
‘arg2’: ‘job’
}, # set the webhook request’s query params (optional)
‘headers’: {
‘IS_TEST_REQUEST’: ’true’
}, # set the webhook request’s headers (optional)
‘request_body’: ’test_request’, # set the webhook request’s body (optional)
‘job_config’: {
’number_of_retries’: 2, # set the number of retries
‘retry_interval’: 15 * 60 * 1000 # set the retry interval
} # set job config - job retries => 2 retries in 15 mins (optional)
})
These SDKs will also be available in these sections:
- Paste the copied code in your code file and configure the job according to your required logic.
- The job will be submitted to the job pool during run time.
Submit an Instant Job to the Circuit Job Pool
-
Choose the required job pool from the Job Pool section.
-
Click the Jobs tab.
-
Click Create Job.
-
You can create and submit a job to a job pool directly in the console using the Builder option. You can also submit a job to the job pool through code using the Catalyst SDKs that are available in Java, Node.js and Python. The SDK snippets can also be copied from the console.
-
Provide a name for your job in the Job Name input field.
-
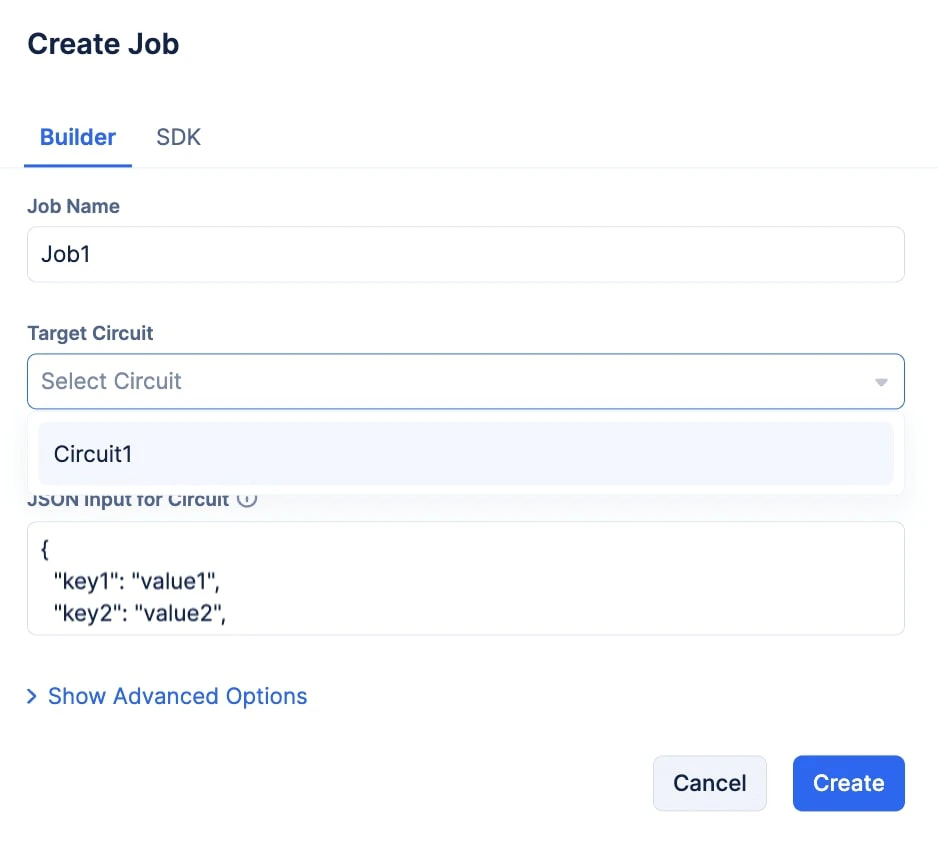
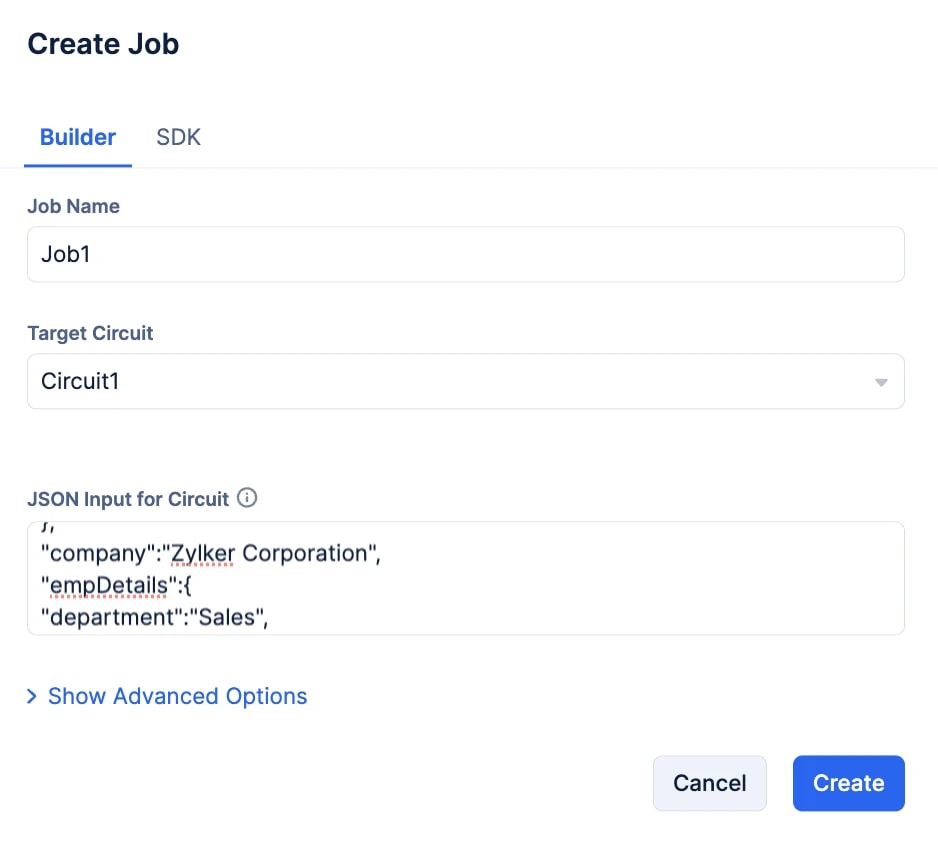
Choose your required Circuit from the Target Circuit drop-down.
Note:
-
It is vital you create the required circuit, and deploy all the functions required by the circuit to the console. The circuit needs to be ready and functioning, to ensure that when the job is executed in the job pool it triggers the circuit, and the required workflow is executed.
-
If you have not created a circuit yet, click the Create New option in the drop-down. You will be directed to the Catalyst Serverless console, where you can engineer a new circuit.
-
You can find the steps to create a Catalyst Circuit from this help documentation.
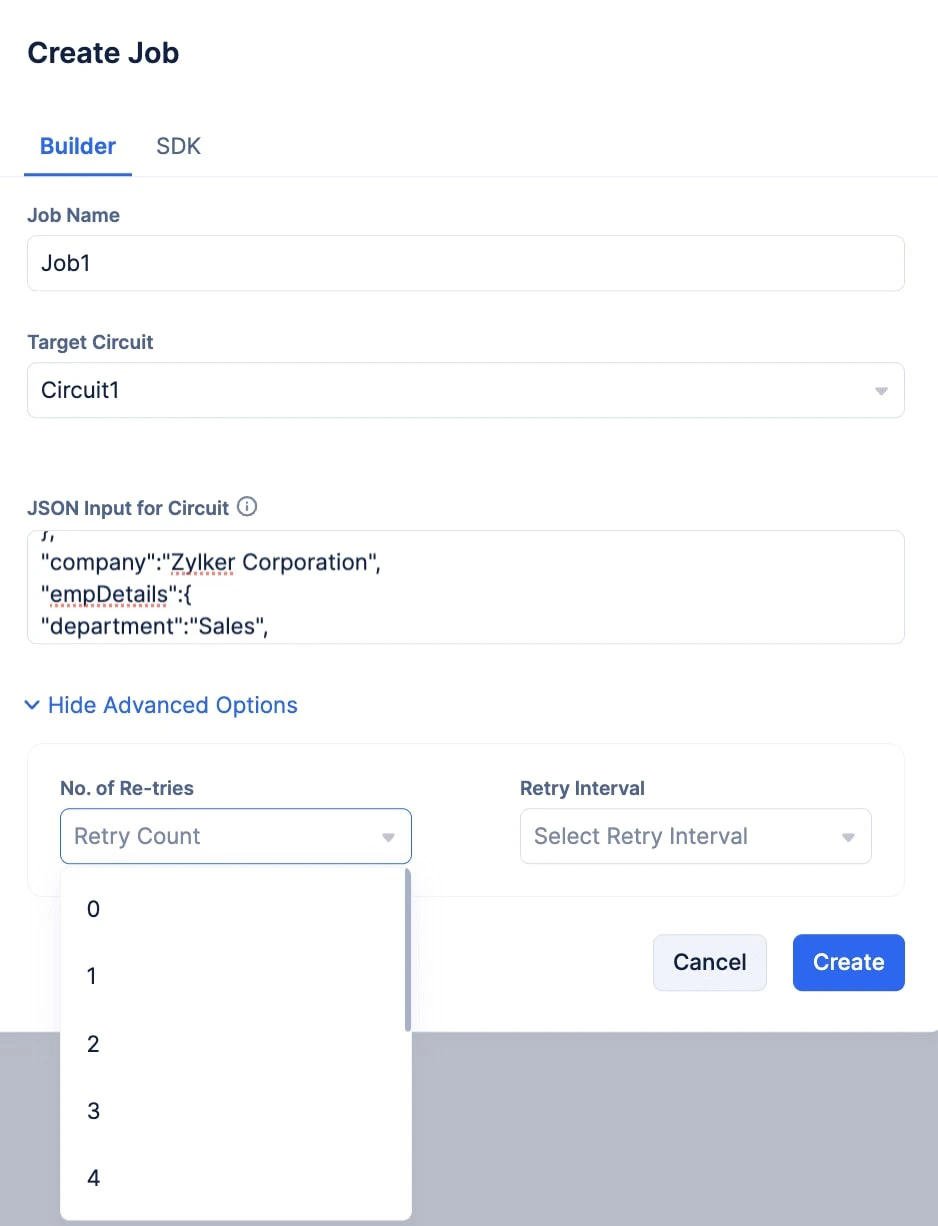
- Enter the JSON Input for the Circuit.
-
Optionally, you can click the Show Advanced Options to provide resubmission instructions.
-
You can choose the number of retries you wish to attempt from the No. of Retries drop-down, and you can choose the time interval between each retry attempt using the Retry Interval drop-down.
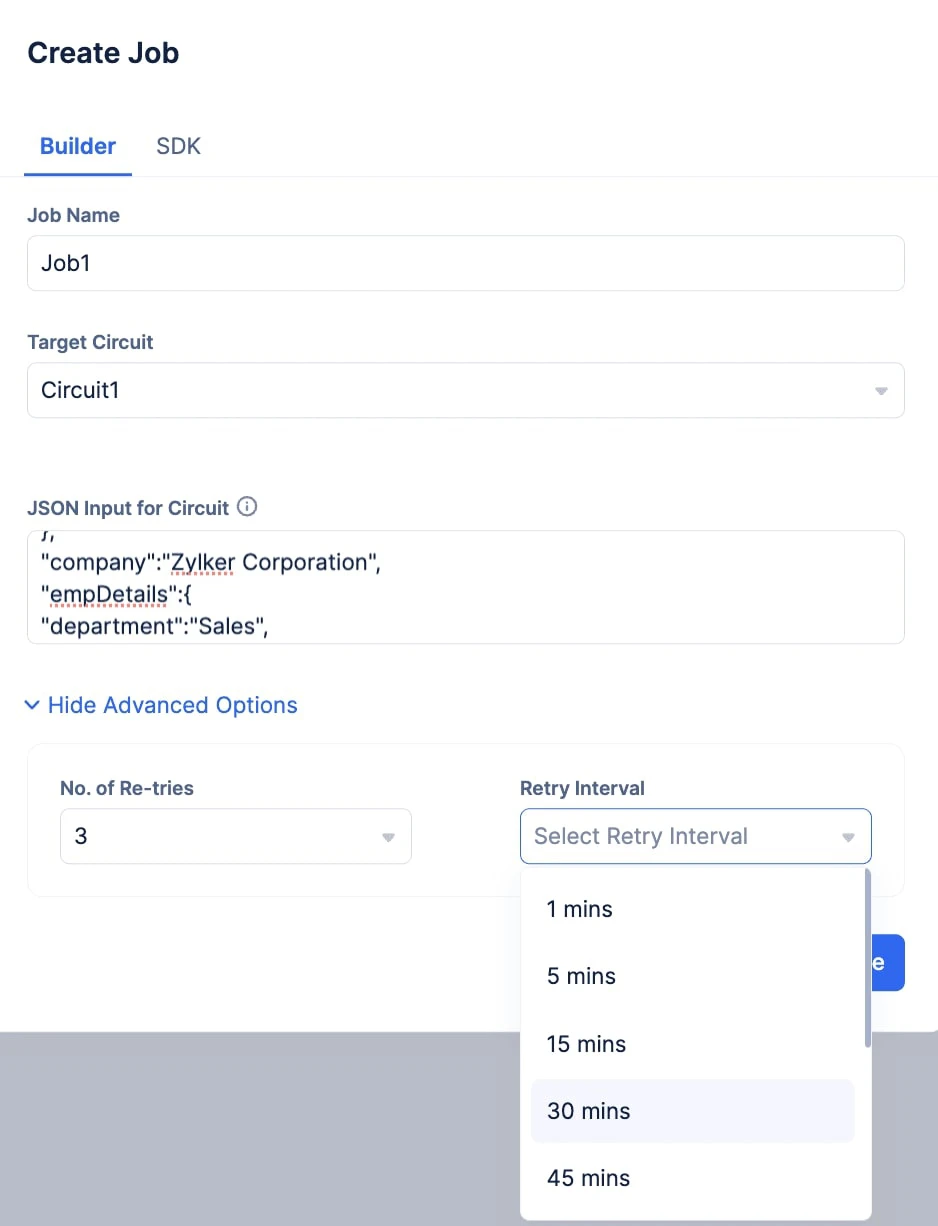
- Click Create
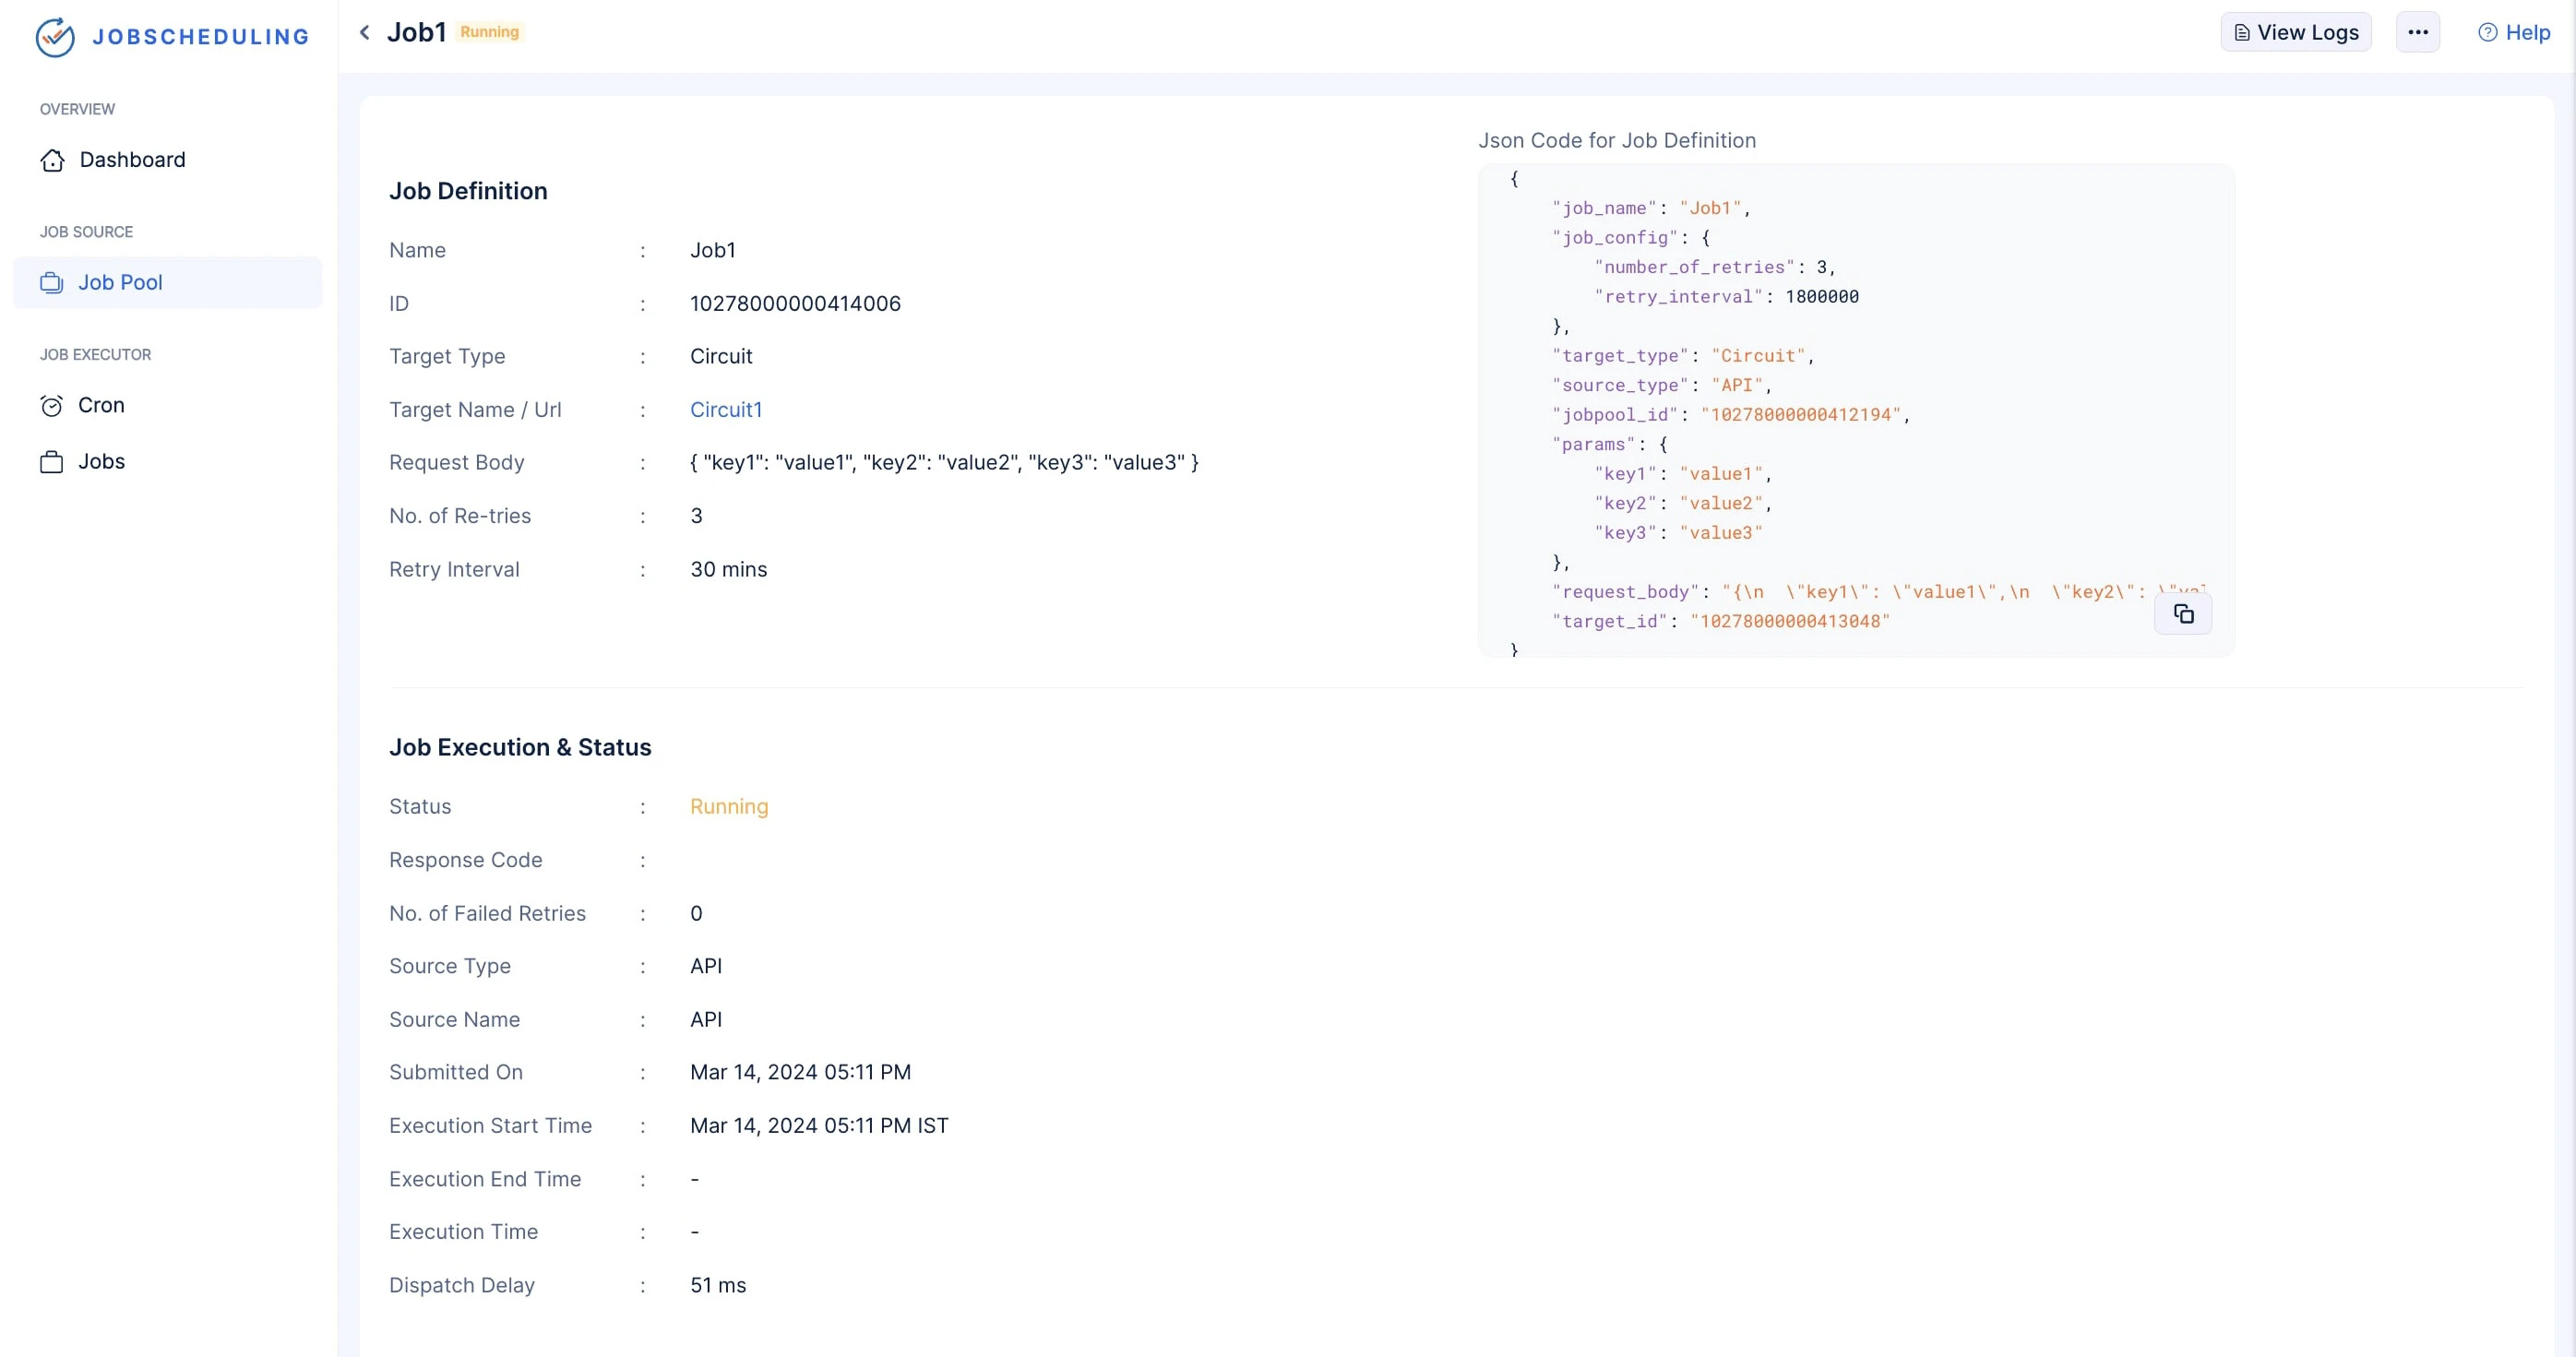
Once you click Create, the job will be immediately submitted to the job pool for execution. This makes the Builder option a great tool to test your job pool’s performance.
Once the job is submitted, you will be able to view all the general details of the submitted job in the Job Definition section. You will also be able to view the status of the Job Execution in the Job Execution & Status section.
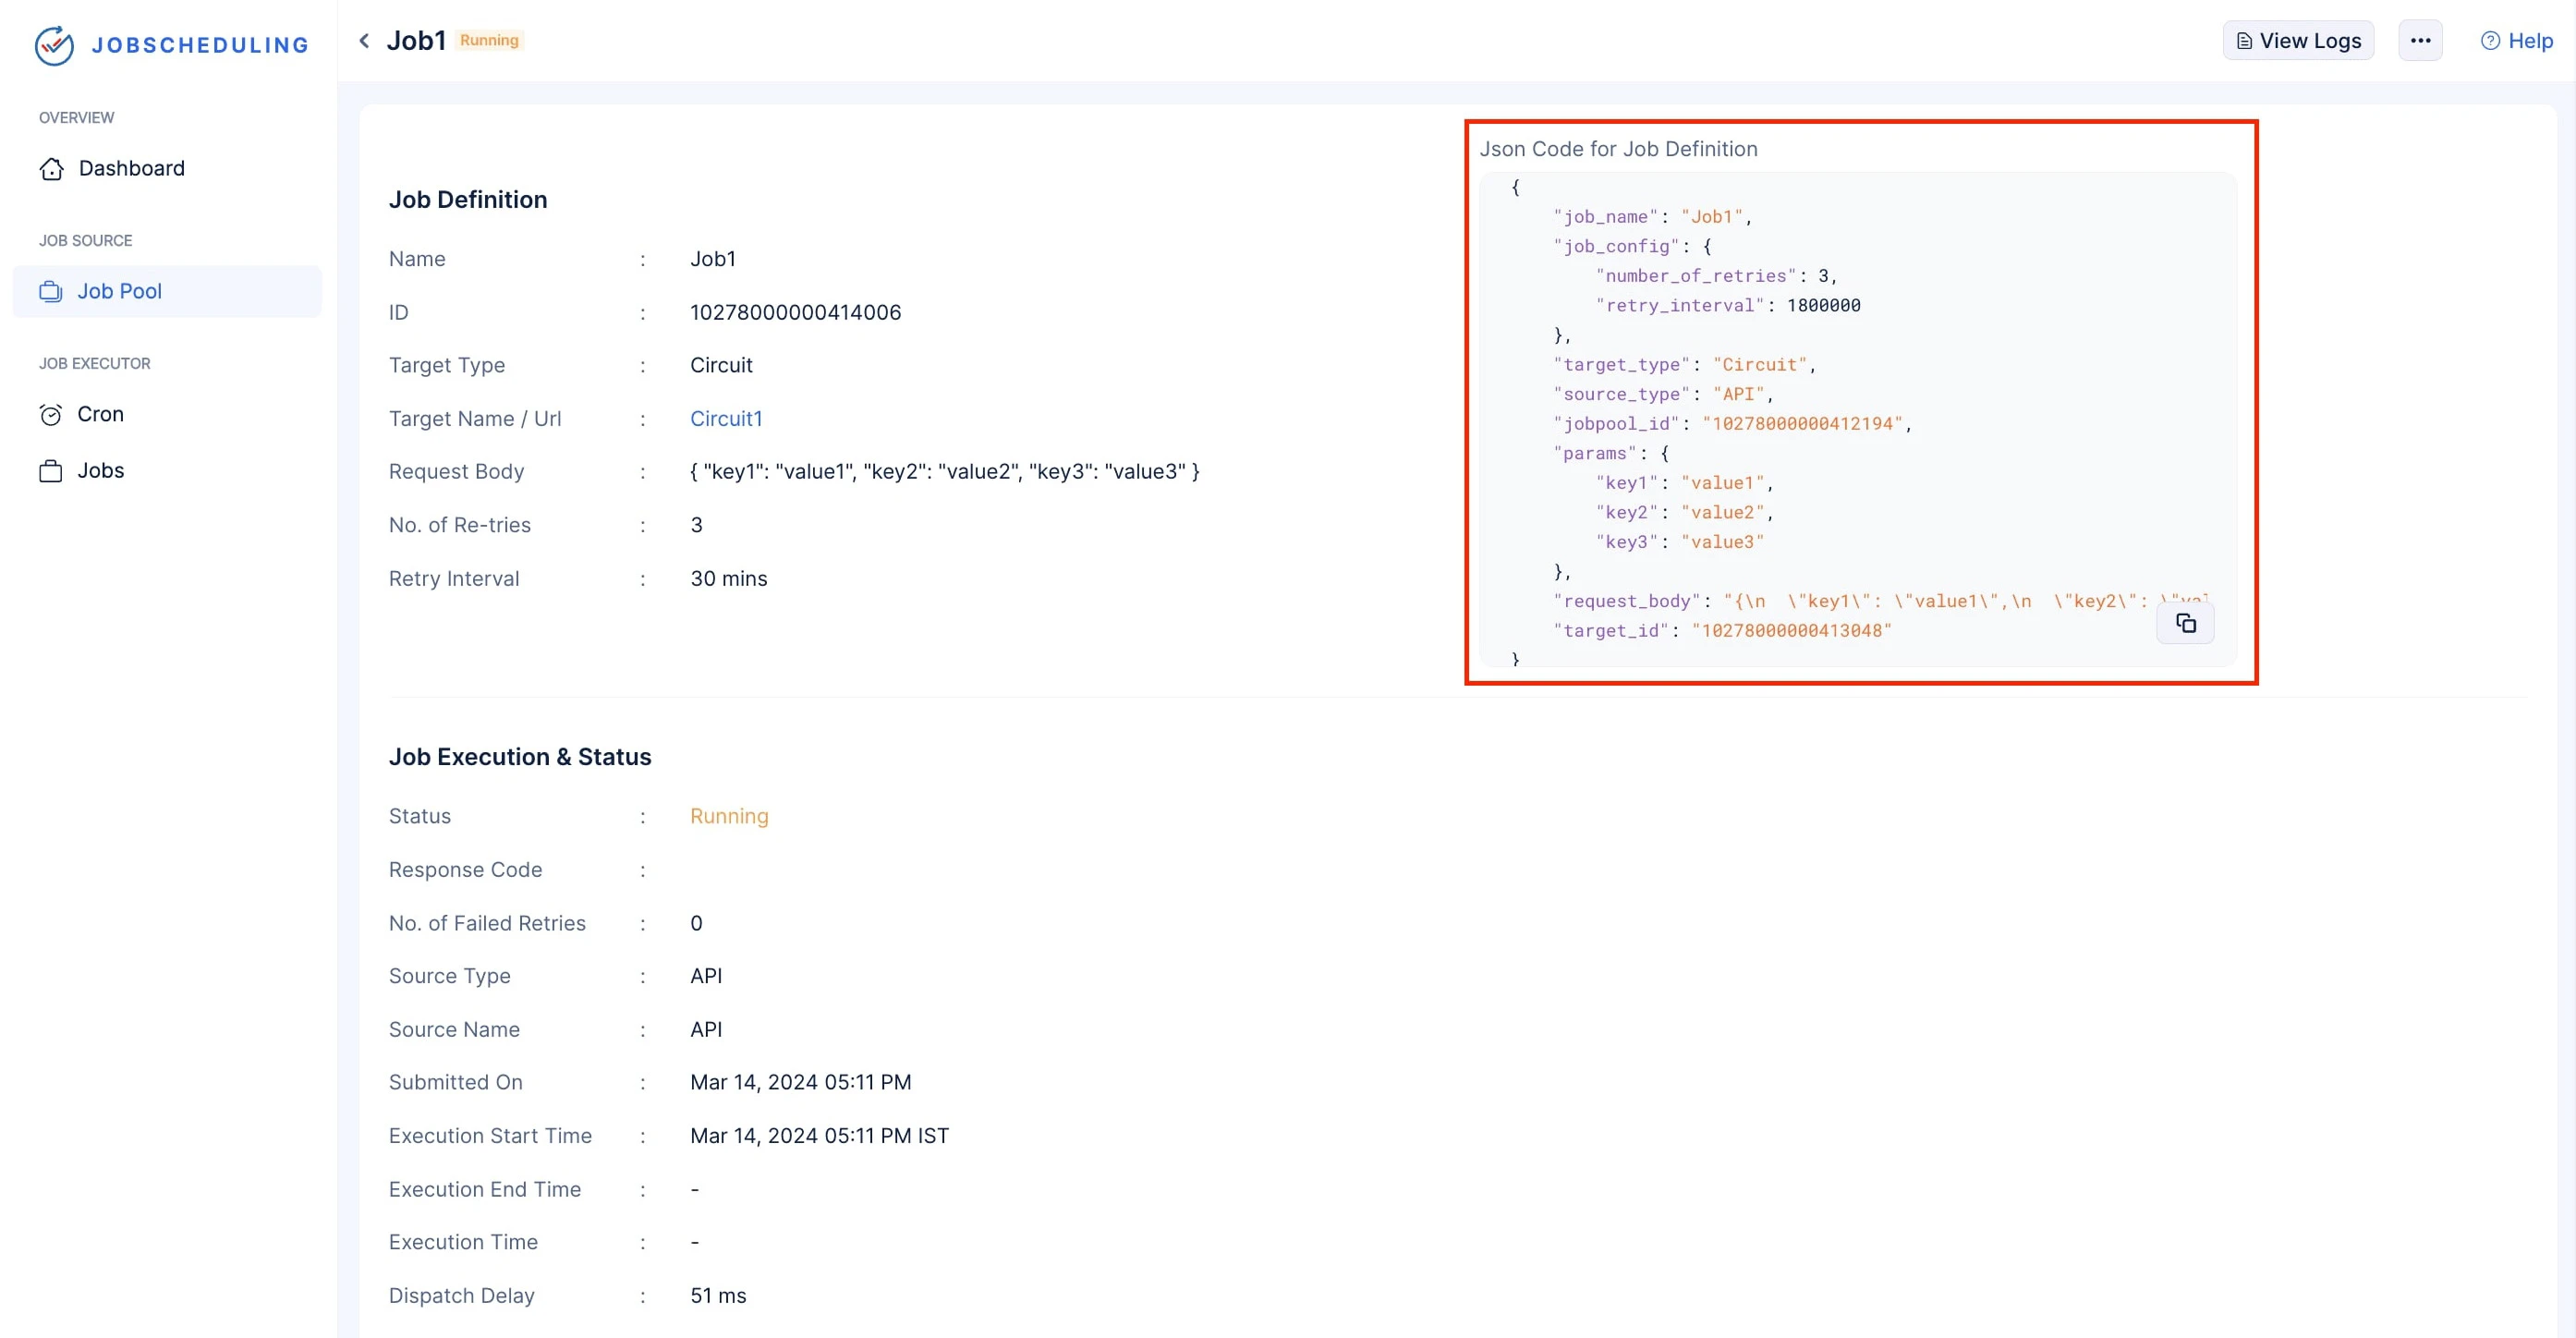
The execution status of the job will also be labeled at the top next to the Job Name. You will also be provided with the Job Definition in a JSON code format that you can copy and use to submit a new job with the same specifications. You can also visit the logs of the execution generated in DevOps’s Logs component by clicking the View Logs button.
- Click the SDK tab.
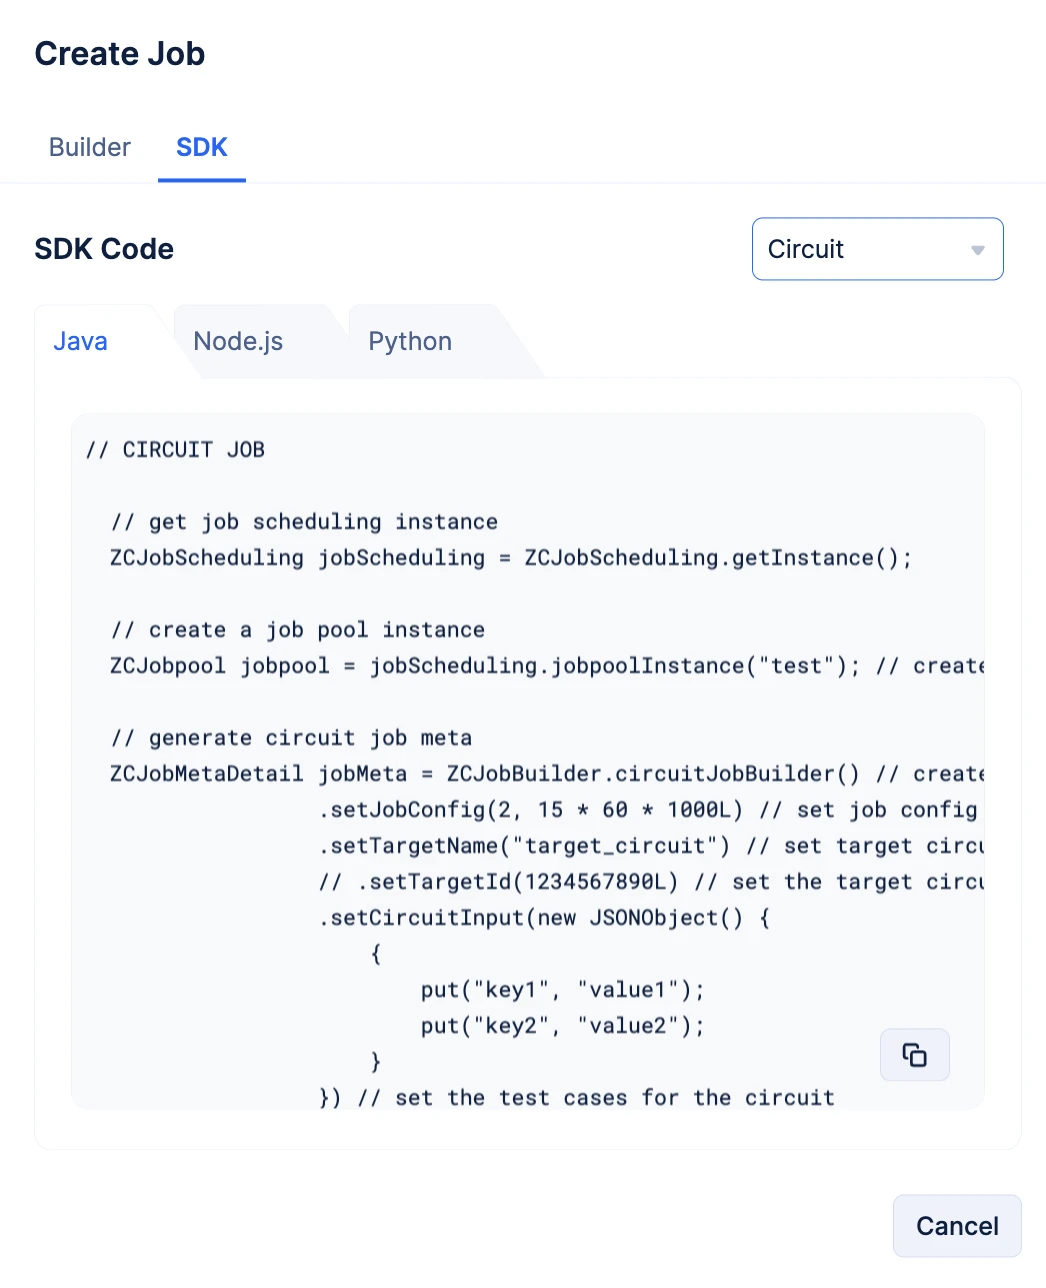
Choose your preferred programming language by navigating the tabs and copy the required code snippet, using the copy-button.
// CIRCUIT JOB
// get job scheduling instance
ZCJobScheduling jobScheduling = ZCJobScheduling.getInstance();
// create a job pool instance
ZCJobpool jobpool = jobScheduling.jobpoolInstance(“test”); // create a job pool instance for the circuit job pool named test
// generate circuit job meta
ZCJobMetaDetail jobMeta = ZCJobBuilder.circuitJobBuilder() // create circuit job builder
.setJobConfig(2, 15 * 60 * 1000L) // set job config - job retries => 2 retries in 15 mins (optional)
.setTargetName(“target_circuit”) // set target circuits’s name (optional) (either TargetName or TargetId is mandatory)
// .setTargetId(1234567890L) // set the target circuits’s Id (optional) (either TargetName or TargetId is mandatory)
.setCircuitInput(new JSONObject() {
{
put(“key1”, “value1”);
put(“key2”, “value2”);
}
}) // set the test cases for the circuit
.setJobName(“test_job”) // set job name
.build(); // build circuit job meta
// submit circuit job
ZCJobDetails circuitJob = jobpool.submitJob(jobMeta);
// CIRCUIT JOB
const jobScheduling = app.jobScheduling(); // create job scheduling instance
const jobpool = jobScheduling.jobpool({ name: ’test’ }); // create job pool instance for the circuit job pool named test
// create circuit job
const circuitJob = await jobpool.submitJob({
job_name: ’test_job’, // set a name for the job
target_type: ‘Circuit’, // set the target type as Circuit for circuit jobs
target_name: ’target_circuit’, // set the target circuit’s name (optional) (either target_id or target_name is mandatory)
// target_id: ‘123467890’, // set the target circuit’s Id (optional) (either target_id or target_name is mandatory)
test_cases: {
arg1: “job”,
arg2: “test”
}, // set the circuit test cases
job_config: {
number_of_retries: 2, // set the number of retries
retry_interval: 15 * 60 * 1000 + ’’ // set the retry  interval
} // set job config - job retries => 2 retries in 15 mins (optional)
});
job_scheduling = app.job_scheduling() # create job scheduling instance
jobpool = job_scheduling.jobpool(jobpool_name=“test”) # create jobpool instance for the circuit jobpool named test
# create circuit job

circuit_job = jobpool.submit_job({
‘job_name’: ’test_job’, # set a name for the job
’target_type’: ‘Circuit’, # set the target type as Circuit for circuit jobs
’target_name’: ’target_circuit’, # set the target circuit’s name (optional) (either target_id or target_name is mandatory)
# ’target_id’: ‘123467890’, # set the target circuit’s Id (optional) (either target_id or target_name is mandatory)
’test_cases’: {
‘arg1’: ‘job’,
‘arg2’: ’test’
}, # set the circuit test cases
‘job_config’: {
’number_of_retries’: 2, # set the number of retries
‘retry_interval’: 15 * 60 * 1000 # set the retry interval
} # set job config - job retries => 2 retries in 15 mins (optional)
})
These SDKs will also be available in these sections:
- Paste the copied code in your code file and configure the job according to your required logic.
- The job will be submitted to the job pool during run time.
Submit an Instant Job to the AppSail Job Pool
-
Choose the required job pool from the Job Pool section.
-
Click the Jobs tab.
-
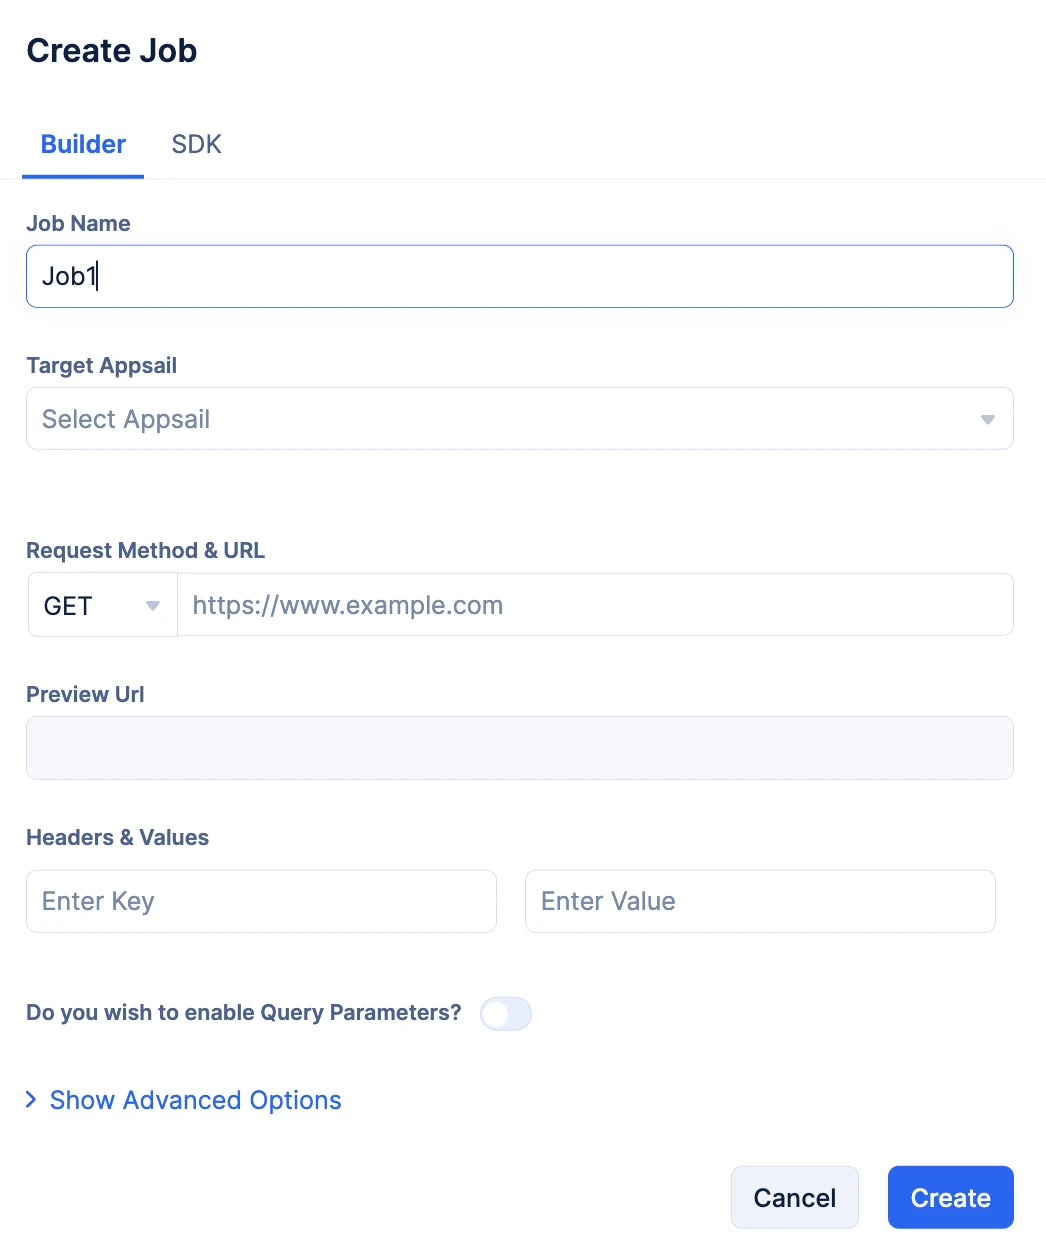
Click Create Job.
-
You can create and submit a job to a job pool directly in the console using the Builder option. You can also submit a job to the job pool through code using the Catalyst SDKs that are available in Java, Node.js and Python. The SDK snippets can also be copied from the console.
-
Provide a name for your job in the Job Name input field.
-
Select the AppSail service you wish to trigger from the Target AppSail drop-down..
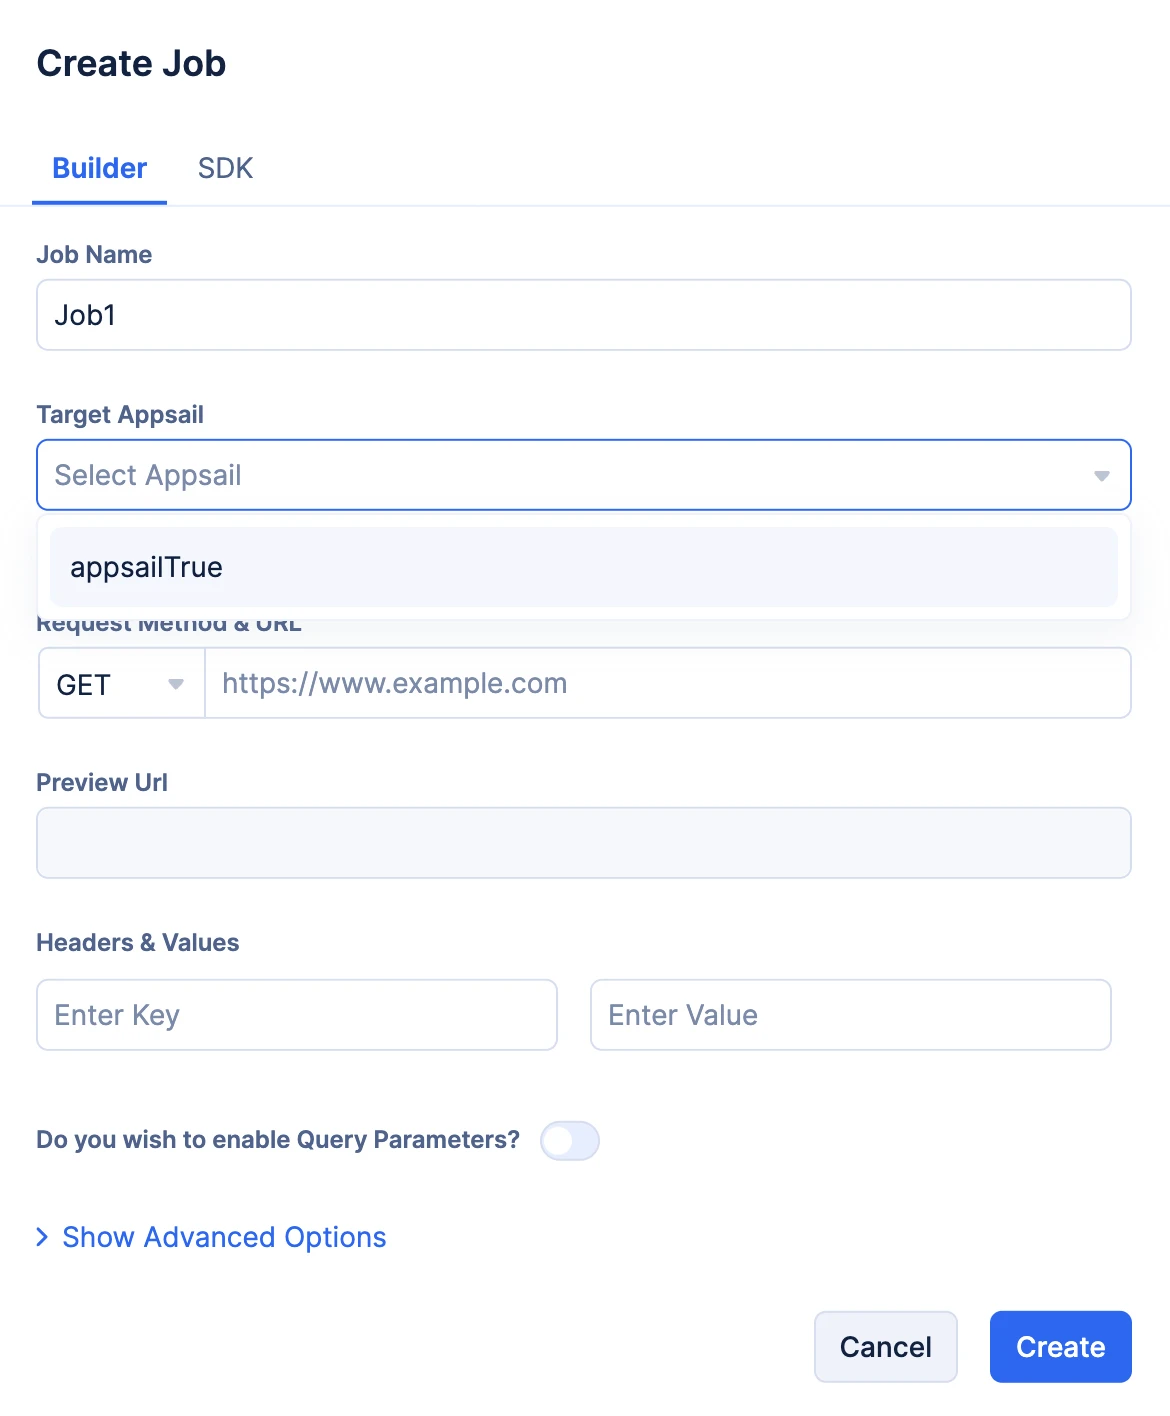
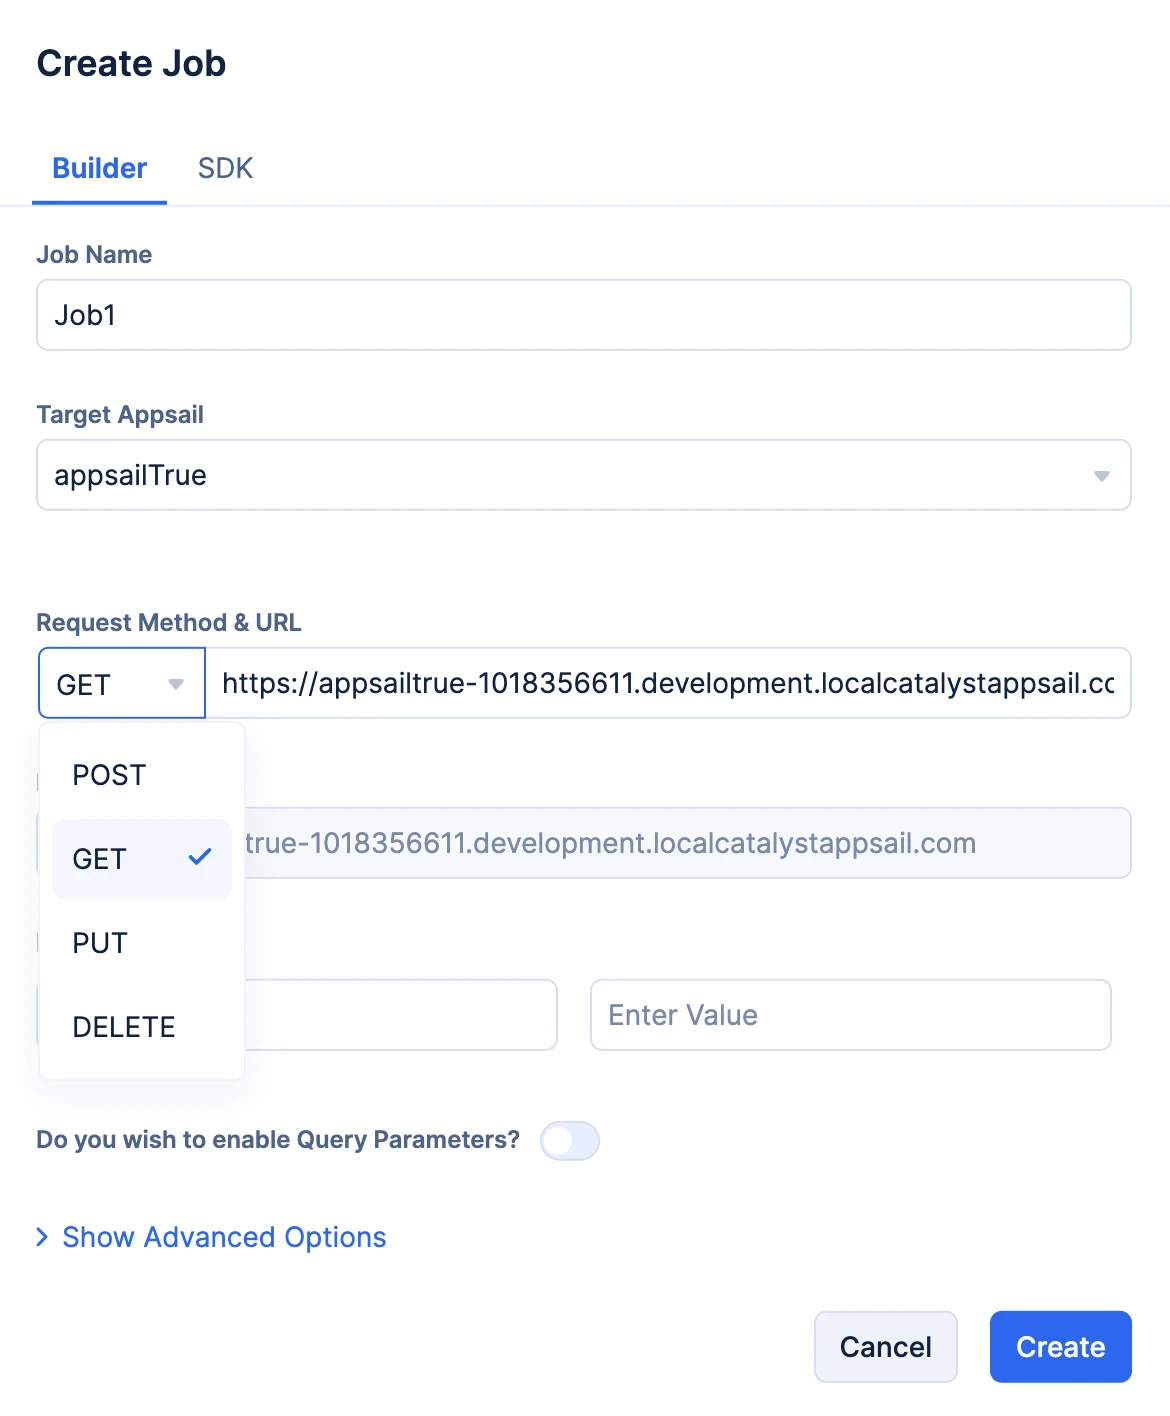
The URL input field and the Preview URL will be populated automatically once you select your AppSail service.
Note:
-
It is vital you create and deploy the required AppSail service to the Catalyst console, to ensure it is available in the drop-down when you create a job to trigger the service.
-
If you have not deployed an AppSail service yet, click the Create New option in the drop-down. You will be directed to the Catalyst Serverless console, where you can begin steps to create and deploy your AppSail service.
-
You can find the help documentation for Catalyst AppSail here.
-
Select your required Request Method from the drop-down..
-
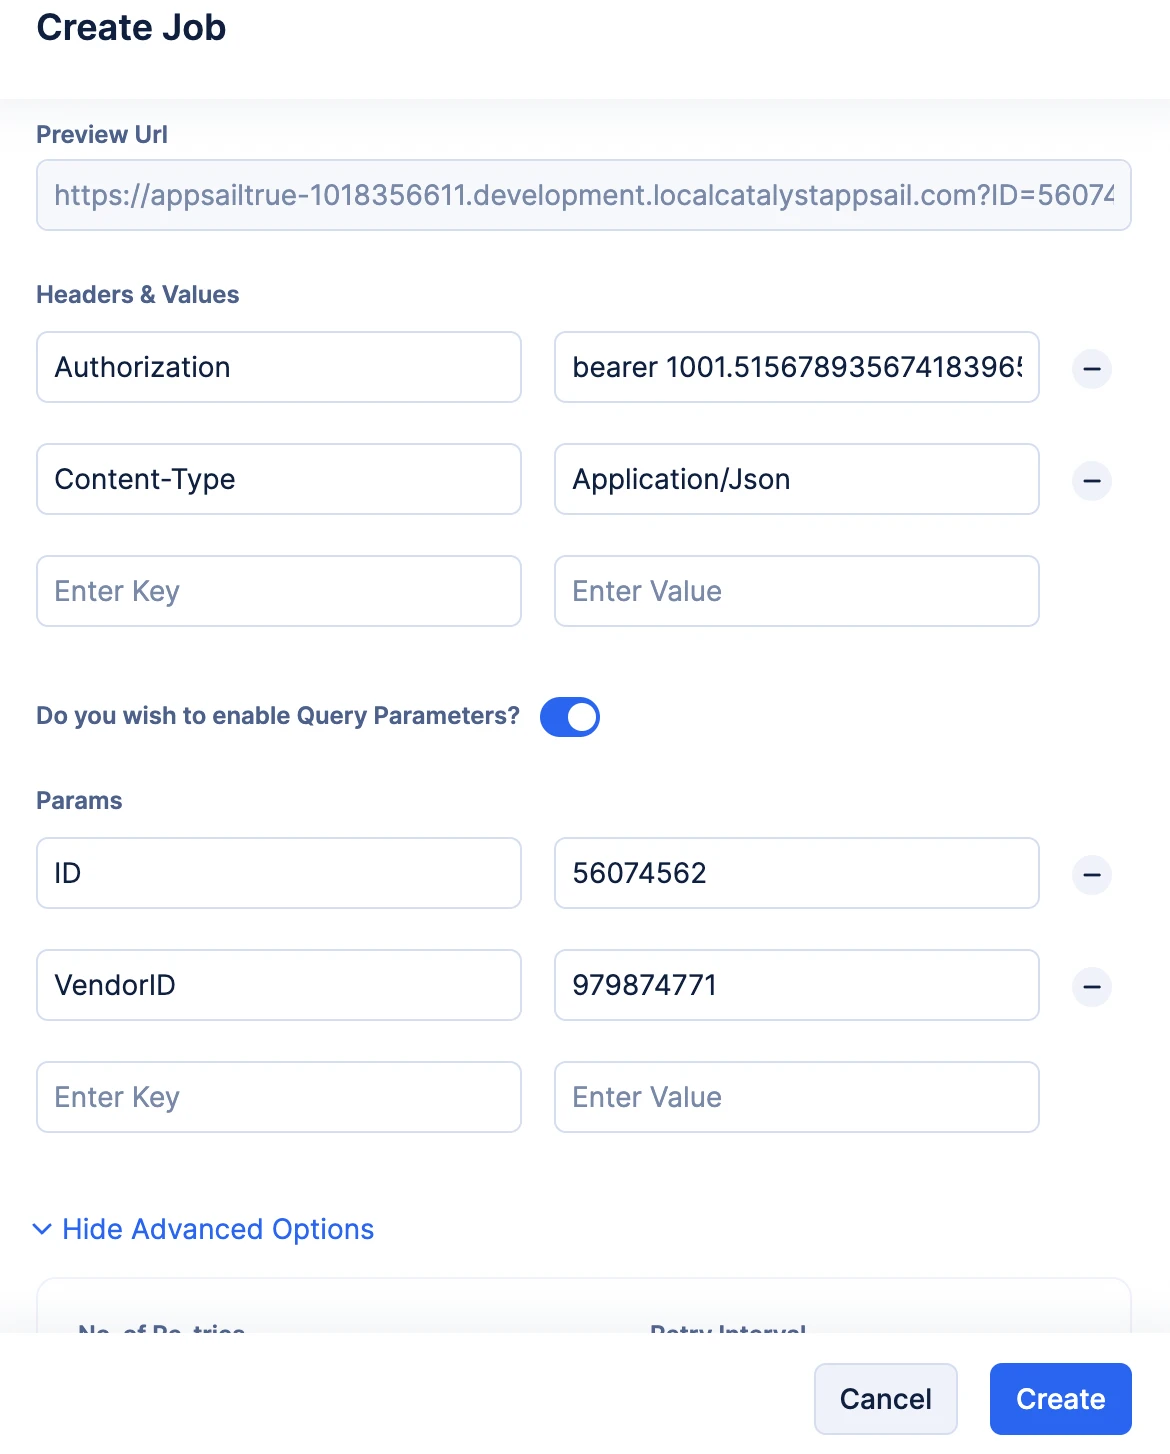
You can provide Headers & Value in a key-value pair format.
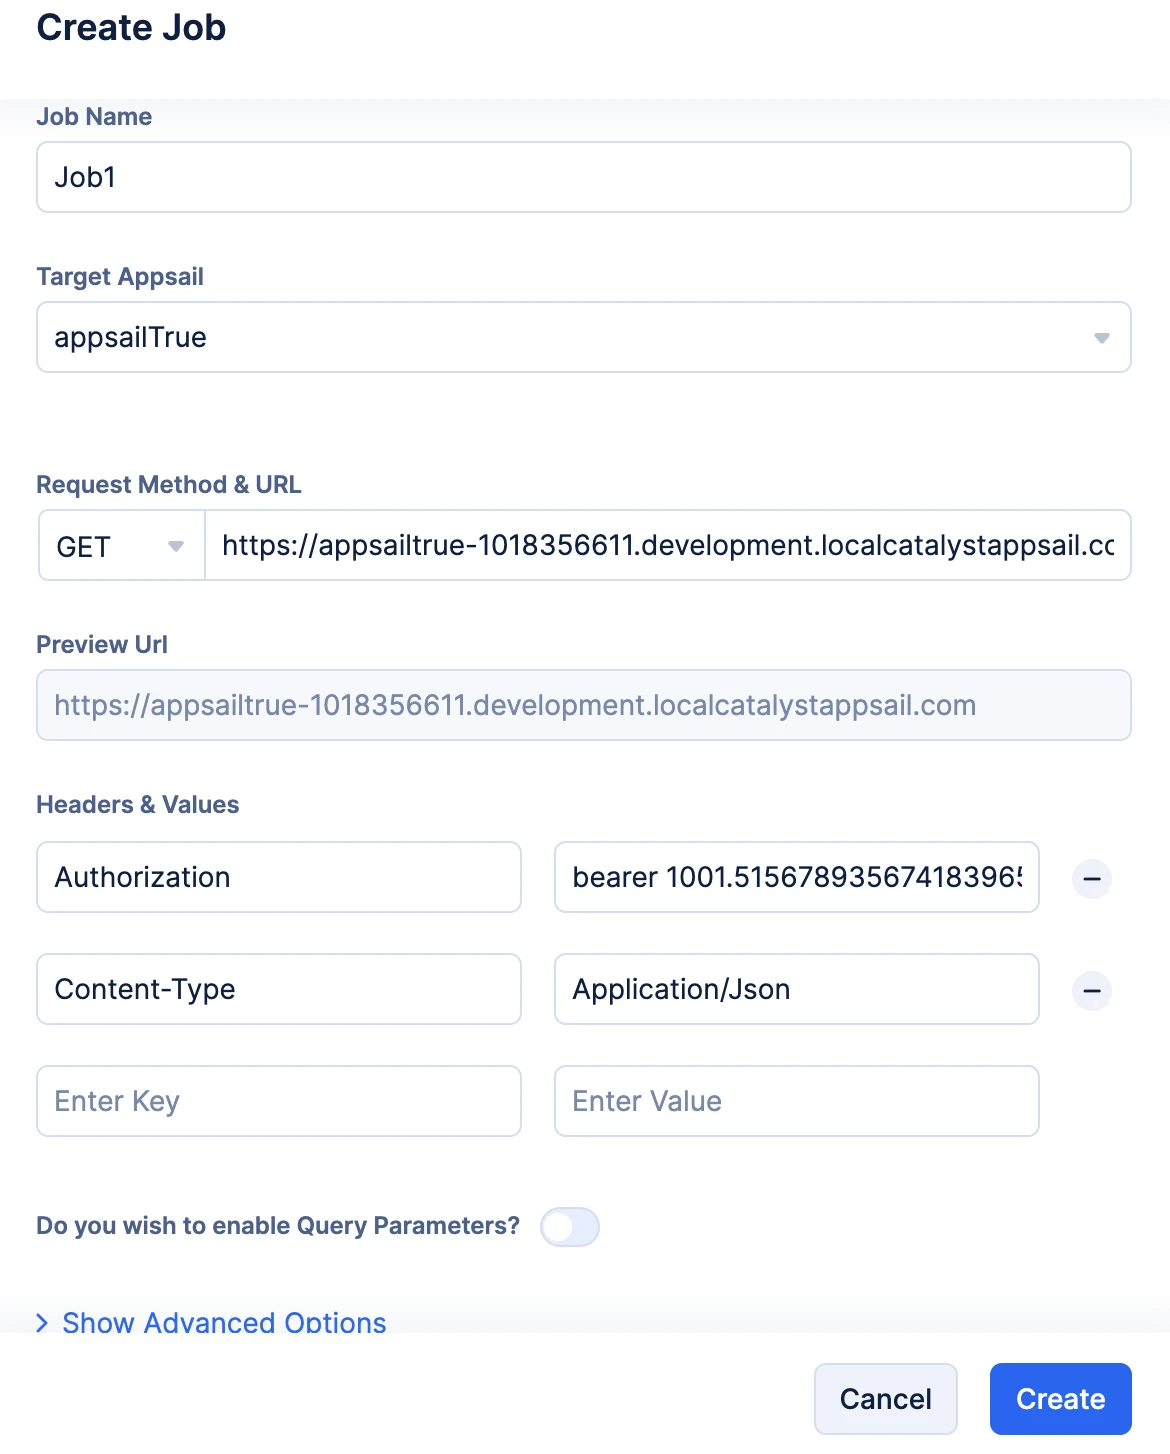
You can also provide Params in a key-value pair format by enabling the Query Parameters toggle.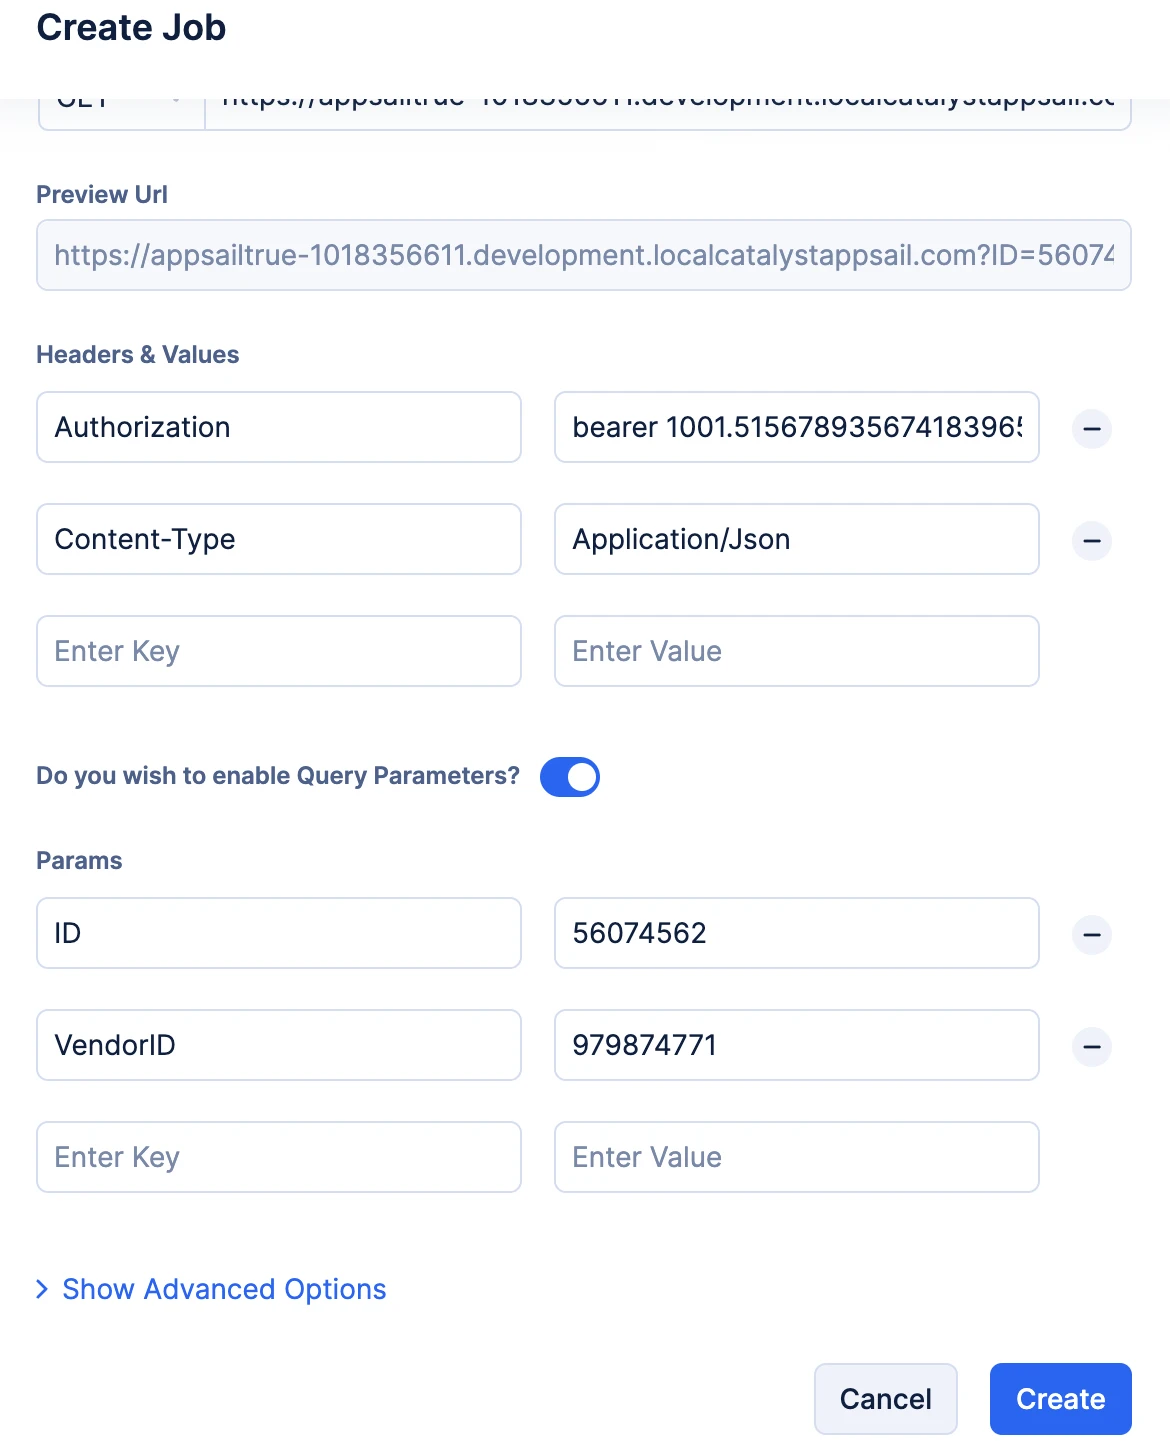
You can verify your Query Params, as the Preview URL section gets populated automatically when you input them.
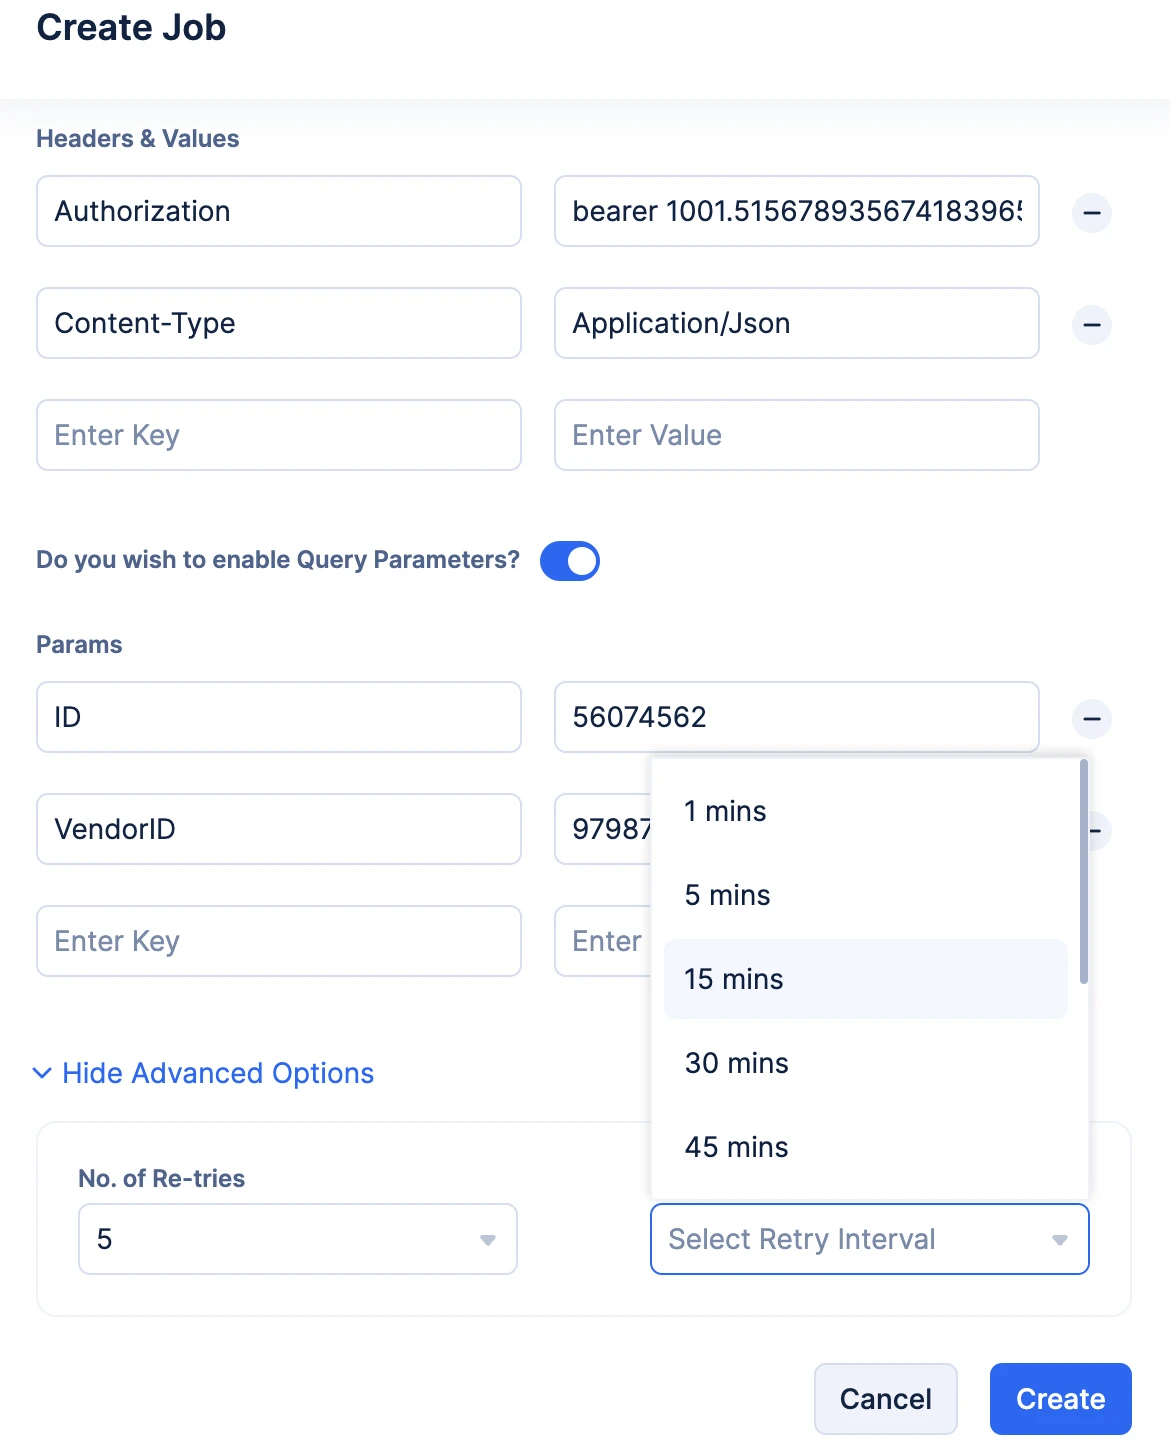
- Optionally, you can click the Show Advanced Options to provide resubmission instructions. You can choose the number of retries you wish to attempt from the No. of Retries drop-down, and you can choose the time interval between each retry attempt using the Retry Interval drop-down.
- Click Create, after confirming your configurations.
Once you click Create, the job will be immediately submitted to the job pool for execution. This makes the Builder option a great tool to test your job pool’s performance.
Once the job is submitted, you will be able to view all the general details of the submitted job in the Job Definition section. You will also be able to view the status of the Job Execution in the Job Execution & Status section.

The execution status of the job will also be labeled at the top next to the Job Name. You will also be provided with the Job Definition in a JSON code format that you can copy and use to submit a new job with the same specifications. You can also visit the logs of the execution generated in DevOps’s Logs component by clicking the View Logs button.
- Click the SDK tab.
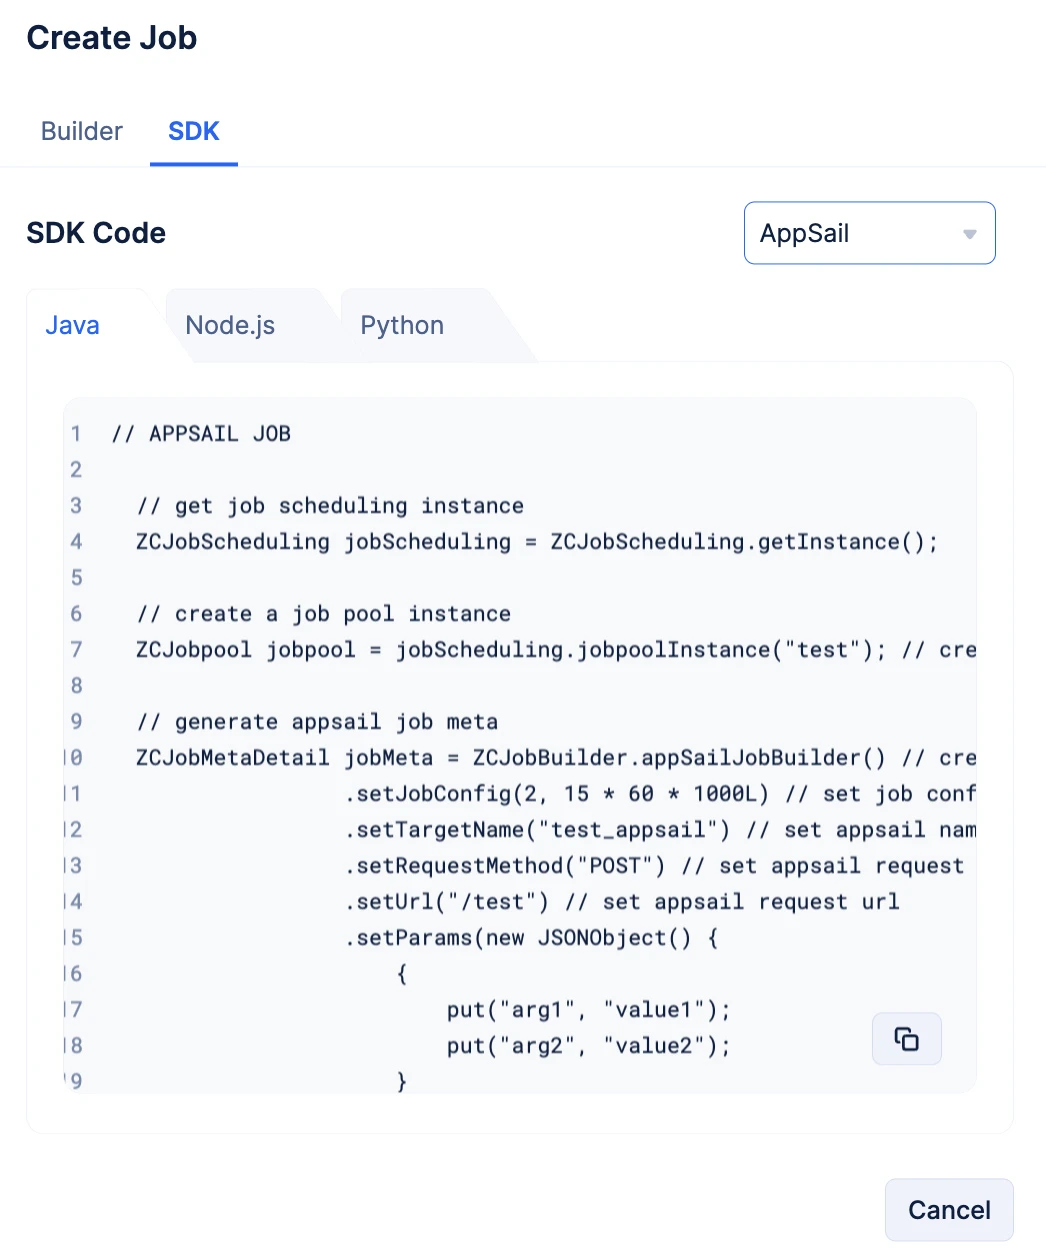
Choose your preferred programming language by navigating the tabs and copy the required code snippet, using the copy-button.
// APPSAIL JOB
// get job scheduling instance
ZCJobScheduling jobScheduling = ZCJobScheduling.getInstance();
// create a job pool instance
ZCJobpool jobpool = jobScheduling.jobpoolInstance(“test”); // create a job pool instance for the appsail job pool named test
// generate appsail job meta
ZCJobMetaDetail jobMeta = ZCJobBuilder.appSailJobBuilder() // create appsail job builder
.setJobConfig(2, 15 * 60 * 1000L) // set job config - job retries => 2 retries in 15 mins (optional)
.setTargetName(“test_appsail”) // set appsail name
.setRequestMethod(“POST”) // set appsail request method
.setUrl("/test") // set appsail request url
.setParams(new JSONObject() {
{
put(“arg1”, “value1”);
put(“arg2”, “value2”);
}
}) // set appsail request query params
.setHeaders(new JSONObject() {
{
put(“IS_TEST_REQUEST”, “true”);
}
}) // set the appsail request’s headers (optional)
.setRequestBody(“test_request”) // set the appsail request’s body (optional)
.setJobName(“test_job”) // set job name
.build(); // build appsail job meta
// submit appsail job
ZCJobDetails appSailJob = jobpool.submitJob(jobMeta);
// APPSAIL JOB
const jobScheduling = app.jobScheduling(); // create job scheduling instance
const jobpool = jobScheduling.jobpool({ name: ’test’ }); // create job pool instance for the appsail job pool named test
// create appsail job
const appsailJob = await jobpool.submitJob({
job_name: ’test_job’, // set a name for the job
target_type: ‘AppSail’, // set the target type as AppSail for appsail jobs
target_name: ’target_appsail’, // set the target appsail’s name (optional) (either target_id or target_name is mandatory)
// target_id: ‘123467890’, // set the target appsail’s Id (optional) (either target_id or target_name is mandatory)
request_method: ‘POST’, // set the appsail request’s method
url: ‘/test’, // set the appsail’s url path (optional)
params: {
arg1: ’test’,
arg2: ‘job’
}, // set the appsail request’s query params (optional)
headers: {
IS_TEST_REQUEST: ’true’
}, // set the appsail request’s headers (optional)
request_body: ’test_request’, // set the appsail request’s body (optional)
job_config: {
number_of_retries: 2, // set the number of retries
retry_interval: 15 * 60 * 1000 + ’’ // set the retry  interval
} // set job config - job retries => 2 retries in 15 mins (optional)
});
job_scheduling = app.job_scheduling() # create job scheduling instance
jobpool = job_scheduling.jobpool(jobpool_name=“test”) # create jobpool instance for the appsail jobpool named test
 # create appsail job

appsail_job = jobpool.submit_job({
‘job_name’: ’test_job’, # set a name for the job
’target_type’: ‘AppSail’, # set the target type as AppSail for appsail jobs
’target_name’: ’target_appsail’, # set the target appsail’s name (optional) (either target_id or target_name is mandatory)
# ’target_id’: ‘123467890’, # set the target appsail’s Id (optional) (either target_id or target_name is mandatory)
‘request_method’: ‘POST’, # set the appsail request’s method
‘url’: ‘/test’, # set the appsail’s url path (optional)
‘params’: {
‘arg1’: ’test’,
‘arg2’: ‘job’
}, # set the appsail request’s query params (optional)
‘headers’: {
‘IS_TEST_REQUEST’: ’true’
}, # set the appsail request’s headers (optional)
‘request_body’: ’test_request’, # set the appsail request’s body (optional)
‘job_config’: {
’number_of_retries’: 2, # set the number of retries
‘retry_interval’: 15 * 60 * 1000 # set the retry interval
} # set job config - job retries => 2 retries in 15 mins (optional)
})
These SDKs will also be available in these sections:
- Paste the copied code in your code file and configure the job according to your required logic.
- The job will be submitted to the job pool during run time.
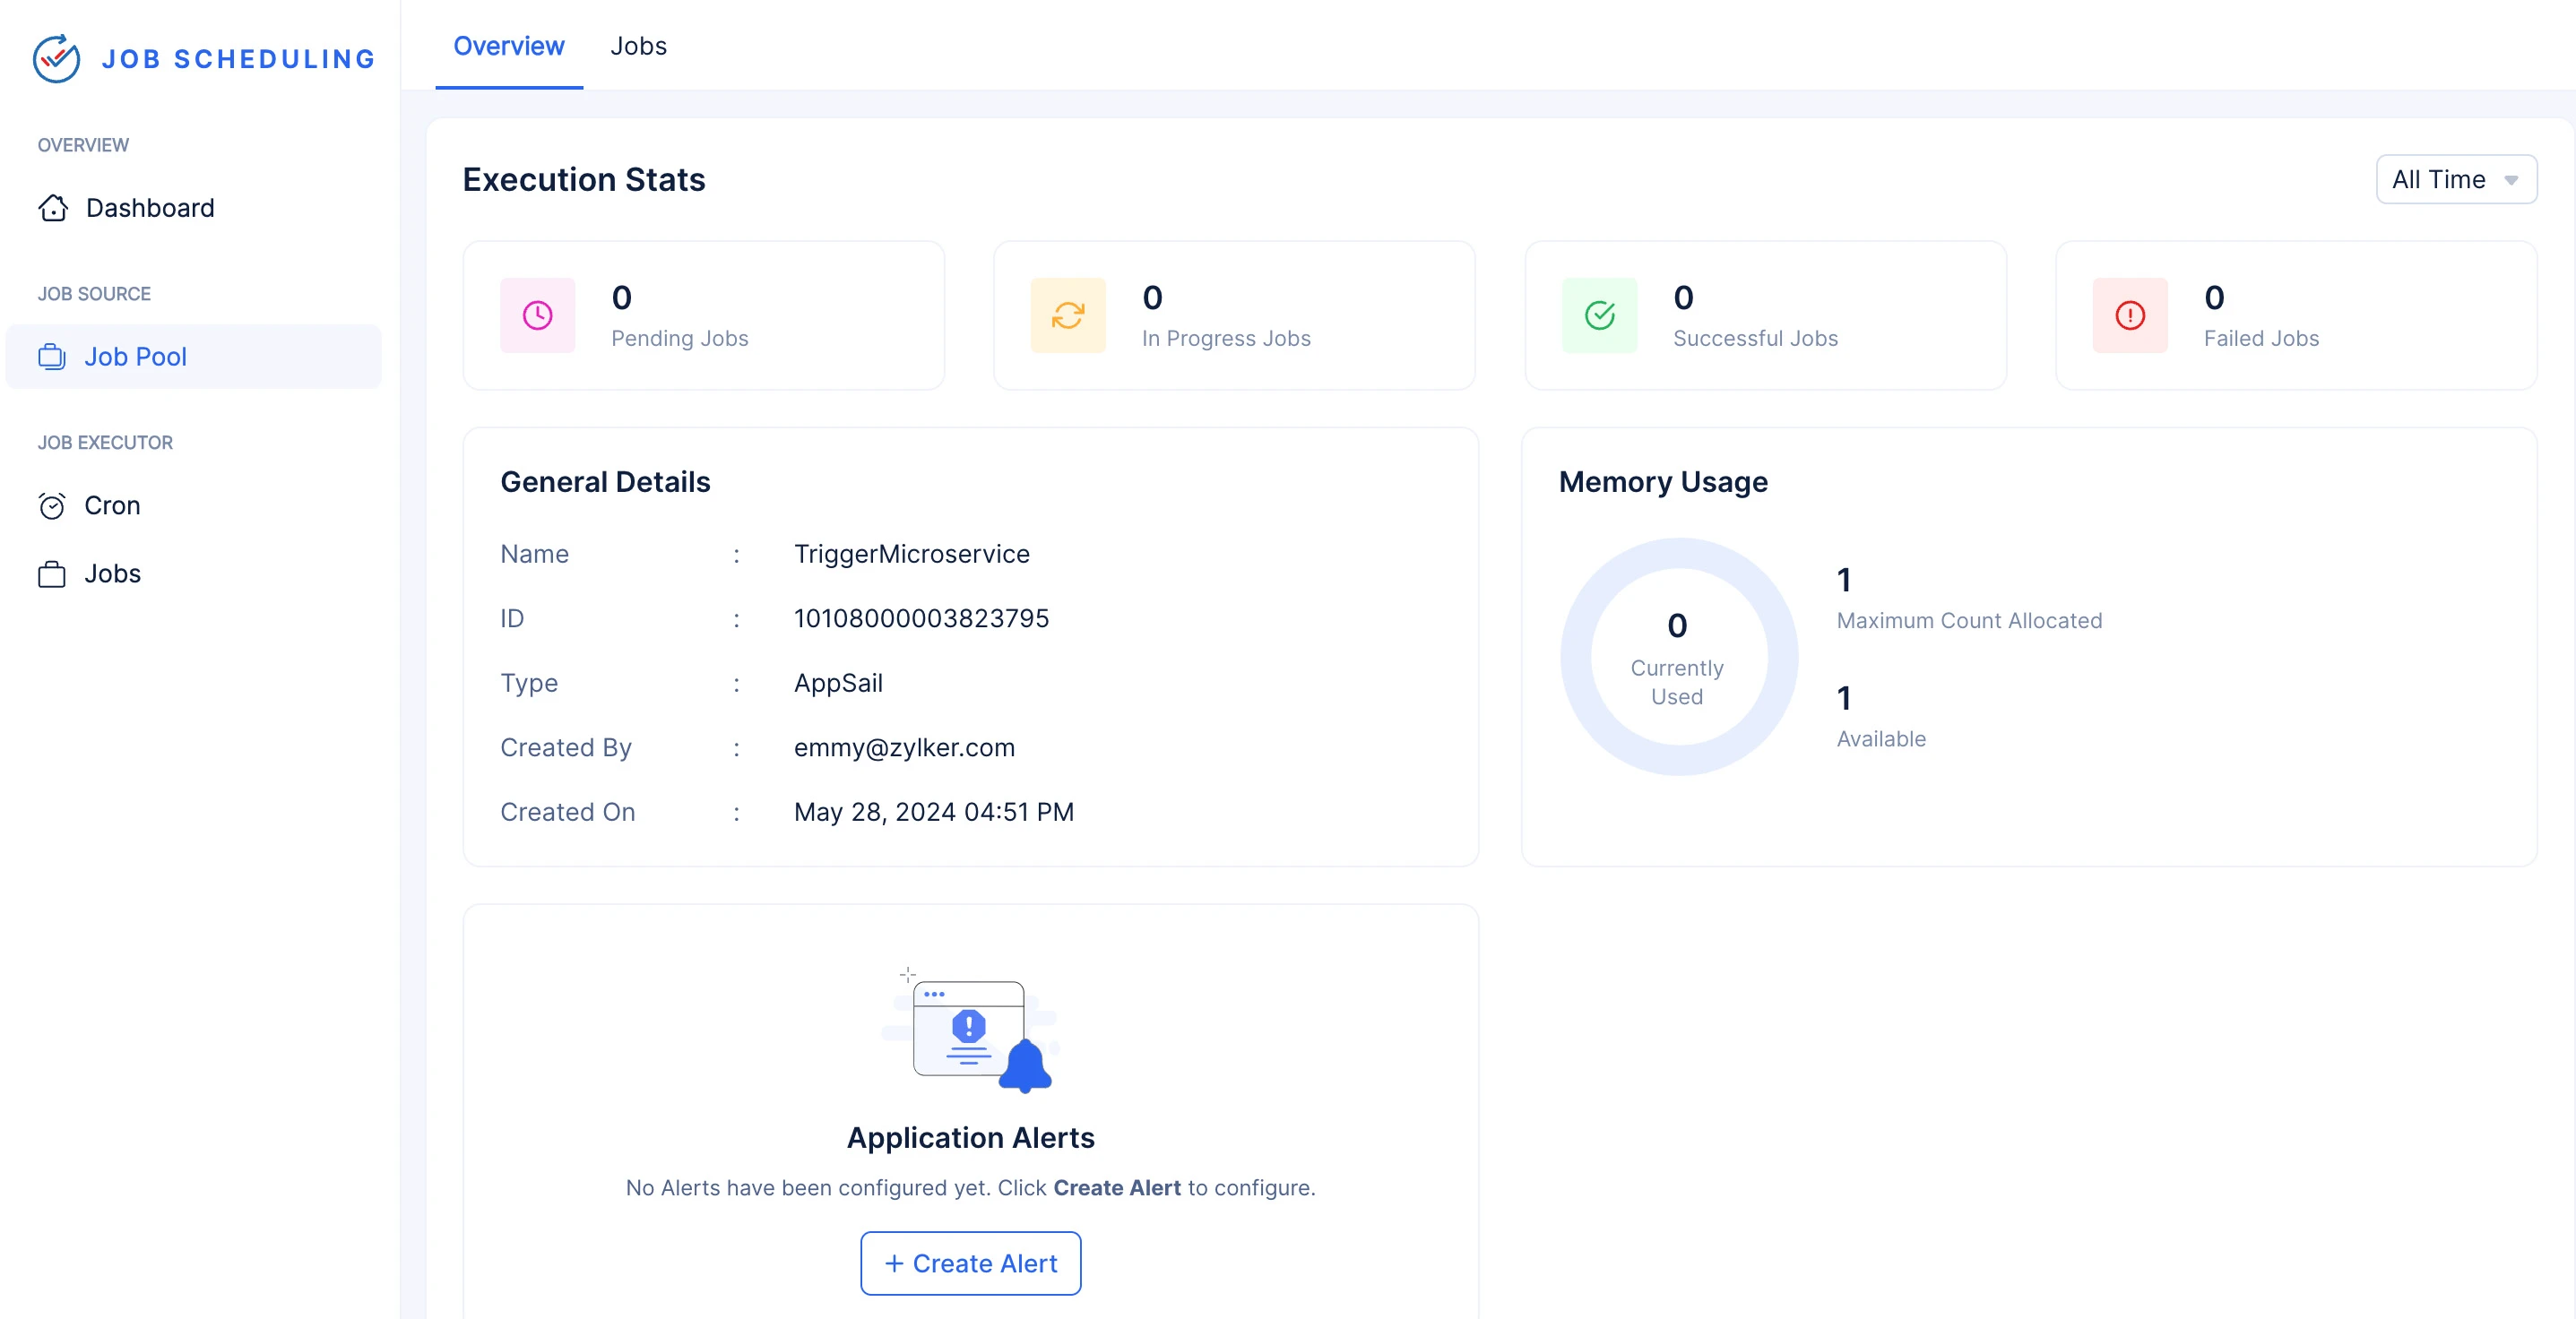
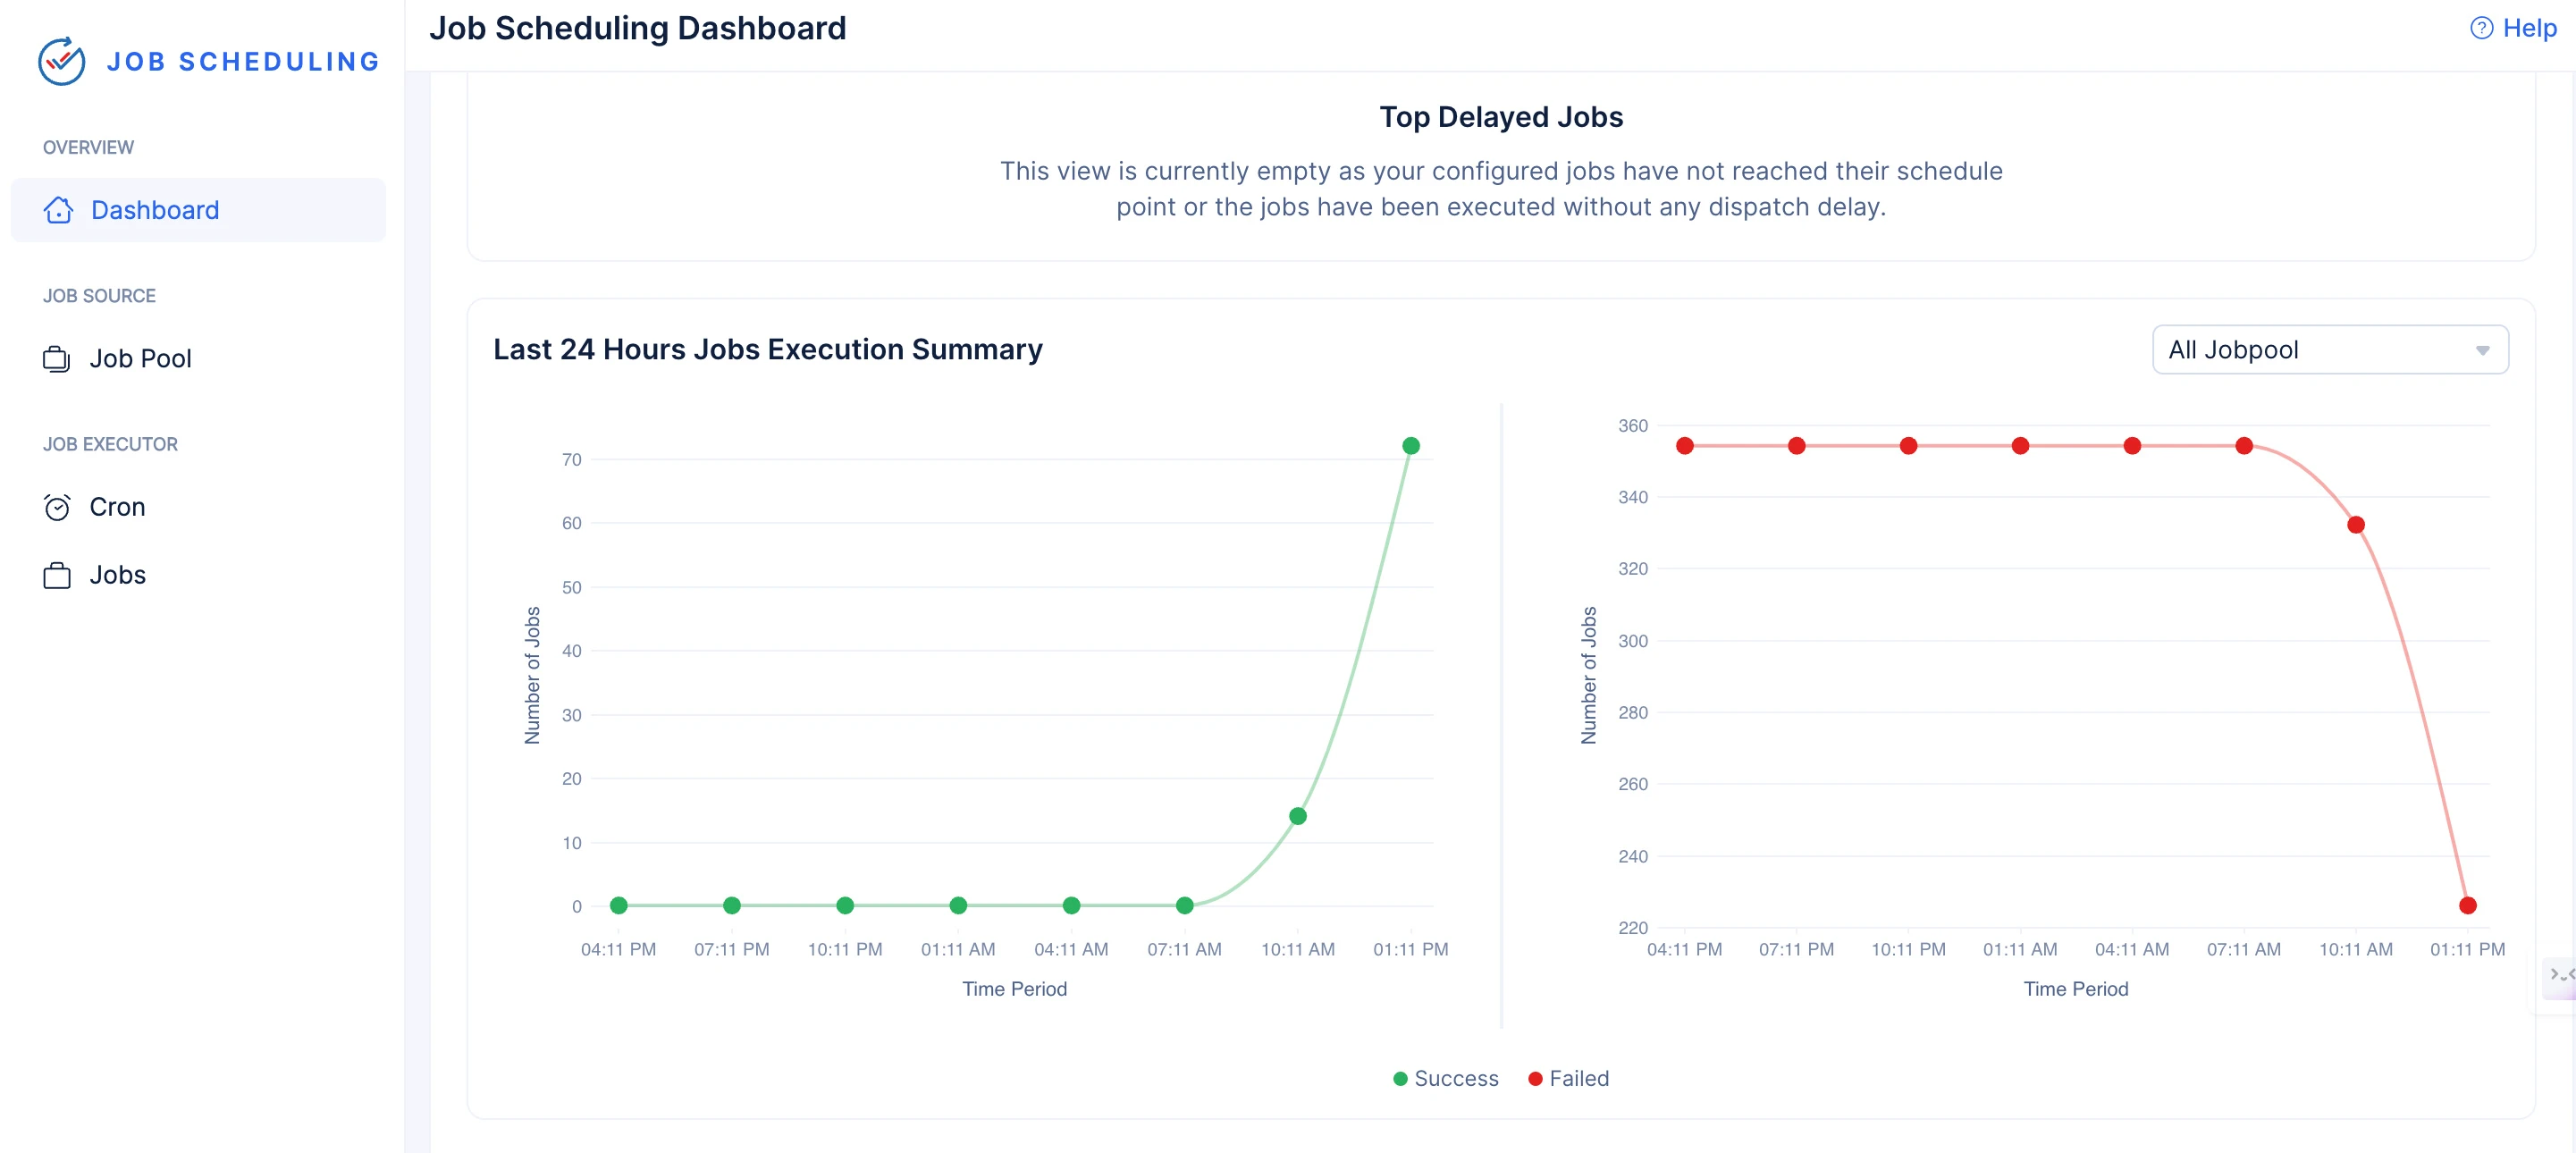
You can view the performance and status of your job in the following sections:
-
The Dashboard
-
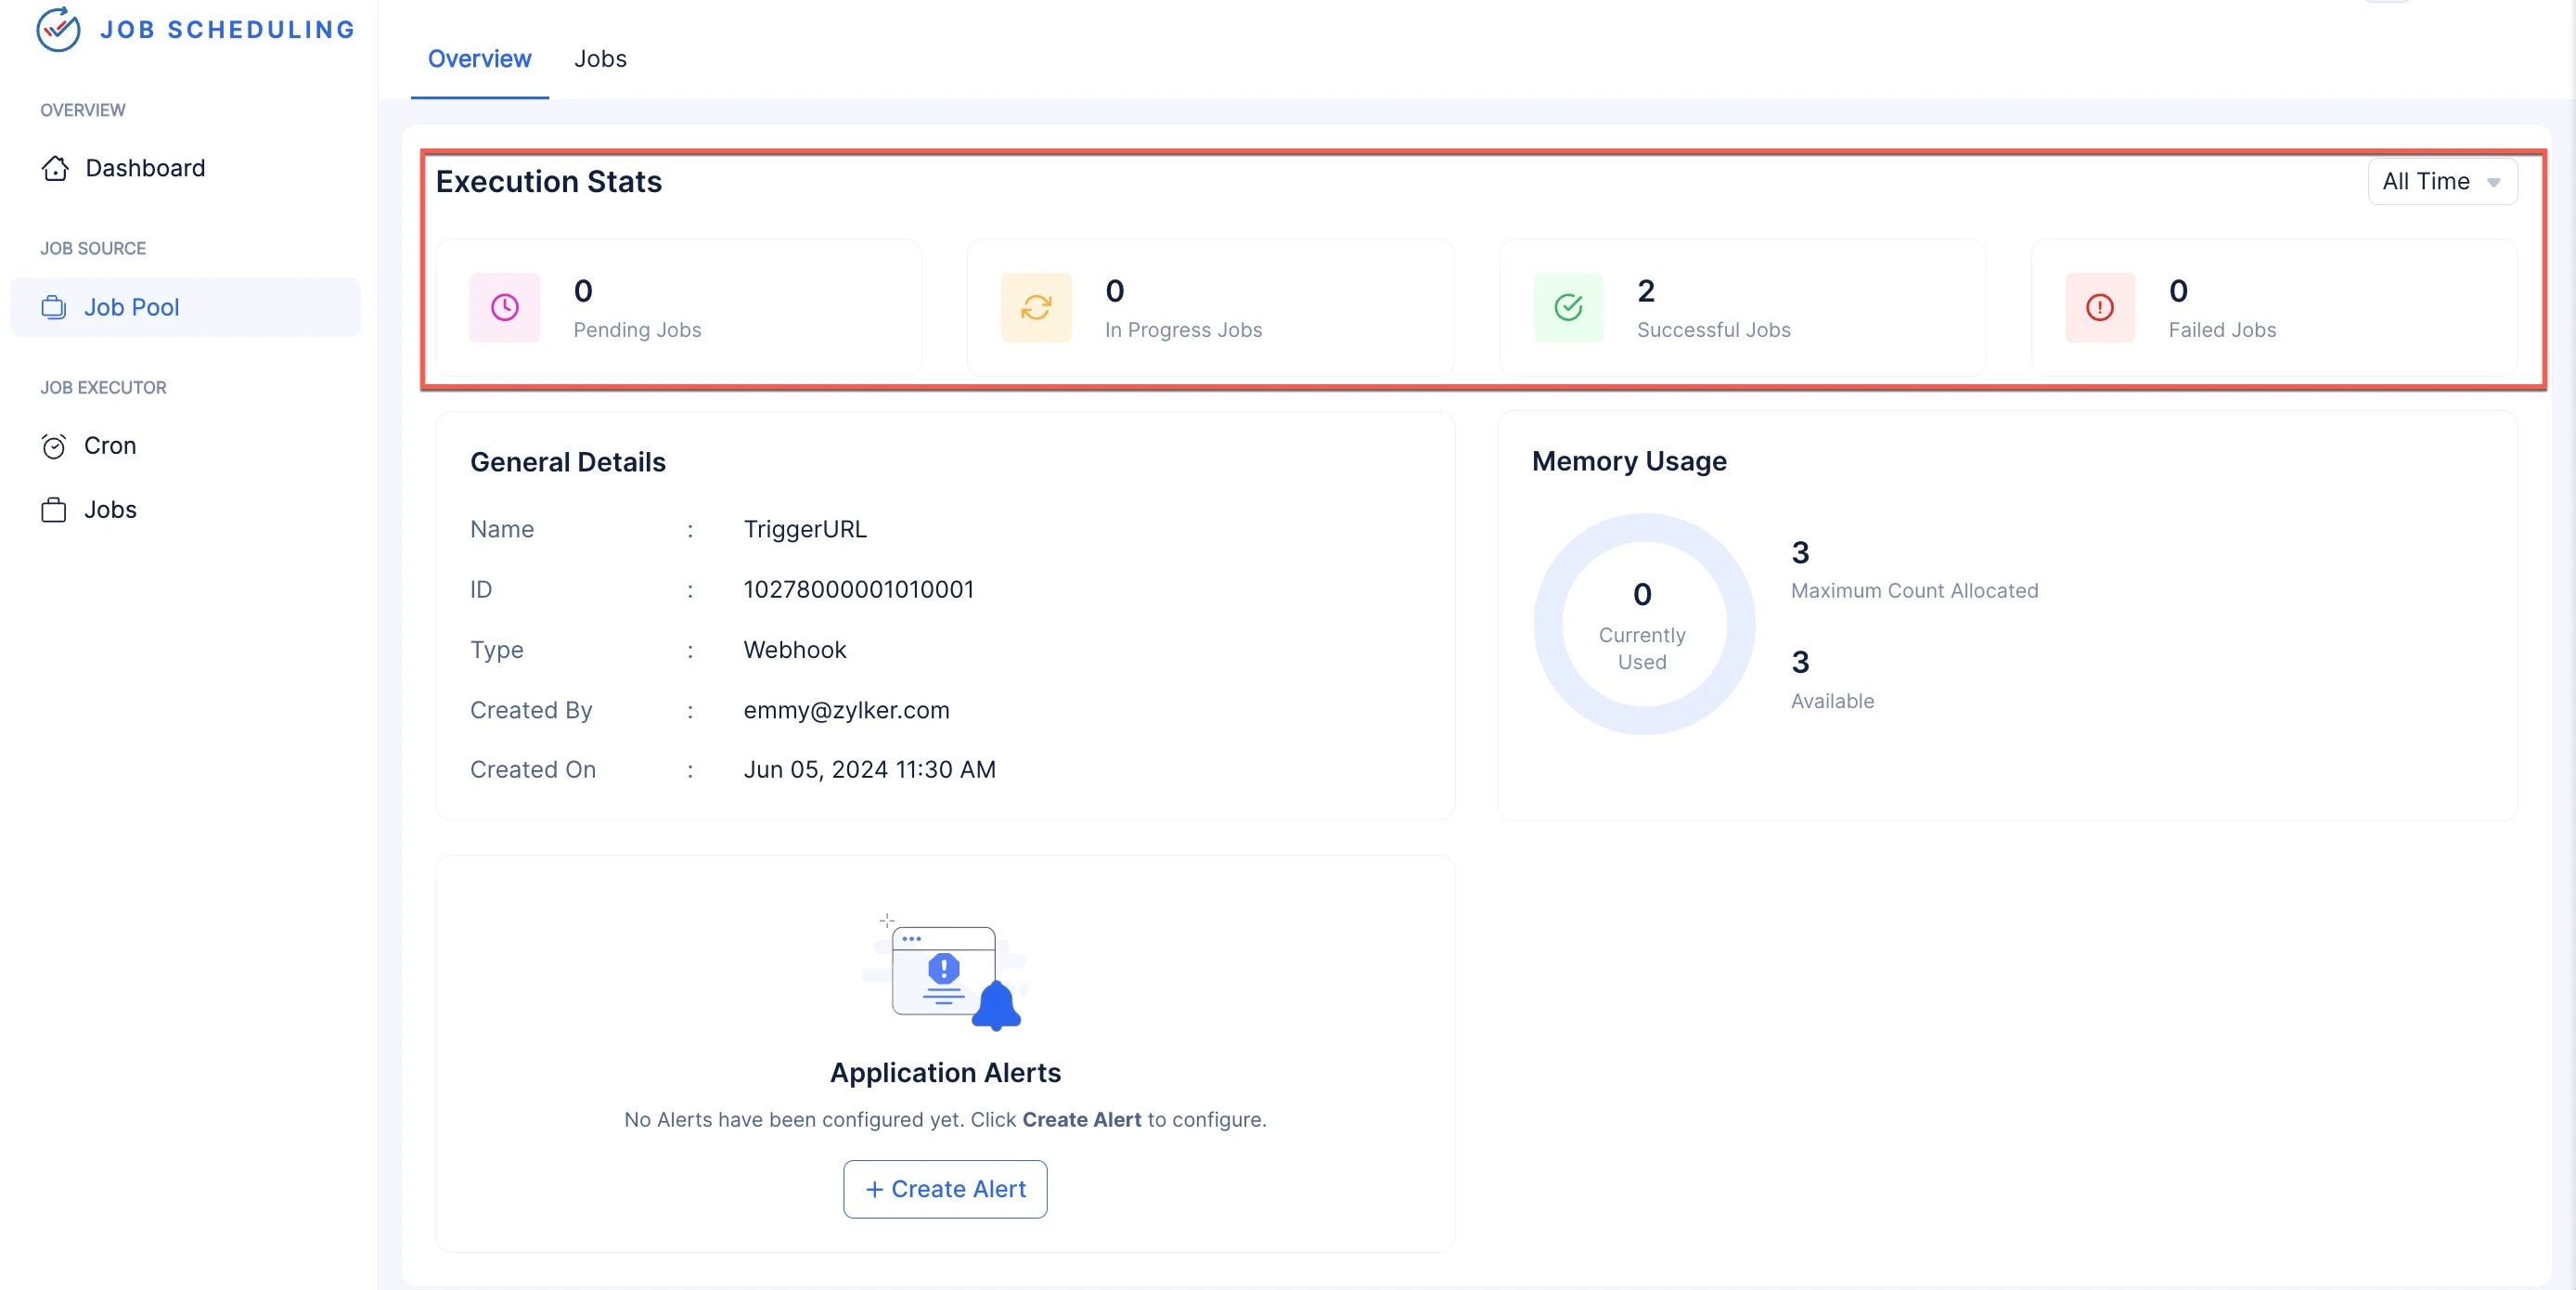
The Job Pool Overview section
-
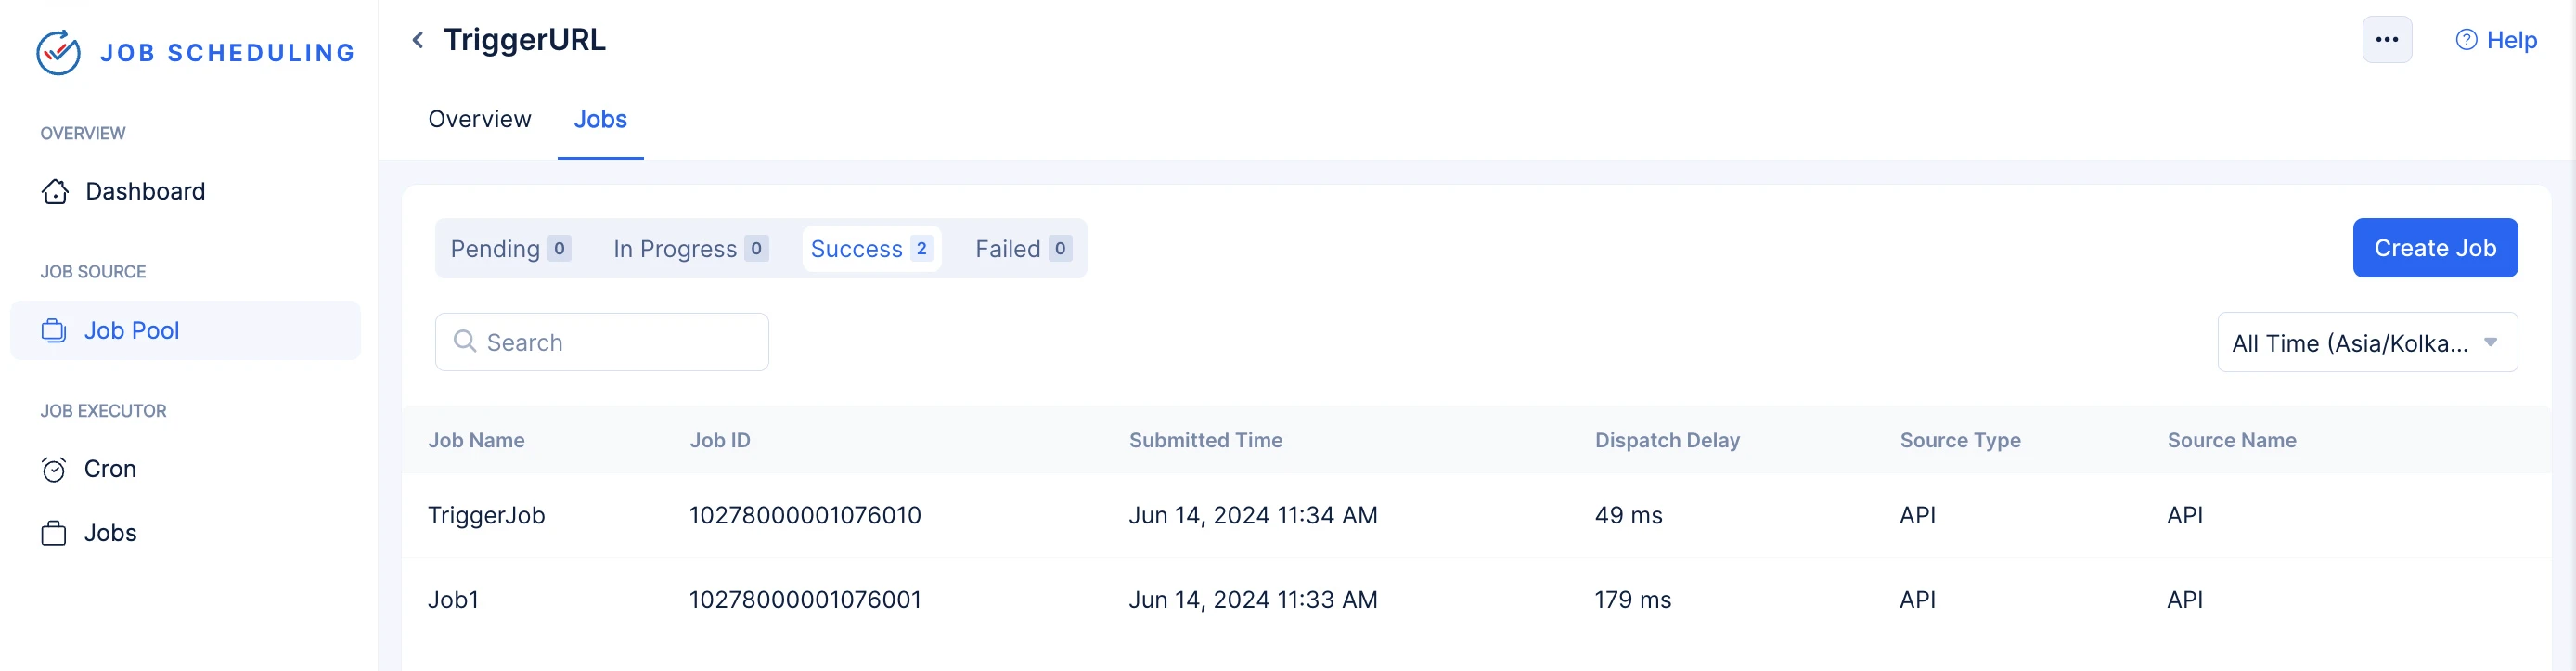
The Jobs tab in the Job Pool section
-
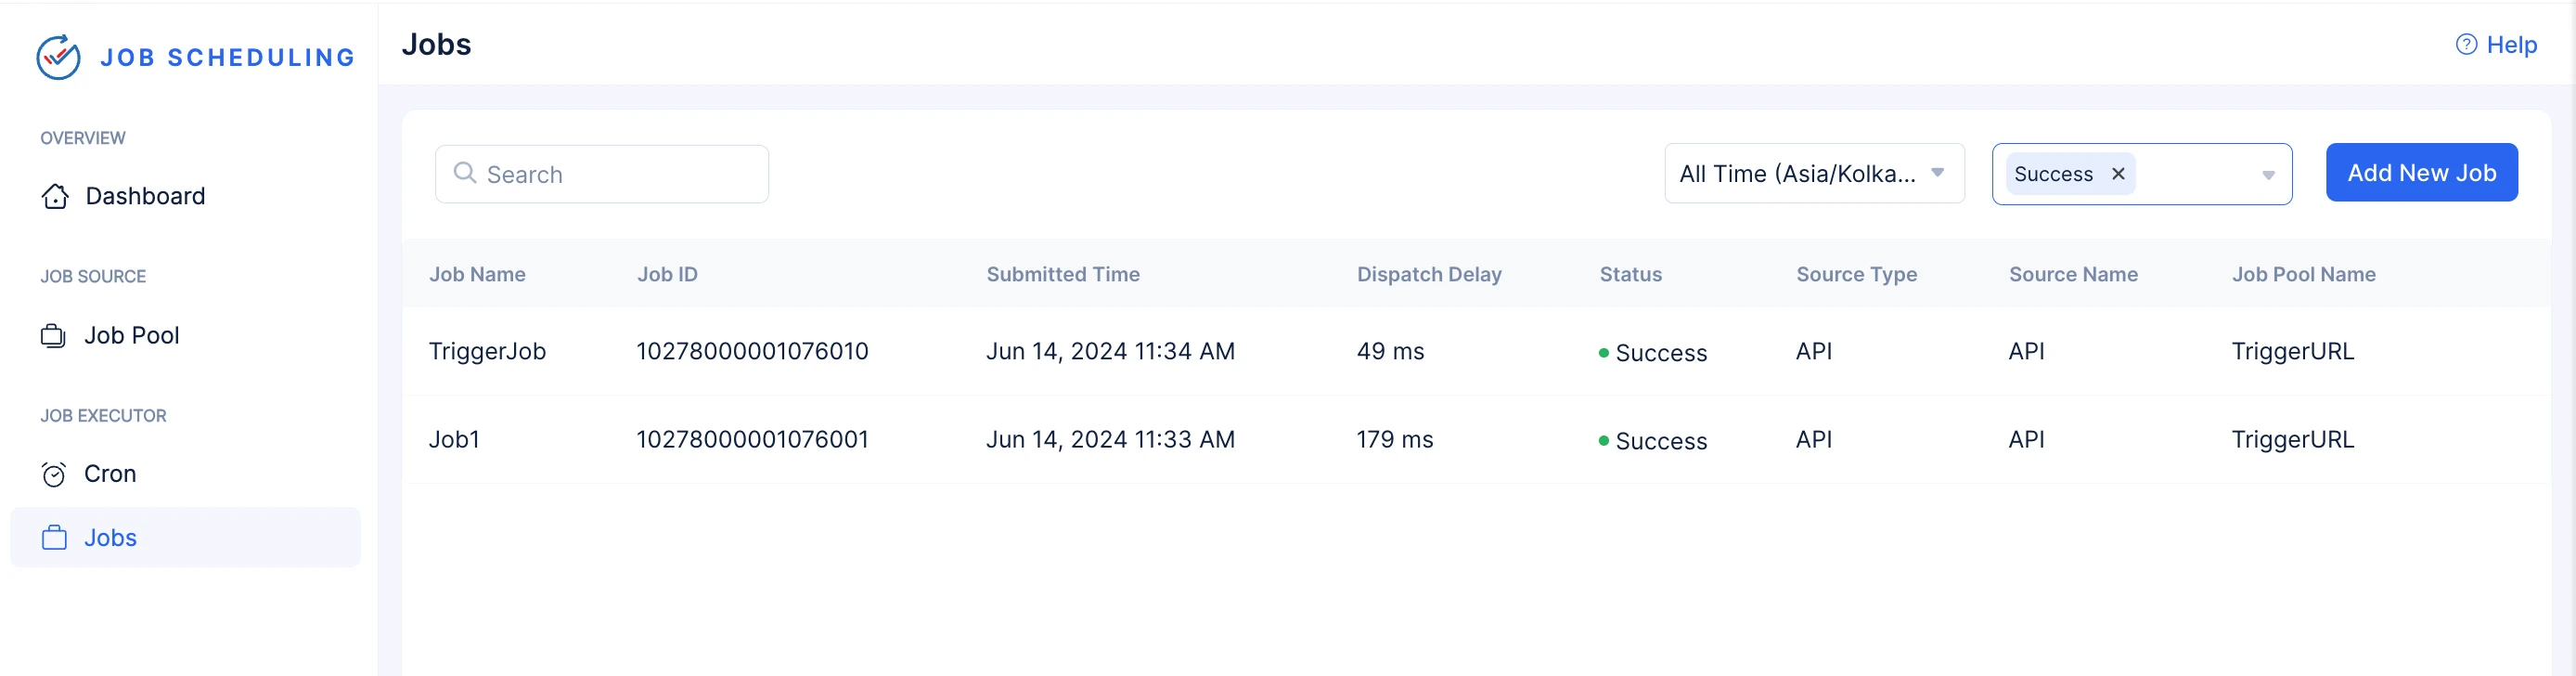
The Jobs component section
You can submit the next job to the job pool in this section by clicking the Create Job button and following the steps mentioned above.
Last Updated 2025-11-19 20:37:41 +0530 IST
Yes
No
Send your feedback to us