クライアントの設定
クライアントコンポーネントを設定しましょう。
クライアントディレクトリには以下が含まれています:
- フロントエンドアプリケーションのHTMLコードを含むindex.htmlファイル
- フロントエンドアプリケーションのCSSコードを含むmain.cssファイル
- JavaScriptコードを含むmain.jsファイル
- client-package.json設定ファイル
index.htmlとmain.jsをコーディングします。また、アプリケーションのホームページが認証済みページになるようにclient-package.jsonを変更します。
コードについてはこのセクションの最後で説明します。
以下のコードをコピーして、IDEを使用してプロジェクトのclient/directoryにあるそれぞれのファイルに貼り付け、ファイルを保存してください。
<!DOCTYPE html>
<html>
<head>
<title>Profile Information</title>
<link rel=“stylesheet” href=“https://cdnjs.cloudflare.com/ajax/libs/font-awesome/4.7.0/css/font-awesome.min.css" >
<script src=“main.js”></script>
<script src=“https://static.zohocdn.com/catalyst/sdk/js/4.0.0/catalystWebSDK.js"> </script>
<script src=”/__catalyst/sdk/init.js”></script>
<style>
.card {
max-width: 500px;
margin: auto;
text-align: center;
font-family: arial;
background-color: #a5a4a4;
}
.title {
font-size: 23px;
color: black;
}
button {
border: none;
outline: 0;
display: inline-block;
padding: 8px;
color: white;
background-color: #000;
text-align: center;
cursor: pointer;
width: 50%;
font-size: 18px;
border-radius: 8px;
}
a {
text-decoration: none;
font-size: 22px;
color: black;
}
button:hover,
a:hover {
opacity: 0.7;
}
body{
background-color:#a5a4a4;
font-size: 20px;
visibility: hidden;
}
p{
font-family: ‘Trebuchet MS’, ‘Lucida Sans Unicode’, ‘Lucida Grande’, ‘Lucida Sans’, Arial, sans-serif;
font-size: 10px;
font-weight: bold;
}
</style>
</head>
<body onload=“showProfile()">
<h1 style=“text-align:center”>User Profile Information</h1>
<div class=“card”>
<img width=“200px” height=“450px” src=“https://cdn2.iconfinder.com/data/icons/user-management/512/profile_settings-512.png" alt=“John” style=“width:80px;height: 80px;” >
<p class=“title” id=“fname”></p>
<p class=“title” id=“lname”></p>
<p class=“title"id=“mailid” ></p>
<p class=“title"id=“tzone” ></p>
<p class=“title"id=“ctime” ></p>
<p><button onclick=“logout()">Logout</button></p>
</div>
</body>
</html>
function showProfile() {
debugger;
//catalyst.auth.isUserAuthenticated()メソッドは、認証済みユーザー(ログインしているユーザー)のみがページにアクセスできるようにします
//ページのbodyでこのメソッドを読み込むことで、認証済みユーザーのみが特定のページにアクセスできるようにすることができます
catalyst.auth.isUserAuthenticated().then(result => {
    //ユーザーがログインしている場合、ページのこれらのコンテンツがユーザーに表示されます
    document.body.style.visibility = "visible";
    const first_name = "First Name: " + result.content.first_name;
    document.getElementById("fname").innerHTML = first_name;
    const last_name = "Last Name: " + result.content.last_name;
    document.getElementById("lname").innerHTML = last_name;
    const mailid = "Email Address: " + result.content.email_id;
    document.getElementById("mailid").innerHTML = mailid;
    const tzone = "Time Zone: " + result.content.time_zone;
    document.getElementById("tzone").innerHTML = tzone;
    const created_time = " Joined On: " + result.content.created_time;
    document.getElementById("ctime").innerHTML = created_time;
}).catch(err => {
    //ユーザーがログインしていない場合、これがユーザーに表示され、ログインページにリダイレクトされます
    document.body.style.visibility = "visible";
    document.body.innerHTML = 'You are not logged in. Please log in to continue. Redirecting you to the login page..';
    setTimeout(function () {
       window.location.href = "/__catalyst/auth/login";
    }, 5000);
});

}
function logout() {
//signOutメソッドは、ユーザーをアプリケーションからサインアウトするために使用されます
const redirectURL = location.protocol +"//"+ location.hostname + “/__catalyst/auth/login”;
catalyst.auth.signOut(redirectURL);
}
{
    "name" : "ZylkerTechnologies",
    "version" : "0.0.1",
    "homepage" : "/__catalyst/auth/login",
    "login_redirect" : "index.html"
}
クライアントディレクトリが設定されました。
関数とクライアントコードの動作を確認しましょう:
- エンドユーザーは、コンソールで設定・スタイリングしたLogin Pageに最初にアクセスします。
- アカウントを作成するには、Sign UpオプションをクリックしてSign Upページに移動します。
-
情報が入力されてSign Upをクリックするか、選択したソーシャルログインを使用してサインアップを試みると、その詳細がJSON入力としてCustom User Validation関数(authorization_portal_function/main.py)に提供されます。
-
関数は、コーディングした条件が満たされた場合にのみユーザーを認証します。このチュートリアルでは、Zylker登録メールアドレスを使用してアプリケーションにサインアップした場合にのみ、ユーザーが認証されます。
-
認証に成功すると、アプリケーションへのサインアップに使用したアカウントにメール検証メールが送信されます。
-
ユーザーがメール内のリンクをクリックしてメールアドレスを確認すると、アプリケーションにサインアップされます。詳細はAuthenticationコンポーネントのUser Managementセクションで確認できます。
-
エンドユーザーは、認証済みの資格情報を使用してアプリケーションにログインできるようになります。
-
エンドユーザーは、Forgot Passwordオプションをクリックしてパスワードをリセットすることもできます。この場合、登録済みメールアドレスにPassword Resetメールが送信されます。メールに記載された手順に従って、簡単に資格情報をリセットできます。
クライアントコンポーネントを設定しましょう。
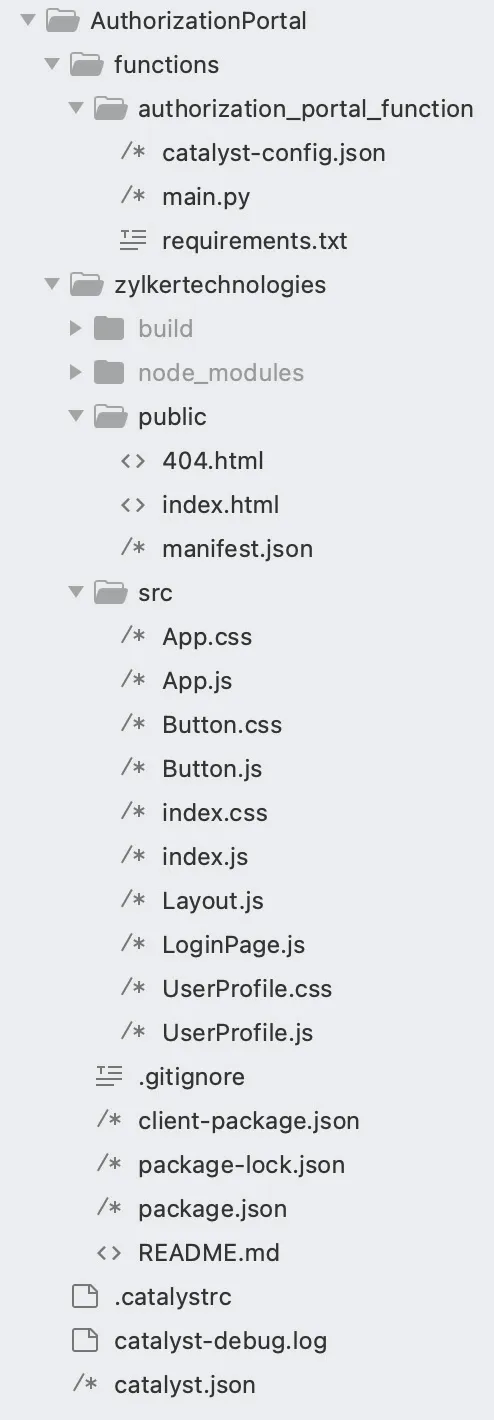
Reactウェブクライアントディレクトリには以下のファイルが含まれています:
- クライアントのルートディレクトリには、クライアントコンポーネントの名前、バージョン、デフォルトホームページ、リダイレクトページを定義する設定ファイルであるclient-package.jsonファイルが含まれています。
- zylkertechnologiesクライアントディレクトリには、Reactアプリのデフォルトプロジェクト構造に従って、2つのサブフォルダが含まれています:
- publicフォルダは、WebアプリのアイコンファイルA、index.htmlファイル、404.htmlファイルなど、ブラウザがパブリックURLを通じてオープンにアクセスできるファイルを保持するために使用されます。
- srcフォルダには、Reactアプリをコンパイルする際にビルドフォルダに含まれるアプリケーションのソースファイルが含まれています。
- クライアントディレクトリには、package.json依存関係ファイルと隠しファイルの.gitignoreファイルも含まれています。
- publicフォルダに含まれるファイル:
- ネイティブReactファイル(setup Tests.js、index.js、reportWebVitals.js、logo.svg、App.test.jsなど)。
- index.html - CatalystコンポーネントにアクセスするためのCatalyst Web SDKを含みます。
- エラー処理要素を含む追加の404.htmlファイルを作成します。
- srcフォルダに含まれるファイル:
- ネイティブReactファイル(setupTests.js、reportWebVitals.js、logo.svg、App.test.jsなど)。
- App.js - アプリケーションへのハッシュルートを含みます
- App.css - アプリケーション全体のスタイリング要素を含みます
- index.js - Reactアプリケーションのエントリポイント。
- index.css - index.jsファイルに存在する要素のスタイリングを含みます。
- srcフォルダに以下のファイルを作成します:
- Button.css - アプリケーションに存在するLogoutボタンのスタイリング要素を含みます。
- Button.js - アプリケーションに存在するLogoutのReactコンポーネントを含みます。
- Layout.js - アプリケーションのロジックのReactコンポーネントを含みます
- LoginPage.js - Catalystコンソールで生成したログインページのReactコンポーネントを含みます。
- UserProfile.css - アプリケーションにログインした後に表示されるユーザー情報ページのスタイリング要素を含みます。
- UserProfile.js - ログイン後にユーザー詳細をレンダリングするReactコンポーネントを含みます。
index.html、404.html、App.js、App.css、index.css、index.js、Button.css、Button.js、Layout.js、LoginPage.js、UserProfile.css、およびUserProfile.jsファイルをコーディングします。また、アプリケーションのホームページが認証済みページになるようにclient-package.jsonも変更します。
追加のReactパッケージのインストール
以下のCLIコマンドを使用して、AuthorizationPortal/zylkertechnologiesクライアントディレクトリにreact-router-domパッケージをインストールする必要があります:
このコマンドにより、react-router-domモジュールがインストールされ、依存関係が保存され、アプリケーションで必要なハッシュルーティングを実行できるようになります。
これは、必要なファイルを作成し、不要なファイルを削除した後のクライアントディレクトリです。
以下のコードをコピーして、IDEを使用してクライアントディレクトリ(zylkertechnologies/public/)にあるindex.htmlと404.htmlにそれぞれ貼り付け、ファイルを保存してください。
<!DOCTYPE html>
<html lang=“en”>
<head>
<meta charset=“utf-8” />
<meta name=“viewport” content=“width=device-width, initial-scale=1” />
<meta name=“theme-color” content="#000000" />
<meta
name=“description”
content=“Web site created using create-react-app”
/>
<link rel=“manifest” href="%PUBLIC_URL%/manifest.json" />
<title>React App</title>
<script src=“https://static.zohocdn.com/catalyst/sdk/js/4.0.0/catalystWebSDK.js"> </script>
<script src=”/__catalyst/sdk/init.js"></script>
</head>
<body>
<noscript>You need to enable JavaScript to run this app.</noscript>
<div id=“root”></div>
</body>
</html>
<!DOCTYPE html>
<html lang=“en”>
<head>
<h2>You are viewing this 404 page since you tried to access a page which does not exist.</h2>
</head>
</html>
以下のコードをコピーして、IDEを使用してクライアントディレクトリ(zylkertechnologies/src/)にあるApp.css、App.js、index.js、index.css、Button.css、Button.js、Layout.js、LoginPage.js、UserProfile.css、およびUserProfile.jsにそれぞれ貼り付け、ファイルを保存してください。
.App {
text-align: center;
}
.App-logo {
height: 40vmin;
pointer-events: none;
}
@media (prefers-reduced-motion: no-preference) {
.App-logo {
animation: App-logo-spin infinite 20s linear;
}
}
.App-header {
background-color: #282c34;
min-height: 100vh;
display: flex;
flex-direction: column;
align-items: center;
justify-content: center;
font-size: calc(10px + 2vmin);
color: white;
}
.App-link {
color: #61dafb;
}
@keyframes App-logo-spin {
from {
transform: rotate(0deg);
}
to {
transform: rotate(360deg);
}
}
.inputs {
width: 90%;
padding: 15px;
margin: 15px 0 22px 0;
display: inline-block;
border: none;
background: #f1f1f1;
border-radius: 8px;
}
#root {
background-color: #c0c0c0;
}
h1,
h2,
h3,
h4,
h5,
h6,
p {
margin: 1;
}
import “./App.css”;
import { HashRouter, Navigate, Route, Routes } from “react-router-dom”;
import Layout from “./Layout”;
function App() {
return (
<HashRouter>
<Routes>
<Route path="/" element={<Layout />} />
<Route path="" element={<Navigate to="/" replace />} />
<Route path="*" element={<Navigate to="/" replace />} />
</Routes>
</HashRouter>
);
}
export default App;
body {
margin: 0;
-webkit-font-smoothing: antialiased;
-moz-osx-font-smoothing: grayscale;
background-color: #c0c0c0;
}
import React from “react”;
import “./index.css”;
import App from “./App”;
import * as ReactDOM from “react-dom/client”;
const root = ReactDOM.createRoot(document.getElementById(“root”));
root.render(
<React.StrictMode>
<App />
</React.StrictMode>
);
button {
border: none;
outline: 0;
display: inline-block;
padding: 8px;
color: white;
background-color: #000;
text-align: center;
cursor: pointer;
width: 20%;
font-size: 18px;
border-radius: 8px;
}
button:hover,
.forgetPassword-btn:hover,
a:hover {
opacity: 0.7;
}
a {
text-decoration: none;
font-size: 22px;
color: black;
}
import { useCallback } from “react”;
import “./Button.css”;
function Button({ title }) {
const logout = useCallback(() => {
const redirectURL = “/__catalyst/auth/login”;
window.catalyst.auth.signOut(redirectURL);
}, []);
return (
<div id=“logoutbtn” style={{ textAlign: “inline-block” }}>
<button onClick={logout} id=“logout” style={{ display: “inline-block” }}>
{title}
</button>
</div>
);
}
export default Button;
import UserProfile from “./UserProfile”;
import LoginPage from “./LoginPage.js”;
import { useEffect, useState } from “react”;
function Layout() {
const [isUserAuthenticated, setIsUserAuthenticated] = useState(false);
const [isFetching, setIsFetching] = useState(true);
const [userDetails, setUserDetails] = useState({
firstName: “”,
lastName: “”,
mailid: “”,
timeZone: “”,
createdTime: “”,
});
useEffect(() => {
window.catalyst.auth
.isUserAuthenticated()
.then((result) => {
let userDetails = {
firstName: result.content.first_name,
lastName: result.content.last_name,
mailid: result.content.email_id,
timeZone: result.content.time_zone,
createdTime: result.content.created_time,
};
setUserDetails(userDetails);
setIsUserAuthenticated(true);
})
.catch((err) => {})
.finally(() => {
setIsFetching(false);
});
}, []);
return (
<>
{isFetching ? (
<p>Loading ….</p>
) : isUserAuthenticated ? (
<UserProfile userDetails={userDetails} />
) : (
<LoginPage />
)}
</>
);
}
export default Layout;
import { useEffect } from “react”;
function Login() {
useEffect(() => {
window.location.href = window.origin + “/__catalyst/auth/login”;
}, []);
return null;
}
export default Login;
.card {
margin: auto;
text-align: center;
font-family: arial;
text-align: center;
font-weight: bold;
}
.title {
font-size: 23px;
color: black;
}
#userimg {
height: 20%;
width: 15%;
}
div.login {
padding-top: 10px;
height: 260px;
width: 500px;
margin: 0 auto;
}
div.signup {
display: none;
}
div.forgotpwd {
display: none;
}
/* Full-width input fields */
input[type=“text”] {
width: 90%;
padding: 15px;
margin: 15px 0 22px 0;
display: inline-block;
border: none;
background: #f1f1f1;
border-radius: 8px;
}
/* Add a background color when the inputs get focus */
input[type=“text”]:focus,
input[type=“password”]:focus {
background-color: #ddd;
outline: none;
}
/* Set a style for all buttons */
/* Float cancel and signup buttons and add an equal width */
.seperatebtn {
width: 10%;
padding: 8px;
border-radius: 8px;
}
.signupbtn {
width: 10%;
padding: 8px;
border-radius: 8px;
}
.signupfnbtn {
width: 20%;
padding: 8px;
border-radius: 8px;
}
.pwdfnbtn {
width: 40%;
padding: 8px;
border-radius: 8px;
}
/* The Modal (background) */
.modal {
display: none;
/* Hidden by default */
position: fixed;
/* Stay in place */
z-index: 1;
/* Sit on top */
left: 0;
top: 0;
width: 100%;
/* Full width */
height: 100%;
/* Full height */
overflow: auto;
/* Enable scroll if needed */
background-color: #474e5d;
}
/* Modal Content/Box */
.modal-content {
background-color: #c0c0c0;
margin: 5% auto 15% auto;
/* 5% from the top, 15% from the bottom and centered */
width: 25%;
/* Could be more or less, depending on screen size */
}
/* The Close Button (x) */
.close {
position: absolute;
right: 35px;
top: 15px;
font-size: 40px;
font-weight: bold;
color: #f1f1f1;
}
.close:hover,
.close:focus {
color: #f44336;
cursor: pointer;
}
/* Clear floats */
.clearfix::after {
content: “”;
clear: both;
display: table;
}
p.homepage {
font-size: 23px;
}
/* Change styles for cancel button and signup button on extra small screens */
@media screen and (max-width: 100px) {
.signupbtn {
width: 100%;
}
}
import Button from “./Button”;
import “./UserProfile.css”;
function UserProfile({ userDetails }) {
return (
<div className=“card”>
<br> </br>
<h1 className=“title”>User Profile Information</h1>
<img
alt=“usericon”
id=“userimg”
width=“200px”
height=“450px”
src=“https://cdn2.iconfinder.com/data/icons/user-management/512/profile_settings-512.png"
/>
<p className=“title”>First Name : {userDetails.firstName}</p>
<p className=“title”>Last Name: {userDetails.lastName}</p>
<p className=“title”>Email Address: {userDetails.mailid}</p>
<p className=“title”>Time Zone: {userDetails.timeZone}</p>
<p className=“title”>Joined On: {userDetails.createdTime}</p>
<Button title=“Logout”> </Button>
</div>
);
}
export default UserProfile;
{
    "name": "zylkertechnologies",
    "version": "0.0.1",
    "homepage": "/__catalyst/auth/login",
    "login_redirect": "index.html"
}
クライアントディレクトリが設定されました。
関数とクライアントコードの動作を確認しましょう:
- エンドユーザーは、コンソールで設定・スタイリングしたLogin Pageに最初にアクセスします。
- アカウントを作成するには、Sign UpオプションをクリックしてSign Upページに移動します。
-
情報が入力されてSign Upをクリックするか、選択したソーシャルログインを使用してサインアップを試みると、その詳細がJSON入力としてCustom User Validation関数(authorization_portal_function/main.py)に提供されます。
-
関数は、コーディングした条件が満たされた場合にのみユーザーを認証します。このチュートリアルでは、Zylker登録メールアドレスを使用してアプリケーションにサインアップした場合にのみ、ユーザーが認証されます。
-
認証に成功すると、アプリケーションへのサインアップに使用したアカウントにメール検証メールが送信されます。
-
ユーザーがメール内のリンクをクリックしてメールアドレスを確認すると、アプリケーションにサインアップされます。詳細はAuthenticationコンポーネントのUser Managementセクションで確認できます。
-
エンドユーザーは、認証済みの資格情報を使用してアプリケーションにログインできるようになります。
-
エンドユーザーは、Forgot Passwordオプションをクリックしてパスワードをリセットすることもできます。この場合、登録済みメールアドレスにPassword Resetメールが送信されます。メールに記載された手順に従って、簡単に資格情報をリセットできます。
クライアントコンポーネントを設定しましょう。
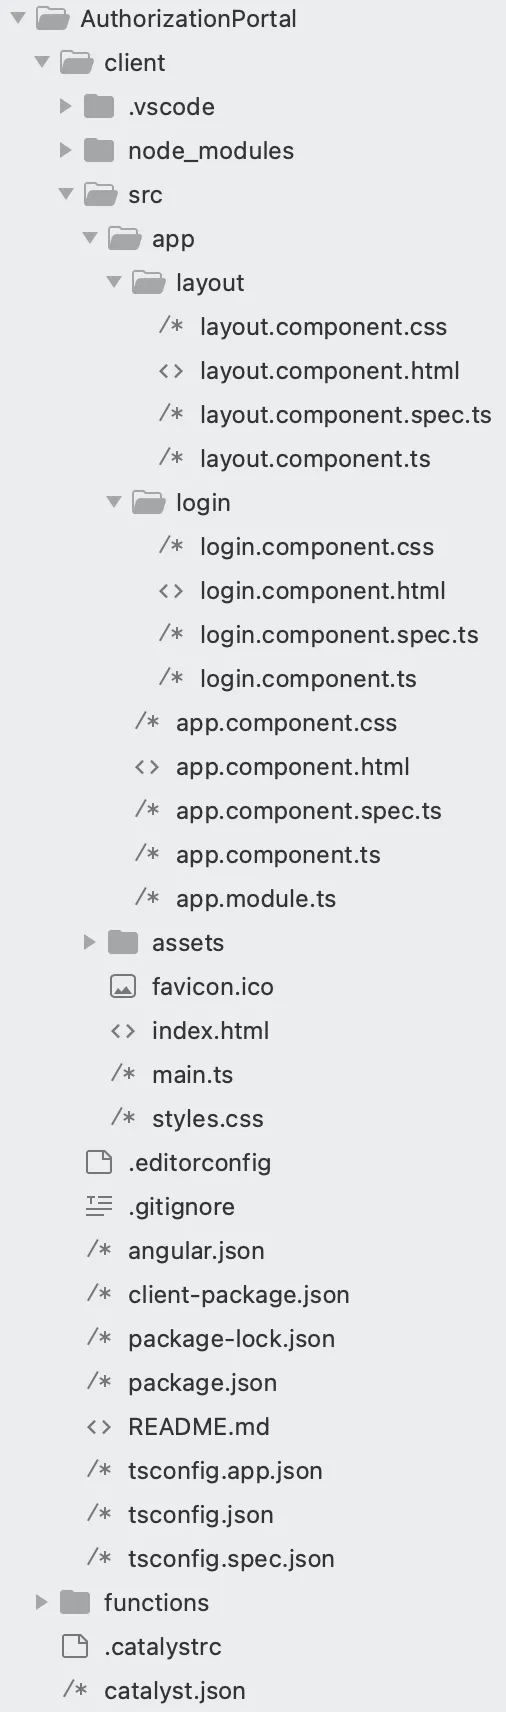
Angularウェブクライアントディレクトリには以下が含まれています:
- クライアントのルートディレクトリには、クライアントコンポーネントの名前、バージョン、デフォルトホームページ、リダイレクトページを定義する設定ファイルであるclient-package.jsonファイルが含まれています。クライアントコンポーネントのコーディング後にこのファイルを変更します。
- ネイティブAngularファイル(angular.json、tsconfig.app.json、tsconfig.json、tsconfig.spec.jsonファイルなど)。
- クライアントのルートディレクトリには、package.json依存関係ファイルと.gitignorefileも含まれています。
- srcフォルダには、Angularアプリのデフォルトプロジェクト構造に従って以下のファイルとディレクトリが含まれています:
- ネイティブAngularファイル(favicon.ico、main.ts、polyfills.ts、test.tsファイル、およびassets、environmentディレクトリなど)。
- index.html:アプリケーションのデフォルトエントリポイント。
- style.css:アプリケーション全体で必要なスタイリング要素を含みます。
- src/app/ディレクトリに含まれるファイル:
- ネイティブAngularファイル(app.component.css、app.component.spec.tsなど)。
- app.component.html:アプリケーションで行われるルーティングをレンダリングするHTMLコンポーネントを含みます。
- app.component.ts:Catalyst Web SDKメソッドを使用するためのCatalyst変数が宣言されているアプリケーションのグローバルインターフェースを含みます。
- app.module.ts:アプリケーションに関連するルーティングロジックを含みます
index.html、app.component.html、app.component.ts、およびapp.module.tsファイルをコーディングします。
Layoutコンポーネントの作成
src/app/ディレクトリパスにLayoutコンポーネントを作成する必要があります。このコンポーネントには、認証済みユーザーと未認証ユーザーに適切なレスポンスを提供するためのスタイリング要素、クライアントロジック、リダイレクトロジックが含まれます。
Catalyst CLIを使用して、src/app/ディレクトリで以下のコマンドを実行します:

これにより、src/app/ディレクトリにlayoutという名前のフォルダが作成されます。
このlayoutフォルダには以下が含まれます:
- ネイティブAngularファイルlayout.component.pec.ts。
- layout.component.html:ユーザー検証中に必要なHTMLコンポーネントを含みます。
- layout.component.css:必要なスタイリング要素を含みます。
- layout.component.ts:ルーティングとリダイレクトロジックを含みます。
layout.component.html、layout.component.css、およびlayout.component.tsファイルをコーディングします。
Loginコンポーネントの作成
src/app/ディレクトリパスにLoginコンポーネントを作成する必要があります。このコンポーネントには、認証済みユーザーと未認証ユーザーに適切なレスポンスを提供するためのリダイレクトロジックが含まれます。
Catalyst CLIを使用して、src/app/ディレクトリで以下のコマンドを実行します:

これにより、src/app/ディレクトリにloginという名前のフォルダが作成されます。
このloginフォルダには以下が含まれます:
- ネイティブAngularファイルlogin.component.pec.ts。
- login.component.html:ユーザー検証中に必要なHTMLコンポーネントを含みます。
- login.component.css:必要なスタイリング要素を含みます。
- login.component.ts:ルーティングとリダイレクトロジックを含みます。
login.component.cssおよびlogin.component.tsファイルをコーディングします。
クライアントディレクトリは、以下の画像のようになっているはずです。
これで、クライアントのコーディングを開始できます。
以下のコードをコピーして、src/ディレクトリにあるindex.htmlファイルに貼り付けてください。
<!DOCTYPE html>
<html lang=“en”>
<head>
<meta charset=“utf-8” />
<title>Zylker Technologies</title>
<base href="/app/" />
<meta name=“viewport” content=“width=device-width, initial-scale=1” />
<script src=“https://static.zohocdn.com/catalyst/sdk/js/4.2.0/catalystWebSDK.js"> </script>
<script src=”/__catalyst/sdk/init.js"> </script>
</head>
<body>
<app-root> </app-root>
</body>
</html>
以下のコードを、src/app/ディレクトリにあるapp.component.html、app.component.ts、およびapp.module.tsファイルに貼り付けてください。
<router-outlet> </router-outlet>
import { Component } from ‘@angular/core’;
declare global {
interface Window {
catalyst: any;     //Catalyst Web SDKメソッドにアクセスするために必要なCatalyst変数です。
}
}
@Component({
selector: ‘app-root’,
templateUrl: ‘./app.component.html’,
styleUrls: [’./app.component.css’],
})
export class AppComponent {
}
import { NgModule } from ‘@angular/core’;
import { BrowserModule } from ‘@angular/platform-browser’;
import { CommonModule } from ‘@angular/common’;
import { AppComponent } from ‘./app.component’;
import { FormsModule } from ‘@angular/forms’;
import { RouterModule, Routes } from ‘@angular/router’;
import { LayoutComponent } from ‘./layout/layout.component’;
import { LoginComponent } from ‘./login/login.component’;
const approutes: Routes = [
{ path: ‘’, component: LayoutComponent },
{ path: ’login’, component: LoginComponent },
{ path: ‘**’, redirectTo: ’’ },
];
@NgModule({
declarations: [AppComponent, LayoutComponent, LoginComponent],
imports: [
BrowserModule,
CommonModule,
FormsModule,
RouterModule.forRoot(approutes, { useHash: true }),
],
providers: [],
bootstrap: [AppComponent],
})
export class AppModule {}
以下のコードをコピーして、src/app/layoutディレクトリにあるlayout.component.html、layout.component.css、およびlayout.component.tsファイルに貼り付けてください。
<div class=“card” *ngIf=“isAuthenticated”>
<div class=“titleDiv”>
<h1 class=“title”>User Profile Information</h1>
</div>
<div class=“imgDiv”>
<img
id=“userimg”
width=“200px”
height=“450px”
src=“https://cdn2.iconfinder.com/data/icons/user-management/512/profile_settings-512.png"
/>
</div>
<div class=“textDiv”>
<p class=“title” id=“fname”>First Name: {{ firstName }}</p>
<p class=“title” id=“lname”>Last Name: {{ lastName }}</p>
<p class=“title” id=“mailid”>Email ID: {{ mailID }}</p>
<p class=“title” id=“tzone”>Time Zone: {{ timezone }}</p>
<p class=“title” id=“ctime”>CreatedTime: {{ createdTime }}</p>
</div>
<div className=“logoutDiv”>
<button (click)=“logout()” id=“logoutBtn”>Logout</button>
</div>
</div>
<div *ngIf=“isFetching” class=“loading-div”>
<p class=“loading”>Loading…</p>
</div>
.card {
margin: auto;
text-align: center;
font-family: arial;
text-align: center;
font-weight: bold;
}
.title {
font-size: 23px;
color: black;
margin-top: 30px;
margin-bottom: 30px;
font-weight: bold;
}
#userimg {
height: 20%;
width: 15%;
}
#logoutBtn {
background-color: rgb(2, 136, 2);
color: white;
border: none;
border-radius: 8px;
width: 100px;
height: 40px;
margin-bottom: 30px;
cursor: pointer;
}
#logoutBtn:hover {
background-color: rgb(2, 165, 2);
color: white;
border: none;
border-radius: 8px;
width: 100px;
height: 40px;
margin-bottom: 30px;
cursor: pointer;
}
body {
width: 100%;
}
.loading-div {
margin-left: 45%;
}
.loading {
font-weight: bolder;
font-size: large;
}
#logoutBtn:active {
background-color: rgb(2, 172, 2);
color: white;
border: none;
border-radius: 8px;
width: 100px;
height: 40px;
margin-bottom: 30px;
cursor: pointer;
}
import { Component, OnInit } from ‘@angular/core’; //これがコンポーネントであることを示すデコレータ
import { Router } from ‘@angular/router’;
@Component({
selector: ‘app-layout’,
templateUrl: ‘./layout.component.html’,
styleUrls: [’./layout.component.css’],
})
export class LayoutComponent implements OnInit {
constructor(private router: Router) {}
firstName: any;
lastName: any;
mailID: any;
timezone: any;
createdTime: any;
isAuthenticated: boolean = false;
isFetching: boolean = true;
ngOnInit(): void {
window.catalyst.auth
.isUserAuthenticated()
.then((result: any) => {
console.log(result);
console.log(result.content.email_id);
this.isAuthenticated = true;
this.mailID = result.content.email_id;
this.firstName = result.content.first_name;
this.lastName = result.content.last_name;
this.timezone = result.content.time_zone;
this.createdTime = result.content.created_time;
})
  .catch((err: any) => {
    console.log(err);
  })
  .finally(() => {
    console.log('finally');
    this.isFetching = false;
this.isAuthenticated
  ? this.router.navigate([''])
  : this.router.navigate(['login']);

});

}
logout() {
const redirectURL = ‘/__catalyst/auth/login’;
console.log(redirectURL);
var auth = window.catalyst.auth;
auth.signOut(redirectURL);

}
}
以下のコードをコピーして、src/app/loginディレクトリにあるlogin.component.cssおよびlogin.component.tsファイルに貼り付けてください。
h1 {
color: red;
}
import { Component, OnInit } from ‘@angular/core’; //これがコンポーネントであることを示すデコレータ
@Component({
selector: ‘app-login’,
templateUrl: ‘./login.component.html’,
styleUrls: [’./login.component.css’],
})
export class LoginComponent {
ngOnInit(): void {
window.location.href = window.origin + ‘/__catalyst/auth/login’; // ログインリダイレクトを処理します
}
}
クライアントルートディレクトリにあるclient-package.jsonファイルを変更します。
{
    "name": "zylkertechnologies",
    "version": "0.0.1",
    "homepage": "/__catalyst/auth/login",
    "login_redirect": "index.html"
}
クライアントディレクトリが設定されました。
関数とクライアントコードの動作を確認しましょう。
-
エンドユーザーは、コンソールで設定・スタイリングしたLogin Pageに最初にアクセスします。
-
アカウントを作成するには、Sign Upオプションをクリックして、Sign Upページに移動します。
-
情報が入力されてSign Upをクリックするか、選択したSocial Loginを使用してサインアップを試みると、その詳細がJSON入力としてCustom User Validation関数(authorization_portal_function/index.js)に提供されます。
-
関数は、Zylkerメールアドレスを使用してアプリケーションにサインアップしたユーザーのみを認証します。
-
認証に成功すると、アプリケーションへのサインアップに使用したアカウントにEmail Verificationメールが送信されます。
-
ユーザーがメール内のリンクをクリックしてメールアドレスを確認すると、アプリケーションにサインアップされます。詳細はAuthenticationコンポーネントのUser Managementセクションで確認できます。
-
エンドユーザーは、認証済みの資格情報を使用してアプリケーションにログインできるようになります。
-
エンドユーザーは、Forgot Passwordオプションをクリックしてパスワードをリセットすることもできます。
-
この場合、登録済みメールアドレスにPassword Resetメールが送信されます。メールに記載された手順に従って、簡単に資格情報をリセットできます。
最終更新日 2026-03-24 17:38:39 +0530 IST