Configurar el cliente
Vamos a configurar el componente del cliente.
The directorio del cliente contiene:
- El archivo index.html que contiene el código HTML para la aplicación frontend
- El archivo main.css que contiene el código CSS para la aplicación frontend
- El archivo main.js que contiene el código JavaScript
- El archivo de configuración client-package.json
Codificaremos index.html y main.js. También realizaremos un cambio en el client-package.json para asegurar que la página de inicio de la aplicación sea la página autenticada.
Discutiremos el código al final de esta sección.
Copia el código a continuación y pégalo en los archivos respectivos ubicados en el client/directory de tu proyecto usando un IDE y guarda los archivos.
<!DOCTYPE html>
<html>
<head>
<title>Profile Information</title>
<link rel=“stylesheet” href=“https://cdnjs.cloudflare.com/ajax/libs/font-awesome/4.7.0/css/font-awesome.min.css" >
<script src=“main.js”></script>
<script src=“https://static.zohocdn.com/catalyst/sdk/js/4.0.0/catalystWebSDK.js"> </script>
<script src=”/__catalyst/sdk/init.js”></script>
<style>
.card {
max-width: 500px;
margin: auto;
text-align: center;
font-family: arial;
background-color: #a5a4a4;
}
.title {
font-size: 23px;
color: black;
}
button {
border: none;
outline: 0;
display: inline-block;
padding: 8px;
color: white;
background-color: #000;
text-align: center;
cursor: pointer;
width: 50%;
font-size: 18px;
border-radius: 8px;
}
a {
text-decoration: none;
font-size: 22px;
color: black;
}
button:hover,
a:hover {
opacity: 0.7;
}
body{
background-color:#a5a4a4;
font-size: 20px;
visibility: hidden;
}
p{
font-family: ‘Trebuchet MS’, ‘Lucida Sans Unicode’, ‘Lucida Grande’, ‘Lucida Sans’, Arial, sans-serif;
font-size: 10px;
font-weight: bold;
}
</style>
</head>
<body onload=“showProfile()">
<h1 style=“text-align:center”>User Profile Information</h1>
<div class=“card”>
<img width=“200px” height=“450px” src=“https://cdn2.iconfinder.com/data/icons/user-management/512/profile_settings-512.png" alt=“John” style=“width:80px;height: 80px;” >
<p class=“title” id=“fname”></p>
<p class=“title” id=“lname”></p>
<p class=“title"id=“mailid” ></p>
<p class=“title"id=“tzone” ></p>
<p class=“title"id=“ctime” ></p>
<p><button onclick=“logout()">Logout</button></p>
</div>
</body>
</html>
function showProfile() {
debugger;
//El método catalyst.auth.isUserAuthenticated() permite solo a usuarios autenticados, es decir, los usuarios que han iniciado sesión, acceder a las páginas
//Puedes cargar este método en el cuerpo de tu página para permitir que solo usuarios autenticados accedan a una página específica
catalyst.auth.isUserAuthenticated().then(result => {
    //Si el usuario ha iniciado sesión, este contenido de la página se mostrará al usuario
    document.body.style.visibility = "visible";
    const first_name = "First Name: " + result.content.first_name;
    document.getElementById("fname").innerHTML = first_name;
    const last_name = "Last Name: " + result.content.last_name;
    document.getElementById("lname").innerHTML = last_name;
    const mailid = "Email Address: " + result.content.email_id;
    document.getElementById("mailid").innerHTML = mailid;
    const tzone = "Time Zone: " + result.content.time_zone;
    document.getElementById("tzone").innerHTML = tzone;
    const created_time = " Joined On: " + result.content.created_time;
    document.getElementById("ctime").innerHTML = created_time;
}).catch(err => {
    //Si el usuario no ha iniciado sesión, esto se mostrará al usuario y será redirigido a la página de inicio de sesión
    document.body.style.visibility = "visible";
    document.body.innerHTML = 'You are not logged in. Please log in to continue. Redirecting you to the login page..';
    setTimeout(function () {
       window.location.href = "/__catalyst/auth/login";
    }, 5000);
});

}
function logout() {
//El método signOut se usa para cerrar la sesión del usuario en la aplicación
const redirectURL = location.protocol +"//"+ location.hostname + “/__catalyst/auth/login”;
catalyst.auth.signOut(redirectURL);
}
{
    "name" : "ZylkerTechnologies",
    "version" : "0.0.1",
    "homepage" : "/__catalyst/auth/login",
    "login_redirect" : "index.html"
}
El directorio del cliente está ahora configurado.
Let’s repasemos cómo funcionan la función y el código del cliente:
- El usuario final primero encontrará la Página de inicio de sesión que has configurado y personalizado en la consola.
- Para crear una cuenta, harán clic en la opción Registrarse y serán dirigidos a la página de Registro.
-
Una vez que se ingresa la información y hacen clic en Registrarse, o si intentan registrarse usando un inicio de sesión social de su elección, sus datos se proporcionarán como entrada JSON a la función de Validación personalizada de usuario (authorization_portal_function/main.py).
-
La función solo autenticará a los usuarios si se cumple la condición que has codificado. Para este tutorial, los usuarios solo serán autenticados si se registraron en la aplicación usando una dirección de correo electrónico registrada en Zylker.
-
Tras la autenticación exitosa, se enviará un correo electrónico de Verificación de correo electrónico a la cuenta que usaron para registrarse en la aplicación.
-
Once the user verifies their email address by clicking the link provided in the email, they will be signed up to the application. Their details can be viewed in the User Management section of the Authentication component.
-
The end-user can now log in to the application using their authenticated credentials.
-
The end-user can also reset their password by clicking the Forgot Password option. In this event, the Password Reset email will be sent to their registered email. Following the steps mentioned in the email, they can easily reset their credentials.
Vamos a configurar el componente del cliente.
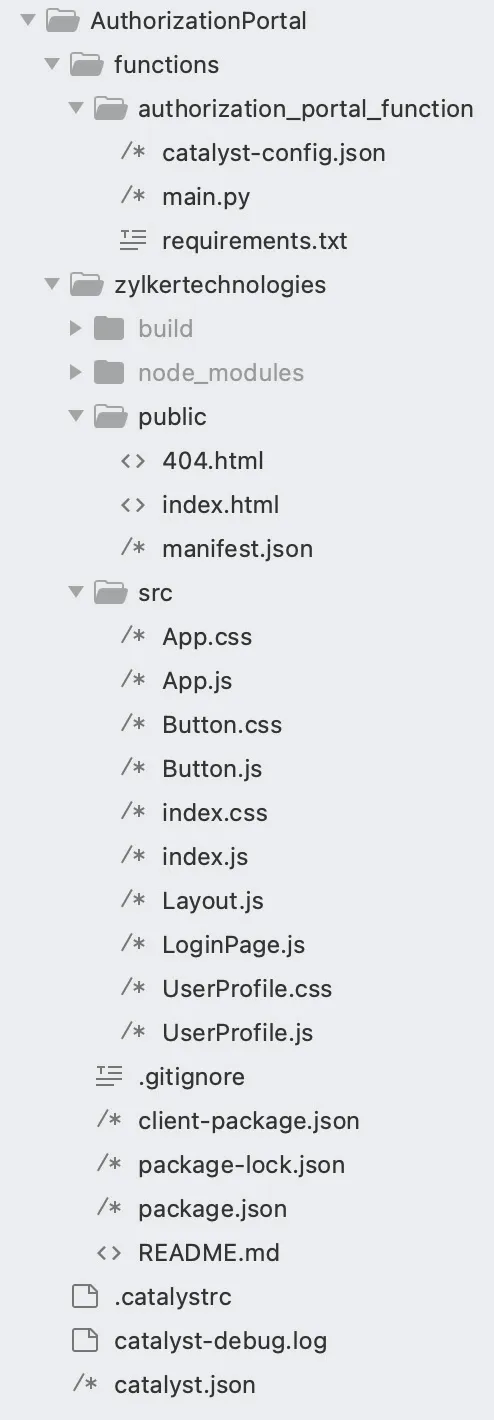
The React web client directory contains the following files:
- The root directory of the client contains a client-package.json file, which is a archivo de configuración defining the name, version, default home page, and redirect page of the client component.
- The zylkertechnologies client directory contains two subfolders, as per the default project structure of a React app:
- The public folder is generally used to hold files that can be openly accessed by browsers through public URLs, such as icon files of the web app, the index.html file, and the 404.html file.
- The src folder contains the application’s source files that will be included in the build folder when we compile the React app.
- The client directory also contains the package.json dependency file and a hidden .gitignore file.
- The files present in the public folder include:
- Native React files such as setup Tests.js, index.js, reportWebVitals.js, logo.svg, and App.test.js.
- index.html - Contains Catalyst web sdk that allows you to access Catalyst components.
- We will be creating an additional 404.html file that will contain the error handling elements.
- The files present in the src folder include:
- Native React files such as setupTests.js, reportWebVitals.js, logo.svg, and App.test.js.
- App.js - Contains the hash routes to your application
- App.css - Contains the overall styling elements of your application
- index.js - The entry point of the react application.
- index.css - Contains the styling of the elements present in the index.js file.
- You will be creating the following files in the src folder:
- Button.css - Contains the styling elements for the Logout button that will be present in the application.
- Button.js - Contains the React component for the Logout present in the application.
- Layout.js - Contains the React component for the application’s logic
- LoginPage.js - Contains the React component for the login pages you generated in the Catalyst console.
- UserProfile.css - Contains the styling elements for the user information page that will be displayed once you log in to the application.
- UserProfile.js - Contains the React component to render the user details after you login.
Codificaremos in the index.html, 404.html, App.js, App.css, index.css, index.js, Button.css, Button.js, Layout.js, LoginPage.js, UserProfile.css, and UserProfile.js files. También realizaremos un cambio en el client-package.json. para asegurar que la página de inicio de la aplicación sea la página autenticada.
Install additional React packages
The react-router-dom package needs to be installed in the AuthorizationPortal/zylkertechnologies client directory using the CLI command given below:
This command will install the react-router-dom module, save the dependencies, and allow us to perform the required hash routing in our application.
This is the client directory after you have created the required files and deleted the unnecessary files.
Copy the code given below and paste it in index.html and 404.html, respectively, located in the client directory (zylkertechnologies/public/) using an IDE and save the file.
<!DOCTYPE html>
<html lang=“en”>
<head>
<meta charset=“utf-8” />
<meta name=“viewport” content=“width=device-width, initial-scale=1” />
<meta name=“theme-color” content="#000000" />
<meta
name=“description”
content=“Web site created using create-react-app”
/>
<link rel=“manifest” href="%PUBLIC_URL%/manifest.json" />
<title>React App</title>
<script src=“https://static.zohocdn.com/catalyst/sdk/js/4.0.0/catalystWebSDK.js"> </script>
<script src=”/__catalyst/sdk/init.js"></script>
</head>
<body>
<noscript>You need to enable JavaScript to run this app.</noscript>
<div id=“root”></div>
</body>
</html>
<!DOCTYPE html>
<html lang=“en”>
<head>
<h2>You are viewing this 404 page since you tried to access a page which does not exist.</h2>
</head>
</html>
Copy the code given below and paste it in App.css, App.js, index.js, index.css, Button.css, Button.js, Layout.js, LoginPage.js, UserProfile.css, and UserProfile.js, respectively, located in client directory (zylkertechnologies/src/) using an IDE and save the file.
.App {
text-align: center;
}
.App-logo {
height: 40vmin;
pointer-events: none;
}
@media (prefers-reduced-motion: no-preference) {
.App-logo {
animation: App-logo-spin infinite 20s linear;
}
}
.App-header {
background-color: #282c34;
min-height: 100vh;
display: flex;
flex-direction: column;
align-items: center;
justify-content: center;
font-size: calc(10px + 2vmin);
color: white;
}
.App-link {
color: #61dafb;
}
@keyframes App-logo-spin {
from {
transform: rotate(0deg);
}
to {
transform: rotate(360deg);
}
}
.inputs {
width: 90%;
padding: 15px;
margin: 15px 0 22px 0;
display: inline-block;
border: none;
background: #f1f1f1;
border-radius: 8px;
}
#root {
background-color: #c0c0c0;
}
h1,
h2,
h3,
h4,
h5,
h6,
p {
margin: 1;
}
import “./App.css”;
import { HashRouter, Navigate, Route, Routes } from “react-router-dom”;
import Layout from “./Layout”;
function App() {
return (
<HashRouter>
<Routes>
<Route path="/" element={<Layout />} />
<Route path="" element={<Navigate to="/" replace />} />
<Route path="*" element={<Navigate to="/" replace />} />
</Routes>
</HashRouter>
);
}
export default App;
body {
margin: 0;
-webkit-font-smoothing: antialiased;
-moz-osx-font-smoothing: grayscale;
background-color: #c0c0c0;
}
import React from “react”;
import “./index.css”;
import App from “./App”;
import * as ReactDOM from “react-dom/client”;
const root = ReactDOM.createRoot(document.getElementById(“root”));
root.render(
<React.StrictMode>
<App />
</React.StrictMode>
);
button {
border: none;
outline: 0;
display: inline-block;
padding: 8px;
color: white;
background-color: #000;
text-align: center;
cursor: pointer;
width: 20%;
font-size: 18px;
border-radius: 8px;
}
button:hover,
.forgetPassword-btn:hover,
a:hover {
opacity: 0.7;
}
a {
text-decoration: none;
font-size: 22px;
color: black;
}
import { useCallback } from “react”;
import “./Button.css”;
function Button({ title }) {
const logout = useCallback(() => {
const redirectURL = “/__catalyst/auth/login”;
window.catalyst.auth.signOut(redirectURL);
}, []);
return (
<div id=“logoutbtn” style={{ textAlign: “inline-block” }}>
<button onClick={logout} id=“logout” style={{ display: “inline-block” }}>
{title}
</button>
</div>
);
}
export default Button;
import UserProfile from “./UserProfile”;
import LoginPage from “./LoginPage.js”;
import { useEffect, useState } from “react”;
function Layout() {
const [isUserAuthenticated, setIsUserAuthenticated] = useState(false);
const [isFetching, setIsFetching] = useState(true);
const [userDetails, setUserDetails] = useState({
firstName: “”,
lastName: “”,
mailid: “”,
timeZone: “”,
createdTime: “”,
});
useEffect(() => {
window.catalyst.auth
.isUserAuthenticated()
.then((result) => {
let userDetails = {
firstName: result.content.first_name,
lastName: result.content.last_name,
mailid: result.content.email_id,
timeZone: result.content.time_zone,
createdTime: result.content.created_time,
};
setUserDetails(userDetails);
setIsUserAuthenticated(true);
})
.catch((err) => {})
.finally(() => {
setIsFetching(false);
});
}, []);
return (
<>
{isFetching ? (
<p>Loading ….</p>
) : isUserAuthenticated ? (
<UserProfile userDetails={userDetails} />
) : (
<LoginPage />
)}
</>
);
}
export default Layout;
import { useEffect } from “react”;
function Login() {
useEffect(() => {
window.location.href = window.origin + “/__catalyst/auth/login”;
}, []);
return null;
}
export default Login;
.card {
margin: auto;
text-align: center;
font-family: arial;
text-align: center;
font-weight: bold;
}
.title {
font-size: 23px;
color: black;
}
#userimg {
height: 20%;
width: 15%;
}
div.login {
padding-top: 10px;
height: 260px;
width: 500px;
margin: 0 auto;
}
div.signup {
display: none;
}
div.forgotpwd {
display: none;
}
/* Full-width input fields */
input[type=“text”] {
width: 90%;
padding: 15px;
margin: 15px 0 22px 0;
display: inline-block;
border: none;
background: #f1f1f1;
border-radius: 8px;
}
/* Add a background color when the inputs get focus */
input[type=“text”]:focus,
input[type=“password”]:focus {
background-color: #ddd;
outline: none;
}
/* Set a style for all buttons */
/* Float cancel and signup buttons and add an equal width */
.seperatebtn {
width: 10%;
padding: 8px;
border-radius: 8px;
}
.signupbtn {
width: 10%;
padding: 8px;
border-radius: 8px;
}
.signupfnbtn {
width: 20%;
padding: 8px;
border-radius: 8px;
}
.pwdfnbtn {
width: 40%;
padding: 8px;
border-radius: 8px;
}
/* The Modal (background) */
.modal {
display: none;
/* Hidden by default */
position: fixed;
/* Stay in place */
z-index: 1;
/* Sit on top */
left: 0;
top: 0;
width: 100%;
/* Full width */
height: 100%;
/* Full height */
overflow: auto;
/* Enable scroll if needed */
background-color: #474e5d;
}
/* Modal Content/Box */
.modal-content {
background-color: #c0c0c0;
margin: 5% auto 15% auto;
/* 5% from the top, 15% from the bottom and centered */
width: 25%;
/* Could be more or less, depending on screen size */
}
/* The Close Button (x) */
.close {
position: absolute;
right: 35px;
top: 15px;
font-size: 40px;
font-weight: bold;
color: #f1f1f1;
}
.close:hover,
.close:focus {
color: #f44336;
cursor: pointer;
}
/* Clear floats */
.clearfix::after {
content: “”;
clear: both;
display: table;
}
p.homepage {
font-size: 23px;
}
/* Change styles for cancel button and signup button on extra small screens */
@media screen and (max-width: 100px) {
.signupbtn {
width: 100%;
}
}
import Button from “./Button”;
import “./UserProfile.css”;
function UserProfile({ userDetails }) {
return (
<div className=“card”>
<br> </br>
<h1 className=“title”>User Profile Information</h1>
<img
alt=“usericon”
id=“userimg”
width=“200px”
height=“450px”
src=“https://cdn2.iconfinder.com/data/icons/user-management/512/profile_settings-512.png"
/>
<p className=“title”>First Name : {userDetails.firstName}</p>
<p className=“title”>Last Name: {userDetails.lastName}</p>
<p className=“title”>Email Address: {userDetails.mailid}</p>
<p className=“title”>Time Zone: {userDetails.timeZone}</p>
<p className=“title”>Joined On: {userDetails.createdTime}</p>
<Button title=“Logout”> </Button>
</div>
);
}
export default UserProfile;
{
    "name": "zylkertechnologies",
    "version": "0.0.1",
    "homepage": "/__catalyst/auth/login",
    "login_redirect": "index.html"
}
El directorio del cliente está ahora configurado.
Let’s repasemos el funcionamiento de la función y el código del cliente:
- El usuario final primero encontrará la Página de inicio de sesión que configuraste y personalizaste en la consola.
- Para crear una cuenta, harán clic en la opción Registrarse y serán dirigidos a la página de Registro.
-
Una vez que se ingresa la información y hacen clic en Registrarse, o si intentan registrarse usando un inicio de sesión social de su elección, sus datos se proporcionarán como entrada JSON a la función de Validación personalizada de usuario (authorization_portal_function/main.py).
-
La función solo autenticará a los usuarios si se cumple la condición que has codificado. Para este tutorial, los usuarios solo serán autenticados si se registraron en la aplicación usando una dirección de correo electrónico registrada en Zylker.
-
Tras la autenticación exitosa, se enviará un correo electrónico de Verificación de correo electrónico a la cuenta que usaron para registrarse en la aplicación.
-
Once the user verifies their email address by clicking the link provided in the email, they will be signed up to the application. Their details can be viewed in the User Management section of the Authentication component.
-
The end-user can now log in to the application using their authenticated credentials.
-
The end-user can also reset their password by clicking the Forgot Password option. In this event, the Password Reset email will be sent to their registered email. Following the steps mentioned in the email, they can easily reset their credentials.
Vamos a configurar el componente del cliente.
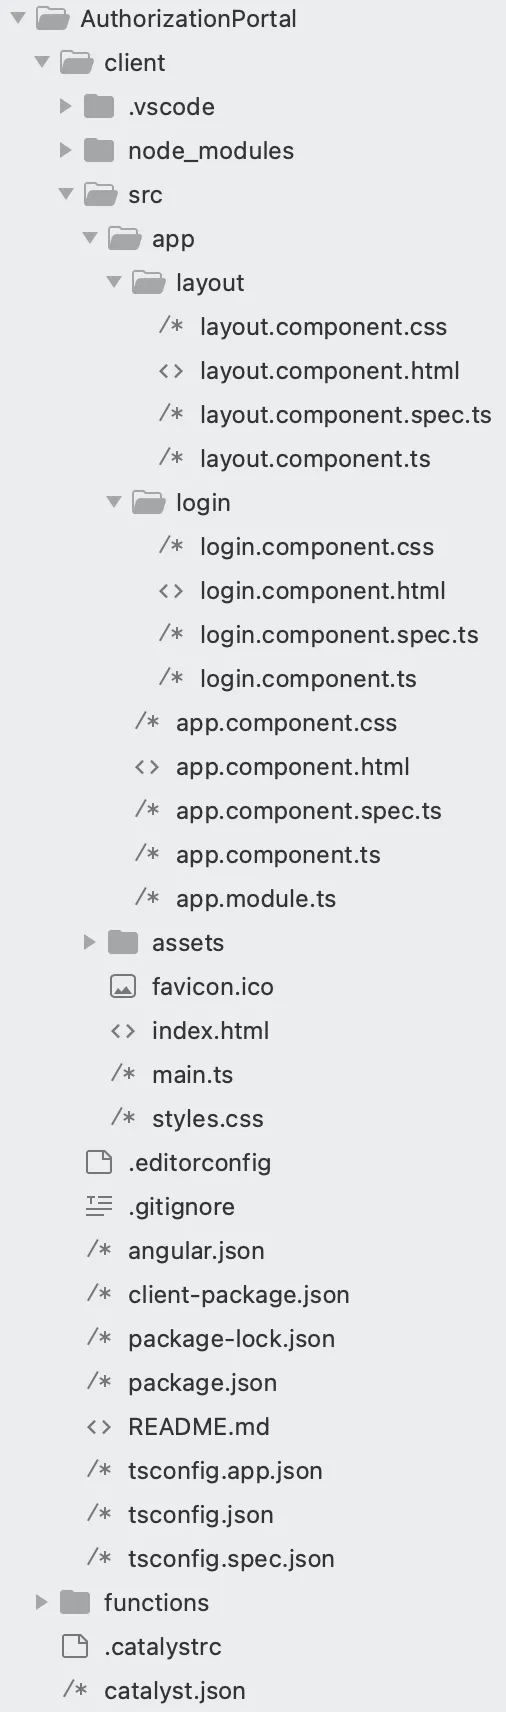
The Angular web directorio del cliente contiene:
- The root directory of the client contains a client-package.json file, which is a archivo de configuración defining the name, version, default home page, and redirect page of the client component. We will be modifying this file after we have coded the client component.
- Native Angular files such as angular.json, tsconfig.app.json, tsconfig.json, and tsconfig.spec.json files.
- The root directory of the client also contains the package.json dependency file, and a .gitignorefile.
- The src folder contains the following files and directories as per the default project structure of the Angular app:
- Native Angular files such as favicon.ico, main.ts, polyfills.ts, and test.ts files along with the assets, and environment directories.
- index.html: The default entry point of the application.
- style.css: Will contain any styling elements required by the overall application.
- The files present in the src/app/ directory are:
- Native Angular files such as app.component.css and app.component.spec.ts.
- app.component.html: Contains the HTML component that renders the routing that happens in the application.
- app.component.ts: Contains the global interface of the application where a Catalyst variable is declared to use Catalyst Web SDK methods.
- app.module.ts: Contains the routing logic involved in the application
Codificaremos the index.html, app.component.html, app.component.ts, and the app.module.ts files.
Create a Layout Component
You need to create a layout component in the src/app/ directory path. This component will contain the the styling elements, client logic and redirect logic to provide appropriate responses to authenticated and non-authenticated users.
Execute the following command in the src/app/ directory using the Catalyst CLI:

This will create a folder named layout in the src/app/ directory.
This layout folder will contain:
- Native Angular file called layout.component.pec.ts.
- layout.component.html: Will contain the HTML component required during user validation.
- layout.component.css: Will contain the required styling elements.
- layout.component.ts: Will contain the routing and redirect logic.
Codificaremos the layout.component.html, layout.component.css, and the layout.component.ts files.
Create a Login Component
You need to create a login component in the src/app/ directory path. This component will contain the redirect logic to provide appropriate responses to authenticated and non-authenticated users.
Execute the following command in the src/app/ directory using the Catalyst CLI:

This will create a folder named login in the src/app/ directory.
This login folder will contain:
- Native Angular file called login.component.pec.ts.
- login.component.html: Will contain the HTML component required during user validation.
- login.component.css: Will contain the required styling elements.
- login.component.ts: Will contain the routing and redirect logic.
Codificaremos the login.component.css, and the login.component.ts files.
The client directory should now look like the one depicted in the following image.
You can now begin coding your client.
Copy the below code and paste it in the index.html file present in the src/ directory.
<!DOCTYPE html>
<html lang=“en”>
<head>
<meta charset=“utf-8” />
<title>Zylker Technologies</title>
<base href="/app/" />
<meta name=“viewport” content=“width=device-width, initial-scale=1” />
<script src=“https://static.zohocdn.com/catalyst/sdk/js/4.2.0/catalystWebSDK.js"> </script>
<script src=”/__catalyst/sdk/init.js"> </script>
</head>
<body>
<app-root> </app-root>
</body>
</html>
Paste the following code in the app.component.html, app.component.ts, and the app.module.ts files present in the src/app/ directory.
<router-outlet> </router-outlet>
import { Component } from ‘@angular/core’;
declare global {
interface Window {
catalyst: any;     //This is a Catalyst variable that is required to access Catalyst Web SDK methods.
}
}
@Component({
selector: ‘app-root’,
templateUrl: ‘./app.component.html’,
styleUrls: [’./app.component.css’],
})
export class AppComponent {
}
import { NgModule } from ‘@angular/core’;
import { BrowserModule } from ‘@angular/platform-browser’;
import { CommonModule } from ‘@angular/common’;
import { AppComponent } from ‘./app.component’;
import { FormsModule } from ‘@angular/forms’;
import { RouterModule, Routes } from ‘@angular/router’;
import { LayoutComponent } from ‘./layout/layout.component’;
import { LoginComponent } from ‘./login/login.component’;
const approutes: Routes = [
{ path: ‘’, component: LayoutComponent },
{ path: ’login’, component: LoginComponent },
{ path: ‘**’, redirectTo: ’’ },
];
@NgModule({
declarations: [AppComponent, LayoutComponent, LoginComponent],
imports: [
BrowserModule,
CommonModule,
FormsModule,
RouterModule.forRoot(approutes, { useHash: true }),
],
providers: [],
bootstrap: [AppComponent],
})
export class AppModule {}
Copy the following code and paste it in the layout.component.html, layout.component.css, and the layout.component.ts files present in the src/app/layout directory.
<div class=“card” *ngIf=“isAuthenticated”>
<div class=“titleDiv”>
<h1 class=“title”>User Profile Information</h1>
</div>
<div class=“imgDiv”>
<img
id=“userimg”
width=“200px”
height=“450px”
src=“https://cdn2.iconfinder.com/data/icons/user-management/512/profile_settings-512.png"
/>
</div>
<div class=“textDiv”>
<p class=“title” id=“fname”>First Name: {{ firstName }}</p>
<p class=“title” id=“lname”>Last Name: {{ lastName }}</p>
<p class=“title” id=“mailid”>Email ID: {{ mailID }}</p>
<p class=“title” id=“tzone”>Time Zone: {{ timezone }}</p>
<p class=“title” id=“ctime”>CreatedTime: {{ createdTime }}</p>
</div>
<div className=“logoutDiv”>
<button (click)=“logout()” id=“logoutBtn”>Logout</button>
</div>
</div>
<div *ngIf=“isFetching” class=“loading-div”>
<p class=“loading”>Loading…</p>
</div>
.card {
margin: auto;
text-align: center;
font-family: arial;
text-align: center;
font-weight: bold;
}
.title {
font-size: 23px;
color: black;
margin-top: 30px;
margin-bottom: 30px;
font-weight: bold;
}
#userimg {
height: 20%;
width: 15%;
}
#logoutBtn {
background-color: rgb(2, 136, 2);
color: white;
border: none;
border-radius: 8px;
width: 100px;
height: 40px;
margin-bottom: 30px;
cursor: pointer;
}
#logoutBtn:hover {
background-color: rgb(2, 165, 2);
color: white;
border: none;
border-radius: 8px;
width: 100px;
height: 40px;
margin-bottom: 30px;
cursor: pointer;
}
body {
width: 100%;
}
.loading-div {
margin-left: 45%;
}
.loading {
font-weight: bolder;
font-size: large;
}
#logoutBtn:active {
background-color: rgb(2, 172, 2);
color: white;
border: none;
border-radius: 8px;
width: 100px;
height: 40px;
margin-bottom: 30px;
cursor: pointer;
}
import { Component, OnInit } from ‘@angular/core’; //decorator which indicates this is a component
import { Router } from ‘@angular/router’;
@Component({
selector: ‘app-layout’,
templateUrl: ‘./layout.component.html’,
styleUrls: [’./layout.component.css’],
})
export class LayoutComponent implements OnInit {
constructor(private router: Router) {}
firstName: any;
lastName: any;
mailID: any;
timezone: any;
createdTime: any;
isAuthenticated: boolean = false;
isFetching: boolean = true;
ngOnInit(): void {
window.catalyst.auth
.isUserAuthenticated()
.then((result: any) => {
console.log(result);
console.log(result.content.email_id);
this.isAuthenticated = true;
this.mailID = result.content.email_id;
this.firstName = result.content.first_name;
this.lastName = result.content.last_name;
this.timezone = result.content.time_zone;
this.createdTime = result.content.created_time;
})
  .catch((err: any) => {
    console.log(err);
  })
  .finally(() => {
    console.log('finally');
    this.isFetching = false;
this.isAuthenticated
  ? this.router.navigate([''])
  : this.router.navigate(['login']);

});

}
logout() {
const redirectURL = ‘/__catalyst/auth/login’;
console.log(redirectURL);
var auth = window.catalyst.auth;
auth.signOut(redirectURL);

}
}
Copy the following code and paste it in the login.component.css, and the login.component.ts files present in the src/app/login directory.
h1 {
color: red;
}
import { Component, OnInit } from ‘@angular/core’; //decorator which indicates this is a component
@Component({
selector: ‘app-login’,
templateUrl: ‘./login.component.html’,
styleUrls: [’./login.component.css’],
})
export class LoginComponent {
ngOnInit(): void {
window.location.href = window.origin + ‘/__catalyst/auth/login’; // Manejará las redirecciones de inicio de sesión
}
}
We will now modify the client-package.json file present in the client root directory.
{
    "name": "zylkertechnologies",
    "version": "0.0.1",
    "homepage": "/__catalyst/auth/login",
    "login_redirect": "index.html"
}
El directorio del cliente está ahora configurado.
Repasemos el funcionamiento de la función y el código del cliente.
-
El usuario final primero encontrará la Página de inicio de sesión que configuraste y personalizaste en la consola.
-
Para crear una cuenta, harán clic en la opción Registrarse y serán dirigidos a la página de Registro.
-
After the information has been entered and they click Sign Up, or if they attempt to sign up using a Social Login of their preference, their details will be populated and provided as a JSON input to the Custom User Validation function—authorization_portal_function/index.js.
-
The function will only authenticate users that have signed up to the application using a Zylker email address.
-
Tras la autenticación exitosa, se enviará un correo electrónico de Email Verification email will be sent to the account they used to sign up to the application.
-
After the user verifies their email address by clicking the link provided in the email, they will be signed up for the application. Their details can be viewed in the User Management section of the Authentication component.
-
The end-user can now log in to application using their authenticated credentials.
-
The end-user can also reset their password by clicking the Forgot Password option.
-
In this event, the Password Reset email will be sent to their registered email. Following the steps mentioned in the email, they can easily reset their credentials.
Última actualización 2026-03-30 13:40:30 +0530 IST