Configure Actions
After creating the bot, you will need to create actions and configure the responses of the actions as required. You can generally choose to configure the response of an action to be either based on a business logic or a static direct response without involving any operation. In this tutorial, the response of all actions will be configured based on the execution of a business logic.
We will be creating the following set of actions for the ecommerce bot, so that the users can directly interact with the bot and perform actions at ease.
- To list the products in the ecommerce store
- To place a new order
- To view the details of an order
- To change the delivery address
- To reschedule the order to a later date
In order to configure an action based on your application’s specific needs, you must define the appropriate sample sentences and params for it. In this section, we will be discussing in detail about the sample sentences and params to be configured for the actions mentioned above for your ecommerce bot.
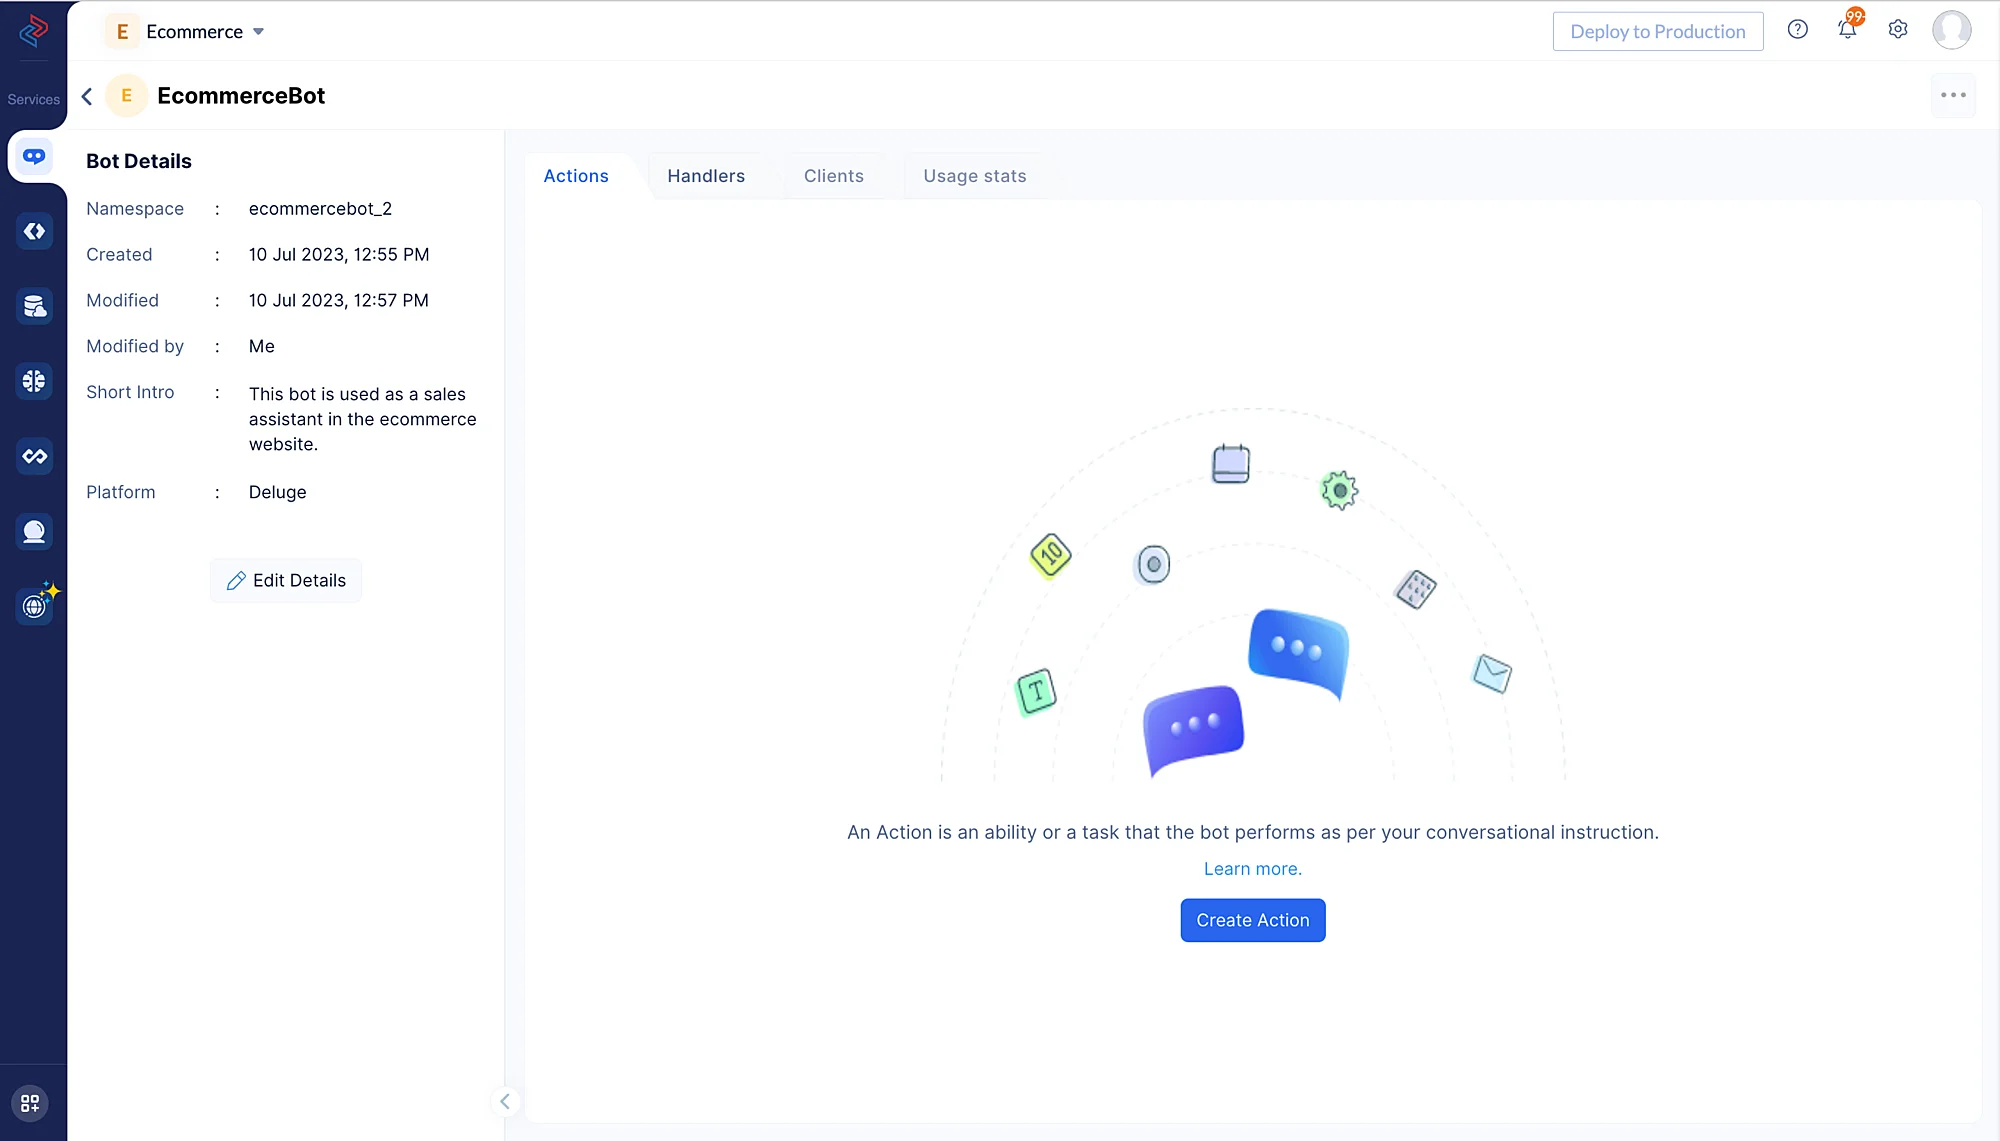
After you create a ConvoKraft bot and choose the appropriate development platform to build the business logic, the bot’s details page will be displayed as shown in the screenshot below.
Please follow the steps listed below to create and configure actions for the ecommerce bot :
-
Click on Create Action after you open the bot to add a new action.
-
We will create the first action for our ecommerce bot to list the items available in the store. In the pop-up window that opens, provide the name of the action as “List the items available in Store”. Select the response as Based on a business logic and then click Next.

-
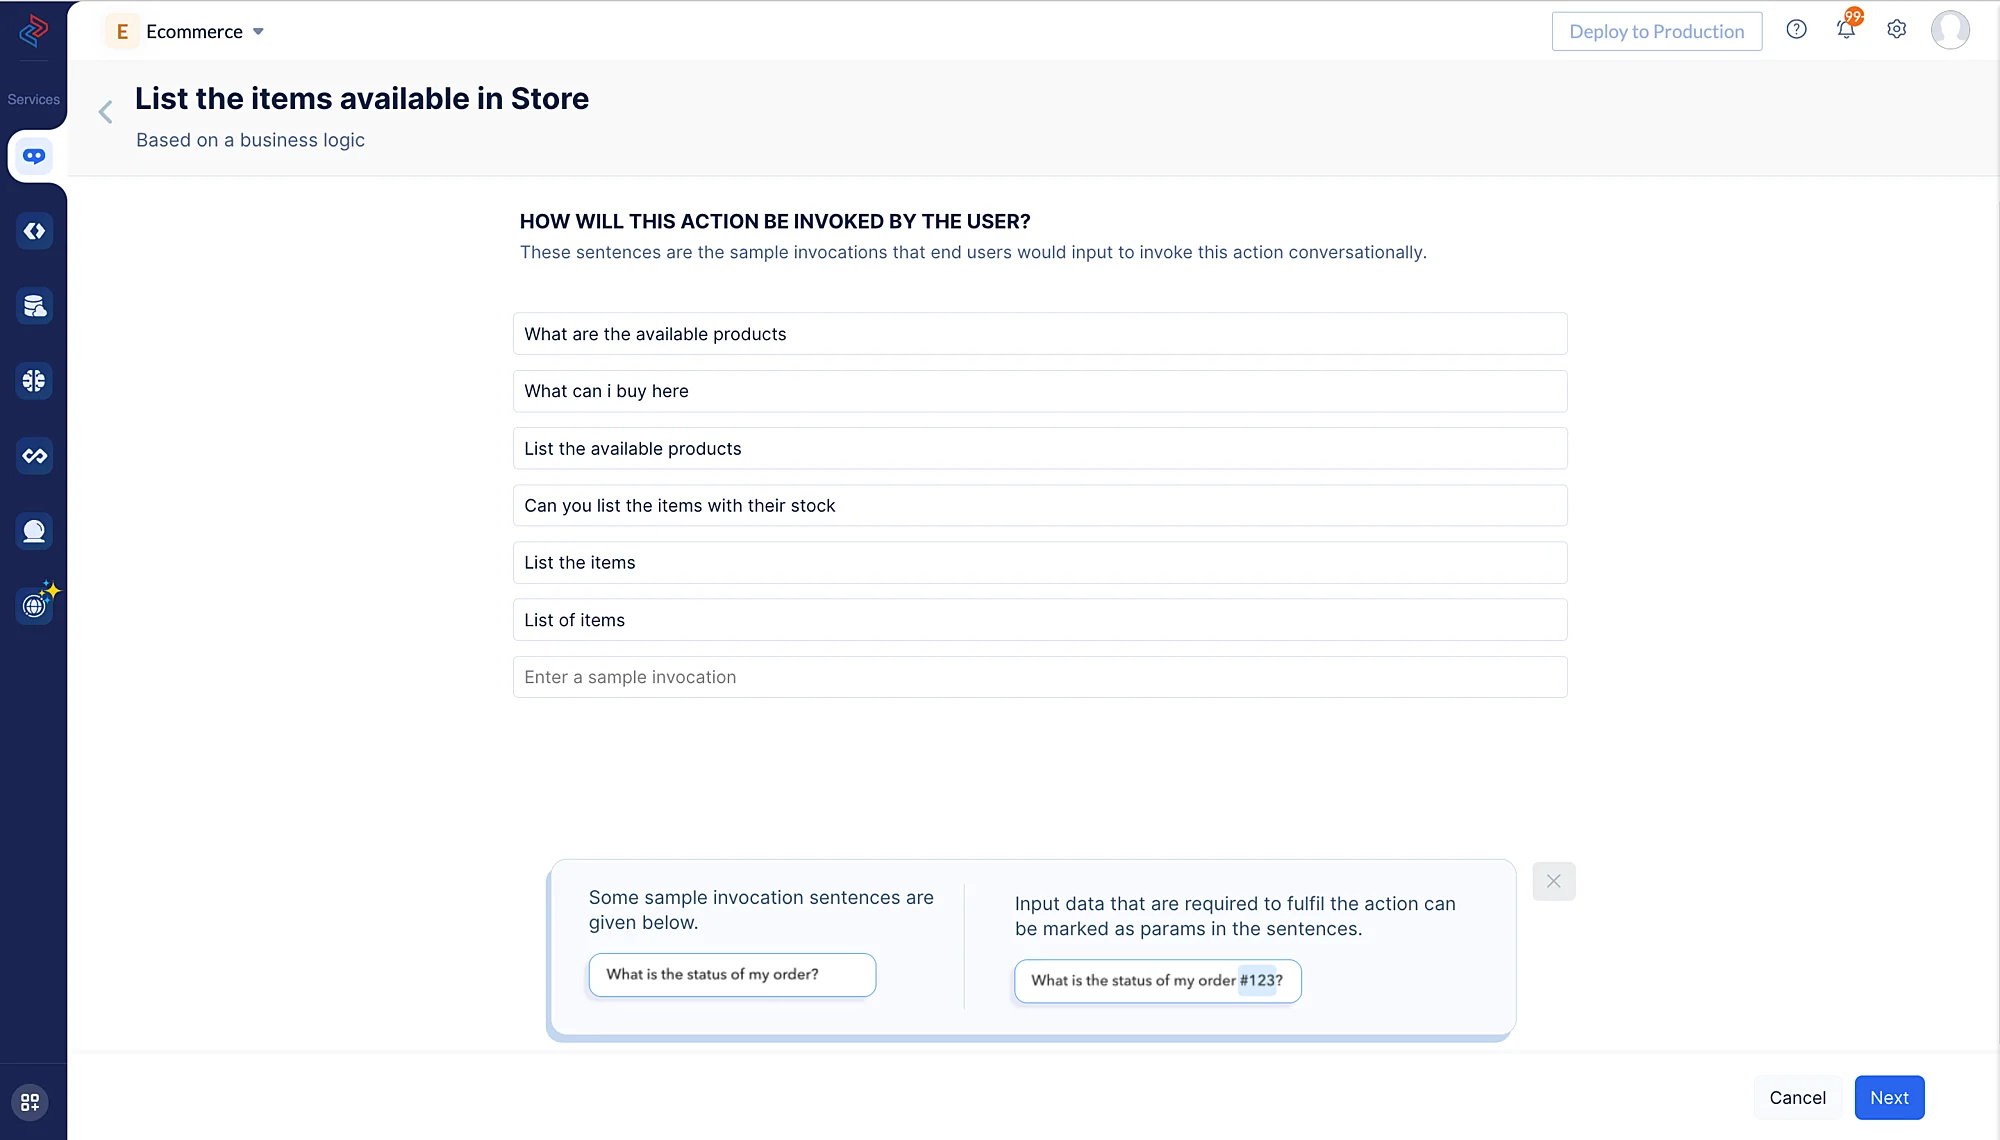
Configure the applicable sample sentences. In a conversational way, the user would prompt this action in many ways, such as “list the items available”, “what are the products available in the store?”. You can configure similar sentences as the sample sentences for the action and Click Next.
-
We will not be configuring any params for this action. You can therefore skip this step and proceed to click Save.

-
After configuring the sample sentences and params of an action, the Action’s details page will be displayed.
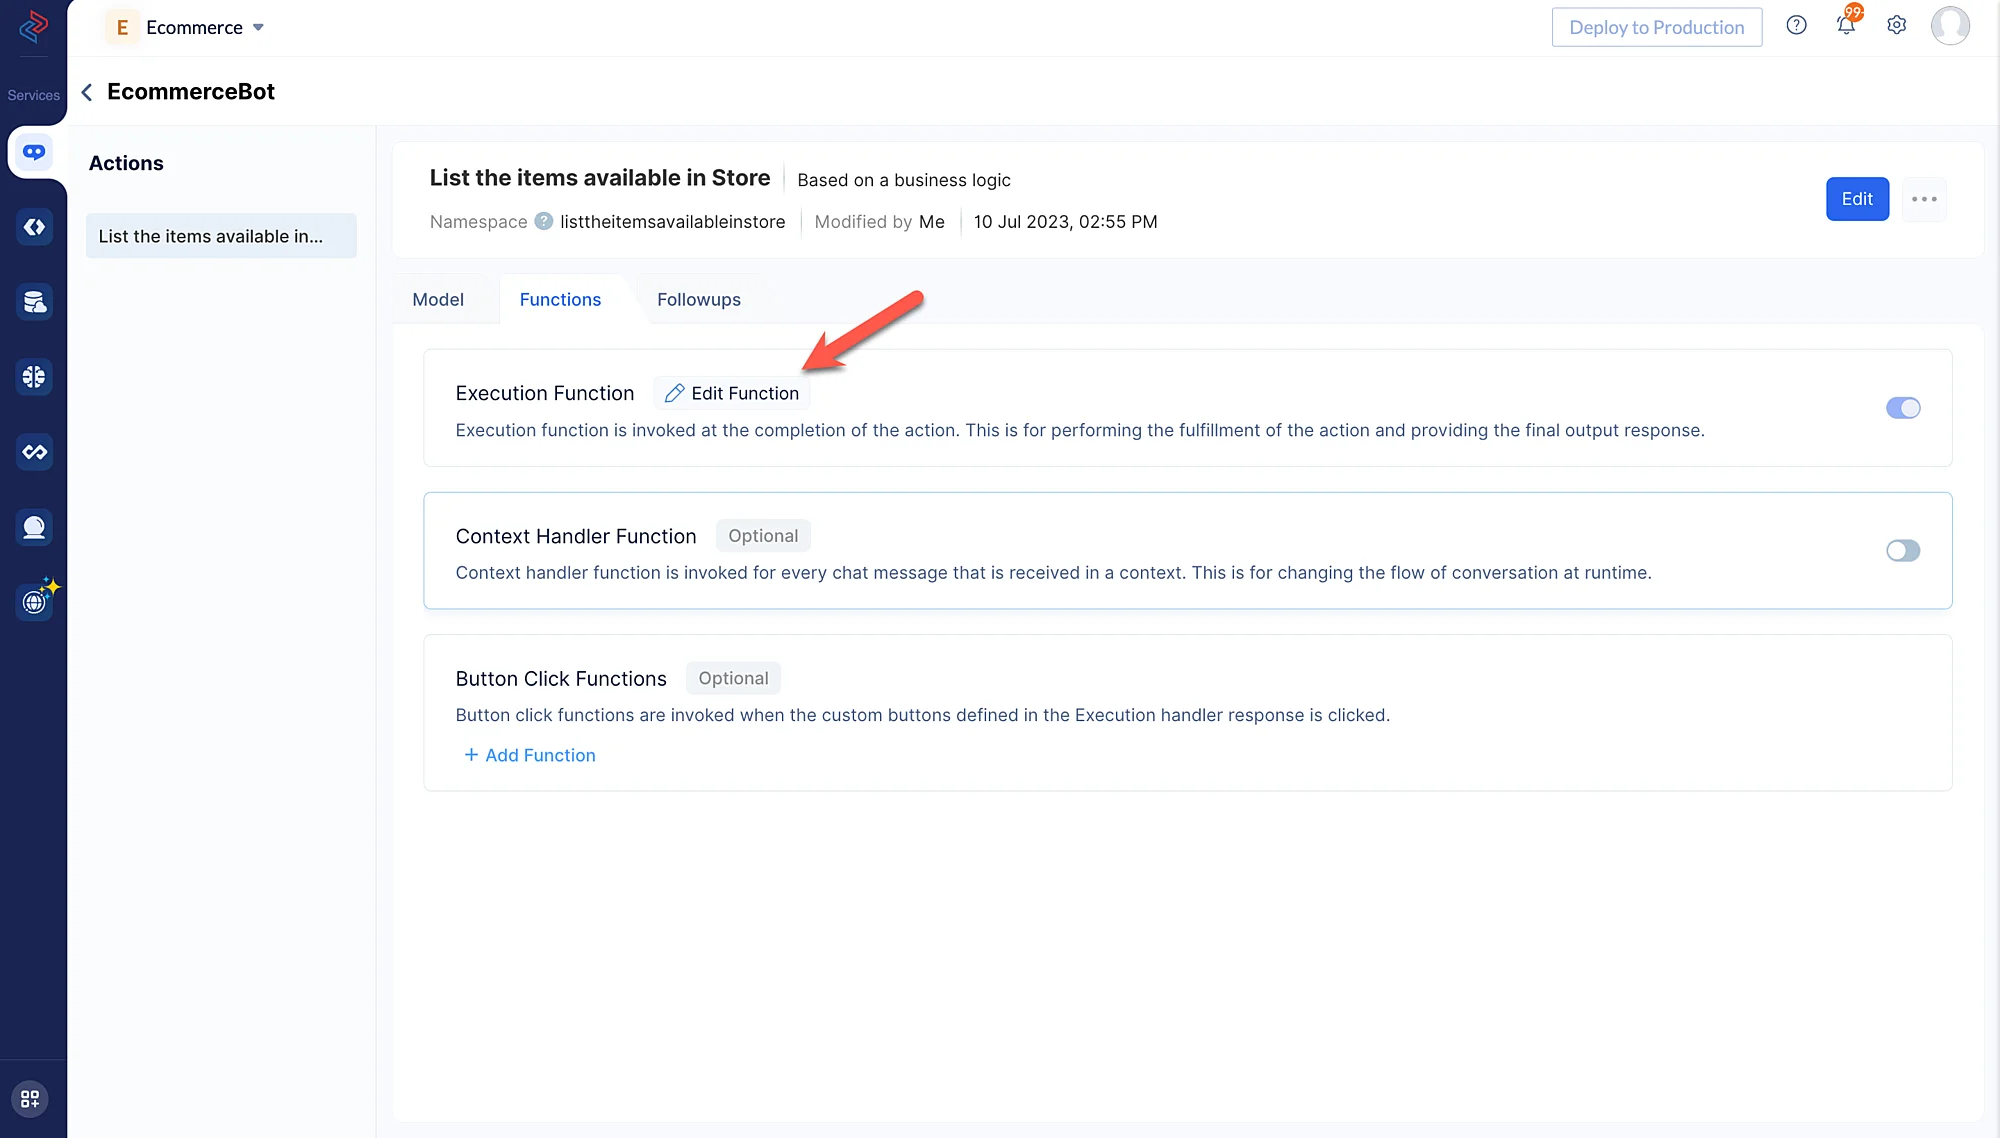
Since we have chosen to build the business logic of the ConvoKraft bot using Deluge, the Execution function will be enabled by default.
Click Edit Function and the ConvoKraft Deluge Editor will be opened automatically.
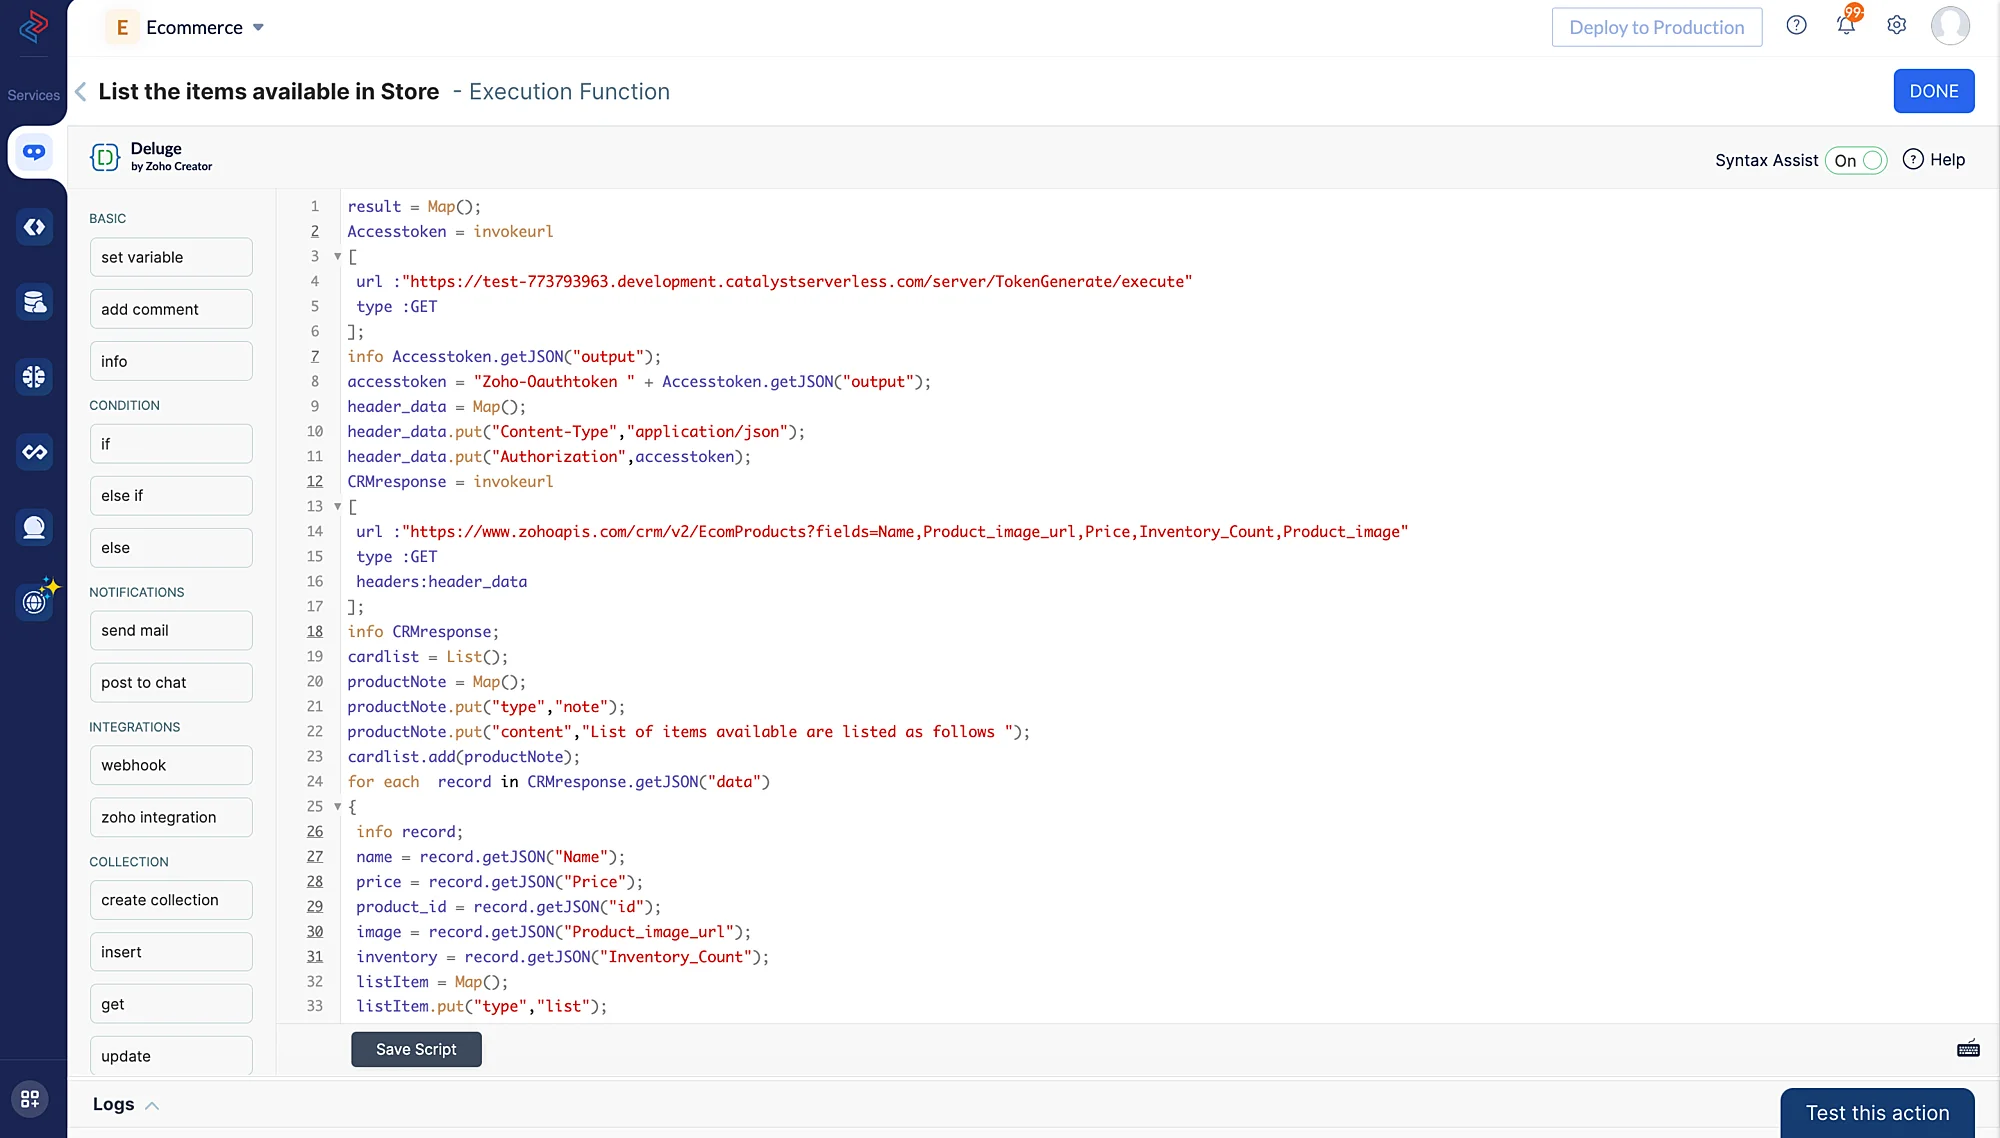
- To code the business logic, you can copy and paste the below mentioned code for this function in the editor and click Save script.
result = Map();
Accesstoken = invokeurl
[
 url :"https://test-773793963.development.catalystserverless.com/server/TokenGenerate/execute"
 type :GET
];
info Accesstoken.getJSON("output");
accesstoken = "Zoho-Oauthtoken " + Accesstoken.getJSON("output");
header_data = Map();
header_data.put("Content-Type","application/json");
header_data.put("Authorization",accesstoken);
CRMresponse = invokeurl
[
 url :"https://www.zohoapis.com/crm/v2/EcomProducts?fields=Name,Product_image_url,Price,Inventory_Count,Product_image"
 type :GET
 headers:header_data
];
info CRMresponse;
cardlist = List();
productNote = Map();
productNote.put("type","note");
productNote.put("content","List of items available are listed as follows ");
cardlist.add(productNote);
for each  record in CRMresponse.getJSON("data")
{
 info record;
 name = record.getJSON("Name");
 price = record.getJSON("Price");
 product_id = record.getJSON("id");
 image = record.getJSON("Product_image_url");
 inventory = record.getJSON("Inventory_Count");
 listItem = Map();
 listItem.put("type","list");
 listItem.put("format","bullet");
 listElements = List();
 elem1 = {"label":"Name : " + name};
 elem2 = {"label":"Total Price : $ " + price};
 elem3 = {"label":"Product ID : " + product_id};
 elem4 = {"label":"Stock : " + inventory};
 listElements.add(elem1);
 listElements.add(elem2);
 listElements.add(elem3);
 listElements.add(elem4);
 listItem.put("elements",listElements);
 //info listItem;
 // defining the 'image' card
 // defining the 'note' card
 productPic = Map();
 productPic.put("type","image");
 productPic.put("content",record.getJSON("Product_image_url"));
 cardlist.add(productPic);
 cardlist.add(listItem);
}
info cardlist;
result.put("card",cardlist);
result.put("message","List of Objects in response");
return result;
- Click Test this action at the bottom right corner of the page to test the configurations being made to the current action.

For example, enter “Can you list the items with their stock” in the chat window. The bot understands the intent of the message and tries to find a match with the defined sample sentences and executes the business logic to provide the response.
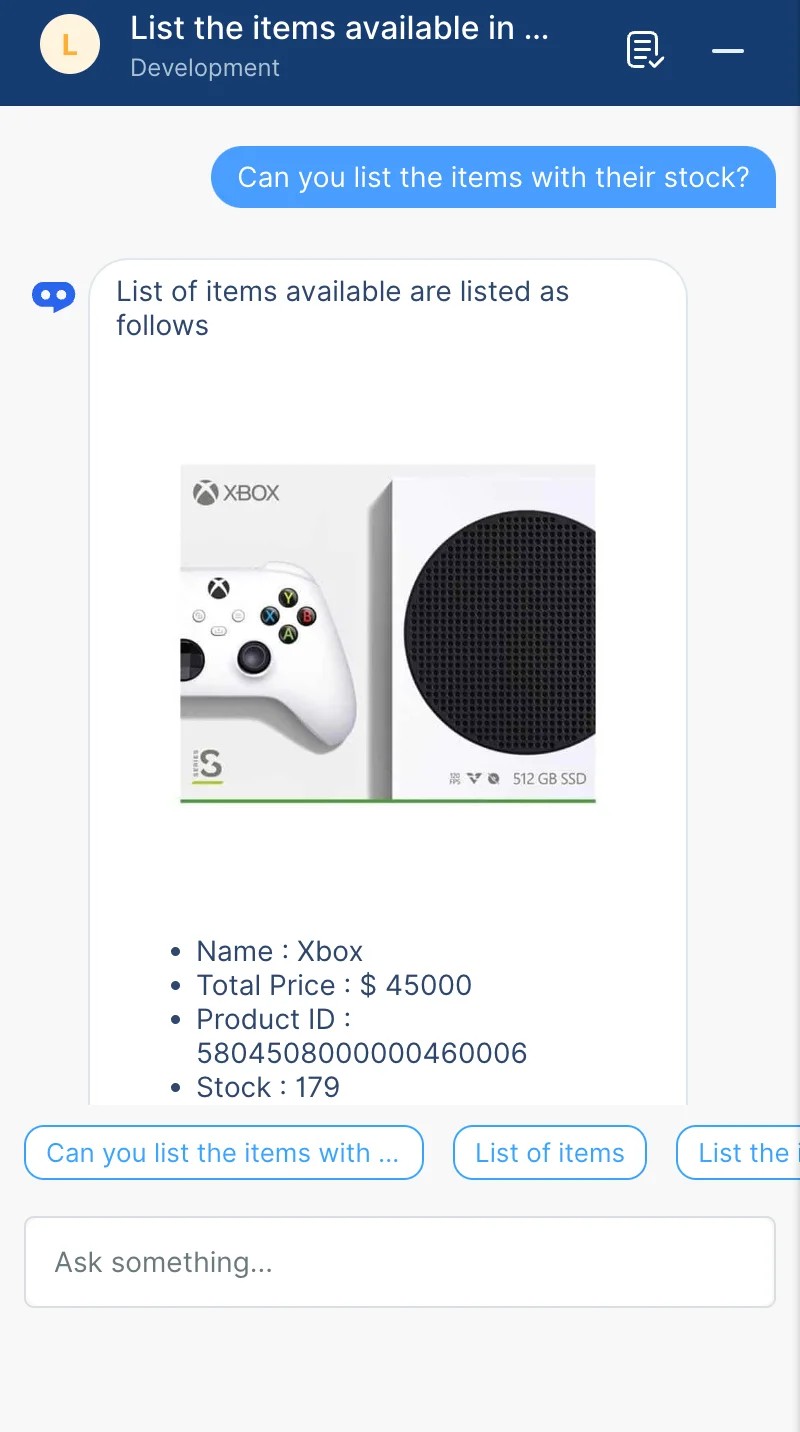
- After you test the action, proceed further by clicking DONE.
Similarly, we will create the remaining actions of the ecommerce bot. The above mentioned steps will apply to all actions, additionally you might be required to create params and configure the logic in a context handler function.
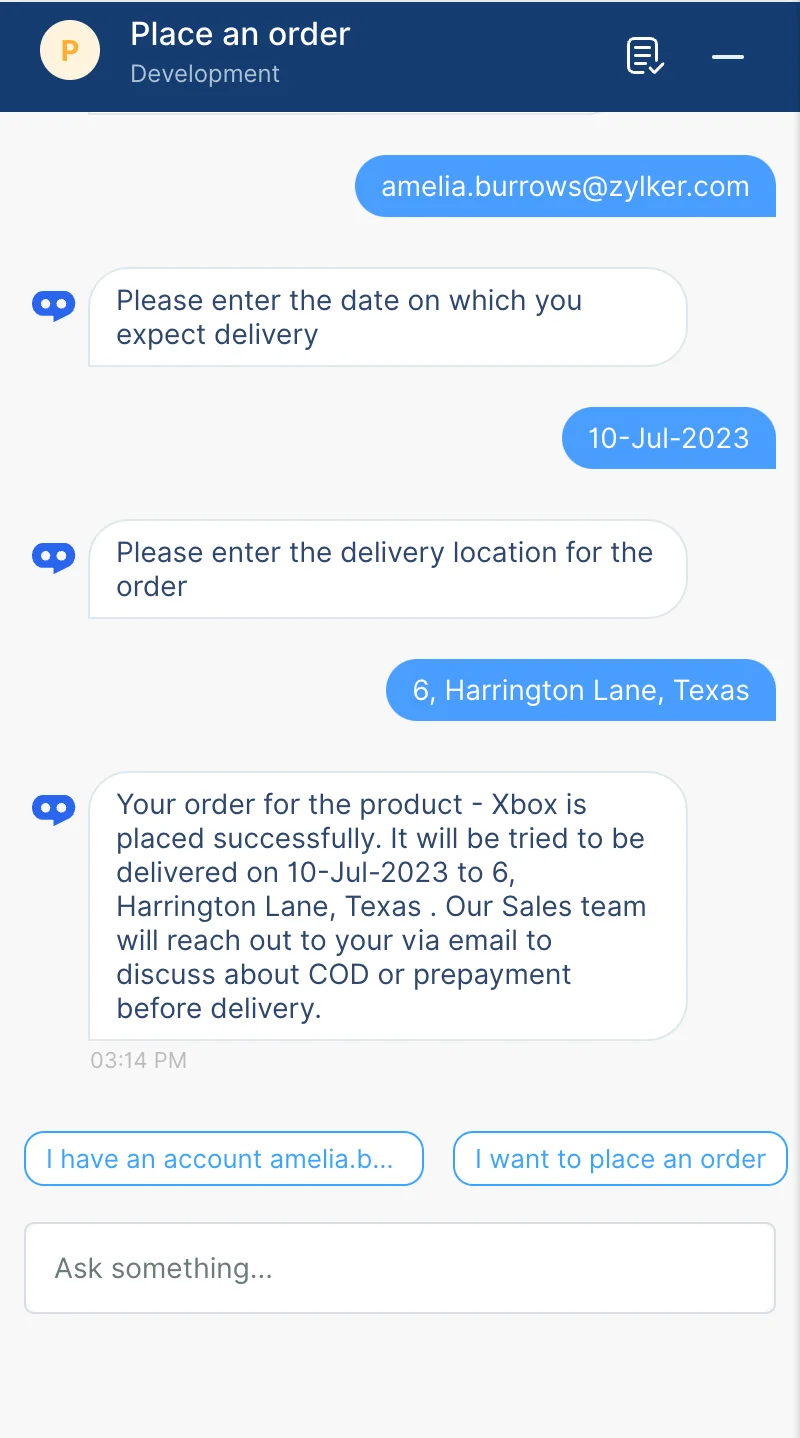
Place an Order
-
Create a new action from the bot’s details page to respond based on the business logic as discussed in the previous step, and name it as “Place an order”. The sample sentences for this action can be defined as follows:
-
“I want to place an order”
-
“I would like to place an order of the product id :5804508000000460006 to be delivered on 10-Jul-2023”
-
Click Next after configuring the sentences.
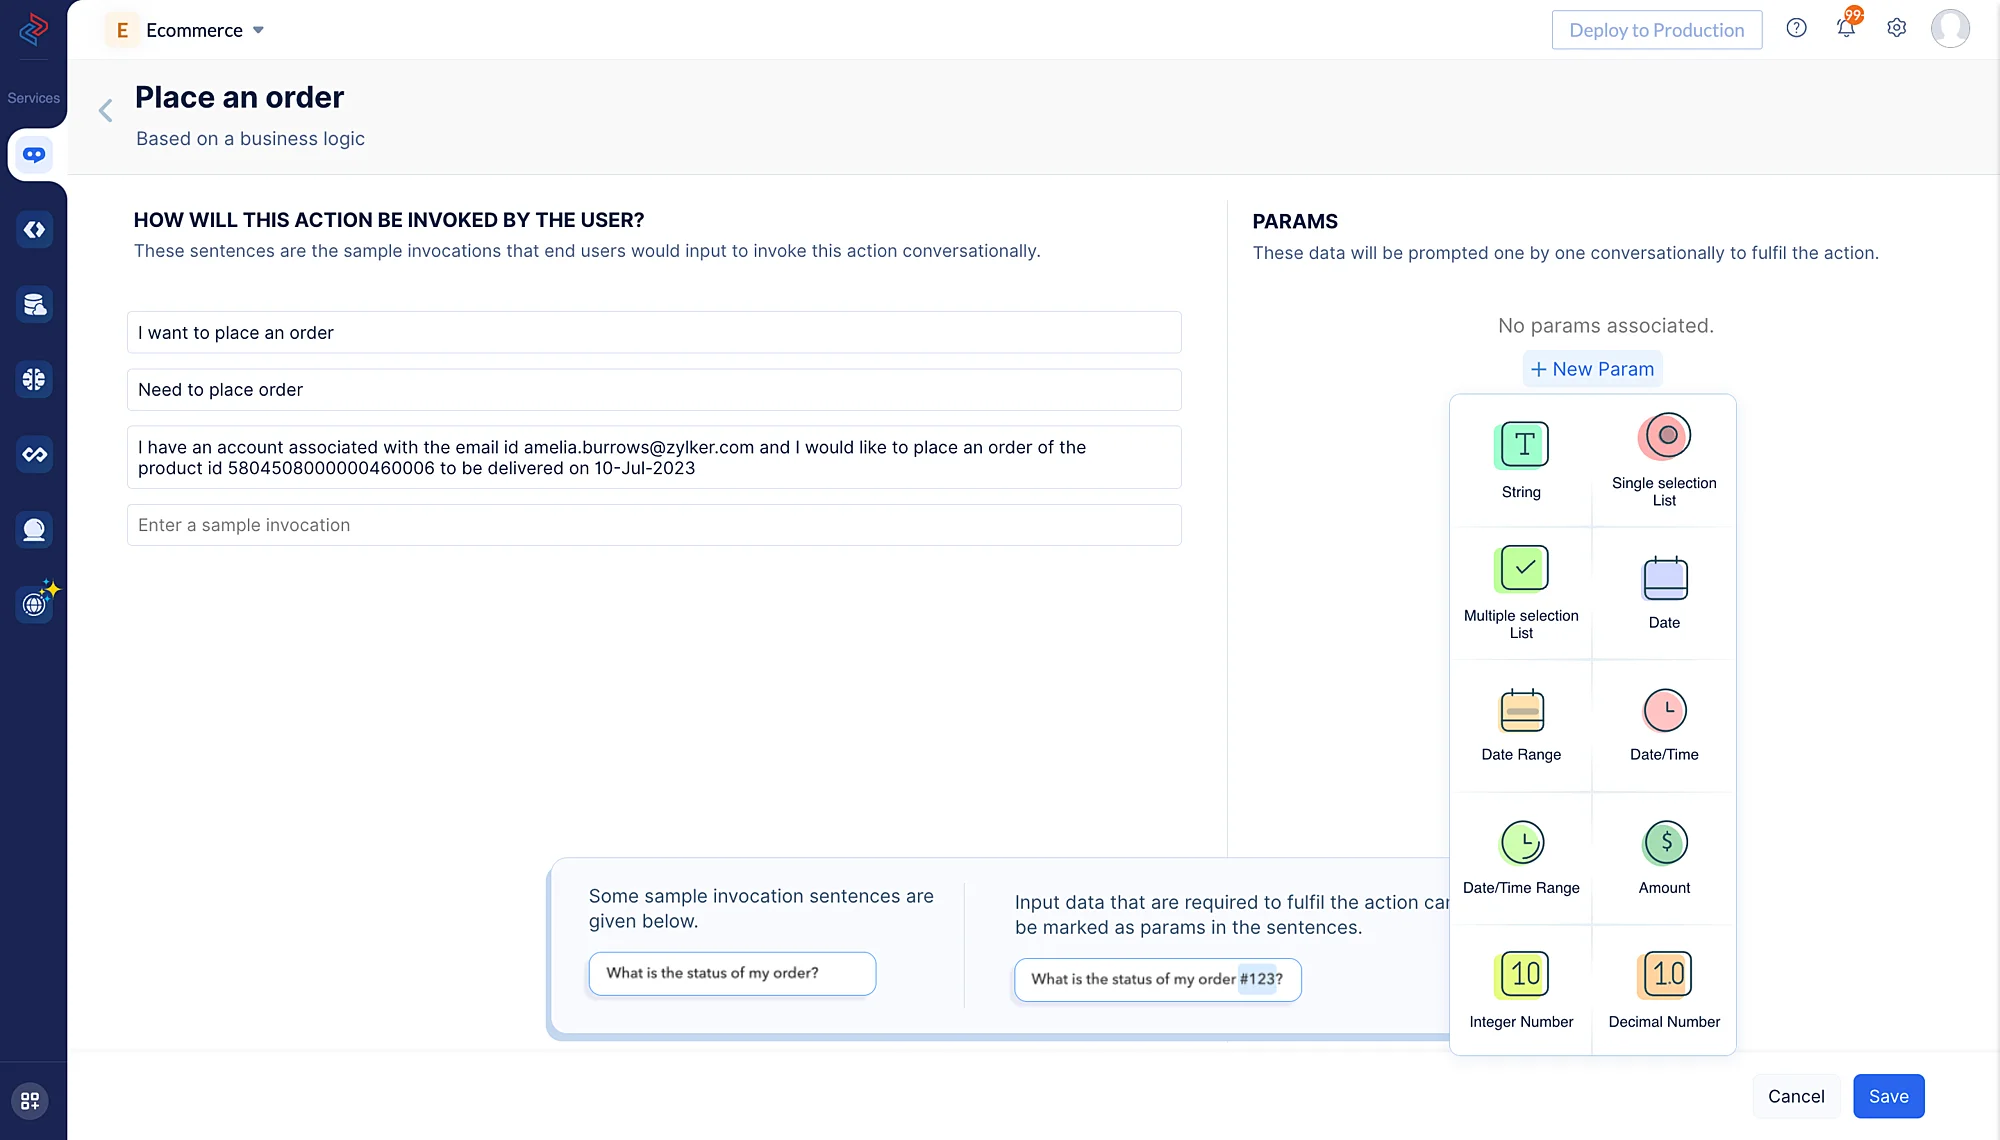
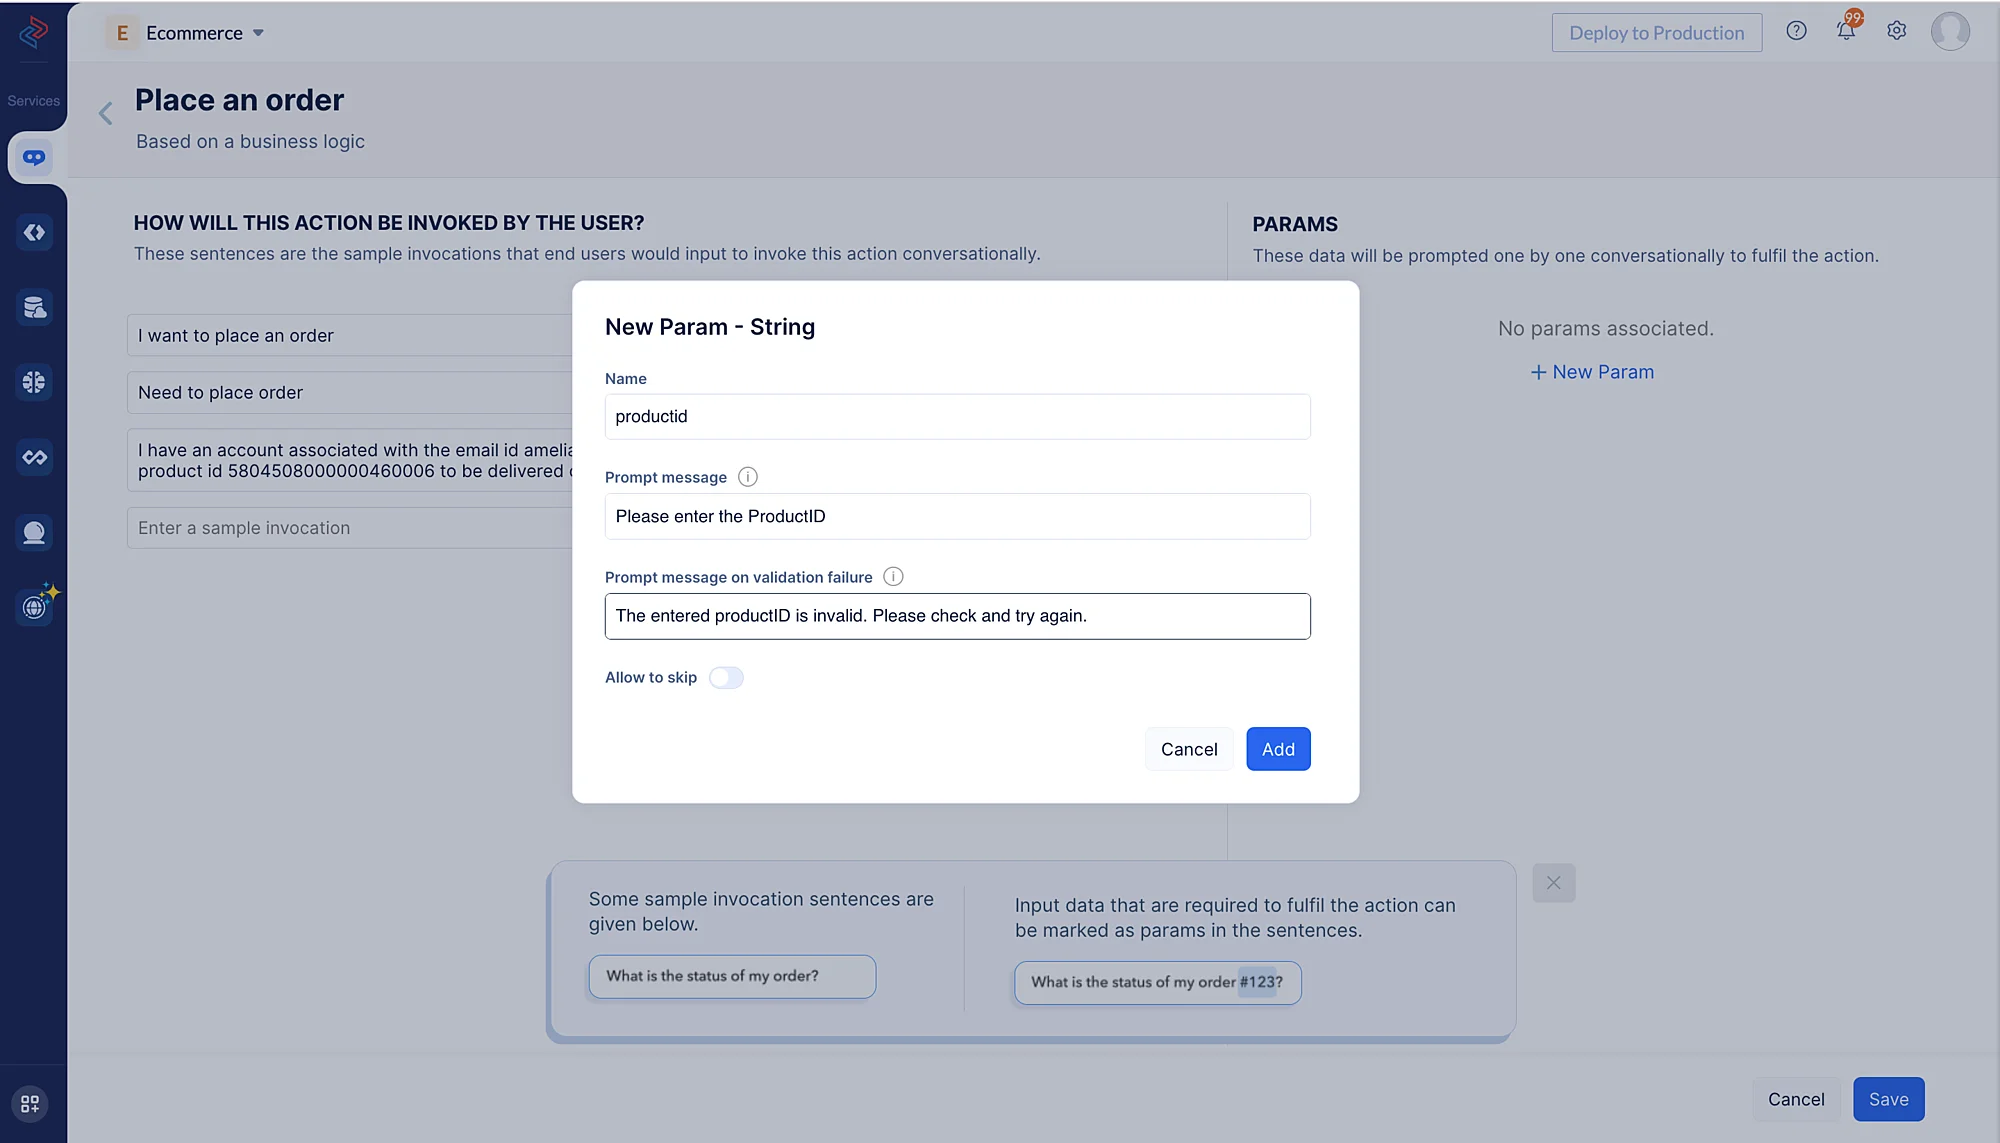
- Click on New Param and click String. Provide the name for the param as “productid” and add a prompt message by referring to the table below. To learn more about the attributes of each param type in detail, please refer to this page.
We will be creating the following params for this action:
| Param Type | Name | Prompt message | Prompt message for validation failure |
|---|---|---|---|
| String | productid | Please enter the Product ID | The entered ProductID is invalid. Please check and retry. |
| cxemail | Please enter your Email ID | The entered email ID is invalid. Please check and retry. | |
| Date | cxdate | Please enter the date on which you expect the delivery | The entered date is invalid. Please check and retry. |
| String | cxaddr | Please enter the address where you want the order to be delivered | The entered address is invalid. Please check and retry. |
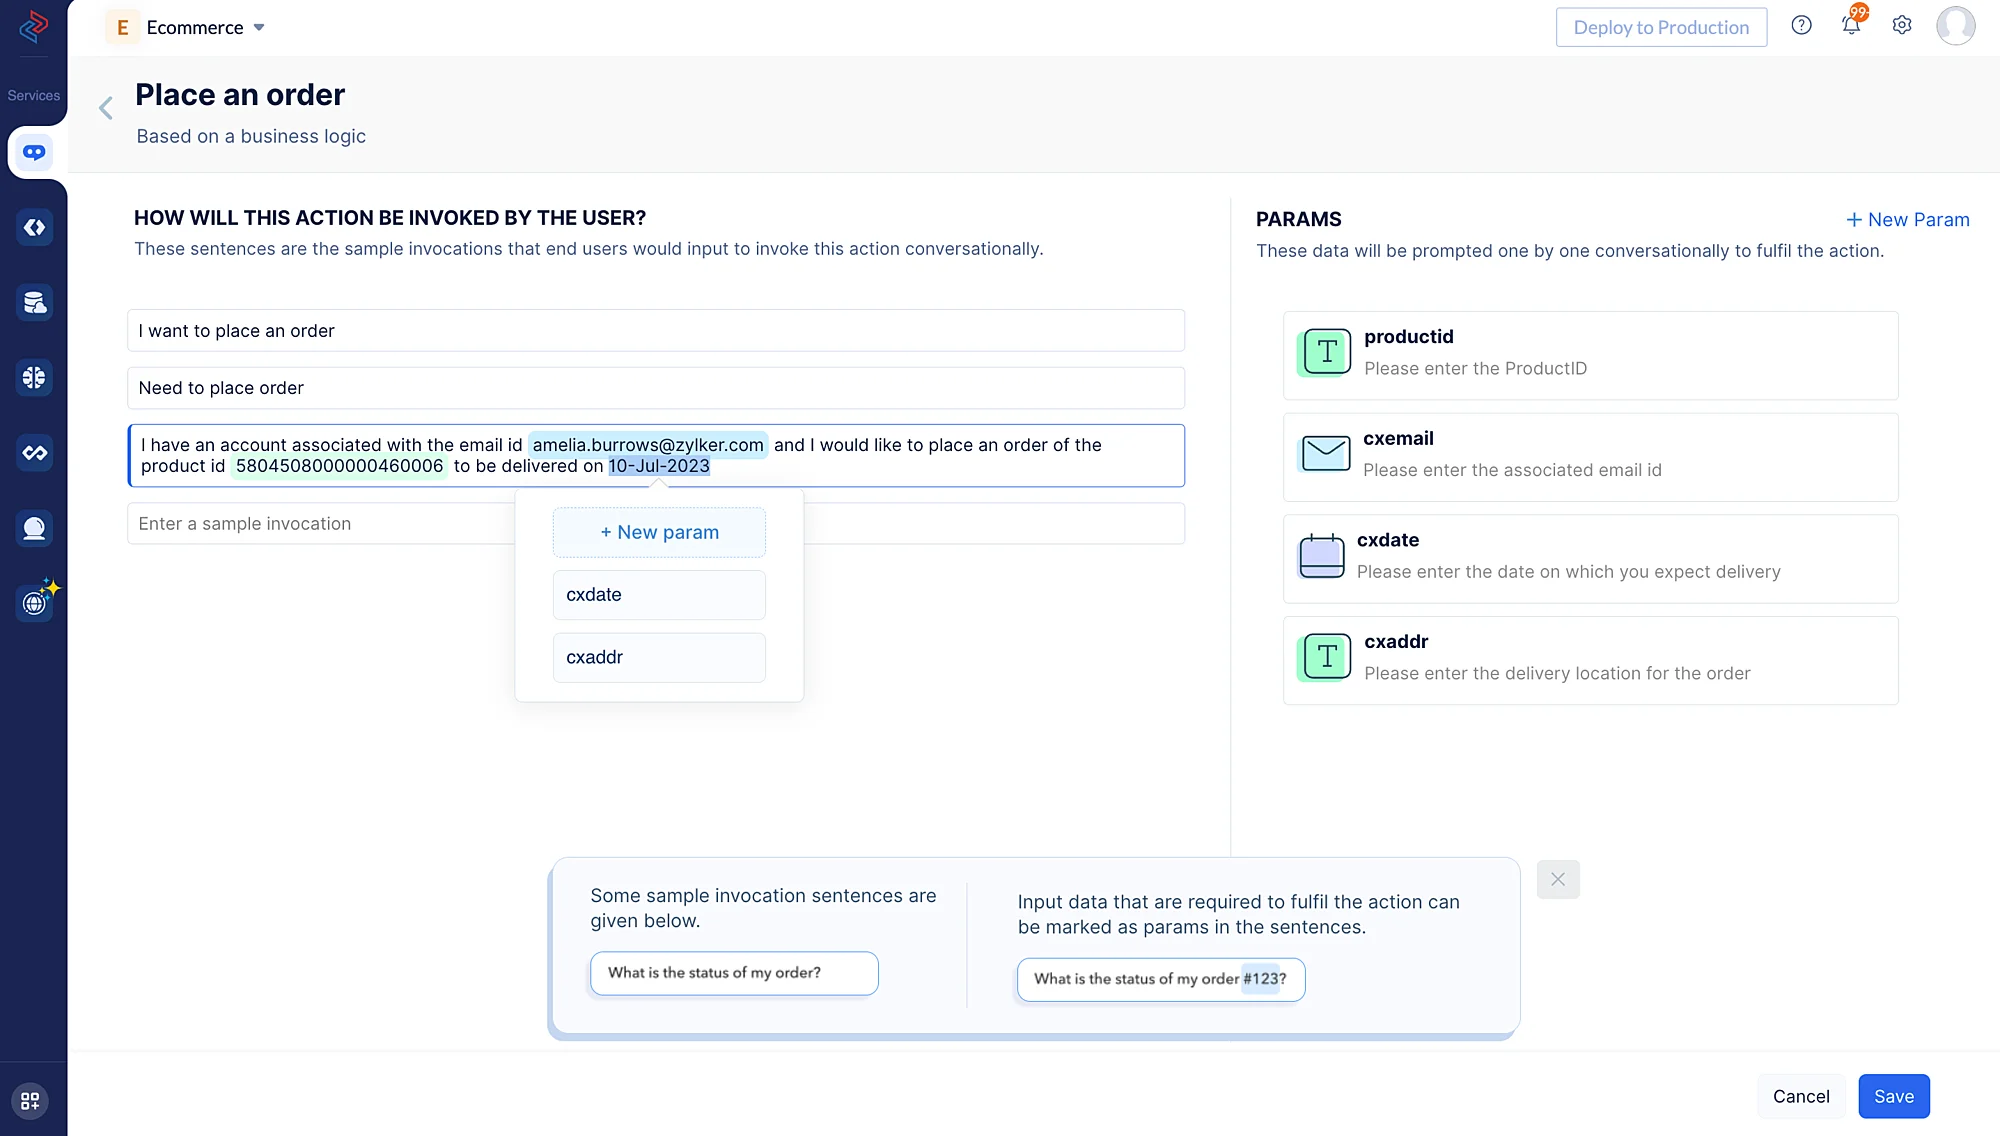
In a similar way, create the other three params, “cxemail”, “cxdate”, and “cxaddr” with the param type and prompt messages as mentioned in the table above.
-
Map the params with the corresponding text in the sample sentences, in order to instruct the bot to prompt the inputs from the user consecutively in the conversation. For this, hover over the text in the sample sentence and choose the corresponding param to associate them. Here, we will be associating the “cxemail”, “productid” and the “cxdate” with their corresponding example values in the sample sentences as shown in the screenshot below.
-
After configuring the sample sentences and params for the action, click Save.
-
Now you can proceed to code the business logic in the execution function, similar to what we did for the previous action.
Copy and paste the below code in the execution function page and click Save Script.
result = Map();
info productid;
info cxemail;
info cxdate;
info cxaddr;
placeorder = Map();
Accesstoken = invokeurl [ url :"https://test-773793963.development.catalystserverless.com/server/TokenGenerate/execute"
type :GET ]; //Replace the org id of your project in the URL
info Accesstoken.getJSON("output");
accesstoken = "Zoho-Oauthtoken " + Accesstoken.getJSON("output");
info accesstoken;
header_data = Map();
header_data.put("Content-Type","application/json");
header_data.put("Authorization",accesstoken);
try
{
 //CRMresponse = invokeurl
 //[
 // url :"https://www.zohoapis.com/crm/v2/EcomProducts/" + productid
 // type :GET
 // connection:"ecommerce"
 //];
 CRMresponse = invokeurl
 [
  url :"https://www.zohoapis.com/crm/v2/EcomProducts/" + productid
  type :GET
  headers:header_data
 ];
 info CRMresponse;
 if(CRMresponse.isNull() && CRMresponse.getJSON("status") != "error")
 {
  stock_count = 0;
  info "Empty response. So stock count reset";
  placeorder.put("Stiock","Empty");
 }
 else
 {
  recordid = CRMresponse.getJSON("data").getJSON("id");
  stock_count = CRMresponse.getJSON("data").getJSON("Inventory_Count");
  imageurl = CRMresponse.getJSON("data").getJSON("Product_image_url");
  productname = CRMresponse.getJSON("data").getJSON("Name");
  price = CRMresponse.getJSON("data").getJSON("Price");
 }
}
catch (e)
{
 info e.lineNo;
 // Displays line number of the statement that caused the error
 info e.message;
 // Displays the error message
 info e;
 // Displays both line number and error message
}
if(stock_count > 0)
{
 stock_count = stock_count - 1;
 reduceStock = Map();
 reduceStock.put("id",recordid);
 reduceStock.put("Inventory_Count",stock_count);
 updatedata = list();
 updatedata.add(reduceStock);
 updatedatamap = Map();
 updatedatamap.put("data",updatedata);
 //updateResp = invokeurl
 //[
 // url :"https://www.zohoapis.com/crm/v2/EcomProducts"
 // type :PUT
 // parameters:updatedatamap.toString()
 // connection:"ecommerce"
 //];
 updateResp = invokeurl
 [
  url :"https://www.zohoapis.com/crm/v2/EcomProducts"
  type :PUT
  parameters:updatedatamap.toString()
  headers:header_data
 ];
 info updateResp;
 //info zoho.crm.updateRecord("EcomProducts",productid,reduceStock);
 placeorder.put("Name",productname + " " + cxdate);
 placeorder.put("Product_Name",productname);
 placeorder.put("Email",cxemail);
 placeorder.put("Delivery_Address",cxaddr);
 placeorder.put("Expected_Delivery_Date",cxdate.toDate("yyyy-mm-dd"));
 info toDate(cxdate,"yyyy-mm-dd");
 info toDate(cxdate,"MM,d,yyyy");
 placeorder.put("product_image_url",imageurl);
 placeorder.put("Price",price);
 placeorder.put("OrderID",productid + "_" + randomNumber(1111111,9999999));
 placeorder.put("Order_Status","Reviewing the Order");
 info placeorder;
 insertdata = list();
 insertdata.add(placeorder);
 insertdatamap = Map();
 insertdatamap.put("data",insertdata);
 //insertResp = invokeurl
 //[
 // url :"https://www.zohoapis.com/crm/v2/Orders"
 // type :POST
 // parameters:insertdatamap.toString()
 // connection:"ecommerce"
 //];
 insertResp = invokeurl
 [
  url :"https://www.zohoapis.com/crm/v2/Orders"
  type :POST
  parameters:insertdatamap.toString()
  headers:header_data
 ];
 info insertResp;
 //info zoho.crm.createRecord("Orders",placeorder);
 result.put("message","Your order for the product - " + CRMresponse.getJSON("data").getJSON("Name") + " is placed successfully. It will be tried to be delivered on " + cxdate + " to " + cxaddr + " . Our Sales team will reach out to your via email to discuss about COD or prepayment before delivery.");
}
else if(stock_count == 0)
{
 info "The item is out of stock. Please retry after some days as we restock.";
 result.put("message","The item is out of stock. Please retry after some days as we restock.");
}
else
{
 result.put("message","There was some issue during the order. Please contact support team. They shall assist in placing this order for you.");
}
info stock_count;
//zoho.crm.updateRecord("EcomProducts",productid, )
//result.put("message","Function executed successfully");
broadcast.put("cxemail",cxemail);
result.put("broadcast",broadcast);
return result;
- Similar to the previous action, you can test the action simultaneously from the ConvoKraft Deluge editor and then click DONE.
View Order Details
-
Create a new action, and choose to configure a response based on business logic. Name it as “View Order Details”.
-
Add the following sample sentences for the action :
- “Where is my order?”
- “I want to view my order details of email id amelia.burrows@zylker.com”
- “I want to check my order details”

-
Define the params specified below for the action as discussed in the last section. You can associate the params with the sample sentence as shown in the screenshot above and click Save.
| Param Type | Name | Prompt message | Prompt message for validation failure |
|---|---|---|---|
| cxemail | Please provide the email ID associated with your order | The entered email ID is invalid. Please check and retry. |
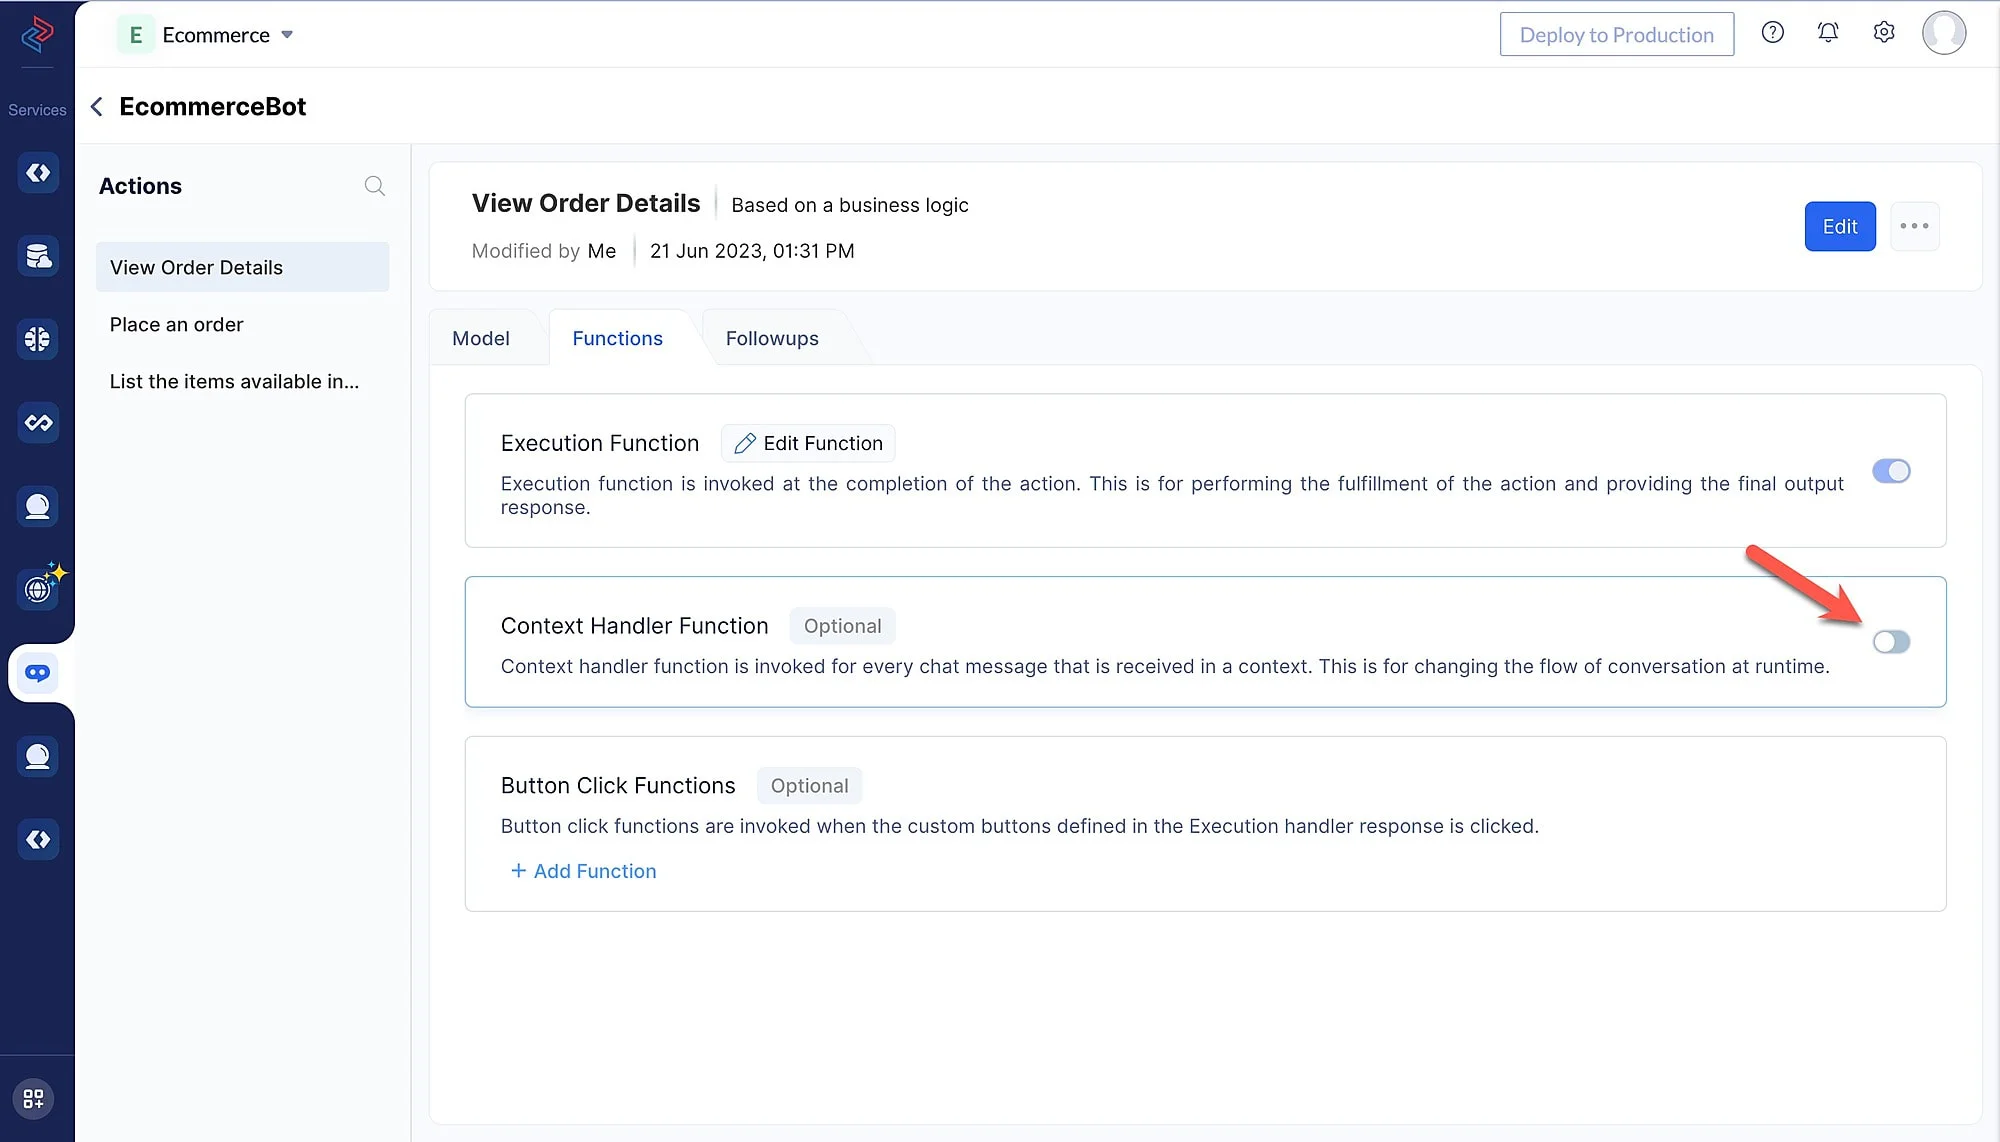
- After you define the sample sentences and params for the action, the Action’s Details page will be displayed. For this action, we will be configuring the Context handler function along with the Execution function . This is used to store the email address of the user in the broadcast argument of the execution function and instruct the ConvoKraft bot to remember the email address in the further conversations of the chat session instead of prompting from the user every time.
Copy and paste the below code in the execution function page and click Save Script.
result = Map();
// making API call to search specific order details of the given email id
//resp = zoho.crm.searchRecords("Orders","(Email:equals:" + cxemail + ")");
//extract required details from the JSON response
//info resp;
cardlist = List();
Accesstoken = invokeurl
[
 url :"https://test-773793963.development.catalystserverless.com/server/TokenGenerate/execute"
 type :GET
];
info Accesstoken.getJSON("output");
accesstoken = "Zoho-Oauthtoken " + Accesstoken.getJSON("output");
info accesstoken;
header_data = Map();
header_data.put("Content-Type","application/json");
header_data.put("Authorization",accesstoken);
//resp = invokeurl
//[
// url :"https://www.zohoapis.com/crm/v3/Orders/search?criteria=" + "((Email:equals:" + cxemail + "))"
// type :GET
// connection:"ecommerce"
//];
resp = invokeurl
[
 url :"https://www.zohoapis.com/crm/v4/Orders/search?criteria=" + "((Email:equals:" + cxemail + "))"
 type :GET
 headers:header_data
];
info resp;
items_count = 0;
if(!resp.isEmpty())
{
 for each  order in resp.getJSON("data")
 {
  items_count = items_count + 1;
  info "+++++++++++";
  // info order;
  orderid = order.getJSON("id");
  //CRMresponse = invokeurl
  //[
  // url :"https://www.zohoapis.com/crm/v3/Orders/" + orderid
  // type :GET
  // connection:"ecommerce"
  //];
  CRMresponse = invokeurl
  [
   url :"https://www.zohoapis.com/crm/v3/Orders/" + orderid
   type :GET
   headers:header_data
  ];
  name = order.getJSON("Name");
  contact = order.getJSON("Contact_No").toString();
  email = order.getJSON("Email");
  product_name = order.getJSON("Product_Name");
  orderid = order.getJSON("OrderID").toString();
  price = order.getJSON("Price").toString();
  delivery_date = order.getJSON("Expected_Delivery_Date");
  delivery_address = order.getJSON("Delivery_Address");
  order_status = order.getJSON("Order_Status");
  //defining the bullet list
  listItem = Map();
  listItem.put("type","list");
  listItem.put("format","bullet");
  listElements = List();
  elem1 = {"label":"Name : " + name};
  elem2 = {"label":"Contact No :" + contact};
  elem3 = {"label":"Email ID : " + email};
  elem4 = {"label":"Product Name : " + product_name};
  //elem5 = {"label":"Order ID : " + orderid};
  elem6 = {"label":"Total Price : $ " + price};
  elem7 = {"label":"Expected Delivery Date : " + delivery_date};
  elem8 = {"label":"Delivery Address : " + delivery_address};
  elem9 = {"label":"Order Status : " + order_status};
  listElements.add(elem1);
  listElements.add(elem2);
  listElements.add(elem3);
  listElements.add(elem4);
  //listElements.add(elem5);
  listElements.add(elem6);
  listElements.add(elem7);
  listElements.add(elem8);
  listElements.add(elem9);
  listItem.put("elements",listElements);
  //info listItem;
  // defining the 'image' card
  // defining the 'note' card
  productNote = Map();
  productNote.put("type","note");
  productNote.put("content",items_count + ") Your order details for order id : " + orderid + " are listed as follows: ");
  cardlist.add(productNote);
  productPic = Map();
  productPic.put("type","image");
  productPic.put("content",CRMresponse.getJSON("data").getJSON("product_image_url"));
  cardlist.add(productPic);
  cardlist.add(listItem);
  info "+++++++++++";
 }
 //info cardlist;
 result.put("card",cardlist);
}
else
{
}
// defining broadcast
broadcast.put("cxemail",email);
result.put("broadcast",broadcast);
result.put("message","The Shoppers Stores. You don't have an order.");
return result;
-
Navigate back to the Action’s Details page and enable the Context Handler Function as shown in the screenshot below.
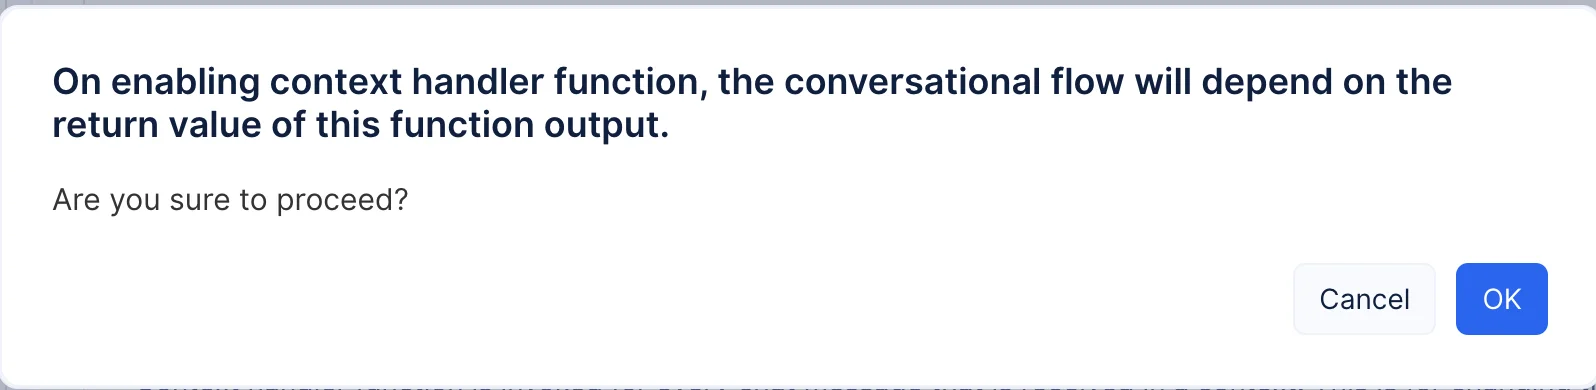
-
After you enable the Context handler function, click OK in the pop-up that appears in order to proceed further.
-
Now, copy and paste the below code in the Context handler function editor and click Save Script.
result = Map();
assign = Map();
if(broadcast != null)
{
 //checking whether the 'broadcast' argument has any data
 cxemailid = broadcast.get("cxemailid");
 //fetching the 'cxemailid' value from 'broadcast'
 assign.put("cxemailid",cxemailid);
 //assigning the cxemailid's value to the 'cxemailid' param
 result.put("assign",assign);
 result.put("todo","execute");
 // jumps to the execution function
}
result.put("todo","prompt");
return result;
-
Click Test this action and test the updated configurations of this action similar to the previous actions.

-
After you test the changes, click DONE.
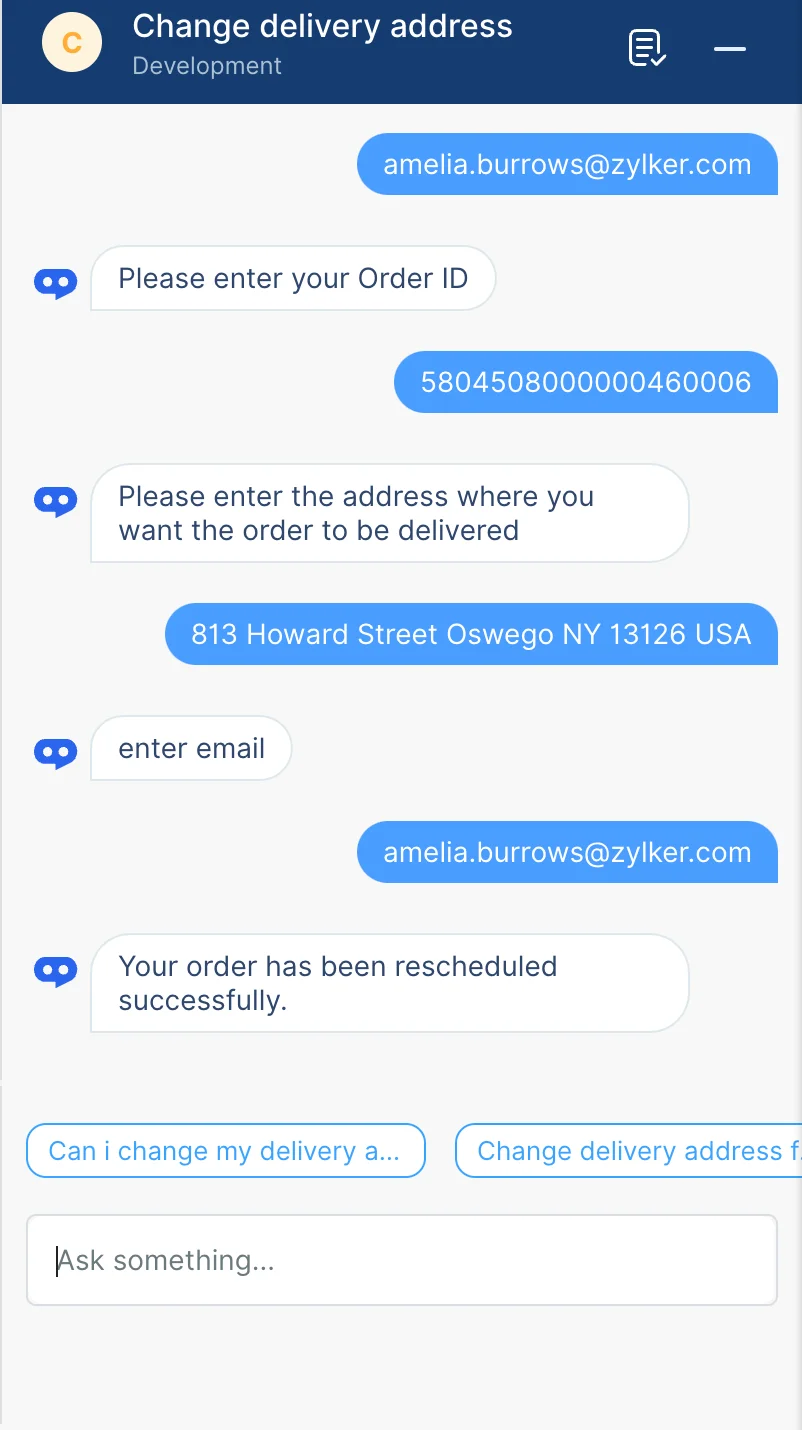
Change Delivery Address
- Similar to the actions created above, we will be configuring the response of this action to be based on a business logic. Enter the name of the action as “Change Delivery Address”. For this action, you can define the sample sentences given below :
- “I want my order to be delivered at a different address”
- “I want to change delivery address for my order id 5804508000000460006 under the email amelia.burrows@zylker.com”
Add the params given below for the action:
| Param Type | Name | Prompt message | Prompt message for validation failure |
|---|---|---|---|
| cxemail | Please provide the email ID associated with your order. | The entered email ID is invalid. Please check and retry. | |
| String | cxorderid | Please enter your Order ID. | The entered OrderID is invalid. Please check and retry. |
| String | cxaddr | Please enter the address where you want the order to be delivered. | The entered address is invalid. Please check and retry. |
You can associate the param “cxemail” to the sample sentence as shown in the screenshot below.

- After configuring the sample sentences and params, copy and paste the below code in the execution function page and click Save Script.
result = Map();
//fetching the order's 'id' from the cache argument
Accesstoken = invokeurl
[
 url :"https://test-773793963.development.catalystserverless.com/server/TokenGenerate/execute"
 type :GET
];
info Accesstoken.getJSON("output");
accesstoken = "Zoho-Oauthtoken " + Accesstoken.getJSON("output");
info accesstoken;
header_data = Map();
header_data.put("Content-Type","application/json");
header_data.put("Authorization",accesstoken);
addrmap = Map();
//addrmap.put("Delivery_Address",cxaddr);
//reduceStock = Map();
searchOrderresp = invokeurl
[
 url :"https://www.zohoapis.com/crm/v2/Orders/search?criteria=((OrderID:equals:" + cxorderid + "))"
 type :GET
 headers:header_data
];
recordid = searchOrderresp.getJSON("data").getJSON("id");
addrmap.put("id",recordid);
addrmap.put("Delivery_Address",cxaddr);
updatedata = list();
updatedata.add(addrmap);
updatedatamap = Map();
updatedatamap.put("data",updatedata);
updateResp = invokeurl
[
 url :"https://www.zohoapis.com/crm/v2/Orders"
 type :PUT
 parameters:updatedatamap.toString()
 headers:header_data
];
//making an API call to reschedule the order to given date
broadcast.put("cxemail",cxemail);
//configuring the 'broadcast' argument
result.put("broadcast",broadcast);
result.put("message","Your order has been rescheduled successfully.");
return result;
- Again, test the action using Test this Action chat window by initiating conversations regarding this action.
Re-schedule order date
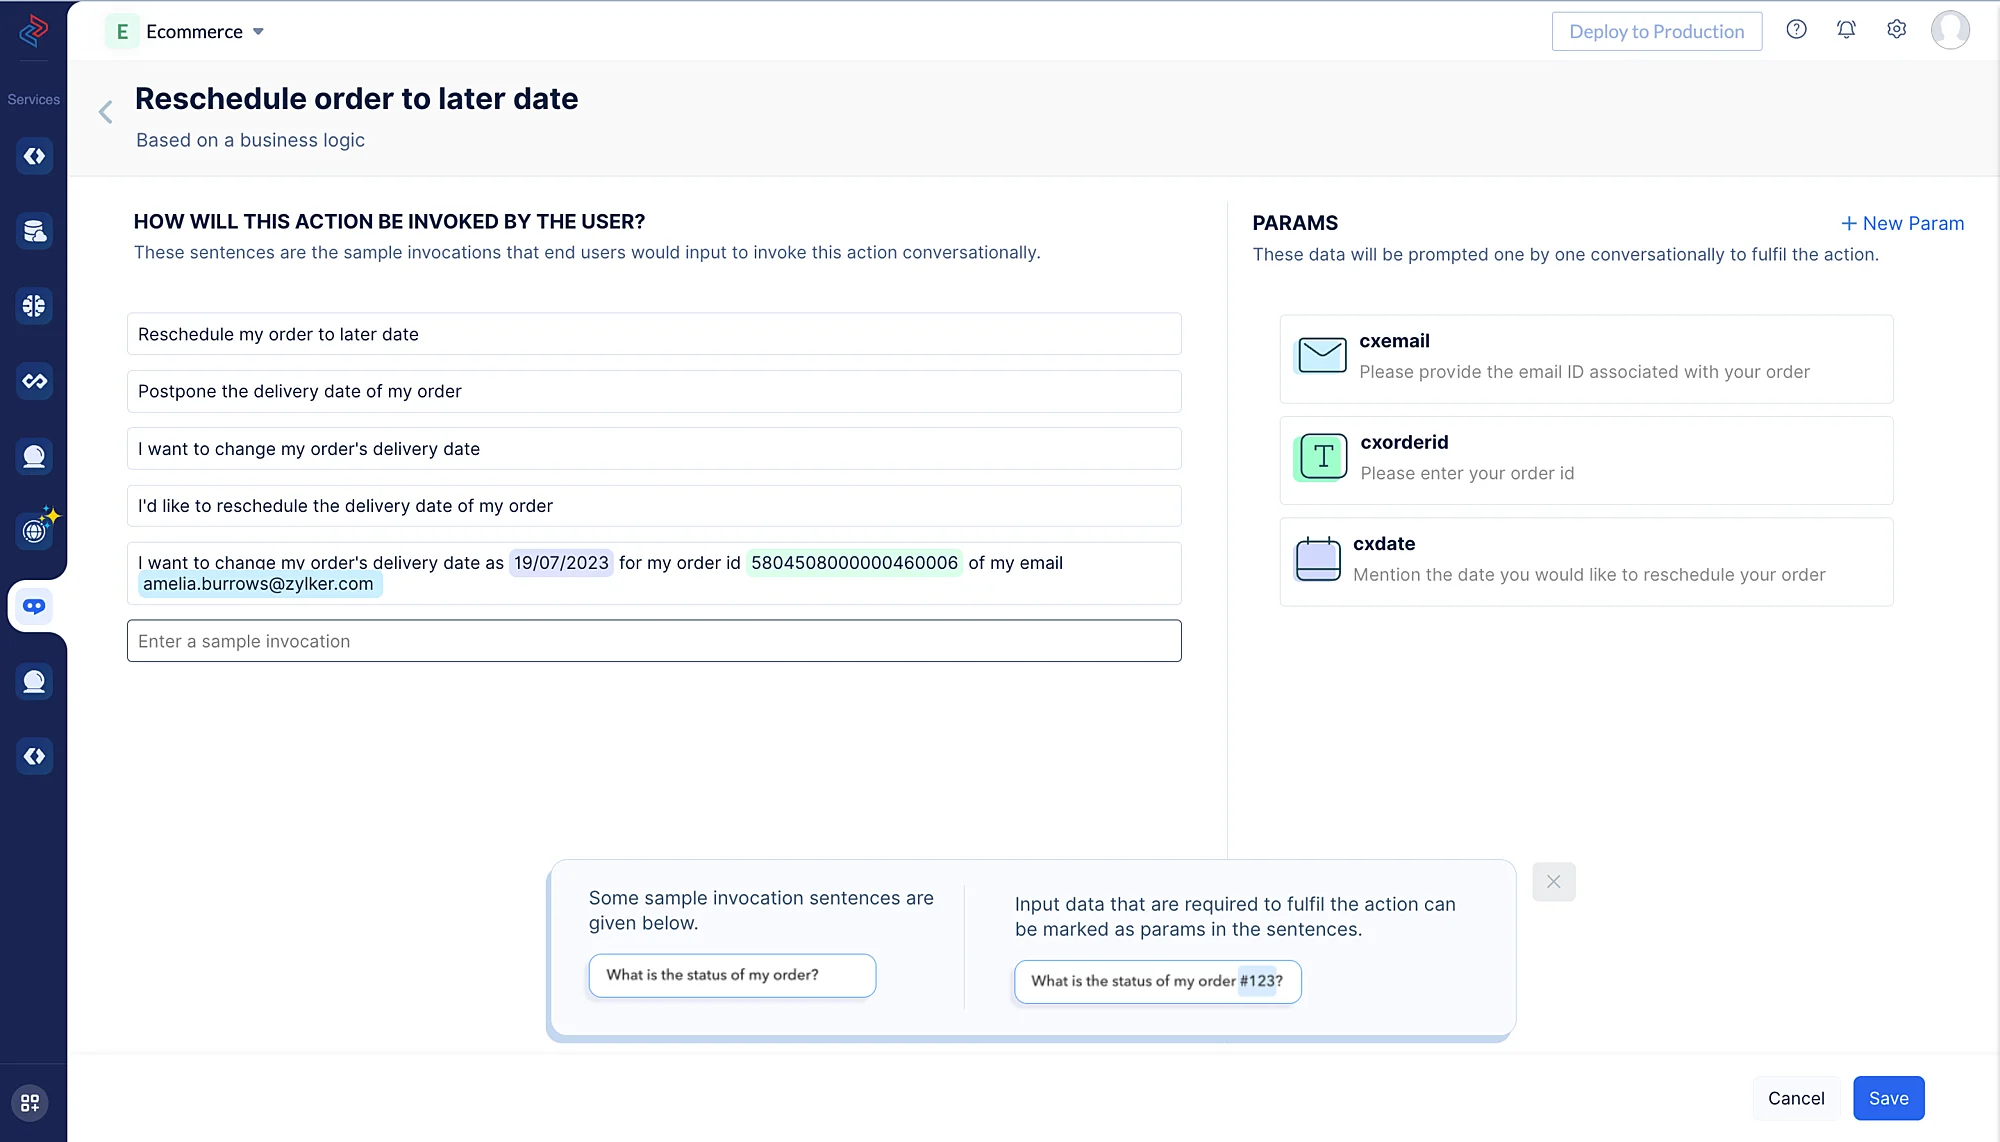
- Enter the name of the action as “Reschedule order to later date”. For this action, you can define the sample sentences given below:
- “Reschedule my order to later date”
- “Postpone the delivery date of my order”
- “I want to change my orders delivery date as 19/07/2023 for my order id 5804508000000460006 of my email amelia.burrows@zylker.com”
Add the params below for the action :
| Param Type | Name | Prompt message | Prompt message for validation failure |
|---|---|---|---|
| cxemail | Please provide the email ID associated with your order. | The entered email ID is invalid. Please check and retry. | |
| String | cxorderid | Please enter your Order ID. | The entered OrderID is invalid. Please check and retry. |
| Date | cxdate | Mention the date you would like to reschedule your order | The entered date is invalid. Please check and retry. |
You can associate the params as shown in the screenshot below and click Save.
- After configuring the sample sentences and params, copy and paste the below code in the execution function page and click Save Script.
result = Map();
//fetching the order's 'id' from the cache argument
Accesstoken = invokeurl
[
 url :"https://test-773793963.development.catalystserverless.com/server/TokenGenerate/execute"
 type :GET
];
info Accesstoken.getJSON("output");
accesstoken = "Zoho-Oauthtoken " + Accesstoken.getJSON("output");
info accesstoken;
header_data = Map();
header_data.put("Content-Type","application/json");
header_data.put("Authorization",accesstoken);
searchOrderresp = invokeurl
[
 url :"https://www.zohoapis.com/crm/v2/Orders/search?criteria=((OrderID:equals:" + cxorderid + "))"
 type :GET
 headers:header_data
];
info searchOrderresp;
recordid = searchOrderresp.getJSON("data").getJSON("id");
info recordid;
datemap = Map();
datemap.put("id",recordid);
datemap.put("Expected_Delivery_Date",cxdate.toDate());
info datemap;
updatedata = list();
updatedata.add(datemap);
updatedatamap = Map();
updatedatamap.put("data",updatedata);
updateResp = invokeurl
[
 url :"https://www.zohoapis.com/crm/v2/Orders"
 type :PUT
 parameters:updatedatamap.toString()
 headers:header_data
];
info updateResp;
//making an API call to reschedule the order to given date
broadcast.put("cxemail",cxemail);
//configuring the 'broadcast' argument
result.put("broadcast",broadcast);
result.put("message","Your order has been rescheduled successfully.");
return result;
- Again like the previous actions, you can test this action as well and click DONE.

Now, we have configured all the required actions and the business logic for them.
Last Updated 2025-10-21 12:04:01 +0530 IST