Advanced I/O Functionの設定
次に、ファンクションコンポーネントを設定して、Payslip Generatorアプリケーションのコーディングを開始します。
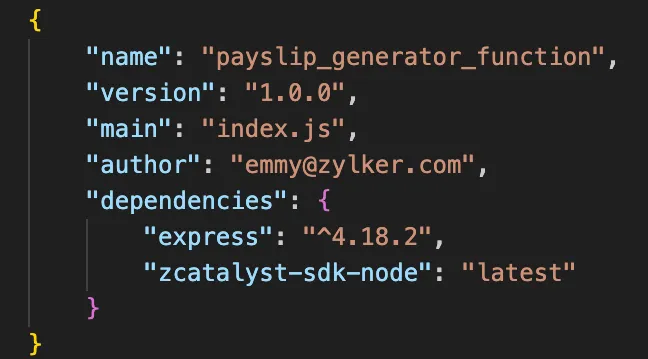
ファンクションのディレクトリ(functions/payslip_generator_function)には以下が含まれています:
- index.js メインファンクションファイル
- catalyst-config.json 設定ファイル
- Nodeモジュール
- package.json および package-lock.json 依存関係ファイル
index.jsファイルにコードを追加します。
Advanced I/O functionには以下の機能が含まれています:
-
PDF & Screenshot SDKをトリガーして、ヘッドレスブラウザを実行し、入力された詳細情報をテンプレートにレンダリングしてPDFドキュメントを生成します。
-
Send Mail SDKをトリガーして、PDFドキュメントを添付し、アプリケーション内からメールで送信します。
Node.js用Expressフレームワークのインストール
Advanced I/O functionのコーディングには、Expressフレームワークを使用します。ファンクションのコードでExpressパッケージをインポートするには、システムにExpress依存関係をインストールする必要があります。
ローカルマシンにExpress.jsをインストールするには、ターミナルでファンクションのホームディレクトリ(functions/payslip_generator_function)に移動し、以下のコマンドを実行します:
これにより、Expressモジュールがインストールされ、依存関係が保存されます。

この情報はpackage.jsonファイルにも更新されます。
それでは、Advanced I/O functionのコーディングを開始しましょう。
以下のコードをコピーして、プロジェクトのfunctions/payslip_generator_functionディレクトリにあるindex.jsに貼り付けて、ファイルを保存します。アプリケーションのファイルの作業には、お好みのIDEを使用できます。
-
このセクションのコードをよく読んで、完全に理解してください。
-
33行目にTemplate IDを、68行目に設定済みのメールIDを入力してください。
'use strict'
const express = require('express')
const catalyst = require('zcatalyst-sdk-node')
const fs = require('fs')
const app = express()
const os = require('os')
const path = require('path')
app.use(express.json())
app.post('/generatepayslip', async (req, res) => {
  try {
    const catalystApp = catalyst.initialize(req)
    const smartbrowz = catalystApp.smartbrowz()
    if (!req.body) {
      throw new Error('Request body is empty')
    }
    const {
      employeeName,
      employeeEmail,
      employeeId,
      designation,
      basicSalary,
      allowances,
      deductions,
      paymentMethod
    } = req.body
    const date = new Date()
    const currentMonth = date.toLocaleString('default', { month: 'long' })
    const currentYear = date.getFullYear()
    const filepath = path.join(os.tmpdir(), '/payslip.pdf')
    // テンプレートから出力を生成
    await smartbrowz
      .generateFromTemplate('xxxxxxxx12345', // Template IDを入力してください
        {
        // クライアントから取得したテンプレートに渡すデータ
          template_data: {
            company: 'Zylker Technologies',
            employeeName,
            employeeId,
            designation,
            basicSalary,
            allowances,
            deductions,
            totalEarnings:
            parseFloat(basicSalary) + parseFloat(allowances),
            netSalary:
            parseFloat(basicSalary) +
            parseFloat(allowances) -
            parseFloat(deductions),
            paymentMethod,
            month: currentMonth,
            year: currentYear
          }
        })
      .then((inputStream) => {
        return new Promise((resolve, reject) => {
          inputStream
            .pipe(fs.createWriteStream(filepath))
            .on('close', resolve)
            .on('error', reject)
        })
      }).catch((err) => {
        throw err
      })
    await catalystApp
      .email()
      .sendMail({
        from_email: 'emmy@zylker.com', // コンソールで設定したメールIDを入力してください
        to_email: [employeeEmail],
        html_mode: true,
        subject: `Payslip for the month of ${currentMonth} ${currentYear}`,
        content: `Hello ${employeeName}, Your payslip for ${currentMonth} ${currentYear} has been issued. You can find your payslip attached with this email. Cheers,Zylker`,
        attachments: [fs.createReadStream(filepath)] // ファイル添付用のファイルストリームを作成
      })
      .then((row) => {
        res.status(200).send('Payslip generated and sent to Employee email')
      })
      .catch((err) => {
        throw err
      })
  } catch (error) {
    console.log(error)
    res.status(500).send(error)
  }
})
module.exports = app
ファンクションディレクトリの設定が完了しました。次に、クライアントディレクトリの設定に進みます。
最終更新日 2026-03-05 11:43:24 +0530 IST